Search the Community
Showing results for tags 'AT-AT'.
Found 41 results
-
Discovering the Battle of Hoth on screen is one of those childhood moments I'll always remember. So my first ever walker MOC had to be the AT-AT from Episode V: The Empire Strikes Back. And for such an iconic scene, making a diorama-style build was mandatory. At only 19cm (7,4") high, this Midi-Scale AT-AT consists of 924 pieces (1,317 in total with the diorama base & T-47), and is accurately Nanofig-scaled. It features a movable head and fully articulated legs, allowing many different poses. Working at such a compact scale, capturing fine surface detail and smooth, gapless angles for the body required a great deal of unique techniques. My main goal was to make the model feel deceivingly heavy and massive despite its small size, and of course achieve that prop / toy vibe I'm so fond of. The most challenging parts of the AT-AT were definitely the head and legs: the head for its subtle angles and challenging shape, and the legs for proportions, joints, feet, and very slight width differences as you go towards the bottom. Nanofigs (or trophy figs) scale perfectly to both the AT-AT and T-47, which also scale accurately to each other. The diorama base allows the AT-AT feet to be connected in various positions, and can accommodate two flying T-47s. This 358-piece base is optional and comes in a separate parts list, for builders who prefer displaying the model solely (picture 7 in the Flickr album). Parts list also include a string piece that can be easily added to reproduce the harpoon scene (picture 5 in the Flickr album). ► Instructions for the AT-AT are available at BrickVault. More pictures on my Flickr page.
-
Hi everyone! I haven't been here for a long time ... Over 4 months ago I started building a new MOC The idea came up a long time ago, but each time I started a different project. In October 2021 I ordered the 75288 set and I knew it was high time for my AT-AT :) AT-AT Dimensions: 4882 parts (list of parts here: https://drive.google.com/file/d/1crWVI4Cygw0i5zEefJh7ClROWkN2_iGy/view?usp=sharing) 46,1 cm height, 52,1 cm lenght, 18,4 width. It is much larger than the playset 75288 but smaller than the UCS 75313. I think that for many of us this size is the perfect solution. Personally, I don't have a place for UCS at home, it's too big for me. In addition, he did not make such an impression on me live - he has too many studs :) It is possible that my design is similar in size to Raskolnikov, that is, such PlusSize. The project has a huge number of functions, I will mention some of them: - movable feet and legs - rubber bands under the feet, improve stability, - bottom with details, the possibility of attaching a rope from Luke Skywalker, - a lot of tiles on the side panels, - all side panels open to get inside, - a speeder bike stand mounted on the back, - fuel tank, - black interior trim, - a lot of control panels inside, - 2 racks for weapons, - special seats for Snowtroopers, - 2 lightbricks and a switch on the roof - movable neck - moving head - the head can be detached very easily - head interior for 3 minifigures - 20+ minifigures can be given in the entire vehicle PDF Instructions Contains 3 files, 2 are ready now - if you are intrested ask me on kozlowski.michal86@gmail.com Project will be available on Rebrickable soon! Today will be movie on my youtube where you will see all the details
-
Hi all. I haven't added much to my 1:250 fleet of Star Wars fighters, gunships, freighters and one corvette (plus a couple of mini scenes) this year but I have been working on my photography. I've really enjoyed seeing the groups of ships grow and comparing the sizes of the finished products, Slave 1 and the Rogue Shadow turned out surprisingly big, but the biggest surprise was how huge a Blockade Runner is! In case anyone's interested, instructions for all of them are on Rebrickable... https://rebrickable.com/users/ron_mcphatty/mocs/ And here's another with almost all the ships arranged together, which took far, far longer than I thought it would!
-
I usually don't post my Studio MOCs on Eurobricks, but a friend of mine IRL said Eurobricks might get a kick out of this one. I've read in several places online that some 80s kids used to use the old Alien Moon Stalker set (#6940, year 1986) as a substitute for an AT-AT when playing Star Wars with their Lego way back when. That makes last year's AT-AT set (#75288, year 2020) the natural starting point for a remake of the Alien Moon Stalker. This is still a rough WIP, lots and lots left to do, but I hope you like the idea! Comments and criticism welcome.
-
*This entry has earned 20 XP (x2 LTC Bonus Applied)* Excerpt from Cdr. Bannon’s log: Our efforts on Altor 14 was little more than a formality in order to establish control of the sector. We did not expect major resistance from the locals. This made the mission perfect to test out our newly acquired Virgillia-class Bunkerbusters. The reports should be interesting...
-
Nov. 2015 Initial Post: Hello Eurobrickers! I have a great announcement for you guys, especially those who are interested in Cavegod's UCS AT-AT. Over the past month or so, I have worked a countless number of hours in order to bring all of you guys something that this MOC deserved ever since its creation, a proper instruction manual. Yes, that's right, the famed issues of LDD will no longer be apart of this project thanks to this manual. Now I'm sure you're wondering, how big is a 6000+ piece manual? Well, to answer that question, the manual is a massive 1,089 pages. No that is not a typo, ONE THOUSAND AND EIGHTY NINE PAGES!!! A special thanks goes out to both Cavegod and drdavewatford. Cavegod designed a masterful MOC, one of the greatest ever, and drdavewatford was kind enough to allow me use of some of his photos throughout the manual. This could not be achieved without you guys! Enough of me talking, here are some images directly from the manual: (Initial images removed for clarity on update) Oct. 2020 Instructions Update: Almost five years after its initial release, I'm thrilled to announce that the remastered instructions for Cavegod's AT-AT are complete! The instructions feature updates that make this build SO much easier and affordable. The most important things that are included in the updated instructions are: Redesigned Legs. These new legs have a technic interior and erase any issues that occurred with the original leg stability Reinforced Body Frame. The handle is now incredibly sturdy and the technic structure that is housed within the body is significantly more sturdy Cheaper Pieces. After several years it was time to swap out the expensive parts. The parts and MOC are now much more affordable. Display Base. What MOC would be complete without a display base? I designed a large black display base that includes technic framing to snap in the feet, a much better alternative to the old method of tires within the feet. The base also features several snow-covered rocks to imitate a Hoth landscape The MOC now consists of 8,935 pieces and measures: 34" long 18" wide 30" tall The instructions are now reduced down to 550 pages. More information about getting the instructions and free access to the parts list can be found here Pete and I are super pumped to be sharing the update with you, and I cannot understate how much better they've made the build experience and final MOC. If you already own the instructions after getting them from me in the past, you should have received an email detailing how to obtain the updated instructions. If I missed you just shoot me a PM or contact me via email at alloutbrick@gmail.com and I'll get your upgrade over to you. Here's some photos of the update:
-
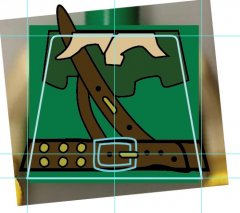
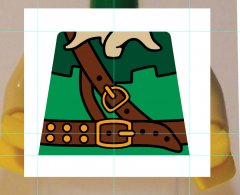
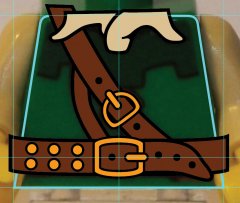
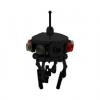
So, this is my mod based on the pictures from @Kozikyo86 I have to say that the mods to this set were easy to make and as always the only difficulty was parts. I had to take apart a good number of sets, mainly for smooth tiles. However, In my opinion it was totally worth it. First off, the head, Here i just added some parts to smooth out the jaw and the front end. I also replaced the black window with red, I am not sure why Lego went with black, red looks much more menacing for a robot dog. I also changed the canopy and increased the size as per the mod. Next, the legs, again this follows the moc, this was just a case of adding smooth tile pieces and added a few extra parts to the top of the leg to create a more bulky outline. In addition i added a few plates on the inside of the legs, to bring the depth closer to the technic beams. I tried to bring these totally level but it looked too bulky. I also tried making using 2 stud wide smooth tiles to totally cover the legs, again, this looked too bulky. Next up, the sides of the AT AT. This was an area where plates were in short supply so I had to use what I could find. I followed as closely as I could and made sure that any studs showing looked like they were purposfully placed. I still think the panel over the front leg needs adjusting slightly. I also added some small pieces on the leg joints. These look great from a distance and are easy to remove, i think they add a little extra interest. Bottoms of the legs, I added some smooth quarter pieces on top of the round circles. I also increased the height of these by one extra plate. On the (real) thing these parts are really high. I also echoed some of the detail on the outide of the legs onto the inside sections. All in all, I am very happy with the final result and I think it looks great on display with my other star wars stuff.
-
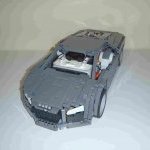
Not all ideas are good ideas and even the powerful and experimented Kuat Drive Yards (KDY) engineers can fail utterly. The AT-AC or All Terrain Armored Crawler is a perfect example of one of these false good ideas. While the supremacy of the AT-AT on the field was not to be demonstrated anymore, particularly after the crushing imperial victory on Hoth, the Imperial Army still complained about the AT-AT expensive cost per unit and its highly demanding maintenance. KDY engineered went back to their plans and after a few months, they proposed the AT-AC. The concept was quite simple, starting from the successful AT-AT, they replaced the costly maintenance-intensive articulated legs by continuous track systems. AT-AC by Veynom, on Flickr When presenting the AT-AC to the Imperial Army, KDY was proud to claim that it was significantly less expensive than the original AT-AT, that it required only one third of the AT-AT maintenance time, while still retaining the same firepower and robust protection. Unfortunately, the first field deployments quickly demonstrated all weaknesses of the AT-AC. Because of its great armor and protection, it was heavy and because it was heavy, it was really slow when crawling, its speed approaching ridiculous levels when the landscape was not ideal. The second issue comes from the change of height. While crawling on the ground, the AT-AC was no more inspiring fear but also found itself very limited in its fire coverage ability. AT-AC by Veynom, on Flickr As consequence, the limited number of assembled prototypes have been assigned to 3rd class garrisons on planets with limited local technological civilizations. Surprisingly, the troopers reported only positive feedback about their AT-AC. These were offering comfortable, reliable and well protected transportation and the lack of agility was not a real issue when battling primitive tribes and species. It is even rumored that some COMPNOR officers would have confessed that with AT-AC on Endor instead of AT-ST, the rebellion (not to mention the despised Ewoks) would never had won. AT-AC by Veynom, on Flickr One last remark about the AT-AC. According to several concurring sources, it would have been nicknamed Crawling Armored Transport (C.A.T.) among the troops. COMPNOR supposes that it may related to some kind of resemblance to an animal on one of the remote planets where the AT-AC operates. AT-AC by Veynom, on Flickr Disclaimer: the above is 100% fiction. This MOD is based on set 75288 (the 2020 AT-AT) with the track system design from the Sandcrawler 75220 (from 2018), some detailing here and there, and a bit of color swap. Free instructions are available on Rebrickable. Just click here.
-
...maybe no one has modified yet, so I'll be first ;) Hi I've prepared for you a modifications of the new Lego set - 75288 AT-AT I think that many of you have or plan to buy this set, so I decided to make modifications, improving as much as possible, but not changing the construction and features of the set. After modifications AT-AT have 1499 parts! Compare all with 75288 set. What I changed: - I improved the armor, added tile and details, - I corrected the head, changed the top cover and details, added a red visor, - I added more tile on the legs, - the feet have been increased by one plate layer, - top covers have been improved, - the inside of the head slightly changed, I slightly changed the way the head is fixed, - main interior slightly changed, I added a few tiles, - I covered the blue pins on my legs, - I changed some colors (brown, black) to light bluish gray. File to download from my YouTube channel - link in the description, Stud.io file, so knowledge of this program is recommended. I would be very grateful if you leave a comment, a thumbs up, and a subscription!:) It's very important for me, and you can say "thanks" for free downloading the file! You can download file from this movie, link in the description. I would be very grateful if you leave a comment, a thumbs up, and a subscription!:) In this way you can say "thanks" for free file!
-
Hi, it's my long time project. It's heavily based on the famous Plus-Size AT-AT by raskolnikov. I've changed mainly the outlook of almost everything. It's an on and off project when new ideas came out. Recently, a new idea: head movement was inspired by cavegod's new UCS AT-M6 ([Moc] [Instructions] UCS AT-M6 - LEGO Star Wars - Eurobricks Forums). Why not give it a try? Any comments are welcome.
-
There are many AT-AT mocs. Many with great interiors. Many with great exteriors. This is my attempt at integrating both into one model. The model is minifig scale, has at least 6000 thousand pieces and stands two feet tall. It is stable enough to be picked up and moved. Another rebuild(plus head redesign) in the books by Jhaelon Edwards, on Flickr Features -Articulated head area -Removable panels to reveal interior -Lights throughout inside -Motorized deployment cables -Speeder bike garage for 4 speeders -Two floors with seeting areas -Gun/backpack racks -Cockpit area with seating for two pilots -Sliding Side Doors Side View: The complete scene has been reconstructed. by Jhaelon Edwards, on Flickr Rear View: IMAG1033 by Jhaelon Edwards, on Flickr Head: IMAG1037 by Jhaelon Edwards, on Flickr Full Interior: IMAG1019 by Jhaelon Edwards, on Flickr Speeder Garage: IMAG1021 by Jhaelon Edwards, on Flickr Top Floor Seating Area: IMAG1023 by Jhaelon Edwards, on Flickr Bottom Floor Front Area: IMAG1026 by Jhaelon Edwards, on Flickr Bottom Floor Deployment Area: IMAG1028 by Jhaelon Edwards, on Flickr Top Floor Access Ladder: 2016-08-07_10-36-53 by Jhaelon Edwards, on Flickr Troop Deploying: 2016-08-07_10-27-42 by Jhaelon Edwards, on Flickr Cockpit Area IMAG1030 by Jhaelon Edwards, on Flickr Assault on Hoth!: Assault on Hoth by Jhaelon Edwards, on Flickr The AT-AT at Brickfiesta: Another brickfiesta in the books! by Jhaelon Edwards, on Flickr is a youtube video detailing all the features of the model, including the motorized deployment cable. Check my flickr for progress photos starting from the first LDD files. Special thanks to Cavegod and LILmeFromDaFuture. I got a lot of inspiration from their models/techniques. Let me know what you guys think. Sorry for the cell phone quality pictures. Would buy new camera but can't stop spending money on lego parts ;). I'm considering distributing/selling the LDD files for this model if there's interest. They do need some refinements, however.
-
A long, long time ago I started working on a micro scale Millennium Falcon. To begin with all I wanted to do was add detail to the Microfighter but I kept tinkering and before I knew it I had a growing collection of micro Star Wars freighters and fighters, and here they are! Instructions for all these little builds are on my Rebrickable page. Since this all started with that Falcon Microfighter the cockpit piece (a light blueish-grey 2x2 truncated cone) became my yardstick for scale. Luckily trans-black 1x1 slope pieces work as fighter cockpits at the same scale so all the ships are, and will continue to be, as close to scale with each other as I can manage, at least based on these pieces and whatever reference images I can gather from Google. My Blockade Runner (April 2021) is the last ship on my micro Star Wars to-do list, although it’s hardly micro! The size and weight were a new challenge for me, I’ve never had to worry about a moc falling apart under its own weight before, but I enjoyed the challenge and managed to make it pretty easy to pick strong. I’ve put together instructions for the Tantive IV as well as the Liberator from Star Wars Rebels, which I couldn’t resist building for myself. Rather than doing new posts for each new ship I’ll edit the very long post below. All the instructions are on my Rebrickable page and there are photos and Studio renders some photos of the ships in this post, plus a few more on Flickr and Instagram. Thanks for looking!
-
Hi, i'm in the process of making a new MOC. It will be a mini assault on Hoth MOC, BUT with a kinetic walking AT-AT as centre-piece. I have parts to somewhat test the walking mechanism, but I don't have enough parts to build the whole MOC, so I can't acquire good footage and test it properly. I'm asking for someone with quite an impressive lego parts collection to build my moc, test it and take some photos and most importantly a video of it. Together we can improve it and eventually put it up on Rebrickable. Any other suggestions and/or improvements are ofcourse welcome as well. I will add a render of the current state of the MOC, just so you have an idea of the finished MOC. Thanks.
-

[MOC] Micro Kinetic scenes for the original trilogy.
Sandlot_Creations posted a topic in LEGO Star Wars
These are original trilogy themed scenes for my Kinetic Balancing desk toy with Interchangeable scenes. Here is a video of it in action and photos/more info below : LEGO Kinetic Balancing Desk Toy by Sandlot Creations, on Flickr Lego balancing Desk Toy - Star Wars themed scenes by Sandlot Creations, on Flickr Lego balancing Desk Toy - Star Wars themed scenes by Sandlot Creations, on Flickr If you would like to make the Balancing Desk Toy concept into an official Lego product please consider voting for it on Lego Ideas here: https://ideas.lego.com/projects/235a536e-c6cc-4b0e-889f-1daf1403da88 Every vote counts! You can also see the other scenes I've created for this on the Lego Ideas Page! Also, Let me know any scenes you would like to see created for this project! Thanks for watching! -
I made a quick render for the May the Fourth Promotional Set. May the Fourth 2019 Promotional Set by Money Money 2020, on Flickr
-
The Head - No, it is not the understated as just another AT-AT, because it won’t be, but for the matter of this topic, it is, momentarily, just a head. Though merely a head, it makes a rather astonishing display piece by itself. Aside from the towering height and lumbering movement of this terrifying machine, the head is quite formidable in appearance, resembling that of a fearsome beast. - In the course to build my original creation of the greatly revered imperial walker of the grand army of the empire, I amass a wealth of reference material concerning studio models, replicas, on-screen images, artwork, etc., to meticulously build the perfect LEGO incarnation that is indubitably authentic to the movies. I have been building this minifigure-scale AT-AT for quite some time—I recall since 2012 with the start of the body section. However, as of recently, since early 2015, I have built the head for this admirable tool of destruction. - Furthermore recently, I have been constructing the infrastructure of the body, acquiring additional parts & correct colors, making considerable amount of alterations, but I have postponed most of this to venture off and design my original minifigure-scale T-47 Airspeeder (Snowspeeder) in LDD, which turned out into a successful MOC and will be a great companion. I planned after that to resume progress with the AT-AT, but after I was inspired by anothergol’s innovative use of paint rollers and mudguards for the waist of his articulated AT-ST, I was just motivated to jump ahead and create my own creation of the imposing “chicken walker” beforehand. Mine, which will implement those techniques of his that I mentioned early, but also the 5 x 5 Scala dish. Interestingly, my own creation first turned out MF-scale, then evolved into UCS scale, then separated into two projects: a MF-scale and UCS scale! A considerable amount of progress has been completed on both projects, with the MF-scale almost finished and the UCS scale having feet and the waist finished. However, for concern of the UCS model, I have postponed its progress to focus on the MF-scele—to complete that and finally resume progress with the MF-scale AT-AT walker. - Regarding this MOC of the AT-AT head, you should notice that I deliberately took some liberty in the greebling located at the bottom. This was a compromise due to the thickness of some elements and from the lack of elements that could properly represent those tiny details, in this scale, authentically. I was as well tight on space for building the main cannons. I originally wanted to attribute a sliding action to them, as if they were in action, but this was unfortunately omitted due to a number of things, which includes: space, structure, scale, parts, etc., which also brought them closer together than intended. Along with other things, like the lack of other small details on the face and others things, that is practically as far as inaccuracies go for it. Nevertheless, one extra detail I have included, which I have not seen previously before represented, are the light fixtures atop the medium support blasters mounted on the cheeks. Then among other characteristics, I can grasp the head by the neck and jerk it around without any parts coming undone, with exception to the roof because it is not fixed together (kinda like other @@ heads I know of ). That rigid likability is attributed to the infrastructure constructed exclusively with Technic & modified plates (w) Technic elements, which also clutches the sides securely in place and almost seamlessly with other aspects. For this fact of such a packed, robust, complex infrastructure, there is no interior, likewise for the whole body—I never had intentions to include such luxuries anyway, but I congratulate those who did. - To determine the dimensions of a MF-scale AT-AT walker, I first acquired theorized dimensions of the actual walker from an in depth survey of its structural components, capabilities, practical role, and tactical uses: here. Wookieepedia is informative in some areas, but it claims the walker is taller than it is longer, which it is clearly not. Besides the overall dimension of the walker’s height and length, this technical commentary also provides a reasonable measurement of its width, diameter of the footpads, and other aspects like the height of boarding hatch. I also found this useful: here. To find the MF-scale, it took some little conversion of average human being height, minifigure height, dividing, multiplying, then more multiplying, but it came out to be around 20in/50cm. Some time on, I took the actual height of my model from toe to the main section of the body and acquired the measurements around 21in/53.34cm, then rework some steps back to get the plausible measurements of 85ft/26m. For the footpads, each are 12 studs in diameter and its height a few measures above a minifigure's chin. So the model is rather on scale for minifigures’ height, as well other aspects in general scaling, as according to the probable height of an actual AT-AT walker. - If there is any misconception about the visor of the command viewport being transparent red, I have some valid reasons to put those to rest. At first, if you notice the moment when five imperial walkers are advancing towards echo base, only the lead walker exhibits a red visor. During the scene, where General Maximilian Veers oversees the battlefield through the viewport the visor is transparent clear. Logically, if the visor was transparent red it could not beam as so bright as it did in a cloudy, snow filled day—not even in a sunny day. Though it appears black this is due to the overcasting shadow from the outside portion of the viewport. Therefore, the red lighting is believably a system for operations in low light periods or environments, to preserve the crews vision in these circumstances, while still being able to function about in the walker. - Well, if you are still reading, I am done for expressing this MOC, for I believe I have covered everything concerning the model and relating to it that was on my mind to say. So, you can finally enjoy the photos and express your own thoughts, criticisms, questions, etc. below. However, bear in mind that I will not be giving out any form of direction that will describe or depict how it is built—I appreciate that this is understood in advance of your comments. Much appreciated, LiLmeFromDaFuture
-
Hi. I thought I would share my experince with the bricklinking and building of one of the most wonderful MOCs I have seen in my life: The 6100+ pieces UCS AT-AT designed by Cavegod. I have already bricklinked the UCS 10179 Millennium Falcon and had lots of fun doing it. Some threads already discuss in lenght the process of doing so. Since there seems to be no thread from other members discussing in details this adventure (please point me to one if it already exists), the following posts will describe, step by step, my own experience. Comments are gladly welcome! Here's a picture that shows in a great way the sheer size of that thing...(with Cavegod, its creator):
-
-
-
Here is my Assault on Hoth MOC layout. The idea for this build came after building the Raskolnikov AT-ATs half a year ago. They were standing on display next to other SW sets, but I felt that they deserved more. The intention was to make a Hoth display for the Imperial side instead of an Echo Base, which has been done many times already. After designing the layout in LDD I started building and more ideas came to mind. I decided that I still needed some Rebel influences as otherwise the display would be too dull, so I opted to go for a Trench as seen in Episode V. The entire build is modular so that I can easily transport it. The left and right side are both on 2 48x48 baseplates and are connected via technic pins. The 'snowground' is constructed with 16x16 plates and some smaller ones. Dimensions: Entire build: 96x96 studs (80x80 cm) Snowground: 88x88 studs Partcount: 13000+ Credit: I used a lot of inspiration from existing MOCs/MODs and other things. Credit goes to all these people for their builds:
-
Taking a little break from building a minifigure scale AT-AT and going in the opposite direction in scale. Not sure what to call this scale, so I call it Tiny AT-AT. The AT-AT measures 3 inches (7.5 cm) tall. Feel free to build your own, follow this link to my web site for the instructions, LDD file and the Rebrickable page: https://humblebricks.com/star-wars/
-
[EV3] Mindstorms Star Wars AT-AT
The_Icestorm posted a topic in LEGO Technic, Mindstorms, Model Team and Scale Modeling
Standing 58cm tall and 59cm long, this AT-AT from Star Wars is probably my largest robot to date. It is controlled by an EV3 p-brick, and is capable of walking, turning its neck, and shooting balls from a twin-ball launcher located inside its head. Here is a list of the functions of the robot: - Walking: 2 EV3 large motors - Neck turning: 1 EV3 medium motor - Shooting: 1 NXT motor Also includes an EV3 IR sensor for use with the EV3 IR remote. After getting the BWE, I had a plentiful supply of grey beams and panels, which I used in the aesthetics of the model. The head design was the most tricky part of the build. I needed it to look good, while at the same time have enough space for the twin-ball shooter with magazines. However, I'm happy with the end result, as it looks quite accurate to the actual thing. With the amount of pieces I had, I was also able to achieve a (almost) full body cover, which although adds to the weight of the robot, looks really nice. There are also two flaps on top of the head that can be lifted up to access the ball magazines. Walking was especially tricky to achieve in this model, as it was so top heavy. Rubber bands had to be used to help pull in the legs when they bore the load of the robot, otherwise the motors would not have enough torque. All legs are controlled simultaneously by the two motors, so the robot theoretically can't turn. However, I doubt the robot could turn even if the two sides could be controlled independently, since it is so top heavy. The EV3 brick can be accessed through opening of the panels on the side of the body. This was the easiest way to access the electronics while keeping a full-body cover (The real AT-AT in the movies also had opening side body panels). Here is a video of the AT-AT walking, turning its neck, and shooting. More information about the robot can be found here: https://www.us.lego.com/en-us/mindstorms/community/robot?projectid=afba4def-3b6b-49f3-8e0f-f964224763d9 Hope you enjoyed this robot! -
Hello all, I have decided to resurrect this project from my archive of many unfinished builds. The only problem with this unfinished build is that I do not have any, and I mean any of the pieces ready to start this project. After a failed attempt last winter, I sold my pieces and as I thought back then, I would one day regret that. Today is that day. After the destruction of 6200 pieces all over my floor, I impulsively sold the pieces, as I was frustrated and did not want to rebuild every part of the AT-AT that took me weeks to make. This feeling of not satisfying my crave to build this AT-AT has recently emerged up again, and I am ready to tackle this project once again. Of course this time, I am better prepared. This time around, I must mention that I will use the updated body rather than the original for obvious cost reasons. As for my bricklink process, I am not going to follow the generic style of ordering all pieces and building once I have them all. In fact, what I am going to do this time around is order all the parts for one section (neck, body, or legs, etc.) and build that section once those pieces are in. Now why this may seem like a bad way to minimize cost, which it is, the reason I am doing this is because if I encounter any issues with the build of one section, I can immediately make modifications and focus purely on that section alone while my wallet restocks itself for the next section. I believe that this method will have its benefits that will cancel out its cons, and thus give me a stabler product. Another reason why I am choosing to do this is just in case Cavegod modifies one of his sections. A while back, around February-ish, he stated on the brick set forums (at least I think brickset), that he will be modifying the legs to make them sturdier. Now whether he did this or not is unknown, so I reached out to him and am awaiting his response. As of right now, there are no pieces in my hand that I can use for this MOC. However, I just placed a total of 7 bricklink orders totaling a bit over 700 pieces that will cover all pieces needed for the beast's head. I have decided to start with this because from what I've both heard and experienced, it is the trickiest to get right. This way I have plenty of time to make any adjustments if I notice a weakness that seems repairable, or even just a detail to the head that I want to be included, although there doesn't seem to be anything missing detail wise, credit to Cavegod! I will update as often as possible, mainly when I reach a breakthrough with the process, or when I place orders. I plan on this project taking quite some time to complete as I am going to try, and likely fail, to simply add this to my collection without giving up a current UCS set, although my Imperial Shuttle is a tempting sell for what it's worth! That being said, I am going to put a lot more effort into the AT-AT this time around as I now know that it will be much harder than just looking at LDD and putting the sections together.
-
Soooo, being a huge fan of AT-ATs but not mad enough to try and make Rocco's/Cavegod's creations, i thought i would have a go at something that was accurate, almost as big and not kill your bank account buying all the pieces. As of now its just an LDD design, must give a massive shout out to the lego gods Rocco and Cavegod for inspiration, i followed many design cues but tried to scale down and put my own spin on it. Also a shout out to rx79gez8gundam and his AT-AT design, i hadn't clocked his work till id almost finished mine and noticed how similar the legs were, total coincidence but seeing as he posted his way before mine im giving props to him and his great work. So as it stands it still needs some work to the frame and neck joint but its designed to hold the head strong. Im hoping it will be strong enough AND have space inside for troops but thats still to be figured out. At the moment its about 3800 pieces but i'll wager it will hover around 4000 when all is said and done. I'm sure someone could streamline it and maybe get it to 3500, im not a Lego genius like some on here :D Anyway here she is.... ps:pics are a bit small and blurry, no idea whats happening there, site is resizing them?
-
Hello eurobricks! Im building a moc with an AT-AT. I have a problem though. Im stuck between 2 models to chose, Im wondering if anybody has done an interior for the model below, also i have compared both and the one made by brickplumber is higher. My criterias are: Has to be realistic (size, details) EDIT: The only problem with the last model are where the legs and armored part connect, is it possible to take the hips from the first model and add to the other one? Thanks!
-
[LDD][MOC] DF.9 Turret (Star Wars: Battlefront)
LegoStarWarsLDDShop posted a topic in LEGO Star Wars
This weapon is another one of my favorites from the original trilogy and Star Wars: Battlefront. I was very disappointed, though, with the design included in both 75138 and 75098. It doesn't do the original cannon justice at all. Given that, I decided to try my hand at creating one, and I think it turned out really well. http://www.moc-pages.com/moc.php/428616 Please let me know what you think in the comments. God bless.


.thumb.JPG.3c74c0d405dc1afb04b2fa216ebc79e6.JPG)


.thumb.png.d1506c976462e0f6ae4ace82212c85b3.png)