Search the Community
Showing results for tags 'yellow'.
Found 37 results
-
Hello Speed Champions and City fans, It was my entry to Bricklink Designer Program Series 3 and 4. It has received many kind comments and support, but unfortunately it has not been selected, therefore I decided to make the instructions available here: https://rebrickable.com/mocs/MOC-177592/_TLG_/school-bus I always loved American style school buses, therefore I decided to design one to Bricklink Designer Program Series 3. It is not actually based on a real one, but it contains many typical details: the black bumper rails and STOP arms on the sides, the crossing arm, the side and rear doors, the rearview and crossover mirrors, the mudguards, the warning lights etc.. The roof assembly can be removed as one piece and in this case the internal details are visible: there is a driver seat with steering wheel, dashboard, gear shift, passenger seats and even a fire extinguisher. It is 8 studs wide, studless build in minifigure scale and fits perfectly to Speed Champions cars or to a LEGO City. There are many working details: the front and rear doors, the STOP arms, the crossing arm and windshield wipers. I wanted to create a clean build and tried to fill every unnecessary gaps and hide unnecessary studs, therefore some tricky, but legal build techniques are used. The set includes three minifigures: a driver, a school girl with a pen and backpack and a school boy with a brick built backpack. The model has space for 17 minifigures: one driver and 16 passengers. If the passengers are kids with short, rigid legs, then they can stand on the seats. The building instructions guidelines have been followed. It is built from the palette "BDP Series 3", so there are some color and part restrictions. The color "Bright Light Orange" would be a bit more authentic, but the available parts are restricted, therefore I decided to use "Yellow" and I am satisfied with the result. The STOP sign is very rare part and it is not available in this palette, therefore it is replaced by a simple, white, circular sign with a sticker. The door 43967 is also not available in yellow, therefore it is replaced by a brick built one, however, in this case I was able to add some extra details: a black door handle, bottom window and red lights. I hope you like my design, I appreciate any feedback. Thanks for visiting, _TLG_ School Bus - Bricklink Designer Program 3 - 01 by László Torma, on Flickr School Bus - Bricklink Designer Program 3 - 02 by László Torma, on Flickr School Bus - Bricklink Designer Program 3 - 03 by László Torma, on Flickr School Bus - Bricklink Designer Program 3 - 04 by László Torma, on Flickr School Bus - Bricklink Designer Program 3 - 05 by László Torma, on Flickr School Bus - Bricklink Designer Program 3 - 06 by László Torma, on Flickr School Bus - Bricklink Designer Program 3 - 07 by László Torma, on Flickr School Bus - Bricklink Designer Program 3 - 08 by László Torma, on Flickr School Bus - Bricklink Designer Program 3 - 09 by László Torma, on Flickr School Bus - Bricklink Designer Program 3 - 10 by László Torma, on Flickr
-
Hello Skoda and Speed Champions fans, Skoda 105 is one of the iconic Eastern Bloc cars of my childhood. It was a rear-engined, rear-wheel drive small family car that was produced by Czechoslovakian car manufacturer AZNP in Mladá Boleslav, Czechoslovakia between 1976 and 1990. Engine sizes were 1.05 and 1.2 liters respectively. The color scheme of this model is based on my father's first car. Building instructions are available on the following links: https://rebrickable.com/mocs/MOC-93968/_TLG_/skoda-105/#details https://www.mocsmarket.com/lego-mocs/skoda-105-building-instructions/ KIT is available on MOCHUB: https://www.mochub.com/moc/skoda-105 It is a studless build in the original, 6 studs wide Speed Champions scale and fits perfectly to the new City style cars too. I have minimized the number of the stickers to keep the flexibility of the parts in further builds, therefore only two standard vehicle registration plate stickers are used. I wanted to build the model as accurate as possible in this small scale, therefore it contains lots of details: for example the front ligths, the front grill with the narrow chrome line and Skoda logo, the side view mirrors and the rear view mirrors, the door handles, the black rubber stripe on the sides etc... Maybe the most challenging one was the C pillar solution. I tried to fill every unnecessary gaps and therefore some tricky build techniques are used. The model has space for two minifigures: one on the front seat with small or middle sized hair (the rear view mirror assembly has to be removed in this case) and one on the rear seat without any hair. I prefer the model as it is shown on the pictures, but there are some modification possibilties: a) a rear windscreen can be added (there is a more detailed explanation in the last step), b) many of Skoda 105 cars has side view mirrors only on one side, c) on the real cars the color of the door handles and side view mirrors are sometimes black on the other ones they are chrome. Thanks for visiting, _TLG_ Skoda 105 - Instructions 1 by László Torma, on Flickr Skoda 105 - Instructions 2 by László Torma, on Flickr Skoda 105 - Instructions 3 by László Torma, on Flickr Skoda 105 - Instructions 4 by László Torma, on Flickr Skoda 105 - Instructions 5 by László Torma, on Flickr
-
A tiny microscale Offshore Powerboat!!! It contains 33 pieces without the base.Fast,tiny and yellow,the king of the sea. Offshore powerboat new_4 by Antonis Papastergiou Offshore powerboat new_3 by Antonis Papastergiou Offshore powerboat new by Antonis Papastergiou Offshore powerboat new_4 by Antonis Papastergiou Ofshore powerboat_6 by Antonis Papastergiou Ofshore powerboat_7 by Antonis Papastergiou Ofshore powerboat_8 by Antonis Papastergiou Ofshore powerboat_9 by Antonis Papastergiou, on Flickr
-
Instructions available NOW for US $7.99: Instructions Explore the depths of the deep sea with the HERMES EX101 Deep Sea ExoSuit. Seat yourself in the double-walled cockpit and use the levers to control the arms and legs. Be careful, though, the oxygen may run out! Attach the hook to rocks so you don't drift away (and watch out for the sharks)! This mech is designed with LEGO bricks that are currently available. However, lights are not included in the package but are only shown in the render. They can be purchased at several third-party retailers including LYGOD, LightMyBricks, Brickloot, and Lightailing. BUILD [url=https://flic.kr/p/2kXsKq8][/url]Deep Sea Suit Lit Drop 1 by [url=https://www.flickr.com/photos/192785398@N07/]Peter Bryant[/url], on Flickr This build is remarkably simple: It's divided into 14 submodels, most of which are repetitive. I incorporated what I believe to be my best SNOT (Studs Not On Top) techniques yet. DESIGN PROCESS As with all of my MOCs, I started by doing a rough sketch of how I wanted it to look. I took heavy inspiration from 76105-1 The Hulkbuster: Ultron Edition. This means that many design elements are taken from that mech. For example, the design of the legs is very similar to, but not a direct copy of, that robot. [url=https://flic.kr/p/2kXunQw][/url]Deep Sea Suit Lit and Released Back by [url=https://www.flickr.com/photos/192785398@N07/]Peter Bryant[/url], on Flickr FINAL PRODUCT Instructions are available now at the link above. Please, consider purchasing as I am trying to gather all of the parts to build in real life. FEATURES Minifigure cockpit (as in, a Minifigure fits inside) Fully posable Instructions bundle includes .xml file for easy upload to BrickLink and full - color instructions (White Background) Sticker Sheet and display stand coming soon!
-

[MOC] My kind of Sneakers.
0937 superfan posted a topic in LEGO Technic, Mindstorms, Model Team and Scale Modeling
My kind of Sneakers by 0937 Superfan, no Flickr Since I start building with LEGO® pieces one of my goals was to design a pair of Sneakers. I hadn't a scale in mind, but with my collection growing up I found out that I had enough pieces to start making a prototype at least. When the set 43179 - Mickey Mouse & Minnie Mouse came out, I was able to finish my idea because of the Round Corner 3 x 3 x 2 Dome Top - 88293 in yellow ( yes I wanted to build a yellow pair of shoes ). When I started to search for inspiration and to check how other AFOLs were building their sneakers I found out that one thing that I was not fully fulfil were the shoe laces! So I knew that one thing that I could make a diference from the others was on this part. My favorite photo is the bottom back point of view. It does show the main part of the MOC but get a little teaser about how everything is assembled. This is my favorite type of sneakers. And you? What is yours? -
[MOC] Chilean "Gondola Carril T-1024" in 1:22.5 scale
Paperinik77pk posted a topic in LEGO Train Tech
Hi all, today I'd like to show you something I'm after since a few months. During the first days of lockdown I saw a documentary on Chile and its people, towns, traditions and lifestyle. One of the main points of the documentary was focusing on the railway running from Los Andes to Rio Blanco valley , a spectacular run between mountains, aside the Rio Blanco river. Originally it connected Chile to Argentina. And this "thing" was presented as the main attraction of the current line - its name is "Gondola Carril T-1024". I sincerely do not know why it is called "T-1024" . The "Gondola Carril" is a railmotor, based on an American built bus, the Yellow Coach Z-26. This time I understood that the letter Z is identifying the chassis type and 26 the number of passengers it could carry . The bus was normally used in Los Andes town, until it was converted into this very nice railcar. Originally used as a cheap inspection vehicle, It is now fully restored and used for touristic travels. And I can say it is an experience I would like to do once in my life. The "Ferrocarril Transandino de Chile" is a narrow gauge (metric) railway, therefore I based the whole project on 1:22.5 scale (good for running in the garden!). It is designed to run on G-Scale track (45mm), but with some modifications it could easily be converted to run also on standard Lego gauge (on large curves, since it is quite long). Since there are no specific technical specifications for the Gondola, I searched for the ones of the Z26 Bus - and tried to adapt the design according to the pictures and videos of the real railcar. The original motor used by Yellow Coaches Bus was replaced by a more modern Cummins Diesel, as nicely "declared" above the radiator. Despite the original railcar is based on a chassis, this one is basically a unibody build with some underside reinforcing (let's say - like the Jeep Cherokee XJ). It's quite light, so a medium motor is sufficient to move it. In the design, I used a PuP motor, placed in the front, under the hood. Then a pair of gears in cascade, cardanic joints and a transmission axle bring the power to the rear wheels. The "gears" I mentioned can be changed easily to have a lower or higher gear ratio, as needed. This railcar not meant to pull anything, so a lower gear ratio could save some batteries. Battery box is placed in the rear part, immediately beyond the rear axle. The small red axle you can see near the T-1024 sticker is used to turn the PuP battery/receiver on and off. The next picture shows the powertrain - it's taken from an alternative blue version of the railcar I prepared , with some freelance solutions which make it more "generic". I hope you like this one, and (more important) take a look to the original one, because it's really nice piece of history. https://www.ferrocarril-trasandino.com.ar/historia/ Ciao! Davide -

[MOC] LAND ROVER YELLOW CAMEL TROPHY
Fabiomaster posted a topic in LEGO Technic, Mindstorms, Model Team and Scale Modeling
Hi, my first moc: Lego Land Rover 90 Camel Trophy Edition. Original chassis RC made project by "sheepo garage". Body is my original project, but inspired by RM8 and sheepo. I hope You like it :-) my moc`s: https://www.bricksafe.com/pages/Fabiomaster- 11 replies
-
- yellow
- cameltrophy
-
(and 1 more)
Tagged with:
-
The taxi is in minifigure scale. Four doors, the hood, and the trunk can be opened. Four minifigures can fit into this six studs wide taxi. It is on Lego Ideas now. I hope you like my model, and support it. Thanks :D https://ideas.lego.com/projects/ba0ece27-3326-46d0-90ef-2a2940698db1 More models are on my Youtube channel: https://www.youtube.com/channel/UCBOYseqPC24roj_mAHtu9Yg?view_as=subscriber Modification to Taiwan Taxi My other MOC models: [MOC] Police Motorcycle #2 [MOC] Sport Bike Stop Motion Speed Build [MOC] New York City Police (NYPD) Car [MOC] Lego Mini Cooper [MOC] Japan Tokyo Taxi vol.1 東京無線タクシー [MOC] Ice Cream Truck [MOC] LEGO California Highway Patrol [MOC] LEGO Police Car [MOC] Police Motorcycle [MOC] New York City Taxi / Cab [MOC] LEGO NYC News Stand [MOC] New York City Transit Bus [MOC] Newspaper Rack [MOC] Coke/Beverage Cooler Initial D AE86 Racer AC Transit Bus AC Transit Bus Short Version Ice Cream Van
-

Functional Wind-up Robot
Eddie_Young posted a topic in LEGO Technic, Mindstorms, Model Team and Scale Modeling
If you remember those little clockwork robots, which used to be toys and are now prized collection articles, than you will surely recognize my representation! I've been working on this for some time now and I'm proud to say that this robot walks as well as the real thing! It uses two pullback motors, a couple cogs (gears) and 623 LEGO elements to achieve (I only hope you agree ) both good looks and great functionality. The mechanism with the incorporated motors is made to fit exactly into the case and the case comes off all in one piece (I like my modularity). The mechanism for the legs is the most simple thing ever but making it was as complicated as any of my larger MOCs, because balance played such a vital role in all of it. You can still see it wobble as it walks (I find the wobble quite indearing though ) and a lot of work went into keeping it from falling when it does. I like to think this is my best work yet, so I hope you like it just as much enjoy!!! My Flickr gallery -
Other guys get to call Interflora when they need to say sorry.
-
Spent the last few days using spare blue parts to make this mech. Decided to go with a water theme since it was blue. And why not a trident? And a giant fan thingy? Lemme know what you think. Last photo is a bit grainy cause the sun was going down :p
-
.thumb.gif.ad7c8d88b264ee812194946c07404504.gif)
[TC12][MOC] The Banana Scorpion
mocbuild101 posted a topic in LEGO Technic, Mindstorms, Model Team and Scale Modeling
Question: What do you get, when you cross a tank, with a banana, a scorpion, a V8 engine, and a bunch of stud-shooters? Answer: The Banana Scorpion! Color scheme: Yellow, with some black and grey. Driver: A Big Giant Banana-eating Tiger! (this one) Powered Functions: Drive: Tank tracks - powered by 2x M-motors. (also used for steering) Steering: Tank type skid steering. Engine: A massive V8 - powered by a high speed motor. Wacky function 1: Lifting hull mechanism - powered by M-motor. Wacky function 2: High speed spinning sweeper - powered via V8. Wacky function 3: The ability to tank-wheelie!!! (with some help...) Manual Functions: (aka: weapons) Cannon: A giant cannon mounted on the end of the adjustable scorpion tail. Stud-shooters: Front: 2x six-round, and 2x single-round - Rear: 4x single-round. Spring-shooters: 2x rear-mounted. (can be triggered by driver) The story of how The Banana Scorpion was built: -
I was thinking about what I could do with the newly acquired bucket wheel excavator parts. Something that I couldn't build without these big yellow circles. That's how this strange idea came to be. The arms are motorized: they grab or drill and retract into the wheels. The compact and functional hand is my favourite part of the robot The two-wheel design makes it wobble a lot. Someone on youtube commented that it's headbanging to the music - genius!!! I might try making one with adjustable wheel angles next! Any suggestions? Check it out on LEGO Ideas!!!
-
-
- tc10
- pneumatic
-
(and 82 more)
Tagged with:
- tc10
- pneumatic
- technic
- moc
- engine
- 4 stokes
- nz
- lego technic
- v8
- impro
- tv
- wliia
- whose line
- comedy
- star wars battlefront
- the empire strikes back
- 1.4 fd p-tower
- battle of hoth
- at-at
- at-st
- star wars rebels
- rebel alliance
- a new hope
- return of the jedi
- rogue one
- city
- town
- bank
- key bank
- lego ideas
- landmark
- moc
- arc de triomphe
- france
- ag
- mantis
- technic
- scania
- truck
- yellow
- lowloader
- moc
- cv-project
- trailer
- mall of america
- lego shop
- lego brand retail
- lego store
- moa
- truck
- rc
- challenge 4a
- oleon
- 3rd party
- kit
- drone
- lego
- modular
- block
- lego
- modular
- building
- ideas
- brick
- minifig
- afol
- moc
- house
- falcon
- millennium
- design
- vedosololego
- micro
- custom
- furniture
- room
- diorama
- advent
- calendar
- city
- 2016
- octan
- ag
- rexgain
-
Hello, this is a yellow-headed amazon. It is native to Mexico and Guatemala. But there is also a small wild population in Stuttgart, Germany.
- 7 replies
-
- yellow-headed
- amazon
- (and 7 more)
-
SlammerVan RC - 42030 C-Model
Immo posted a topic in LEGO Technic, Mindstorms, Model Team and Scale Modeling
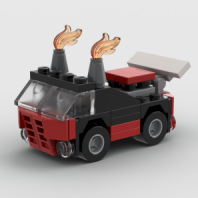
Here's a little 42030 C-model (+ extra wheels, ONLY added extra parts). It was meant to be just a remedy for boredom while ill, so I build "just so", whatever comes to my mind - just wanted it to be remote controlled. But I quite like the result: a flamboyant van perfect for just cruising around and scaring people. It performs well enough for a heavy, single XL motor-powered model. The gearing somehow makes it slower on reverse which is a fringe benefit, realism-wise. Steering is quite good, turn radius is tight. 35 studs long body + 5 studs long "wings". Functions and feats: ► RC driving and steering ► sliding side doors on the right side, opening doors and fuel cap ► supercharger's scoop in the rear tilts up to reveal the gap leading towards the on/off switch that is activated by rod that can be kept on a special pivoted rack inside the van (you can use the "flag" poles as well, but that's just barbaric) ► non-functional decorated interior, including seats, steering wheel, gear shifter and handbrake ► details such as supercharger scoop, roof-mounted horns, floodlights and break lights, rear view mirrors, exhaust pipes, fenders, flags, radio antenna, floored interior- 7 replies
-
- rc
- power functions
-
(and 3 more)
Tagged with:
-
This car MOD was inspired by the flying car named Lola from the Marvel set number 76077. (Iron Man: Detroit Steel Strikes) The color has been changed from red to yellow, though blue, red, and black are possible colors that can be built instead of yellow. I removed the flying car convertible wheels and replaced the printed front grille with actual grille tiles. I also added a licence plate, rear bumper, and side mirrors. The car can seat one mini-figure, and the cabin features opening side doors. LDD file coming for this model as soon as MOCpages is back online. Comments, Question, and Complaints are always welcome!
-

[CV-Project] [MOC] [RC] Yellow Tractor Unit
KikoTube posted a topic in LEGO Technic, Mindstorms, Model Team and Scale Modeling
What is CV-Project? The CV-Project (Construction Vehicles Project) is a project i started. It will be featuring a Tractor Unit (this Topic), a lowloader and a excavator. And maybe some other Vehicles. Introduction: My Name is Christopher and i am 14 years old. You are asking yourself, why i am telling you this? Because i maybe wont understand every word you will say Dimensions: Height: 24 cm Length: 42 cm Width: 15 cm Features: • Drive: 2XL Motors • Steering: Servo Motor geared down 1:3 • Live Axle Suspension on all axles • Detailed Cab and Interior Pictures: Tell me what you think. Thanks for reading- 9 replies
-
- live axle
- cv-project
- (and 6 more)
-
Hello everyone! I'd like to show you another modern house: Qubi House. Following Villa Diaman I wanted to try more and so here it is! Enjoy! All photos can be found in my Flickr Gallery.
-
I built this station with set #7997 in mind. (Link to this set's Brickset listing: http://brickset.com/...1/Train-Station ) I got the original set in 2007, along with a double rail crossover for my Birthday. I wanted to make it a full building but didn't have the parts. By 2008, I had discovered Bricklink, but the station was in pieces by then and was not re-created until early 2012. The station was a stock set, while I searched for ideas. Eventually, I came across a build by fellow Eurobricks user named Lazarus that incorporated a modular basis, a full building (street & track-sides) & a appealing design. I saved a picture of it and made my own design based on his. I included really neat features, (such as the arched lattice windows made with a fence) but I went too far and made it impossible to transport to train shows and LUG meetings. The platforms were very flimsy, and during the recent move to my families new house, it shattered into small chunks. So, I went back to the drawing board, scrapping everything but the building itself. Here is the end result, which is strangely near where I started with set #7997. It has one platform, plentiful outside seating on the platform, and is still yellow-and-black. There are many changes from the set, (no stairs on the platform, for example.) but the heart and soul is still there. In this latest version, I relocated the clocks to the top of the tower roof so that the design was closer to the original model. I also combined / redid sections of the model, such as the building and trackside awning have become one large section instead of two smaller ones. I even swapped the town-name of this station and my Victorian station, making the one you see here "Barretts" while the other one became "Ironwood". Also, this side of the station is 5 tracks long, or 80 studs. Here is the street side of the station. Here we can see the interior of the station, with ticket machines,seating, and snack bar on the first floor, plus the train tracking / switching controls on the second floor. You can also see the modular breakdown of the model, which includes the following: -Station building (lower floor) -Station roof and Tower control room (upper floor) -Tower roof -left platform section -right platform section The original set, courtesy or Bricklink. LDD file here: http://www.mocpages.com/user_images/80135/1449078417m.lxf
-
Hi folks, My long running saga of a project has finally been finished. Inspired by a trip to Portugal this summer, Rua Amarelo is a corner street featuring a Pasteleria and a hat shop. The yellow corner building is perhaps more authentic in colour and I would of preferred to have made a tiled effect for the narrower building but could not source enough tiles from what I had at my disposal. Really would like TLG to bring back sand red in an assortment of pieces! No interior this time but I'm hoping to have something to see inside on my next MOC which is already planned. Anyway on with all 4 of the pics; You can view them at flickr if you so wish https://www.flickr.c...s/52656812@N04/ Comments welcome!
-
Boxcab Shunter Hi guys, I've just finished a new Power Functions boxcab locomotive. I hope you guys like it. It was my first ever Power Functions MOC and I think it came out quite well. Here are the specs length: 16 bricks (with couplings) hight: 11 plates colour: yellow motor: PF train motor battery box: AAA weight: 314,1 gram But without further ado, Here are some pictures of it! Front view side view Motor How I hid the battery box And how I hid the reciever the only problem is that it doesn't have any wagons... And I have zero idea about what to build for it. I thought about some giant boat trailer or a flatbed but I scrapped those ideas. Bye
-
So many of the people who like the SImpsons are fans of the many nice LEGO sets that were made by the LEGOS to be about the show. But i thought there should be a very big statue of the head of Hommer Simpsen the dad from the Simpsons. So I did the statue in the LDD. It's good old Hommer Simspon and his dognut. Homar has a mouth and just like in the show it is full of many food. He is gluttonous but love able. His tounge moves too and there is food in his mouth. Here is the Homer eat the donut. Hommer have many adventures with his wife Marg and his children Magey, Lysol, and Bert. They live in town of Springtown and have adventures with Mr. Barnes and Smather, Kirsten the Cloun, Apu Nahasapeemapetilon, Ralf and Chef Wiggem, Hand Malloman, and even Bender the Robot. I will make all of them to have adventures soon. I uploaded the Hommer so you all can look on it with you're computer and change it to be green if you really like. HOMMER SIMPSEN.lxf I hope you like the lego building I made
- 1 reply
-
- LDD
- Homer Simpson
-
(and 2 more)
Tagged with:
-
I think this is the right forum to post it at.. I have build a 6 wheel sport/race car. 6 wide, front spoiler 8 wide. Description : this V8 voice command driven car is all you need for fun on the track! The 4 front wheels give you a great amount of downforce and amazing steering abilities! It has space for to minifigures who would love to race! For pictures this link: https://www.flickr.com/photos/132315528@N04/sets/72157654451150402 Note: i DONT use bb codes just because they freakin don't work when copied on my ipad and the slow connection makes it even impossible to get to flickr on the computer. Is there a way to fix this on the ipad? I'm getting annoyed.
-
Motorized Blue & Yellow diesel locomotives - Power Functions MOCs
Murdoch17 posted a topic in LEGO Train Tech
I have motorized my 7939-inspired MOC and added a new engine inspired by early Box-cab diesels. This is my first couple of motorized MOCs ever, and I'm not sure I did it quite right. I won't be building them, but if anyone wants to take a crack at them be my guest. Here is the front view. The yellow engine is also build able in red or black, while the blue engine is also build able in white. The cab on the yellow engine opens up, but the blue loco is inaccessible at this time. It may be possible to fix this, but it would require a roof redesign and I don't feel like redoing the engine (again) right now... Here we see the innards of the engines: The triple A Battery box and IR receiver. There are two 2x2 holes in the frame of the engine for a PF cord to the motor. No lights are included, but it may be possible to make them fit inside if you really wanted to. The roof sections that are hidden in this picture are removable, and are held on by four studs each. LDD file: http://www.mocpages.com/user_images/80135/1432672946m.lxf As I said above, these are my first motorized models, so please tell me if I did something wrong. Also, Comments, Questions, & Complains are always welcome!


