Search the Community
Showing results for tags 'starfighter'.
Found 142 results
-
Hi, As the Star Wars Episode I - The Phantom Menace - turns 25 (already!!!) this year, and some sweet sets (ekhm...droideka) coming along, I decided to also build one of the icons of the film, and, dare I say, one of the most beautiful Star Wars ship designs ever, the Naboo N-1 starfighter. So, as the N-1 minifig scale built by @Inthert is the pinnacle of this design nearly impossible to improve upon, I went for the model in much smaller (I guess it is mini or larger micro...) scale with an aim to build it as sleek as possible utilizing metallic parts as much as possible. So here it is: N-1 N-1 N-1 N-1 N-1 N-1 I apologize for links, as I could not embed the links as pictures in the post from Flickr properly (don't know why..)
-
Introducing you to my latest Midi-Scale spaceship, the timeless Y-Wing from Episode IV - A New Hope! At 546 pieces, this compact and intricate model is barely wider than your average smartphone's height, but keeps a dense, detailed look and accurate proportions. I initially made a first prototype more than a year ago but was unhappy with the half-baked, almost playset-ish scale. I took on the challenge again and recreated it entirely from scratch: it's now smaller, more accurate, and just better in every aspect. Despite the small size, I did my best to capture the essence of the original ILM prop: tilted cockpit section, engines off-center relative to the thin support struts, asymmetrical greebles from top to bottom, cockpit turret... Believe it or not, the deceptively simple shape of the body was not easy to capture at this scale: with such a tiny surface to work with, a subtle balance had to be struck between incorporating complex greebling and "drawing" an accurate body outline. The cockpit section was a whole other beast, but once I figured out how to create the tapering, things clicked pretty fast. I managed to reproduce the slight downwards tilt, the yellow stripes on the fuselage, and the more discreet gray stripes on each side as well. I believe it's about as small as you can go when creating a Y-Wing cockpit without sacrificing crucial features and proportions! This model comes with a removable stand. Although it being purely a display piece, its swooshability is very good. In addition to being cost-effective, I think it makes a nice desk model for anyone loving that ILM prop look, with a small space footprint. ► Instructions for the Y-Wing are available at BrickVault! More pictures on my Flickr page.
-
My first ever true Minifig-scale ship is finally here, and what better model to start with than the sleek BTL-B Y-Wing from The Clone Wars series. Being 23 meters long in universe, this accurately Minifig-scaled MOC is quite a unit: 57 cm long, 1,6 kg, 2,954 pieces. It can accommodate two clone pilots - one in the cockpit, the other in the turret. The model is available in three versions: classic (yellow), Rex's (blue), and red. With a spaceship of this kind, the main challenge is to achieve a level of smoothness and fluidity that gets as close to the original as possible. Using the Battlefront II model as a reference, my goal here was to closely match all key features of the ship: the subtle downwards angle on each side of the body, the curvy and tapered front section, the continuous yellow stripes that run across the entire fuselage, the intricate middle-section... and for such a smooth ship, going full SNOT (from top to bottom!) goes without saying. The T-shaped body of Y-Wings usually allow for simplistic structures, but in this case, figuring out the internals was one of the truly head-scratching parts of the build, since I had to properly incorporate angled fuselage assemblies and make a proper interior for Minifigs. Even so, the model is very swhooshable and can be grabbed from the underside, from the rear or even from both wings. Each color variant is accompanied by its specific set of instructions and parts list, giving you the freedom to build the one you prefer. The ship has two display modes, "in-flight" with its fully removable stand, and "landed" with retractable and easy-to-connect landing gear. The swooshing can begin. ► Instructions for the BTL-B Y-Wing are available at BrickVault! More pictures on my Flickr page.
-
After a year's break from Star Wars, I decided to improve one thing in my collection. I already had one MOC/MOD for X-Wing, strongly based on the 75218 set, but for some time there were a few things that bothered me about it. It turned out that the rubber bands had lost their properties and the mechanism was malfunctioning. Plus I wanted something much better and here it is my new Luke Skywalker's X-Wing Fighter The build took about 3 weeks, I had most of the parts so I only needed one order on Bricklink. There are 985 pieces here, quite a lot. The mechanism works on the same principle as in the 75301 set My X-Wing has retractable landing gears and a new type of display stand. Instructions is available on Rebrickable! more about this MOC on my YouTube channel - Edge of Bricks
-
Got inspired and did a second NoVVember build for 2023, this time inspired by the Life on Mars theme. Yes, that's Cassiopeia piloting directly from a hypersled! The landing gear folds up and in to push the hypersled into the piloting position!
-
things changed: -lowered cockpit down roughly 1 brick, changed build around cockpit region to slope into wings, taper into body, round out the rear to more accurately reflect the shape of the model in canon -filled in gaps with 1 tile width across whole body; requires some gaps in wing construction -replaced guns for accuracy; subject to further change to reduce conspicuousness -cut up stickers to apply across model -cut cockpit -nexo tile at front to hammer in the point :) working on instructions if anyone's interested. if ur curious on scale it works like this
-
Gold 5 was a BTL-A4 Y-Wing Heavy Starfighter, built by Koensayr Manufacturing, and serving as part of the Rebel Alliance. As was common with the rebellion's aging fleet of Y-Wing's, Gold 5 was stripped of it's armour plating by rebel technicians to allow for easier maintenance, and was heavily modified in order to improve performance and to keep it operational. Part of the venerable Gold Squadron, Gold 5 was piloted by Davish "Pops" Krail (according to Legends), an experienced veteran pilot. Gold 5 was destroyed during the assault on the first Death Star at the Battle of Yavin. My aim when I set out to make this MOC was to make a minifigure-scale rebel Y-Wing that was highly detailed, but more importantly, the details matched to the original studio filming model. What a high target to aim at... My decision on which member of Gold Squadron to make was largely influenced by what reference pictures I could find. In the end, I found the most pictures for the Gold 5/Gold 3 model (they were the same physical model used to film both), and so my decision was made for me. The reference pictures I used can be found here, if anyone would like to play a game of spot-the difference. In terms of details, I've done my best. Any suggestions would be appreciated though. A fair few sections in the pictures were pretty hard to make out, and so I had to go with my best guess as to what I thought I was seeing and what I should be trying to replicate. Admittedly, the engines were built by (somehow) managing to reverse engineer the engines used on Jerac's Y-Wing model. I couldn't help it, he absolutely nailed the design, and I couldn't think of any better engines to use. The Ion cannon on the top of the cockpit is in the same situation. Thankyou Jerac for the great designs, and sorry for pinching them! The rest however is all original. As of this post, the entire model is buildable irl as far as colour's go, except 4 pieces. I have used 2x 65426 in yellow (one on top, one on bottom) and 2x 65429 in yellow (again one on top, one on bottom). These are used to create the yellow detailing on the cockpit/head. I hope to come back to this model in the future and, among other things, rectify this by finding a solution that will work irl. If building irl, I would also use 30327pb05 as the windscreen, but unfortunately stud.io does not have this piece yet, so the pictures show a different print pattern instead. I mentioned earlier I plan to come back to this model. Hopefully soon, I will do this. My aims will be to rectify the unavailable pieces, and add (functional) landing gear that can fold up and away. I don't know whether I will be able to or not, but I am going to give it a go. After that, I plan to build it irl and test whether it's actually stable enough, or whether it will fall apart... 🤞 But now, the renders... Please feel free to share your criticisms, suggestions, or ideas! I also made a "generic" rebel Y-Wing which has more generic greebling and a few features that the Gold 5 model never had, but was essentially the same as this model with a few surface details changed. A BTL-B Y-Wing (the type flown by the republic during the Clone Wars, which has full armour plating) is also in the works, but has sort of been left and not touched for a while, but I will come back to it eventually. Anyway, I hope you enjoy, this is certainly my favourite MOC that I've built. I hope someone else can enjoy it too! -Binks
-
Hi everyone, My Midi-Scale TIE collection expands again with a new TIE starfighter: the TIE Striker from Rogue One. Made of 730 pieces, this TIE Striker features a fully SNOT surface, a smooth cockpit section, and includes blaster cannons below the cockpit. Design-wise, this ship really felt like a natural continuation of my previous TIE Reaper MOC. Although being almost Minifig-scaled, (hence the Midi-scale) this ship obviously doesn't have any interior due to the techniques used and small space allowed for the internal structure. Due to the front-heavy nature of the design, a rather long (but very simple) stand had to be made in order for the ship to remain perfectly steady and horizontal. The overall build is pleasantly sturdy for a display model and can be moved around easily. Hope you guys like it! ► Instructions for the TIE Striker are available on Rebrickable or via email at flyinspace.mocs@gmail.com More pictures on my Flickr page.
-
Hi! The last month has been intense construction and here it is: Mandalorian's N-1 Starfighter You've probably already seen a lot of projects of this vehicle, I delayed building mine for a long time. But as we know in February there will be a premiere of the 3rd season of The Mandalorian series, so it's high time for N-1 in my collection The construction was much more difficult than I thought. I wanted to get the best shape of this vehicle, while also making it durable. The number of parts in my project is 832, including the display stand I use some parts from set 75325 but decided not to buy it. I just bought stickers and a new LBG windscreen (mounted from below). The instructions for this project are almost ready. Soon I will upload the video to my Youtube where you will be able to see all the details List of parts, XML code rady to upload on bricklink https://drive.google.com/file/d/12devj019hg2ORztQcTRIr0dQM4YPFwvz/view?usp=share_link more details coming soon!
-
It began with @mcphatty's excellent mod for this set (check it out on his rebrickable if you're interested). Adding the inner wing pylons really helped, as well as some of the more minor changes he made. I was still unhappy though, and wanted to push for further accuracy. First up was some minor colour changes of pieces, mainly removing any dark bley, replacing it with either light bley or black, where appropriate. I ended up figuring a solution for the famous inset "exhaust" at the back of the cockpit - although this shape is sometimes referred to as a window or hatch instead. Regardless, I managed to capture the shape pretty well and am happy with how that turned out. Next was a slight change to the "arms" that connect the cockpit to the wings - I ended up reverting some of ron_mcphatty's changes, so it became a blend of the set, and his mod. The biggest change of all came in the form of the cockpit and it's interior - taking inspiration from the @BrickVault / @Jerac model, I changed up the controls. I then added the dark bley paneling at the front of the cockpit window, something which has been omitted from almost every version of TIE Fighter I've seen. I like to call it a dashboard. Overall I'm quite happy with this mod, although I still think it could be improved further in future... Maybe one day. Also happy to take suggestions if there is anything you want to point out for me to fix/change! The model, built and rendered in studio. They aren't the latest renders, and have not been updated with the dashboard in the cockpit interior. The dashboard on the interior of the cockpit viewport. It just fits and allows the window to close 99% fully. Reference photo of an original studio model. Visible is the dashboard.
-

[MOC] TIE Interceptor™ (ROTJ 40th Anniversary Product Concept)
Rui Miguel posted a topic in LEGO Star Wars
TIE Interceptor™ (ROTJ 40th Anniversary Product Concept) By Rui Miguel “Greetings exalted ones” From the Galaxy Far Far Away I bring you the TIE Interceptor. One of my favourite Empire Starfighters from Star Wars. When I was 12 years old in 2006 I remember receiving on my birthday the set 6206, it was a blast back then, but little did I know it would be the last time seeing another release of this specific class. In 2023, The Return of The Jedi will be celebrating its 40th anniversary so I asked myself: what would a TIE Interceptor look like nowadays? I feel like this is one of those long overdue Star Wars vehicles, us LEGO fans hope to see with a modern take and add to our collections. This is my attempt to fill that gap in your collection. As with my previous projects, I brought into my MOC the same design process in order to present a product concept that could identify with the official LEGO product standards. Bellow you can get access to the PDF file of the building instructions and the Bricklink studio file of the model (without minifigures). You can upload to Bricklink and generate a wanted list of LEGO parts needed to order. Download Links (Google Drive): - PDF Building Instructions (23 MB) Here - Bricklink Studio file (375 KB) Here Features: - 545 pcs (Starfighter and Stand only) - Removable and playable Starfighter - Stand display - Printed tile not included - 4x Spring Shooter Darts I'm very happy to finally be able to share this with fellow LEGO Star Wars fans and I hope my MOC inspires LEGO to consider making a TIE Interceptor in the future, that would be awesome. If you have the opportunity to build my version and add it to your collection I hope you have a fun experience while building, playing and displaying 😉 Until the next project, May The Force Be With You If you haven't, check out my other projects SDCC Ghost Rider Midnight Race Utapau Defense - Crab droid -
[MOC] RZ-2 A-Wing (Blue and Red) - Instructions available
StephenBoe posted a topic in LEGO Star Wars
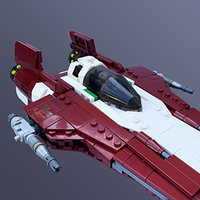
Hello! this is my first actual moc post here, and hopefully far from the last. I hope you all enjoy this Resistance A-Wing design! I must give a big shoutout to Gumbinger, as a few elements are lifted from his RZ-2 design. I borrowed the general dimensions, the conical-shaped front deflector shield generators, but most notably the engine designs are almost exactly the same. I lowered the height of the top fins, but otherwise, I thought everything about his engine design was too good not to use. This design was the result of about a few weeks worth of first building in stud.io and then some back and forth of testing in real bricks and revising. Compared to the RZ-1, the RZ-2 has a lot more subtle, smoother and straighter angles. The angles coming from the front of the RZ-1 are slightly curved and round out at about the front of the cockpit, with the top and bottom surfaces becoming seemingly parallel with each other. With the RZ-2, the angles taper back from the front very evenly back past the cockpit, without ever really rounding out. This gives the side silhouette a very sharp triangular look, and it's one of the things I wanted to capture most. I feel like it turned out pretty well! The green markings on the red one stick out in an unfortunate way, I really had no idea how to incorporate them more smoothly into the design. They sit right on top of the old style 1x2 finger hinges. If I liked it less, it would be easy to remove the markings and just continue the white tiling. A small thing but I'm only just now noticing that the red 1x1 tile on the ship's left lower fin should be dark red, not white There are definitely a few areas that really could use improvement. Ideally, the panels on the middle sides of the ship could be stronger and easier to put together. It's not totally fragile or unswooshable but I don't love that area's construction either. There's also a good few gaps here and there, I feel like the part directly behind the windscreen could be more smoothly rounded, that area was surprisingly hard. I'm happy to accept all these flaws and just call this a version 1. After a while I'd like to come back and try to revisit all the problem areas in a version 2. Hope you enjoyed the model! If you're interested in buying instructions and parts lists, check out this flickr post for details. -

[P6-LS] Joining Blackmoon Squadron
Ephseb posted a topic in Mysteries: A Star Wars Role-Playing Game
*Your entry has earned 13 XP (S:4, T:4, A:5) + 5 bonus XP for a total of 18XP Lieutenant Seb „Chase“ Koltin Phindar, Demetras Sector, Outer Rim Territories 43:3:16 GrS (9 ABY) After the New Republic’s conquest of the Pyria system, Wing Commander Varth created Blackmoon Squadron, referring to the codename of the planet Borleias during the operation. For his new squadron, which is made up of fresh-off-the-assembly-line E-Wings, the experienced officer recruited mainly pilots with experience in flying Incom vessels for clandestine Rebel Alliance cells in heavily fortified Imperial sectors. Blackmoon Squadron has flown its first missions out of Phindar in the Demetras Sector. In stark contrast to Commander Varth’s reputation, the squadron has only lost a single pilot during the first four standard months of its existence. As a replacement for the fallen squadron member, Seb Koltin, a native of Vondarc and former commercial pilot, has been recommended to Commander Varth. Koltin has combat experience in both the Z-95 and T-65B, having served in Bothan Space and the Tapani sector during the height of the Rebellion. FXT29954 Seb Koltin: Lieutenant Koltin reporting for duty, Commander! Cmdr. Varth: At ease. Welcome to Phindar, Lieutenant, I hope you had an uneventful journey. You’re taking the callsign Blackmoon 9. Simulator training is scheduled daily at 0900 and 1800 hours, unless otherwise specified. Your quarters are in Complex Besh, Room 272. I’ll introduce you to the squadron and our support staff at tonight’s briefing, 2100, conference room Four, Complex Besh. - - - - - - - - - - - - - - - - For my first ever Eurobricks RPG build, I’ve created the hangar-space for Blackmoon 9 (indicated by the Aurebesh “9” on the floor) at the New Republic base on Phindar, the accompanying E-Wing starfighter, utility towers for mechanics, a mobile refueling tank and a ladder for climbing up into the cockpit. I hope you like it and would appreciate any feedback! FXT30001 Blackmoon squadron E-Wing FXT30004 E-Wing front view FXT29999 E-Wing underside FXT29955 FXT29980 FXT29981 FXT29992 - the figures: R5-L2, Commander Varth, Lieutenant Seb Koltin FXT29988 - more figures: 2 mechanics FXT29994 Underside of the ladder - I used the clear accessory clips to make it "hover" -
Hello there! Here is my second iteration of one of my favorite ships of Star Wars -- the Delta-7 Aethersprite Delta-7 Jedi Starfighter. @khatmorg & @atlas_er are big influences on this design -- especially the cockpit area of @khatmorg's, and the wings by @atlas_er. Biggest difference in mine is the overall length; it's shorter by two studs (which I think is more accurate). Making it a little smaller in comparison, but still has a lot of detail. Overall I'm really happy with how it came out. I tried my best to eliminate all gaps, and make it smooth as possible. I've very proud of the green accent on the back wings, and how I was able to keep the front wing/hood area smooth. The only thing I'm bummed about is that I couldn't squeeze in rear landing gear, but I love how the smooth underside came out. And the little bit of stickering on the back section to better convey the curve of the green. It's quite sturdy, but it does have some weakish points in the design. Thanks for checking it out! Delta-7 Jedi Interceptor MOC by GUMBINGER, on Flickr Delta-7 Jedi Interceptor MOC by GUMBINGER, on Flickr Delta-7 Jedi Interceptor MOC by GUMBINGER, on Flickr Delta-7 Jedi Interceptor MOC by GUMBINGER, on Flickr Delta-7 Jedi Interceptor MOC by GUMBINGER, on Flickr Delta-7 Jedi Interceptor MOC by GUMBINGER, on Flickr Delta-7 Jedi Interceptor MOC by GUMBINGER, on Flickr Delta-7 Jedi Interceptor MOC by GUMBINGER, on Flickr Delta-7 Jedi Interceptor MOC by GUMBINGER, on Flickr
-
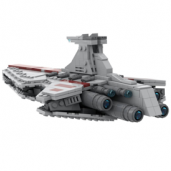
Hi, here's another one of my recent MOCs. It's a Liberator-class starfighter from Star Wars: The Old Republic in UCS size. The Galactic Republic used it against the Sith Empire, which also knew it as Talon Fighter. The wings can be folded to two positions (similar to the U-Wing from Rogue One). This design allows it to be used like an interceptor with the speed of an A-Wing or a starfighter with the firepower of an X-Wing. Hope you like it :) Liberator-class Starfighter UCS by Vaionaut, on Flickr
-
Before you read any further: I want to give massive credits to RenegadeClone (or his brother.. or both.. it's confusing) for coming up with this great MOC and leaving enough instructions for me to reconstruct the model. My version is 90-95% the same and I can only take credit for making the model and some small differences in detail (I'll get to those later). RenegadeClone's done a great job. You can find the original topic here. Having said that, things are easier to build when you have an LDD file. A small introduction I'm Krispy. I've been lurking here for a while, taking in ideas and techniques. Now that I've started building again, I figured it's good to share. I'm a big fan of Star Wars universe starfighters, but only the classic trilogy and the stuff after that. I love space sims and "Tie-Fighter" in particular; I've wasted half my childhood on that game . And now I've decided to collect Lego version of the starfighters from that universe. In minifig-scale. I was a little bummed out that TLG doesn't have a proper B-Wing set. Bummed out until I found RenegadeClone's MOC. The Model B-Wing v1.1 by Krispy's brick stuff, on Flickr There she is, rendered using LDD2PovRay. Total part count: 951. Ouch. There are small differences with the RenegadeClone's original; most concern the cockpit: The cockpit is all light bley; this meant using some different parts The rear cockpit section (with the curved slopes) is completely different in internal construction. The slopes are now attached using 3 stubs making the use of rubber bands unnecessary (I dislike rubber bands). The pilot now has a seat (in dark green!). Flying a B-Wing is tough enough without the physical discomfort.... or so they say. The internal structure of the main wing and the engines is different. I only knew the outside dimensions, so I had to reconstruct them on my own. Internally this B-Wing is probably rather different. Below you will find all the files you need to source the parts and make the model. The LDD model is made using LDD 4.3.5. The partslist spreadsheets was made using LDD Manager, but I've added some extra columns to keep track of the parts that you have ("Have" column) so you can see which bricks you still need. For those of you who don't do LDD, I've exported the instruction to html and put them in a zip; they should work on any browser. The Files The LDD file: v1.0 / v1.1 Partslist (v1.0): XLSX (office 2010) / ODS (openoffice) Building instructions in html (v1.0): link LDD file of the display stand: link If you want to figure it all out yourself, stop reading and start building. Below I've posted some notes on sourcing the parts and building the model that you may find useful though. Sourcing the parts Please note that there are a small number of rare-ish parts used in the model, so check if you have these or are able to order them before you start your Bricklink frenzy: Large hard plastic wheel in classic grey Wedge 4 x 4 (Slope 18 Corner) in light bley; you'll need 4 Most parts in sand blue 4L bar in dark grey/dark bley; dark grey shouldn't be too hard, but dark bley is rarer 8.5L Hose in classic grey Also note that if you need to source almost all parts (like me; my lego is older, so I only have classic grey), this beast will set you back considerably. It has almost 1000 parts. By my estimation I've spend somewhere between €100 and €120 on parts (about $125 to $140). It's not cheap. If you use LDD Manager to check if you can do other colours instead of sand blue, you will only find a small number of basic colours. This is due to this brick. If you want to know what your real options are, paint this brick black in the model. If you are having trouble sourcing sand blue parts (I'm looking at you fellow europeans), dark bley offers a good alternative though your model will look more like the UCS B-Wing that way. Building considerations It's possible to build this model using the LDD generated instructions. I've done so, proving they actually work, but they are a bit weird and unlogical. The LDD model has been grouped in to logical groups, so you might want to check those. As reference, I've rendered a picture showing these elements. Minifig-scale B-Wing v1.0 in parts by Krispy's brick stuff, on Flickr Below I will note some things you want to look out for. Engine covers by Krispy's brick stuff, on Flickr Build these engine covers seperate and add them to the model later (after step 180 or something). Engine (build this first) by Krispy's brick stuff, on Flickr That means you want to build this engine part first. Exhaust close-up by Krispy's brick stuff, on Flickr Note that the technics half pins do not go in all the way. That's not a bad thing though: you now have the option to add a 2x2 dish giving your exhaust the same look as the offical TLG sets (eg. the 9493 X-Wing). Technics tubing not in instructions by Krispy's brick stuff, on Flickr Note that this piece of pneumatic tubing is not on the LDD model. The holders are though; look at the completed model (all the way below) to see where it slots between the two torpedo launchers. Fix for curved plate problem by Krispy's brick stuff, on Flickr I had a problem with the narrow 1 stud wide cover plate for the rear of the main wing: it curved outwards (to the left in this picture) because a 1x12 plate I used wasn't straight!! Using this modification at the bottom of the assembly, I was able to hold it in place. Cockpit axle mount thingy in place by Krispy's brick stuff, on Flickr Notice that I used old school connectors with studs on the side. This means the model is a bit sturdier on top (also I have, like, tons of these parts). Cockpit section by Krispy's brick stuff, on Flickr Cockpit with seat. Notice that the headrest has two 1x1 dark bley plates instead of one in the LDD model. This depends on what helmet your minifig pilot is wearing. Build complete! by Krispy's brick stuff, on Flickr Build complete! It's big, it's heavy. If anyone has suggestions on a stand that works for this beast, I'm all ears. I hope you've enjoyed this little write-up. Good luck and happy building if you're going to attempt one... trust me, they are worth the effort: the build was definitely one of the most challenging I've done so far! update 13-01-2013: A stand I've updated the files section with a LDD model of the stand I came up with (see picture below). It's bulky, but sturdy and allows you to show off the model with open s-foils! Stand - front by Krispy's brick stuff, on Flickr update 19-01-2013: version 1.1 I've updated the model to 1.1. Grab the new model file from the files section above! What is different you may ask? Well, there's somewhat less studs on the outside of the model. Oh... and the lower part of the internal skeleton has been redone completely. It definitely feels more rigid now. Check out the differences below! Even if you don't want to update your model with loads of tiles, I would recommend redoing the skeleton. B-Wing v1.1 Skeleton update by Krispy's brick stuff, on Flickr
-
Greetings Eurobricks, I have for you today a MOC of the T65-B X-Wing Starfighter seen in the OT. Specifically, this is Luke's Red 5. This is the second of 3 Star Wars ship MOCs I will be posting to the forum today. Apologies for the photography and cluttered background. I tried my best but I don't have a great set-up at the location I am now. So, I have taken a stab at creating this iconic model in LEGO, and I have come out a changed man. This took about two months of consistent work to get it how I wanted it, and I'm pretty happy with the result. But, gosh, was the process grueling at times. There are so many images, movie-stills, and diagrams of this thing, and they all have varying degrees of difference between them. The result of my MOC basically encompasses all the things that they have in common, with a few liberties of my own. My biggest point of pride with this creation is probably the nose section. I think I got the shaping just right, and I like how the angling of the side panels came out. I haven't seen anyone else try to replicate the leveling-off/slit portion of the silver head, so I took that challenge head-on, and I think it came out looking pretty spectacular (though I'm sure it could be improved!). A couple of images of the back and back fuselage: I'll say the only thing I'm not happy with here is how I've attached the wings. This was one of the biggest challenges I faced, since the stiffer ratcheting hinges bring too harsh of an angle but the more adjustable clip method does not support the weight. Since I definitely did not want to use ugly rubber-bands, I ended up doubling up on 2x1 ball joints for each wing, which works but still doesn't hold super well. But, since functionality is second to appearance for this model, I probably will not fix it. An aerial view. Like my Naboo Starfighter, this model is scaled almost perfectly to the astromech droid head on top, which is just slightly bigger than minifigure scale. Cockpit view I think that about covers it. Thanks for viewing and I hope you enjoyed my rendition of this ever-popular MOC. Any thoughts you have are welcomed in the comments!
-
(Updated version in the comments) --- Here's a different spin on the E-Wing. Not exactly proportional to the actual dimensions, but I wanted to build one that had clean lines while still being rigid. I wasn't able to accomplish that with plates, either the parts don't exist or I'm not creative enough. Either way, the fuselage is shorter and wider than the source material, the engines are integrated into the wings instead of suspended underneath, and a cavity has been added for a droid. The dorsal laser lifts to access the cockpit and landing gear folds flush with the hull. Cheers! BW
-
Hi everyone, I have been busy working on a mechanism for the Droid Factory for Geonosis. That is still ongoing and last weekend I was working on something else. I have build two Geonosian Starfighters. There is another picture in the Flickr album. Feedback is appreciated. Sander
-

[EP IX CAT B] [U6 - Mon Cala - FF] Flight of the Sparrow
RocketBoy posted a topic in Factions Archive
*This entry has earned 17 XP and a Mon Calamari Space Station* Having downed another of the numerous pirate starfighters, Suppi Vio's A-Z1 Sparrow picks up an enemy fighter on its tail. Three intuitive flicks of the flight-stick sends her rolling into her attacker's blind spot. Scratch one more bogey. (Editing by the super generous @Darth Bjorn) Battle over the waves of MON CALA! The Outer Rim homeworld of the Mon Calamari comes under threat from Imperial Pirates. Called into action one last time, Admiral Yima deploys the 2nd Fleet of the Freedom Fighters to answer. For the first time, the Freedom Fighters deploy a brand-new starfighter designed specifically for their use. The A-Z1 Sparrow was designed from the ground up as an ace starfighter for the Followers of the Force, and quickly proves it was worth the effort. The FF send twelve Sparrows against a swarm of over thirty enemy Scyk interceptors. By the end, the interceptors were like buzzflies against birds of prey. SHIP DESCRIPTIONS MORE PHOTOS Thanks for looking! -
A highly manueverable corvette with complement of two Hylopetes-class starfighters. Standard crew complement of 7 bridge officers, 3 pilots, and 3 maintenance droids. Armament includes 4 heavy plasma beam cannons, 4 light plasma beam cannons, and 6 point-defense ion burst turrets, and 4 graviton torpedo projectors. Weapons and engines are both powered by a Callisto Shipyard's Mk. XLII Stellarator. Play features include: - Functioning turbolift allowing crew members to traverse the change in local gravity between decks. - Pull-out bed in the brig allows for both efficient space utilization and humane treatment of prisoners. - Fully retractable forward hull sections provide access to the bridge and hangar deck. - Removable roof on the middle hull sections provide access to the turbolift. - Retractable walls in the rear hull section provide access to the reactor, maintenance bay, and brig. Other notes: although this was created in BrickSmith, besides the extravagant choice of brick colors and light-up features, the entire ship is structurally sound and should be physically realizable in a different palette. A.S. Desert Rain by Thomas Dickerson, on Flickr A.S. Desert Rain by Thomas Dickerson, on Flickr A.S. Desert Rain by Thomas Dickerson, on Flickr A.S. Desert Rain by Thomas Dickerson, on Flickr A.S. Desert Rain by Thomas Dickerson, on Flickr A.S. Desert Rain by Thomas Dickerson, on Flickr A.S. Desert Rain by Thomas Dickerson, on Flickr A.S. Desert Rain by Thomas Dickerson, on Flickr A.S. Desert Rain by Thomas Dickerson, on Flickr
-
Hi everyone! After 15+ hours, it's finally finished! I'm quite happy with the end results however there are some small bits I'm not quite satisfied with yet. The angled wings were quite a challenge as well as the top but I think I managed to do those decently. Hope you all like it! Part count is 1002 Comments and criticism are welcome!
-
This has been my first LEGO MOC, I designed this on BrickLink Stud.io after Porsche collaborated with Star Wars to make their own spaceship. When I first saw their design I instantly fell in love with it, and I thought I might just make that in LEGO. Thanks to everyone for taking a look. Pictures
-
A long, long time ago I started working on a micro scale Millennium Falcon. To begin with all I wanted to do was add detail to the Microfighter but I kept tinkering and before I knew it I had a growing collection of micro Star Wars freighters and fighters, and here they are! Instructions for all these little builds are on my Rebrickable page. Since this all started with that Falcon Microfighter the cockpit piece (a light blueish-grey 2x2 truncated cone) became my yardstick for scale. Luckily trans-black 1x1 slope pieces work as fighter cockpits at the same scale so all the ships are, and will continue to be, as close to scale with each other as I can manage, at least based on these pieces and whatever reference images I can gather from Google. My Blockade Runner (April 2021) is the last ship on my micro Star Wars to-do list, although it’s hardly micro! The size and weight were a new challenge for me, I’ve never had to worry about a moc falling apart under its own weight before, but I enjoyed the challenge and managed to make it pretty easy to pick strong. I’ve put together instructions for the Tantive IV as well as the Liberator from Star Wars Rebels, which I couldn’t resist building for myself. Rather than doing new posts for each new ship I’ll edit the very long post below. All the instructions are on my Rebrickable page and there are photos and Studio renders some photos of the ships in this post, plus a few more on Flickr and Instagram. Thanks for looking!
-
The Havoc is the pirate Nym's Scurrg H-6 Bomber from the old Starfighter games on PS2 and Xbox. I've posted a couple of earlier models since 2018 and this is the final version of this ship - of which I am now happy to present building instructions for those who wish to include this powerful craft in their Lego collection - there are 1320 pieces required, most of which are very common parts. I've gathered as much data as possible about the ship and included every specification and detail that I could possibly find, so that the ship features stations for 2 astromech droid co-pilots, seating for 3 passengers, guns galore including a rotating roof turret, retractable landing gear and an energy-bomb dropper within the undercarriage. Thanks for looking and I hope you like my build! PDF instructions available from Rebrickable: https://rebrickable.com/.../MOC-55952/evilkirk/the-havoc/...