Search the Community
Showing results for tags 'transport'.
Found 39 results
-
Perhaps the new theme park needs a better transport which can maneuver in the city, right? Based on my previous truck design, I did this for moving the raptors. The tractor section has a turret that can be used for any emergency cases like dinosaur escape, and now raptor transport can go through the city without problem! Hope you enjoy this :) thanks!
-
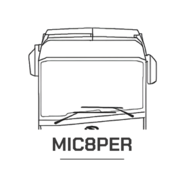
[MOC] App-controlled bus
mic8per_ posted a topic in LEGO Technic, Mindstorms, Model Team and Scale Modeling
After a half year of work I present you this bus.The goal was to make as functional bus as possible with least amount of motors.The result is fully RC bus with openable doors, propulsions and steering using only 3 motors. The steering angle is really good. Steered by Large angular motorPropulsion uses XL-motorDoors work smoothly & flawlessly. They are powered by L-motorPowered by C+ hub.Lots of interion & exerior details. Building and programming instructions for $9.99: https://rebrickable.com/mocs/MOC-100999 Video: -
Today, I am proud to present you my I-XTS (Intersystem eXtended Transport Ship). When I discovered the release of the 75293 Resistance I-TS Transport set, I immediately imagined to make a bigger version. When SHIPtember started (one month to build a ship of at least 100 studs) then I decided to actually build it. So the base concept was easy: increase the length of the standard I-TS set up to at least 100 studs knowing that the original is only 43 studs long. Because of the extended length, the ship name was easy to find. The base design concept In the SW universe, it is common to find extended versions or variants of a base design. Look at Star Destroyers, Calamarian cigars, Corellian corvettes, YT variants, all these nice ships we see in Dark Empire.... But ok, just increasing the length is easy. Still ensuring that the resulting design is attractive is another topic Instead of having a single cargo bay, I decided to go with 2 bays with a small central module to create texturing and shape variation. Globally, it works: With a widened and detailed cockpit, 2 large cargo bays, and an larger engine section, the ship is coherent. Please note as well as the ship backbone is 2 studs wider than the stock model. Technically, there was nothing too challenging in building the backbone based on the I-TS instructions. Just add technic bricks until you reach the desired length, and abuse of technic pins to make everything fitting together. In the end, it is robust. The result I-XTS profiles by Veynom, on Flickr I-XTS details by Veynom, on Flickr I-XTS inside by Veynom, on Flickr Anio pointait le manque d'espace dans la soute cargo .... moi, je peux facilement y loger un Bantha. Some reviewers complained about the tight cargo area ... well, I can put a Bantha in each of my cargo bay. Fine, taking decent picture of this long ship is more difficult than actually building it. If you're interested in the constructions steps, please see below. It took me around 30 hours spread over 10 days. Day 1: After the first hours, the backbone is ready. It measures already 96 studs and has the correct shape. The location of both cargo bay is already defined. The extra width (2 studs) is very noticeable. SHIPtember 2020 - day 1 by Veynom, on Flickr Day 2: The top of the ship is becoming wider to match the original shape. The side supporting structures are in place and the central section start showing how it will look like: a kind of mirrored of the front section (just behind the cockpit). Clones have been supplied as re-enfircement to speed up the construction process. SHIPtember 2020 - day 2 by Veynom, on Flickr Day 3 Time to play with the engines (port side). Size seems fine from the first try ... and the ship officially goes over the 100 studs threshold. Building the engines and the supporting pod was quite easy based on the original instructions. It was even fun. SHIPtember 2020 - day 3 by Veynom, on Flickr Day 4 After the engine, the bow. The cockpit is twice wider than the original I-TS and is the larger section of the ship. Initially, I wanted to put 2 minifigs inside but I failed due to some structure constraints as you will see below. From this day, the length is around 110 studs. SHIPtember 2020 - day 4 by Veynom, on Flickr Day 5 I wanted to detail the cockpit further and that consumed a lot of time. Finally, after too many build-unbuild-rebuild phases, here is the result. Detailed inside, slick outside. In the end, I liked how the modified plate with rail perfectly fits on top of the panel 1x2x1. Sadly, I had to drop my initial idea of putting 2 minifigs in the cockpit. SHIPtember 2020 - day 5 by Veynom, on Flickr Day 6 Now that both the bow and engine designs are complete,d it is time to work on the main body. The core section is taking shape and the same pattern as the original I-TS is mirrored to provide the final design of the transport ship. The large cargy bay doors and panels are being worked on. As of right now, 8 technic bricks are missing but these are on their way to my home. SHIPtember 2002 - day 6 by Veynom, on Flickr Day 7 Almost there. The bow is considered as completed and the design should not change anymore. I also reached a satisfying balance between greebling, texturing, and colors. Again, it required a few build-unbuild-rebuild phases (same player, try again) but ultimately, it is good looking. But it is about time as we are on the 24 of September with only 6 days to go before the deadline. And the cargo is large enough to hold a Bantha! Achievement! SHIPtember 2020 - day 7 by Veynom, on Flickr Day 8 This is copy/paste day. If it works in one location, then I copy it everywhere. As I received the technic bricks, I could complete the cargo bays. Then the 2nd engine pod. 5 days before the deadline and still the rear section is not over, without mentioning the core section. SHIPtember 2020 - day 8 by Veynom, on Flickr Day 10 Job done! Intersystem eXtended Transport Ship by Veynom, on Flickr A simple yet elegant transport ship, if you ask me. And now the question, could you spot where this part is used ? Minifig, cape plastic
-
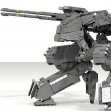
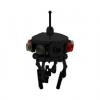
The AT-PT, fully known as the All terrain Personal Transport was a bipedal, all-terrain light infantry walker distinguished by its triple-jointed legs and one-pilot cabin. It's armed with two twin blasters located below the viewpoint. It's slightly armored to withstand small blaster fire.They were design before the start of the Clone Wars and utilized during the Galactic Civil War, a galaxy-wide conflict between the Galactic Empire and the Rebel Alliance.They stood only three meters tall, and were driven by AT-PT pilots.
-
Does anyone ever combine their LEGO bricks with scale electric trains? I’ve found them to be compatible for track structures for 1/87th scale systems as well as structures such as elevated rail stations and bridges I’ve also used Legos as the base for a moc up of a section of track in Columbus, Ohio where a derailment occurred back In 2012 for something I was doing
-
"Sir, we don't have the firepower." "Use the Scout Walkers!" -Imperial comm intercept The Variable Terrain Scout Transport is the first walker in the Variable Terrain family. Originally, the head of the walker was meant to be placed on an Imperial armored vehicle (currently a still on-going project) as a turret; however, the turret was deemed unsuitable with the vehicles designed (though it could still be used as a turret), so it was decided to use it in a pint-sized scout walker. With this in mind, inspiration was taken from the 2016 AT-ST in regards to the legs. The overall design is similar, albeit shrunk to about half the size in most of its proportions. I'm satisfied overall with the design, though as a cockpit for a walker, I find the controls a bit lacking (as I'd prefer a bit more); I also wanted the twin cannons in front to be able to articulate up and down like the AT-ST, but I thought it was low enough to not matter much (as well as having the side armament compensate a bit for this)- due to its connection method, the twin cannons can be modified with bars and clips to articulate, similar to the ones on the VT-IT. Th VT-ST is armed with twin heavy blaster cannons, as well as a missile launcher on each side, all in a fixed forward position. It is also equipped with a grenade launcher on either side that can articulate in multiple directions, as well as a short range comm antenna. SW Imperial VT-ST #1 by Jonathan Wallace, on Flickr SW Imperial VT-ST #2 by Jonathan Wallace, on Flickr SW Imperial VT-ST #3 by Jonathan Wallace, on Flickr SW Imperial Turret #1 by Jonathan Wallace, on Flickr SW Imperial Turret #2 by Jonathan Wallace, on Flickr SW Imperial Turret #4 by Jonathan Wallace, on Flickr The cockpit, as a consequence of its origin as a turret, is equipped with a joystick control, a holotransmitter, and a control panel. SW Imperial Turret #3 by Jonathan Wallace, on Flickr The VT-ST is the mainstay of the Variable Terrain line, and they make up the bulk of the various VT models assigned to Imperial units in the field. Although Brickthana Engineering hoped its VT line could be a competitive alternative to All Terrain family, various issues from production problems to under-performance (among others) hampered its chances, and Brickthana eventually accepted its current place, and began focusing on smaller and more well-defined and in-depth projects. If you want to build this for yourselves, here's the instructions: https://drive.google.com/open?id=1JwnhA1YJRbazR8FXOoOl8Yh4ctVuPn4O As usual, any feedback would be much appreciated
-
"We got walkers!" "Don't worry, they're just eye-tees" - Rebel radio chatter This simple MOC is part of my VT family of walkers, being a sort of offshoot of my original VT-PT prototype, and is based off of the walker in the Imperial Trooper Battlepack (in a kind of roundabout way). Envisioned as a more armed and protected reconnaissance walker by Brickthana Engineering, the Variable Terrain Infantry Transport featured similar construction to both its bigger brother the VT-PT, as well as turrets used by both Imperial and Rebel forces. Unfortunately for Imperial forces, combat performance for the VT-IT fell below expectations and they were often stripped for parts for both VT-RT and VT-PT walkers by the units they were assigned to. Brickthana desperately tried to prop up the walker's abilities, but they finally yielded to the operators' preference for previous reconnaissance walkers and shut down production. After a time, and still having many of the walkers still in warehouses, Brickthana began work on a successor to the VT-IT; this second attempt has four legs, and is planned to have room for at least two or three troops onboard. Retaining the same weapon loadout as the original (or an equivalent one), this version is thought to be a direct response to both the lacking performance of the first one, as well as the Rebel's Scorpius Mk I. The VT-IT is armed with a two twin missile launchers, as well as a chin-mounted twin light blaster cannon; it's also equipped with a powerful, and detachable, communications array. SW Imperial VT-IT #1 by Jonathan Wallace, on Flickr SW Imperial VT-IT #2 by Jonathan Wallace, on Flickr Inside the cramped cockpit, the VT-IT has a pair of joystick controls, a weapons sensor, a targeting array, and a holotransmitter. SW Imperial VT-IT #3 by Jonathan Wallace, on Flickr If you want to build this yourselves, here's the instructions: https://drive.google.com/open?id=1oek7pVqNSDlEji5pPW4taSax8E0mxqr1 As usual, any feedback would be much appreciated
-
"Although versatile, Imperial Scout walkers are not all-powerful. We need dedicated Patrol walkers, and soon." -Commander Selm The second walker in the Variable Terrain family, the Variable Terrain Patrol Transport was the result of designers blending the plans for the Scout Transport and Recon Transport together into one composite idea. The various STs were implemented in a variety of roles that they were not necessarily suited for, leading to mission proficiency dropping. Although some tasks could be taken over by the complementary RTs, there still exists a gap between the two where a new walker would hep the mission profile. Thus the VT-PT was born. Designed to work well in both urban and open environments, it features increased armor and a more robust armament than its counterparts, in addition to a fairly quick speed thanks to its reinforced legs and servo-motors. The main armament is flexible Heavy Blaster Cannon with a wide arc of fire, with the secondary armament being the twin missile launchers on either side. In addition, the VT-PT also has an advanced forward sensor and a redundant communications array for keeping in touch with command and other patrolling forces. SW Imperial VT-PT #1 by Jonathan Wallace, on Flickr SW Imperial VT-PT #2 by Jonathan Wallace, on Flickr Although simple, the walker is equipped with an on-board AI to aid the pilot. SW Imperial VT-PT #3 by Jonathan Wallace, on Flickr Many features are shared between the VT-PT and the VT-ST, including a general interior layout. SW Imperial VT-PT #4 by Jonathan Wallace, on Flickr A look inside at the targeting controls, sensor gauge, and holo-transmitter. SW Imperial VT-PT #5 by Jonathan Wallace, on Flickr Overall, this was meant to be the equal of the VT-ST, fulfilling a similar role while carrying a different weapons load out and leg structure. If you want to build this yourselves, here's the instructions: https://drive.google.com/open?id=1ukXIVIj0IrDZYed7qi6PywzJW8DTJlSV As usual, and feedback would be appreciated
-
"Not as pompous as claiming 'All Terrain', we instead provide... variability." -Brickthana Engineering Executive Following the increase in the numbers of Rebel groups, the Galactic Empire needed more equipment to deal with the new threat, and turned to numerous companies to fill the gaps. An alternative to the 'All Terrain' family of walkers, the Variable Terrain series was meant to be a cheaper, more easily produced addition to Imperial forces. Part of this initiative is the Variable Terrain Reconnaissance Transport, a group of walkers designed to supplement their AT counterpart in a variety of ways. While following a superficially similar design, Brickthana has tried, with varying degrees of success, to expand the mission capability of its walkers. To try and compete with Rebel designs, versatility was a must for these new vehicles being made. First up is the initial prototype of the VT-RT concept, eventually getting the designation of 'VT-RT(L*)' and be the basis of the VT-RT(X). Although broad/blocky, a design 'flaw' inherent to many of the VT family, the aim of the designers were to add more protection to both the driver and the important components of the walker itself. Eventually these walkers would be replaced, seeing some use as turrets after modifications. SW Imperial VT-RT(L) Prototype #1 by Jonathan Wallace, on Flickr SW Imperial VT-RT(L) Prototype #2 by Jonathan Wallace, on Flickr The second walker of the RT series is the VT-RT Experimental. Being dubbed the 'Expendable' by its drivers, the VT-RT(X) was a further step in trying to get as much from its frame as possible, with four versions being created. While all had the same base model, they could be modified into the different versions to operate in different mediums- these being the standard land configuration (Experimental-Land), an amphibious configuration (Experimental-Sea), an aerial configuration (Experimental-Air), and finally one meant for use in space (Experimental-Vacuum). Issues plagued the RT(X)- from certain system malfunctions to poor handling, eventually forcing Brickthana to review the design and begin work on a new version of the walker. The third walker of the RT series is the RT Heavy. The biggest of the three 'standard' VT-RTs, the RT(H) design was completed first. Meant to be a versatile infantry support vehicle, it ended up not performing to expectations, though it was still useful in its role. While it does have some amphibious capability, it was not equipped like the RT(X-S), and therefore is not as reliable in the water as its cousin. To compensate for some of its deficiencies, it is armed with a heavy blaster cannon and two detachable grenade launchers, as well as a more powerful transmitter. SW Imperial VT-RT(H) #1 by Jonathan Wallace, on Flickr SW Imperial VT-RT(H) #2 by Jonathan Wallace, on Flickr SW Imperial VT-RT(H) #3 by Jonathan Wallace, on Flickr The fourth walker of the RT series is the RT Medium. The RT(M) was something of a misplaced design, as originally there was only two sizes that the RT would come in. This changed when it was decided that a design in the works (a troop transport) needed better escorts, and the RT(M) was created. In addition, there was an explicit order to try and incorporate parts/sections of one into the other, to ease production and interchangeability. While it was initially proposed to have a rotating bottom, to be converted into a turret, this was denied. Though it was mounted on a pair of legs, the body retained some of its features as a turret, including its armored sides and controls that can fold forward. SW Imperial VT-RT(M) #1 by Jonathan Wallace, on Flickr SW Imperial VT-RT(M) #2 by Jonathan Wallace, on Flickr SW Imperial VT-RT(M) #3 by Jonathan Wallace, on Flickr The fifth and final walker of the RT series is the RT Light, the most direct counterpart to its AT compatriot. The RT(L) was designed to be a well balanced machine, combining decent armament, speed, and protection. Like its bigger brother the RT(H), it can float, however it wasn't designed with this explicitly in mind, and therefore has no propulsion; furthermore, if rocked too much, it can easily tip over and sink. SW Imperial VT-RT(L) #1 by Jonathan Wallace, on Flickr SW Imperial VT-RT(L) #2 by Jonathan Wallace, on Flickr SW Imperial VT-RT(L) #3 by Jonathan Wallace, on Flickr A semi-addition to the RT project is the RT Droid, an automated bi-pedal walker. The VT-RT(D) is in a sort of grey area, and so is not fully included with the rest of the RT walkers. Instead, it's been put with other Brickthana droids, and may even have its designation changed. SW Imperial VT-RT(D) #1 by Jonathan Wallace, on Flickr If you want to build any of these for yourselves, here's the instructions: VT-RT(X): https://drive.google.com/file/d/1yff351-w3sy1eyjQWu0awe88lGsyM2Nk/view?usp=sharing VT-RT(H): https://drive.google.com/file/d/1wtnQpUb9V0GD_j1_cZuB9T0KiSRMrKJQ/view?usp=sharing VT-RT(M): https://drive.google.com/file/d/1gJOcc4ppMsbLF82g1kfIGiZ7wjpzxWR3/view?usp=sharing VT-RT(L): https://drive.google.com/file/d/1tipChHxhxKB54LxdCGOvqzqOZEkCfRVs/view?usp=sharing As usual, any feedback would be most appreciated! P.S. As far as the VT-RT(D) goes, you can see more pictures on Flickr, and I plan on including it in a topic with other Imperial Droids I'm currently working on.
-
 Backstory: Ever since I emerged from my dark age I was mesmerized by Designer Han’s models – especially dragline excavator. I like all kind of excavators so I was slowly gathering pieces for it to buy instructions and build it. I have realized over the time that building from instructions is not entertaining for me and that I can build almost anything if I have the drive (and parts). I still admire Han’s models, but I know that I would be disappointed because of his design choices. Don’t get me wrong – I still like his work, but I don’t want to build it anymore. Long story short – I wanted my own dragline excavator with truck transport. Preparations: First of all I had to pick a reference machine, in this case Sennebogen HD 670 tracked crane. Why this one? Sennebogen because it is not very known and because of this fantastic die cast model: http://www.cranesetc.co.uk/library/rosreviews/203/203review.htm . Such models are very good because you can see the machine from a lot of angles and you can replicate small details from them more easily. The model is however 690HD and I have picked smaller 70 ton 670HD. This is because of whole concept with transport truck. The scale is dictated by wheels, in this case by wheels on truck and wheels on excavator as well. Since TLG is making only two wheels for tracked vehicles it is simple choice. With bigger tracked wheels the scale is 21,5:1, meaning that 49,5mm tires for truck are perfect fit. 690HD with the same wheels would be closer to 23:1 and we do not have truck wheels for this scale. Features: Undercarriage Real crawlers have either retractable tracks or dismount them completely when transported. In order to achieve that I had to place all motors to superstructure and use single battery box. As you can see from datasheet, the tracks can be retracted so they are not wider than body. To replicate it I have built it in such way that both tracks are very easily detachable from central piece that can be swapped for narrow one. Replacing this central piece doesn’t take more than few minutes, it is only necessary to take apart two liftarms on each side as seen in the picture. Another stud or two narrower tracks would be probably better, but I would certainly lose the ability to swap it easily. All four wheels are driven by two shafts from superstructure connected to M motors; final ratio is 9,265:1. Wide track Narrow track IMGP5236 Superstructure The superstructure holds six motors (4x M-motor and 2x L-motor) – two M motors are for tracks, 1x M motor is for slewing via worm gear on turntable (56:1) and rest are for winches. Slewing gave me quite a headache because of the desired gear ratio. The real machine can rotate up to 4 revolutions per minute so I wanted to replicate that. In the end the only viable solution was to use older turntable driven by worn gear without further gear reductions. I use train PF remote to start and stop smoothly. The usage of older turntable meant I had to shorten boom because of its less stability as it bends significantly more than new type. The A frame is fixed – the boom is raised by pulling floating pulleys with attached ropes. Bigger machines uses movable A frame where the angle between A frame and boom is fixed. The A frame can be folded down when the crawler is transported. A frame is Pythagorean triplet with beams length 29-21-20. There are 3 winches for boom raising, bucket lifting and bucket drag. All three are equally geared 5:1. Counterweight is detachable as on real machine, it of course holds standard Technic battery box. Cabin features opening doors and foldable walkway. IMGP5220 IMGP5222 Ready for work side by side Boom Booms on real machines are made out of several truss elements bolted together. There is usually lower boom section that stays on crawler when transported, then are intermediate sections in various lengths (2,9m, 5,7, and 11,2m) and then headpiece section. I wanted to replicate this kind of boom so I focused on correct shape of each section and size as well. This mean that the lower boom section is pyramid-shape: 5x1 studs wide at crawler side and 9x9 studs at opposite end. I guess not all connections on it are TLG legal, but everything fits nicely without any stress and thanks to it truss-like constructions it is very sturdy. The same principle follows at intermediate section, in my case the shortest one (2920 mm => 17 studs). Boom ends with headpiece that is quite similar to lower section but ends with two pulleys. They are of course not real pulleys as TLG doesn’t make anything free-spinning in that size but size was more important to me. The drawback of such modular boom is its weight; it is almost double the weight of boom that would be built in one piece so I had to stay low with total length. There are also two pulleys serving as fairlead so the rope dragging the bucket goes to winch from top, the fairlead pulleys are mounted on lever so they stay in same position regardless of boom angle. Headpiece side comparsion boom Bucket It is brick-build and its size is only guessed from pictures and its volume, I was unable to find any datasheets with buckets. Bucket Greebling, look and difficulties As usually I pay a lot of attention to greebling like railings, mirrors, cabin shape, lights and other small details. I really had fun with this model as it is quite packed with it. The biggest obstacle during the build was constant lack of parts. Together with truck and low-loader it is reaching 4000 pieces and I was even running low on both 2l and 3l pins once. I had selected yellow color at the start, green would be certainly better for Sennebogen, but I already had some yellow parts and green technic is very expensive. Beside that I have seen pictures of Sennebogen machines in various colors like yellow, red and blue, so I think it is fine. The whole internal build is very symmetric; the only asymmetric is gearing on left side for slewing and gearing on right for drag winch. IMGP5223 Playability Honestly, playability sucks. There is one important feature of real dragline omitted – free fall winches. Without it you can place bucket too close and drag it only few centimeters. Grabbing anything with the bucket is also very difficult. Drive and slew works very well though. Truck The truck is very loosely based on this real counterpart: http://www.ditzj.de/html/en/trucks/scania/wiesbr500.html i.e. 8x4 tractor with short wheelbase, 2 steered axles, high cabin and tower behind it. It is driven by L-motor and servo is used for steering. Both steerable axles use the same configuration like in my previous truck – 5l steering arms and hubs with 3 ball joints. There is of course Ackermann steering and different angle on both axles. Rear axles are connected to fake V6 engine. Cabin features two seats, IR receiver between them and steering wheel. Whole cabin can tilt to reveal engine. Gear ratio from L motor is 7:1 because it is meant to haul quite a lot of weight. The truck can be easily modified to low cabin version as the high roof is only held by four pins. The tower is too high then so it is replaced with bare battery box. The whole truck is quite heavy on front and it have sometimes trouble with driving when it is without load so it is possible to add ballast box on its fifth wheel. There is also coupling for draw ball trailer, but it is not meant for pulling. I think the most difficult part of design was not to copy my previous truck. The cabin is still quite similar, I’m aware of that, but in the end I’m happy with other small details that makes it different – flags on front, mud flaps, detachable roof, etc. IMGP5248 IMGP5249 Working fake engine Low cabin Ballast box Low-loader Low loader with detachable gooseneck is based on Motomat’s trailer because in the end you realize there is only one viable way how to build it – two technic beams with plates between. A little challenge was how to mount wheels without using single axle for both sides. The frame between wheels can be only 4 studs wide meaning the axle can be supported by 2 studs. I have used 8L axle with stop supported by thin liftarms. In the end the wheels are supported enough, they can rotate freely and you can take them apart without axle. IMGP5260 Lowloader with detachable gooseneck Instructions I have made instructions for dragline and truck as well. Lowloader will follow soon. Both will appear on Rebrickable soon, I will add link here later. Due to amount of work it took I will sell instructions for dragline for 10€ and truck for 5€. Lowloader will be free as it is not something trully mine. Both instructions are as usually PDF generated by LPub3D. Especially the dragline is compressed into as few steps as possible, with only 115 pages (~2400 parts), so if you don't like TLG instructions for beeing too easy this might be something for you. Dragline rebrickable link: https://rebrickable.com/mocs/MOC-17193/Ivan_M/dragline-excavator/#parts Video & gallery Whole gallery is here: https://flic.kr/s/aHskDJiTT8 And one crappy video for end:
 -
 Hi ! Here is my WIP for the TC6 contest. It's a transport truck with a palfinger crane on the back. My model have 4 powered motors. I use a gearbox, so i have 7 functions motorised. - Selection of operating mode (M-motor) Driving : - Drive (XL-motor) - Steer (M-motor) - Outriggers (M-motor) Handling : - UP arm (XL-motor) - Rotate arm (M-motor) - Open arm (M-motor) + fake engine and suspension When the gearbox is in neutral, it is possible to drive in hand with HOG. And small render with LDD. Very far from the quality of Blackbird.
 -
Update 22/11/17 Project abandoned, LDD file here for anyone interested: https://www.dropbox.com/s/wwc7v3p2s2yep72/UCS UT-60D Rebel Transport.lxf?dl=0 Welcome everybody, After recently seeing Rogue One, which is an amazing film, I decided to redesign my U-Wing and make it UCS by recommendation of @brobert as it wasn't very accurate. I have managed to get the model to approximate minifigure scale. The cockpit can accommodate two pilots and the cargo bay around 10 troopers. I am pleased that I have managed to keep the sleek aerodynamic look, as that was my original goal that I set out for myself. For the sliding doors, I have mainly kept TLG's design, but I have hidden the function almost completely as theirs is clearly visible. The wings do swoop back, however, I was having difficulty rotating them on LDD so I do not have any images. Hopefully, I will fix this issue!I have also used their UCS Y-Wing stand as I thought it suited my model well. There is not a transparent piece/cockpit large enough for the bottom of the ship, so I used four transparent 6180s instead. My design is made up of 888 bricks, which is not a great amount for a UCS set. However, this is because there are a lot of big bricks throughout the model. This MOC surprisingly only took 5-6 hours to create. It would not be a UCS Star Wars ship without greebling, so I have included this at the rear next to the engines. The only noticeable issue with the model is the lack of the cannons at the front of the ship, I will incorporate this at some point Please give me your suggestions, so I can improve my model, as this is a work in progress. Thank you for reading! Kind regards, Ellis.
-
UPDATE : 6th October 2017 The building instructions (PDF + partslist.xls) of my ITT are finally available! The rebrickable link is not valid yet (I'll do an update for that) but you can go to my website (https://bricksfeeder.wixsite.com/bricksfeeder/starwars-1). To help me a little to continue this passion, these instructions are paying (10 euros by paypal). Link to Rebrickable : https://rebrickable.com/mocs/MOC-10166/BricksFeeder/itt-imperial-troop-transport-minifigs-scale/#comments My final MOC has 1154 pieces and has light f you want. https://youtu.be/2S4VYgInwfM I hope you enjoy! :) Keep on building! ----------------------------------------------- Hello from France Guys ! I'm Bricks Feeder and it's my first topic on Eurobricks! :) I show you my third version of my MOC of the ITT (Imperial Troop Transport) seen on the SW Rebels series. This MOC has the dimensions of the mining's scale with 1174 bricks. => Almost 21cm (L) x 10,5 cm (W) x 9cm (H) I'm trying to build a "cool" Interior of the cockpit. I'll continue to work on it. I am not satisfied yet ! I'll show you my advance and if I can, the real one! If you have some ideas or constructive criticisms, share with me please! I want to upgrade my skills! :) Enjoy and have a nice day! P.S. : If you have the time... Check my You Tube Channel! ;) My previous version can be seen in this video.
-
Creating Tiny Turbo MOC is a great way to design a LEGO Car, it's small and you can add so many details on it. I've done some Tiny Turbos MOCs, so here it is... Let's start with my very first Tiny Turbo creation, Orcar: Orca Car: Orcar by Kamal Muftie Yafi, on Flickr The second one, a Hatchback Racer: Hatchback Racer by Kamal Muftie Yafi, on Flickr Then get low with this Slance, Slammed or Stanced Car: Slance by Kamal Muftie Yafi, on Flickr Got into a concept theme, a Concept Buggy and it's ready for Off-Roading! Concept Buggy by Kamal Muftie Yafi, on Flickr And lastly, a Concept Semi Truck: Concept Semi Truck by Kamal Muftie Yafi, on Flickr Okay, that's just some of my Tiny Turbos creations, hope you enjoy it! You can see some information about these models in my Blog!
-
LEGO NEO Fighter, inspired by TIE Fighter from Star Wars movie. Called NEO because this model using NEXO Knights part, and I cut the NEXO to NEO. NEO Fighter by Kamal Muftie Yafi, on Flickr Some more Information in my Blog!..
-
[EV3] Mindstorms Star Wars AT-AT
The_Icestorm posted a topic in LEGO Technic, Mindstorms, Model Team and Scale Modeling
Standing 58cm tall and 59cm long, this AT-AT from Star Wars is probably my largest robot to date. It is controlled by an EV3 p-brick, and is capable of walking, turning its neck, and shooting balls from a twin-ball launcher located inside its head. Here is a list of the functions of the robot: - Walking: 2 EV3 large motors - Neck turning: 1 EV3 medium motor - Shooting: 1 NXT motor Also includes an EV3 IR sensor for use with the EV3 IR remote. After getting the BWE, I had a plentiful supply of grey beams and panels, which I used in the aesthetics of the model. The head design was the most tricky part of the build. I needed it to look good, while at the same time have enough space for the twin-ball shooter with magazines. However, I'm happy with the end result, as it looks quite accurate to the actual thing. With the amount of pieces I had, I was also able to achieve a (almost) full body cover, which although adds to the weight of the robot, looks really nice. There are also two flaps on top of the head that can be lifted up to access the ball magazines. Walking was especially tricky to achieve in this model, as it was so top heavy. Rubber bands had to be used to help pull in the legs when they bore the load of the robot, otherwise the motors would not have enough torque. All legs are controlled simultaneously by the two motors, so the robot theoretically can't turn. However, I doubt the robot could turn even if the two sides could be controlled independently, since it is so top heavy. The EV3 brick can be accessed through opening of the panels on the side of the body. This was the easiest way to access the electronics while keeping a full-body cover (The real AT-AT in the movies also had opening side body panels). Here is a video of the AT-AT walking, turning its neck, and shooting. More information about the robot can be found here: https://www.us.lego.com/en-us/mindstorms/community/robot?projectid=afba4def-3b6b-49f3-8e0f-f964224763d9 Hope you enjoyed this robot! -
It was early morning and the Heroes arrive at the designated meeting location, outside the northgate of Eubric. The Heroes party consist of: Zannaqim (Flipz) 77 years old Female Selkreeth Rogue Level 1 Power: 20 (Level 1 + WP:14 + 5 (Anniversary Medal)) Power Bonus: +5 (Anniversary Medal) Defense: 5 (Anniversary Medal) Health: 12/12 (Basic health: 7 + level bonus: 0 + class bonus: 0 + artifact bonus: 5 (Anniversary Medal)) Gold: 60 Equipment: Sven's Dagger (WP: 14, Fire- and Earth+Sealed Elemental), Anniversary Medal (Power +5, SP +5, Max. Health +5, Max. Ether +5. The values will increase by 1 with each passing year; accessory.) Inventory: Sir Roderick's Sword (WP:12, Longsword), Selkreeth Shuriken (WP:3, throwing weapon), White Ninja Cowl (The wearer can choose to hide for up to three rounds, avoiding Free Hits; the effect ends if the user targets an enemy; suitable to rogues, beast warriors, chi monks and infiltrators; headwear), Bedroll, Shovel, Pickaxe, Magnifying Glass, Telescope, Magic Compass, Of Power and Mortals (+1 power each successful quest), Trial Brew, 4x Potion, Venom, First Aid Kit (Completely restores health and removes all negative effects for the entire party once.) Addok-Zo Obbex (Goliath) 135 year old Male Wakorian Ranger Level 1 Power: 6 (4 + 2) Defense: 0 Health: 6/6 Gold: 30 Equipment: Jury-Rigged Long Hand Cannon (WP:3), Pugilist’s Gloves (Power +2, protects from weakened-effect; handwear.) Inventory: Potion, Smoke Bomb Boris Bruhalv (Waterbrick Down) 38 year old male vampire Cleric *Immune to Stunned and Poisoned* Level 8 Power: 11 (8 + 3) Defense: 2 (2) Health: 16/16 (16) Ether: 12/12 (10) Gold: 53 Equipment: Simple Mace (WP: 3, mace), Rusty Chainmail (SP: 2, Immune to Stunned and Poison) Inventory: 2 Potions, 4 Remedies, Phoenix Essence, 4 Tonics, Scroll of Sleep (Enables casting the asleep-effect to the target, forcing them to miss its turn for three rounds or until woken up by an attack. Each casting has a 50/50 chance of success and costs 1 ether.), 1 Sleep Bomb, 3x Blind Bomb, Military Grade Fire Bomb (Deals 10 Fire damage to all opponents when used), Military Grade Dirt Bomb (Deals 10 Ground damage to all opponents when used), Military Grade Holy Bomb (Deals 10 Holy damage to all opponents when used), Military Grade Lightning Bomb (Deals 10 Lightning damage to all opponents when used), Floral Bomb, Defender's Ring (Accessory, Rolls of "Heal Less" become "Heal"), Bone, Grating Stone, Sword of the Vampir (WP:17, user is Jinxed; longsword), Staff of Ennon - (WP: 5, staff, Restores 2 ether on a roll of 2, 3, or 4) -------------------------------------------------------------------------------------------------------------------------------------------------------------- It was a beautiful morning, sun was already up and shinning from a cloud free sky. The heroes had a feeling that this was going to be a great day. It seemed their employer was running a bit late, altough he had been so precise about meeting outside of the gates as soon as possible. Perhaps the heroes could get to know each other in the meantime. Note: Welcome all to my first quest of hosting! Try to confirm in about 24 hours and we can get it started. Meanwhile, please check your stats and inform me of any last minute changes you have made. I know everybody who I have chosen are more experienced players so if I mess something up please let me know so I can fix it . Good Luck and Let's have some fun.
-
Here is my MOC of Hoth Generator Defense. This set features the following: - DSS-02 Shield/Power Generator (791 pieces) - Rebel Troop Carrier (RTC) (102 pieces) - Perimeter Defense Trench (787 pieces) - DF.9 Anti-Infantry Battery/Turret (131 pieces) - 1.4 FD P-Tower Anti-Vehicle Laser Cannon (90 pieces) - Medium Repeating Blaster / Heavy Repeating Blaster (46 pieces) - Brick-built Tauntaun (113 pieces) - Ice Mountain (432 pieces) This MOC is intended to be a big playset with the total piece count of 2553 (including minifigures and props). Photo source: the force.net Added tripod mounts to repeating blasters for standalone use. Photo source: rebelscum.com Photo source: stardestroyer.net This is now also my Lego Ideas project: https://ideas.lego.com/projects/121776 Also check out my bigger Echo Base MOC v.1.0: http://www.mocpages.com/moc.php/421468
-
This is my first complete piece that I have made as an adult. LOL. Woo hoo! I won't have a brick count until I dismantle, but it is huge. 54 studs long x 20 studs wide, almost as long as my arm. It can carry up to 24 men tightly, 16 men loosely (pictured). The heavy weapon can be dismounted and placed on field mount if tactically useful. The searchlight on the front can rotate a full arc.
-
Location: G09 - Greater Drigo Tags: Exploration, Land vehicle Log #008 – 11 Desembrinali 3816 Oswald is in trouble and HQ sent me to help him back to the cargo station with the acquired water that has rare healing chemicals in It. He can't risk It to flush It away for his research. His transport is not very suited to drive through all this clay in zone C38 on the planet Greater Drigo though. Equipped with a solid detector, I'm scanning our way through where there are hard rock formations under all the clay we're walking on. If there are big gaps between the hard rock formations, we have to walk another path and so on. We explored I think every uncharted area of zone C38 and If I continued this job for 6 months more, I'd develop the universe's biggest thighs. My legs are killing me and they're heavy from all the clay I stepped in, but we finally made It! By the way. Why could I not get a vehicle that floats or something? Is someone pulling a prank on me at HQ because of my inactivity? More information and pictures under the spoiler tag:
-
Here is my entry for the SHIPtember 2016 contest. Mobquet Medium Transport by Veynom, on Flickr This year, I decided to build a Mobquet Medium Transport coming straight from the Star Wars Expanded Universe. Those among you who played to the X-Wing Alliance videogame or read the Dark Empire comics book must maybe remember it. Length: 104 studs Width: 34 studs This is my 5th SHIP. Mobquet Medium Transport by Veynom, on Flickr A small zoom on its "head": Mobquet Medium Transport by Veynom, on Flickr And on the back, with the engine exhausts: Mobquet Medium Transport by Veynom, on Flickr Please note that the back side is not fully conform to the original pictures. Normally, there should be 2 large engines at the bottom-read side. However, for playability reasons, I have decided not to display them. By removing them, the MOC can strongly land on the bottom repulsors and is much sturdier. My build technic is mainly about cladding panels around a strong technic backbone. I am still working on the inside as I want to make it playable for my son. However, here is a small sneak preview of one of the bays. More pictures later. Mobquet Medium Transport by Veynom, on Flickr A few features: A handle to easily carry it (and it is not too heavy according to my son) Opening panels on each sides (4 total) and on the top (also 4) in order to easily access the inside. Side panels can be used as access ramps A few visible studs inside the bays in order to attach small vehicles and ships Rear bay transport capacity: 6 speeder bikes (Empire or Clone Wars style) OR 4 speeder bikes & 2 pallets of equipment (small repair area) OR any 6 of the vehicles usually found within battle packs Central bay transport capacity: any of the below lines (all tested successfully) 2 Tank Droids (75015) 1 Mandalorien speeder 1 Jedi fighter (Aethersprite) 2 Geonosian fighters or Canon 2 clone light artillery guns 1 speeder bike with side-car Plenty of crates, or troops or whatever A few pictures from the build : I started by measuring the length, just to have an idea of what I ned to build SHIPtember 2016 Day 1: The beginning of the journey by Veynom, on Flickr Then I try transforming it into a strong backbone (with the handle, it has to be strong) SHIPtember 2016 Day 4: Assembling the backbone by Veynom, on Flickr After the first cargo area, I start the second, while testing the cladding technic. SHIPTEMBER going forward. by Veynom, on Flickr The idea of a double floor for the rear bay is born here .... simultaneously with my fear of not having enough plates to cover the entire surface. Ultimately, it was ok but I have no more black, dark blueish grey or green plates anymore. SHIPTember 2016 Day 27 by Veynom, on Flickr Almost finished .... on one side at least. The second side was still empty and panel-less. Mobquet Medium Transport by Veynom, on Flickr Mobquet Medium Transport by Veynom, on Flickr And a small image from the X-Wing Alliance game so that you may compare. I hope you enjoy it!
-
This is a set I made for LEGO Ideas, but I figured I'd share it here as well. I'm still very new on Eurobricks and this is only the very first MOC that I've posted, so I'm open any tips anyone has to offer about how to format these sorts of posts in the future. The set is based on science fiction classic Forbidden Planet and includes minifigs of all the main characters from the film, including a block-built version of Robbie the Robot, plus the weird unnamed space-car thing that Robbie drove around. I also included a minifig-scale lego version of the film's poster. I tried to make everything as accurate to the film as it was possible to get at that scale, including custom decorations for the uniforms complete with accurate rank insignias. Here's some various angles of the car thing. Sadly, I wasn't able to make it so the front opens like in the film. Here's some of Robbie. Funnily enough, he actually has greater range of articulation than the original Robbie costume/prop did. And here's some closer looks at the poster I designed for it Let me know what you think. If you like it, please take the time to support it on Lego Ideas.
-
Rebel Troop Carrier (The Empire Strikes Back & Star Wars Battlefront)
LegoStarWarsLDDShop posted a topic in LEGO Star Wars
I'm finally ready to introduce a new, originally-designed speeder to you straight from the classic trilogy: --Rebel Troop Carrier-- Based on the speeder used by the Rebel Alliance at Echo Base on Hoth, this speeder isn't the most recognizable among Star Wars fans, but as a vehicle from the films, as well as being featured as a design element on the Hoth maps of Star Wars: Battlefront, it is still a valuable icon of our appreciation. To date, LEGO has only released one version of this speeder. Included as a supplement in their newest hoth set, 75098, it wasn't my favorite. To me, little-to-no detail was put into the build, as it was a very simple build and, surprisingly, much smaller than I'd previously hoped it be. Needless to say, I took it upon myself to create a much more, highly-detailed rendition of the speeder. Using namely the photos of the speeder from The Empire Strikes Back and Star Wars: Battlefront, as well as inspiration from other LEGO customs designers, I think this speeder turned out great. The scale is perfect for this build. It includes spaces for 4 rebel troops and a driver, as well as 5 spots for easy blaster housing. The front of the model is a very sturdy assembly which houses the different lights seen on the original speeder. It's also built at an angle, just like the real thing. The most challenging aspect of this model was the rear side, as there is a LOT of detail to consider. In the end, I was able to synchronize detail and functionality/playability together, rather than have detail be the "sacrificial lamb: for functinality's sake. The center end opens up so there is more access from the rear side of the speeder for troop entrance. MOCpages Comments welcome. God bless. -
In the year 2561, a gas giant exists known as R7-55, or Gelo. The planet is inhabited by a rag tag society of aliens from across the galaxy, living on towns built on small low-orbiting asteroids in the planets sea-like gases. However, only an approximate 700,000 people live on the planet, spread out among the surface, making economy difficult. So what most inhabitants do to make money, is build boat-like transporters designed to "float" across waves of gasses. These are used to transport goods between towns, and look like this: (sorry you can see my finger in this photo.) These "boats" bring and trade goods at trade stores. You can make a trade right through an open window, or you can also buy something inside the shop while your transporter is being loaded. Transporters are created by building a hull out of pretty much any material you can get your hands on, then adding a "mast",with some pieces of fabric to catch the wind. Engines usually consist of a few gas tanks connected to a compression chamber, to create a small (or large) flame to propel the transporter through the gasses. A rudder is always added for steering, and occasionally an extra fin or two for stability. While most transporters are relatively small, this is the largest transporter ever built, owned by Arnold Henderson and is wife. In this picture, it's docking with Dragon Traders, the planets most successful trade shop. The trade shop is so successful, it had a crane built in 2558 so it could load larger amounts of goods in faster time. The transporter has been designed to go longer distances and hold more cargo, the engine is significantly larger, and also carries a water tank and a generator for the on board cabin. Even though the engine is much larger, you can still see the similarities it has with the other much smaller transporter. here you can see the ships cabin, and its detailed interior. I had some trouble getting a good roof with my peices, so it's a little flimsy. You can see my design though. Sometimes pickup trucks ship out goods to other planets. This is an old one way back from 2234! And here are some shots from inside Dragon Traders. Here you can see the shop level of the trade store. Funny, I thought they stopped selling alien weapons. And for fun here are some goods that are often shipped between towns. Gold, warp crystals, and carbon rods. And always, a transporter operator should be aware of the unpredictable lighting storms that happen in the planets gassy layers, as they can easily knock a transporter off course. hope you enjoyed the post, Th3_Br1ck_Kid
-
Hi all, I wanted to present this MOC that I built originally for the Evolved contest on FBTB but due to various circumstances, I could not complete it on time. Anyway, I thought it was a brilliant contest idea and therefore I decided to complete my MOC eventually. The most important aspect of a MOC contest is not winning. It is not even participating, but it is definitively building one's own creations. :D Therefore, please let me present you my Sheathipede-class transport shuttle Evolved. Thirty years after the fall of Palpatine, the First Order is running at full speed its rearmament program. In order to be able to quickly ship troops to all corners of the known and unknown galaxy, the First Order looks toward reliable, effective, multi-purpose transport ships providing a flexible and large freight capacity. Some of the First Orders engineers decided to base their design on an old separatist shuttle dating from the Clone Wars: the Sheathipede. And they made it evolve... Sheathipede-class transport shuttle Evolved by Veynom, on Flickr For the very first tests, Captain Phasma is around. Sheathipede-class transport shuttle Evolved by Veynom, on Flickr A bulky rear side which offers a large loading ramp. (Who said "a big a.."?) Sheathipede-class transport shuttle Evolved by Veynom, on Flickr Troops can be landed and quickly get out of the ship. Sheathipede-class transport shuttle Evolved by Veynom, on Flickr I am currently also building several cargo modules that will fit inside and maximise both the playability and flexibility of this ship. Sheathipede-class transport shuttle Evolved by Veynom, on Flickr Sheathipede-class transport shuttle Evolved by Veynom, on Flickr Inspection ... Sheathipede-class transport shuttle Evolved by Veynom, on Flickr Sheathipede-class transport shuttle Evolved by Veynom, on Flickr Sheathipede-class transport shuttle Evolved by Veynom, on Flickr Sheathipede-class transport shuttle Evolved by Veynom, on Flickr Sheathipede-class transport shuttle Evolved by Veynom, on Flickr Sheathipede-class transport shuttle Evolved by Veynom, on Flickr This MOC is quite sturdy but is hard to carry, just by its shape and size. Comments are welcome.


.thumb.jpg.25baa490c88582e649b56b854a721261.jpg)