Search the Community
Showing results for tags 'laat'.
Found 12 results
-
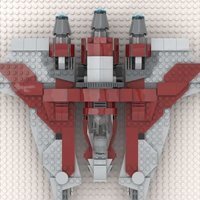
"Commander Cody, prepare the gunships for ground assault!" Let's give the Midi-Scale treatment to another timeless ship: the LAAT Gunship or Republic Gunship from The Clone Wars. Being a fan of the sleek and flush Clone Wars era design, I thought this variant deserved more attention, especially in Midi-Scale. This Midi LAAT/i consists of 1,015 pieces, measures only 22cm (without guns), and is accurately Microfig-scaled. It features a fully SNOT look, openable front doors, and a removable stand that can be tilted to taste. Design-wise, this ship was full of challenges, with lots of subtle angles and curved surfaces everywhere. Shaping the front section wasn't an easy task at this scale, as well as adding that crucial touch of lime green without any stickers. All of this resulted in a pretty intricate structure, especially for the front section. The angled rear section of the body features other details such as missile belts, exhaust slats and tail cannon. The underside of the ship is also fully SNOT-built. Initially, all four doors could be opened, but I chose to remove the less useful rear door mechanism for a smoother, easier building process. ► Instructions for the LAAT are available at BrickVault! More pictures on my Flickr page.
-
Started on this last weekend, I think I am nearly there, any suggestions please? Imperial LAAT Gunship, 2 x 75338 by Richard Yao, on Flickr Imperial LAAT Gunship, 2 x 75338 by Richard Yao, on Flickr
-
April 2023 Update: I've made some changes to the Midi Republic Gunship, more info further down and on the Rebrickable page, here's a quick comparison and below is my original post. May 2022 Original Post: I've wanted an LAAT of my own for a long time, I missed the opportunity to get one of the Lego sets during my dark-ages and have absolutely nowhere to put a UCS sized pile of plastic, so I thought I'd continue the midi-scale thing and try to make something bookshelf friendly. This isn't intended to be any particular scale, just roughly the same size as the midi-sized Slave 1 (75312) with room for figures and strong enough to be played with. The cockpit bubble looks oversized and there’s obviously only one of them so I had to throw accuracy to the wind there, but I’ve squeezed in as many other recognisable details as I could. The roof opens up to allow access to the cockpit which has just enough room for two Clone Troopers/Pilots to get cozy. There’s a small weapons locker in the area between the front hatches, though it' mostly for decoration as its very hard to acces, and the side doors hinge outwards and fold back so that four Clones can be seated inside. There isn't enough headroom to have them hanging by a handrail but some fearless perching before deployment is definitely doable. Finally I squeezed a stupidly small BARC speeder up the back end of the ship. Overall the Republic Gunship is a 28cm long (including the guns), 27cm wide and weighs 410g. Instructions are on Rebrickable, I've only used common and cheap parts so the whole MOC with stand will cost around £45 for the 608 pieces. https://rebrickable.com/mocs/MOC-107732/ron_mcphatty/midi-republic-gunship And here's my other midi-scale efforts.
-

[MOC] Minifig Scale Clone Wars LAAT/i Republic Gunship
IcarusBuilds posted a topic in LEGO Star Wars
Hey everyone, today I bring you my take on a minifig scale LAAT/i or Republic Gunship. Firstly, this thing is complicated... I started working on this early last year, but took a break from it because trying to figure out how to translate the complex shape of this thing was driving my crazy. While there are a lot of really nice gunships out there, I really wanted to see if I could match the narrow profile of the front of the ship, as well as get the flare out to the back that it has. Needless to say, accomplishing that in Lego is not easy, but I think I came up with a decent solution. The entire upper part of the gunship actually tapers from 6 studs wide in the back, down to 4 in the front. The "floor" of the gunship also tapers, which is one of the most common things people seem to avoid in other MOCs, probably because it's a major pain to do and it messes with the door alignment. The doors utilize technic fig hands and mixel joints to achieve the sloping from the front to back of the gunship. The doors were a real challenge due to the angles, and my first go at it didn't have enough head room to allow for a fig to stand inside, so I had to take another go at it, but this version seems to hold up. As usual a pic with my Delta-7B for scale. And some other colour variants. I've also done some test building to make sure that this thing actually works, I was worried that with all the angles it would be extremely brittle, but it holds together better then I thought it would. Inspiration notes: Under wing supports as well as some frontal structure inspired by Caleb Ricks. Front nose roundness inspired by Maelven. Engine build inspired by Chef Aslopert. Engine cones inspired by Kit Bricksto. Flood/Search lights inspired by David Buchholz. -
A long, long time ago I started working on a micro scale Millennium Falcon. To begin with all I wanted to do was add detail to the Microfighter but I kept tinkering and before I knew it I had a growing collection of micro Star Wars freighters and fighters, and here they are! Instructions for all these little builds are on my Rebrickable page. Since this all started with that Falcon Microfighter the cockpit piece (a light blueish-grey 2x2 truncated cone) became my yardstick for scale. Luckily trans-black 1x1 slope pieces work as fighter cockpits at the same scale so all the ships are, and will continue to be, as close to scale with each other as I can manage, at least based on these pieces and whatever reference images I can gather from Google. My Blockade Runner (April 2021) is the last ship on my micro Star Wars to-do list, although it’s hardly micro! The size and weight were a new challenge for me, I’ve never had to worry about a moc falling apart under its own weight before, but I enjoyed the challenge and managed to make it pretty easy to pick strong. I’ve put together instructions for the Tantive IV as well as the Liberator from Star Wars Rebels, which I couldn’t resist building for myself. Rather than doing new posts for each new ship I’ll edit the very long post below. All the instructions are on my Rebrickable page and there are photos and Studio renders some photos of the ships in this post, plus a few more on Flickr and Instagram. Thanks for looking!
-
This is my Republic Gunship MOC from Star Wars: The Clone Wars. The build features opening cockpits, side and rear doors, and deployable speeder. Door design adapted from Caleb Ricks. More images on my Flickr.
-
I am proud to introduce myself with my Republic Gunship.
-

[MOC] Microscale Republic Gunship with Video and Instructions
Guy smiley posted a topic in LEGO Star Wars
Hey guys! You may have seen this build on my photostream, or The Brothers Brick, but I thought I would post it here as well so the Eurobricks exclusive crowd would get to see it as well! I want to be more active on other forums besides Flickr this summer too. The nose decals are by Tbone_tbl on Flickr, I found them on MOCpages here: http://www.moc-pages.com/moc.php/72865 I added the door designs and sized them correctly. I made a YouTube video on my channel that showcases the models and shows how to build them check it out here: Thanks for looking! -
I am not a big fan of the prequel trilogy but I couldnt resist to give a try on the brick masters mini builds, however due to the unavailability of some bricks and esthetical purposes, I made several improvements over the oficial design. P1010058 por Nom Carver, en Flickr P1010079 por Nom Carver, en Flickr And here is a mini version of my LAAT/s which you can see over here: http://www.eurobricks.com/forum/index.php?showtopic=87241&hl=laat P1010075 por Nom Carver, en Flickr P1010069 por Nom Carver, en Flickr
-

Working Republic Gunship 75021 Lights (No Modding required!)
joev14 posted a topic in LEGO Star Wars
Hey there everyone, I'm Joev14, a new guy on the forums. I got myself pretty much all the fall 2013 star wars sets, and have been experimenting with an idea I had, what if it were possible to put working lego electronic lights into a Republic Gunship and AT-TE, without using any modified parts. After much work, I have finally found a way to do lights in both the AT-TE and the Gunship. So without further ado, I present to you, building steps for how to install working unmodified lights into your Republic Gunship. Click the photos to be linked to larger versions of the images. Sorry for the change in lighting throughout the pictures, sometimes the flash from my camera makes it hard to see the separate white parts, so I don't always use it. Step 1: Begin with a standard 75021 Republic Gunship (Mine is slightly modded with orange accents and a few other things, but the base design is still the same) Step 2: Absolutely necessary parts. You will also need a wire of whatever desired length (I recommend the 15-stud long ones), and two of these lights. Step 3: Recommended parts Step 4: Remove any parts that may get in your way, including minifigs inside the hangar. I also recommend removing the wings, although you don't absolutely need to. Step 5: Remove this chunk of the ship. Step 6: Remove the two sides of the upper section of the ship. Step 7: Continue by removing all the above-shown parts. Step 8: Remove the 4 containers. It is your choice whether or not you want to keep them. I chose to turn them into a crate as shown below. Step 9: Canister pod Step 10: Remove these two pieces Step 11: Replace the four openings where the canisters used to be with these four bricks. Also, run a wire from the hanger roof through the opening in front of the handle as shown. Step 12: Place these three plates on the bottom of the battery box. Make sure to put in a 9V battery first, so you don't have to go back and do it later! Step 13: Place the battery box in the space shown. Attach the lead of wire to the battery box (make sure to skip one set of studs, this is crucial). Step 14: Place two of the slopes in front of the wire end, and two small cheese slopes behind the co-pilot. Place 2 L-shaped plates around the wire opening. Step 15: Place two 1x2 plates ontop of the L-shaped ones, then another two L-shaped plates facing in the opposite direction atop those. Finally, place two 1x3 plates ontop, bridging the battery box to the L-shaped plates. Step 16: Place two more 1x3 plates on both sides of the end of the wire. Place two rounded slopes atop them, and finally, place a 2x4 tile on top of the wire end. Step 17: Place two more rounded slopes to cover the wiring. Step 18: Reattach the remaining large sections of the upper part of the ship, excluding the wings. You may fill in the gaps as desired. I intentionally left the 1x4 block area behind the co-pilot exposed so you can still press the button on the battery box. Step 19: Next comes the lights. There is no specific way you have to place them, but I chose to do it in this configuration. With a few red studs, as well as two round trans-orange bricks, I can get the two lamps to light up the whole hangar. Step 20: Above are the parts you should still have remaining, assuming you used the same method I did. Step 21: Reattach the wings and put all your figs back in, your done! Step 22: And boy does it look sweet! What are everyone's thoughts/suggestions for this? The only thing that really seemed to have me stumped was the rounded slopes in front of the handle, I couldn't figure out a sturdier design. While it does hold up, it looks a little awkward with all the obvious spaces between the bricks. I can't figure out a better looking way to do it and still have room for the wire though. Ideas? Facecast Episode discussing these modifications: (skip to 15:20) I will be posting the guide for how to put lights into a 75019 AT-TE soon! -
So I finally got my hands on the new RGS and I must say it looks amazing, but is waaaay to big and with all its battle stations I would need at least 5 Clone Troopers vs Droidekas battlepacks (?) to fill it properly, and in some aspects I feel it a little flimsy and that handle feels a little stressed while moving it, since I ran out of dust-safe shelving space, I had to alter it to fill the next requirements: Be smaller (no shelf space) Have one seater cockpit (I have only one pilot) Have no bubble turrets (they make no sence to me) Tight close side doors (if the doors are not going to close why the need of them) Minimal play features (I simply display and swosh around a little) Be strong and sturdy like a brick (a real brick) Be aesthetically sleek Now the backstory: During the clone wars, the LAAT/i was one of the fastest and most effective ways to deploy troops into the battlefield, however many were downed by the CIS during deployments behind the enemy lines, and the crescent need of sending troops from onboard of the cruisers straight to the ground required of a vehicle capable of traveling on the limits of a planet´s orbit, for those reasons Rothana Heavy Engineering developed a new variant: the LAAT/s fast enough to outmaneuver a heavy bomber/fighter thanks to its higher maneuverability due to its smaller size and aerodynamics, travel through hostile enviroments without further modifications thanks to it air lock pressurized side doors, and quick land/take off capacities to deploy and extract safely troops behind hostile ground, all this characteristics combined with the strength and fire power of the regular LAAT/i make it the ideal vehicle for elite troops and support personnel. P2180634 por Nom Carver, en Flickr P2110792 por Nom Carver, en Flickr P2110780 por Nom Carver, en Flickr P2110773 por Nom Carver, en Flickr P2110756 por Nom Carver, en Flickr P2110738 por Nom Carver, en Flickr P2110732 por Nom Carver, en Flickr P2110726 por Nom Carver, en Flickr I know you are not big fans of set modding, but I hope you liked it, comments and criticism are welcome.
-
Now with the release of the new gunship, I came to realise that is way to big beside the rest of my colection and that I dont have enough clones to fill it up, so I made some editing on this pic to find out how it would look: Dibujo2 por Nom Carver, en Flickr I know that this isn't an actual moc but as I said before this will be very likely to what will be done to it, what do you think about it?, I cant wait to get this set to make this mods, I hope they are possible. I edited this image from one of exxtrooper's pics of his review of the gunship. Update: ARC por Nom Carver, en Flickr LAAT por Nom Carver, en Flickr