Search the Community
Showing results for tags 'prototype'.
Found 27 results
-

Universal 4x4 off-roader
Zerobricks posted a topic in LEGO Technic, Mindstorms, Model Team and Scale Modeling
This model (and it's prototypes) are a result of the following topics: Basically the idea behind this project is to make an offroader capable of driving on all kinds of terrain with a simillar perofrmance as the Wildcat 6x6 but having a lower weight So, why would I want to reduce the weight? While the wildcat 6x6 works great most of the time, it's high weight of 2,5-3 kg has some drawbacks: The model requires a lot of expensive electronics (12 BuWizz motors, 6 BuWizz 3.0 bricks) High part count (1869 pieces) Tendecy of front wheels falling off at hard landings High wear and tear of the individual components, which lead to premature failure - planetary hubs, CV joints And lastly high wear and tear of the handler due to it's heavy weight Of course decreasing the weight also means decreasing the power to weight ratio, since there will always be components which are needed regardless of the number od drive motors like wheels, hubs, steering system, suspension and frame. The first protoype, which I simply call Light 4x4 used only 2 BuWizz motors coupled to a 2 speed gearbox: While the model worked good in low gear, the high gear proved much trickier. The single gearbox put a lof of strain on the drive axle in high gear, causing it to melt, even with lubrication. Another issue was the high load of the motors in high gear, resulting in them overheating, while the motor could not even remotely apporach the 15 km/h top speed of the Wildcat 6x6. But not all was bad, I really liked the free-moving front suspension which acts like a suspended pendular axle, while having a much lower unspring weight. While I could make the rear suspension act like a pendular axle instead off front, i decided agaisnt it, since most of the weight is shifted back when crawling and I wanted to keep the rear stable. With that knowledge, I went back to the drawing board and decided to up the power for the next version... Medium 4x4 prototype: This version used 4 BuWizz motors coupled in a manner simillar to my 1:10 Acura NSX which negates the sideways load on the output axle of the gearbox. As you can see, this version was quite bigger and it used the reinforced differentials. The increased power drastically improved the performance, the top speed and overall power being simillar to the Wildcat 6x6. BUT the model had a few problems, main being the exposed gearbox which would get clogged and jam while driving outside. This version was aslo wider compared to the first prototype. Medium version prototype 2: This is another concept where the entire front axle is designed to pivot, but I ultimately decided to go agaisnt it due to the higher center of gravity and higher unspring mass. The final, universal 4x4 model: I have built and tested the model, but have yet to make any media, that's why I'm using LDD photos for now. I had to way to make the model more ingress resistant and narrower. This is where I came up with the idea of using the new, reinforced differentials as 28 tooth clutch gears for the high gear of the gearbox: This way the gearbox's output axle was moved a stud lower, allowing me to cover the bottom of the model with panels which prevent the dirt from getting into the gearbox without sacrificing ground clearance: The model inherited the front axle from the prototypes which acts like a free pendular axle. This keeps the weight even on both side of the suspension sosimple open differentials sufficed without a need for lockers. The gear ratios are a bit of a compromise comapred to the Wildcat 6x6, with low gear being 0,89x the ratio and high gear being 0,83x the ratio. Even with these differences, the model still reaches a very simillar speed in high gear, probably due to lower friction losses and lower rolling resistance. All in all I think this is a worthy successur to the Wildcat 6x6, even though it may not be as flashy, massive or functional (no skid steering). Final part count is 774 pieces which is 41% od the Wildcat 6x6 and the weight has been reduced to around 1,4 kg - around half of the Wildcat 6x6. I will be creating a proper in-depth video about the finished models and the protoypes, so I suggest you to watch this space for more upcoming details. -

[MOC] BMW LMR '99 - 1/15 Scale
prototyp posted a topic in LEGO Technic, Mindstorms, Model Team and Scale Modeling
TLDR: Super-detailed fully-modularized Creator-scale 16-wide MOC build of beautiful 1999 Le Mans-winning FIA LMP prototype. 903 pieces (including 3 round-plates-with-strings, 6 whips, and 8 “non-Lego” custom wheel parts). 1/15.2 scale: 16 stud wide, 38 stud long, 23 stud wheelbase Winner - with a bit of luck - of an exceptionally rough and tumble 1999 Le Mans in the hands of Joachim Winkelhock, Pierluigi Martini, and Yannick Dalmas. The LMR was the second iteration of BMW’s LMP car, designed and constructed by BMW with Williams F1, powered by a development of the BMW S70 V12 which the McLaren F1 had used to win Le Mans a few years prior. Longtime BMW racing partner Schnitzer Motorsport ran the team at Le Mans proper as well as in the American Le Mans series. The low and sleek car looked like a ufo compared to the competition. The LMR has a fairly simple and compact shape, but it’s not a brick… the subtle lines are quite refined and put up a challenge to capture smoothly in Lego. The entire nose build is a circus of surfaces all at slightly different angles, their mountings dotted here and there in precise positions over the tub structure. The roll-hoop and engine hump cowlings are jammed full of more angles and curves. The rear fenders tumble and taper back to those extremely compact multi-directional-snotted wing mount and taillight assemblies. The sidepods look simple but are full of some connections voodoo for their multi-hinged lower surfaces. The car's so slim there's really nowhere to hide much supporting structure. Wheel inserts and brake discs are designed in Cinema4d and fit into the back axle tubes of Lego's Icons wheel #42716. The spoke shape, offset and hub proportions were refined through a sequence of paper prototypes to dial in their scale, then the final design was high-resolution SLA resin printed and sprayed with Tamiya TS38 gunmetal (as are the backs of the Lego wheels). Graphics are a mix of printed stickers and cut vinyl. It's not quite perfect: the indigo color-shift blue vinyl turned out a bit too dark - needs a much larger surface area and strong light to really sparkle - and those delicate air-flow pinstripes need to be metallic on transparent substrate so the different white materials aren’t as noticeable. The open cockpit captures various details; Pi/BMW M digital dash, switches panel, electronics boxes all carefully studied, drawn in Illustrator, and shrunk down to scale. (I forgot to do the Emergency markings, so these are swiped from a 1/24 model and comically small) The rear bodywork is a large single assembly that lifts off, revealing that glorious V12. The rear wing and trailing edge of the bodywork (with those complex little taillights) is cantilevered off the end of the transmission. The intake airbox assembly lifts off to reveal 12 intake trumpets, the oil tank and engine ancillaries. Getting the radiators attach at angles flush with the wing plates on the ends of the sidepods was a triumph of Lego maths... A few stickers for the radiator faces and the cam covers provide some texture. The sidepods, splitter, and engine drivetrain are all separate from the tub following the construction and design typical of these cars; the bare chassis of these masterpieces of design and packaging is one my favorite views… The tub itself has a raised footbox with a rounded 'boat prow' profile which helped to channel airflow from the upswept nose underside out through the open sidepods. The remaining flat floor continues back to under the rear axle where the shallow diffuser tunnel kicks up. As always, thanks for looking and thanks for the inspiration, Prototyp These photos up at Flickr: https://www.flickr.com/photos/prototyp/ Stop by and say hi: https://instagram.com/prototyp_brickworks -
Hello everyone 1- I hope this subject is in the right place. 2- Sorry for my bad english I think you all have at one time or another during a construction, wanted to have a room that does not exist to carry out your project. So, you've probably imagined several over the years. 1- I imagined myself to create several in recent days (others to come) You can find them on Flickr HERE you can react on what you see. 2- Would you like to propose some already, in 3D or other? I opened a group for: - the techniques, - tutorials - new coins 1 month ago on Flickr HERE 3- Do you have any ideas? => Could you describe by embellishing an image that you would like to have? I can try to create on request if my limitation 2D (photoshop) allows it. By the way for your information, I also realized baseplates that are on Flickr. I would like your opinions, your reactions, your proposals ... TYVM Some exemples:
-
 Hey guys, During a chat I was pointed to the Steinwinter Supercargo 2040. I was fascinated by the look and decided to build it. It was designed by the german engineer Manfred Steinwinter. During my research, I found out that he build only one prototype, but planned many more versions. I liked the three-axled version and so started with a rough sketch to get an idea of the proportions: While I was searching for images of that truck, I also contacted the current IP owner and asked for blueprints. Fortunately he liked my project and he send me some. Since then this truck went through many iteration of improvements and design changes. In the end I decided to use Powered Up to control it. This is the current state: These are planned/implemented features and specifications: Current weight: 3kg Length: 86 studs Height: 14 studs Width: 27 studs Power supply: 4x Technic hub Driving: 4x C+ XL motor, each motor is connected to one hub to spread the load (3,528:1, theoretically 0,74 km/h @7,5V @124Ncm) Steering: 1x C+ L motor, two steered axles with Ackerman geometry Compressor: 1x C+ L motor, 4 pumps 3 RC valves: 3x C+ L motor, 3x newest valve one for each the rear axle, front/middle left wheel, front/middle right wheel Angle sensor for suspension on front and middle axle: 2x C+ XL and 2x Boost Medium motors OR 2x C+ XL Angle sensor for rear axle: 1x motor (not implemented yet) Air/pneumatic suspension on all axles controlled by Powered Up double wishbone suspension on fron and middle axle Each front/middle wheel on the left and right side are one unit. That means if the front wheel is pushed up the middle wheel is pushed down. That way the weight is equally distributed on the wheels live rear axle When I decided to use Powered Up I thought about controlling the ride height somehow with Powered Up. To do that I needed something to read the position of the double wish bone arms and the rear axle. Since several motors in the C+/Powered Up eco system can report their position, tried to use them to read the angle of the suspension arm. I successfully implemented that on the front and middle axle. For the rear axle I haven't found a good solution yet, because that axle can move on two axis. While I'm waiting for some additional parts, I'm working on the solution for the rear axle. As for the code, I already made a proof of concept. I created a test setup and wrote some code, which reads the angle of a suspension arm and adjusts it to the desired value. for the finished MOC a can think of something like a parking height, highway ride height and more or less off-road height. Once the chassis is finished the and the Powered Up is working I'll start working on body. Feel free to leave comments, critique and suggestions.
 -

[MOC] Lego DRG V3201 - Diesel/Pneumatic Locomotive - in 12v style
Paperinik77pk posted a topic in LEGO Train Tech
Hi all, always starting from this inspiring discussion... ... @Reker1000000 introduced me to a very particular locomotive: "DB V3201 seems like it would be an interesting starting point for a locomotive to model in 12v style with the red motor..." The locomotive we're speaking about is the DRG V3201, one of the first experiments to upgrade from steam to Diesel engines. In this case, Diesel motors were available , but problem was related to transmitting their power to the wheels. Gears were too weak, Hydraulic transimission was still in development...so the idea was to replace steam with compressed air, therefore maintaining the "old" transmission system (including distribution) used by steamers. In short, it worked this way: DIESEL ENGINE --> COMPRESSOR --> RESERVOIR -->CYLINDERS --> COUPLING RODS --> WHEELS More or less what is seen in some Pneumatic locomotives made in Lego (great stuff!) with electric motors. Well, seems great, but there were many problems related to the heating of compressed air, its cooling (!) and cylinders lubrication - all for maintaining its efficiency. Here's an interesting link! http://www.douglas-self.com/MUSEUM/LOCOLOCO/diesair/diesair.htm All in all - a very complex hybrid system, with many gaps to be solved with engineering "patches". But it's a cool locomotive and making it in 12v style could really be a challenging task. First of all, it's the most asymmetric thing I've ever seen , second - it's a very tormented design - which cannot be captured fully in 12v style, due to lack of parts at the time. It's however a very peculiar locomotive (depicted also in a postal stamp!!!) and it's worth to be tried. Here it is, just out of the shed , helped by a small V60. In reality, this event could not happen, since the V3201 was scrapped many years before the launch of the little shunter, but since we can do whatever we like with our fantasy, I was more optimistic and imagined a restored V3201 ready for some hystorical train! The V3201 is based on the chassis of a BR78, which - luckily - is one of the 12v locomotives I've already tried to create. Therefore, chassis was already prepared and only needed to be adapted to the longer body. This big beast has a quite boxy body, which seems to be made soldering together some parts of cabins, cut from steam locomotives. The central part of the body is sticking a bit out from the overall shape, and this is due to the big submarine diesel and air reservoirs. The main charachteristics are the two big gray radiators, the small windows on the corridor side, and those big stairs. Stairs were a nice thing to replicate, even if these are not the same as in the prototype. I did not use the big train doors, since these did not allow me to recreate the stairs and handrails. In the real thing, the stairs go over the cylinders, so using the 12v standard ones was quite a mess. I replicated them with normal parts. and this was not a problem. I had however to "cut" the stairs in half, the upper one being fixed to the body, while the lower one being part of the bogie (and turning accordingly). With the 12v motor, this design needed to be somehow adapted. On a real 12v motor, the central hole can accept an half Technic pin. Using a normal Techic brick some plates and tiles solved the problem. The ladder is kept in place by the pin and "slides" together with the motor. Between the radiator and the cabin there's a small, virtually transparent door since it's made of a panel full of small holes. The body in reality should be 4-wide in that point. I tried fences, door fences, everything did not fit and SNOTting was quite impossible (for me at least), given the limited parts available. Even Marklin's model is solid in that point, so I concentrated more on having at least a grille pattern. Using the ladder part was not so nice, it was just confusing. I therefore tried the just seen @zephyr1934 technique (thanks to you and Katy!), to have some visible horizontal lines. I used 3794b parts (jumper) . It works also with normal plates, but this is way better. Doors features a possible, even if not used at the time, SNOT for the door hadle, using headlamps bricks. Here's a shot from above, showing the 7-wide central part of the locomotive. As you can see I played a lot with the jumpers parts. And here's the "blind side" of the locomotive there's not so much to say ,being pretty smooth! Apart big red wheels and red motor, 2x1x2 and 1x1x2 black windows are there, just to remember there's some 7730s and 7750s blood inside the veins of this "thing". Here is visible the big radiator... ...and here is visible the smaller one. Looking better at the central headlight you can see some "white stuff" between the bricks - it's the classic 12v light brick with the addition of a small diode. This old trick allows the headlight to be lighten up according to locomotive's direction. Radiator is made by 1x1 plates, trying to replicate the "pattern" of the real thing. I put here red lights in 7777 style, even if these should be white, according to prototype. A brief mention to the Shed - it's an old MOD - I do not sincerely remember if I already presented it here in Eurobricks. It's a 7777 build, converted to a more shed-looking thing. Since I like to replicate dioramas in 12v style, this could be a nice addition to the overall scene. I hope you like it! Thanks again to @Reker1000000 for his inspirational idea! Ciao, Davide -

The Brass Automaton (a steampunk style prototype of the Iron Giant) MOC
Murdoch17 posted a topic in LEGO Action and Adventure Themes
Long before the Iron Giant began hurtling towards Rockwell, there was a prototype model, which landed on Earth close to 64 years earlier than the Iron Giant's 1957 landing. They were very similar robots, made by an Ancient race of beings that wanted to gather as much information about the Universe as possible. They first created this prototype model which was made mostly of brass, copper, and iron, but was powered by a highly advanced Fusion reactor that was powered by metals the robot consumed, usually uninhabited asteroids floating through space. Unlike the Iron Giant, this prototype was not able to re-assemble itself as it had a error in it's programming. In the year 1893, the then un-named Brass Automaton landed in the Pacific Ocean near the long-forgotten Dino Island. It created a tsunami and unhinged the island from the Earth's crust and as such the land began to slowly sink. The robot was first sighted by nearby Australian military sailors, who upon seeing the giant being arise from the water, tried to describe the being the best way they could through their wireless telegraph: they named it the Brass Automaton. Johnny Thunder and his Adventurers crew would later go looking for this great metal being after saving as many dinosaurs as possible from the sinking primeval island in 1923, but never saw it, as it was hiding in South American coastline to gather information on the dominant beings of Earth, also known as Humans. After staying relatively hidden in various secluded ocean floor places around the globe for around thirty years, the Brass Automaton was finished reading the minds off people for information on humans as a species: Our past, our present as of 1924, our origin (as it was then known), and our many languages, along with defenses, politics, and technology. After gathering all that intelligence, the Brass Automaton headed to the North Pole along the sea floor to transmit the required information to it's home planet using a faster-than-light sub-dimensional beacon. (Basically, a fancy radio) That is just about when a major solar storm hit the Earth, with the radiation hitting the atmosphere of the Earth and scrambling the outgoing signal into nonsense. Now the garbled signal was received by the home base, and as a precaution, the Iron Giant version of the Brass Automaton was dispatched as fast as possible to earth. (That would take it nearly 35 years for it to get there at all possible speed, which would require it to refuel once arriving on Earth, which is why the Iron Giant was at the power plant at the beginning of the movie, whereupon it's memory was scrambled by the high-voltage electricity.) After sending the garbled message and being struck by a passing icebreaker-ship on his trip southwards, the Brass Automaton was temporarily incapacitated. It was then discovered washed ashore at the southern tip of Greenland by Dr. Harold Wormwood and brought back in pieces to his stately laboratory / mansion in Legorado, Colorado, where he ran test after test on the alien visitor. By 1926, the mad scientist-type Doctor Wormwood had the resembled robot nearly reassembled, and was preparing to restart it when a Lord Sam Sinister came upon rumors of the robot and wanted it for his own nefarious desires, with Johnny Thunder close on his heels... This steampunk version of the Brass Automaton a recolored and modified version of Build Better Bricks' Iron Giant with the head of my previous @hachiroku version of the model (seen above) of the same robot's head added on... I consider it a mashup of the two models. I made it into steampunk colors (black, brown and dark gray) with an exhaust steam pipe at the back of the neck, and yes, that is a monocle / targeting computer over the right eye for use with the gun arm (it was included in the Build Better Bricks instructions) that I'm still considering trying to use. You also may have noticed, the model is incomplete in places - some things just don't lineup properly in LDD like they do in real life. When fully assembled IRL, it should look much better though. Here is the Brass Automaton's laser gun... probably not going to build this, but I MIGHT place it on a tank or something. This is what I've found so far for this model.... 100 parts down, about 650 left to go. Comments Questions, Complaints are welcome! -
A long, long time ago I started working on a micro scale Millennium Falcon. To begin with all I wanted to do was add detail to the Microfighter but I kept tinkering and before I knew it I had a growing collection of micro Star Wars freighters and fighters, and here they are! Instructions for all these little builds are on my Rebrickable page. Since this all started with that Falcon Microfighter the cockpit piece (a light blueish-grey 2x2 truncated cone) became my yardstick for scale. Luckily trans-black 1x1 slope pieces work as fighter cockpits at the same scale so all the ships are, and will continue to be, as close to scale with each other as I can manage, at least based on these pieces and whatever reference images I can gather from Google. My Blockade Runner (April 2021) is the last ship on my micro Star Wars to-do list, although it’s hardly micro! The size and weight were a new challenge for me, I’ve never had to worry about a moc falling apart under its own weight before, but I enjoyed the challenge and managed to make it pretty easy to pick strong. I’ve put together instructions for the Tantive IV as well as the Liberator from Star Wars Rebels, which I couldn’t resist building for myself. Rather than doing new posts for each new ship I’ll edit the very long post below. All the instructions are on my Rebrickable page and there are photos and Studio renders some photos of the ships in this post, plus a few more on Flickr and Instagram. Thanks for looking!
-
This is my entry in the Brickset Star Wars 'What's Missing?' building contest. 75213 Blade Wing Starfighter - £69.99, $79.99, €89.99 - Hera Syndulla, Garazeb Orrelios, Sabine Wren, Quarrie, BG-81 This set contains 704 parts. - Fly into battle aboard the prototype Blade Wing Starfighter! - Open the dual cockpits to seat the pilot and gunner inside. - Convert the Blade Wing from its landed configuration to flight mode. - Rotate the cockpits as the starfighter manoeuvres. - Fire the spring loaded shooters. - Includes Blade Wing Starfighter and five minifigures!
-
Here are a prototype version of the Acklay and Reek which was made in 2002 and later shown for the 2005 Lego Star Wars Weekend in celebration of Episode 3. They decide to cancel this set because one of them believed "it would not sell well". I searched for any remaining photographs which I could find of the set but I have only found these three. If you have any more available please share. It could be interesting to see the Reek in closer details. Especially to see if it has anything on the tail which I have missed. Here below are all three of the beasts together. (The mini Nexu design was made by me) Finally here is a edited version of the Prototype Acklay which I made using the original design. As you can see it has more mobility to it's limbs, some extra details are added and finally the color is corrected.
-
[MOC] Toyota Eagle MkIII IMSA GTP ’93 - 1/15 Scale
prototyp posted a topic in LEGO Technic, Mindstorms, Model Team and Scale Modeling
TLDR: Super-detailed fully-modularized Creator-scale 16-wide MOC build of epic multiple-championship-winning early-90s IMSA GTP prototype. 1007 pieces (including 4 round-plates-with-strings, 6 pneumatic tubes, 1 hose, and 8 “non-Lego” custom parts). 1/15 scale: 17 stud wide (ish), 40 stud long, 22 stud wheelbase October 2nd, 2018 marks the 25th anniversary of the IMSA GTP championship’s last race. This is the car that won. –––––– The mid-1980's were a boom time for American sports car racing. The IMSA GTP series was thick with manufacturers and strong privateer teams running Porsche, Jaguar, BMW, Chevrolet, Buick, Ford, Mazda, Acura, Nissan, and Toyota power integrated into myriad different chassis designs. Swelling budgets and fierce competitiveness forced materials and electronics technologies to evolve at a rapid pace. Dan Gurney and his All American Racers team had been on a learning curve with sports cars which really started heating up with the beastly GTO-class Toyota Celica. Their foray into big-league prototypes came first with an adaptation of a Group C based Toyota 88C and then the team's own 962-inspired HF89. These all helped to forge reliable power from Toyota’s 2.1 liter twin-cam 4cyl and teach many valuable lessons in designing and building a robust and competitive car. The MkIII debuted in 1991, entering into arguably the most competitive of GTP's seasons. The now-mighty little Toyota engine was connected to a compact carbon-fiber space-capsule wrapped in an achingly-simple shape which hid massive aero tricks. Dominance quickly followed with 21 victories in 27 races entered over three seasons. The glory of the series wasn't to last. By 1993, a global recession and conflicting technical regulations thinned the field such that at the end of the GTP era, Dan’s team was effectively left battling itself. For what it’s worth, I don’t believe this is the “car that killed GTP”… Successful racing series don’t die because a team or a car dominate, that’s what heads-up rulemakers govern and what motivated competitors rise to challenge. These guys were just the last ones standing as top-tier sports-car racing collapsed worldwide. ______ The exterior build posed a few challenges, mostly in capturing the layered smoothness of the nose and weaving slopes together to form the severe cutaway area aft of the front wheels. One of the things which has made me reluctant to work at this scale in Lego is the lack of an elegant solution for the heavily-curving windscreens and rear cowls found on prototypes. I wanted to capture the smooth simplicity of the MkIII’s shape without doing complex arrays of slope parts for the glass and engine cover so these surfaces are done as single-piece sheet elements designed to lock into the Lego framework (much like the recent minifig camping tent or Forma fish... anyone remember the City windsurfer?). These few non-TLG exterior parts plus the handmade BBS wheel centers are why strict Lego-only purists should probably think of this a “hybrid scale model”… Pull off the bodywork, though, and it’s 100% TLG. The MkIII's chassis has layers of very clever engineering done with a beautiful aesthetic of carbon fiber, kevlar, bare exotic metals, spindly gray-painted suspension arms, and amazing red-anodized fixing points throughout. It’s very purposeful but also very cohesive and elegant. This translates into an opportunity for some excellent Lego part and color usage. My primary goal for this model was to render a study of the engineering under the skin and to capture the modularity of prototypes as much as possible. There’s the core monocoque tub and a separate drivetrain, with further modules for the ducted side pods, doors, front splitter, bodywork, wing, etc. Hung off the chassis at all four corners is a suspension of bars and clips locating #90202 Technic wheel hubs. The driveline build captures the MkIII’s key features: the semi-structural and heavily-turbocharged Toyota 503E engine, the big red anodized mounting plates, the tall trapezoidal magnesium bellhousing which serves as the oil tank and rear suspension rocker-arm mounting structure, and the long load-bearing plates for the rear wing. This rear half of the model is mounted to the tub as in the full-scale car: plates at the top and base of the engine plus struts locating the central suspension structure. Despite all this modularity, the model builds up to be very solid. The cockpit is complete too; the seat, steering wheel, digital dash, switch panel, giant boost knob and handy “hardwood” shift-knob are all tucked in there. Other details inside include the bulkhead-mounted electronic engine-management modules and the front suspension's lower trailing-arm mounting. More photos up at Flickr: https://www.flickr.com/photos/prototyp/ As always, thanks for looking and thanks for the inspiration, Prototyp ______ References and inspiration Malte Dorowski : for just how detailed and accurate this scale can be. Sir.Manperson : detailed Creator-scale car builds, and particularly his bars n clips suspension. Senator Chinchilla : engine builds, in particular his technique of wrapping hoses as turbos. Want to read more about the MkIII? Here are interviews with the MkIII’s design team by Mulsanne Mike (with some photos from my visit to AAR): http://www.mulsannescorner.com/ToyotaEagleMkIII.html Essential reading "Prototypes" J.A. Martin & Ken Wells "GTP Race Cars" J.A. Martin & Michael Fuller -
This is a discussion for unique lego misprints, mistakes and prototypes. TLG is renowned for its quality bricks, but sometimes a misprint or mistake can slip by, and therefore be worth a lot. As for prototypes, I'm not sure how people acquire them, but maybe they work in the LEGO factory? Please tell me as I would love to have one, but they do cost a lot, as a single helmet piece can cost you a whopping 600 dollars! My heart says yes, but my wallet says no way. Ok, so I found a few listings on eBay and this one seller does seem to have an interesting collection of them. And once again, I'm wondering how he got them. Red Darth Vader Prototype helmet type 2 Type 1 Darth vader helmet Red This guy has a lot https://www.ebay.com/sch/kont4569/m.html?item=153092572672&hash=item23a5074600%3Ag%3AqjUAAOSwtXxbQzLA&_sacat=0&_nkw=lego+prototype&_from=R40&rt=nc&_trksid=p2047675.l2562 This is the place to share about your collection and boast your rare Lego pieces! (Unfortunately I don't have any)
-
This is the fourth version of the Joker's Lowrider-inspired car for Bob from the Neo Nexus Force. (a space faction I came up with after the LEGO Universe video game shut down, whose topic can be seen here) I was inspired to create a new front end grille for this car from two newer fender pieces, with one of them upside down to make a unique "O" effect. This very rare car is powered by a turbine, which means it can run on gasoline, diesel, alcohol, paint thinner, and even cheap perfume. It runs very efficiently at high speed, but gets very fuel-hungry at slow speeds, like sitting in bumper-to-bumper City traffic. Luckily for it's owner, Bob, the snowy tundra wastelands offer little time for sitting still, and plenty of space for getting up to very impressive speeds. And if he gets struck in a snowbank, the very high-heat exhaust (which can melt asphalt if stationary too long on City streets!), can easily break the car free with no problem. The rear of the car has a license plate and dual super-hot exhaust. As usual this printed part is missing from the hood. The roof of the car is easily removable to get at the mini-figures seats which allow for figures to sit side-by-side. The spacious opening trunk has plenty of room for luggage and the doors to the cabin area open as well. This LEGO model was partially inspired by the early 1960's Chrysler turbine car (one of the nine left is seen above, but it's not my picture). You can read more about the experimental car at this Wikipedia link on the car. Any thoughts, suggestions, complaints and ideas are always welcome. This car is on the "to be built" list after the current Western project is done. (and when funding allows!)
-
I have had this helmet for years. Bought it from a seller on Bricklink in the early 2000's. Can't remember who. I also added the red legs, torso, head, and cape. Cool little figure, but, without going into a long drawn out story, it has to go. One sold on Brinklink for a little over $850 in February. I assume, without the rest of the figure. I would like to use that as a starting point and work from there. Make offers! Ask questions!! Need more pics? I am on the Official Eurobricks Straightshooters List. I will also provide user ID and feedback from Brinklink and Ebay if necessary. I would prefer Paypal and offer free shipping to the US. Thanks for looking, Jamie
-

[MOC] TIE Advanced Prototype (aka Inquisitor's TIE) from SW Rebels
Bricks Feeder posted a topic in LEGO Star Wars
Hello from France Guys ! I'm Bricks Feeder and it's my first topic on Eurobricks! :) I show you my MOC of the TIE Advanced Prototype (aka The Sith Inquisitor's TIE) seen on the SW Rebels series. I will make some pictures of my advance in the future but for the moment, I give you some videos (of my YouTube Channel) of my prototype on LDD. This MOC is based on the original LEGO set 75082. The "wings" were directly inspired by this forum on Eurobricks (http://www.eurobricks.com/forum/index...). I'm trying to build a "cool" Interior of the cockpit. For that point, I'm inspired by the awesome TIE Fighters short film. I'm trying to be "accurate" but it's difficult when you found pictures of a subject with different "shapes" or variations of shape between them. So I based my model on the first appearance of this fighter in the Rebels Show... I made a second version with some upgrades of the articulations of the "wings" to get it stronger. Moreover, I change all the back! I'll continue to work on it. I am not satisfied yet ! I'll show you my advance and if I can, the real one! If you have some ideas or constructive criticisms, share with me please! I want to upgrade my skills! :) Enjoy and have a nice day! P.S. : If you have the time... Check my You Tube Channel! ;) -

WANTED: LEGO Prototype Figure/Pieces + Other Rare Items
samiam391 posted a topic in Buy, Sell, Trade and Finds
Hi All, I'm looking for LEGO Prototype figures/pieces (preferably Star Wars but will hear anything out) as well as any other rare LEGO items. I recognize the high cost some of these items command and am willing to pay them. Please shoot me a PM if you have any of these items are know of someone that does! Thanks, Samuel -

LEGO phone case, (primarily) for use in LEGOland
LEGO_DT_designs posted a topic in Special LEGO Themes
Hello, I'm making this post to seek evaluation from people who love LEGO or have young children who love LEGO and this seemed like the best place to get accurate and reliable feedback. I have designed a phone case (for the IPhone 6) with the interest of creating further interaction with the LEGO land park; basically the idea of having people go through the park searching for puzzles with their camera through the use of an app, then completing the puzzle by creating a and image on the back of the case using 1x1 flat tiles and showing them to scanners situated all over the park, this would increase consumer flow throughout the park and create a fun challenge for parents and kids alike. (the product would still be expected to be used as a general phone case and would provide fun in a normal day as it provides a very versatile build platform to create from) I know there are some issues with the alignment of the LEGO studs and the Technic pin holes, but this product is still in a prototyping phase so this is understandable. If you have any comments or questions regarding anything to do with the design. (it's aesthetics, manufacture, safety, function. etc). please make a comment below as ANY contributions would be greatly appreciated. Thank you URLs for pics: https://www.flickr.com/photos/149486063@N07/shares/2MwR9H https://www.flickr.com/photos/149486063@N07/shares/425txQ -

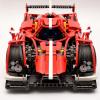
[PORSCHE] Porsche Prototype
jovel posted a topic in LEGO Technic, Mindstorms, Model Team and Scale Modeling
Hi everybody, This is my entry for the Porsche contest! It features: - working steering wheel and HOG steering - full independent suspension - 5 + R gearbox using a link system - opening doors and hood The gearbox mechanic: Animated gif, switching from 3 to 4 to 5: -

[PORSCHE][WIP] 816 RX Prototype
syclone posted a topic in LEGO Technic, Mindstorms, Model Team and Scale Modeling
Finished the 816 RX I wet for a bit of futuristic design and I hope to receive some feedback about it. Shall I remove the Mindstorms logo, or it looks good? Photos: -
So over at minifigpriceguide I saw this picture of a prototype Cloud City Boba Fett. According to the website owner, it belongs to a collector in France. Now, I can imagine that if the regular Cloud City Boba Fett sells for hundreds of dollars, then this prototype would be insanely expensive, and must be even rarer. I was simply curious as to whether or not anyone here knows more info about this figure or has more pics. It is certainly interesting how it differs from the regular Cloud City Fett.
-
/
-

[MOC] RWD Car with Mechanical Traction Control
896gerard posted a topic in LEGO Technic, Mindstorms, Model Team and Scale Modeling
Four wheel drive on Lego Technic cars with small wheels is hard to realize, as they become relatively too wide (which is ugly) and the ground clearance is also compromised. The problem then is: how to get the same grip back with only rear wheel drive? Then you need to push something 'extra' in the back of your already crammed, small nice-looking vehicle... This concept is an approach to keep this 'something extra' as small as possible while giving awesome and unexpected grip to the car. (At least, I was astonished by what it achieved!) Instead of typing a lot, I've put it all into a video with the theory of how it all works at the back of the video to let the 7 billion minus 1000 viewers that are not interested into more advanced Technic stuff experience how it works in practice on a 2 cm (that is: inchy) thick ice floor. As for the car, it is built from Power Functions spares as all my L-motors (which have quickly become the main workhorse for every Technic builder) are ehm... in use. That is why you find me using a geared up XL motor, which gave me memories of the good old times when the poor knob wheel parts splattered around. Sharp images of the car and mechanism explanation can be found on: http://www.brickshel...ry.cgi?f=564319. On MocPages (beware, there is a piece of code there that simply destroys anything such as image resolution on .png files...) http://www.moc-pages.../moc.php/428881 Video: I finally have found PovRay so (with many thanks to all those who make that software) I can present a high-quality render: -
[POC] Twin beam suspension with drive and steering
Zerobricks posted a topic in LEGO Technic, Mindstorms, Model Team and Scale Modeling
After watching some youtube videos I noticed some trucks had some weird suspension on them... It looked something like this: So naturally I started investigating and found that this is a type of setup called a twin beam suspension. So I tried to replicate one in Lego. To explain the concept behind this hybrid, here's a series of stages leading from live axle suspension to the double beam setup: In order: Yellow setup is a live axle Red setup represent the change from dependent suspesnion to independent suspension By extending the half axle lengths (blue) we get a lower change in wheel angle relative to the drive surface (camber) And finally by extending the swing arms PASS the center point we get a double beam suspension And here's a version with drive and steering: So what are the advantages compared to the live axle? - Its independent, which as name suggest aloows the wheel to work independent from each other - Lower unsprung weight - Less moving parts - to keep a live axle in place you need several linkages. Here the axle pivots around one central point And disadvantages? - Complex design, the axles have to be made to travel pass each other without interfering. - A need for a CV joint which needs to allow the axle to slide in and out - Not as robust - Hard to implement portal gears without making the wheels slide sideways excessively - Camber changes are still present I also made a video explanation of the principe. You can skip to 4:30 to see the final version in action: So the final question. Is it useful? Fo me as far as the Lego version goes....no. The disadvantages outweigh any possible advantages. Also lately I have been working a lot on long travel double wishbone suspension which outperform any other previous suspension system in almost all categories. The only usefulness in this design I see is realism, if you are building a replica of a truck that has such suspnesion. Because I want to hear your opinion, here's the LDD link to the suspension, so you can try to make your version and improve upon my prototype: Download prototype here -
I think it's time for me to start posting some finished LEGO work again, it's been a while Here's my latest creation - an LMP-style race car. Inspired by both the 60053 (which I found too stubby) and the upcoming Speed Champions line. It can sit minifigs upright. Since I'll probably buy some of the Speed Champions stuff I am contemplating moving my future car MOCs to full 6-wide body, as well. Also, it started off in LDD. Here's my POV-Ray render (and my current wallpaper) Here's the whole album with the full-size images! https://www.flickr.c...57650317055727/ Thanks for looking! I am looking for other CITY/Friends cars to modify. I gotta get my feet warm again before I post some of my bigger stuff!
-
My first gundam moc , this is not base on any real gundam model ! My newer moc : Strike gundam Astray gundam Astray M1 gundam cover LEGO Prototype Gundam by demon demon demon, trên Flickr LEGO Prototype Gundam by demon demon demon, trên Flickr LEGO Prototype Gundam by demon demon demon, trên Flickr LEGO Prototype Gundam by demon demon demon, trên Flickr LEGO Prototype Gundam by demon demon demon, trên Flickr LEGO Prototype Gundam by demon demon demon, trên Flickr LEGO Prototype Gundam by demon demon demon, trên Flickr LEGO Prototype Gundam by demon demon demon, trên Flickr LEGO Prototype Gundam by demon demon demon, trên Flickr These are my newer moc Thanks for visiting !
-
Hi, This is my LMP1 car, that I made for the current TechLUG Technic contest. The full review (and much, much more pictures) is here: http://bj51creations...c-lmp1-car.html. Please leave a comment. Hope you enjoy.