Search the Community
Showing results for tags 'model'.
Found 85 results
-

small railroad ferry - real world MOC - City set 60119 inspired model
Murdoch17 posted a topic in LEGO Town
(I was torn between Train Tech and Town forums for this thread, so if it needs moving - don't hesitate to move it, mods!) Recently a Flickr user named elijahleestewart commented on one of my riverboat pictures asking about me making a Ninjago ferry from season 4. I said I already had City set 60119 (Ferry) and was not interested in making another. But this conversation got wheels turning, and about two hours later I came up with this vessel you see here, which was made by tearing apart my original Ferry to revise it. The port / left side of the vessel. From here you can see the ladder to access the bridge. The starboard (or right side). The opening gates no longer fold down (as in the original set 60119), but they do split apart to allow train cars to be loaded two at a time. You can load two of the bigger cars (24 or 28 studs long), three 16-long cars, or a single 34 stud long depressed center car on this ferry or you can mix and match. (The last 34 stud long car type is too long to have two of it's kind on there, but it can fit one 34 long and another of anything shorter than that such as a 16, 24 or 28.) The roof section of the bridge is removable to place figures at the controls. Another source of inspiration was the Albatross, a former Vicksburg-area railroad ferry from 1907 that was converted to a St. Louis river cruising ship (one of the largest vessels ever on the river) called the Admiral in the late 1930's which then became a casino and then was sadly scrapped in 2011. You can read about the Admiral here on Wikipedia, and view a picture of the Albatross on Flickr here, courtesy of the Herman T. Pott National Inland Waterways Library. (You can loose a few hours perusing through steamboats on that Flickr page!) ...That's all I got. Thoughts, comments, opinions, and questions welcome! -
1950s dark red tow truck for my town layout - real world 75972 MOD
Murdoch17 posted a topic in LEGO Town
I finally took pictures of this MOD of Overwatch set 75972 I've been working on basically since the set released in 2019. It's been turned into a 6-studs wide 1950's-style tow truck, and seats one figure at the wheel. The front of the truck. The rear of the truck. The cab roof is removable to seat the driver behind the wheel. NOTE: The vehicle might get changed to black later on because a printed grille (the same part type I'm already using here) in CITY 4+ set 60435 is coming out, and I always wanted the grille on my tow truck to be more pronounced. Only time will tell if this truck gets color swapped or not... Thoughts? -
For the last couple of years I've been secretly working on something different than my previous cars and trucks. This here - I present to you Boxer - Infantry fighting vehicle. It's the same scale as my other car MOCs. But boy oh boy - it is a beast compared to those tiny cars. This one here is larger than the famous Abrams tank in real life. So imagine that this one here is like a heavy duty truck. Full with as many details as I could possibly find in the internet. It may sound silly that I mention it so, but... those military vehicle details, especially when it comes to the interior details and gadgets, those pictures are very hard to find. Probably for a good and secure reason, so - can't really blame anyone for that. Would love to see one of these up close in person. Some day, maybe. Till then - enjoy this one. Hope you like it, couse I sure do :) Oh, did I mention? It has all wheels double spring suspension, all wheels drive with PF (2 x XL) and 2 x front axle steering (1 x M). See full album on my flickr account
-
Hogsmeade Railway Station MOC - based on HP concept art and the later films
Murdoch17 posted a topic in LEGO Licensed
It's a rainy and cold evening in Scotland, and you are on the Hogwarts Express as a first year student. You have noted other students have changed from street-clothes into the black robes with the crest of your destination on the front: Hogwarts School of Witchcraft and Wizardry. You do the same, and then notice the train slowing down, and finally coming to a stop at a small station marked "HOGSMEADE" on a wooden platform sign. You don't want to get too wet in your nice new robes, and feel a bit lost in the hustle and bustle of older students departing and railway staff getting luggage off the train and onto the platform. You spot your trunk on the platform and detrain. It's raining less hard now, and a slightly portly-looking, very tall man in a beard and fur-lined coat comes down the platform shouting above the steam engine's noise; "First years with me!" He leads you and about dozen other 11-year old's away from the nice and neat (and warm!) station down to a series of boats on the water's edge of a huge lake not far from the train. He leads each student into the boat, and then boards the lead boat himself. He taps the oarlock of his boat with his umbrella, and all the boats move away in sync by themselves. You are then astounded to see a huge castle, perched on rocky cliffs on the other side of the lake, lit up by hundreds of candles under the moonlight of the clearing sky. The man then shouts out to everyone assembled in the tiny boats; "Welcome to Hogwarts!" (small note: This movie concept art was taken from the Harry Potter wiki sometime in 2015. It is NOT mine.) I have converted and combined this Hogsmeade Station from two different versions found on Rebrickable, and made it my own using pictures and guesswork. This design is supposed to go well with set 76388 - Hogsmeade Visit - (or my Winter Village MOCs) but of course, in the official Harry Potter canon it's on the other side of the lake from Hogsmeade proper. (But I don't listen to canon!) The entrance to the employees-only ticket counter area is on the side furthest to the camera, while the nearest door is to the passenger waiting room. The model has two rooms under the removable roof, featuring seating from the Disney train set. One one side is the ticket office, with a cash register / ticket window and a sorting desk for tickets / packages. The other is the waiting room with a few bench seats w/ individual arms and a bulletin board. Starting amount of parts: 1,185 Parts found so far: 657 Parts still to find: 528 Over half of the parts have been found so far. (I've also started taking apart my Disney-inspired station for it's pieces, so that has made a dent in this project, with more to come as I start on the ground floor of that older MOC.) EDIT 4/15/24: Sorry for the REALLY late update, but I've finally gotten started on building this in real bricks! (only took three years, but whose counting?) It should be finished sooner rather than later. Thoughts, comments, suggestions, and complaints are always welcome! -

McLaren 720s 1:10 scale
tiledfloor posted a topic in LEGO Technic, Mindstorms, Model Team and Scale Modeling
After many years of work, I am proud to present my take on the McLaren 720s in 1:10 scale. Lego 1:10 McLaren 720s by @tiledfloor, on Flickr It took 4 different iterations of chassis to get to this final version. I started this project with (almost) no experience in Technic MOCs, so I expected this to be the case. The first version was in 1:10 scale, had an 8-speed gearbox (which couldn't shift reliably), was wobbly as could be, and looked abhorring. The second version was in 1:8, -for some reason I thought that my first technic MOC could be THAT large without encountering many problems- I quickly realized how wrong I was. The building process was infinitely harder than in 1:10 due to the required stability and stiffness and added connections between components. This version had a really unique mechanism that I hadn't seen anywhere else though: adjustable drive modes, thanks to small linear actuators controlling the stiffness and travel of the shock absorbers. (you can find a video of the mechanism in action here:) Suspension with adjustable stiffness by @tiledfloor, on Flickr This version also had remote door controls, but after many problems regarding part count, sturdiness etc. I quickly realized that 1:10 was a better suited building scale for me. And so came the final two iterations, the first was almost a 1:1 copy of Dirk Klijn's mp4-12c, but after completing the chassis, I dismantled it to create one that allowed me to add a couple more functions, but I can safely say Dirk's model was the one that inspired me and taught me the most throughout my journey, along with Bruno Jensen's P1 and Charbel's 720s. And the final one was the one that I was finally satisfied with… Lego 1:10 McLaren 720s by @tiledfloor, on Flickr I wanted it to be completely modular, meaning that every single mechanism could be separated from all of the surrounding components. This was the most difficult part of the building and designing process. To achieve this, I settled on a transverse 4-speed sequential gearbox (IIRC, it was borrowed from Charbel’s 8 speed design), a custom made v8 which would sit as low as possible to allow for some detailing on top. The most difficult part of the chassis was the one-piece carbon monocoque also present in the real deal. Lego 1:10 McLaren 720s by @tiledfloor, on Flickr It had to be stiff, allow for two functions to pass through it (gear shifting and active aerodynamics), and still fbe as close to the real McLaren as possible form-wise. Lego 1:10 McLaren 720s by @tiledfloor, on Flickr The modularity also presented many problems mainly relating to the longitudinal stiffness, and I must admit, I wasn’t able to solve all of them, which resulted in a chassis that bends a bit when the suspensions are activated. Though overall it does generally behave as a single-piece chassis, and driving it around feels stable. Lego 1:10 McLaren 720s by @tiledfloor, on Flickr The rear axle is perhaps the most compact, stable and best looking part of the chassis imo. Lego 1:10 McLaren 720s by @tiledfloor, on Flickr After the chassis came the bodywork. It has many, many, MANY illegal connections that bend and induce torsion in long beams and panels. But overall, I am actually quite happy with the way the body turned out. The lines are as smooth as I find reasonably possible in this scale, and the proportions are mostly accurate. The car sits as low as I wanted it to, and has many of the original curves and lines that make the car recognizable imo. (most importantly, it passes my “squint test”, where if I squint hard enough it is indistinguishable from a photo of a real 720s.) :) Here is a rundown of the functions present in my model: -independent suspension on both axles -steering wheel/HOG with an acceptable turning radius -folding display in front of the steering wheel -adjustable seat recline on both seats -opening hood (half) and doors (though the doors require a bit of a wiggle to get them to sit right) -airbrake connected to steering -fake v8 -4 speed sequential gearbox controlled from the cabin (via turning a knob) -modular chassis -modular bodywork Lego 1:10 McLaren 720s by @tiledfloor, on Flickr The rear was very difficult to recreate due to the many intersecting curves and the large space the active airbrake mechanism takes up, but it’s the part of the body that I’m most happy about. Lego 1:10 McLaren 720s by @tiledfloor, on Flickr here you can see the airbrake in action, notice that the front wheels are in a “steered” position and that the spoiler is raised compared to the previous photos. And a final shot of the rear: Lego 1:10 McLaren 720s by @tiledfloor, on Flickr I am going to upload a video showcasing the functions whenever I can, in the meantime here is my bricksafe for a couple more photos: https://bricksafe.com/pages/tiledfloor/mclaren-720s-110- I eagerly await any and all constructive criticism. With this being my first full technic MOC, as well as my first scale model, there are plenty of things I can learn from you guys. Thanks! -
The 1st of July is an important day for the Greek Parliament building. This year marks 87 years since July 1st, 1935, when the 5th National Assembly solemnly began its work in the new Plenary Hall of the Parliament, thus establishing the role of the building that remains the same to this day. Wanting to honor the history of my country and highlight one of the country's most emblematic neoclassical buildings, I decided to build it with the use of LEGO (in the spirit of the Architecture series) the parliament building, as well as the square with the monument dedicated to the Unknown Soldier. Hellenic Parliament by George Patelis My model consists of 4,842 pieces and measures 35cm x 51cm x 19cm and marks my first attempt to create something in Architecture style. The flag, which is the only non-LEGO element, is my wife's creation, using the macrame technique. More photos can be found on my FlickR account! Below, you can read some of the most important historical elements of the building; The Parliament Building, was built from 1836 to 1843 in the design of Friedrich von Gaertner, to house the palaces of Othon. In 1922, the palace ceased to be used and due to the circumstances after the Asia Minor Disaster, they were housed in it government agencies, private social agencies, and various international organizations. In 1925 a small building was erected in the grounds of the Old Palace, which is known to this day as "Palataki" and in 1928 the Monument to the Unknown Soldier, designed by the architect Emmanuel Lazaridis, was built and thus changed the facade of the building in relation to the surrounding area. Then, in November 1929, the Government of Eleftherios Venizelos, after many discussions, decided to house the Parliament together with the Senate, in the building of the Old Palaces. The works for the conversion of the building into a House of Parliament and Senate were plans of the architect Andreas Kriezis, and it was the most radical intervention in it, after the initial construction and gave it its present image. Finally, some of the most important aesthetic interventions on the outside of the building were the placement of the statue of Harilaos Trikoupis and Eleftherios Venizelos, works by the sculptor Yiannis Pappas, in the western enclosure of the building, and in 2003 the placement of the statue of the Mother of Christos Kapralos in the eastern precinct. (Source)
-
164C Ahoy! She is finally complete and here are a whole bunch of photos. She appears in most photos as I have her on display - turning to port under full sail, flying her red flag of attack, with guns ready for a full broadside. Approximate dimensions of the Crow, based on a 1:40 scale. Length - 128 ft Beam - 55 ft Height from waterline - 115 ft First, some shots displaying functional minifig areas of the build, like the midships. Poop deck. "I think this compass is broken, Captain." Dining cabin. Then we move fully below decks. Fore to aft, the crew quarters (note the rat in the brig to the left of frame - it took me ages to find one of them and so disappointing that it looks more like a possum then a rat ). Main gun deck: And, astern, the galley. Next, some model type shots, that show the crow as she appears on her display base. The final crow design on the main course. The crew bids you and your ships fair winds and following seas... until such time as her Captain stops playing his organ ( ) and sets the Crow on the hunt. There are more images on flickr https://www.flickr.c...57645632299833/ Hope you enjoy the images.
-
Hey everyone, I'm glad to present you my latest Midi-Scale MOC, the TIE Reaper from Rogue One. The TIE Reaper drew my attention when I discovered Doug Chiang’s wonderful concept art of the ship. The typical empire-like, aggressive and angular look of it instantly reminded me of my favorite vehicles from the movie. The main features of this design are: fully SNOT build from top to bottom, accurate proportions, studio model / prop look, removable stand and working ramp. Getting all the very complex angles and shapes, while maximizing the SNOT look, led to a very intricate Midi-Scale build. My main goal wasn’t “swooshability”, but making a convincing, display-only build. Although not intended for play, it can be easily moved around with or without its stand, and safely held from below. ► Instructions for the TIE Reaper are available at Rebrickable or via email at flyinspace.mocs@gmail.com More pictures on my Flickr page.
-
Hi Everyone, As the weather's taken a turn for the worse here, I've been unable to get out on my bike, so today I decided to do the next best thing, and make a little model of it! I had no exact scale or requirements in mind for this other than that it be feasible to buy, as I think it'll look nice on the desk. Without further ado, here's my attempt at a, maybe, midi-scale Royal Enfield Bullet 500! And for reference, here's my real one: It took several attempts to get the headlight gasket to be a reasonable shape that I wanted, and have it be able to connect to the rest of the body. Here's the graveyard of failed attempts! I reckon some of them could be put to good use by a MOC-er better than I, in particular I was happy with the top right one, which used that Overwatch Gun piece as a base, but I just couldn't figure out how to level out the angle of the grip 😅 I'm quite happy with the look of the rear headlights and indicators; that black 2 x 1 tile would have a registration number on it. The connection to the rear wheel is probably quite flimsy in reality, but I like that it "technically" would work like the swingarm on the real thing. (It's just a 1 x 4 tile attached to a blue technic pin.) I think I've captured the exhaust's shape pretty well, except where it connects into the engine. But overall i'm happy with this, and it kept me occupied for the day instead of pining at the rain! Finally, because I can, here's other nice colours its possible to buy it in, I quite like the dark blue one's look, may end up purchasing it as well as the dark green one. Thats all! It's not perfect, and i'm already seeing ways to improve upon it, but that's half the fun anyways.😛 Any suggestions or thoughts are more than welcome, and thank you for looking! 😁
-

Working Orrery
Jcreations912 posted a topic in LEGO Technic, Mindstorms, Model Team and Scale Modeling
Hey everyone! Welcome to my latest LEGO Ideas project - a kinetic sculpture of an Orrery where the earth goes round the sun and the moon round the earth. Go support it here: https://ideas.lego.com/projects/bc099c6a-9cf0-427b-a35e-3aff4599b150 Build This build consists of the Sun, the Earth and the Moon, built on a vintage/antique style base. The Moon revolves around the Earth while the earth revolves around the Sun. The mechanics are hidden nicely inside the base. I have put a lot of effort into making the model as sturdy as I can, and the motion as smooth as possible. The model was built to look as nice as possible, with a detailed, brick-built version of the Earth. Dimensions of the build: 35x18.5x28 (LxBxHcm) Pieces This model has 1200 LEGO Bricks (give or take a few). I built the model digitally to check! Aim My aim with this model was not to make a 100% accurate scientific model of an orrery, but rather to make something that looked great on display, while still being functional. I also wanted to make the design as compact so as to keep it affordable. Another important aspect of this project was the varied build experience - a combination of Technic and System bricks to create an interesting and fun build. This model would also have a very wide appeal - from space and astronomy fans to technic fans, as well as people who like collecting models for display. Hope you like this project! Don't forget to support and share! :D -
It's been a long time, maybe even too long, since I posted a finished MOC. But here I am, posting again this now good old BMW i8 of mine. It has already seen some exhibitions and received some appreciation. So, let's hope that it will receive some more in this audience ? Enjoy! Full gallery here at flickr.
-

[MOC] My kind of Sneakers.
0937 superfan posted a topic in LEGO Technic, Mindstorms, Model Team and Scale Modeling
My kind of Sneakers by 0937 Superfan, no Flickr Since I start building with LEGO® pieces one of my goals was to design a pair of Sneakers. I hadn't a scale in mind, but with my collection growing up I found out that I had enough pieces to start making a prototype at least. When the set 43179 - Mickey Mouse & Minnie Mouse came out, I was able to finish my idea because of the Round Corner 3 x 3 x 2 Dome Top - 88293 in yellow ( yes I wanted to build a yellow pair of shoes ). When I started to search for inspiration and to check how other AFOLs were building their sneakers I found out that one thing that I was not fully fulfil were the shoe laces! So I knew that one thing that I could make a diference from the others was on this part. My favorite photo is the bottom back point of view. It does show the main part of the MOC but get a little teaser about how everything is assembled. This is my favorite type of sneakers. And you? What is yours? -
Just browsed through the forum and could not find this anywhere. Think I just forgot to share it. Mentioned her some time ago in the General MOC-Discussion, WIP-Help, and Teaser Thread. If she is hiding somewhere in the forum, I do hope someone has the chops to remove this topic. Scale 1:40’ish L: 150 cm B: 26 cm H: 114 Bricks approx. 19300. Looking back at my earlier designs I found that my version of the HMS Surprise, just like the HMS Ontario, was somewhat wanting. This is a model of the HMS Surprise launched as the corvette Unité in 1794. In 1796, The Royal Navy conquered, refitted and renamed her. She later on chased pirates in the Caribbean for several years. The ship plays a central role in the Aubery-Maturin stories. This includes the movie from 2003 Master and Commander: The Far Side of the World. The HMS Rose, which was later, renamed HMS Surprise, plays the “role” as HMS Surprise. Neat, but somewhat confusing. Being notoriously bad at taking photos of my creations there is some Renders below, these are also in the General MOC-Discussion, WIP-Help, and Teaser Thread. …but you need to look at the LDD file to get a view of the details of the creation. Find it at MOCPAGES http://www.moc-pages.com/moc.php/452403 She has been on display at LW Copenhagen 2019. A Swedish AFOL has taken some fine Pictures from the event on this link. Hope it is ok that I link to this https://www.flickr.com/photos/86394332@N03/47062421172/in/album-72157705321073761/ There are also some more photos including WIP at my Flickr page. https://www.flickr.com/photos/131641614@N06/with/46031790204/
-
 Hi again, Sorry if I am repeating a topic but I am new in here. Also, I think this topic can stay as long as LEGO Technic exists Including the latest (2019) LEGO Technic sets/models, which do you think is the “hardest to assemble”, complex/though, etc. You understood me. For example, in my opinion, still the 1275 part - 42070 - 6*6 40th year edition 2017 Towing Truck is one of the “kings”. Waiting for your kind and precious thoughts and opinions. All the best, Idris
 -

[WIP] Jiotto Caspita mk1
hexgraphica posted a topic in LEGO Technic, Mindstorms, Model Team and Scale Modeling
Started a new build, hope you'll like it Looking for every kind of suggestion -
 Here's a wee little project I've spent the last 12 months on. Yes, it's a 3+ meters long LEGO ship that floats (without a drop of glue), moves and recovers sunken submarines, occasionally ripping them apart in the process. There's really too much to describe here so allow me to present you with a video covering all the details:
 -
The School of Athens (Scuola di Atene) is one of the best pieces of art in the history of humanity, here's the Lego version: The School of Athens was completed in 1511 and is not only considered Raffaello Sanzio's finest work, but also the work that sums up the spirit of the Renaissance. My brother has struggling to finish this project properly and almost set it aside and gave up. I took it over and finished it in a smaller scale. Why "The School of Athens"? With so many sets based on movie and on pop culture, we thought it was only right to give art in the traditional sense a chance at becoming an official product. For us, this painting represents humanity, explicitly and implicitly. Just at first galnce, some aspects of human knowledge are visible: architecture, painting, sculpture, philosophy, anatomy, cosmology, but also things inherent to the work: manual rendering of materials and surfaces, colour theory or the perspectives that became so common around then. But the fun of it are the layers of extra meaning it bears. The figures stand in certain angles, perpetually braking the symmetry, linking geometry to the real world. Raphael crafted the characters so they are immensely expressive and vital; they really do feel alive, something I feel my brother has also achieved, they interact, they discuss, they disagree, they agree, they are typically human: they cooperate with one another, something the ancients can teach us. I believe this is not a mere fresco, it is a piece of art that can teach us. Who is who? Represented here are some of the most important philosophers, mathematicians and thinkers of ancient Greece, Rome and even muslim Spain. Some of the statues are pagan gods and some of the figures have the faces of eminent Renaissance figures, with Heraclitus having Michelangelo's face, Euclid having Bramante's face and Apelles having the painter's face, all in all, a nice mix, something that also applies to today's multicultural cityscapes. Video: Fun facts about the Lego model: Originally the plan was to give the 1x1 brick with 4 studs on the sides to the women in the painting and the Erling brick to the men, but my brother ended up giving the 1x1 brick with 4 studs on the sides to male figures too, as the Erling brick didn't allow for side hair. The compass Euclid uses are some cherries. The only Olive Green pieces in the whole model are for Socrates, the originator of what today we understand as "philosophy" (the philosophers before him are today known as "pre-Socratics". The robes next to Diogenes are regular Lavander, nor Medium Lavander like the rest of the robes in the rest of the model. Only women wear Aqua garbs.
-
I present to you, the first gundam of Allelujah Haptism in the series : Mobile Suit Gundam 00. Type: Lego Gundam Name: Gundam Kyrios Code: GN-003 Size: 1/60 Pilot: Allelujah Haptism Team: Celestial Being Series: Mobile Suit Gundam 00 ( 機動戦士ガンダム00 Kidō Senshi Gandamu Daburu Ō? ) Reference: _Non-Grade 1/100 _High Grade 1/144 _Anime This is my Facebook page: https://www.facebook.com/demon1408/ Flickr album: https://www.flickr.com/photos/148042982@N03/albums/72157710585691868 DevianArt album: https://www.deviantart.com/demon14082000/gallery/70316722/lego-gundam-kyrios-gn-003 You can also check this video for full gimmick and articulation :) These are more image LEGO Gundam Kyrios GN-003 by Demon1408, trên Flickr LEGO Gundam Kyrios GN-003 by Demon1408, trên Flickr With weapon LEGO Gundam Kyrios GN-003 by Demon1408, trên Flickr LEGO Gundam Kyrios GN-003 by Demon1408, trên Flickr LEGO Gundam Kyrios GN-003 by Demon1408, trên Flickr LEGO Gundam Kyrios GN-003 by Demon1408, trên Flickr LEGO Gundam Kyrios GN-003 by Demon1408, trên Flickr LEGO Gundam Kyrios GN-003 by Demon1408, trên Flickr LEGO Gundam Kyrios GN-003 by Demon1408, trên Flickr Since this is a transformable Gundam , I also implement the Flight mode for this Kyrios LEGO Gundam Kyrios GN-003 by Demon1408, trên Flickr LEGO Gundam Kyrios GN-003 by Demon1408, trên Flickr LEGO Gundam Kyrios GN-003 by Demon1408, trên Flickr With a team: Gundam of Celestial Being by Demon1408, trên Flickr Thumbnail by Demon1408, trên Flickr
-
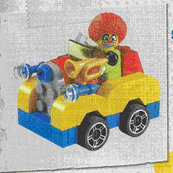
Need help on "reverse-engineering" part of a model without instructions
Transparency for Effect posted a topic in Special LEGO Themes
I'm trying to recreate the one model made in the LEGO Club Magazine for the first series of Collectable Minfigures that didn't come with instructions in 2010; the Clown car. I've basically been recreating it in LDD and so far the one area I'm having issue in is the round front section with the blue stud. The car looks like it uses this mudguard, but whatever the front rounded plate with the blue stud is connected to seems to collide with the studs of said mudguard and can't be placed down flat, meaning it may not be the same but red rounded plates. That or it's connected to a hinge piece at the back to "drape" over part of the car at an angle, but would there be enough stud space to do that length wise? It could also just be a matter of what's connected to the grey piece and the answer not being the same, rounded plate, but it does look like it's rounded like the front piece and I'm not sure of other similarly rounded pieces that are shorter to accomodate for the mudguard studs and still connect to the rest of car through SNOT. TLDR; I'm bewildered by the construction of the SNOT-based, blue/grey/red middle front section of the car and wonder if anyone here could take a crack at it. EDIT: Here's a link to the image I took from that might be slightly better quality: http://www.brickshelf.com/cgi-bin/gallery.cgi?i=4642125 -
Lego HMS Interceptor nearly finished. One of the most beautiful boats <I mean ships> as shown in the POTC franchise "Curse of the Black Pearl". A fast merchant brig, adapted by the british navy, to hunt down faster pirate vessels. As shown here in what i think nearly original Minifig scale
-

[MOC] Liebherr R 980 Excavator 1:25 motorized
Brickzone52 posted a topic in LEGO Technic, Mindstorms, Model Team and Scale Modeling
Hello Everybody Im happy to introduce you my Liebherr R 980 excavator scalemodel 1:25. The whole excavator is fully motorized with power functions. The goal was to combine the motorized technic world with the usual lego bricks. Was not that easy because of the weight. This beauty will be for ever with me, thats why i also builded up a box as you can see on the pictures. Let me know what you think. :-) Best Regards from Zürich Switzerland. Dani 0 by Dani Brickzone, auf Flickr 0 2 by Dani Brickzone, auf Flickr 0-1 by Dani Brickzone, auf Flickr 0-3 by Dani Brickzone, auf Flickr 0-2 by Dani Brickzone, auf Flickr 0-5 by Dani Brickzone, auf Flickr 0-6 by Dani Brickzone, auf Flickr 0-4 by Dani Brickzone, auf Flickr 0-12 by Dani Brickzone, auf Flickr 0-13 by Dani Brickzone, auf Flickr 0-14 by Dani Brickzone, auf Flickr 0-7 by Dani Brickzone, auf Flickr 0-8 by Dani Brickzone, auf Flickr 0-9 by Dani Brickzone, auf Flickr 0-10 by Dani Brickzone, auf Flickr 0-11 by Dani Brickzone, auf Flickr 0-15 by Dani Brickzone, auf Flickr 0-16 by Dani Brickzone, auf Flickr 0-17 by Dani Brickzone, auf Flickr 0-18 by Dani Brickzone, auf Flickr 0-19 by Dani Brickzone, auf Flickr -

[MOC] 1:16 Volvo FMX with Palfinger PK78002 SH
dikkie klijn posted a topic in LEGO Technic, Mindstorms, Model Team and Scale Modeling
The Volvo FMX is an oddly styled truck, its bulldog nose like design stood out to me instantly. Having an inherent weakness for the odd I decided to build one all the way back in 2015. Four years later I proudly present my latest model :). Developing the Palfinger crane took the better half of the development time for this model. In order to house all the electronics necessary a flatbed truck design was chosen with 4 axles, 2 under the bed and 2 to support the crane and cabin. The crane is operated by 3 servo-controlled pneumatic switches, the newer style switch allowed me to build this more compact than we ever could! The Pneumatic cylinders for the extension sections have been modified to allow for a more realistic reach. Two original cylinders were cut and acetone welded together for each one of them. The compressor is powered by an L motor and assisted by a rubber band to reach the pressures necessary to operate the crane. The crane is able to reach the back of the bed, as was my goal, but isn't able to lift much anymore then, the limit of pneumatic control is really stretched when a single-cylinder needs to push an arm of 30+cm on a point 5 studs away from the pivot point. With all this functionality, details are fun but also frustrating to add. Two tiny tool compartments have been fitted on the rear of the truck stowing away lifting equipment. The engine is only built for the upper 2/3 to accommodate for the suspended axles and steering mechanisms. The model is also fitted with a full custom led kit. A custom electronics board with an Arduino pro mini takes the signals from the Sbricks and converts them into turn signals, driving lights, hazard lights and much much more. More can be seen on the Flickr album and in the Youtube video! -
Hello Speed Champions fans, Trabant 601 is a legendary car of Eastern and Central Europe. This is its studless model in Speed Champions scale. If you like it, please keep alive this project and support on Lego Ideas to become a real set (only 3 supporters are missing in the next hours to reach the first milestone): https://ideas.lego.com/projects/77b0428c-c46c-47b0-984c-1fd7c97a2948 I wanted to create a relatively accurate model, and some details were challenging in this small size. Firstly I needed smaller wheels than my other builds in this scale, the size of the actual ones are equal to the Mini Cooper (Lego 75894) ones. It was clear too that the City mudgards will not fit to this size, therefore I created a brickbuilt one. The connection of the wheels are tricky a bit which helps to keep the room between the wheels and the mudguard proportional. I wanted to create an accurate front, and I added simple white stickers to the direction indicator lamps to keep the orange parts visible on the front only. The most common colors of this car are the light blue and white (broken white). I decided to use white pieces as the roof element of Mini Cooper (part 6018101) is ideal as hood and roof, and I have this item only in this color. The rear of the car is a bit tricky too as I wanted tilted lights similarly to the real ones. The back lights could be red transparent elements, but I was not able to buy them in that color. I had to buy some elements of "brick, modified, 6191" to the sides too, and it was available only with "Nitro" stickers, but my son said that these stickers are cool, so I kept them. I wanted to use as less stickers as possible as I don't really like them, because they restrain the applicability the stickered elements in different builds. There is picture without the "Nitro" sticker and an other one without any stickers. The set includes a minifigure with a baseball hat and with an additinal red helmet. Trabant 601 by László Torma, on Flickr 02 Trabant 601 by László Torma, on Flickr 03 Trabant 601 by László Torma, on Flickr 04 Trabant 601 by László Torma, on Flickr 05 Trabant 601 by László Torma, on Flickr 06 Trabant 601 without Nitro sticker by László Torma, on Flickr 07 Trabant 601 without any stickers by László Torma, on Flickr My other Speed Champions scale model in "LEGO Town" forum is the Audi R8:
-

Imanol BB´s MOCs and MODs (And possibly good ideas)
Imanol BB posted a topic in LEGO Technic, Mindstorms, Model Team and Scale Modeling
Hello people, as i have seen some topics made by some members were they share their creations, modifications and ideas, i thought it was a good idea to start my own topic about that, this way i can avoid filling other topics with too many information by saving all that information here and just posting small texts in those other topics. To start, i would like to share some creations which i worked on: Model Team Nissan Frontier. This is one of my oldest models, i made it even before i knew about Eurobricks, and i would like to share it with you because you might like it or modified it: This model features front independent suspension, rear leaf spring suspension using 5.5 axles, HOG steering, working doors, bonnet and tailgate, 5 seats and a towing hitch; its very possible that some parts are with wrong colors or there could be outdated building techniques, but i think that is not too bad for one of my first LDD models (i am no sure, but if i have enough time and inspiration i could make it in real Technic parts), The LXF: http://bricksafe.com/files/imanol/nissan-frontier/Nissan Frontier.lxf. Model Team Paramount Group Marauder MRAP. Again, one of my oldest models, it is made at a pretty small scale but it could still be considered as "model team" (i think), it has pendular suspension in both axles which are damped by cross-axles which act as leaf springs, it has HOG steering, working winch and doors, a spare tire and 2 turrets that can be mounted on the roof: The LXF: http://bricksafe.com/files/imanol/paramount-marauder/Paramount Group Marauder.lxf Technic Unimog U500 Long Chassis (I have called it UNI-MOC) You might have seen it in the latest posts at 8110´s Mods topic ( http://www.eurobricks.com/forum/index.php?/topic/57543-8110-unimog-mods-and-improvements/&page=78 ), it is a 64 studs long and 24 studs wide model which i started to make because the modifications in the 8110 got to a too high level and i wasn´t satisfied with the whole model, i created this new model to hold all of my wanted functions and details, this model has some designs from other builders: Madoca´s Tatra 2-speeds gearbox (slightly modified to fit in this new chassis), Efferman´s planetary rims, a modified version of Didumos knob gear driven axle and a 3-side dumping system and dropping sides inspired by Kumbbl´s modifications, it was also made by some help and inspiration by Pat-Ard: This Unimog has 4 M-Motors, 2 L-Motors, 2 XL-Motors, 3 IR RC Receivers, 2 AAA Battery Boxes and 3 PF Switches (brick-built with ugly colors), why so many motors? well, as you might know, the 8110 had only one M-Motor inside it, which was meant to drive the 3 main functions of the set (front PTO, rear PTO and the pneumatic pump) the problem was that the functions couldn't be used simultaneously, you couldn't power front and rear PTO´s at the same time or with the pneumatic pump and because this system uses a gearbox and axles to engage and transmit the power to the different parts, this results in a lot of friction and power losing (other of the reasons of why i started this MOC), other thing that bother me about the 8110 was the proportions of it, it was very tall with lifted wide axles, but very thin cab and bed which made it look silly, the chassis had no space for all the functions that i wanted, i couldn't place enough motors or functions on it, and the axles were another problem, the steering pivot and angle was a disappointing, the tires couldn't steer too much with the half pins, and if you removed them, the mudguards and the surrounding elements needed to be placed far away from the tires to avoid them from colliding, these are few of the reasons of why i started to make my own version of this UGN class of Unimog (which are U300, U400 and U500). Some of the good features of this model are: Improved steering pivot (2 studs closer to the wheels compared to standard portal hubs) Wheels and portal hubs can handle more torque without jamming parts The axles are more compact (less tall), so the chassis can move even lower for a more realistic performance Front steering by L-Motor Rear steering (By M-Motor) with the same axle design as the front one Anti-roll bars in both axles, which help a lot to handle with weight and give a lot of stability, and they can be easily removed for serious offroading Remotely shifted 2-speeds gearbox by M-Motor Directly driven pneumatic pump (L-Motor) and PTO´s (M-Motors) for less power losing 3-side tipping 37 studs long 23 studs wide dump bed with dropping sides using a V2 large pneumatic cylinder Drive by 2 XL-Motors So, these are some of my models, i hope you like them, and i hope to upload more of them, i will try to do my best with all them, let me know what you think about this topic and the models, and any suggestion is well received Thanks. -

Alternate MOC models from official #LEGO Creator sets
Peteris_Sprogis posted a topic in Special LEGO Themes
Custom design alternate MOC model made using pieces from official LEGO sets. Let's start off with the 31074 Rocket Rally set. More to come!