Search the Community
Showing results for tags 'lgb'.
Found 4 results
-
MOC: 1/22.5 scale Kitson-Meyer - Ferrocarril de Taltal. UPDATE: Now with video!
Sven J posted a topic in LEGO Train Tech
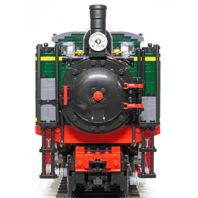
Dear trainheads, Finally, my new locomotive is ready! This time, I chose a prototype from quite a distant edge of the world - an articulated narrow-gauge (1067 mm) 0-6-6-0T "Kitson-Meyer" engine belonging to the Chilean "Ferrocarril de Taltal" (FCT; written as "Ferro Carril Taltal“ on locomotive number plates), or "Taltal Railway". Ten of these locomotives were delivered to the FCT by Kitson & Co. (Leeds, UK) between 1904 and 1907, and further eight engines later acquired second-hand. Over the years, several modifications were carried out: For example, all engines were converted to burn oil soon. Water and fuel capacity of some locomotives (including No. 50, the prototype for my model) were increased by adding welded enlargements on top of the side and rear tanks. "The Railway Magazine" gives a short description of the FCT (Vol. 90. No. 551, May-June, 1944, pp.158—159): More detailed information can be found in the books "The Taltal Railway" and "Kitson Meyer Articulated Locomotives", both by Donald Binns, which were my two principal sources. In general, very few technical information about the FCT locomotives can be traced. Despite searching for months, I wasn't able to find a detailed drawing. So I had to largely rely on taking measures from photos and on one single, distorted sketch on a data sheet describing the near-identical engines from the "Ferrocarril Tocopilla al Toco" - see below. (While there are numerous photos of the sole surviving FCT Kitson-Meyer, no. 59, nearly all of them were taken during the engine's last years in service, when it was already in a very poor state of maintenance, or since it has been on display as a monument. Because of that, it's difficult to conclude how it looked in better days. Nevertheless, I hope - and believe - that the model's overall impression comes close enough to the real locomotive's appearance.) The model is held in accurate 1/22.5 scale. It consists of quite exactly 3,000 parts and weighs in at 2.4 kg. The engine is powered by two L-motors (one mounted vertically in each bogie); each motor has its own BuWizz as a power supply and R/C unit (technically, one BuWizz would suffice, but this configuration allows for longer running times). The wheels come from BBB and the lighting equipment was purchased from Brickstuff, as usual, while the rods are 3D-printed parts of my own design. Enough said – enjoy the photos! Data sheet for the similar engines (though with different brake equipment and cab) of the "Ferrocarril Tocopilla al Toco": Detailed cab... ... and also smokebox interior, showing the exhaust nozzle, the base of the chimney and the boiler tubes: The cab roof is detachable. The ventilation flap really opens, you can see the lever for the steam whistle through the hole: The top of the Belpaire firebox is also detachable, giving access to the charging sockets and the power buttons: The lower part of the cab ladder is attached to the bogie and turns with it. Note also the chain which prevents the bogie from jackknifing in case of a derailment. Advanced lighting functions, controlled via two BuWizz channels: Before starting their daily trip into the Andes, engineer and fireman still have enough time to pose for a photo with their trusty old lady... ... while one of the brakemen uses the unexpected spare time in a different way. Well, but not for long. Soon "El Jefe" arrives in his flashy Chevrolet and critically watches his employees' activities... A few shots from the building phase, showing further details. First, the bogies with the motors. You can see the leaf springs underneath, as well as the brakes and (as on the real thing) only one single sanding pipe in front of the first wheel: The firebox once again: The main frame. The ashpan contains two weight bricks, which help to keep the centre of gravity low and thus to prevent the model from tipping over. And a view of the complete technical layout with batteries and motors. The multi-coloured bricks underneath are just the building stand. Full-resolution images can be found in my Bricksafe folder. At the moment, it’s too hot in my attic for filming, and I’ll go on holiday next week; but when I’m back, of course I'll shoot a video of the locomotive and its train, so stay tuned! Last but not least, I'd like to give my heartfelt thanks to all those AFOLs who attended the development of this model with their feedback and encouragement; and especially (though we've never met in person) to my dear "pen-friend" Sergio Monai @monai, whose multilingualism and commitment were an invaluable help during the research phase. Comments and criticism are of course most welcome! Thanks for stopping by! Best regards, Sven Edit: Video now available here! -

[MOC] 1:22,5 Scale - G Gauge (45mm) - Toy Locomotive (Mark II) and new LGB-based "gondola" wagons
Paperinik77pk posted a topic in LEGO Train Tech
Hi all! Here we go again with big Lego trains running on 45mm G Gauge track! Some of you may remember the yellow Toy Train locomotive I prepared back in 2019 -it was one of my first experiments with G-Gauge trains. This little locomotive was based on a small Powered-Up battery box and a Medium motor. Here it is during a night run on the new 45mm copper track with wooden sleepers I restored to be used on my small garden railway. Here's a detail of the old chassis with the original 1,667:1 gear ratio. This solution proved to work fine on a flat track at home, but was completely useless on the garden line, which can be easily considered a "mountain railway". A 3:1 gear ratio worked better, but gears were too stressed and speed was ridicolous. Plus, with some wagons, the motor always needed to work at full speed. Therefore, back to the lab, I completely revisited the heart of the locomotive, and updating some details on the exterior. Here it is, the Mark II (TADAAAAAAA) !!! And...what's new??? Actually, at body level, it did not change so much from the older one . Handle bars, and headlights have been modified and a new exhaust scoop has been added over the hood (there's no more a red On/Off button). The real new part is under the bodywork: A completely new chassis has been introduced, and now features a new 4-ports PuP Hub and a more efficient Large Motor. Gear ratio is now 2.779:1. It is very strong and smooth - the big battery/bluetooth hub helps traction (which can be increased with the use of rubber bands around the wheels), and the L-Motor is a great improvement over the M-Motor. I've prepared some workflows on the PuP application to work at 25/50/75/100% of the power. The chassis can be detached from the body with four "fast unlock" pins, so changing the batteries is now an easy task. Then, with a locomotive now up to the task of garden railroading, I needed some rolling stock. I've some LGB wagon bases with studs on top (item number 94063) which are the perfect chassis for some wagons I've designed in Stud.io. Both axles are steering, to help the wagon working on tighter curves. So here it is the small gondola , in a bright blue color: And the tan/beige gondola with taller sides: The LGB chassis runs smoothly and really helps the whole train to roll better. Sometimes these things are available (used or new) with an acceptable price, so I get them. A final photo of the consist (fat least for the moment)! Next to come, a passenger and a closed freight wagon with sliding doors (let's see who comes first). I'll try it on the garden railway soon and give some feedbacks (for now only some pretty satisfactory tests were conducted on homemade ramps) I hope you like it!!! Ciao! Davide -
[MOC] Chilean "Gondola Carril T-1024" in 1:22.5 scale
Paperinik77pk posted a topic in LEGO Train Tech
Hi all, today I'd like to show you something I'm after since a few months. During the first days of lockdown I saw a documentary on Chile and its people, towns, traditions and lifestyle. One of the main points of the documentary was focusing on the railway running from Los Andes to Rio Blanco valley , a spectacular run between mountains, aside the Rio Blanco river. Originally it connected Chile to Argentina. And this "thing" was presented as the main attraction of the current line - its name is "Gondola Carril T-1024". I sincerely do not know why it is called "T-1024" . The "Gondola Carril" is a railmotor, based on an American built bus, the Yellow Coach Z-26. This time I understood that the letter Z is identifying the chassis type and 26 the number of passengers it could carry . The bus was normally used in Los Andes town, until it was converted into this very nice railcar. Originally used as a cheap inspection vehicle, It is now fully restored and used for touristic travels. And I can say it is an experience I would like to do once in my life. The "Ferrocarril Transandino de Chile" is a narrow gauge (metric) railway, therefore I based the whole project on 1:22.5 scale (good for running in the garden!). It is designed to run on G-Scale track (45mm), but with some modifications it could easily be converted to run also on standard Lego gauge (on large curves, since it is quite long). Since there are no specific technical specifications for the Gondola, I searched for the ones of the Z26 Bus - and tried to adapt the design according to the pictures and videos of the real railcar. The original motor used by Yellow Coaches Bus was replaced by a more modern Cummins Diesel, as nicely "declared" above the radiator. Despite the original railcar is based on a chassis, this one is basically a unibody build with some underside reinforcing (let's say - like the Jeep Cherokee XJ). It's quite light, so a medium motor is sufficient to move it. In the design, I used a PuP motor, placed in the front, under the hood. Then a pair of gears in cascade, cardanic joints and a transmission axle bring the power to the rear wheels. The "gears" I mentioned can be changed easily to have a lower or higher gear ratio, as needed. This railcar not meant to pull anything, so a lower gear ratio could save some batteries. Battery box is placed in the rear part, immediately beyond the rear axle. The small red axle you can see near the T-1024 sticker is used to turn the PuP battery/receiver on and off. The next picture shows the powertrain - it's taken from an alternative blue version of the railcar I prepared , with some freelance solutions which make it more "generic". I hope you like this one, and (more important) take a look to the original one, because it's really nice piece of history. https://www.ferrocarril-trasandino.com.ar/historia/ Ciao! Davide -
Hi all, after a very long time, dedicated to my retrocomputing hobby, I finally got back to Lego trains . What made me come back to drawing and studying was a very cheap copy of G-Gauge LGB trains, made in China by a company called Newquida. These trains also offer a specific track, only proposed in Radius 1 (600mm), all made by brown plastic. So I gave this track a try (for 25 Euros I got a full circle, two points and an half circle). Apart the 45mm gauge, the track is all in all very similar to Lego standard geometry. Currently my two prototypes are not G-gauge perfect, they simply are 12v Lego trains with their size multiplied by 2. They are a 7810 and a 7720 on steroids, basically. After getting the track, I widened the bogies of my Lego prototypes of "big" Lego trains from L-gauge to G-gauge and I made a test run...the result is...I'll never go back to L-gauge (only for for trains which are so big and heavy ). This track is cheap and quite solid. More than enough for the moment! So, having the opportunity to properly test my locomotives, I bought three LGB cars (the ones used on standard sets) at quite a bargain price. Immediately, I understood that some ideas I got from photos, catalogues , Eurobricks members ( @Tenderlok ) were correct, others were quite right at a first sight, but totally wrong. First thing to think about: dimensions - The scale 1:22,5 is the one commonly used by LGB for Narrow gauge trains running on 45mm tracks. It means that real trains running on tracks around metric gauge (950mm/1000mm/1067mm, but also smaller ones) are quite standardized to this scale. Standard gauge real trains are quite commonly scaled to 1:32. My Double-L trains are something between these two standards. They are taller and narrower than LGB cars. They are close, and this was quite a satisfaction for a newbie like me. So let's make a bit of reverse engineering. I got some data of real trains (for example BerninaBahn Abe 4/4 30 - 1000mm , JNR KIHA 31 railcar - 1067mm and Genova-Casella locomotives 950mm adapted to 1000mm), and I calculated the measures in studs. We're always around 13/14 studs for width, lenght may vary but buffers are quite often near 3 studs, height can slightly vary but roofs at 15,16 bricks from ground. What I would like is to have some basic reference measures to standardize a bit some parts of my future design. So i dismantled one of the LGB cars and started to take some measurements in order to see if my calculated dimensions were correct. Well,let's say three studs for a single buffer. So lenght of the body could be approximately calculated as: overall lenght over buffers translated in scale and then divided by 0,8cm, subtracted by 6 studs. It's not a general rule, but it works to at least have an idea. I went back on fixed buffer solution instead of pivoting one - it works perfectly. My train base chassis is 12 studs wide - LGB one is 11. but LGB undercarriage parts are thinner than Lego, so I will have to rework all the details (leaf springs, bogies and so on) to be a bit more narrow. Axle steering at least is correct and works fine - it should be limited a bit - LGB axles steer but not so much (I'm no more using Lego tracks for these trains so I can limit the steering a bit). The wagon's body is 14 studs (sounds nice). All doors and windows are smaller than I thought on these wagons. Second thing to think about: weight So, I always tought my locomotives were too heavy. Not at all, LGB wagons are heavy too, so a bit of weight in the locomotive is welcome to improve traction. One thing for sure: the XL motor works fine and smoothly , but bigger batteries are needed (the small battery box is not enough). So, this is what I learned from my errors and ideas so far . First trial in designing something more serious I would like to share with you my first design of a locomotive in real G-Scale, not based on double-sized Lego sets. It's the Electric locomotive number 29 (red) and 28 (blue) of the Genova-Casella railway, one of the survived narrow gauge railways in Italy. Locomotive number 28 was scrapped and parts were used to keep the 29 alive. This design still keeps the possibilty of changing from L-gauge track to 45mm track, but I am redesigning the whole thing. I do not know the real width of the locomotive and I do not have blueprints...so I used a lot of photos. Currently it is 14 wide (16 with ladders), but I'm going to make it narrower by one stud (the real locomotive is thin and tall), in order to give a more faithful look. It will loose the double gauge feature, but I think it deserves a less square design. I'm planning to use two XL motors and a standard PF battery box, but I could also think of a 7,2v high capacity (4000Mah) RC car battery. They are simple as usual, the only snot-designed part are in the front of the locomotive. I hope you like them, and I'd really like to understand if what I experienced could be correct or useful Ciao to all! Davide