Search the Community
Showing results for tags 'creator'.
Found 210 results
-
The Antarctic Snow Cruiser was a vehicle designed late 1930's, intended to facilitate transport in Antarctica. It has a very interesting and adventurous history. Cruiser (known as Turtle), a very innovative vehicle, designed to operate at extreme conditions. Plane (known as Eagle), a Beechcraft D17 Staggerwing type airplane mounted on the roof of the cruiser. (To get the airplane on or off the Cruiser, a ramp of snow was to be built-up to meet the sloping aft deck of the "Turtle".) This set presents the Arctic Snow Cruiser with a correct minifig scale. All the parts connects fine, the whole vehicle is very stable to grant great playability. With tons of features the set offer a very good playing for everyone. You can find it at: https://ideas.lego.com/projects/46670 If you like it, please support it. Thank you. More to read about: http://www.joeld.net...nowcruiser.html or at the project's page: http://antarcticsnow...er.blogspot.com
-
Hello Creator and Disney fans, Mickey Mouse is a legendary American cartoon character co-created in 1928 by Walt Disney and Ub Iwerks. Steamboat Willie is a 1928 American animated short film directed by them. It was produced in black and white and this cartoon is considered the debut of both Mickey and Minnie Mouse. Building instructions are available on the following links: https://rebrickable.com/mocs/MOC-171558/_TLG_/mickey-mouse-steamboat-willie This is a studless model and everything is brick-built, stickers are not used. I wanted to create a clean model which is as accurate as possible in this scale. It includes many typical details: the shoes, the pants with buttons etc.. Maybe the most challenging one was the head with some tricky build techniques. Thanks for visiting, _TLG_ Mickey Mouse, Steamboat Willie - Instructions 01 by László Torma, on Flickr Mickey Mouse, Steamboat Willie - Instructions 02 by László Torma, on Flickr Mickey Mouse, Steamboat Willie - Instructions 03 by László Torma, on Flickr Mickey Mouse, Steamboat Willie - Instructions 04 by László Torma, on Flickr Mickey Mouse, Steamboat Willie - Instructions 05 by László Torma, on Flickr Mickey Mouse, Steamboat Willie - Instructions 06 by László Torma, on Flickr
-
Hello Creator and Disney fans, Mickey Mouse is a legendary American cartoon character co-created in 1928 by Walt Disney and Ub Iwerks. The longtime icon and mascot of The Walt Disney Company, Mickey is an anthropomorphic mouse who typically wears red shorts, large yellow shoes, and white gloves. This is a studless model and everything is brick-built, stickers are not used. I wanted to create a clean model which is as accurate as possible in this scale. It includes many typical details: the yellow shoes, the red pants with white buttons etc.. Maybe the most challenging one was the head with some tricky build techniques. Thanks for visiting, _TLG_ Mickey Mouse - instructions 1 by László Torma, on Flickr Mickey Mouse - instructions 2 by László Torma, on Flickr Mickey Mouse - instructions 3 by László Torma, on Flickr Mickey Mouse - instructions 4 by László Torma, on Flickr Mickey Mouse - instructions 5 by László Torma, on Flickr Mickey Mouse - instructions 6 by László Torma, on Flickr
-

[OFFICIAL] LEGO 40597 Scary Pirate Island - Gift With Purchase - UPDATED October 4
F1stzz posted a topic in LEGO Pirates
4 October, 2023 The set has been officially named LEGO® 40597 Scary Pirate Island. The new LEGO Creator set will be available from LEGO.com between October 13-22 with purchases (estimated) over US$100, although purchase thresholds and regional dates have not yet been officially confirmed. ------------------------------ 16 September, 2023 A couple of hours ago a source named @exabrickslegogo_ posted a leak about the upcoming LEGO Creator Pirates GWP 40597 set which is gonna hit the shelves in October He's also posted a pic of the set's box in his leaks channel which everyone can find in the description of his Insta page. Feel free to check it all out & share your thoughts, mateys EDIT: here's a picture of the box I've mentioned earlier posted by @greekbricks_ -

[MOC]◄URAL 4320 6x6►[2023]
Michael217 posted a topic in LEGO Technic, Mindstorms, Model Team and Scale Modeling
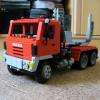
Welcome to my garage LEGO!!! Hello! My name is Michael. I'm a Builder from Russia, I love muscle cars! URAL 4320 6x6 The legendary Soviet truck, which has been produced since 1977 to the present! I started collecting in parallel with Dodge at the beginning of the year. Initially, I put ordinary hubs on it and drove around the house very well, but before photographing the finished model, I decided to test it on the street, as a result, it was very hard for the engine, (the old version is on the video) after which, over the past week, I went through the chassis, put the portal hubs, abandoned the fake engine and moved the buggy motor under hood (to make a direct gimbal on the gearbox). As a result, it became slower, but more passable! Description: -Drive Buggy motor -Steering Geek Servo -Managing RCbrick -Permanent ALL-wheel drive 6x6 -Bridges with planetary gearboxes -2x high-speed transmission (the lever is duplicated in the cabin) -The steering wheel turns with wheels -Doors, hood and tank open -Detailed interior and under-hood space -Weight: 2.6 kg Length: 68 cm. Instagram: https://www.instagram.com/lego_muscle_garage/ Join my group in VK: https://vk.com/legomusclegarage All photos on the link: https://bricksafe.com/pages/Michael217/ural-4320-6x6 All photos on the link: https://bricksafe.com/pages/Michael217/ural-4320-6x6 -
[MOC]◄Dodge Challenger 2008 SRT►[2021]
Michael217 posted a topic in LEGO Technic, Mindstorms, Model Team and Scale Modeling
Welcome to my garage LEGO!!! Hello! My name is Michael. I'm a Builder from Russia, I love muscle cars! Dodge Challenger 2008 SRT Hello everyone It's the first of August and I'm in a hurry to share with you another project! This time I collected the younger Dodge) And this is the third car of this brand in my garage! Description: - Drive - 1 Buggy motor - Steering - Servo - Nutrition-Small BB - Brain RC brik - Independent front suspension - Rear suspension bridge with four-point mounting - The steering wheel turns with wheels - Open the doors, hood, sunroof - Well-designed interior and under-hood space - About 2000 parts Instagram: https://www.instagram.com/lego_muscle_garage/ Join my group in VK: https://vk.com/legomusclegarage All photos on the link: https://bricksafe.com/pages/Michael217/dodge-challenger-2008-srt Enjoy your viewing! Rate, comment! Thanks!) -
Hey guys, I want to know lore or hidden secrets in Lego sets from any theme (city, creator, dots, disney, duplo, friends, harry potter, icons, ideas, marvel, dc, minecraft, minifigures, monkie kid, ninjago, trains, xtra, star wars, sonic the hedgehog, studios, toy story, indiana jones, overwatch, lord of the rings, architecture, juniors, batman, cars, lego movie, lego batman movie, clikits, 4+, classic space, castle, modular buildings, dacta, dimensions, factory, discovery, exo force, elves, frozen, fabuland, fusion, galidor, ghostbusters, hidden side, hero factory, technic, island extreme stunts, jack stone, jurassic park, atlantis, juniors, chima, ninjago movie, mixels, monster fighters, nexo nights, powerpuff girls, pirates, roboriders, racers, scooby-doo, simpsons, brickheadz, spongebob, sports, stranger things, teenage mutant ninja turtles, thomas and friends, bob the builder, town, unikitty, vidiyo, trolls world tour, ultra agents, wild west, vikings, winnie the pooh, world city, world racers, bionicle, and znap)
-
Hi everyone, Creator and Classic are themes that are targeted at people who want to build and rebuild their sets over and over again. In order to chose the right set that suits your needs, I created a tool that simply takes the rebrickable inventory and plots it as a histogram. Instead of explaining all the details, here's an example output for a Classic and a Creator set. Classic - 11033 - Creative Fantasy Universe Creator - 31132 - Viking Ship and the Midgard Serpent Since not all types and colors of bricks are as useful to others as they are for me, I will not write any recommendations or ratings of the sets. However, if you point out any interesting facts, I can add these to the individual graphs. Let me know if you are interested in such diagrams. I will then upload the graphs for all the 2023 sets from these themes.
-
Hi everyone It's been a while since I've posted any new MOC's on Eurobricks but I wanted to show the latest project I've been working on called "Red London Telephone Box". In the past I've included miinifig scale phone box's in a couple of my other MOCs, which gave me the idea of building a much more detailed, large scale model of this British cultural icon. Although the red phone box can be found throughout the UK my model is based on an early version of the phone box called the "K2" which was designed specifically for use in London. As well as the phone box itself I've also included a red British pillar box and a street lamp complete with hanging flower baskets and plant pots. The front door can be opened to reveal a vintage telephone and detailed interior. LEGO IDEAS Thanks for checking out my latest MOC and I hope you like it. Whilst designing this I felt that it would make a pretty good submission for LEGO IDEAS. If you'd like to read more about the model or give it your support on LEGO IDEAS then I'd be very grateful. https://bit.ly/legotelephonebox Thank you very much.
-
INTRODUCTION The Viking theme always captured my imagination. And after my dark ages it was one of the first themes I went and bought sets from on eBay. However, Viking Ship Challenges the Midgard Serpent, was not one of those sets. So when Lego decided to pay homage to that set in the form of a 3-in-1 Creator set I knew I had to check it out. SET INFORMATION Number: 31132 Title: Viking Ship and the Midgard Serpent Theme: Creator Released: 2022 Part Count: 1170 Box Dimensions: 48 cm x 37.8 x 7.05 cm Weight: 1840 gram Set Price (RRP): 119.99 EUR / 104.99 GBP / 119.99 USD / Price per Part: 10.1 EUR / 8.8 GBP / 10.1 USD Links: Brickset, Bricklink THE BOX The box shows off the main build of the set, the "Creator" label, and the fact that it's a 3-in-1 set. I've got to say, if I was a Lego ignorant parent buying for a kid I might assume you got all 3 builds in the set. Clearly Lego hasn't received enough complaints of that nature to change the packaging though. The back of the box gives more close-ups of the 3 different models with artistic backdrops setting each scene. The side of the box shows us one of the Viking women in official minifigure size and even more ways you could set up the models. CONTENTS OF THE BOX Inside you'll find 7 numbered bags, 1 unnumbered bag holding the flex cables, and one bag holding the instruction books. THE BUILD PART 1 I considered saving the Viking ship for building last as it's the model I want to display. But when I opened the instruction books I found this for the boat: And this for each of the other models: That meant I built the boat first as was clearly intended by how the parts were packaged. The instructions for the boat follow the standard format of opening bags in sequential order to get to the end. The other two models pull parts from all over. I find it humorous that the designers decided they should indicate one should just dump all the parts out at once to begin building the lodge or the wolf. If you've built a Lego set from the past couple years you've noticed that the instructions have star-burst animations when you finish a set. In building the boat I found that instructions added these bursts for small things like attaching a sub-model to the main model. Have we really become so dopamine addicted that we need this? The boat uses a lot of SNOT to great effect. A section that impressed me was the use of the new 6x6 curved plates offset to get the curve of the hull. Here you can see the SNOT sections coming together. The front and back sections of the hull are practically identical. Which means the build process feels very repetitive. But the end product looks good so I can't really fault that. FINISHED PRODUCT The first six bags give you the great looking boat. Bag 7 gives you the sea monster. The end result is a fantastic looking set! The boat is large and could easily host twice the number of Vikings. The brick-built sail is sturdy and looks really good. There are plenty of places to pose figures. And the Midgard serpent just begs for storytelling of epic battles on the high seas. I love how the set designers made the figurehead similar to the head of the serpent. It really feels like the Vikings had inspiration in carving the figurehead because of past encounters with the serpent. Now for a few complaints. The standard yellow is an odd choice under the dark blue sections. I wish they would have used an earth tone, flaming yellowish orange like on the figure head, or kept it dark blue. It's just too bright. The back of the sail has a lot of exposed under-studs which is unavoidable. The front looks amazing so you just need to display it from that direction. The Midgard serpent is also very bright. It's ok, but it doesn't feel necessary. It's also got unsightly hinges breaking up the flow of the body. And while the tail has a lot of movement because of those hinges, the front half of the body is very limited in movement. From the back you can see that the technic elements have gaps which are left when just a few more pieces could have covered them up. But these are small gripes. Overall the main build looks really good. I don't have the original Viking ship to compare this version to so I compared it to the Goat Boat. You can see how much bigger the Viking boat is to Thor's version. Though they aren't soo different in scale that they couldn't be seen in the same scene together. Those looking to make huge Viking layouts could add a sail to Thor's boat and have both in the same diorama. Also included in the main build are some animals. Following the Creator trend there are no molded animals forcing the designer to create brick-built designs. The crows found perched above the sail look amazing. These probably symbolize Odin's crows. But the cow, underwhelms. It's a clever way to create a cow with a minimal number of parts. And things like the legs and head look good. But the body is too angular and the lack of tail makes it feel incomplete. And now for the minifigures! All 4 are unique to this set. And 3 new torsos were designed to fit the Norse aesthetic. Lego brought back the traditional helmet mold. And while history books tell us Vikings didn't have horns on their helmets, I think Lego has been smart to keep that feature. A new mold was created for the female Viking that looks like a cross between Middle-Earth and Elsa from Frozen. But don't mistake me, it looks amazing! Here's a better shot of the torsos and heads. And the amazing torso detail continues on the back. Compared to Viking figures of days gone by these new additions fit in while maintaining a fresh look. I don't have the Series 7 Viking Woman and you'll have to excuse the green arms on my Series 4 Viking (I added those for my Mitgardians and didn't want to risk cracking the torso to switch them back out). My biggest complaint about the new Vikings is concerning shields. When I heard Lego was making this set I wished for a new set of printed shields like the Series 20 Viking had. Instead we got brick-built ones. And I actually really like how you can customize the brick-built shields with a myriad of color schemes. But it's still no substitute for the minifgure scale shield. Finishing the main build leaves you with a small selection of extra parts. THE BUILD PART 2 The next build I tackled was the lodge. It helped that I built it on the heels of building the boat so I remembered where parts were. Otherwise I would have had to completely disassemble and organize the parts to be able to find anything. I don't know a way around this, but building either of the models apart from the main model is a lot harder. The lodge has a main floor and a roof that can be removed for easy play access. Once it's finished you have a small lodge with attached anvil station, a plow attached to a cow, and a dragon attached to burning up your supply of hay. The roof has lots of gaps and would be very drafty in the winter. The plow is amazing and looks like the real thing. Easily the best sub-build of the entire set. The dragon is lack-luster. Only the head and tail can move up and down. So the wings have to remain stationary. If you don't want to lift the roof off you can raise the panels to see inside. There are shields lining the walls and small throne in front of the fire. The other side has the attached platform for using the anvil and a small stream. When all is said and done here's what you have left over. It's a tone of parts! Seems like a larger dragon could have been made and/or the unsightly gaps in the roof fixed. THE BUILD PART 3 Finally I build the wolf. The sand green pieces find their best use here in making a tree. But it's far from the best brick-built tree I've seen. And the dark blue gets used to create a giant Fenrir wolf. The size of the wolf is fine when you think of it as the mythical Fenrir wolf. But it's shaping leaves much to be desired. The legs are thin and the tail is bushy(?) and full of gaps at the same time. This is the worst of the 3 build options. The plot of ground where the Vikings have made camp includes a spot to hide some gems. And when you're done with this build you again have a ton of parts left over. In both of the alternate builds the cables, most of the yellow slopes, and most of the pieces used for the brick-built sail are never used. There's also a fair amount of technic that only gets used on the serpent and nowhere else. This begs the question, "why?" Seems like Lego could really make better use of the pieces for the alternate models. The fact that they don't leads me to believe the 3-in-1 aspect is more a gimmick than something that adds value to the set. OVERALL I'm old enough to remember when all Lego sets had alternate models advertised on the box of the box. The Creator 3-in-1 line seems to be trying to bring that feature back for a specific line of sets. But it ultimately fails for the Viking Ship and the Midgard Serpent. If all you want to do is build the main model then this set does a fantastic job! The serpent isn't as good as the original one from 7018. And there are no printed shields. But overall it's a great looking Viking boat. And the minifigures really increase the desirability of the set. SCORE How do I rate this set? DESIGN 9 If I had to rate the other two models by themselves I'd lower the score to 4. But the main ship really carries this score. It's designed well and looks good. BUILDING EXPERIENCE 7 It's a little repetitive. And there are a few fun SNOT techniques. But overall this is a fairly standard build experience. FEATURES 9 Lots of places to pose minifigures, a working ballista, the ability to customize the shield colors even within the set, and while lack-luster the addition of alternate models means this set has a lot going for it. PLAYABILITY 10 As soon as I finished building it I wanted to sail my ship across the table to hunt Midgard serpents. This set is extremely playable. PARTS 8 There are a good selection of parts. There's a good selection of newer elements like the large curved plate. And the minifigures are amazing. VALUE FOR MONEY 9 This set almost hits the 10c/piece ratio and once you're done building the main model you really feel like you got your money's worth. FINAL SCORE: 9 There are some obvious flaws with the set, but they are minor. If you like Castle themed sets, ships, or Vikings this is going to be a great buy.
-
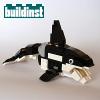
A tiny microscale Offshore Powerboat!!! It contains 33 pieces without the base.Fast,tiny and yellow,the king of the sea. Offshore powerboat new_4 by Antonis Papastergiou Offshore powerboat new_3 by Antonis Papastergiou Offshore powerboat new by Antonis Papastergiou Offshore powerboat new_4 by Antonis Papastergiou Ofshore powerboat_6 by Antonis Papastergiou Ofshore powerboat_7 by Antonis Papastergiou Ofshore powerboat_8 by Antonis Papastergiou Ofshore powerboat_9 by Antonis Papastergiou, on Flickr
-
This project is based on the house of Ole Kirk Kristiansen, the founder of the LEGO group that celebrates its 90th anniversary this year. I made several rooms in the house. The workroom contains various details such as his typewriter and various blueprints. If you want you can support this project https://ideas.lego.com/s/p:ddb75bfdf7644f8386cb25501c7a685e
-

[MOC] 10290 - UAZ 3303 (1:16)
ArtemyZotov posted a topic in LEGO Technic, Mindstorms, Model Team and Scale Modeling
Alternate build of the "10290 Pickup Truck" set.Medium truck UAZ 3303 aka "Tadpole" is one of the legendary Soviet Union cars.The car has been manufactured since 1965. Features:- 1:16 scale- openable doors and trunk- rigid structure- all accessories from the original set was not used, you can put them into the trunk Instructions: Rebrickable -
Hi, I'm Tim and I'm in Canada. 43 now and I've grown up with LEGO my whole life, I focused on Classic Space when I was a kid, my brother was into Castle. During my 20s and 30s most of my LEGO was packed away. Last year I pulled them out again since my kids were now getting into LEGO as well. Going through my old collection and cleaning it up rekindled my addiction for it and I've started collecting now. I am amazed by the Creator Expert line and Modular Buildings collections. I also like the Creator 3in1 and Speed Champions as well as anything that I'll find interesting to build. Keep building!
-
10290 sadly won't be a Delorean Time Machine, instead it's a lovely vintage pickup truck. From Promobricks: https://www.promobricks.de/lego-10290-pick-up-truck-offiziell-bild/126707/ "A perfect escape from modern life! Get ready to travel back to the 1950s with this LEGO® Pickup Truck (10290) building project. Packed with details, this true-to-life model recreates the vintage pickup truck shape with its rounded lines. Explore the model to discover realistic pickup truck features like a stepside bed, opening doors and tailgate and removable wooden side railings. Celebrate the seasons This truck is hard at work all year round, delivering produce from Green Farm. Create a seasonal display with the many accessories included. There’s a wheelbarrow with flowers and a watering can for spring. For summer there are 2 wooden crates, tomatoes, carrots and a milk bucket. Autumn brings a crate of pumpkins, while for winter there is a wreath and a festive gift. Love the journey This set is part of a collectible series of LEGO buildable models for adults who appreciate beautiful design. It offers an immersive build and will make a top gift for any fan of vintage pickup truck models. Build a faithful LEGO® model version of a vintage 1950s farm pickup truck. Explore all its realistic features then place your truck on display to admire this classic collectible model. This LEGO® Pickup Truck 10290 buildable model set offers a rewarding building project for adults as you recreate the iconic rounded pickup truck shape from a classic era in vehicle design. Explore the model to discover its many realistic pickup truck features like a stepside bed, opening doors and tailgate and removable wooden side railings. Fresh from the farm! Discover lots of seasonal accessories including a wheelbarrow and watering can, vegetables and a milk bucket, a crate of pumpkins, plus a festive wreath and gift. Steer the truck then open the doors to inspect the interior. The bonnet also opens to reveal the engine. Designed especially for adult LEGO® builders, this set offers a rewarding build with a collectible display piece to cherish. It’s also a great gift idea for anyone who loves vintage 1950s pickup trucks. Measures over 5.5 in. (14 cm) high, 13 in. (33 cm) long and 5.5 in. (14 cm) wide. This LEGO® 1950s vintage pickup truck set is part of a range of creative building sets designed for adult building fans who love stunning design, intricate details and elegant architecture. LEGO® building bricks are manufactured from high-quality materials. They’re consistent, compatible and connect and pull apart easily every time – it’s been that way since 1958. With LEGO® pieces, safety and quality come first. That’s why they’re rigorously tested so you can be sure that the model is as robust as it is beautiful."
-
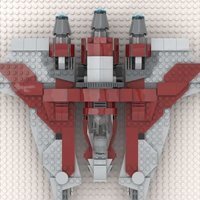
I was 8 years old when I got my first Lego Classic Space set LL918. I remember I spent hours with catalogs looking at LL924 and the Galaxy Explorer LL928. When I got LL928 from my grandma I was thrilled and couldn't let go. I even took it with me on holidays. Galaxy Explorer Dropship by Giorgio Chronas, auf Flickr A few years later I saw the Galaxy Commander in the store. At the time, due to my father's job, I was living in an a developing country in Africa, where Legos were very rare. I was gazing at the store window, nearly paralyzed and probably with a wide open mouth. I had just past my birthday and for Christmas time I would have to wait a long time. As quickly as I could I ran back home broke that piggy bank into pieces, took everything I had and ran back to the store. I still remember the feelings I had when building this spaceship and looking at every new part as if it were yesterday. Galaxy Commander Dropship_1 by Giorgio Chronas, auf Flickr Now, decades later, being an AFOL I still love space topics, specially neo classic space models from other Afols. A few years ago I remember seeing Wolf Leews modernized version of LL928 (and 924 and 918) in LegoIdeas and having exactly the same feelings. I tried to push it in LegoIdeas but unfortunately it did not make it to the threshold. Wolf Leews, if you see this post, thanks for sharing the instructions. I have your models in my showcase ever since. The idea of an own classic space model did not let go of me. It took me again years of thinking how to approach this topic. My problem was I wanted everything. I wanted to have a command centre, several spaceships, some robots some cool versatile and functional vehicles, a garage where the vehicles would go for repair, a habitat, a repair bay for the robots. And I wanted the antagonists as well: Blacktrons! And I wanted everybody to build up his own space station. Uff! Galaxy Explorer Commander Dropship I knew this was impossible. Then my Lego Pueblo came to mind. It was a 4in1 set proposal at LegoIdeas that you could buy multiple times and stack to each other building up your own Pueblo village. My Lego Pueblo did not make it to the threshold but if I did such a concept once, maybe I could do it again. Many months of thinking and planning what to do, which bricks to use, color scheme, how to combine classic space with Blacktron, drawing and doing research followed. Then I started building. The target was a 3in1 space creator set with three different scenarios that you could combine forming a big space centre. Each scenario should have its own theme and its own playability concept. At the same time some models of one scenario should connect to models of other scenarios, so at the end you have one big unity. I also needed a story. As I love sci-fi and astronomy this part was the easiest one for me. What came out was space station "Antares", a 3in1 space creator set, where New Classic Space searches for Legonit ressources and Blacktrons trying to steal it from them. One alternate build is the Mining Outpost, the other one is the Bot Repair Bay and one is the Galaxy Dropship. 9 Antares Classic Space3x by Giorgio Chronas, auf Flickr With the Galaxy Dropship I combined the features of the Galaxy Explorer and the Galaxy Commander and built a mashup that had its own look. Like the Galaxy Commander the dropship can be split into a space fighter and the cargo bay. Like the Commander it may hold a space lab. But it also may hold a space buggy like the Galaxy Explorer. Since the space buggy is from scenario Mining Outpost, I decided it may also hold the truck from its own scenario. Then I continued. The Galaxy Dropship may hold the trailer the fuel or plasma tanks or even a small space fighter which actually is the cockpit of the robot of scenario Bot Repair Bay. The set seems to be huge, too big, but actually it is only big when the set is acquired multiple times. As a single set it has less bricks than the biggest official LegoIdeas set. I hope you like it and support it at LegoIdeas. It is another attempt to bring back some space without StarWars. 5 Antares Galaxy Dropship by Giorgio Chronas, auf Flickr 6 Galaxy Dropship Hangar by Giorgio Chronas, auf Flickr Guys I do not want to bore you too much. Please take a look for yourself at LegoIdeas. Check out the three different video animations (search for "Legocionado" at YouTube) and take a look at the pics of the updates at LegoIdeas (I have made some animated gifs explaining the concept). Here are the direct links: To LegoIdeas "Antares": https://ideas.lego.com/projects/447bf8bd-a7e8-4c0d-9918-59c668b23018 2 Antares Classic Space by Giorgio Chronas, auf Flickr To YouTube animated video for the "Galaxy Dropship":
-
Racing Speedboat microscale vignette.The "sea" part is made in a way that the hull of the speedboat seems submerged as in reality.It contains 235 pieces and throws a lot of water...I also made an alternative front end in parts designer that can be made if you chop the ball of a 4131 party hat and glue it to the cone and one with a 24482 spear that you can easily make if you dont like the front part to be only the 2x2x2 cone.Enjoy and comment if you like it. https://www.bricklink.com/v3/studio/design.page?idModel=245825
-
I haven't bought LEGO Creator set 31121 because I am fan of crocodiles but because it is the biggest Creator set with animals in last 10 years. - So, what will I do with it now? - I'm gonna make some alternative model out of its bricks! - And what could I build from pile of green bricks? - Aquaman! And is not Aquaman from Justice League but Czech Aquaman who is called "vodník" or "hastrman" in Czech. He often appears in traditional fairy tales. He lives in pond and his hobbies are sitting on willow, smoking pipe and collecting souls of drowned people. My figure features great articulation and few accessories: pipe, bench and little frog. Then I thought it would be cool to add one more fantasy creature from water so I built mermaid. She is not perfect but I tried to make her as cute and sexy as possible. It was pretty challenging building - especially head that is mostly built upside-down. She features great articulation thanks to longer ball joints although they doesn't look that good. Finally I made little stone for her from leftover parts so she can sit on it. Building instructions for both models are available at buildinst.cz Any comments are welcome.
-
Finally got this set built, and tried to mod it to fit minifigs, I didn't really do any designing beforehand. Just a quick build, transparent 1x2 plates help fitting the windows together, and had to add a space for the figure helm/hairpiece to fit, while trying to maintain the shape and colors, also added turn signals and steering wheel. As for the race cars/karts, it was very simple mod of moving the nose 1 stud forward and adding a steering wheel, really got some Town vibes. Orginal set : Mod for minifigs:
-
[MOC] ◄Volkswagen Beetle "Bugzilla" WRECKFEST► [2021]
Michael217 posted a topic in LEGO Technic, Mindstorms, Model Team and Scale Modeling
Welcome to my garage LEGO!!! Hello! My name is Michael. I'm a Builder from Russia, I love muscle cars! Volkswagen Beetle 1968 "Bugzilla" This time I collected cars from a very cool computer game Wreckfest! The assembly was very difficult, especially because of the spikes! Description: - Drive - 1 Buggy motor - Steering - Servotronic - Power supply-Small BB - The steering wheel turns the wheels - Open doors, hood... - Fashion salon - The receiver is hidden in the cabin - 2000 + parts - Two bridges, front bridge with Ackermann angle, rear with two Panar rods (for better stabilization) All this business is supported by the combined traction of 11 students. Instagram: https://www.instagram.com/lego_muscle_garage/ Join my group in VK: https://vk.com/legomusclegarage All photos on the link: https://bricksafe.com/pages/Michael217/volkswagen-beetle-1968-bugzilla -
[MOC] Small Rat Rod
rhplus posted a topic in LEGO Technic, Mindstorms, Model Team and Scale Modeling
Hello, I'm back in business after some years of dark age and I want to present you my new MOC, which is actualy a facelifted version of my older rat rod presented here years earlier. The model is build from scratch using current pieces and building techniques, sharing the main concept with its predecessor. Model features drag link steering operated steering wheel in cockpit, openable doors, detailed fake engine and fuel tank. I hope you will like it! -
Hi everyone It's been a while since I've posted a MOC on Eurobricks, in fact this is my first new MOC for over a year and the first building I've designed for almost 2 years. Anyway this is my latest creation "The Village Post Office". The model represents a typical British Post Office from the early 1930's and also features a vintage mail van. At first glance it may look like a modular but it is not. The model features an open back design and the different levels can't be separated. The base is also much different in size and design to a standard modular building. In total the model contains 2262 pieces. Here are some shots of the exterior... Notable features include an iconic red phone box, pillar box a bench and a tree. A series of steps at the side give the minifigs access to the first floor. INTERIOR DETAILS As mentioned earlier the building has an open back to give access to the interiors. On the ground floor is the main Post Office itself. I've tried to give this a rustic, vintage appearance with wooden floorboards and wood panelled service desk. Details include a cash register, lable dispenser, a set of weighing scales and shelves behond the desk for sorting all the mail. Opposite the desk is a parcel wrapping station. The idea for this was stolen borrowed from the Elf Clubhouse set. On the first floor above I've added an apartment which is home to the couple who run the Post Office. This is packed with everything they need including a bed, fireplace, kitchen and an antique gramophone. I didn't have space to include a toilet - but at least they have a bucket. VINTAGE MAIL VAN The mail van is a traditional red style truck as would have been used in Britain during the early 1930's. It is 6 studs wide and features opening rear doors and a removeable roof. The emblems on the van and postman are bespoke prints I created for this model. MINIFIGS AND OTHER DETAILS The model contains 4 mnifigs, a postman, customer and the husband and wife who run the post office and live in the appartment above. I've also included a bike and several animals. LEGO IDEAS My reason for designing this with an open back and with a unique style base was to try and distance it as much as possible from the modular buildings and hopefully give it a better chance of success on LEGO IDEAS. My hope is that if this was lucky enough to reach 10K then LEGO would view it as a standalone building in a similar way to The Old Fishing Store, and not something that would conflict with the modular building series. Anyway I hope you like the model. I had a lot of fun designing this one.. Feel free to let me know what you think. I'd also be massively grateful if anyone would be kind enough to support it on LEGO IDEAS as well. https://ideas.lego.com/projects/16ae1e95-cf30-41dd-ae23-36e07668df05 Thanks very much.
-
This topic has a lot of photos inside, to make it easier for everyone to see the latest version of my MOD, I have editted this first post to show version 5, 14th Nov 2020. Your feedback is welcome or share your MOD ideas Please! Port View by R Y, on Flickr Bow by R Y, on Flickr Stern Starboard by R Y, on Flickr My Lego collection consisted mainly of SW sets and its MOCs, I was tempted to get the 21322 Barracuda Bay when it came out in April but decided to save up for the UCS A-Wing, which I still haven’t got around to build yet, I have been modify the 75175 A-wing. A-Wing Mod by R Y, on Flickr I wasn’t too keen on the 31109 Creator Pirate Ship when I first saw its photos, especially the brick-built sails. During the Queen’s Birthday long weekend, I was reading posts on OZLUG of buying multiple sets to make it a bigger ship; that grabbed my attention as I mod all Lego sets where possible after I figured out Bricklink. However, at RRP of $160 AUD each, I might as well just buy the 21322 for $300 AUD; then again thanks to OZLUG, I realised that they are $119 at Kmart, meaning $238 worth of investment, no brainer! I quickly read up on reviews from Brickset and Brother’s Brick, how the completely brick-built design is its selling point, instead of using specialized boat hull pieces. My local Kmart had no stock, so I went to the next nearest one, nothing on the shelves again and a store girl told me all they have is already on the shelfs even though the online stock check shows limited availability. Disappointed, I was about the leave the store empty handed before I talked past the customer service counter, there was only one person in line so I decided to wait and check. The service girl was very helpful and checked the stock room for me, it turned out they do have three at the back, which I gladly picked up two; she told me apparently people try to steal Lego all the time, so they keep the good stuff at the back. I had to wait for my baby to settle and sleep before started building that night. As the original model is built in 3 sections: bow with forecastle, waist, stern with captain’s cabin; I decided to build 2 x waists sections and have 3 masts. I always build repetition sections step by step simultaneously instead of finishing one section and start another, personally I find this method quicker. My aim is to stick to the original Lego design and finish the hull asap, redesign the masts into foremast, mainmast and mizzen mast, and use the remaining pieces to touch up and make the 2 waists transition smoothly. 31109 Long Side View by R Y, on Flickr I wanted to rig the ship from the bowsprit to the stern flagpole, I had to move the “Plate Round 2 x 2 with Pin Hole and 4 Arms Up” to the mainmast beneath the lookout so the arms are equal distance to the diagonal spars from the foremast and mizzen mast. I spent more time on the foremast and rigging than any other sections. I tried a few different arrangements before settled down on the current layout, where the rigging goes down to the bowsprit from the upside-down diagonal spar. I used light bluish grey Technic Bush instead of the yellow ones provided. The hose piece is still slightly short and the bowsprit is pulled upwards, but the jib sail hides most of it. Overall, I was happy that I achieved my goal. Masts and Rigging by R Y, on Flickr I added a 1 x 2 red brown plate to each of the gun port openings so they are not too close to the waterline, I initially wanted to add 2 pieces per opening, but they were too high and affected the guns inside. You can tell where each of the section ends with the breaks from the 3027 6 x 16 plate in dark tan secured with 2 x 2 blue round tiles. I made sure the 1 x 4 special plates overlap the gap to secure the sections. The alternating red and light orange strip along the deck worked out perfectly, I was initially worried that I may get a double up of same coloured plates with my MOD. Joins of the Sections by R Y, on Flickr As Lego only gives half the number of guns compare to the gun ports, having 2 sets gives me 4 guns to fill up the front gun deck, squeezed 2 minifigs inside with torches. Gun Deck with Baboon by R Y, on Flickr I plated over the opening next to the gangways on the 2nd waist, to make it look like a quarterdeck, but not really raised due to the limitation of my skills in the mod. I really like the brick-built rowing boat from the alternative Skull Island bult, I made it longer using 2 x 2 slopes at the stern and made other changes as certain parts were already used in the main ship built. I also built a boat rack with 4 cheese slopes and some plates. The rowing boat fills up on the empty quarterdeck perfectly, I really like how it turned out. Rowing Boat by R Y, on Flickr With the 2 sets of 3 human minifigs, I swapped around their outfits, brought in a pair of black legs to swap out the peg leg. Now I have 6 different minifigs, I left out the epaulette for the officer to differentiate him from the captain. a9 by R Y, on Flickr a8 by R Y, on Flickr I built the red/green parrot and blue seagull according to the instructions, again had to use some different pieces due to availability. Lastly, I added the pet baboon hanging off the shroud, it’s a really fun build where its arms and waist are twistable to get a good pose. Baboon by R Y, on Flickr I really liked how this MOD turned out, this is probably the cheapest and easiest way to get a Lego 8-gun full-rigged-ship (three or more masts), even the 21322 only has only two masts. It’s around 58cm long from the tip of the bowsprit to the edge of stern flag, around 36cm tall from the tip of mainmast to the bottom of the hull, 19cm wide at the horizontal spars. With the elongated waist, it makes the forecastle and poop deck seem small in comparison, a bit out of proportion to be honest; but at this stage, I don’t have the skills to design and make them bigger. Side Front View by R Y, on Flickr Top Front View by R Y, on Flickr Back View by R Y, on Flickr
-
Hi everyone I'd like to present my latest MOC, a new modular building called Bricks & Blooms. I hope you like it. Bricks & Blooms is a modular Garden Centre built over 3 levels on a 32 x 32 base plate. in total it uses 2587 bricks. The facade is supposed to give the impression of being 2 buildings side by side but it is of course just one single building. The front to back measurement of the building is quite narrow, similar to Parisian restaurant. This is because I wanted to maintain plenty of space at the rear of the building for the main outside garden centre / plant sale area. THE MINIFIGURES I've included 6 mini figs and a cat with this MOC. Left to right they are: 2 customers (a father and his daughter), The garden centre shop keeper and gardener, the chef and the Aquatics shop assistant. THE GARDEN CENTRE AND GROUND LEVEL DETAILS The main garden centre area of the store is situated on the ground level. Outside on the street, I've included a tree, bench and lots of plants and flowers for sale. The garden centre also has a fruit and veg stall that sells it's produce directly to passers by on the street. Inside the shop I've included the cashier desk and more plants and gardening tools for sale including a little lawn mower side-build. Here is the interior of the fruit and veg stall that is accessed through a door at the back of the cashier desk. A door at the back of the shop leads out in to the main outdoor gardening area. Here I've included a large glass canopy covering rows of tables holding bedding plants. There are also more flowers, pots and other gardening products including a water feature. The stairs at the back of the building lead up to level 2. LEVEL 2 - CAFE/RESTAURANT No garden centre would be complete without its own cafe/restaurant. The cafe on level 2 has a fully equipped kitchen with serving desk and tables and chairs for the minifigs. There is also a small balcony in the cafe that looks out on to the street below. LEVEL 3 - AQUATICS Many garden centres here in the UK also have departments that specialise in pet fish and Aquatics. Bricks & Blooms is no exception and has it's own dedicated Aquatics section on level 3. The Cat below seems to have its eye on the goldfish. The door behind the desk leads out on to a small roof terrace area. FLOWER CART The model also includes a flower cart. THE FINISHED MODEL The picture below shows Bricks & Blooms combined with my other modulars and vehicle MOC's. Left to right they are. The Queen Bricktoria Convenience Store Brick Square Post Office Bricks & Blooms The Old Workhorse - Traction Engine LEGO IDEAS I have submitted Bricks & Blooms as a LEGO Ideas project. If you like the model I'd be really grateful if you'd be kind enough to head over to LEGO Ideas and give the model your votes. You can find the project at the following link. Many thanks! http://bit.ly/bricksblooms I hope you like my newest MOC and thanks very much for reading. As always, there are many more pics on my Flickr page and feel free to leave comments and let me know what you think.
-
Captained by a Scottish fellow named Albert McCartney, this ship, the "Kintyre", originally operated out of what became one of the Southern-most English Colonies. There mission was as a privateer to harass any Spanish ships coming from the Caribbean to the old world with gold and silver, (plus harass and steal from the French), for around five years, starting in 1705. But eventually, McCartney grew tired of paying his due of treasure to the English crown, and set off to make his own way in the world "free" of any government. He moved his base of operations to a small island in the Caribbean with his crew, where there resided a abandoned French attempt at a fort from years prior. He got his crew to complete the fort, and used it as his base of operations. He plundered many a French, Spanish, and other nations' ships, along with his former comrades in the English navy. In early summer 1717 the Kintyre was last seen by some trappers on land (near what later became the port of Savannah, Georgia) sailing low in the water, going north, unknowingly into the path of a massive hurricane. The resulting wreck has never been found, and it was rumored to have been loaded to the gun-ports with gold and silver taken from a Spanish treasure ship by Florida's southern coast. (which had been found empty of most of it's treasure in the 1960's.) This could explain the heavily laden shape of the Kintyre that day in June 1717. As to what happened to the ship after it left the later-day Savannah area is anyone's guess, as it seems to have vanished without a trace off the face of the Earth. This ship is named the Kintyre, and is a recolor and MOD of set 31109 (3-in-1 Pirate Ship) in the Creator theme. She is captained by a Scottish fellow named Albert McCartney (nicknamed McCartney the Green for the color of his ship and clothes), a former (fictional!) privateer turned pirate. Some parts are missing, as the plastic pirate flag from Ninjago, 12 lattice window pieces, etc. And yes, the name of the ship and it's Captain are both Paul McCartney references. (The Mull of Kintyre and Uncle Albert / Admiral Halsey songs along with their creator's last name inspired the names of the ship and it's captain.) This MOD was also inspired by this very similar model by Eurobricks user @Wurger49. The name of the ship is supposed to go on the back of the captain's cabin spelled out in 1 x 1 printed tiles, located just below the flag pole. The Captain's cabin has a desk and chair. Eight cannons are ready for firing on the Kintyre. It was said by the trappers that last saw the Kintyre afloat that one or two cannons were pushed overboard to make the ship more buoyant. (Most likely against the weight of the treasure they had just stolen from the Spanish ship in Florida.) Excavations for enlarging the port of Savannah in the 1970's found two such cannons buried under two hundred year of ocean silt. These were confirmed by the proper authorities to be of the same age and type used by the English Navy around the time of Kintyre's construction in 1699. The only question remains is this: where is the rest of the ship and it's treasure? Questions comments, and complaints are always welcome!