Search the Community
Showing results for tags 'train'.
Found 774 results
-
.thumb.jpg.94f9298766d6d9d68a5d10281a4f37ab.jpg)
Custom Dark Blue Train Windows for OE and Other MOCs
SerperiorBricks posted a topic in LEGO Train Tech
I've custom ordered a batch of Dark Blue 1x2x3 Train Windows for us Train Folk. Trying something out with getting parts custom ordered in useful colors (that LEGO won't make for us). I've got 500 in this initial batch, for sale from my store, SerperiorBricks.space Some pictures of the physical parts. Unfortunately around the same amount of scuffs/scratches as we get out of LEGO these days, so they're not perfect. But they fit the standard glass and LEGO bricks just fine. Color is pretty much spot on as well. I've got them for sale as low as $.50/pc, but those prices may be able to reduce in future batches depending on demand. 1 2 3 4 I've got a batch of Tan windows on the way as well, hopefully they should arrive in by the end of the month. -
The 12v traincollectors know the rare and expensive 7750, I guess : Well I do like this steam engine a lot, but I miss that 'greatness' look. A bit tiny when you compare it with the real German steam engines. A friend of mine liked the model of Baureihe 41 from Fouke Boss. After I build it, the steam engine is slim, but the wheel setting would be perfect for a 7750. And that's what I did, although I had to make the set a 4 studs longer. In this way the 7750 is a more impressive train to look at and not a dwarf between al those modern diesel and electric locomotives. Welll compared with a BigBoy, every train is a dwarf . How does it looks in the curves? Well the project 7750 XL is finished and placed back on the shelve where it used to be. Too expensive to drive around with it. To enjoy the wheel setting, I use the 7777 of mine friend pushed along through a NS1700 at PF .
-
As @legotownlinz listed last year, recent trains have been: 2022 60335 Train Station 60336 Freight Train 60337 High Speed Passenger Train 76405 Hogwarts Express Collector’s Edition 10308 Holiday Main Street (trolley/tram) 2021 N/A 2020 10277 Crocodile Locomotive 40370 Trains 40th Anniversary Set (GWP) 60271 Main Square (tram) 2019 70424 Ghost Train Express 71044 Disney Train 2018 75955 Hogwarts Express 60197 Passenger Train 60198 Cargo Train 2017 10259 Winter Village Station 2016 10254 Winter Holiday Train Sets with a strikethrough are retired. Itallicised sets are ones with expected imminent retirement. Bold sets are new for 2022. Following this pattern, a CITY cargo and passenger train are very likely to be released in 2022 - this two trains every four years pattern dates back to 2006. According to Brickset, 60271 will be retired at the end of 2021. The crocodile has just been retired, as has the Disney Train, meaning that once the City trains are discontinued, the Hogwarts Express will be the only one left. It’s also worth noting that the Hogwarts Express is the only Harry Potter set left from the first wave when it returned back in 2018. 2021 was the first year there hasn’t been a train set at minifigure scale, so hopefully we’ll get another other next year.
-
 "Sometimes, late at night, you can hear the whistle wail with a spooky, screechy sound like a wheel gone off the rail; and up in the smoky clouds, you can almost recognize the ghost of a crazy engineer with fiery cinder eyes; I say, Whoo-whoo! Can't you hear the haunted train? Whoo-whoo! Waiting on a haunted train I'm gonna, crash that engine, you know, only sticks and stones and old conductors' bones remain..." This steam loco was from the first animated train cartoon I ever saw when I was very small (three years old, from what I'm told), and is one of my favorites, easily beating The Brave Engineer (1950's Disney cartoon) and only being bested by The Polar Express film! I got the basic looks for the model from a single screenshot of the 1990's Nickelodeon cartoon show "Hey Arnold!". The engine seem to be based on Norfolk and Western K-1 class 4-8-2, but is apparently owned by Great Northern as evidenced by the tender writing. You can read more about the haunted engine, it's known story, and even potential theories for why it crashed here on the Arnold wiki. (yes, that's a thing, and credit to Paul Welch on Flickr for bringing this info to my attention.) The following text is from the wiki page for the episode: "As shown in the episode of the same name (Haunted Train), the legend concerns the phantom locomotive, Old Engine 25. Forty years ago (from original broadcast date, so November 1956), during a movement from the train yard to Union Station, Engine 25's engineer suddenly went insane. Defying signals and warnings to slow down, he intentionally derailed the engine and its train which slid down a high embankment. However, no wreckage was found beyond the engineer's severed hand, still clutching a part of Engine 25's throttle. According to the legend, the engineer drove the train straight to the fiery underworld, and now once a year on the anniversary of the engine's derailment, returns aboard Engine 25 with the intent of collecting new passengers to return to the underworld with him." There is even a song used over the closing credits of the episode, sung by the ghostly crazed engineer who drove his train all the way to hell (see first portion of post for that song!) And yes, I know a steam engine is not a entire train... it may partially make up a train, but it itself is not a train. The rear of the engine. The engine's boiler is a highly modified version of one seen on this Rebrickable MOC by @Plastic_Goth (only the boiler is partially reused, I designed everything else myself). Inside of the ghost engine's cab. Yeah, I know the engine from the Hey Arnold! cartoon episode 'Haunted Train ' only had a ghost engineer. But I thought a ghostly conductor would be a good addition, and I just couldn't resist. You will note the loco's fireman is not present here; he must've jumped off just before the wreck and survived, so he isn't a ghost. (some fan theory's say Arnold's grandpa was the fireman, as he did work for the railroad and saw first hand what happened during the wreck) ...Would you look at that! It's the anniversary tonight of the wreck! Won't you go on a lovely train ride with me? Notes: It's BAAACK! The Haunted Train never finished it's journey to real bricks, so I decided to give it a new lease on life rather than just haunting my computer. I was inspired to do this by a kid at a recent train show I displayed my models at, who asked me if I had heard of the TV episode and it's train. (and why I didn't have a model of it on display!) I took this as a sign from forces beyond my comprehension that I needed to build this engine, pronto. Thoughts welcome!
 -
Some years ago, I built a coal train with @HoMas Express Steam Locomotive BR10. Later I learned that this locomotive was primailiy used for long express trains like the Riviera Express. Recently, I decided to go for a Garratt Steam Locomotive which was mainly used for heavy freight trains in southern Africa and Australia. The choice fell on a Garratt designed by Tony Sava and built by @LeifSpangberg. This spectacular locomotive needed some modifications in order to cope with the challenges in my track, in particular humps. The train consists of ten fully loaded coal wagons, equipped with eight 9V engines. And this is what it looks like:
-
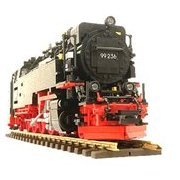
[MOC]: Brockenlok 99 236 (Harzbulle) of the Harzer Schmalspurbahnen (HSB) in scale 1:22,5 (gauge IIm)
Spur II aus Klemmbaust posted a topic in LEGO Train Tech
Hello everyone, after a long time without a new locomotive, I would like to introduce you to my newest MOC: 99 236 of the Harz narrow-gauge railways (HSB). The model is my most complex one until now (11 months of construction time, over 5,000 bricks). About the original: The 99 236 (formerly 99 7236-5) has been my absolute favorite locomotive for as long as I can remember. Therefore, it was clear that when the time came and after I had some experience with building MOCs (99 1782-4, Mallet 11sm) I had to build this machine out of Lego. About the model: The locomotive is completely to scale and is powered by two L-motors on one axle. I'm a little proud of the slanted driver's cab windows, the slanted tender and the snow clearers, which cost me a lot of work. The MOC can run on standard garden railway tracks of gauge IIm (gauge 45mm). As always, I have put together a short video with detailed shots, driving videos and, as a bonus, a ride with the great role model from Wernigerode to Drei Annen Hohne. I hope you enjoy watching it. Best regards, Niklas -
I need to re-introduce myself again I guess. Mine name is Jacob and born in 1978. I love 12v trains, but 9v trains which are nice are also be found in mine layout. Mine last layout was full and a great oppertunity came to move to a bigger house. Mine demand was simple, the attic must be bigger and the heating installation must be by the stairs (which is common in Holland to have that thing at attic). The house itself was ok, only attic needs to rebuild. I've removed everything what not belonged to structure of house itself to maximaze to area for the trains. It took me almost 1 year for the first legotrack could be laid down. I need to work too :P . Now we are more than half year building and this is result sofar. I made a few movies at YouTube. Spoken movies are about 15min and a few shorter ones were only the trains are running, so you can hear the sound of running 12v trains. Movies of PandaCity of Bricks Offocurse a few pictures of mine layout: The heart of the layout, the controlpanel. A laptop is smaller, but I want to use the orginal switches and original parts that Lego has made. The proud of mine layout and where the layout is build around it, the train-engineshed 10027 x2 and made it higer so the 7740 can pass without modification. The 7740 is based on the Baureihe class 103 and always wanted the model of it. After 40 years some-one made a moc and that has changed many times till one came which fits beautifully side by side the set 7740. I made one in the colors of 7740 and one in darkred/tan what is the color of the Baureihe class 103, which is in livingroom in showcase :P . Never realized it, but the Emerald Night is also a jewel in any lego train layout. It is based at the Flying Scottmann, so I was so free to made it more looking as Flying Scotmann, what a red buffer can do with the looks. Also made the steamengine smaller to 8 studs, which is more pratical with running at 12v. Grey connecting rods for better visability when moving. An 2d tender for a 2d 12v motor for more pulling power. And build 2 extra wagons, diner- and sleepwagon. an 4th will build also, cargowagon. Problem I need to order parts everywhere to build what I want. If bricklink didn't excist, this as not possible. This is a few what I have done sofar. Movies tells more than I can write here. Hope you like it, or maybe not. Have a nice day and enjoy building wit lego.
-
Hello. After collecting parts and making a copy of #7740, I wanted a red and black large locomotive like #7750. However, the original set was very expensive for me as a student, I couldn't afford it. So I decided to make a new MOC. [MOC] 12v Steam Locomotive by Kento Tanaka, on Flickr [MOC] 12v Steam Locomotive by Kento Tanaka, on Flickr This steam locomotive was inspired by the legendary Train Idea Book #7777 and Deutsche Bahn's BR 23. [MOC] 12v Steam Locomotive by Kento Tanaka, on Flickr I got these red train pieces to make this MOC. As you know, the red train motor is the most expensive part. The middle wheels are also expensive, so in order to reduce the cost, installed the motor on the front instead of on the tender. [MOC] 12v Steam Locomotive by Kento Tanaka, on Flickr Luckily I was able to put weight inside the boiler (blue squares in the image) so it runs powerfully with good traction. [MOC] 12v Steam Locomotive by Kento Tanaka, on Flickr Before I got the original 29mm wheels (4180c05) I used BBB middles instead. In this previous version, the structure of the trailing wheel was bad and I decided to replace it to slow down on curves. [MOC] 12v Steam Locomotive by Kento Tanaka, on Flickr Inside the cab is very simple. [MOC] 12v Steam Locomotive by Kento Tanaka, on Flickr Gray era's bogie pin is 7mm and 2mm longer than the current one, so it enable to place a tile and fix it to the technic plate. This allows you to put the motor on the leading wheel. [MOC] 12v Steam Locomotive by Kento Tanaka, on Flickr The reason the second pin is behind the original is to avoid hitting the signal post on the switch track as shown in the image. [MOC] 12v Steam Locomotive by Kento Tanaka, on Flickr The tender has round plate coal. Thank you for reading to the end.
-
https://www.bricklink.com/v3/studio/design.page?idModel=523436
-
The Orient Express has always been one of my absolute favorite trains, with all its history and fame. Unfortunately, I have never had the opportunity to travel with this iconic and mythic luxury train that celebrated its 100th anniversary a couple of years ago. However, to create this spectacular MOC and watch it moving up and down my 9V extreme track is a decent compensation, to put it least ... My Orient Express consists of a steam locomotive with tender, a restaurant coach, two sleeping coaches and a baggage coach. The locomotive has some similarities with the legendary french Class 241-A express steam locomotive which appeared on France's rails in the early Thirties and pulled heavy express trains in the golden period of train travel before WWII. In those days, the Orient Express was operated by "Compagnie Internationale des Wagons-Lits et des Grands Express Européens", a company founded by Georges Nagelmackers from Belgium. Back to my MOC and some technical details: The locomotive and tender are built 8-wide, with a total length of approx. 60 studs. The electric headlights are connected to a 9V battery in the tender. Each coach is 7-wide and 48 studs long. The train has a total length of approx. 2.1 meters. This OE is equipped with six 9V engines: two on the tender and two on each sleeping coach. Like for many of my other wagons carrying "coal", I have used a piece of net stockings to prevent "coal" from dropping off. Quite amazing tu use and classify net stockings as Lego train accessories ... Last but not least, I would like to thank Selander for all his advice and support. Much appreciated! And this is what my Orient Express looks like: Bon Voyage! Addition: Shortly after finishing my own OE, I watched the movie "Murder on the Orient Express" with Kenneth Branagh acting as Hercules Poirot (2017). Nice pictures of and breathtaking scenes with the classic Orient Express! All of a sudden appeared a coach at the end of the train that I haven't seen before: a lounge coach with a porch! I decided right away to build this coach as well, and this is what it looks like - crowded, incl. piano player and waiter: My wife and myself. This is what the extended train looks like with five coaches, eight 9V engines - and my wife & myself on the porch, enjoying and toasting to the magnificent views over the Alps and over My Own Lego World! Finally, we got the opportunity to travel aboard this magic train! Cheers!
-
Hi everyone! This model represents the design of Pennsylvania Railroad's standard design two-story wood frame interlocking towers and is deffently a part of railway history. I was attempting to show admiration for this magnificent structure! It comprises 2600 parts and is constructed on a 32*32 plate. John, a railroad worker, oversees everything here. He is a devoted railway enthusiast, and everyone along the route is familiar with him. Therefore, whenever you hear a train signal, it's the engine driver saying 'Hi' to John :) And, as all my Signal Boxes, I devote this project to to my Grandfather (railworker) P.S. If you like it - you can support it in current BDP4 https://www.bricklink.com/v3/designer-program/series-4/1311/Interlocking-Tower-1885
-
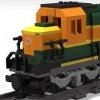
Hello. Long time no see. It's been about a year since I last posted an update to my collection. This time I’d like to introduce my first MOC of 2024. [MOC] 12v German Crocodile E194 178-0 by Kento Tanaka, on Flickr [MOC] 12v German Crocodile E194 178-0 by Kento Tanaka, on Flickr This is a locomotive that I became interested in after seeing @Paperinik77pk's post. The best feature is that it is powered by two 12v Technic motors. LEGO Group's Köf Ⅱ by Kento Tanaka, on Flickr Latest MOC is a retry of the Köf II, which used the same motor but didn't have enough power. https://x.com/0815tanaka_lego/status/1756876699558608945?s=20 First, look at the running. The running speed in the video is the maximum speed. [MOC] 12v German Crocodile E194 178-0 by Kento Tanaka, on Flickr [MOC] 12v German Crocodile E194 178-0 by Kento Tanaka, on Flickr The biggest factor was being able to secure space to gear down. Initially, I designed it with a gear ratio of 3:5, but I couldn't get enough power, so I changed it to 1:9. It runs very well and can pull seven 6x28 base wagons in the range I tested it with. But it's much slower than a normal motor. [MOC] 12v German Crocodile E194 178-0 by Kento Tanaka, on Flickr When mounting a minifigure, change the legs to avoid the axle. The original locomotive was owned by Barbara Pirch, so it uses an Ice Planet series head. [MOC] 12v German Crocodile E194 178-0 by Kento Tanaka, on Flickr The nose moves in the same way as #4551. [MOC] 12v German Crocodile E194 178-0 by Kento Tanaka, on Flickr Line up with my previous work Swiss Crocodile. I am very happy that I was able to recreate the two crocodiles in 12v Thank you for reading to the end.
-
-Mini.thumb.jpg.03594ed3626ab4a4b625a32af4d03d5f.jpg)
A Layout in Three Eras - 4.5v, 9v and 12v - Photo update!
Andy Glascott posted a topic in LEGO Train Tech
(Click to skip to the post with the latest photos) The Backstory: For years I've wanted to be able to display my 12v collection at shows/exhibitions/libraries or wherever, but the wiring is a challenge - I reckon on my last full layout there was 250 to 300 feet (75-90 metres) of the stuff, which on a static layout is one thing, but one built in modules for transport is a challenge. Three or four months ago I came up with a solution (more on that below) and the dreaming started. After much playing in Bluebrick, and nostalgic posts appearing here about older era trains, I settled on a plan. I still had a bunch of my old blue track from the 4.5v era, but no motors. Off we go to Bricklink then! The Layout So, here's the plan. Ten years ago I had a small portable layout on 4 modules, each 3x5 baseplates, and over the years have simply added more of these. Following my Bricklink spree, I now have 2 working 4.5v motors, so rebuilt the loco from set 183 and I have the loco from 7720 in progress. These 2 will feature on the 4.5v loop below, which is 3 of those modules. Next to the 4.5v loop will be the showpiece, the main 12v loops. 12v Lower by andyglascott, on Flickr And on the right of the layout will be the 9v loops. Unlike the other 2 eras, I will have 9v track left over, so this is likely to be expanded in due course, particularly as @michaelgale releases motors, power supply etc. 9v Loops by andyglascott, on Flickr Lastly, there will be another 12v loop, elevated, which will run across the back of all three eras. 12v Upper by andyglascott, on Flickr Putting all of those together looks like this (the white baseplates are roughly where the mountains, tunnels etc will be for the elevated sections. The green and grey sections are simply so I could keep track of where the 3x5 modules were to try and avoid having curves/points on more than one module. When it all comes together, in most likely a couple of years, I'll be able to run 6 trains at a time. Whole Layout by andyglascott, on Flickr The Beginning After all the planning, and clearing away of my last (incomplete) layout, I've finally started building the first module, part of the 4.5v loop. I decided to start here as this will be the quickest era to build, and to a large extent, each era can also be displayed as a stand-alone smaller layout. These three modules will be countryside/farmland, and the trains will reflect the farming side of it when they get built. Module 01 Pic 02 by andyglascott, on Flickr The 12v Wiring The solution that I've come up with is fairly simple, but does involve taking a drill to some baseplates.... At each of the 12v points or signals I'll drill a small hole through the baseplate and the wood for each module, thread the wire through and attach either the original Lego plugs or a quick connect/release plug/connector so that when the layout is set up I'll use already measured lengths of wire to go from that point to the control panels, which will be on their own module. This is going to be a heck of a journey, and build, I'll post updates from time to time, particularly at landmark moments such as completing an "era". I always said, growing up, I was keeping my Lego for my kids. It was really only an excuse, and I'm really glad I didn't sell my old blue track even though I didn't, for years, think I'd use it. Sadly my original 4.5v motors, battery boxes, lights and even signals are long gone, but I was only 7 or 8 when I got 7720.... -
NOTE: As some of you might be able to guess, the loco was inspired by pictures of @SavaTheAggie's original streamlined Hudson locomotive from 2007... no instructions were used to build this engine. See the inspiration here on Flickr. So you think I'm building a streamlined passenger train too, right? After all, it's a streamlined locomotive... ..WRONG! Yes, I know the streamlined Hudson's never pulled freight in the real world. HOWEVER: The Iron Giant animated film has a New York Central streamlined Hudson pulling a coal train that is badly wrecked (accidentally) by the robot. As I have the Iron Giant model already built, this was a no-brainer to make. Along with the engine and tender, there are going to be four coal hoppers, as you will see. Front view of the loco. This Dreyfuss-style streamlined 4-6-4 steam loco is numbered 5448 and is mostly modeled after a real, long-scrapped New York Central engine. The tender really should say the railroad's full name of New York Central instead of its initials, but I don't want to shell out the money for all those 1 x 1 tiles, so I'm using fewer 2x2 tiles instead to spell out NYC, as it's much cheaper that way! The cab of the loco is actually unable to fit a mini figure inside. (It's a brick too short.) These four heavily modified copies of the 1991 set 4536. (Blue Hopper Car) They lack the drop--bottom dumping feature of the set, as I made it much simpler (and cheaper!) by removing the playability from the cars. As you can see, I also had to shorten the train by one car from the original five down to four. This was because I ran out of room in the box to store them with some other freight cars. Now, if the train gets wrecked by a big metal man, I obviously need to add him to the post too! This is not my MOC: I bought the instructions for the model from B3 customs back in 2021. I found them on my hard drive again in late July 2023 and decided to build him in LDD. Then, in mid-August, I built him in real life... and promptly forgot to take photos of the completed model for over four months until November of last year. (whoops!) The rear of the robot. The original models' rotating hip joints (as used in the Build Better Bricks instructions) were removed from this version of the model because it was not strong enough. If the parts were worn even slightly, then the robot would not stand up under his own weight, breaking at the hip. Thoughts, comments or questions welcome! Updates: 1/30/24 real world photos added of everything, including Iron Giant!
-
Hello. I would like to introduce you to my updated collection [MOD] 12v Train Collection Update by Kento Tanaka, on Flickr With the release of the Collector's Edition Hogwarts Express #76405, I realized could get the new type red train doors (part number %43967, %42819) in new condition and cheaper than old ones. So I decided to make another #7820. The one I made this time is pictured on the right. [MOD] 12v Train Collection Update by Kento Tanaka, on Flickr The interior has also been changed this time. Two yellow bicycles used by postal workers for delivery are loaded. These were also revived in last year's City sets and became available cheaply. [MOC/MOD] 12v Train Collection by Kento Tanaka, on Flickr By the way, the interior of the left one, which I mentioned in the previous post, is like this. [MOD] 12v Train Collection Update by Kento Tanaka, on Flickr Also, I didn't have a station that matched the gray era, so I extended the #7745 station by 24 studs and installed 2 lamp posts. I love that 80's electrical cables are easy to adjust and distribute. The wiring is hidden under the platform. Personally, I like this smaller station than the big stations #7822 and #7824. I take two videos with these new collections. I placed the camera in front of the s-shaped curve to capture the movement of the wheels of the crocodile engine. I’m very satisfied with the way these two #7820 are running The lamp post at the station also looks great in a dimly lit room. Thank you for reading to the end.
-
Hello. I'd like to introduce my latest 12v train MOC. [MOC] 12v Crocodile Engine by Kento Tanaka, on Flickr Crocodile engine based on SBB Ce 6/8. It is built mainly in reddish brown and dark bluish gray. Using these colors because some parts were not available in the old colors. (However, light gray is the original ) [MOC] 12v Crocodile Engine by Kento Tanaka, on Flickr The chassis reproduces the main model of Hobby Train set #10183. Two motors are used to move either the front or rear connecting rod. It has plenty of traction even without weights. [MOC] 12v Crocodile Engine by Kento Tanaka, on Flickr The roof can be easily removed to allow access to the engineer. [MOC] 12v Crocodile Engine by Kento Tanaka, on Flickr Unfortunately, brown train doors are doesn't exist, so I had to find an alternative. So I assembled most of the sides horizontally and used the jumper plate grooves to make the door. They are all fixed and cannot be opened The center mounted engine is a copy from #7745. This is my Twitter account that I post in Japanese, you can see the video in action from here. Thank you for reading to the end.
-
So I was designing the the whole NS/NMBS Beneluxtrein, a service that ran from Amsterdam to Brussels. Here is the final HLE 25 Design. The driving cab is already built. I made some fixes with the HLE 25 engine. All bogies are aligned and the cab has a better design. The only big problem is that I don't know if the standard PU or PF is able to pull all these heavy coaches. I noticed my 7939 locomotive had some problems pulling and pushing the coach w/ driving cab alone. If you have ideas to improve the locomotive feel free to tell!
-
Took some ideas from recent Orient express but made it longer, thinner. And took idea with front boogies from recent Hogwarts Express and Lego's big trains wheels don`t look so small https://www.bricklink.com/v3/studio/design.page?idModel=503834
-
 Hello, last year I presented here on Eurobricks a method to equip the LEGO train wheel holder with ball bearings. A disadvantage of that method (see here) was that it required to cut a small part of the wheel holder, thus you had to damage the rather expensive wheel holder. Even worse, removing the ball bearings after modification left you with a more or less useless LEGO piece, thus making it very difficult to sell these LEGO pieces in the future. Furthermore, the modification slightly added to the height of the wheel holder, i.e. the resulting holder was approximately half a plate higher than without modification. I came up with an improvement that does not require cutting the wheel holder and does not notably add to the height of the holder. It does require cutting of a 2L technic axle though, which I do not consider a big thing since these axles are really cheap: When inserting the red axle pieces into the holder, it is important to align them exactly as shown in the picture. When the assembly is complete, it is crucial to prevent the axle from touching the two clamps in the center of the holder. For some additional information, click on the picture above . For a comparison of the wheel holder with and without modification, see this video:
 -
The 709.600 studs foundation of our LEGO layout is finished, and the first part of the layout is now completed. The central part of the finished section is based on our previous MOC "Møllestien", which depicts a real world location (Møllestien in Aarhus, Denmark). The MOC has previously been on display at the Christmas Exhibition at the local department store Salling, but has has now been modified and integrated into our own layout. In our new version, Møllestien is surrounded by train tracks and landscaping, and all houses are illuminated by LEDs from Light My Bricks. Compared to the original version, four additional houses have been added, covering the posts for the upper level of the layout. As shown in the video, the full layout consists of three levels. Everything is built in LEGO - including the posts for the upper levels and the upper levels themselves. A lot of technic elements were built into posts and upper levels to provide strength and stiffness, so that heavy MOCs can be added without risk of collapse. More details in the video: Pictures:
-
Hello to the community. The last weeks, I had finally a bit more time for LEGO, so I started a new small digital project: (digital) modern redesign of the classic LEGO Set 4554 Central Station (also known as Metro Station) from the LEGO Trains Theme from 1991. These have been my first steps in the Lego Train Theme, maybe you like the result. ;-) Picture 1: 4554 Central Station Revisited Picture 2: 4554 Central Station Revisited I also created some building instructions for the train station. You can download them (PDF File, 125 pages, for free, no registration) under the below URL: http://afol.lu/afol52/filebase/index.php?file/55-lego-4554-central-station-revisited/ Ok, this is now a bit offtopic, but may I ask you however, as a sort of recompensation, to vote for my LEGO Ideas Project Queen Elizabeth II and share my project idea in social media. You can vote for my project here: https://bit.ly/legoqueenelizabeth . I would really appreciate. Happy Building, stay safe and keep healthy. :-)
-
Hi all! old pics are gone so take a look at new one on 2 side ;) TX
-
LDraw Files for Shupp's XXL Train Wheels (Download Link)
Unfinished_Projects posted a topic in LEGO Train Tech
LDraw Files for Shupp's XXL Train Wheels Download links: XXL Flanged and Blind: https://bricktraindepot.com/resources Myself and a few others expressed interest in using Shupp's XXL wheels in digital form, so I decided to give LDraw part creation a try. Instead of designing the part directly into .dat format I used Solidworks to create the wheels, exported them as .stl files, and converted them using a python converter script (https://github.com/HazenBabcock/stl-to-dat). Please note these are not perfect, and may have slight differences from the real product. Included below is a picture of the wheels next to a Big Ben Bricks XL wheel and a Lego L wheel. Since I designed these in Solidworks I can export them in many 3D/CAD formats. So if anyone wants these wheels in a different file type, just let me know. ***UPDATE: First of all, many thanks to @supertruper1988 for hosting these files on Brick Train Depot! Secondly, I have ordered some XXL wheels so I can take my own measurements and make a more precise model. I should have the wheels by mid April and have the new files made soon after. Unfinished_Projects -
CB&Q Pioneer Zephyr streamlined diesel train-set - updated 12/08/23
Murdoch17 posted a topic in LEGO Train Tech
The Chicago, Burlington & Quincy (CB&Q) Pioneer Zephyr was the first successful American stream-liner, and made a record-breaking speed run from Denver to Chicago on May 26th, 1934. It arrived 1 hour and 55 minutes ahead of schedule with a total run time of 13 hours and 5 minutes... Note, the run time of a regular steam train pulled across the same distance in about 25 hours at much slower speed than the 77 MPH average of the Zephyr on this non-stop run. (It even reached a top speed of 112 MPH at one point during the trip!) This event was even featured in a heavily fictionalized Hollywood block-buster movie, "The Silver Streak" (The original 1936 drama, not the 1970's comedy of the same name) which also featured many scenes of and on the train. This train even started it's own Zephyr-mania, with everything from Ford cars to sports-teams having "Zephyr" slapped on the name to capitalize on it's considerable fame. The Pioneer Zephyr consist was eventually donated to the Museum of Science and Industry in Chicago, Illinois on the 26th anniversary of the Denver-Chicago speed run. From 1960 until 1994 it was stored outside, but since then it is now indoors in the basement of the museum near the parking garage. As such, it will never turn a wheel again. (picture coming eventually) The rear car features a wraparound back window. (It isn't pretty, but it is the best I can do.) (picture coming eventually) The Lego model and the real train feature four joined cars, with the power car / RPO area up front, (RPO is short for Railway Post Office) baggage and coach in the next car, then another coach, and finally the observation lounge at the rear. The third car (the coach) was added in 1938, and even though it isn't original to the train and is not on display with the rest of the Pioneer Zephyr in Chicago, it carried the car for most of it's operational life, thus it was added onto my MOC. Comments, Questions & Complaints are always welcome! Thoughts? NOTE: Main post edited 12/8/23 - one real life photo added to this post, the other two didn't turn out... will retake them when time allows. Sorry! -
The Brave Locomotive, Katy Caboose, and Conjunction Junction freight train - real world MOCs
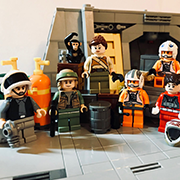
Murdoch17 posted a topic in LEGO Train Tech
This is *almost* a Disney train - Linus the 2-4-0 steam engine is from "The Brave Locomotive" that was started by Disney animator Andrew Chatsworth before he got hired, Bill Peet wrote "The Caboose who Got Loose" some years after being let go from Disney, and Conjunction Junction (part of "School House Rock!" educational TV series) was created by ABC, which is now owned by Disney. What am I talking about? Keep reading to find out! Meet Linus the Brave Locomotive, and his driver Henry! (from Andrew Chatsworth's animation on Youtube as seen here. ) I decided to make this 2-4-0 out of LEGO after watching the short over and over, as it's an inspiring tale and very well done animation-wise. I did make some changes to Linus' design from the cartoon, such as adding a number 2 to his tender and cab. I also borrowed heavily from the 2019 Disney train and 2010 Toy Story Western Train Chase sets. (Linus is actually missing one part - the smokestack from the Orient Express. The stack seen above is a stand-in and will be replaced at some point.) The rear of the engine. Sorry for the color issues with some of these photos, it's because my phone camera doesn't like taking pictures of blue objects.... no idea why. On September 29th, 1973, a new School house ROCK (link to wiki page for those unfamiliar with what that is) music video was played for the first time alongside your regular American Saturday morning cartoons such as Scooby-Doo, old Rocky and Bullwinkle show episodes and maybe some Johnny Quest. This new music video featured a diminutive stereotypical train conductor, two hobos (one fat and tall, and one small and skinny), and a train with words on it... not just any words, but CONJUNCTIONS, as the name of the video and location is Conjunction Junction. This train is shown in order above, with comments about what it could possibly be carrying in the fictional ROCK-verse. The first two (NOT + THIS) are obviously Boxcars. The BUT tanker (most likely hauling Butane) and THAT boxcar. Finally, AND (which is possibly a refrigerated goods wagon) plus an OR (ore) hopper. All together, these train cars taught (and entertained!) generations of school-age children and some older adults about Conjunctions, and other videos taught about American history, the environment, math (multiplication tables up to 12 but skipping the number 1), science, money and even early home computers! (among MANY other subjects) All of them can be found on Disney +, as Disney owns ABC, which is who made the original music videos. Heavily inspired by @zephyr1934's MOC of "Katy" from the classic children's book "The Caboose who got Loose" by ex-Disney animator Bill Peet. Zephyr's version can be seen here in his own topic. I didn't want to use stickers for Katy's eyes like what's being done by the original builder, so I decided to use the eyes from set 43186 (Bruni the Salamander buildable character) from the Disney Frozen II line . I also added a actual mouth, as just the two eyes without something between them looked kind of odd, most likely because of the specific eyes I chose. The MOC I based this on used a different method for the mouth using a lot of SNOT-work.... I used a brick with 2 studs on the sides and two quarter tiles to give her a open mouth. The roof has also been modified, and a different stove pipe added compared to what the original MOC has. However, what's a freight train without someone or somewhere to tell it where to go next? Enter the railyard dispatch center, which is not just any old building: it's the Conjunction Junction dispatch office as seen in the education cartoon series Schoolhouse Rock "Conjunction Junction" episode from September '73. I've made some changes to the original cartoon design, such as adding a removable roof to the building (for getting access to the inside details), and placing a water tower nearby for thirsty steam locomotives. The tower top rotates a full 360 degrees with the water pipe, allowing the engineer to pull up, get his loco full of (imaginary) water, shove the pipe away, and move on. Also, there is a dilapidated boxcar behind the water tower for the Junction's two resident hobos. Inside the openable building is a typical furniture for the 1930-'50's time period which I think the cartoon takes place in. This includes: - corner desk with telephone, a railroad oil can, and lantern, plus two chairs - oil fired heater / stove - time clock next to a day-at-a-time calendar showcasing a exotic locale - potted plant, just because! EDIT 11/28/23: Added Katy caboose and Linus - the brave locomotive to the main post, which has been completely redone! Thoughts welcome!