Search the Community
Showing results for tags 'tank'.
Found 237 results
-

Compact flat subtractor - tank steering
SaperPL posted a topic in LEGO Technic, Mindstorms, Model Team and Scale Modeling
This is a type of steering for a tracked vehicle that uses so-called subtractor which means input from motor used for steering is subtracted from the main drive input -
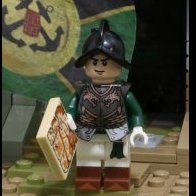
The Hedgehog A few weeks ago while I was watching Hayao Miyazaki's masterpiece Nausicaä of the Valley of the Wind, I spotted a large tank that caught my attention. From that I built this menacing 'bad boy' full of details and features and wrapped in a total dark gray color scheme. It's called The Hedgehog and the reason is quite obvious: dozens of dark tan claws guarantee maximum grip on all types of terrain. And the appearance resembles the small spiky mammal. The shape is deliberately awkward and a little cartoonish. I added details and features without ever going overboard. The upper part with the turret opens to expose a detailed little interior with such an assortment of armaments and equipment. Last but not least, the moustached commander looks like he came out of a WW II Panzer.
-
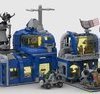
The most versatile unit on the Blacktron arsenal. It becomes a one vehicle army The front turns into an armored unit. The sides into track bikes Gets air support with an exploration drone The main cabin can become airborn. The turret unit deploys droid troops The Cyber Bounty Hunters are heavy armed robotic troopers. Finally, The Enforcer is a small Space Police armed vehicle. Please help me with your support to make this proyect epic! https://ideas.lego.com/projects/fa6d0fe0-4b07-4eec-a375-ad7638975418 Also check all my other Lego Ideas projects.
-
Hi guys At first, we want to introduce ourselves: We are three excited Lego builders: Budo, Paliason and Bedo. Each of us has built many of our own MOCs in the past. Before the recent, we decided to do something together. The main condition was to do something untraditional, original and with many details. This is the Lego project, which we will introduce to you now. It is the scene from the PC game Command & Conquer: GENERALS and its expansion ZERO HOUR. Three factions fight against each other: USA, CHINA and GLA. USA: CHINA: GLA: Our common goal is to make a large map of approx. 6.25 square meters and on it the combat scenes of vehicles and the infantry of all three opponents. The map will also include several civilian objects (farm, houses), industrial buildings (Oil derricks) but also large USA base. The model will be dedicated to exhibitions and commemorations of the great PC game C&C: GENERALS, at this year's 15th anniversary of this masterpiece. Finished 3D CAD models: USA - Vehicles: USA - Structures: CHINA - Vehicles: GLA - Vehicles:
-
Here's my first tank build, the classic American M4 Sherman, I built it a while back but never posted it here so here it is... Yeah, I know I got bad lighting in the photos... Just Lego pieces, no customs The back looks okay, I never decided on a variant, in retrospect, I probably should have. The other side, the whole build is built with 1 stud = 1 foot, so there is no interior but thanks for taking a look :)
-
This is something I've built today after realising this could be used in a half-track: The braked differential steering is a steering system that was widely used in tanks. The idea is that we lock one output drive from differential and thus all power goes to the other side. In theory it is simple, but with no dedicated brakes in Lego Technic it gets complicated. It was often used with differential lock for driving straight though, which complicates such mechanism even more in Technic model. The drive input is in a poor position for the tank - I'll probably have to figure out how to connect the drive from the other side if I want to use it in a tank build, but it's not an easy task. It might be just in the right spot for the halftrack model though.
-
My version of the M3 Bradley IFV. It is classified as an armored reconnaissance and scout vehicle. The M3 is fielded with two-man 25mm Bushmaster Cannon turret with a coaxial 7.62mm machine gun, and also carries more TOW missiles. The Bradley is highly capable in cross-country open terrain. The Bradley is designed for reconnaissance and to transport a squad of infantry, providing them protection from small arms fire, while also providing firepower to both suppress and eliminate most threats to friendly infantry. It is designed to be highly maneuverable and to be fast enough to keep up with heavy armor during an advance. Lego M3 Bradley IFV (1) by Jordan Parmegiani, su Flickr Lego M3 Bradley IFV (3) by Jordan Parmegiani, su Flickr Lego M3 Bradley IFV (4) by Jordan Parmegiani, su Flickr Lego M3 Bradley IFV (5) by Jordan Parmegiani, su Flickr
-
[MOC] Through the Streets of Fallujah, November 2004
A_Goodman posted a topic in The Military Section
Through the Streets of Fallujah, November 2004 Minifigures and Vehicles From BRICKMANIA Through the Streets of Fallujah, November 2004 by Nicholas Goodman, on Flickr Through the Streets of Fallujah, November 2004 by Nicholas Goodman, on Flickr Through the Streets of Fallujah, November 2004 by Nicholas Goodman, on Flickr Through the Streets of Fallujah, November 2004 by Nicholas Goodman, on Flickr -
Hi Guys, This is my first post here so tell me if I am doing things wrong. After a long time of not doing anything with lego I decided to start up again, a bit older and wiser (so they say) I started to get interested in making some more difficult models that don't exist from Lego themselves. I started snooping around and eventually bumped into Sariel & Tommy Stryvoky 's MOC's, one thing led to another and I am currently designing a MK V tank. I started using the photo's from Sariel's MK V as a reference but quickly decided that I can use other parts or design it differently. The first thing I did was another color, the original one was a dark tan color but since Lego doesn't have a lot of pieces in this color, this one went to the trashbin. Finally I decided to go with the standard tan color as this resembles the real paint job better than just standard grey. THE HISTORY: The British MK V was an upgraded version of the MK IV. It was first deployed in 1918, used in action during the closing months of World War I. The tank was improved in several aspects, chiefly the new steering system and engine, but it fell short in other areas such as mechanical reliability and its insufficient ventilation.However, the Mark V was a great improvement on the MK IV due to the use of Wilson's epicyclic steering gear meant that only a single driver was needed. -wikipedia The base model: Where am I with the project: Cosmetically the tank is finished, still finetuning the design and changing parts that can be made stronger. mechanically I need to change a lot! at the moment I am driving the wrong gear and thus not functioning as it should when I turn. Tommy Styrvoky helped me a lot with the clutch drive system, this will be similar to how the tank moved in its day, thus no 0° turning circle. More pictures in this topic or on my Flickr page Please leave your thoughts, comments & ideas I am interested in hearing your opinions.
-

[MOC] Tiger II full RC
Gray Gear posted a topic in LEGO Technic, Mindstorms, Model Team and Scale Modeling
Hi there everybody! It's been a while since I posted anything here, but allow me to present my latest Project: A small scale Tiger II tank! Years ago when I got first into World of Tanks Blitz, the Tiger II was my favorite tank. I still play it sometimes, so I decided to build it. My goal for this Tank was simple: To get all the functions big RC tanks have in a small scale tank model, and still make it look good. - RC driving (powering the front drive sprocket) - RC turret rotation - RC gun elevation/depression - Suspension system to replicate the torsion bar suspension From the beginning it was clear that this would not be possible using LEGO electronics due to the size constraints. I used a CADA Battery box, 2x M motor (drive) and 2x Micro motor (Turret+Gun) to power the tank. The rest of the Tank can be built with 100% LEGO with some minor color changes, especially on the insides to save money. Building istructions are on Rebrickable I hope you like my little gray cat and am looking forward to your comments Gray Gear -
Hi all! I'm mostly a technic moc builder, and during the last few years, I didn't post about anything except technik, but now I'd like to present my mini tanks and self propelled guns. The theme is the first world war, except a few, there will be posted mocs only about real tanks. Prototypes, which were built in relality (but never seen combat), also can be found here. My concept: all tanks (no SP guns, because there was one-two prototypes only) are built in more or less microfig scale, my reference is the Tiger1 german tank, it's 6 studs wide, so 6 stud is 3,7 meter. So 1 meter is eqaul to 1,62 studs. The width is determinative, the smallest tanks are 3 studs wide, the small ones are 3-4, the mediums are 4-5. The heavy and super heavy tanks have 6 or 7+ width. All mocs in this topic are built only digital so far, but I'm planning to make them in reality, too, as my financial status and time allows. All tanks were made in LDD, and rendered with Pov-ray. I will update this topic frequently, as a new tank is done. Sooner or later I'll post also real pictures beside renders. Some tanks requires special stickers and thchniques (like covering a part to be in the requested color, or connect the tracks with strings), I will write that in these cases. I tried to use only real colored parts (except few cases, where they are covered with stickers). I tried to catch the characteristics of tanks, instead of being 100% proportional, but I tried to make them as proportional, as possible in this size. Sometimes there aren't a lot of possibilities to make proportional, for example: the tank should be 4,5 studs wide. Width can only be a round number, so a tank which should be 4,5 w, is disproportionate already. Main folder of all tanks: http://www.brickshel...ry.cgi?f=548239 I render one picture about one tank, if you want to see more, ask for it, I can make more in LDD, or render about the requested part/viewpoint. There will be a lot of mocs, so I also opened a topic for WW2 tanks, see here: http://www.eurobricks.com/forum/index.php?showtopic=100891 The tanks: 1. Renualt Ft-17: French light tank, mother of all modern tanks, the first one with 360° rotatable turret. Was quite fast and effective. Info: http://en.wikipedia....wiki/Renault_FT Big picture: http://www.brickshel...nualt_ft-17.png It's a typical 3 studs wide very little tank, but thanks to it's individual shape, can be recognize easily. 2. Mark IV (male version): The first british tank in combat, very iconic and famous. Had no suspension and was pretty big with more than one guns. Info: http://en.wikipedia....ki/Mark_IV_tank Big picture: http://www.brickshel...-IV/mark-iv.png The front shape around the tracks is very special, angled and rounded, I think brick technique is better here than plates. There isn't a lot of variations from hoses, the big cannons standard 3mm wide (like in most of my tanks), the smaller machine guns are screw drivers. I'm planning to make all significant ww1 tanks, like K-wagen, Tsar tank, A7V, Gun carrier Mark 1, Whippet, Saint Chamond, etc... to be continued...
-
Just a small build of scenery for a Panzer IV L/70 Advance through the Ardennes, December 1944 by Nicholas Goodman, on Flickr
-
[MOC] Pz.Kpfw. I Ausf. B Light Tank
Tarix819 posted a topic in LEGO Technic, Mindstorms, Model Team and Scale Modeling
Hello, My latest model is the Panzerkampfwagen. I Ausführung B, a German Light Tank developed during the inter-war period. Building Instructions are available to purchase over on Rebrickable: https://rebrickable.com/mocs/MOC-119345/Tarix819/pzkpfw-i-ausf-b-light-tank/#details HISTORY The Pz. I was the first widely successful tank to enter service in the German Army. The Ausf. B model, the successor to the Pz.Kpfw. I Ausf. A, featured a number of upgrades including a new water-cooled Maybach six-cylinder engine, which required the hull to be lengthened to accommodate it. The crew count remained two men (Driver and Commander). MODEL FEATURES -A custom brick-build sprocket design inspired by the work of @Milan -Weight: 5.2kg. -Scale: 1:8. -Full drive, each track driven by two PF-XL motors. -Twin PF battery boxes for powerplant, the model is controlled using two SBricks. -Working and historically accurate suspension - the frontmost roadwheels are suspended on pivoting arms which connect to a coil-spring, whilst the remaining road wheels are paired together on four bogies suspended using leaf-springs. -Working headlamp. -Functional track tensioners. -360-degree rotating turret. -Elevation and depression of the main guns inside the turret. -Accurate detailing, including sledgehammer, storage box, exhaust, aerial and vision slits. BUILDING THE MODEL I chose to build the Pz. I because it was a relatively simple, straightforward design; there was no heavy firing mechanism or bridge deployment mechanism, basically just a chassis with a rotating turret and moving guns. The real aim behind it was to test out the new sprocket designs, and to see how they would run on a tracked vehicle weighing above 5kg. In the end I was very pleased with the performance of the sprockets and I will likely be using them on future models. As I will explain, they are an enormous upgrade to the rubber tyre system that I was previously using to engage the tracks. Otherwise, the tank is sturdy and looks good, although the suspension is somewhat fragile. I am very happy with its overall performance and I hope that fans of early German inter-war and WWII tanks will be pleased to see it. SPROCKETS As you may already know, my specialty here is large-scale tanks and tracked vehicles, weighing in the range of 4kg upwards. Building at such a large scale allows me to incorporate a great amount of detail and functionality into my models, however this requires me to use custom Lego tracks built from axles and lift-arms instead of the conventional Lego-produced caterpillar tracks, which are limited by their width and sprocket size. I have been using these types of tracks for about four years now, however since there was no specific sprocket design available for them, and certainly not at the required sizes (10st/12st/14st diameter), I have instead used Lego wheels with rubber tyres as the driving wheels, since, at least for lighter models, the friction between the tyre and the track is enough engage the track and drive the model along. In April 2020, I built my A34 Comet tank model, the weight of which was roughly 5.9kg. It was driven by two PF-XL motors connected to tyres at the rear, but had some trouble steering and reversing as the tyres were slipping on the tracks. The solution to this problem was provide front and rear drive, increasing the number of PF-XL motors to four. I first used this setup in my Vickers Mk. E model in August 2020, and the slipping problem was fixed; it worked very well on that particular model. But since then I have built a variety of other vehicles of different weights and sizes, using the same setup, and a number of problems have come up: 1) Weight Distribution -My most recent model, the AMR 33, was particularly rear-heavy as motors had to be installed at the back (in addition to the front), where the turret was. 2) Historical Accuracy -There was excessive bulk on my Matilda I model caused by the front wheels requiring a drivetrain connected to motors. The front lower glacis on that model is too far forward to make room for the drivetrain. This was not necessary on the real-life vehicle, which simply had idlers. It was a similar case for the rear idlers on my Vickers Light Commercial tanks models. 3) Track Tensioning -Having track tensioners means the motor, direct drive connection and the wheel itself all need to be movable, which adds unnecessary complication. 4) Heavy Vehicles -Even with both wheels driven, heavier vehicles will still suffer slipping between the wheels and the track, especially on rougher terrain. My Bridge Carrier model weighed between 7.7kg and 9.4kg, was powered by six PF-XL motors and suffered from this a lot. Moreover it could not actually drive onto its own bridge because the wheels kept slipping and the tracks would come off. 5) Steering -Tracks of course would not always be locked in properly by the rubber tyres. This wasn’t a problem on most of my models, but I remember my T.13B3 and Vickers M1937 occasionally threw their tracks when making tight corners. The solution to these problems was to develop a sprocket that would engage with the custom track properly. And here they are: https://imgur.com/a/q71kRuh (I will try to make some building instructions for these) I had not yet come up with a design due to the complicated geometry of custom-built wheels, and the difficulty in building with Lego elements accurate to the millimeter, however with some inspiration from Milan’s excellent Brick-built wheels book, I have designed two sizes (12st and 10st diameter) of custom sprocket that work smoothly with the custom track. Everything is built from 100% genuine Lego elements, no illegal connections or 3D printing is required. The first that I built was the 12st diameter sprocket. This uses 1x2 plate hinges arranged in a decagon, which is held taught by rubber connectors fitted in the center. Each tooth is built using two Bionicle pieces. In between each tooth there is a rubber connector which helps keep the track round as it traverses the sprocket. The principles of the 10st diameter sprocket are the same, however the hinges are arranged in a nonagon, and each tooth is made using one Bionicle piece and a 1x2 flat lift-arm. There are only four teeth on this sprocket, meaning there is a gap of two on one side. This has no effect on the sprockets performance so long as a gap is left every link on the track rather than every two links. It is this size of sprocket that my model of the Pz.Kpfw. I Ausf. B uses. These sprockets certainly have great potential and I am confident it is possible to construct them from at least 8st diameter and upwards. With the correct arrangement/modification they should also be able to fit any width of track of at least 5st, and any arrangement of track teeth (Either one row in the center or a row on each side). This will be extremely important for my future models as historically tanks have had sprockets of a great variety of different sizes. IMAGE GALLERY More images can be found over on Imgur, I shall put some up on my Flickr shortly, too. https://imgur.com/gallery/jyhtIhN -
The T - 90 is a Russian main battle tank. The variant shown here is the tank used for my MOC 'Taking Potshots'. This is why the white 'Z' is present. Please note that I do not support or condone the war in any way.
-
Built and rendered in Stud.io. 5 trees. 2 soldiers and a few guns against a Russian T - 90 tank. I took a few creative liberties (i.e. the blue and yellow shoulder pad, the flag on the tank) but tried to stay true to life a good bit. This includes the infamous 'Z' on the port side of the tank. Слава Україні! Peter
-
[MOC] 1:8 Renault AMR 33 Light Tank
Tarix819 posted a topic in LEGO Technic, Mindstorms, Model Team and Scale Modeling
This is my latest model which I have managed get done over the Christmas period - The Renault AMR 33, a Light Cavalry Tank used by the French Army from 1933 to 1940. History The Renault AMR 33 (Auto-Mitrailleuse de Reconnaisance) was an early French Light Cavalry Tank designed between 1931 and 1933, entering service with the French Army in the latter year, and would be used up until the fall of France in 1940. It was a two-man vehicle designed for reconnaissance and equipped only with a MAC 31 machine gun, in a similar manner to the early British Carden-Loyd Light Tanks that were entering service around the same time. Model Features -Weight: 4.9kg -Scale: 1:8 -Full drive, each track driven by two PF-XL motors. -Twin PF battery boxes for powerplant, the model is controlled using two SBricks. -Working and historically accurate suspension - the central bogie is suspended with vertical coil-springs, whilst the front and rear roadwheels are suspended using the French crank-bell system, which in this model uses a rubber band (Though the vehicle is quite back-heavy, so the rear roadwheels are assissted also by coil-springs). -Working rear light. -Functional track tensioners. -360-degree rotating turret. -Vertical and horizontal traverse of the machine gun inside the turret. -Accurate detailing, including spare wheel, grills, exhaust, hatches, vision slits. Building the Model This vehicle was another one which I was very constrained on time to build, which was the reason I chose such a small, basic, machine. I was back from University for just three weeks over Christmas, and whilst I already had a plan and even a very early chassis ready when I came back, vehicles of this size usually take me at least a month to build and have filmed, so another week or two of refinement wouldn't have hurt. The rubber band suspension for example is one thing I would have changed had I had more time, but it works well enough as it it. In the end I was pretty happy with how the model looks and functions, and the vehicle was an appropriate choice for my first model of a French Tank. Like some of my other models I intend to make instructions for this vehicle, which I have about 60% built in Studio 2.0, but since I haven't had the time, I will finish these later in 2022. Images More photos can be found over on this Imgur album: https://imgur.com/gallery/tYodhmr There are also some in-development photos of this model on my Instagram account, (tarix819technic) going back to October 2021. I will also post some others on my Flickr in due course! Thanks for reading! -
Hi all Here are some photos of some minifigs and vehicles of an up and coming moc I'm working on, many thanks. Tom 323rd legion fig barf by Tom, on Flickr Scouting party. by Tom, on Flickr
-
Simple model of a ripsaw controlled by BuWizz. Features drive with 2 RC motors, suspension, and a dual-missile turret that can be elevated and lowered. Functions/features: Drive (2x RC motors, 1 per track) Suspension Dual-missile turret Turret elevation It's been several months without publishing any new MOCs, and this is largely due to me working on my huge New Flyer XD60 articulated bus model. I placed two major orders of pieces directly from LEGO back in August, and as their parts take several weeks to ship I decided to work on a smaller project in the meantime. Since my Azure Racer XL I wanted to create another MOC using RC motors and BuWizz, so I decided to go with a tracked vehicle this time. However, I did not want it to be just another boring tracked vehicle with drive only (like my Lime Tracker from 2017), and I realized a ripsaw would be just big enough to house a turret that can be elevated and lowered. The building process actually started out with the body instead of the tracks. The model has a rather modular build, with individual parts (tracks, chassis, body) built separately and joined together. The turret mechanism was built in the rear of the body, and it is elevated by two small LAs. To reduce complexity, the turret motor is attached directly to the turret and moves with it when elevating. This however required more space in the chassis to allow it room to move. Both the turret elevation and missile firing are driven by PF M motors, and the turret consists of the new spring-loaded turret in a brick housing from the 51515 set. The missile firing motor has a 2L liftarm attached to it that hits the release button on the left/right missiles depending on the direction it turns. Overall, both turret functions worked well. As for the tracks, they have a suspension system with bogies attached to arms with shock absorbers. This part was a challenge, as the tracks needed to sit high but also be reinforced enough to resist the forces from turning. After several attempts with the tracks falling off, I was able to create a setup with the optimal tension in the tracks to prevent them from falling off during serious driving but also not too tight as to add excessive friction. I was initially worried that driving the tracks straight from the RC motors' outer outputs wouldn't be enough torque, but it looks like the finished model performed fine. In the end, the model performed well other than being a little bit top-heavy, but I feel like I could've modeled the shape better to make it resemble a real ripsaw more. I tried to be loose with the design, using curved panels over flat panels and stacked liftarms wherever possible, but still I feel like it can be improved. And as for the color, I think DBG would work best for a ripsaw like this (a Google search for "ripsaw" would show several dark gray ripsaws), but given all the pieces I'm ordering for my New Flyer XD60 model I didn't want to spend anymore on pieces for a side project, so I went with white for the model. Photos: Video:
-
[MOC] Bateman Assault Bridge Carrier
Tarix819 posted a topic in LEGO Technic, Mindstorms, Model Team and Scale Modeling
Hello, Finally my latest model is complete and filmed, this time it is of the Bateman Assault Bridge Carrier, an experimental bridge-laying machine of the inter-war period. HISTORY This is an extremely obscure historical military vehicle, and there is very little information about it anywhere, this is just my understanding from traces of information found in different places online: The Bateman Assault Bridge Carrier was an early attempt by the British Royal Engineers at a bridge-laying military vehicle, and the first dedicated bridge-layer, as previous attempts at such a vehicle had been First World War - type landships fitted with an assault bridge on the front. Additionally, the BABC was the first bridge-layer to carry its assault bridge on top of the vehicle. It was based upon the Medium Dragon Mk. I Artillery Tractor, which itself was produced from 1922, and the BABC was trialled at the Premier Dominion Power & Speed demonstration at Camberley, England in 1926, meaning the prototype(s?) must have appeared between 1922 and 1926, being scrapped afterward. The universal scissor-bridge system seen on modern bridge-layers did not appear until the mid-1930s, so the BABC uses a more primitive, rigid bridge design, which is carried on runners and deployed using a hand-cranked winch on the rear of the vehicle. In some instances, a smaller rigid structure is deployed by hand before the main bridge, which is used to better align bridge deployment and increase distance over wider obstacles, however there some photographs show that this was not a vital part of the machine and therefore I have not included it in my model. When retreiving the bridge it must be hauled back by hand once the bridge reaches a certain point on the runners. It is also worth noting that the bridge could only be picked up from one side, and I have kept this historically accurate in my model. THE MODEL I had been building this vehicle since mid-June, and certainly it took far longer than I had expected, mostly due to the problems I encountered regarding the drive and the winching system, but also because I have been busy with work. In the end I was not entirely satisfied with the vehicle, as the machine cannot cross its own bridge due to its immense weight. I spent a great deal of time trying to achieve this goal, include the installation of two additional PF-XL motors to couple at the rear drive wheels, and I managed to get it crossing the bridge up to about 6.5kg. However once I had built the superstructure the weight of the model increased to over 7.7kg, and now the weak point in the drive was the rear axles, which twisted quite badly when put under too much stress. In theory by heavily gearing down all of the drive wheels, I could probably have the vehicle cross the bridge under its own power, however the speed would be so reduced I thought it not worth the bother. I decided I would be happier having the vehicle drive on flat ground at a decent pace, than being able to cross the bridge at snail-pace. A transmission on such a heavy vehicle was out of the question entirely of course. The question may be asked then; Why build it so big and heavy? The answer is that I wanted to keep it in scale with my other Tanks: 1/8 scale, however I mistakenly underestimated how big it would be after planning and draughting it, and honestly being able to cross the bridge at 6.5kg it did look promising for a while that it would still be able to cross when it was finished. Sadly this was not the case, but I had come too far to restart given my limited time. I am still mostly pleased with the result, as the fact that the vehicle being so heavy can still drive at such a speed is already quite impressive, but more so that the model is very detailed, accurate and functional. It is great fun driving around and seeing the bridge-deployment in action. FEATURES -1:8 Scale. The bridge measures 1.1m in length. -Highly detailed, featuring the driver's compartment, mud-chutes, hand-cranks, grill, exhaust pipe, and bridge latticework. It is great to look at with high historical accuracy. I also quite like the strings used to keep the bridge in place when moving. -Unladen Weight: 7.7kg -Laden Weight: 9.4kg -Bridge Weight: 1.7kg -Fully tracked drive: each track powered by three PF-XL Motors, two for each rear drive wheel, one for each front drive wheel. The vehicle is reasonably fast given its size. -One AA battery box per track - each fitted with three Li-Ion 14500 batteries and three dummy batteries. -Powered by two SBricks; one per track. -Functional vertical coil-spring bogie suspension, historically accurate to the real vehicle. -Functional track tensioners. -Functional headlamp. -Functional Armstrong-Siddeley Air-Cooled V8 Engine. -Functional bridge-deployment system using a winch, which is powered by one PF-L Motor. IMAGES More images can be found on my Imgur post: https://imgur.com/gallery/pWfYT98 -
Hi mates! This is my last update of my flagship Main Battle Tank: M1A2C Abrams USA's MBT with SEP V3 and TUSK2. This is the latest operational update by the US Defense to its M1 Abrams prior to the M1A2D version currently under development. It has increased power generation and distribution, better communications and networking, new Vehicle Health Management System (VHMS) and Line Replaceable Modules (LRMs) for improved maintenance, an Ammunition DataLink (ADL) to use airbust rounds, improved counter-IED armor package, improved FLIR using long- and mid-wave infrared, a low-profile CROWS RWS, Next Generation Armor Package (NGAP),and an Auxiliary Power Unit (APU) under armor to run electronics while stationary instead of the engine, visually distinguishing the version by a small exhaust at the left rear. More passive ballistic protection added to the turret faces, along with new Explosive Reactive Armor mountings (Abrams Reactive Armor Tile (ARAT))and TROPHY Active Protection systems added to the turret sides. Prototypes began testing in 2015,and the first were delivered in October 2017.The first unit received them in July 2020. Other images on my flickr!
-

[WIP] BuWizz Ripsaw Tank with Turret
JLiu15 posted a topic in LEGO Technic, Mindstorms, Model Team and Scale Modeling
Hey guys, I'm starting a smaller project here with the aim of maximum playability. Currently I'm waiting for a huge Pick-A-Brick order to arrive for my New Flyer XD60 project, so I've decided to do a small project in the meantime, especially since I haven't published anything since January. This will be a small and simple ripsaw model equipped with a two-missile turret, using new missile elements from the Robot Inventor set. The model will probably be modular, with the body and chassis largely built modularly and connected together when finished. Currently I have the turret and some of the body built. The turret can also raise and lower, but unfortunately cannot rotate as the BuWizz unit only has 4 ports (and two will be taken by the drive motors). As for the drive motors, I plan to use 4 L motors with one connected to each sprocket, although I might also go with one RC motor per track. Overall, I see this model as an upgrade from my Lime Tracker of 2017, as this one will be driven by the more powerful L motor and feature BuWizz. I think this will be a fun little MOC to drive around. It's nice to build something else after months of work on a single project, and it'll be a great way to pass the time as I wait for parts to arrive for that project. Photos: -
It all started with this small tank based off of the m3 Lee, I wasnt very happy with it but I loved the engine, so I kept it around I later redid the turret to be more round This was the first design that was called the Arnam, named after a famous admiral in the Legion Republic (this is a whole universe my friend and I came up with) despite this being a Senate tank It had 2 main guns, but was very tall (I was still obsessed with the engine) and track protection, I don't have chain link pieces on hand, so the tracks are bare I then retooled it into the Arnam Mk II, which had a decent slope to the from armor, but was built in the same frame as the original tank I had built roughly a year prior This version incorporated a new version of track protection that would be used to this day Finally, after a solid year of redesigns I came to a difficult realization. I needed to reduce the detail of the engine compartment in order to have the tank work both structurally and aesthetically. I removed the old droid bodies and halved the overall height of the model. This is the Arnam Mk V The driver gets in through this hatch in the bottom the engine bay has been reduced to a lever and a telephone piece to allow the height reduction. This is the first tank I will give you the tech specs of. It has 1 AG (weapons manufacturer) TC (weapon type) 413 110mm cannon 3.5 inches of armor on the sides and rear 4.5 inches of armor on the front and turret Crew of 3, commander, gunner, driver (no loader as the gun is auto-loading) Multiple add one for various missions The commander's cupola can be replaced with a 30mm auto cannon and 2 .50 caliber machine guns The missile interference system (MIS) which messes with incoming guided projectiles and makes them not hit their target And the cluster of guided missiles that can be fired at enemy aircraft However there was room for improvement. I felt that the turret was too much like a WWII panther tank and not like a modern tank. So last week I ripped apart the old turret and built the Arnam Mk VII It has 1 AG TC 424 150mm cannon 4.5 inches of armor on the sides and rear 5.5 inches of armor on the front and turret Crew of 3, commander, gunner, driver (no loader as the gun is auto-loading) Various add one similar to the Mk V, with the exception of the MIS, as this is now built into the turret Optional 20mm auto cannon in the hull (adds a 4th crew member) Secondary turret in place of commander's cupola And 2 different sensor packages There are no missiles, as the role of a missile firingntank was delegated to the Honey Badger super-heavy I also added this hinged piece to cover up the gun when elevating The driver's viewport is underneath the 1x2 dark red tile I will likely update with either a stud.io file or chain link pieces, whichever comes first Stud.io model is here. https://www.bricklink.com/v3/studio/design.page?idModel=246061
-

Six wheel steam tank loco (grayscale color scheme) with 1920's commuter passenger train
Murdoch17 posted a topic in LEGO Train Tech
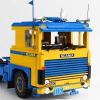
The 0-6-0T (T standing for Tank) steam engine seen below was inspired by this English 0-4-0T shunting loco made by Block Junction. I made the loco look a bit more American and gave it a grayscale color scheme so it could be owned by my fictional version of the real-world Wabash Frisco & Pacific 12-inch gauge ride-on steam railroad. The loco gives me a 1920's commuter-engine feel, so I hooked it up to four, two-axle commuter cars which were created by using this tutorial made by @Pdaitabird here to build the coaches. I heavily modified the coaches by enclosing the entry doors area and adding inter-car connection doors. The loco is a 7-wide six wheel model, with (working!) outside pistons. Big Ben Bricks medium wheels will be used for the driving wheels, with two being blind, and the remaining number will be flanged. The engine will feature the letters WFP (standing for Wabash Frisco & Pacific) on the tank side, while 771 will go on the cab walls. The rear of the tank loco, showcasing the coal bunker and inside details. The four-wheel baggage car. The are two commuter coaches. The observation car, designed to give a little class to the workday commute with a rear platform at the rear of the train. This train will go alongside the shark-nose diesel loco with mainline passenger train and the (as yet unbuilt) 4-8-4 steam locomotive that will pull the Conjunction Junction freight train on my layout. What do you all think? Comments, Questions, and Complaints welcome! -
Hey guys, I wanted to update my Rebel Heavy Tank, which I created back in 2009, with newer pieces and techniques. I modeled and rendered in Studio. For those unfamiliar with the vehicle, T3-B tank is the heavy attack tank of Rebels from the RTS game Star Wars Force Commander and also made appearance in Star Wars Galactic Battlegrounds. Hope you enjoy, and feel free to comment!
-
[MOC] Lego Technic Single Motor Tank V2.0
TechnicBrickPower posted a topic in LEGO Technic, Mindstorms, Model Team and Scale Modeling
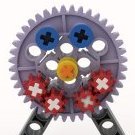
Hi Everyone. Here I present my second new and improved version of a tank that is driven by a single power functions motor. In this version the gearing mechanism has been optimized and far fewer gears are used to create the four different track direction combinations, namely both forward, both reverse, one forward & one reverse (turn left), and the opposite to turn right. Also the motor has been upgraded to an XL power functions motor instead of the large power functions motor. This gives an extra 0.5 watts of peak power. The tank can be controlled remotely using a single remote channel and driven forwards, backwards, and steered left and right. These functions are implemented by exploiting the direction of rotation of the motor to either drive the tank or select one the four track functions. This is done by a swinging liftarm with a gear that connects the motor output to one of two separate axles - one for driving the tank and one for selecting the track functions. The track functions are built using 2 orange rotary catches to switch a gearbox design that allows both tracks to be selected to drive forwards or backwards or to drive in either of the two opposite directions for steering. The track function selector uses a 90 degree stepper and a knobbed wheel to drive the rotary catches. Enjoy.