Search the Community
Showing results for tags 'air'.
Found 22 results
-
 Hey guys, During a chat I was pointed to the Steinwinter Supercargo 2040. I was fascinated by the look and decided to build it. It was designed by the german engineer Manfred Steinwinter. During my research, I found out that he build only one prototype, but planned many more versions. I liked the three-axled version and so started with a rough sketch to get an idea of the proportions: While I was searching for images of that truck, I also contacted the current IP owner and asked for blueprints. Fortunately he liked my project and he send me some. Since then this truck went through many iteration of improvements and design changes. In the end I decided to use Powered Up to control it. This is the current state: These are planned/implemented features and specifications: Current weight: 3kg Length: 86 studs Height: 14 studs Width: 27 studs Power supply: 4x Technic hub Driving: 4x C+ XL motor, each motor is connected to one hub to spread the load (3,528:1, theoretically 0,74 km/h @7,5V @124Ncm) Steering: 1x C+ L motor, two steered axles with Ackerman geometry Compressor: 1x C+ L motor, 4 pumps 3 RC valves: 3x C+ L motor, 3x newest valve one for each the rear axle, front/middle left wheel, front/middle right wheel Angle sensor for suspension on front and middle axle: 2x C+ XL and 2x Boost Medium motors OR 2x C+ XL Angle sensor for rear axle: 1x motor (not implemented yet) Air/pneumatic suspension on all axles controlled by Powered Up double wishbone suspension on fron and middle axle Each front/middle wheel on the left and right side are one unit. That means if the front wheel is pushed up the middle wheel is pushed down. That way the weight is equally distributed on the wheels live rear axle When I decided to use Powered Up I thought about controlling the ride height somehow with Powered Up. To do that I needed something to read the position of the double wish bone arms and the rear axle. Since several motors in the C+/Powered Up eco system can report their position, tried to use them to read the angle of the suspension arm. I successfully implemented that on the front and middle axle. For the rear axle I haven't found a good solution yet, because that axle can move on two axis. While I'm waiting for some additional parts, I'm working on the solution for the rear axle. As for the code, I already made a proof of concept. I created a test setup and wrote some code, which reads the angle of a suspension arm and adjusts it to the desired value. for the finished MOC a can think of something like a parking height, highway ride height and more or less off-road height. Once the chassis is finished the and the Powered Up is working I'll start working on body. Feel free to leave comments, critique and suggestions.
 -
[MOC] Lego Pneumatic Steam Locomotive
alfredboyer posted a topic in LEGO Technic, Mindstorms, Model Team and Scale Modeling
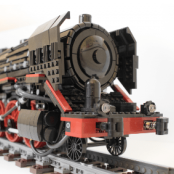
Hello everybody, I am glad to introduce you my last big project : a pneumatic steam locomotive ! I think it's one of the firsts pneumatic locomotives, using only Lego parts. First of all, the YouTube video and some photos: The idea with this model is to replace the steam of a real Locomotive by compressed air, and this for as much functions as possible. Here are the main functions : Movement of the train : Using 4 pistons, 2 on the sides, and 2 inside, the train can move forward. It works like a classic LPE, with 2 pistons shifted 90° from the others. 4 pistons consume a lot of air, but they guarantee enough power to move the whole train. To make the rotation smooth, a free wheel is hidden inside the boiler part of the locomotive. Its rotation is 25 times faster than the wheels of the train (40t/8t x2). The train isn't moving very fast because the pneumatic elements aren't modified. However, it's fast enough to make it interesting to look at the connecting rods and wheels moving. The breaks : On a real locomotive, compressed air is produced by a compressor (powered by steam) and is used to press some brake shoes against the wheels. Here, the same technique is used : a small piston is filled with compressed air, and thanks to some rods, brakes shoes are pressed against the wheels. It's cool but...it's not enough. Plastic against plastic isn't very efficient to stop the train's movement. Therefore, another rod is connected to the brake system and press another brake shoe against the free wheel. Because its rotation is faster (and therefore, with a low torque), it's is way easier to stop it. The Whistle : A system that I love in this locomotive is the whistle. Currently there isn't any whistle produced by Lego that could be used in the locomotive, so I had to think a little for finding something working. This whistle is activated by a switch in the cabin. The Cabin : Nothing much to say except that in contains 3 switches for the 3 main functions (whistle, wheel movement and brakes). There is also a pressure gauge showing the pressure coming from pumps. The train moves with a minimum of 1 bar. A 2-2.5 bars, the movement is faster. The air supply : There are several possibilities for the train : we can directly pump with Lego pumps, or store the air into 6 to 8 airtanks or produce the air with Lego motors and small pumps. For instance I use 4 pumps side by side, linked to some air tanks, but I don't what the final model should work. Maybe some motors and pumps could be cool ? The design : The hard part was to make the boiler of the locomotive. It's a little hard to make cylinders with Lego technic parts but, with flex axles passing through Technic beams, I managed to make something satisfying. Some details are visible on the locomotive, I tried to make it look a little crowded like a real locomotive with fake air/sand tanks, fake compressors and mechanical elements. It's probably possible to make it look better, but for instance I am happy with it. The rails are "homemade" with Lego bricks. The locomotive is too big of course to work on Lego railtracks. The wheels aren't perfectly flat so the train is "blocked" in position inside the rails. Therefore, the train can move foward cur cannot go out of the railtracks (which is great for a train). Finally, as a bonus functions, there are some bumpers at the front and back of the locomotive to imitate the real bumpers used to absorb small chocs on a Locomotive. That's it for now, I hope the model is interesting to you and if that's the case, don't hesitate to support it on Lego Ideas ! Click Here to support :) If you have any question or comment, please reply to the post, I'll be glad to discuss with you ! -
X-Drone , Your comments helps me a lot !
Saher posted a topic in LEGO Technic, Mindstorms, Model Team and Scale Modeling
I was always dreaming for creating my own quadcotper/Drone,I am so glad to share with you my X-Drone design which I spent a lot of time to do it. The design was built in many stages to fulfil the Aerodynamics ( as shown in last picture ) and to be as light as possible. I believe a video will be much better than writing a lot :) LEGO IDEAS Link ( Please support me if you like it ) https://ideas.lego.com/projects/f51a1d5b-9fd3-4356-ab59-af97c52eb0fa Kindly check my video on the following : I always fail to have good support in lego ideas so I really need your to give me your opinions and what i do wrong .... Your comments & Supports will help me a lot... Thanks for sharing your feedback with me. More Pics that I like : -
[MOC] Concorde (Air France/British Airways)
DoubleBU posted a topic in LEGO Technic, Mindstorms, Model Team and Scale Modeling
I was looking for LEGO Concorde designs but not very much came up in such a small scale so I thought I might as well give it a try. It comes complete with bendable nose cone, retractable landing gears (front and back), moveable back wing flaps (thanks again, mini fig pants...!) and the optional flame FX for... historical accuracy... . . .!? And as always you can find more pics here and if interested in a cutesy little Concorde to swoosh around the full set & instructions are available here. I hope you like my small sized interpretation of one of aviation history's most iconic aircraft. Thanks & have fun! (And many thanks to ukbajadave for explaining to a noob how to implement more pics here!) -

Range Rover Evoque + Instructions
Lox Lego posted a topic in LEGO Technic, Mindstorms, Model Team and Scale Modeling
For my final post of this year, I am proud to introduce the Range Rover Evoque with air ride. Thanks to all for the comments and suggestions in my WIP thread to create a better SUV. The car was too black so I added white, it was too low so I raised it a stud and the hood wasn't slanted enough so I re-created the front of the vehicle. I reduced the weight to 6.3 pounds (2850g) This car has 4wd, air ride, torsion bar suspension, 2 XL motors for drive, 2 m motors for lift, V8, servo for steering, gear shifter turns on the lights. The car is finally to a perfect scale. The hard parts of this build was the air ride, torsion bar and having the doors start low at the front and higher at the back. I bought a pair of custom chrome exhaust pipes for this built. flickr: https://flickr.com/photos/139930963@N04/sets/72157676733470861 MOC-Pages: http://moc-pages.com/moc.php/435565 Instructions: https://goo.gl/photos/KLwkEfTt2LzsRMkG8 Inspiration: Inspiration by lachlan cameron, on Flickr Below is the car in comparison to the 42052 helicopter set Air ride Range Rover Evoque by lachlan cameron, on Flickr Back end was super difficult: Air ride Range Rover Evoque by lachlan cameron, on Flickr Everything opens: Air ride Range Rover Evoque by lachlan cameron, on Flickr Front View: Air ride Range Rover Evoque by lachlan cameron, on Flickr I'm ready to take my helicopter to work... Air ride Range Rover Evoque by lachlan cameron, on Flickr Air ride Range Rover Evoque by lachlan cameron, on Flickr underside shot: Air ride Range Rover Evoque by lachlan cameron, on Flickr Side view: Air ride Range Rover Evoque by lachlan cameron, on Flickr Interior by lachlan cameron, on Flickr Framework video: -

Together we could bring back LEGO Avatar: The Last Airbender sets in 2020/21
RavaLamp posted a topic in LEGO Licensed
Flameo my fellow Avatar fans, I’m a huge fan of ATLA and I need your help. Recently I have submitted a project on LEGO IDEAS, it's the Spirit Oasis from Avatar: The Last Airbender. As you might know LEGO IDEAS is a website which allows users to submit ideas for Lego products to be turned into potential sets. So If my project reaches 10.000 supporters it may become an official LEGO Product. Many Avatar Fans including me would love to purchase another LEGO ATLA Set since the original sets from 2006 are not available anymore. Check out my project: The Spirit Oasis Project on LEGO IDEAS All you need to do is press the support button and create a free LEGO Account if necessary. Thanks a lot, Every supporter counts! -

Custom Pneumatics and Air-powered Motors Idea
powerwindows83 posted a topic in LEGO Technic, Mindstorms, Model Team and Scale Modeling
Hello all! I don't know if this is in the right place or not, but it's quite an outlandish topic so I'm gonna assume this is right! The pneumatics system has gone through many part additions and changes over the decades. One component that never showed up is the hydraulic motor. Now, I'm aware that hydraulics and pneumatics are very different things, but the operational differences would fade in higher speed applications. What I mean by that is if there were to be a very high speed (due to the differences in how air and liquid drive these motors) gear type or axial piston type motor for example, and you coupled them to the existing planetary gear trains found inside most PF motors, the results in theory would be fairly decent torque and roughly normal lego motor speed inside of a roughly lego motor-sized housing. So why haven't they done this? And how come no one else has done it on the internet so far as I've seen? I know you can make rotary motion using pistons in an "engine" application, but that method has some obvious limitations barring it from actual use in an MOC usually due to size and/or switching inefficiency. Let me know what you all think of this as an idea, and fill me in if you know why this wouldn't work in practice if it doesn't! -
I wanted to create some different areas based on the four elements represented by the four main elves, I've mixed parts from all kinds of different sets to create these places. This one is the earth themed home for Farran the Earth Elf. I wanted it to be part cottage, part treehouse. It's mostly parts from The Elves Treetop Hideaway and the Ewok Village sets. I attached my waterfall cave alongside the treehouse I also made a fire themed volcano cave with a tall treehouse/tower neighbouring it. It's mostly made from a Lego Friends set that has a cabin and a waterfall. I kept the cabin and built the tower above it and changed the waterfall into a volcano. I've created a workshop for the Air Elf Aira in one section of the tower with a bedroom above it, an observing platform with a telescope above that and a turret room on the top. The webisodes show that Azari the fire elf is homeless and just crashes with the other elves, but I've given her a warm place to sleep inside the volcano. I kept the camp beds in the cabin for the humans to sleep in when they visit Elvendale. And here's some random pictures..
-
Aircraft-Fighter Bomber MK.II Lego Technic
Nikolay posted a topic in LEGO Technic, Mindstorms, Model Team and Scale Modeling
Aircraft-Fighter Bomber MK.II Lego Technic [MOC] All the good time! I present to you project Fighter-Bomber. This is the final modification. Instruction: https://yadi.sk/i/kS8e8Z0e3MQAsF And: https://www.flickr.com/photos/141358259@N08/albums/72157685860317263/page3 Management of the Сab : 1. Aileron 2. The Elevator 3. Rudder + Control Back Rack Chassis 4. Flaps 5. Step Rotor 6. Machine Guns 7. Clear Bombs 8. Armchair Сatapult 9. Landing Gear Selection 10. Сabin illumination Exterior Functions : 11.Opening: a. Hood b. Lantern Cabs c.Technical Compartment d. Fuel Tanks 12. Folding the Front and Rear Rack Chassis 13. Retractable Leaf Front and Rear chassis 14. Index Edition Chassis 15. Rocket Launch 16. Folding Wings 17. Landing Light The model is equipped with a m-motor to drive the rotor, turn the machine guns and the landing gear. You can do without m-motor, and activate the function by rotating the screw by hand. Subscribe to the Shannel YouTube Aircraft-Fighter Bomber MK.II Lego Technic by Nikolay Zubov, on Flickr Aircraft-Fighter Bomber MK.II Lego Technic by Nikolay Zubov, on Flickr Aircraft-Fighter Bomber MK.II Lego Technic by Nikolay Zubov, on Flickr Aircraft-Fighter Bomber MK.II Lego Technic by Nikolay Zubov, on Flickr Aircraft-Fighter Bomber MK.II Lego Technic by Nikolay Zubov, on Flickr Aircraft-Fighter Bomber MK.II Lego Technic by Nikolay Zubov, on Flickr Aircraft-Fighter Bomber MK.II Lego Technic by Nikolay Zubov, on Flickr Aircraft-Fighter Bomber MK.II Lego Technic by Nikolay Zubov, on Flickr Aircraft-Fighter Bomber MK.II Lego Technic by Nikolay Zubov, on Flickr Aircraft-Fighter Bomber MK.II Lego Technic by Nikolay Zubov, on Flickr Aircraft-Fighter Bomber MK.II Lego Technic by Nikolay Zubov, on Flickr Aircraft-Fighter Bomber MK.II Lego Technic by Nikolay Zubov, on Flickr Aircraft-Fighter Bomber MK.II Lego Technic by Nikolay Zubov, on Flickr Aircraft-Fighter Bomber MK.II Lego Technic by Nikolay Zubov, on Flickr Aircraft-Fighter Bomber MK.II Lego Technic by Nikolay Zubov, on Flickr Aircraft-Fighter Bomber MK.II Lego Technic by Nikolay Zubov, on Flickr Aircraft-Fighter Bomber MK.II Lego Technic by Nikolay Zubov, on Flickr Aircraft-Fighter Bomber MK.II Lego Technic by Nikolay Zubov, on Flickr Aircraft-Fighter Bomber MK.II Lego Technic by Nikolay Zubov, on Flickr Aircraft-Fighter Bomber MK.II Lego Technic by Nikolay Zubov, on Flickr Aircraft-Fighter Bomber MK.II Lego Technic by Nikolay Zubov, on Flickr Aircraft-Fighter Bomber MK.II Lego Technic by Nikolay Zubov, on Flickr Aircraft-Fighter Bomber MK.II Lego Technic by Nikolay Zubov, on Flickr Aircraft-Fighter Bomber MK.II Lego Technic by Nikolay Zubov, on Flickr Aircraft-Fighter Bomber MK.II Lego Technic by Nikolay Zubov, on Flickr Aircraft-Fighter Bomber MK.II Lego Technic by Nikolay Zubov, on Flickr Aircraft-Fighter Bomber MK.II Lego Technic by Nikolay Zubov, on Flickr Aircraft-Fighter Bomber MK.II Lego Technic by Nikolay Zubov, on Flickr Aircraft-Fighter Bomber MK.II Lego Technic by Nikolay Zubov, on Flickr Aircraft-Fighter Bomber MK.II Lego Technic by Nikolay Zubov, on Flickr Aircraft-Fighter Bomber MK.II Lego Technic by Nikolay Zubov, on Flickr Aircraft-Fighter Bomber MK.II Lego Technic by Nikolay Zubov, on Flickr Aircraft-Fighter Bomber MK.II Lego Technic by Nikolay Zubov, on Flickr Aircraft-Fighter Bomber MK.II Lego Technic by Nikolay Zubov, on Flickr -
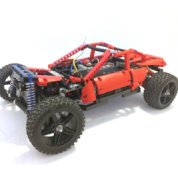
Project Air Pocket (WIP) [gearbox installed]
Aventador2004 posted a topic in LEGO Technic, Mindstorms, Model Team and Scale Modeling
current: the bodywork was the downfall of this car, i do better with gaps and holes. the chassis is my strong point, bodywork is not my strong point with legos. dont expect an update for a few days. this car will not have instructions. sorry i disappoint this time, this next car i have good experience with the bodywork for. a insight: this is not my only project...... le mans... prototype...... power functions..... concept: Air Pocket this is my project i have been working on the last 2 days, project Air Pocket. the aim of my current project is to make the most light, easy to make, simple, and durable car i can. the current car has a simple Rwd, hog, setup. those work fine, but not enough. the plan is to finish before the 24h le mans race, or on that day (17–18 June 2017) as a car to celebrate. some photos.. suicide doors.. for now.. underbody. it is not final of course, just a test chassis. color vomit is there on inside as much as possible. -

Self Built Automatic Lego Technic Pneumatic Air Pump
EvilKenevil posted a topic in LEGO Technic, Mindstorms, Model Team and Scale Modeling
Hello, I have been recently wondering "How can I make fast air with my pneumatic pumps" I have built a fully functioning, belt driven system which turns the pump at a hell of a speed already, it can go even faster by adding a smaller pulley, but I didn't incase the pump got caught up and snapped. I was filling my air tank up with it, the pressure got so good the pipe popped off the air tank, it filled within 3 seconds, with a small grey pump. I have produced this setup out of a powerful RC motor and meccano and a thick belt and 2 pulleys. I had drilled a hole into a flat circul and attached it to a shaft as an offset gear which drives the pump. If anyones interested, I will take a picture. -

[TC10] Pneumatic 'Nemesis'
Aris posted a topic in LEGO Technic, Mindstorms, Model Team and Scale Modeling
Dear all, For the pneumatic contest, I've built a huge robot called ''Nemesis''(from the ancient greek goddess) and I would like to share it with you. Nemesis has 22 pneumatic functions operated by a double compressor. All pneumatic valves are operated only manually according to the competition. Has a weight of 8kg and consists of 8000 lego technic bricks. Total air cylinders : 26 large 11 mini The compressor uses 2 large pneumatic pumps operated by a PF XL motor. The maximum pressure that can be reached by this pneumatic system is 28 psi with fresh batteries. Due to more than 30 pneumatic ''T-air pieces''pressure cannot reach a higher level because there is a huge drag and the XL motor has no power to rotate more. The length of pneumatic tubes are between 0.5 and 1.5 meters long. Due to the large hoses, large air storage is needed because there is a lot of air loss in the system. The air of the whole system is stored inside 2 lego air tanks (although the system needed far more) : The compressor has an auto-pneumatic switch using a large cylinder, which turns the air engine off when the pressure reaches 24 psi. A manometer is used for showing the air pressure at any time. Functions : Nemesis has 2 arms. The bigger front arm has 15 pneumatic functions and the small back arm has 5 pneumatic functions. The small back arm has the following movements : a) small gripper b) elbow1 c) elbow2 d) shoulder e) shoulder rotation The huge front arm has the following movements : a) large gripper, operating 10 fingers independently having 2 mini cylinders each b) wrist, operating 2 functions (up-down and turning) c) elbow d) shoulder e) shoulder turning Besides, the robot has 2 more pneumatic functions : 1) Face movement 2) A third gripper which is mostly for fun (e.g. for scaring house cats) Here is the video of the project : Thanks for watching Good luck to everyone! -

Lego USS Monitor Steam Engine
Boxerlego posted a topic in LEGO Technic, Mindstorms, Model Team and Scale Modeling
Hello Everyone, Check this Air engine Out. We can all agree that Pneumatics wont do this. This Air engine is a recreation of the USS Monitor Steam Engine which is an early American War Ship that was built by Swedish American John Ericsson. This engine is pretty interesting with how it was designed to function. Its very elaborate engine design with opposed cylinder piston that functions a lever arm which is connected to a center crank shaft and it also is name the vibrating lever engine. It was such a neat build I made more then one videos to. I made another video where you see inside and can watch the cylinders move up and down. -
Lego Oscillating Air Engine
JJ2 posted a topic in LEGO Technic, Mindstorms, Model Team and Scale Modeling
Hello After watching this I started to wonder if it was possible to build it with Lego and after some research I started building.IMG_0642 by JJ2Sam, on Flickr The engine is extremely simple with only two holes in the piston housing allowing air in or out making it robust to use. Since it is only a single cylinder it uses a flywheel to keep the cam rotating. IMG_0640 by JJ2Sam, on Flickr Unlike internal combustion engines found in your car where the piston is in a rigid housing or block making the piston have to have a ball joint allowing it to travel up and down this engine allows the entire piston and housing to rock or oscillate. IMG_0641 by JJ2Sam, on Flickr I have made instructions A ReBrickable parts list will be made. Thanks for reading. -
Location: G08 - Xerillian Tags: Vehicle, Spaceship / Airplane, Exploration, Science Pilot and interim CEO John Hannibal barely escapes the "jaws" of one of the most dangerous denizens of Xerillian, G08. [G - 08] LIVE BAIT by Ryan McBryde, on Flickr The pressure is on the would-be executive as he struggles to keep his corporation afloat. Where will he steer the Octan's scientists, chomping at the bit for more challenging pursuits, trusting Octan leadership to deliver a path to success? Hannibal has made his decision. Now he gathers a supply of the most ruthless, hungry beasts that Octan has faced thus far, risking his own life to lure this particular creature. As he flies low among the dunes, the giant worm is close behind him. Hannibal brings his speeder closer to the sand, sacrificing his speed and kicking up a large wake of sand. The worm speeds up and closes in. He's almost there. Almost there... The worm lunges at Hannibal as the speeder dives into LaRose's newly discovered cave. It is uncertain what stuns the giant worm more, bursting through the rock at full speed, or the disappearance of its would-be meal. An Octan cargo ship quickly pulls the beast out of the hole and into a secured container. Soon Hannibal will deliver his bounty of death to I06, the future home of a new training facility unsurpassed in its rigorous curriculum and exceptional faculty. The future of Octan is bright. Nothing can stand in its way.
-
Civil model of the Bell UH-1N Twin Huey. This example was used by the German Federal Ministry of the Interior for air rescue and ambulance services. Model features a detailed interior, rotating main and tail rotors with adjustable blade pitch, opening crew cabin doors, and sliding main cabin doors with swing open forward auxiliary main doors.
-

Adventurers - 1920's military Land, Sea, & Air vehicles
Murdoch17 posted a topic in LEGO Action and Adventure Themes
Lord Sam Sinister is in a evil partnership with Lord Ogel, dictator of the industrial country of Vladeck. They are currently (as of January 1925) scouring the world for an artifact named Poseidon's Trident, with the latest lead having them head for the southern tip of South America. Sam is accompanied by his personal battleship named "Sinister Purpose", two diesel-powered submarines, a new series of stealth aircraft and a small battalion of troops and land vehicles. He also has all his underworld contacts, including but not limited to: Senor Palomar, Alexis Sinister, Barron Von Baron, Max Villano, and more, ready to help him with his quest. Lord Sam's mission is to find the Trident and with it, help Ogel conquer the seas (and the world). His only real opposition is Johnny Thunder and his friends Major Quentin Steele, Jake Raines, & Pippin Reed, plus their small fleet of vehicles. This is Sam Sinister's personal battleship, the "Sinister Purpose". It features two anchors, three smokestacks, and four turrets. I have given the turrets the ability to move the triple-gun barrels up and down and swivel side to side. (In the real world, this battleship was originally designed for my brother, Austin, who later discarded the project.) Here is one of the two identical submarines used by Lord Sinister and his forces. This one is named the "Red Fox", while the other is named the "Black Wolf". (In reality, this submarine was gotten from Brickshelf back around 2011. I don't remember who did it, but it is Studs Not On Top, also known as SNOT, for 90% of the build.) Here is the LDD file for both submarine and battleship: http://www.mocpages.com/user_images/80135/1426187247m.lxf This prototype stealth aircraft is nicknamed "The Stalker" for it's ability to creep up on a target and follow without being noticed, before it blows the enemy craft into oblivion. (When Indiana Jones set 7683's (Fight on the Flying Wing) pictures was first leaked in dark grays, I was impressed... but then they went and changed it to dark green in the final, released version. Well, now I changed it back! I removed the unavailable parts, turned the regular green and dark green to light and Dark bluish gray. The cockpit is no longer hinged, making it much stronger, plus the rear guns no longer swivel, eliminating that weak point. The cockpit is supposed to be the Star Wars Jedi star fighter dark-bluish gray-print-on -transparent-black part) The fleet of vehicles at Sam Sinister's disposal includes two dozen fighter aircraft. These fighters are not as advanced as the flying wing above, but still can hold their own against almost anything thrown at them. (This model was originally set 6745. (Propeller power) I turned into that micro scale model into a plane that a mini-figure can sit in. it was turned from red, white, and yellow into a slew of military-looking grayish hues.) LDD file for the aircraft here: http://www.mocpages.com/user_images/80135/1426185143m.lxf This fearsome piece of machinery is used to cut down trees in the path of the land forces. It is currently being heavily used in South America as the search for the Poseidon's Trident grinds on in the Amazon Jungle. (I bought the original set 7626 (Jungle Cutter) in Summer 2008. I wanted to make it it in dark gray to match my two trucks but gave up after trying to order the parts from Lego. (I didn't know about Bricklink at that time) Well, now the shoe is on other other foot and here it is, in full grayish glory!) Here is a fuel supply truck of the convoy currently running back and forth from the battleship Sinister Purpose to the head of the group pushing further inland. These trucks are the weak point of Sinister's forces. Destroy them, you halt the progress towards the Trident. (This model is almost a stock part of 7683. (Fight on the Flying Wing) I simply redid the rear tank to keep it from spinning.) These trucks may be empty now, but usually they are filled with troops protecting the convoy searching for the Trident. (These are made from 7622. (Race for the Stolen Treasure) Since the fabric part is so VERY expensive, I found a solution in the Eurobricks Official sets LDD topic. I took the cover from the trucks built by user ADHO15 and redid some portions to be cheaper (I.E. thinner tires) and better coordinated color-wise.) This vehicle is one of many used by the forces of Evil to search for Poseidon's Trident. This particular car usually holds an officer of the Vladeck Armed forces, Special Recovery Division, which looks to capture objects of power through less-than-legal means. (The car seen here was originally part of set 7622, Race for the Stolen Treasure, as the machine gun hauling support vehicle. I have put a roof on it and turned it into a officer's car.) Here is the LDD file for the land vehicles: http://www.mocpages.com/user_images/80135/1426185434m.lxf Johnny Thunder will need to bring his A-game to stop Sam Sinister this time. Comments, questions, and complaints welcome! -
Hello. My newest MOC. Also in ideas.com https://ideas.lego.com/projects/93697 Thanks for checking it out! Cheers
-
 After I designed an 8x4 chassis, I wanted to try something new when it came to building something to put on it. I wanted to make something with a ton of functions, and I wanted it not to have Power Functions! Seeing all the functions others have previously included in various Tow Trucks (notably Sariel, Dikkie Klijn and Grazi), and the different ways of getting those functions to work, I decided that Tow Truck = lots of interesting functions = a nice challenge! The lack of anything electric here, really reminded me of how Technic Lego used to be when I was young, with manual cranks and pumps and stuff! I really like it this way! Like all my previous MOCs, it is absolutely not based on any particular real life vehicle, but it is in the style of a European type, heavy Recovery Truck. I'm pretty sure some of the particular functions I've implemented doesn't even exist in that iteration in any real life vehicle Anyways, I'll let the pictures do most of the talking, however I will interrupt at occasions to point things out along the way For some "behind the scenes" pictures and some more technical information regarding the functions, please check out my "blog" Will have to wait till tomorrow to make a video, as it is now too dark to make anything good As you can probably see, I borrowed some details from the 8258 cab, and then redesigned it, adding a taller roof, openable doors, a different grille, some slopes for better lines, and a front mounted winch. The cab tilts forward to reveal a V8 engine, driven from the two rear wheels, through a central differential (placed just forward of axle 3) You can also see the front stabilizers. These should be deployed first, as pumping the manual pumps without them, can make even the strongest sailor or truck driver seasick The front winch can be used to recover cars/vehicles that are just slightly stuck on the side of the road. The stabilizers provide.. stability It is driven by turning the grey 12z bevel gear in the front The rear features a similar winch, for the same purpose. It can also be used to tow vehicles, or pull them up onto the towing fork when it is deployed. Here the rear stabilizers also perform the same function as the ones in the front. Between them, the front and rear stabilizers easily lifts the (quite heavy) truck off the ground Yeah, kinda looks like it's going to snap down the middle.. the curse of studless building But it actually is fairly solidly built! The independent suspension works pretty well (then again the truck is quite heavy) The front two axles feature double wishbone suspension, and the rear axles are live (probably not true to life, but good in Lego) The doors open (JUST LIKE IN A REAL LIFE TRUCK!!) And now for the fun stuff The towing fork swivels/yaws, and is lifted and tilted using pneumatics. If you hav crashed another European style truck, and don't want a crane boom through your windshield, it can be extended by 5-6 studs using an old style pneumatic cylinder. It retracts with the help of rubber bands. (Will show better in video later on) As for the crane, if you need to recover someone directly behind you, you can just extend the outriggers and raise it up And the extend the boom Boom extention is not via pneumatics, but rather via a crank mounted on the right hand side of the chassis, just behind the second axle. A system of gears and crossaxles work their way up through the turntable and to the end of the main boom, where there is a worm drive. Did I say turntable? But of course, with the flick of a couple of (pneumatic) switches, you can recover trucks that fell off the side of the road and into a gorge! The slewing of the crane is done with pneumatics, similar to the system on the 8868 Air Tech Claw Rig from the early nineties. Unfortunately this limits the work area to slightly less than 180 degrees to the rear of the truck The outriggers are deployed with.. you guessed it: pneu-matics! And the under belly shot I think this covers it all Two air pumps, one air tank, 8 square bottomed cylinders, 9 rounded bottom cylinders, one long old style cylinder (18 pneumatic cylinders in total), 9 switches, too many T-pieces to count and several meters of pneumatic tubing later, I had to finish it, as I need pieces for the [TRIPLE] challenge! I also made a compressor unit, that will fit in the cabin, if I'm feeling lazy. But the overall goal was to make something PF-less, and I am very happy with the result! Video:
 -
Here is my first-ever render! However, since it is sci-fi, I post it here, right? I looked around and that seems to be correct. If it isn't, I apologize admins! Behold, the Indomitable Rush! This ship blatantly steals ideas from both my Man-o-war airship and my Manticore mech. But the end result, I think, still looks original.
-
Behold! The Airborne Jade! Originally a cargoship, this adventuring vessel was first commandeered by it's heroic pilot, Edvar Figgens, after he had an encounter with the Musina's Royal Air Police. Being an adventurer, Figgens of course did not pay for the airship but merely jumped into the controls while it's original pilot was eating a spicy sausage. Adventurers are not complete without a few scantily-clad females. Figgens has two. One was originally the mistress to a wealthy crime lord in Bulava. The other was part of the crew that manned the Airborne Jade when it was still a cargoship. Their names are unimportant, they are just garnishes, in the old heroic chauvinistic fashion. This was a really fun build. Please tell me what you think of it!