Search the Community
Showing results for tags 'powered up'.
Found 78 results
-
I have recently acquired Cargo Train 60198, which is a great set. I figured out it could do with a shunter, so I started designing one. The main things I am after are: Something small With accurate and releastic speeds (slow!) and acceleration (slow!) Playable and not too difficult to build So the following is largely inspired by other topics, including: There it goes: Unfortunately, the Powered Up motor takes up too much space for the driver to sit inside the cab, but at least they can hang out from the door! Designed largely around placement of motor + battery box like this, giving it the same overall length and wheelbase I think of Shunter 7760.
-
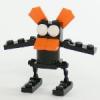
Benny's Space Mech
CheungsLegoCreation posted a topic in LEGO Technic, Mindstorms, Model Team and Scale Modeling
Hi all, Long time no post ;) And here's my latest powered up based mech, utilising 2 technic hubs and 8 motors. 3 motors are used for walking and turning, 1 motor is for raising the arms and moving the antenna, the rest of the motors are for arms movement. Compare to my previous bot, this bot features wider feet, allowing the mech to walk with less body tilt. I hope you will enjoy watching the video. If you have any question about it ask away :) Take care and happy building. Cheung :) -

(WIP Thread) Manta's MOCs
Mantarri posted a topic in LEGO Technic, Mindstorms, Model Team and Scale Modeling
Thought I'd create a thread to just post WIPs of my MOCs, or neat mechanisms. Finished: Generic Muscle Car -
The circuit cube bluetooth kit with it's tiny motors keeps spreading within the AFOL train community (e.g. see this review or this wonderful model). I see two drawbacks with the current version of the official app: only one module can be connected it needs some kind of (expensive) smart device So I asked Tenka (the manufacturer of these kits) for details about the protocol. They kindly shared the documentation and so I started implementing a "bluetooth hub". Using the information from the legoino project my program connects to one LEGO Powered Up remote and up to two circuit cube modules. It runs on a tiny Computer ("M5 Atom") which measures 3x3 studs. So you still need an additional device, but this is tiny and inexpensive and can be placed somewhere on the layout - or even built into the trains. In the videos this is the small grey box connected to the USB power supply. In one mode you can control the official kit: as long as the buttons of the remote are pressed the motors spin with the maximum velocity: The other mode is useful for trains: when a button is pressed the velocities of all motors connected to the corresponding module are increased/decreased: This is currently a "proof-of-concept" - the source code is available in github but using it will require some (basic) knowledge about programming Arduino-like devices.
-

[APP] BrickController2
imurvai posted a topic in LEGO Technic, Mindstorms, Model Team and Scale Modeling
BrickController2 is an Android and iOS application that allows you to control your Lego models using a compatible gamepad. It supports the following devices: - SBrick - BuWizz 1-2 - BuWizz 3 (basic support) - Lego Powered-Up devices: Boost, PUP HUB and Technic HUB (or Control+) - PF infrared (on Android devices having infrared emitter). Features: - Multiple profiles for a single creation - Multiple motor (or output) assignment to a single controller event - Different types of devices can be used at the same time - The same motor (or output) can be assigned to multiple controller events - Different joystick characteristic settings - Different button modes: normal button, simple toggle, ping-pong toggle, carousel toggle, ... - Train mode on joysticks - Normal and servo mode for the new Control+ motors - Sequences (like for flashing light) BrickController 2 on the Google Play Store: BrickController2 android BrickController 2 is also available on the Apple App Store. BrickController2 iOS Video tutorial created by @kbalage (many thanks for this): And another great video by @kbalage: Older versions: BrickController Android application. It lets you to control Lego creations via Lego infra-red, SBrick and BuWizz V1 and V2 using any Android compatible game controller: Current version: BrickController 0.6 User guide: BrickController User Guide Minimum system requirement: Android 4.4 and bluetooth low energy support on the phone (or tablet) Video on the older SBrickController application: -
Finally, the 2022 LEGO 10300 Back to the Future Time Machine the DeLorean - motorized with powered up ★ Building Instructions on Rebrickable (klick) ★ Features remote controlled motorization - fast driving, 40° steering angle - No scratching gears or rubbing tires Cockpit untouched not flying, but you can still modify it for Back to the future I, II and III version easy to reach Battery box for charging and switching on Off Battery box, Motors and Cable well hidden to not change the looks LED light kit fits in (discount code included) will add Instructions to make your own adapter to power the light kit from the buwizz instead of a seperate battery polygons very close to the movie (not flat as LEGO did it) Multi language instructions: ►english ►deutsch ►italiano ►française ►español ►čeština ►русский The Partfinder: An Inventory of left over parts in all bags to find the without scrubbing through all bags while buildingfor building from scratch Buwizz Profile - my programming for the buwizz included. ★ Details 40° of steering angle with virtual pivot point to not rub against that narrow frame Driven by upgeared large motor No Batteries in the interior, it is still there. Hood is still opening. switch the car on and off and charge from below I added a fix for the gull wing doors to stay up. Also I took the liberty to change the colors of some red/orange/tan bricks that you could see when opening the doors. I will put the bricks needed into the spare parts of the inventory. No instructions for the lights included, but they come with the Light kit. AND: I bought all my light set from Game of Bricks. And (after talking to them) I can give you a discount for a light kit for any of my motorizations. The code is included in the downloads.
-

[MOC] - RC 3 Speed Transmission for Land Rover Defender using Powered-Up app.
NikosSprocket posted a topic in LEGO Technic, Mindstorms, Model Team and Scale Modeling
I am building a RC version of the Lego Land Rover Defender (42119) and it will include a 3 speed sequential Transmission. It will be operated from the Powered-Up Lego app. using 3 buttons and it includes a dial that shows the selected gear. I am using a Technic Hub (88012) and a Technic Medium Angular Motor (45603). The Remote Control has 3 buttons; up-shift, down-shift and neutral. When the application is started it calibrates the shifting axle to be at the "neutral" gear and sets the angle to 0. Pressing the up-shift button will engage the 1st gear, then if pressed again the 2nd until it reaches the 3rd gear. If you press the up-shift button more times it will not move the shifting mechanism but will make a "clanking" noise. Pressing the down-shift button will sequentially shift to the next lower gear until it gets to neutral where again will make a "clanking" noise trying to go lower. To the right of the 3 buttons there is a dial that indicates the gear is selected. [Media] -

Universal off-roader 4x4 V2
Zerobricks posted a topic in LEGO Technic, Mindstorms, Model Team and Scale Modeling
As soon as I saw the new parts in the 42159, I knew I just have to use them to upgrade the previous version of the Universal 4x4 off-roader. After tinkering for a few weeks in LDD, and actually building it IRL yesterday, it is officially finished: The V2 has a big list of upgrades comapred to V1. Dual independent drive, one for left and other for right wheels - allowing skid steering Two 3 speed gearboxes - that's right, this is my first off road vehicle with 3 gears for optimal performance Improved steering system - much more direct, accurate and responsive Highly modular design - easier access for maintenance and charging Top speed has been increased by 40% both in low and high gear - the previous version had ample torque, so I geared up all the ratios by 40% and added a middle gear Increased suspension travel at the rear - first time I'm using 11 studs long suspension arms Improved drive motor mounting - now they are no longer at a weird angle Similar part count to the V1 - even though it's 2 studs longer and has way more functionality it has only 20 or so extra parts, totalling at 796 (I tried to keep it under 800) Here you can see how the model looks in LDD: Overview of drive, switching and steering drivelines: The dual driveline is powered by 4 BuWizz motors, 2 motors for each side. The lower PU L motor moves the steering rack via an 8 tooth gear. A second, higher mounted PU L motor spins 4 wave selectors via 8 and 28 tooth gears which in turn switch between the 3 gears. The gearboxes have the following gear ratios: First gear is 20/16 = 1,25 - totalling 4,32:1 gear ratio from motors to the wheels Second gear is 24/12 = 2 - totalling 2,7:1 gear ratio from motors to the wheels Third gear is 28/8 = 3,5 - totalling a 1,37:1 gear ratio from motors to the wheels Thanks to the 3 speeds gearboxes, the model has plenty of torque to climb at 45°+ degrees angle, yet can also reach a speed of over 18 km/h, making it my fastest dedicated off-roader to date: Testing it outside, jumping over pump track course, driving through tall grass, etc... I have yet to encounter any major issues. The model is reliable, fast and can take a beating/rollover with ease. So far I'm really happy with it and can't wait to record more media and publish it soon, so stay tuned! -

Buggy Motors with Powered Up
whitepen posted a topic in LEGO Technic, Mindstorms, Model Team and Scale Modeling
So I was working on a trophy truck/buggy sort of thing with powered up in Bricklink Studio and I was wondering if it is possible to use a buggy motor with an adapter cable together with the large technic hub or train hub. If someone has the proper components to test this idea out, I would really appreciate it. Here is the sort of thing I am trying to build. -

Mini RC/Manual Euro Semi Truck with Free Instructions
SaperPL posted a topic in LEGO Technic, Mindstorms, Model Team and Scale Modeling
I started playing around with the idea of European style semi truck again. I built a prototype to test the chassis design with motors side by side. The core idea here is that both motors are oriented towards back so you can put the medium Technic frame on top of them as well as have cables managed up front. EDIT: final version of the semi: Instructions: https://rebrickable.com/mocs/MOC-90482 (RC Semi Tractor) https://rebrickable.com/mocs/MOC-90484 (Box Trailer) Update: https://rebrickable.com/mocs/MOC-152433 (Manual Semi Tractor) The first iteration/prototype: Prototype showcase: It'll take some time before I'll finish the whole semi truck build, but I prepared the instructions for the chassis so you can build it. Instructions are available for free on Rebrickable: https://rebrickable.com/mocs/MOC-86118 Sneak peek of the instructions: -
Lets "fix" powered up!
allanp posted a topic in LEGO Technic, Mindstorms, Model Team and Scale Modeling
So many of us, myself included, find powered up/control+ to be problematic to say the least. Every great musical artist or band has a bad song or two in their set list, and control+/powered up is TLGs bad song! It pushes up the price of sets, which might be tolerable if it wasn't for it's downsides, namely no physical remote and it's reliance on apps and third party smart devices which removes all confidence in it's longevity. MOCability is also pretty poor, and set costs can be inflated due to components such as driver chips, tilt sensors and encoders being included in the hub and motors but not actually used by the model. However, it does have some advantages over previous systems, such as it's ability to do more complex things, being able to use motors as motors or as servos, being able to flip the controls when the transforming vehicle flips over, the inverse kinematics of the Leibherr excavator and so on. So what if we could design the next generation of electronics, how would we fix all the issues whilst retaining all of it's benefits? Firstly, I think it's best not to even try to retain ALL of it's benefits. Inverse kinematics is a fun novelty but it soon wears off, is set specific and just not worth the previously mentioned issues that comes with it, but I think it's possible to retain most of the other benefits. I would love to hear your ideas, maybe we can come up with the next great thing! To get the ball rolling, my current idea would look like this: EDIT: over the course of this topic I have listened to feedback and my ideas have evolved quite a bit since this first post. On with the topic.....end of edit. Possibly a 4 wire system, 2 for main power, and 2 more for PWM/data, with stackable plugs. It could possibly reuse the PF plugs for backwards compatibility. A large physical PlayStation style remote with lots of buttons, a couple d-pads, a couple of rotary knobs and two large fully proportional twin axis joysticks, each with a two way rocker switch. Bluetooth enabled, you can pair controllers to receivers by turning on each receiver and activating the controller you would like to control that receiver in turn. A basic battery box. Receiver. Has an input from a basic battery box, an output and a push button for pairing. It has a direct, unfused through path for main power but does not do any switching/pwm control of the main power rail as it doesn't contain a motor driver chip. It controls the data signal only. 3 motors. One is a POWAH motor, one is a regular motor and one is a micro servo motor. They contain their own motor driver chips so it can be better paired to the motor it is driving. There is no internal gear reduction or rotation sensing on the regular and power motors. Gear reduction box. Similar to the internal gearing included in the current motors, this is now a separate unit, allowing you to have as little or as much internal gearing as you want. These units can also be used in other places in the model. Rotation sensor/encoder. Convert the regular and power motors into servos by adding one of these. Can also be used as rotation sensors in other parts of the model. Force sensor. You can add more springs (shock absorbers or drive belts) to get the desired spring force (this would be the load sensor of the Liebherr) Speaker. This would come with a bunch of preloaded sounds (petrol and diesel engines at various RPMs, horns, sirens, helicopter sound, train sound etc) as well as a few spare slots in case a model designer wants to add a few set specific sounds (like for a merry-go-round or steam train or whatever). Different signal strengths would play different sounds. Can optionally be plugged into a computers USB port to load in your own sounds but not strictly required. Has a factory reset button to restore the original sounds. "Code" blocks. Instead of an app/smart device, you have physical blocks that are real life physical representations of them. Most of these affect the PWM signal only with through paths for main power. There would only be a couple to start with but more would be added over the years as sets require them. These could included a NO/NC relay switch, various logic gates, math bock (for multiplying/dividing/adding/subtracting of the PWM signal), servo controller, sensor reader block, delay timer with mode and time selector dials, ramp up/down block, etc. Sounds ambitious, but these blocks allow for much more complex control while eliminating the need for an app or a smart device. It is all "programmed" by the way you build and wire it all together. If the current system is "un-Lego like" will how much more like Lego can you can than physically building your "program" out of physical blocks?! I think that's plenty of options and controllability for any Technic set. It might remove some capabilities, you couldn't use inverse kinematics or control a CNC type machine or robot arm, but isn't that what Mindstorms was supposed to be for? Maybe much of the problem stems from unfortunately trying to make Technic into Mindstorms, resulting in control+ and killing off Mindstorms in the process! Sorry for the long read, but it's not an easy thing to get right and what I suggested might not even be feasible! I should have run it past my embedded systems expert buddy first! I would love to hear your thoughts, improvements, criticisms and ideas. -

Remote Controlled Tower Crane - MOC
Timorzelorzworz posted a topic in LEGO Technic, Mindstorms, Model Team and Scale Modeling
Hello everyone, this model of a Tower Crane is made only with 1166 pieces and controlled with either smart device or physical remote. In order to all functions of that model, you get a complete overview in this article how to build and how to control this crane. You can find instructions here if you're interested in building this model. Summary of Functions & Features remote controlled with PoweredUp 2-way-gearbox to select between functions motorized hook, trolley and 360° crane rotation Hub with batteries as counterweight modular building with extendable tower Minifigure scale to fit City layouts openable cabin 83cm superstructure length 70cm tower height Impressions Electronic components The crane uses the newest PoweredUp electronics to power all the functions. In order to remotely control this model, a physical remote pad is not mandatory because the crane is also controllable with optional smart device and PoweredUp app. Shaped with some system pieces, the PoweredUp 2-port hub with batteries included fits perfectly as counterweight and is easily replaceable. Simply turn on the hub by finger press and connect them to either PoweredUp app or physical remote to let the fun begin. The official set 76112 Batman RC Batmobile offers all electronic PoweredUp components they are needed to control this Tower Crane. Trains (60197, 60198, 60336, 60337) from the City theme are also nice and welcome starting packs for electronics, because they all include one PoweredUp hub and a physical remote pad, which then requires only 2 additional medium motors. Controlling the crane Heart of the design and probably the most interesting part building this model is the controllable gearbox behind the cabin. Where motor A controls the movement of the trolley, the functions of motor B are selected through gearbox. The following configurations are possible when playing with this crane and two motors together: Motor A - Motor B Trolley - Hook Trolley - neutral Trolley - 360° rotation For the crane it is very important to have a neutral position for rotating the superstructure. In case this function is unselected, the crane can freely rotate and prevent from falling. This is a feature that can be also seen on real Tower Cranes. All functions are secured with clutch gears to prevent damage. The winch for the hook has also a safety mechanism included. This holds the cargo even when the function is unselected. Controlling the crane is thinkable easy. In the PoweredUp app it just requires a profile with two slider - one for motor A and one for motor B. That means that this crane is controllable with a custom profile or even with the available one from Batmobile. Keep in mind that controlling the model does not require a smart device by using the physical remote pad. Building the crane Splitted in separately parts, building this Tower Crane feels like constructing the real thing. Official strings (part 37597, 56823) are used in this model that are widely used with many lengths in other Technic sets. Of course you can use any other strings you want. The crane uses a modular building style where each part of the tower fits to each other. The inventory includes all parts that are required to build exactly one middle section, but it is still possible to omit and to create a crane with a lower height of the tower. Furthermore the height of the tower can be extended by replicating a middle section stacked to each other. A higher tower then requires a longer string for the hook for sure. The following inventory shows only the parts they are needed to build one more middle section: Made with Minifigure The cabin can be opened to put a Minifure (without hair or hat) inside. Since this Tower Crane is made in Minifigure scale, it matches perfectly each layout with Trains or Construction vehicles also in the City theme. Instructions Premium instructions for this model consists of 283 pages with high quality images and building steps very close to the Lego Technic ones. The instructions helps alot on how to connect strings and wires correctly. Following are some example pages to show the quality of instructions: Goal with this model was to create a Tower Crane that is not that big and expensive and buildable for everyone. Tons of hours are spent to experience with balancing and stability. The end result is pretty neat, the crane works just perfect but dont expect too heavy loads on it. The model fits all standards for easy building and color-coded components. If you're interested in building this model, you can buy instructions here and support me and my future work. Have fun with this Remote Controlled Tower Crane. Follow me on Instagram for updates and news -
 My apologies if there's a tutorial on the recent updates to the Powered Up app somewhere - I haven't been able to find one. Having spent a couple of days playing with recent updates to the app, here's some stuff I figured out so far. I'm sure somebody can contribute with more: how to create custom control profiles with drive & steering motors (also works for the C+ Servo motor) how to set up joysticks, end-to-end buttons, sliders and how to enable controlling motors by tilting your device how to set up display of a motor's speed or position
 -

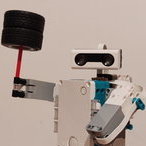
Motorised Johnny 5 MOC <Not an Alternative Build>
RJ BrickBuilds posted a topic in LEGO Technic, Mindstorms, Model Team and Scale Modeling
01 by RJ BrickBuilds, on Flickr Hello, Bozos! You can support Johnny 5 on Lego Ideas to turn him into an Official Johnny 5 Lego Set here: Johnny 5 on Lego Ideas Who is Johnny 5? Those who don’t know him, Johnny 5, also known as “S-A-I-N-T Prototype Number 5” or Number 5 for short, is a very lively and inquisitive military robot prototype who’s perpetually hungry for more “input”. He is the star of the 1980’s movies Short Circuit and Short Circuit 2 and a TV special called Hot Cars. He became sentient when he was luckily struck by lightning during a combat demonstration. Although he is designed to serve the military as a robot prototype, he has an adorable child-like behaviour and has a great respect for life. He is a peace-loving robot and refuses to use his military capabilities to harm others. Despite being very intelligent and inventive, his naivety and trusting nature has been taken advantaged of on several occasions. Design This model is fully motorised using Powered Up motors and hub and controlled through a mobile device using the Powered UP App. It uses Technic parts to ensure stability of the structure, and System parts to capture the look and form of Johnny 5. The following are the playable features of the model: Movement – This model can move around on tank tracks and uses skid steer to change directions. Body – Johnny 5’s body can tilt using a Powered Up L motor and controlled using a mobile. Arms – Arms can be raised and lowered individually using the Powered Up App. The fingers can be adjusted manually as well as the elbows. Head – The head can be tilted and turned using the Powered Up App. Eyebrows – Eyebrows can be manually adjusted to suit the desired facial expression. Laser – The laser at the back can be raised and lowered using the Powered Up App. Watch the YouTube video here to illustrate these functions better: Johnny 5 on Youtube Total Pieces: 2,711 Dimensions: Studs: W 68.4 x L 36.1 x H 73.5 Inch: W 21.5 x L 11.4 x H 23.2 cm: W 54.7 x L 28.9 x H 58.8 Weight: 99.8 ounces or 2.83 kg Johnny 5 MOC Pictures: 02 by RJ BrickBuilds, on Flickr 03 by RJ BrickBuilds, on Flickr 06 by RJ BrickBuilds, on Flickr 05 by RJ BrickBuilds, on Flickr 04 by RJ BrickBuilds, on Flickr 07 by RJ BrickBuilds, on Flickr 08 by RJ BrickBuilds, on Flickr 09 by RJ BrickBuilds, on Flickr 10 by RJ BrickBuilds, on Flickr -

Upgrading Lego motorised lighthouse? Remote Control and permanent power supply.
Pirate_King_1982 posted a topic in General LEGO Discussion
Hi all, I don’t know if this the correct place to ask (feel free to move it if it’s in the wrong place mods), but I’m wondering how I’d go about upgrading the LEGO Ideas Motrised Lighthouse to be able to turn on the functions of the lighthouse remotely, and also how to add a permanent power suply like a USB cable so I n longer have to use batteries. Can anybody offer any advice, point towards any easy to understand resources (either online or in print), or point me towards any of the parts I need or companies that sell the required parts if I have to go aftermarket? Any assistance anyone can offer would be greatly appreciated and I offer my thanks in advance. -

Davejsp's Technic creations
BrisquesDesigns posted a topic in LEGO Technic, Mindstorms, Model Team and Scale Modeling
deleted -
 Hi. If this is the wrong question in the wrong place then feel free to direct me to the right place. I have the top gear rally car model which uses a bluetooth powered up controller app on a phone and that works. What I want to do is to find a generic controller library / software that I could run on a laptop or PC (windows or linux either is acceptable) to use to control the powered up devices without specifically knowing which model it is. What I want to do is to use it as an environment to teach about programming. Yes there may be better educational environments but being lego it will appeal and this is what I have so nice as it would be I am not about to rush out and spend more money on mindstorms or similar. I did find some very basic "generic controller" apps on the apple store but while they were able to drive different models, albeit with the same basic motors none of them seemed to be able to drive the main motor. Steer yes, but not the motor itself, even though the model specific app does work. Essentially what I would hope for would be a library of routines which really knows nothing more than channel and setting for each of the available channels on any powered up controller brick. Is there such a thing out there already? Thanks in advance
 -

LEGO Powered Up Motor Set Concept
Unbrickme posted a topic in LEGO Technic, Mindstorms, Model Team and Scale Modeling
I have designed a concept for the LEGO Powered Up Accessory Box. It is a successor to the 8293 Power Functions Motor set and it would be used to upgrade various technic sets. Please see the image below. My concept contains the basic powered up battery box, a medium motor, lights, the two piecs for the linear clutch, and a few pieces like axles, gears and universal joins just like in the previous power functions motor set Remember back when we could upgrade so many different cheap technic sets? For example, there would be so many technic sets sold for under $100-$150 that had a single knob and a distribution GEARBOX to control the different functions. Essentially, the motor would replace the manual knob and the functions would be controlled by the gearbox, as seen in many older technic sets like the 8294 excavator, the 8295 telehandler, the 8265 front loader, and so many more! Also manual pneumatics sets would be ready for the power functions accessory box, like the tractor with log loader as well as the ew160e. Using that motor set, you could easily add a motorized pneumatic compressor. My goal is to bring that same level of motor upgradeability to the new technic sets, as was seen in the power functions era. Also, keep in mind that back in the power functions era, we got many, many more manual sets with a distribution gearbox. These days fully manual sets completely lack a distribution gearbox, as seen with missed opportunities to put the distribution gearboxes in sets like the 42108 mobile crane, which could have EASILY included a distribution gearbox instead of multiple manual knobs that each control their own function. My point is, that the presence of the previous power functions motor set REQUIRED the designers to add a distribution gearbox to all of the mid-size to larger manual models, the reason why they had the distribution gearboxes, is BECAUSE they had to be motor upgradeable. The distribution gearbox was added so that the single motor in the power functions accessory box could control multiple functions. If we had a powered up accessory box, many of the modern manual models would include a distribution gearbox, BECAUSE they would need to be motor upgradeable due to the powered up motor set. Just the presence of the powered up motor set would automatically cause an increase in the complexity of technic models. These days, the only type of gearbox that modern manual sets get is the speed transmission gearbox, which is WAYYYYYY less fun to play with than a distribution gearbox, and transmissions in manual models are kinda rare in technic sets anyways. Remember that the All Terrain Vehicle is an exception, not the rule when it comes to technic sets. As a kid, I was extremely fascinated with distribution gearboxes, and I still am. But, as a kid, I didn't find speed transmission gearboxes in manual models to be that interesting. The speed of the fake engine slightly changes, so what. But when I played with a distribution gearbox, the same axle that I was spinning suddenly controlled something else! My mind was blown! For example, my concept could be used to upgrade the 42128 Heavy Duty Tow Truck. The motor could be used to power a pneumatic compressor, making all of the pneumatic functions much more fun to play with. The lights could also be used to upgrade the truck's headlights. Another way this set could be used is to upgrade the 42108 mobile crane, motorizing the functions of the crane! Also remember that if that set were made to be motor upgradeable, it would have contained a distribution gearbox. Many affordable technic sets could easily be motorized with the help of this accessory box. This set could also be an easy way for new fans to get into the Powered Up system. Personally, I greatly enjoyed the ability to upgrade many of my manually operated technic sets using the Power Functions motor set. They were so much more fun to play with after the upgrade. Please let me know what you think of my concept LEGO set. Also, I go into greater deal regarding my LEGO Powered Up Motor Set concept in my video here, starting at 0:24. If you are more interested in my concept, I strongly urge you to watch it. -

[MOC] 42131 alternate: snow groomer
jyd80 posted a topic in LEGO Technic, Mindstorms, Model Team and Scale Modeling
Dear all, I would like to present my latest MOC, a one-set MOC for the Cat D-11. It was my first experience with the Powered-Up system, which I have to admit, was a bit painful :p Yet here it comes: The snow groomer is fully functional, featuring a configuration similar to the D11: two independent angular motors for the tracks, and two large motors to control a gearbox distributing four functions: raising/lowering the blade, opening/closing the blade, turning the blade, raising/lowering the tiler. By construction, the four functions cannot be operated simultaneously. The model also features a working L6 engine and tiler. They are both linked to a central differential, so that they will not move if the two tracks operate in opposite directions, but I guess snow groomers do not really turn on site like excavators or bulldozers, do they? The hood can be opened to show the engine, and the cab can be tilt to access the battery box. And here is a video: Instructions (of a further improved version) are available at rebrickable! -
Powered Up 3 Speed Auto Gearbox
TechnicBrickPower posted a topic in LEGO Technic, Mindstorms, Model Team and Scale Modeling
The lego Powered Up motors and functions have been used to create a 3 speed automatic gearbox. With the Powered Up functions you can accurately control motor speed and motor position, as well as being able to measure the angular position of a motor. These new possibilities have been used to create a three speed automatic gearbox. One motor is used to measure the torque at the output of the gearbox by detecting the rotation of an output differential; another motor is used to accurately set the position of an orange rotary catch controlling the switching between three forward gears, and finally one large powered up motor is used to drive the gearbox. The gearbox implements 3 forward speeds at gearing ratios of 1 to 1, 1 to 0.6 and 1 to 0.2 as well as one manual reverse gear. The Powered Up app has been used to program the gearbox controller on an iphone. Thanks to (racingbrick.com) for providing a great guide to all of the available programming blocks. Hope you enjoy this video. https://youtu.be/CRkvFffDef8 -
I am working on a retractable bridge, and have it working with two buttons. One button extends the bridge and the other retracts it. The problem is, if I'm not paying attention and extend the bridge when it's already extended, it breaks the mechanism apart. Same happens if I retract when it's already retracted. Is there a way to disable a control if a criteria is met? For example, if I extend the bridge, can I disable the extend function until I press the retract function?
-
Hello, I'm wondering where people might be discussing Powered Up coding? I'm trying to add sound to my code so that a motor sound will run when my vehicle is in motion. As well, the new Winter Tram has some interesting stop and start sounds, and I wondered if anyone knows how to bring those in to use made code? Any and all help is appreciated!
-

[App] [iOS, Android] Controlz
_Ozzee_ posted a topic in LEGO Technic, Mindstorms, Model Team and Scale Modeling
Control Lego Control+, Lego Powered Up, BuWizz 2.0, BuWizz 3.0 devices. You can create a profile for your MOC model on your smartphone or set up gamepad controls. Supported: - Lego Technic Hub, - Lego Boost Hub, - Lego Smart Hub, - BuWizz 2.0 (BuWizz extension pack), - BuWizz 3.0 Pro (BuWizz extension pack) Motors: - Powered Up, - Control+, - Mindstorm Robot Inventor, - Spike Prime, - Power Functions Get app: [AppStore] [Google Play] -
Stupid name, I know. It wasn't intended to stick, but here we are... This MOC started out as a chassis test and grew from there. I was trying to build as compact a steam based driveline as possible, similar to my Powered Up Shunter from a while back. While that was the smallest I felt I could go with a Diesel (using strictly LEGO parts and legal techniques only) this was kind of the same exercise but with a steam locomotive. Obviously I couldn't hide a battery box in the loco anywhere, so I made a tender. Not prototypical, I know, but this isn't based on anything in particular. It's fantasy for a fictional railway that doesn't really even exist outside of a couple of locos with the WFLR initials on them! That being said, here is my design process so far. Power Tank Engine MOC on Imgur. Sorry for the whole external host thing. Maybe I'll modify the post once I get time to manually resize all the images and embed them from the Imgur links. For now, the external link will have to do. Sorry! I may convert this into a proper tank engine at some point with a coal bunker on the back and a boxcar for the battery box, but I'm pretty happy with it for now.
-
*A Lego IDEAS submission* Frankie's Farm by Nick Jackson, on Flickr Welcome to the farm! This is a farm-themed freight train set that features the small diesel engine Shiro-chan. Shiro-chan v2 (front) by Nick Jackson, on Flickr There are three freight cars to transport cargo from the farm to your LEGO town. These are an all-purpose gondola, a tanker car, and a wood-paneled livestock car. Gondola (v2) by Nick Jackson, on Flickr Tank Car by Nick Jackson, on Flickr Stock Car (open) by Nick Jackson, on Flickr The farm consists of a barn with a loft, a mini tractor with a trailer, and a raised goods platform with a crane hoist. Barn Full by Nick Jackson, on Flickr Tractor (front) by Nick Jackson, on Flickr Farm Platform by Nick Jackson, on Flickr In the barn's loft there is a spot where a minifigure can take a quick nap next to the hay! Barn Loft by Nick Jackson, on Flickr Barn Open by Nick Jackson, on Flickr Drive the tractor and trailer to haul crates' worth of goods and supplies between the barn and the platform. The cargo platform has attachment points in the base which allow you to rearrange the ramps and staircase. The barn can also attach to the platform. For minifigures, there are two train operators, three farmhands, and an assortment of farm animals including cows, chickens, dogs and cats. Barn, Tractor, & Minifigs by Nick Jackson, on Flickr I built this digitally via Stud.io, but I have also built Shiro-chan (the engine) in real life. Depending on how the support campaign goes, I will attempt to construct the rest of the set. Not all of the parts exist (yet) in the colors depicted however. Thanks so much for taking some time to look at my project! **UPDATE** 6/28/22 So, I ordered some parts and set about building this in real bricks! I think the set turned out rather well! Can you spot the differences between the renders and the irl build…?