Search the Community
Showing results for tags 'concept'.
Found 25 results
-

Hogsmeade Railway Station MOC - based on HP concept art and the later films
Murdoch17 posted a topic in LEGO Licensed
It's a rainy and cold evening in Scotland, and you are on the Hogwarts Express as a first year student. You have noted other students have changed from street-clothes into the black robes with the crest of your destination on the front: Hogwarts School of Witchcraft and Wizardry. You do the same, and then notice the train slowing down, and finally coming to a stop at a small station marked "HOGSMEADE" on a wooden platform sign. You don't want to get too wet in your nice new robes, and feel a bit lost in the hustle and bustle of older students departing and railway staff getting luggage off the train and onto the platform. You spot your trunk on the platform and detrain. It's raining less hard now, and a slightly portly-looking, very tall man in a beard and fur-lined coat comes down the platform shouting above the steam engine's noise; "First years with me!" He leads you and about dozen other 11-year old's away from the nice and neat (and warm!) station down to a series of boats on the water's edge of a huge lake not far from the train. He leads each student into the boat, and then boards the lead boat himself. He taps the oarlock of his boat with his umbrella, and all the boats move away in sync by themselves. You are then astounded to see a huge castle, perched on rocky cliffs on the other side of the lake, lit up by hundreds of candles under the moonlight of the clearing sky. The man then shouts out to everyone assembled in the tiny boats; "Welcome to Hogwarts!" (small note: This movie concept art was taken from the Harry Potter wiki sometime in 2015. It is NOT mine.) I have converted and combined this Hogsmeade Station from two different versions found on Rebrickable, and made it my own using pictures and guesswork. This design is supposed to go well with set 76388 - Hogsmeade Visit - (or my Winter Village MOCs) but of course, in the official Harry Potter canon it's on the other side of the lake from Hogsmeade proper. (But I don't listen to canon!) The entrance to the employees-only ticket counter area is on the side furthest to the camera, while the nearest door is to the passenger waiting room. The model has two rooms under the removable roof, featuring seating from the Disney train set. One one side is the ticket office, with a cash register / ticket window and a sorting desk for tickets / packages. The other is the waiting room with a few bench seats w/ individual arms and a bulletin board. Starting amount of parts: 1,185 Parts found so far: 657 Parts still to find: 528 Over half of the parts have been found so far. (I've also started taking apart my Disney-inspired station for it's pieces, so that has made a dent in this project, with more to come as I start on the ground floor of that older MOC.) EDIT 4/15/24: Sorry for the REALLY late update, but I've finally gotten started on building this in real bricks! (only took three years, but whose counting?) It should be finished sooner rather than later. Thoughts, comments, suggestions, and complaints are always welcome! -
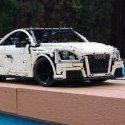
[MOC] Renault Racoon by Admiraltyphoon, on Flickr The Racoon was a concept car made by Renault, which was revealed virtually in 1992 as a CG model, then a physical model was revealed in the Geneva International Auto Show in 1993. [MOC] Renault Racoon - Interior by Admiraltyphoon, on Flickr It featured 3 seats, 2 at the front and a mid-mounted rear seat, as well as cameras instead of side mirrors, and a sat nav system projected onto a heads-up display, all pretty high tech back in the 90’s! [MOC] Renault Racoon by Admiraltyphoon, on Flickr It was designed to push the limits of 4x4 tech, with manageable independent suspension, amphibious capabilities, and futuristic aesthetics that made it look like a rover. [MOC] Renault Racoon by Admiraltyphoon, on Flickr It's is one of my favourite 90's concept cars because of its bulbous shaping and the way the axles/suspension are designed, and I wanted to try and build it in a 8-wide Speed Champions scale. Instructions are available on Rebrickable: https://rebrickable.com/mocs/MOC-135693/Admiraltyphoon/renault-racoon-1993-concept-car/#details
-
 Hey guys, During a chat I was pointed to the Steinwinter Supercargo 2040. I was fascinated by the look and decided to build it. It was designed by the german engineer Manfred Steinwinter. During my research, I found out that he build only one prototype, but planned many more versions. I liked the three-axled version and so started with a rough sketch to get an idea of the proportions: While I was searching for images of that truck, I also contacted the current IP owner and asked for blueprints. Fortunately he liked my project and he send me some. Since then this truck went through many iteration of improvements and design changes. In the end I decided to use Powered Up to control it. This is the current state: These are planned/implemented features and specifications: Current weight: 3kg Length: 86 studs Height: 14 studs Width: 27 studs Power supply: 4x Technic hub Driving: 4x C+ XL motor, each motor is connected to one hub to spread the load (3,528:1, theoretically 0,74 km/h @7,5V @124Ncm) Steering: 1x C+ L motor, two steered axles with Ackerman geometry Compressor: 1x C+ L motor, 4 pumps 3 RC valves: 3x C+ L motor, 3x newest valve one for each the rear axle, front/middle left wheel, front/middle right wheel Angle sensor for suspension on front and middle axle: 2x C+ XL and 2x Boost Medium motors OR 2x C+ XL Angle sensor for rear axle: 1x motor (not implemented yet) Air/pneumatic suspension on all axles controlled by Powered Up double wishbone suspension on fron and middle axle Each front/middle wheel on the left and right side are one unit. That means if the front wheel is pushed up the middle wheel is pushed down. That way the weight is equally distributed on the wheels live rear axle When I decided to use Powered Up I thought about controlling the ride height somehow with Powered Up. To do that I needed something to read the position of the double wish bone arms and the rear axle. Since several motors in the C+/Powered Up eco system can report their position, tried to use them to read the angle of the suspension arm. I successfully implemented that on the front and middle axle. For the rear axle I haven't found a good solution yet, because that axle can move on two axis. While I'm waiting for some additional parts, I'm working on the solution for the rear axle. As for the code, I already made a proof of concept. I created a test setup and wrote some code, which reads the angle of a suspension arm and adjusts it to the desired value. for the finished MOC a can think of something like a parking height, highway ride height and more or less off-road height. Once the chassis is finished the and the Powered Up is working I'll start working on body. Feel free to leave comments, critique and suggestions.
 -
 After long pause, I sat down today to play around with LDD. Oddly the inspiration came from here - see below. This will be a concept UTV for King Of Hammers, first design is ready, I need to build IRL and test. Considering the Corona situation, it might remain digital for a while though, as I might not have all the necessary parts on stock. 323 pcs so far. Nothing special in terms of functions: suspension, HOG steering, differential with fake engine (easy pop-on/off), fake automatic transmission. The latter is just sume pulley wheels and gears rotating along with the cranckshaft, round and bulky, just like a real hydraulic one. In real model, I will fit the tire on the inner wedges of the rim, thus it will get a bit higher (~58 mm) but narrower (~22 mm) profile.
 -
Hello, feel the speed! It is my own hypercar concept inspired by real hyper and supercars. It is a 6 studs wide, studless model built from standard LEGO elements. The overall size is similar to the Speed Champions sets, but the wheels are from City sets as I wanted to keep the height to length ratio closer to the real sports cars. It can be combined with my other MOC Hybrid Truck which will be available on LEGO IDEAS soon too. If you like this car, please share and support the it on LEGO IDEAS: https://ideas.lego.com/projects/44e6dbbf-734f-4b38-84c7-2075b09495bb Many thanks! LEGO Hypercar concept1-02 by László Torma, on Flickr LEGO Hypercar concept1-01 by László Torma, on Flickr LEGO Hypercar concept1-03 by László Torma, on Flickr
-

[TC15] Supersonic Angel
syclone posted a topic in LEGO Technic, Mindstorms, Model Team and Scale Modeling
Probably the closest the humankind has ever gotten to an irl starfighter. Not a fan of white, but unfortunately that is the dominant color of my panels (wonder why). Heavely basing myself off the Sukhoi SU47 "Berkut" with the angled double tail and FS wings, as starfighters are banned. Started off witht rear part as imo these Mars Mission wheels resemble jet exhausts. Most probably will include basic aileron controls , not so sure about the rudder(s) Maybe a third vertical stabiliser to kick it off? current progress: -
 REVIEW - 42081 - VOLVO CONCEPT WHEEL LOADER ZEUX INTRODUCTION Cranes, forklifts, cars....can we please get something different for crying out loud?! Well....here it is, something different. Of course, one can argue that this is yet another a front loader, and technically they might be right. But it is a unique in a way. Volvo and TLG make the most of their ongoing collaboration and present us the ZEUX, an Autonomous Concept Wheel Loader. An autonomous car (also known as a driverless car, self-driving car, and robotic car) is a vehicle that is capable of sensing its environment and navigating without human input (source wikipedia). This boils down to the front loader being capable of navigating without human input, therefore lacking the cabin. In order to perfectly sense the environment, it uses a drone sidekick! Some people think this thing is as ugly as....an autonomous concept wheel loader, but I will tell you straight away I absolutely love it. I love the concept, I love the looks and I love the fact that TLG and Volvo actually made a Technic set for this vehicle. And that's that for an objective review. Of course, I will try to be objective in my review, but I won't hide the fact that I am very enthusiastic about this model. Let's deploy the drone and....grab a beer, since this thing will be driving itself. If you see this icon, you can click the image on the left or right side of the image, to cycle through alternative images. PICTURES Pictures can be clicked to view hi-res versions. More pictures can be found in my Flickr album. DISCLAIMER This set has been provided by the CEE Team of TLG. It's not my goal to promote this set. It's my goal to give you an honest opinion about it. Therefore, the opinion in this review is my own and is in no way linked to TLG. SET INFORMATION Number: 42081 Title: Volvo Concept Wheel Loader ZEUX Theme: Technic Released: 2018 Part Count: 1.167 Box Weight: 2,33 kg Box Dimensions: 57,5 cm x 37,0 cm x 11,1 cm Set Price (MSRP): £ 109.99 / $ 139.99 / € 119,99 Price per Part: £ 0.09 / $ 0.12 / € 0,10 Links: Brickset, Bricklink THE BOX The front shows the model with its flying sidekick. The background shows a pile of sand and behind that a skyline with scryscrapers. Apparently, this vehicle is not only meant to be used in remote mining facilities, but also in urban areas. The bottom right tells us the vehicle measures 59 cm in length. If you don't own the 42030 - Volvo L350F Wheel Loader, but you do want the big bucket, now's your chance. You will get four nice big Claas tires with it, in case you missed those. So, this set might be interesting enough for the unique parts alone. BACKSIDE The back is divided in two sections, a top section for the main model and a bottom section for the B-model, another Volvo Concept, called the PEGAX. Needles to say, I am more enthusiastic about this alternate model, than the one for the Rough Terrain Crane. I actually quite like this one, but more on that later. CONTENTS OF THE BOX This box contains: 1x Sealed pack with booklet and sticker sheet 4x Tires 1x Big bucket 1x Bag with rims, actuators and gear rack housing 9x Unnumbered bag BUCKET AND TIRES I didn't think to see another set with the big bucket, but here it is. And four Claas tires, which are turning into a common presence in my collection. I absolutely love these bad boys and I sure hope TLG will some day release a smaller version as well. RIMS AND ACTUATORS A bag containing four rims, two linear actuators and a gear rack housing. BAGS A total of nine numbered bags. HIGHLIGHTED PARTS I was about to show the pictures of the bucket and rim again here, but that's rather useless, since I already posted them in the content section. Other than those parts, there aren't any new or interesting parts. I can hightlight the propellors, but that's about it. 7 BLADE PROPELLOR This propellor in flat silver isn't very rare, but you don't see it every day either. Comes in seven other sets. PART LIST Two pages showing the 1.167 parts. THE BUILD We start by building the front of the chassis. An interesting technique is used near the gear rack. The white part behind the 12T Gear is not a 1L connector. It's actually a 2L Liftarm with Pin and Axle. It rotates between two 5L thin liftarms. I could be mistaken, but it's probably just for proper alignment of the front and rear wheels. Here's a better view of the 2L Liftarm. I should have taken a better picture. REAR The rear wheels are connected to this assembly. Both the front and rear wheels don't implement shock absorbers or any other form of suspension. When you operate the final model, you are inclined to push it down to test the suspension. Unfortunately, to no avail. I reckon autonomous vehicles don't need suspension BOOM This is the boom which will connect to the bucket. Operated manually via a Linear Actuator. Usually manual operation and LA's don't combine very well, because it makes operating the functions very cumbersome. I wonder if this is the case for this vehicle as well. And the boom connected to the chassis. This is actually turning into some sort of vehicle. Feels more like an excavator than a front loader, but that will probably change in a bit. Next we are going to build the.....the.....uhmmm......what is it that we are building here?! It does seem to be sliding out. Ahhh here it is, the....uhmm.....the.....counterweight I presume. This entire big block can slide out to compensate for the weight of a filled bucket. T = F x L comes to mind. Looking at the left image, you see three (six, if you count the other side as well) panels with stickers, red and green lights and "chromed" grills. A couple of steps further down the road you will cover them with other panels (image on the right) and you will never see those decorated elements again. Is this a way to sneak in some parts for the B-model, which uses these panels in a more prominent way. Either way, I was hoping to be able to see these panels in the A-model as well. Ohh wait, you actually can see the panels inside this big paper weight At the rear you can see the 12T Gear, which is not the Hand of God steering, but it is used to move the weight back and forth. The rear is almost done now. We only need to add the antenna and the drone. I am not sure why the drone is positioned like it is, because it is not able to fly off by itself. The antenna is blocking one of the four propellors. I'd say, move it a couple of studs to the front. After adding some panels, the wheels and the bucket to the boom, the Zeux is finished. I enjoyed building this vehicle. It's not that different from a regular Front Loader, but it does have some unique elements. The usual leftover parts. COMPLETED MODEL Of course, it is a matter of personal taste, but in my opinion this vehicle looks awesome! I love the Tech-look with the black and yellow color scheme. I also love the orange accents to highlight important and/or moving parts, like railings, footsteps, etc. And I also love that TLG (and Volvo) went all out and said....let's do this! This collaboration is proving to be very fruitful. Here is video with some background information on how this project started. A cool fact is that kids actually helped shape this model and made some design decisions. The boom has been properly finished with panels at the right place. Feels solid. Operating the functions manually works better than expected. They are actually quite responsive. Here's the list of implemented functions: Four wheel steering Raising/lowering the bucket Raising/lowering the boom Raising/lowering the chassis Extending/retracting the counter weight The three raising/lowering functions are operated by turning the 12T gears, all located near the front wheel. An interesting fact is that the antenna at the back is actually an eye. You would think it is used to look at the environment, but it's primary function is to interact with people walking near the vehicle. By looking at the eye you can see that the vehicle has seen you. The following video gives you some insights: The back looks even more "Techy" than the front, with the drone and the antenna. Click on the image to raise and lower the chassis. Granted, the looks of this vehicle are relying heavily on the applied stickers. It will probably still look cool without them, but you would lose lot of the details. The front loader in attack mode. Ready to strike There has been some debate about the reason to raise and lower the chassis. At first I agreed that ground clearance was a logical reason, but the axles are still near the ground, so that doesn't make sense. Therefore, I think it has to do with transporting the vehicle. If you put this on a truck it will be quite high. Lowering the chassis will solve this issue. And it can be used to change the angle of the boom without moving it. Not sure if this is an actual purpose, but maybe it doesn't cost as much power, since the arm is longer. Just guessing here. And a final image from the left rear of the vehicle. B-MODEL I haven't been able to build the B-model, so I have no idea how the build is. However, by looking at the picture I have a pretty good idea. It is an odd looking vehicle, but at least we get to see the six grey panels Again, one can discuss the looks. It's not the best looking vehicle I have ever seen, but for an autonomous vehicle, it does what it does, haul a payload. I am not entire sure why this vehicle needs to adjust its ride height. Maybe to prevent from the load falling out of the bed. Anyway, I will most likely get a second copy of this set and build this PEGAX hauler. For me, it's two thumbs up for this alternate model. SUMMARY At the beginning of the review I mentioned that I was very fond of this model. Well, that didn't change upon completing the build. I like everything about it. And I find it particularly interesting, and audacious, that TLG and Volvo actually went ahead with this project. This proves that two major brands working together can accomplish great things. I do understand that not everybody will like this model, but if you are remotely interested in robotics and autonomous vehicles, this should appeal to you. Then there is the discussion about manually operating the functions on an autonomous vehicle. Some claim that it should have been full RC. But if you think about it a big longer....an autonomous vehicle being remotely controlled?! That doesn't make sense either. The perfect solution would be to integrate Mindstorms, but that's not feasible for a retail set. It will even be challenge to add the functionality, even for the avid Mindstorms builder. There's simply not enough room in the chassis to place all the motors and sensors. All things considered, I am very happy with these manual functions, and the way they operate, even with Linear Actuators. Not sure whether this is considered a Pro or a Con, but it is worth mentioning that this set doesn't have numbered bags. Both previous Volvo models didn't have numbered bags either. Makes you think that Volvo has something to do with this. For those of you wondering...the MACK did have numbered bags PROS Unique vehicle Cool design and color scheme Another chance to get the big bucket (and big Claas tires) Manual functions work properly CONS Lots of stickers No intricate gearbox. Functions are directly connected to the LA's. Oddly placed drone (is this even a Con?!) SCORE How do I rate this set? 9 DESIGN I know this is highly subjective, but I love the looks of this vehicle. 8 BUILDING EXPERIENCE Enjoyed the build, but there is no intricate gearbox. 8 FEATURES Enough features to keep it interesting. 8 PLAYABILITY For manually operated LA driven functions, they are surprisingly responsive. 8 PARTS Depends on your needs, but another chance to get the big bucket, in case you missed the Volvo L350F. 8 VALUE FOR MONEY Price per part is not particularly low, but you do get a big bucket and four Claas tires. 8,2 I'M LOVING IT FINAL WORDS One last thing to mention is this page at the end of the instruction manual. It contains some of the prototype (I presume) vehicles which have been created during the design process. Thanks you for reading this review. All pictures can be found here.
 -
Do you have any concept artists or fan artists who's work you may admire? Are there any Eurobricks members here who also have art as another side hobby? What are your favorite genres and subject matters as far as concept or fan art go? Whether their artwork be Lego related or otherwise, share and discuss it all here!
-

TESLA concept 24 hours race car
9 fingers posted a topic in LEGO Technic, Mindstorms, Model Team and Scale Modeling
Hello to all LEGO fans. Today I am presenting you the future of racing cars of 24 hours Lemans. TESLA concept race car. It is driven by 2 electric Buggy motors.Power suply is via freshly charged batteries. ( our future i think) It has a concept steering mechanisem for better driving propertis. It is a concept from Tesla and Michelin group. Its called Das koncept. The whole car inspired me to make someting like the real concept of Tesla T1.But not in the shape, only the steerin system. ( it is ugly ) So i decided to make my own version of the body shape and chassis. Lets see some pictures of my design: Some detailed interior with opening the cabin. Picture of the undercarriage. As you can see, nothing special. It has full independent suspension on all wheels. Rear axle is direct driven from iner output of buggy motors. Frot axle is steered via RC unit. Some dimensions: lenght: 62 studs, width: 28 studs, height:14 studs. weight is 1380 grams. Speed: I did not measure it, But for this weight and size its wery wery fast. After the shooting for the video, i was playing with this litle race monster abouth 1 hour or something. Spectacular driving. I was again a litle child. And the video. I hope you like it. Best regards, Valter -
BMW 2069 AHF TRIKE-Prize arrived :)
Alex Ilea posted a topic in LEGO Technic, Mindstorms, Model Team and Scale Modeling
Hello all! Kinda late but better later than never. I want to present you my entry for REBRICK contest :BUILD THE FUTURE . And I built a trike :) The main feature of this model is the trazition from drive mode to fly mode . Front wheels are lowered by 2 small LAs and the rear wheel raises (by 2 small LAs) . This is done by 1 M motor. Driving works at any time and it is powered by 1 M motor. About the steering , it is powered by 1 servo motor . The handlebar is conected to the steering. When wheels are lowered they can still be sterred [it looks so cool :) ] . The last freature is working front independent suspention (works in both modes) . It was a very interesting challenge and I hope you will like it as much as I do :) My favourite shot : Rear: Posted on Rebrick :https://www.lego.com/en-us/rebrick/view-entry?c_id={0C2B083F-BB14-47C0-84A8-775CB958273D}&a_id=bc094429-5297-4d4f-90dc-6bad2335db1a&sortEntry=false Youtube video : More pictures here: As always a comment is much apriciated :) Btw , whould you guys like tear down photoes ? And AHF stands for Always Have Fun ;) -
Project Air Pocket (WIP) [gearbox installed]
Aventador2004 posted a topic in LEGO Technic, Mindstorms, Model Team and Scale Modeling
current: the bodywork was the downfall of this car, i do better with gaps and holes. the chassis is my strong point, bodywork is not my strong point with legos. dont expect an update for a few days. this car will not have instructions. sorry i disappoint this time, this next car i have good experience with the bodywork for. a insight: this is not my only project...... le mans... prototype...... power functions..... concept: Air Pocket this is my project i have been working on the last 2 days, project Air Pocket. the aim of my current project is to make the most light, easy to make, simple, and durable car i can. the current car has a simple Rwd, hog, setup. those work fine, but not enough. the plan is to finish before the 24h le mans race, or on that day (17–18 June 2017) as a car to celebrate. some photos.. suicide doors.. for now.. underbody. it is not final of course, just a test chassis. color vomit is there on inside as much as possible. -
[WIP] project C.O.R.E.
agrof posted a topic in LEGO Technic, Mindstorms, Model Team and Scale Modeling
Hello All, I am working on a new MOC, which for I am experimenting a lot with unusual pieces in Technic. To achieve their proper implementation into the Technic world, I am at crossroad now: wether to build illegal (tiny stress) or find a legal solution. I prefer the illegal version in look and strength point of view - I can deal with slight bend of the connected parts, but of course a legal solution would be nice - I have 2 for now, but they just look to messy, and 1 of them is weak too (only rubber connection). Lime 15L beams on the RIGHT is the illegal, the others on the LEFT are legal, only 2L axles missing from rubber connectors (marked with pink): Hereby I would like to ask the community for brainstorming, parameters to follow: All red parts must be on place - no possibilities to move. Axles in the frame pieces to be rotate freely. All red parts must be fixed horizontally and vertically too, rigid connection needed. Must be buildable in reality too. The solution must look clean, visible part of the MOC. HERE You can find the LDD file - some parts will be dropped at open, as it was made in Developer Mode, please refer to the picture above. I hope You will find interesting this problem solving, I am open for any ideas. Thanks for everybody in advance! -

[TC10] Concept Dozer
Thirdwigg posted a topic in LEGO Technic, Mindstorms, Model Team and Scale Modeling
It's time for me to submit an entry for the TC10 contest. After toying with a lot of ideas, the idea of a concept bulldozer was the one I gravitated to. I had a lot of fun coming up with the esthetics. Hope you enjoy as well. Features: Power Functions Pneumatic Pump Blade Lift (2 Pneumatic Rams) Blade Tilt/Angle (2 Pneumatic Rams) Hood Opening (1 Pneumatic Ram) Ripper (1 Pneumatic Ram) Opening Driver Door 16 Cylinder Engine I'll post the video soon. -
This text is mostly credit, previous ideas and rambling, you may just look through the links and at the pictures. Recently I've been thinking about how one could build a ship with smoother lines than usual - CGHs building technique might be great, but there are always some steps in between the different modules. Then there is Sebeus I's prefab technique, which requires one to basically build one broadside of a ship and clip it onto it. This might be smoother, but still - it misses some of the curves most of the ships in the Age of Sail had. Part I: In a Lego store I stumbled over a bunch of Harry Potter Wands in black; I picked up a few hundred of them, hoping to do something with them. So, there we have the very first part of my journey - a mini-scale first rate, that I still consider a WIP, even though it is currently disassembled: Now, this technique may work for that specific situation, but I just couldn't see how to apply the technique I used for that one for a minifigure-scale (or illusion scale as it is often called) ship. So put it aside. A few weeks later, Kurigan reminded me of the organic ship from Sebeus (I'm totally stealing that name for this, sorry;)), which brought my interest in this back, but I didn't really want to use that technique - while it might be a great technique, I just can't see it being stable enough, nor cheap. Part II: A few weeks ago a small conversation about a different interior than exterior colour on ships happened - this somehow ended with me going through the ship index (the one for BOBS) and finding the Matterhorn by Mr Townsend - coincidentally build with tiles on the outside and the option to have differently coloured plates on the inside. It still has the steps on the outside - I want to go without that. Part III: Sunday, last week. I had an idea which involved bending a snotted broadside (the idea about bending a broadside I also heard from Kabel), which I quickly turned into a mockup build - and I think this is the idea I'll continue with. So, here is the mockup: Excuse the mess. Part IV: Heard from kurigan about another ship built using a very similar technique, the Revenge by MayDayArtist; the technique behind it seems to be way more advanced, and "more of a one time thing" (not so accurate quote from kurigan). ________________ So, that's basically the story behind this concept. To show it versatility a bit more, I've quickly done a mockup for the tumblehome of a first Rate, and, for comparision, a small, 14 gun, brig: The first rate I'm not going to do more with - it was just to show that you can build basically any ships center hull using this technique. The brig - I'm not sure, I think I'll first build the project I'm starting now, and then maybe look at that brig again. So, let's get started on the WIP, which will be a 42 gun fifth rate frigate - 2x14 guns on the gundeck + 14 guns on the upper deck. The upper decks armament may still change. The stern will be on the right of these pictures, just for perspective. I started by building the length of the central hull; I did this in 3 parts, as I want to keep a ship this size somewhat modular and the broadside can't be easily split using this technique. You can see the tan tiles showing the future positions of the gunports. How it looks connected - there are only 5 technic pins connecting these parts, to allow disassembly later on. Next, I'm using a bunch of 1x4 tiles and 1x6 plates to build another simulated broadside - this is just a part to help me "draw" the lines of the ship. Using some more plates of different length I mount these - note that the last and first gunport still line up; this means that the long line gets streched a little bit, which may not be great, but so far I haven't seen any damage done to the bricks. I think here it makes some sense to show the parts I'm using - some technic pins, technic bricks, old style (!) hinges and some inverted 2x2 brackets. I use these to follow the technic bricks to remake the curve (very roughly) I laid out earlier. I place the brackets with the hinges in positions where the hinges won't obstruct a gunport (I leave 1 stud on either side of the hinges up the gunports). Next, I place these broadside mounts instead of the temporary plates and tiles; I made sure to place them in a way that allows the entire thing to stay modular. Now, I reinforce the lower parts using a bunch of plates (you won't see these later, I just had a bunch of dkb gray around) Here I prepare a bunch of black tiles for simulating the lower part of the hull. Sadly I own very few 1x6 tiles in black, so I had to use 1x8 and 1x4 tiles - 1x6 tiles would be just perfect. These stripes are the full length of the broadside - 6 studs longer than the outer hinges are apart. I'm placing them a little offset from eachother to simulate planking. if one would want to make this even more realistic he could try to angle this part a bit downward too - that was a bit to much for my first model using this technique. Quick view from ontop to show the current state - I think I may have to make this ship a little bit thinner, maybe 2 or 4 bricks? I would be glad about some feedback about that. In the last part for today I'm preparing the lowest part of the angled tumblehome - a long line of 1x6 tiles supported by 1x4 plates. I'll need a lot of these! For now these are just mounted on the further outwards hinges using some plates behind some tiles. All my black 1x6 tiles are currently in the 1st rate broadside that I need to tear down. _________________ So, that is what I have so far. Now I need some feedback and some help - should I make the entire thing a little bit thinner (note that bow and stern are still missing), or maybe change the curve a little bit? So, now to the part where I need help. I'm not quite sure how I'll build the bow, I have a few ideas using hinges and / or flex tubes, but thats all I have. I would be very glad if some of you would try to give me some ideas for that part or just follow along the build. I would also be honored to see someone building along with me - this would also help develop this technique. Thanks for reading! ;) Edit: List of ships/building techniques mentioned in this topic: CGH's technique Sebeus I technique (example) Organic ship by Sebeus I Matterhorn by Mr Townsend Broadside bending by Kabel (visible towards the stern) Revenge by MayDayArtist Bumblebee by Kurigan El Gran Grin's by CGH Dunkleosteus technique
-
http://faberfiles.bl...scontinued.html A few days ago Faber posted a concept poster of Hero Factory during it's early stages of development. The description was later removed as Faber felt it was too emotional and that the development work should remain secret. However, thanks to a 4chan anon and a few board users, we have the full confirmed description which sheds some light on the IFB ending and the original concept of HF. "The last HF episode "Invasion from below" became the most watched piece of content on LEGO's website the year it came out. At the same time it marked the end of the short life of Hero Factory. It was criticised for a lot of different reasons but here are a few personal views on this battered factory." "Invasion from Below" was made on a very low budget by Advance and Ghost who made all the original Bionicle animations. The episode was a struggle because the storyline got changed dramatically during production. It was definitely ment to be continued because (of cause) the Queen wasn't gone and the case wasn't closed for HF. The voice actor changes was done for budget reasons because we didn't have budget for the the original voice actors." "Having worked on both Bionicle and HF from the very beginning I can tell you that the work that went into creating the HF universe was much more deep than the early foundation of Bionicle. We wanted to use all we had learned from Bionicle but make something that was really different from Bionicle yet as epic and big and therefore we created what we called a "realtime IP" meaning that this was not a legend, it was actually happening now somewhere in another galaxy. We wanted to mirror present day but in a tech build-up. In some way inspired by the humor of The Incredibles by Pixar." "The backstory of HF is extremely deep and epic and hold secrets that were never used. They are still in the huge concept bible that I keep. I hope to get to show them and do a extensive blogpost about HF and it's creation on this blog when the time is right. A last note is that Hero Factory was only meant as a location springboard into this vast story universe and the story was meant to get much more personal when the real truth about the factory was discovered. The idea of a factory that builds cocky heros made to specifications was actually a provocation to the whole legendary hero story we had told in Bionicle. The real hero would be found somewhere else...:) to be continued..." Here's the poster depicting a rather superhero-esque robot. Personally it gives me a Rachet and Clank vibe for some reason. Like a lot of other fans I viewed Hero Factory as a mountain of unused potential, and after reading what it *really* could have been those feelings have been amplified by 11. A story and universe that could have been even stronger than Bionicle combined with incredible creative freedom just really hurts as a lost opportunity. I have to wonder if a similar situation happened with Bionicle G2. Discuss what you think on what HF almost was.
-
Anyone on here ever heard of a Third Row Seat before? Most station wagons (typically in North America) have them, which converts the luggage area into a third seating area! Here's what mine looks like: Anyone used these in their wagon MOCs before? Thanks for viewing!
-

[CONCEPT] Double Torque Tube Suspension
Zerobricks posted a topic in LEGO Technic, Mindstorms, Model Team and Scale Modeling
I got this idea yesterday and decided to build it. Its an improvmement of a classical torque tube suspension, but now it uses 2 torque tubes to form two half axles which are connected to each other via a turntable: To keep the half-axles from bending away there's a lower linkage made out of 5L suspension arms and some beams: So what's the difference btween this and classical single torque tube? Lets start with advantages: - No need for links or panhrads to keep the axle in place - Now each axle can have an independent drive, which cancel each other's torque therebye elimenating torque flex - Or you can use one ball joint for drive an dother for steering - Can carry much more torque And there are also some disadvantages: - Less flexible, maximum angle this setup can bend to is some 30 degrees - Steering is a bit more complicated, since the axles pivot in the center, you need some ball joints and links - Takes more space But you can even expand the concept to use three torque tubes. Now the side ones can carry power while the center one supports the steering system: This is just a concept for now, but I might try it in a realy model just to see how well it will work. What do you guys think? If possible try to build one your own and give me some feedback. -
[POC] Twin beam suspension with drive and steering
Zerobricks posted a topic in LEGO Technic, Mindstorms, Model Team and Scale Modeling
After watching some youtube videos I noticed some trucks had some weird suspension on them... It looked something like this: So naturally I started investigating and found that this is a type of setup called a twin beam suspension. So I tried to replicate one in Lego. To explain the concept behind this hybrid, here's a series of stages leading from live axle suspension to the double beam setup: In order: Yellow setup is a live axle Red setup represent the change from dependent suspesnion to independent suspension By extending the half axle lengths (blue) we get a lower change in wheel angle relative to the drive surface (camber) And finally by extending the swing arms PASS the center point we get a double beam suspension And here's a version with drive and steering: So what are the advantages compared to the live axle? - Its independent, which as name suggest aloows the wheel to work independent from each other - Lower unsprung weight - Less moving parts - to keep a live axle in place you need several linkages. Here the axle pivots around one central point And disadvantages? - Complex design, the axles have to be made to travel pass each other without interfering. - A need for a CV joint which needs to allow the axle to slide in and out - Not as robust - Hard to implement portal gears without making the wheels slide sideways excessively - Camber changes are still present I also made a video explanation of the principe. You can skip to 4:30 to see the final version in action: So the final question. Is it useful? Fo me as far as the Lego version goes....no. The disadvantages outweigh any possible advantages. Also lately I have been working a lot on long travel double wishbone suspension which outperform any other previous suspension system in almost all categories. The only usefulness in this design I see is realism, if you are building a replica of a truck that has such suspnesion. Because I want to hear your opinion, here's the LDD link to the suspension, so you can try to make your version and improve upon my prototype: Download prototype here -
I am thrilled to know that my entry to the Ani-Com & Games Hong Kong 2015 LEGO Competition was shortlisted! This year, the topic is "Ideal Home (Interior Design)" (weird title with the confusing brackets, I know!), and since I like building houses, I thought I might give it a try this year. The show ended two days ago and while my submission did not get into the top three, I still got 4th in the judge scoring and I am already happy to be on the stage this year with the other awesome builders! My build is called "S Villa" (previously named Box iN during submission), which is my dream home in the brick city. The design is based on the concept of a garden. To me, home should be a place separated from the hustle and bustle of the city. Instead of being trapped inside another building, the occupants probably want to have their own personal outdoor space, meaning a garden. Therefore, the concept is a central garden with rooms arranged around it. Above is the program of the house, with different rooms arranged around the garden. Here is the final look of it, showing its front facade: The center garden is here, with some pebbles forming a loop path: The arrangement of rooms start from the living room, which is directly facing the garden. It is first place I enter when I arrive home, and I want this to be a relaxing place without TV to distract me. Further in is the kitchen and dining area, the latter which extends out to share the same garden view: The opposite side of dining room is the corridor leading to guest toilets and back door, where you can reach the garage. The staircase forms right above the main entrance, and I refuse to use a stacking type of staircase so that the staircase is like a room itself, creating a middle platform as a buffer to the upper private rooms. The black box, which is my studio, is located at the first stop of the staircase. Inside there are my desk and personal theater. Now this is the place I enjoy TV shows and movies. Going further up is the bedroom and lavatory. If you see closely, you will see I put the rooms that require quiet space, ie dining room and bedroom, away from the street, using the staircase circulation as the buffer separation to kill any noise from outside. The bedroom is a simple one, with an extended balcony next to it. My concept of monochrome design comes from the idea that a building can be simple and neutral-colored so that people focus on its form and shapes. All the colors then come from the inside, where people live, because life is colorful. Without us, there can be no color. We, are the colors. The space underneath the black box is recessed in as a garage. I also made a little extention behind it to put the tools for the garage. S Villa is the house for me and my wife, and the name contains the first letters of our names. Originally it was named "Box iN" during the submission since the idea is about the inner garden. With this design, I hope to inspire people that a house can be simple in geometry, and also functional in use. Hope you enjoy this building and its architectural concepts! More photos at:
-

Independently Steered Vehicle
Nalyd997 posted a topic in LEGO Technic, Mindstorms, Model Team and Scale Modeling
This is something I made quite a while ago but I never finished it. It worked really well as a unit but the axles let it down. They were based off of someones concept car who I can't remember the name of.Like Nkubate's hurricane it has differentials between the left and right wheels instead of the front and back. This allows it to be slightly easier to control. I have an LDD of it which is mostly complete. Finally here is a video: -
Hey! What SW stuff do you wanna build in the future? On my list is this Y-B2 ugly, X-'ceptor, and the various concept snowspeeders. Y-B2 Snowspeeder concepts: X-'ceptor Thing I'll build with what's left for the excrement and excitement: More pics >> http://imgur.com/a/raBFL Pictures are appreciated, but if they don't exist and it's something you came up with on your own, just describe it! I would love to see all your ideas. Dammit, it cut off my thread title. It's supposed to be "Star Wars MOCs you really wanna make but you have to take your time with because you're a man in a world gone mad" Hey mods, think you can rename it "Star Wars MOC To-do List thread?"
-
Just thought I'd share this here: I figure this'll be the area that people go to buy tickets. I know it needs a ticket window to do so, so I'm thinking that the window behind the test figure there will be the place for it. Any thoughts?
-

[TC5] VOLVO SfinX CONCEPT
TheItalianBrick posted a topic in LEGO Technic, Mindstorms, Model Team and Scale Modeling
Hello everybody, please read carefully: as I only had 3 hours to play with my legos I came out with this "non serious try" , it's not intended to win, not to compete at all, I simply had fun doing it and from the bad picture and the "too many" left over parts you can guess I didn't try hard!! But there it is :grin: Sets used: + Hopefully something like this so there we go now! Sorry for the bad quality, taken with my Ipad. I'm off for my holiday now so won't be able to make better ones, neither to work or modify the moc itself! adjustable legs and foldable tracks as the real one!!! It can adapt to rough terrain aswell! OMG it can climb a 42000 tyre!!!! No gears involved as otherwise it would be too good.....so let's keep it as "low profile" :laugh: It can also bend forward! I know it looks like it's get on its knees.....but NO! Here the left over parts! Too many as you can see....I really should have tried harder :cry_sad: Thanks anyway, next time I'll make sure I'll come out with something nicer and more "professional" -

Pneumatic Hovercraft Concept
anton1678 posted a topic in LEGO Technic, Mindstorms, Model Team and Scale Modeling
This is just a concept, and I don't really think there is much physics behind it, but would a lego pneumatic hovercraft be possible? There are lego pressure cylinders, so that would be the air we need to lift it up. When air is forced to come out of somewhere, it has to go out, even if it tears through something. The cylinders, however short-lasting the effect will be, will have air coming out of them, so if the hovercraft is resting on part 99021 it will be able to direct the flow of air downwards, which will build up pressure against the ground, and force the hovercraft up. This part is plastic and rigid, so it won't bend, and if we have at least 4 of them we will be able to support a small hovercraft In theory, this would finally be lego "flight" and the air cylinders would just be fuel. If it works well enough, more cylinders could be added and 2 remote controlled fans or valves that blow air in different directions A ground effect vehicle (hovering vehicle) is the best chance of lego ever flying, so I thought this would be the most practical way for it to work. -

Helicopter Rotor Assembly (proof of concept)
weavil posted a topic in LEGO Technic, Mindstorms, Model Team and Scale Modeling
I got an idea and wanted to share because I don't have the parts to build and test. I got the idea when I was looking at the parts update for LDD and built it. It would be a helecopter rotor assembly. Picture A Picture B LXF File The orange connecter is the CV joint connecter (bug in LDD - won't connect) and the red axles are to control the movements. I really would like it if someone could build it and test the function of it and post some pictures/video. thanks for your time.