Search the Community
Showing results for tags 'ride'.
Found 19 results
-

LEGO Technic Turbo Polyp / Kraken
Techniccrack posted a topic in LEGO Technic, Mindstorms, Model Team and Scale Modeling
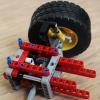
A few years ago i started to make an technic Lego Turbo polyp (fun fair ride) Some call it "Kraken" or "Octopus" How it works The Turbo polyp has a rotating cilinder that holds the arms It also has a second cilinder that rotates the opposite direction. This cilinder containes a lifting system that pushes the head upwards The arms are attached to the head. When the head goes up the arms will make a jumping movement. Heres a video of the real thing: The first model main frame (2013) I build this 5 years ago. with normal turntables. Because its containes two turntables on top or eachother and with the size of the model its was way to heavy to work properly. here is a (blurry) picture of that model The second model main frame(2016) So i started to rebuild the whole thing. I had to build a custom turntable. So i used catterpillar parts to make the turntable. The space in the middle had to be clear to build the support of the middle cilinder it turned out great. surpisingly sturdy and can handle a big load. 4 rubber powered wheels handled the rotation of the ring. Here is the underframe (in buildprogress): And here is the new design turntable: It was very sturdy and could manage heavy weight in it Problem was how to make electric connections on this turntable?(rotating or drag contacts) And the lifting mechanism on the second cilinder was to weak. I was frustrated and the project ended on the attic on a shelf The third model main frame(now) A year ago or so i saw that the new digging machine containes the new curved gear racks. So i figured...that can be the sollution of my project. so i took the old model and began to rebuild the drive ring with the new gear racks i began with order a big pile of parts The new yellow rings are great. They can function as ring with a very sturdy structure to support the weight. It has a small ledge where i perfectly can put round tiles (1 stud) to make an great bearing and i can use the racks to make nice the arms with a nice bow (see photo) I dismanteled the underframe to make the new rings fit properly Here are some photos of the project: The new lower drive ringcilinder that holds the arms:(without springs to hold up the weight:)] [ The lower ring containes two seperates rings. first ring for the main rotation, second ring for control the speed of the rotation of the crosses. This gears are connected to the second ring and due to a connection with the armbrackets the crosses will rotate. By make the second ring rotate, the crosses will slow down or speed up The middle part is connected to the main underframe. that holds up the second cilinder with the lift cilinder. So the 2 cilinder are rotating apart from eachother) Lift system Also the lifting system in the second cilinder is competally modified In the first model used 3 actuators for the lifting system but....to weak. btw..it can only lift the length of 5 studs Then pneumatic? to weak. They a scissor lift system..guess what...to weak! Now i have the sollution..a horizontal 11L gear rack driven by a 24 tooth gear by a worm gear. The gearrack pushes the head upwards. The internal structure of this is so strong it is nearly impossible to slip. And it can lift up to 3,5 kilograms Only think i need to take care of is not go further then the end point because it could damage the motor Here the photos of how the lifting system operate A look from underside (the lift structure is hidden, but i will add a LDD picture of it how its works) I added two hard springs in the structure for extra support the lifting New arm design The old arms i made of studded beams with 3 corners in the arm. Problem one: it looked to "lumpy" Problem 2: its was not very sturdy Problem 3: to heavy Problem 4: difficult to add light wiring Soooo....why not rebuild it? so i did.. Now with the curved gearracks on it. it looks better, its is lighter and very sturdy. Also great for adding wiring for the lights. All arms together: (main frames) Arms in the position that will be when finished the model (for expression) The ends of each arm containes a gear with a smal turntable. Perfect for adding a linear electric contact (non Lego), for the wiring and lights. The lights will be Chasing EL wire and it will look awesome. And a photo while building it: To be continued -
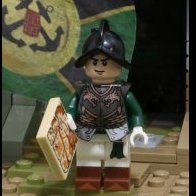
Pirates of the Caribbean Disneyland Ride As my all time favorite Amusement Park Ride I have always wanted to represent Pirates of the Caribbean in LEGO. Lafitte's Landing and the Blue Bayou have always been such a great start to an awesome ride. Thank you for checking out my build! Pirates of the Caribbean Disneyland Ride by Nicholas Goodman, on Flickr Pirates of the Caribbean Disneyland Ride by Nicholas Goodman, on Flickr Pirates of the Caribbean Disneyland Ride by Nicholas Goodman, on Flickr Pirates of the Caribbean Disneyland Ride by Nicholas Goodman, on Flickr Pirates of the Caribbean Disneyland Ride by Nicholas Goodman, on Flickr Pirates of the Caribbean Disneyland Ride by Nicholas Goodman, on Flickr Pirates of the Caribbean Disneyland Ride by Nicholas Goodman, on Flickr
-
Hi everyone, today here I am to show you my version of the Batpod. When 5004590 was released, everyone was thrilled and tried to replicate one on their own with their parts. However, 5004590 looks just strange when you compare it to the real one. I bought the book The Dark Knight Manual to understand the design more, and research on the Internet for a month, and finally I built a version that I think is closer to the real Batpod. The original Batpod is an escape pod from Batman's Tumbler, and the mechanism is based on the S-shaped axis. Each of the two wheels are connected to the body by one-sided arm only. 5004590 set does not do this while mine follows that design. The shape of the Batpod is also in a reverse V-shaped manner, without any horizontal element. The LEGO set did not do that at all, and my version tries to follow that original profile, with rear part elongated as well to match the proportion. Front view, which shows the asymmetrical design of the wheel axis. The front view has mounted 3 pairs of weapons, with headlights on the sides too. Middle part, which retains some of the details of the original 5004590 set. I like this part the most, which keeps the original design of the Batpod: mudguard between the two pedals. I tried to add some wiring to mimic the original, but it looks too busy and so I ditch it in the end. The whole exercise was started as an MOD, but with my design goals to rebuild the form in the most realistic way, I redid the entire chassis in the end. Looks like an MOC at last! Anyway, there is one technical issue that prevents the front wheel guns from holding permanently, but as a display model, this is perfect already. Thanks for watching!
-
Range Rover Evoque + Instructions
Lox Lego posted a topic in LEGO Technic, Mindstorms, Model Team and Scale Modeling
For my final post of this year, I am proud to introduce the Range Rover Evoque with air ride. Thanks to all for the comments and suggestions in my WIP thread to create a better SUV. The car was too black so I added white, it was too low so I raised it a stud and the hood wasn't slanted enough so I re-created the front of the vehicle. I reduced the weight to 6.3 pounds (2850g) This car has 4wd, air ride, torsion bar suspension, 2 XL motors for drive, 2 m motors for lift, V8, servo for steering, gear shifter turns on the lights. The car is finally to a perfect scale. The hard parts of this build was the air ride, torsion bar and having the doors start low at the front and higher at the back. I bought a pair of custom chrome exhaust pipes for this built. flickr: https://flickr.com/photos/139930963@N04/sets/72157676733470861 MOC-Pages: http://moc-pages.com/moc.php/435565 Instructions: https://goo.gl/photos/KLwkEfTt2LzsRMkG8 Inspiration: Inspiration by lachlan cameron, on Flickr Below is the car in comparison to the 42052 helicopter set Air ride Range Rover Evoque by lachlan cameron, on Flickr Back end was super difficult: Air ride Range Rover Evoque by lachlan cameron, on Flickr Everything opens: Air ride Range Rover Evoque by lachlan cameron, on Flickr Front View: Air ride Range Rover Evoque by lachlan cameron, on Flickr I'm ready to take my helicopter to work... Air ride Range Rover Evoque by lachlan cameron, on Flickr Air ride Range Rover Evoque by lachlan cameron, on Flickr underside shot: Air ride Range Rover Evoque by lachlan cameron, on Flickr Side view: Air ride Range Rover Evoque by lachlan cameron, on Flickr Interior by lachlan cameron, on Flickr Framework video: -
Been having fun with my Nexo Knights, some knock-off Dinosaurs and Legend Beasts, some real Lego Legend Beasts and a random Mixel. I thought it'd be fun for each knight to have an animal steed instead of vehicles. What kind of things would you like to see in Nexo Knights? Anybody else found any cool knock offs online that you wish were part of the franchise?
-
I'm building a swinging ship to go with my amusement park. I'm trying to drive the thing with a large rubber tire underneath it, but I'm out of my depth when it comes to gears. I need the wheel to spin clockwise for a few seconds and then switch to counter-clockwise. I have tried using a power functions switch, but without enough momentum to flip it, it always gets stuck in the middle off position. I tried using the remote and the IR sensor and manually controlling it, but I'm running my PF motors off of the old 9V train controllers, and there isn't enough power that way to run the IR sensor. I don't want to go with batteries. I wish there was a wall power option for the PF product line, but there isn't. So now I'm trying to create a gearbox that periodically reverses direction, but everything I've tried is close, but not quite there. Does anyone have the know how to create a gearbox that reversed the output direction every 2-4 seconds?
-
Old MOC in 2016.... The eighth addition to my amusement park. IMG_6250 by skcheung730, 於 Flickr IMG_3294 by skcheung730, 於 Flickr IMG_3289 by skcheung730, 於 Flickr IMG_6267 by skcheung730, 於 Flickr IMG_6257 by skcheung730, 於 Flickr Video:
-
Old MOC built in 2016. Hope you enjoy. IMG_6285 by skcheung730, 於 Flickr IMG_6299 by skcheung730, 於 Flickr IMG_6295 by skcheung730, 於 Flickr IMG_6293 by skcheung730, 於 Flickr IMG_6281 by skcheung730, 於 Flickr IMG_3324 by skcheung730, 於 Flickr IMG_3322 by skcheung730, 於 Flickr Video: https://www.facebook.com/skmoc/videos/950045705126688/
-
The ninth addition to my amusement park. Built in this year. IMG_4070 by skcheung730, 於 Flickr IMG_4157 by skcheung730, 於 Flickr IMG_4135 by skcheung730, 於 Flickr IMG_4095 by skcheung730, 於 Flickr IMG_4169 by skcheung730, 於 Flickr Video:
-
[TC14] Propeller (WIP)
Jurss posted a topic in LEGO Technic, Mindstorms, Model Team and Scale Modeling
Yesterday already came idea, started some digital sketch, will try to find some time in the evening, at least to build first plane -
[TC14] Gyroscope
The_Icestorm posted a topic in LEGO Technic, Mindstorms, Model Team and Scale Modeling
I thought I might try to replicate this ride design for this contest. The ride consists of 3 spinning 'rings' with the riders attached to the innermost ring, and the ride rotates them around 3 axes. Some functions I want to include in the ride: Independent motorised control of each spinning ring. All motors external to ride, using a Mindstorms EV3 controlled system. Whole ride raises and lowers to allow riders to get on and off (like in the video) As I want all the motors to be external to the ride (having motors attached to the rings will cause wire entanglement issues) I have to somehow transfer power through the rings to spin the inner ones. Here's a diagram showing how the power will be transferred to spin up the inner rings. Red line is power transmission. Some pictures of the middle (green) ring and a basic mounting frame (not final). Black axle is input and tan axle is output. -
There was a time that a big piece of brightly colored plastic with some lights on it, gently rocking back and forth, could make us so happy. Coin operated rides are something you grow out of, though, so it has been a long time ago that I enjoyed riding on one of these. Luckily, it turns out that building one is definitely a joyous activity! [MOC] To Space and Back for 50 Cents! by Bert Van Raemdonck, on Flickr The motivation behind this build was the LEGO Ideas "Moments in Space" contest. The objective was to build a small creation in the theme of space. It had to be in the same vein as those small promotional sets you get for free when you spend enough in the LEGO Store or at Shop at Home. I tried to follow this guideline as well as I could, really trying to design a promotional set. One thing I wanted to include, was some kind of mechanical play function. I recently acquired the nutcracker promotional set, and I found myself really enjoying fiddling around with it, endlessly actuating the lever: motion just fascinates me. My mind immediately jumped to the concept of a coin operated kiddie ride, as it moves so hypnotically and since it fills me with warm memories. I started by creating a mechanism that creates a smooth and somewhat realistic motion with a compact mechanism, to keep the build somewhat in proportion with minifigs. In the end, I'm pretty happy with how nice the motion looks, and I'm sure I would play with this endlessly! This motion is made possible with a bar mechanism attached to the sun-shaped dial. I spent most of my time tweaking the positions of the joints to make the motion as realistic as possible. I also used friction pins in the hinges so you can leave it in any position and it will stay in place, so you have more options for display. [MOC] To Space and Back for 50 Cents! - On the Operation of Rockets by Bert Van Raemdonck, on Flickr I also tried to make it as displayable as possible by first of all making it look like an actual kiddie ride such that it should be right at home in a Town layout outside some big store or in a mall. So the rocket got a shape that would be appealing to children nicely fat and round with an interesting shape of the nose (for those who were wondering, the rounded tip of the nose cone is one of those pieces that are the lower half of a balloon), nice lights, a steering wheel that does absolutely nothing but makes all of the difference to children, the typical slanted coin slot and stairs at the back to at least give some explication how that kid got up there. To make it more attractive, I made the base entirely in the space theme. The mechanism isn't actuated by some obvious crank, but by what looks like a sun, which totally blends into the base. All other planets in our solar system have been included as well, with colors and sizes as close as I could get them and a fun little combination of parts to create Saturn. With all of those touches, I hope it looks convincing enough that children would beg their parents for a coin to have a ride on this thing! [MOC] To Space and Back for 50 Cents! - Please, Mummy, Please, Please! by Bert Van Raemdonck, on Flickr That's it! I hope you like it and brought back some wonderful childhood memories! It certainly brought back the same level of enthusiasm for space as when I was a child. Maybe the Falcon heavy launch had something to do with that as well... Anyway, check out all of the contest entries for more spacey fun in a tiny package! ________ The LDD file for this build can be found here.
-
A Swing Ride, one of the most popular ride in the world. It use chains for the chairs like the real one. Inside the central support there is a xl motor that rotate and incline the top circular support. Then the centrifugal force do the rest of the movements. You can see it working here:
-
This is my own vision of the best scaled and with better movements carousel. It has all the functionality inherent to this type of attraction, the horses go up and down, the same rotation also causes a tilt. The entire structure rotates, this rotation is done via a motor without the use of wheels / tires. The motor is located outside the structure. For me this is the ideal scale relatively to the two Lego carousel set's, because one of them is huge while the other is too small and has unrealistic movements, my version is a medium version. The structure has 16 segments making it little more difficult to build but a lot more round. If you like this MOC please support it. >> Lego Ideas
-
Hi there, I just wanted to interact a little more with the community and I thought I would start by sharing my Lego model I designed and built based on my favorite carnival ride; The Tilt-A-Whirl. However, my model doesn't tilt, and the cars don't spin freely, and in fact they are connected to a gearing system so they are always turning while the ride is in motion. This was done because I really like to add motion to my Lego models, and allowing the cars to spin freely was't providing a lot of action. The deisgn on the ride has a platform planetary gear system that revolves around a single solar gear seen here in the center of the ride pavillion Here is a shot of the underside of the platform that shows the gears that move while the platform spins around the fixed gear. After marrying the platform to the base, the result looks something like this And in its current state, operates like this The first design could only be operated by hand (and at a time when I owned a really crappy camera) I then added a Lego motor, and after a bit of trial-and-error on how to attach it, found that using a worm gear to drive the entire platform was ideal. Finally, I submitted it to Lego for consideration to become a real mode at their Cuusoo site: http://lego.cuusoo.c...deas/view/18203 I hope that you like it and let me know what you think.
-
My fourth and final entry for the 2016 MOCathalon. Built for the County Fair category. The build features a fully functional ride, ice cream trailer with interior, ring toss game-stand, and a popcorn vendor. Plus lots of people enjoying the fair. See the ride in action here: Lots more pictures here: Link Thanks for looking, C&C appreciated
-
It has been almost 15 months since I finished building my last "friends-themed" amusement ride, the teacups. Now, I happily present the latest addition to my amusement park: the tourbillion! Tourbillion is a mechanism widely used in vintage watches. A tourbillon aims to counter the effects of gravity by mounting the escapement and balance wheel in a rotating cage, to negate the effect of gravity when the timepiece (thus the escapement) is stuck in a certain position. It is also a kind of training given to astronauts so that they can be get used to the Outer Space. Now, the girls are sent to the machine: Tourbillion has recently become a kind of amusement ride. It is just invented in Switzerland in the middle of 2015. The first launch (which requires you to buy tickets), however, is in HONG KONG!!! Want to see it rolls? Here are a few still images: Of course, you may find a video more helpful to you: Want a virtual ride? Watch this video: As usual, before I have completed my work, I suffer quite many times of failures. ^^ My former works of the Friends' Theme Park for your easy reference: 1. Grand Carousel: http://www.eurobrick...topic=87068&hl= 2. Ferris Wheel: http://www.eurobrick...topic=87882&hl= 3. Gyro Drop: http://www.eurobrick...topic=88256&hl= 4. Bumper Cars: http://www.eurobrick...topic=88770&hl= 5. Teacups: http://www.eurobrick...ds +theme +park I wish I can build part 7 of this park before long.
-
As part of 'Screamworld', this is the latest ride; FROZEN. The track comes out of the side up top and enters at the bottom. 'Let it go'
-
[This is a LEGO Ideas' project and it awaits your support: "]https://ideas.lego.c...rojects/102064] Hello everyone, I have been away from LEGO Town for quite a long time. Here comes my MOC... not 100% a sort of new work but a refinement of my previous one: http://www.eurobrick...l=+bumper +cars (LEGO Friends' Theme Park (4): Bumper Cars) Since then, I was advised by a number of people that such a girly MOC was far less desirable than a boy one. That's why this comes out: It takes me for more than a year to make improvements -- virtually a new start except the use of magnets is retained. There are so many stages of transformation; there are simply many trials and errors I have experienced... The cars looks more resemblance to real ones. I use a tiled baseplate even though a normal baseplate with studs do not affect the smooth running of the cars. I also make the turntable much more handy, so that it require much fewer bricks. In the meantime, I still keep the delay function (In case you don't know what I am referring to, please check the video at the bottom of this page) In order to make the set more playable, there is a manuel mode: you can pick up the axles placed at the top of the set and use them to control a car and smash the others. Hope you enjoy my work and think this is much fun! A video is better than 1000 words. Most likely you will understand all my words above after watching it: Finally, yes, this is my project of LEGO Ideas. If you really want to own this set, please come to the following link and become one of the 10,000 supporters. Every vote counts! ^^ https://ideas.lego.com/projects/102064 Thank you very much!!!