Search the Community
Showing results for tags 'off road'.
Found 31 results
-
Hi, guys! I know that, there is February yet and we're before March release, but let's start new topic! So, at first I want to say that 2023 wave is amazing. New brand, new mudguards, new windscreens! Whoah! And there are my speculation/cars I want to see in Speed Champions 2024: ~ Porsche 911 GT2 RS Clubsport 25 ~ Porsche Taycan ~ Audi e-tron GT ~ BMW M6 ~ BMW M4 GT3 & BMW M3 1991 ~ Ferrari 499p LMH ~ Ford Focus RS 2021 ~ Honda Civic Type R ~ Cadillac LMDH What do you think about my cars? What cars would you like to see? Show your speculation/wishlist.
-

[MOC] A 'Clean' Off Road Car Chassis
zumaidi posted a topic in LEGO Technic, Mindstorms, Model Team and Scale Modeling
A clean car chassis with remote and suspension. https://rebrickable.com/mocs/MOC-76908/zumaidi/clean-chassis/#details Car Chassis -
[MOC] The Snow Racer
mic8per_ posted a topic in LEGO Technic, Mindstorms, Model Team and Scale Modeling
Skid steer off road vehicle. The PF elements are fully protected from snow, and it actually works on harder snow. Driven by two PF L-motors, one motor per side. As a power source can be used BuWizz or any other 4-port battery box (not in the parts list). Building instructions+parts list: https://reb.li/m/95837 -
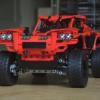
[MOC] Racing Off Road Buggy
zumaidi posted a topic in LEGO Technic, Mindstorms, Model Team and Scale Modeling
A racing off road buggy inspired by Ariel Nomad Tactical. ( I have tried my best to match it :-) ) https://rebrickable.com/mocs/MOC-90673/zumaidi/racing-off-road-buggy/#details -

WIP Kraz 255B with Gearbox (For Fully RC TMM-3 Attachment)
The Vooduist posted a topic in LEGO Technic, Mindstorms, Model Team and Scale Modeling
Hey y'all, First time I'm gonna try to do a WIP page... Been fiddling around with this Kraz 255b MOC by the one and only Ingmar Spijkhoven and figured out what attachment I'll build finally. In short, it's a mini portable bridge (called a TMM-3 or a scissor bridge). Functions of this add on attachment consist of- Actuator for raising and lowering the bridge Winch for deploying and retracting the bridge 2 stabilizers at the end of the truck to... stabilize the truck Propulsion has been swapped from 2 L motors on the sides to 1 one buggy motor under the hood. Now the replica engine can be put on display. The gearbox I really wanted to try part 35188 to make all the functions AND propulsion run on the one motor. Where I guess we can call the "transfer case" is at is right behind the cab, so here's what the result is for now. It was tricky since the tandem axle left no room for fit it in between the chassis rails. The rear shaft will actually hit the bottom of this when compressed all the way. It's as compact as could get it with Studio (kinda a LDD fan). It'll probably need to be reinforced even more, but wanna see how it mates with the buggy motor first. Never built a gearbox before and destroyed many other MOC's with gearboxes so don't have high hopes. Note- all of the motorized attachments will be ran with worm gears, so not to concerned with the gear ratios... buggy motor just gonna make everything super fast anyways with a Buwizz. Where buggy motor is planning to be in the future a bit more securely. Just seeing how a gearbox could be placed and how high it'll be. Part 87408 is now mounted securely below the motor with two 24t gears feeding it above (will get a shot of it soon). Getting the motor to fit underneath the hood was very miserable. Couldn't use a servo anymore since the buggy motor is so low it'll interrupt the travel of the front axle. (yes the fenders are mounted backwards when rebuilt...) Ordered the parts for the gearbox and will update once they come in. Planned order of the build- Gearbox Wheels Test drive Stabilizers Building the frame/chassis of the TMM winch Scissor bridge Survive the misery -

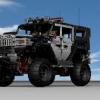
[MOC] MAZ 7310 Uragan Cargo Truck
MrSean7310 posted a topic in LEGO Technic, Mindstorms, Model Team and Scale Modeling
Ladies and Gentlemen, Boys and Girls, BEHOLD: The Mighty MAZ 7310 Uragan Cargo Truck, in LEGO! This massive set, which I have designed over the course of two years, stands almost ten inches tall, two feet long, and is comprised of almost 7,000 pieces. I sat at my computer for hours a day, sometimes, surfing the web, looking at blueprints, building, deleting, building some more, etc. And now, finally, I can reveal my masterpiece to the world! Bwa-ha-ha! Okay, anyway, I have designed my set for maximum playability, stuffing it full of all sorts of awesome goodies, like opening hood, doors, tailgate, and utility boxes. A removable roof, folding rear seats, free-spinning wheels (including the steering wheel), two Diesel engine options, a generator, compressor, radiator, Master Mechanic's Toolkit, fuel and water drums, 12v batteries, large cargo container, winch, wide-load flags, roof racks, warning beacon, fog lights, two sets of mirrors, lightbars, and more! (Whew! I'm out of breath!) Now, for the real machine: The MAZ 7310 (Minsk Automobile Plant, in Russian), was a large 8-wheeled Missile Transport truck built in the 1950s and 60s. Soon after, people started using them as cargo trucks, tankers, tow trucks, and airport fire trucks. Alright, that's it! Thank you all for looking at my LEGO creation! If you have any questions, comment, I'll do my best to respond ASAP. Happy building and have a great day! Update: Also, some of you may have noticed that the cab of the real vehicle is slightly longer. This is true, I had to shorten the LEGO version out of necessity, as the extra length could’ve affected my MOC’s stability and structural integrity. I suppose I could probably figure it out eventually, but I like it how it is. Thanks for understanding! -

BuWizz Picnic & off road competitons 11-13 May
Zerobricks posted a topic in LEGO Technic, Mindstorms, Model Team and Scale Modeling
BuWizz Picnic and Competitions Free accommodation, food, drinks and animation. FUN, FUN & FUN BuWizz Team is happy to invite you all to our annual Picnic and Competition in a beautiful Lake Bled, Slovenia. The event is for all AFOLs and BuWizz fans that would like to meet up with the BuWizz team and big BuWizz international community. This year we will offer free accommodation to all contestant and BuWizz affiliates. There are 20 beds in the Villa. Extra beds can be arranged upon request in surrounding apartments and hotels. Food, drinks, and animations are FREE. Good company and FUN is guaranteed. Come to our event and have FUN with other AFOL’s. Free accommodation The Millhouse guesthouse offers 20+ beds in beautiful refurbished millhouse. It is in the most beautiful place on the planet. Bled is voted the most beautiful place in Europe and the World by Tripadvisor. Slovenia is the 2nd best country to visit in the world by Tripadvisor. It offers so much in a small space. In one our you can be skiing and an hour later swimming on a beautiful coast. BuWizz LEGO Truck Trial 11-13.05.2019 Truck trial in nature with 2 events: Truck trial Tracked vehicles Rally racers No limits competition Sumo (battle bot competition) Free food and drinks - Picnic in nature Food, drinks and crystal clear lake to cool down. Everything for a perfect day with friends and AFOLs. Animation and games We will organize some animation and games for you: archery, blowgun, Survival in nature crash course, and outside games for all (volleyball, swimming…) Please book ASAP as the number of places is limited. Believe us – it is worth it. It’s going to be awesome. For more info, rules and to book, please check the following link: https://buwizz.com/buwizz-picnic-and-competition-2019/ -
 Hello All! It is winter time, so I am bit more busy on Legoing. After seeing, that @Didumos69 started his 4x4 buggy project, I looked into a bit deeper the Ultra 4 racing, and the rigs been driven in this extreme events. Finally the video, what I linked to his topic, triggered the work on another MOC: the Ultra 4 buggy. Here is another video to see the interesting bits of independent suspension system on this beast: Still, I might end up with IFS (independent front suspension) and solid axle with torque bar for the rear, but the body is heavily inspired by the Lasernut buggy. Parameters: 2x L motors 1x servo motor AAA battery box - in order to be replace ability with BuWizz in case IR control Let's look at into the progress a bit, maybe it is interesting to read. I started on 28. november with LDD model. To set the proportions, and the body ideas, I usually place the essential parts free in space first. Check the real inspiration thing and the very first sketch: After that I added the electronic parts, to check the necessary minimum space. (Unfortunately Stud.io has corrupt models, so some cover parts of the motors are just not present.) At this stage, I built the front axle, to see how can I integrate the steering. The answer is: massive fail. So back to drawing table, I deleted the 5x7 frame, and started to figure out, how to connect the needed fixation points for swingarms, servo. Due to this, the model gets more complex than I thought, but buildability is always first! I recommend to check meanwhile IRL building too, or at least stop by and thinking about how to add the related parts. I was hopeing for a simple MOC, but I ended up already a pretty complex assembly, so I made each step with double check. Later on, I will try to add groups in LDD to represent the buildability order too. So far the front module with steering and IFS is ready, the middle module is almost done, I am wondering about interchangable solid axle or independent solution for the rear - not sure yet. Also the color is to be decided yet, as the springs type as well (soft or hard). I think if soft ones will be OK, than I go for white body, as it presents the "rollcage" better. In case the yellow hard shock absorbers will be needed, of course the only choice is: full MEAN black body. This picture shows the advantage of the white body, and also a comparison for tyre types: 3740 on the left, 45982 on the right, both on 56908 wheels. So far 407 parts, and I guess it is about 70-75% ready. I need to figure out how to fix the roof, and create a solid, but easily disconnectable rear module. Necessary parts are ordered, so real build pics might come in couple weeks first. And how is the road presence? I guess it will be pretty much like a punch in the face. p.s.: Yet another WIP, I hope for long winter nights, to finish at least some of my unfinished projects...
 -
The LandShip (Off-Road Tracked vehicle) [MOC] [WIP]
TheNextLegoDesinger posted a topic in LEGO Technic, Mindstorms, Model Team and Scale Modeling
A great man once said “Learn from the mistakes of others. You can never live long enough to make them all yourself.” (G. Marx). When i saw a topic popping up of a tracked ripsaw, i was intrested. But when i saw the pictures, I was SOLD, i just loved the moc, it was so simple, yet it was so nice. i wanted something like that to. and so I ditched everything i had to do (studying) and i began. I started improving on the mistakes he made, and i made my chassis. added a subtractor put the motors in and started testing. for now i have only 1 XL but i'm gonna add another one when i freed that one from a moc (still have to make a topic about that one). this because it lack's a little bit of power (now 1:1 transmission, might change to 1.66:1 or 3:1) as suspention i wanted a soft but 'strong' suspension so i went with springs. i aslo wanted a lot of vertical clearance, so i used near vertical 'bogies'. For a feel of the size, tracks are 92cm long atm chassis is around 45 cm. PS: the side pannels are primarily for looks, secondarly for strength. PPS: the topic where i got the idea: Greetz TNLD -
The Enforcer Recharged: CUUSOO Project
crazy_1993 posted a topic in LEGO Technic, Mindstorms, Model Team and Scale Modeling
The Enforcer is back and better than ever before! Support on CUUSOO! Introduction The Enforcer is a fully motorised remote control Technic off road vehicle. The vehicle has a police theme and is loosely based on the Hummer H2 but many subtle changes have been made to obey copyright restrictions. Here are some examples of the inspiration for my design: The Enforcer was originally an entry for the ‘You Design It, We Make It’ competition but ended up coming in second place to rm88’s ‘Boss’ crawler. However I do not think that it is the end of the road for the Enforcer. The Enforcer Recharged is a massive overhaul of the original Enforcer. Firstly, as this is CUUSOO, the original 9398 chassis could not be used anymore, so the chassis has undergone a massive redesign to adapt it specially to the Enforcer’s needs. The winch has now been motorised and all lights are now power functions. The battery box has now been changed to a 8878 rechargeable battery box which reduces weight massively (by about 160g) and is more convenient. There is now no need to remove the battery box so this allowed major part optimisations to be made. The result is this, The Enforcer Recharged: Note: LDD does not contain certain power functions elements so in some images the following elements will be represented as shown: Chassis The Enforcer now uses a redesigned chassis and not the 9398 chassis.: The new chassis does not have 4 wheel steering like the 9398 as I did not think that it was needed on a model of this theme. The 88004 servo motor for steering is now located in the front suspension module. The chassis is powered by one central 8882 extra large motor transmitting power to all wheels through the power joint system, unlike the 9398 which had one 88003 large motor for drive above each axle. Below is a diagram of the drive-train and gearing: I have now changed the design of the drivetrain to prevent breakages of the gears in and driving the centre differential. The older style non-bevelled differential is now used and the gearing converts the torque from the XL motor to RPM before reaching the centre differential. Further gear reduction has been added after the two axle differentials to maintain an overall gear ratio of 1 : 6.72. The gearing results in 0.44 times the original torque on the centre differential. That's 40.2 mNm with an RPM of 495. I am just finishing the casing for the new rear axle module. I am also thinking of working on an alternate setup which is the 9398 chassis with the battery box changed for the rechargeable version so that the bodywork can still be directly attached. Here are some comparisons between the 9398 crawler chassis and the Enforcer chassis to show how the gear ratios were decided. These stats have yet to be updated for the new drivetrain: Because the extra large motor does not deliver quite as much total power as the two large motors, two gear configurations are available for speed focused or torque focused performance. This is shown in the drivetrain diagram above the table. Although the 8878 rechargeable battery box only outputs 7.2V which is less than the 9V from the 8881 AA battery box, this voltage is more consistent because the voltage from a Lithium polymer battery remains constant until the charge is depleted, whereas the voltage from AA batteries drops significantly throughout use. Note that unlike the 9398 chassis, the front and rear differentials need to be facing in opposite directions as shown, otherwise the wheels will not rotate in the same direction: On the Enforcer chassis, the space above the rear axle in the rear suspension module is occupied by an 8878 rechargeable battery box which is much lighter and more convenient than the regular 8881 battery box. More importantly, this means that the battery box does not need to be removed to change the batteries, it can just be plugged into the charger without being removed. This allowed the bodywork to be built directly on to the chassis, saving parts. Another main feature of the chassis is the dual shock absorbers above each wheel. This is to help prevent the easy rolling behaviour which is common in Technic off-road vehicles with a heavier bodywork and to scale the suspension stiffness more appropriately to the weight of the model. Softer suspension such as using only one shock absorber per wheel results in the bodywork leaning away from the chassis on lateral inclines, causing premature tipping so the new design helps prevent this: Care had to be taken to allow each shock absorber joint to rotate on two axes to allow the front and rear axles to move freely with the suspension. The main image shows the shock absorbers functioning. Different Forms The model with the most features has a very high part count so I have decided to make multiple versions of the model simplified to various degrees for different and slightly more practical part counts. The features of each version are shown below: Features on all models All models feature 4 opening doors, an opening tailgate and an opening bonnet. The doors feature compound hinges to allow the doors to fit into their frames properly. Each door also has a rotary handle to secure the door shut with: The tailgate has a sliding handle which locks it in place when closed: All models also feature power functions headlights and taillights which can be switched on or off while driving: All models except the Enforcer Rapid Response have a rear roof section which can be removed for an alternate form. Charging can be done easily by opening the rear door: The Enforcer Elite The Enforcer Elite features power functions flashing police lights. The flashing is performed by a mechanism containing a medium motor and 2 control switches: The same motor is also linked to a piston engine in the bonnet: The gear ratios mean that the piston engine will run at 127rpm and the light flashing system will be driven at 26.4rpm which will result in the police lights performing one on/off cycle every 1.14 seconds. The Enforcer Elite contains a front mounted winch powered by a medium motor which is shown on the left in the above diagram. The gear ratio for this winch is the same as the gear ratio for the winch on the Unimog U400 (1 : 24 gear ratio, 15.8rpm winch speed, 40mNm torque). The winch would also contains a clutch gear to avoid damage in the event of a string jam or when the winch is fully reeled in. This is replaced by one of the white 24 teeth gears in the render as LDD does not contain the clutch gear. The Enforcer Elite will be controlled with 2 8885 IR controllers. The power functions wiring layout needed to make the functions run correctly is shown below along with the physical locations of the PF elements: The Enforcer Standard Issue The Enforcer Standard Issue shares largely the same bodywork as the Elite version but does not contain the winch, flashing police lights or piston engine to reduce the part count and number of power functions elements required. The bonnet has been modified to accommodate the removal of the piston engine. The power functions lights are now turned on and off by a control switch in the boot which can be accessed by removing the rear roof section. The switch can be secured on with the red push bolt. The power functions wiring and layout for this model are shown below: The Enforcer Rapid Response The Enforcer Rapid Response shares the same functions as the Enforcer Standard Issue but has the entire roof removed for a whole new look and a lighter and faster feel along with a further reduced part count. Possible Stickers The Enforcer has potential for a great sticker set to emphasize the police theme. Below is an example of a possible sticker set: SUPPORT NOW ON CUUSOO!!! Thank you for taking your time to read this, all support is greatly appreciated! -
[MOC] Suzuki Jimny 4x4 Pull-Back Monster
agrof posted a topic in LEGO Technic, Mindstorms, Model Team and Scale Modeling
Hello All, hereby I present You the King of the Pull-Backs, which for I had the idea for very long time. Teaser picture is coming: Where has it started? Well, I had these parts lurking around, and really wanted to test them together: Recently, while I was playing with my Mini Suzuki Samurai, got the idea, how well the body and those parts above would fit together. As I really like the body lines of the Samurai, I decided to keep it, and improve. Let's take a look at on it, the common DNA is quite obvious, that's why I decided to keep it in the Suzuki off-road family, and named as Jimny. I set some constrains for me, like: keeping the body, but reconstruct it using 12M axles for the wheels make it affordable make it sturdy make it fast Here is a picture from inner structure, and how I set the distance with pulley wheels for the chubby tires, and increased the friction for the 12M axle: And one more insight shot (roof is hidden). It was pretty challenging to build a reliable and buildable inner structure for the shape I set in my mind, but finally it works, prototype works and sturdy enough for crashes! The hood still has some flex play, but nothing falls apart. Meanhile the build I made some records for me: Big and heavy wheels have a ton of angular momentum, but 4 Pull Back motors do the job. Big and heavy wheels help to keep the center of gravity low, so it jumps pretty stable. You need extra attention to load both axles properly, but once it is done...whooooooooooooooosh!!!!!! - my 42034 lost the run. (Video might follow, but no promise.) My painting skill (and patience for it) sucks... I want to paint the rims in black, but I have to make a second try on it. I don't find right time and place for taking sharp photos, so I present it as LDD renders, meanwhile I have a built one beside me... sorry. I am also waiting for missing color correct parts (on the way). As an engineer, I wanted to add some extra technical bit first, like suspension, but I realized soon, that it makes the loading of the motors very difficult (as You need to push the car downwards), makes the whole construction very complicated, and adds weight for no reason here. Keep it simple: low weight, big power. BUT, I was smart enough to integrate one nice feature though, and I proudly present You the first Drive Mode Selector in a Pull Back car! HERE You can download the LDD file, I tried to divide the model into small building groups, and built up in the most wallet friendly version. Some parts are mislocated, after real life build, I realised some stress and reinforcement need, but to fix minor placement issues in LDD, I would have to build it again from the ground. We can conclude, that I don't have the patience for it. TO DO: flip the pins (in the side panels) and the 2M rubber damper (under the hood), and push the windshield together - that's it. This is what You get in the LXF file: And finally, some possible versions - I am building the red one. Small part count (284 pcs), great fun. Enjoy! Edit: one small fix in LDD file - v3.31 -

LEGO ARGO 6x6 XTV
amillson posted a topic in LEGO Technic, Mindstorms, Model Team and Scale Modeling
Hi All, The iconic ARGO 6x6 XTV (extreme terrain vehicle), made by ARGO Industries in Canada, was my inspiration for this project; a remote controlled Technic Power Functions version of the real life machine. The ARGO is a formidable little amphibious all-terrain vehicle that will take you deep into the wilderness and get you back safe and sound. You can see some more photos on Flickr: https://www.flickr.com/photos/153579346@N08/with/36775449934/ This model uses disk brakes to lock the left or right wheel-sets to skid-steer. The wheels are connected with chains like the real ARGO. The handlebars are connected to the disk brakes using flex cables. The handlebar assembly decouples the left and right brakes, so when you twist the bars only one side is activated. The brake assembly is very compact. When you want to control the ARGO remotely, you can drop in the handlebar servo assembly. Here's a video of the ARGO that shows the different functions. If you like it, please check the ARGO out on ideas.lego.com. Thanks! -

[MOC] Mercedes-AMG G 65
Hogwartus posted a topic in LEGO Technic, Mindstorms, Model Team and Scale Modeling
Very detailed 1:11 scale model of Mercedes-AMG G 65 with complex suspension, gearbox, engine and much more functions. Video: Functions: - 4x4 driveshaft with differentials and portal axles - Steering with Ackermann steering geometry - 4 speed gearbox - Working engine replica - Openable doors, hood and trunk with locks Please watch the video to see this car in action and for more details. I hope you liked this model. -
hello everyone, my name is Imanol Berecibar, i am mostly a technic builder and particularly new in Lego Town, but i want to show you some trucks i have made that fit into minifig scale and have working suspension using lego rubber parts, and they are good for make more trucks from the chassis (also it would be good to replace the radiator parts with some plates and put stickers on them): unimog u423 (compatible for attachments) unimog u5023 these two vehicles have fully working live axle suspension, the u423 has attachment points for various implements, like mowers, buckets... , and the u5023 its built more for off roading; more pictures at my brickshelf gallery. i hope you like them, i will try to make some more vehicles, thanks.
-
city / speed champions style 4x4 Adventure SUV car moc. 6 wide minifigure scale, cabin seats one fig and the rear trunk can be lifted up. Free building tutorial available in the video. Thanks for watching!
-
hey all, so another year another calendar. I've shown off a few of this years MOCs before, but here's the pics that made the cut. (you can see last years thread here... http://www.eurobricks.com/forum/index.php?showtopic=102510 ) The cover shot to celebrate the Park Services 100th Anniversary (also the August pic). A Two Door JK and CJ5 in Island in the Sky Four Door JK's (one Expedition prepped) and some XJ's on Fins and Things A gnarly custom crawler Jeep and a spotter in a JK (he took the bypass), all geared up for Easter Jeep Safari A Setup JK (with LED bar and winch) and the Expedition JK hitting the washes. A old curmudgeon and his Navy issue Willys to celebrate Armed Forces Day on the 21st Although the willy grill was definitely inspired by others i have seen i did my best to make it my own and build it without directly relying on others. I think i made some nice moves with using the old dark grey and the flags for seat back as well as a neat trick where i used lightsabers and 1x1 bricks with 4 side studs to create smaller red side markers on the back corners. you can't see the markers in the previous pic, but you can see in this earlier rev here (before i changed the window frame)... A stock XJ overlooking the White Rim A classic CJ8 with a truck cab top and classic wood trim sides near Uranium Arch (my favorite Jeep of this project) A YJ and CJ5 on the trail. Both of these Jeeps were in last year's calendar, but the YJ got a facelift and I reworked the grill to give it a better YJ look. I'm especially proud of the SNOT cheese slope move on the front to give it a better looking front grill. A tricked out, no-door YJ Crawler making light of a little climb. This one I was going to build with a full on exo-cage, but it ended up being too much so I stripped it down for a cleaner look. A Girl Powered top down purple JK crawl under a LEGO scale arch. The purple was actually really hard and expensive to get parts for, originally there was six 1x1 plates in the design, but when I realized that part was only ever available in the Harry Potter Knight Bus set, I had to redesign it down to only needing 2 since it was impossible to even find someone with 6 of them. Santa's red CJ5 stuck in some snow in the La Sals....hopefully the elves can dig him out :) The back cover with a couple in their CJ5 with a UTV hot on their trail. Finally here's a shot of us out on the trail with our UTV with some a custom decal i made :)
-

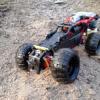
[MOC] RC Mudding Kart
1711902090 posted a topic in LEGO Technic, Mindstorms, Model Team and Scale Modeling
Hey, guys ! Here's my second moc: a kart with some off road ability. Features: power functions, independent suspensions, RWD(powered by 2 L motors) and some details. Didn't create one with similar look but this image is where my idea came from. :D The challenge was fitting everything in the back, fuel tank, engine, ir receiver and battery. The scale was bigger than what I originally planned. The video is here. : ) Thanks for commenting ! -

Articulate Off Road Vehicle
OriolesFan957 posted a topic in LEGO Technic, Mindstorms, Model Team and Scale Modeling
Hi, Check out my newest creation! -

MOC Land Rover Discovery 3
Chapachuk posted a topic in LEGO Technic, Mindstorms, Model Team and Scale Modeling
After few month i finished my largest Model Team creation so far. As i am not very good with technic bricks, this is one of a kind, special edition, only rear wheel drive Land Rover :) Its motorized, working steering and lights, but cause of the weight i didnt connect IR receiver and cables, but its ready to do that. Weight with batteries is over 5000g so it hardly stands on wheels, for that reason there are 16 shocks absorbers, 8 didnt hold the vehicle up. Weight: 5000g Lenght: 553 mm, 70 studs Wide: 264 mm, 34 studs (including mirrors) Height: 260 mm, 33 studs Stickers are temporary, must find better font. More photos and details. https://www.flickr.c...th/15182048387/ A small vignette with the car: http://www.eurobricks.com/forum/index.php?showtopic=100720 -
[WIP] [TC8] 8x8 off road crane
Zerobricks posted a topic in LEGO Technic, Mindstorms, Model Team and Scale Modeling
So as soon as I heard about the new contest, I knew I wanted a different crane as the normal mobile ones... A quick google search for off road crane inspired me as soon as I saw this picture: More info here: http://www.ww.mainpu...ifting/6196.htm Yes, its an 8x8 off road crane with massive tyres, suspension and what-not. After fiddling in LDD and real life I came up with front suspension: As you can see, its inspired by 42043's rear axle assemby, but upgraded: - with all wheel drive - portal axles, - improved steering system - longer, harder shock absorbers - can carry A LOT of weight The steering system is my own idea (as far as i know), by using different handle and steering arms length I get different steering angles: Another thing I built are the outriggers. Because this is an off road truck, the outriggers need to be high enough not to bump into terrain, yet they have to lower enough to do their job. This is why they extend at an angle: The outriggers may look rather thin and weak, but the fact is the 13L beam and 13L rack are in a sandwich which cannot be seperated, so they can carry lot of weight, as long as you dont bend them sideways too much. Here is how the front suspension and outriggers look like together: And I already started working on the rear axle... You can see its simpler than front axle, it has more support, and its very solid. There are a total of 10 points holding the rear axle assembly: - 4x Springs - 4x Longitudal links with rubber bricks with limited longitudal movement (you need a bit of movement in order for axles to flex sideways) - 2x Panhard links which keep the axles from loosely moving sideways Also notice the drive axle on the left, thats for the fake motor drive. More info soon... -
Hello! I continue to post my creations on Fire Trucks theme. This is the time of the my Off Road Fire Truck. Is based on the model from 2012 set 4208 "4x4 Fire Truck". Over the standard set equipments, now has two more large compartments, more equipments as chainsaw, a fire hose with relative control panel and lights.
-
Small scale truck trial
Zerobricks posted a topic in LEGO Technic, Mindstorms, Model Team and Scale Modeling
Since the new Arocs relased with new suspension parts and a great idea for the rear axle I was thinking, why not also make small scale truck trial machines/races with 62,4mm wheels as a reference point. I think this translates to roughly 1:13 scale. Because this is a smaller scale the models should be easier to build with less parts and more structualy rigid I think a max of 2 x XL, 3x L or 4x M motors should be enough at this scale... What do you guys think? Wanna debate, maybe even set up some guidelines and build something? P.S. click here for some axle ideas at this scale -
So after 3 months of working in another town, away from my precious bricks, I am back! I had to return the 4 borrowed wheels from the fox, so I came up with an idea to make a smaller 4x4 off roader with the same amount of power. This is the crazy result: If you look from the side, you can see the model is quite short for its size, which is good for offroading. Also notice the 8 hard shock absorbers giving this beast a lot of suspension travel. There is even an interrior, which can be accessed via gullwing openable doors: I am very proud of the styling, there are no major gaps and almost no straight or perpendicular lines. Now for the performance... I found a way to harness the power of 2XL motors/wheel without breaking gears (too often that is). Each XL motor is placed on opposite sides of the swinging half axle so that their torques cancel each other out, therebye having minimal effect on suspension. The only gears capabale of withstanding such torque at perpendicular angle are of course knob gears. The hub assembly is simillar to the one used in the Fox, but with built CV joints capable of handling 2x the XL motor torque. But even so sometimes an 8 tooth gear may fail if a foreign object is jamed between gears and the wheel is blocked Even though the models tends to kill gears on occasion its still quite relaible for its massive weight of some 4 kilograms. Dimensions: Length: 47 cm Width: 25 cm Height: 21 cm Here's the video of the Jaguar in action: Oh and of course the most important picture of them all Though there's not much to see, but I like the arrangment of the components, its clean.
-

portal axle realistic steering
intellimode posted a topic in LEGO Technic, Mindstorms, Model Team and Scale Modeling
Hallo! I'm using Lego Digital Designer for a few days in order to create a driven, steered and individually suspended portal axle with a realistic pivot point. But I failed to combine all aspects. My endurance has expired. So, is there anyone who wants to accept the challenge and solves this problem. I would be grateful about a lxf-file. Thanks! -
Red Dakar rally car
Samolot posted a topic in LEGO Technic, Mindstorms, Model Team and Scale Modeling
Hello this is my first MOC on this forum. This is only my second fully self MOC, so I treated it for training purposes. The assumption is, to put all the mechanisms as tight as possible and connect pneumatic with electrical systems. Another task that I set for myself is a removable body. Body is connected to the chassis on seven accessible pins, also have to disconnect the power to the lighting and pneumatic for lifting door. For some time, i was thinking to create a progressive suspension of lego. Which has two operating ranges. Is sensitive and precise on a level surface. But it works fine even on rough terrain. The combination of spring and pneumatics gave such an effect and it works very good. Most difficulties caused me to prevail over the steering and drive moving at such a high pitch, and quite a bit of weight of the vehicle. I am aware that it is far from perfect, but it works. Description Weight 2 kg 2 x battery PF Drive 4 x PFL 2 compressor pump 6l and motor PFM The steering servo PF Pneumatically adjustable suspension two large cylinders of the engine controlled PFM Airtank The door opened up two small pneumatic actuators (manual) PF 2x LED Lights Automatic low pressure valve actuator and electric switch of the old type. The trunk opened manually. Movie Full Gallery http://www.brickshel...ry.cgi?f=549113