Search the Community
Showing results for tags 'military'.
Found 261 results
-
For the last couple of years I've been secretly working on something different than my previous cars and trucks. This here - I present to you Boxer - Infantry fighting vehicle. It's the same scale as my other car MOCs. But boy oh boy - it is a beast compared to those tiny cars. This one here is larger than the famous Abrams tank in real life. So imagine that this one here is like a heavy duty truck. Full with as many details as I could possibly find in the internet. It may sound silly that I mention it so, but... those military vehicle details, especially when it comes to the interior details and gadgets, those pictures are very hard to find. Probably for a good and secure reason, so - can't really blame anyone for that. Would love to see one of these up close in person. Some day, maybe. Till then - enjoy this one. Hope you like it, couse I sure do :) Oh, did I mention? It has all wheels double spring suspension, all wheels drive with PF (2 x XL) and 2 x front axle steering (1 x M). See full album on my flickr account
-
My version of the M3 Bradley IFV. It is classified as an armored reconnaissance and scout vehicle. The M3 is fielded with two-man 25mm Bushmaster Cannon turret with a coaxial 7.62mm machine gun, and also carries more TOW missiles. The Bradley is highly capable in cross-country open terrain. The Bradley is designed for reconnaissance and to transport a squad of infantry, providing them protection from small arms fire, while also providing firepower to both suppress and eliminate most threats to friendly infantry. It is designed to be highly maneuverable and to be fast enough to keep up with heavy armor during an advance. Lego M3 Bradley IFV (1) by Jordan Parmegiani, su Flickr Lego M3 Bradley IFV (3) by Jordan Parmegiani, su Flickr Lego M3 Bradley IFV (4) by Jordan Parmegiani, su Flickr Lego M3 Bradley IFV (5) by Jordan Parmegiani, su Flickr
-
Just a small build of scenery for a Panzer IV L/70 Advance through the Ardennes, December 1944 by Nicholas Goodman, on Flickr
-
Another commission I built. My grandfather served as a Seabee in the Pacific theater during World War II, and it made me proud to create this piece. The Navy Seabee logo was designed by Frank Iafrate. He said, “…I thought of a bee — the busy worker, who doesn’t bother you unless you bother him. But provoked, the bee stings. It seemed like an ideal symbol. “The rest came easily. I gave the bee a white sailor’s cap, various tools to show his construction talents, and finally a Tommy gun to show his fighting ability. I made the bee a third-class petty officer (E-4) with the 1942 Naval insignia used by the first Seabees on each arm … a machinist’s mate, a carpenter’s mate, and a gunner’s mate.” Information from: The Seabee Museum and Memorial Park http://www.seabeesmu...ightingBee.html
-
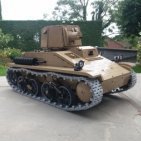
[MOC] Pz.Kpfw. I Ausf. B Light Tank
Tarix819 posted a topic in LEGO Technic, Mindstorms, Model Team and Scale Modeling
Hello, My latest model is the Panzerkampfwagen. I Ausführung B, a German Light Tank developed during the inter-war period. Building Instructions are available to purchase over on Rebrickable: https://rebrickable.com/mocs/MOC-119345/Tarix819/pzkpfw-i-ausf-b-light-tank/#details HISTORY The Pz. I was the first widely successful tank to enter service in the German Army. The Ausf. B model, the successor to the Pz.Kpfw. I Ausf. A, featured a number of upgrades including a new water-cooled Maybach six-cylinder engine, which required the hull to be lengthened to accommodate it. The crew count remained two men (Driver and Commander). MODEL FEATURES -A custom brick-build sprocket design inspired by the work of @Milan -Weight: 5.2kg. -Scale: 1:8. -Full drive, each track driven by two PF-XL motors. -Twin PF battery boxes for powerplant, the model is controlled using two SBricks. -Working and historically accurate suspension - the frontmost roadwheels are suspended on pivoting arms which connect to a coil-spring, whilst the remaining road wheels are paired together on four bogies suspended using leaf-springs. -Working headlamp. -Functional track tensioners. -360-degree rotating turret. -Elevation and depression of the main guns inside the turret. -Accurate detailing, including sledgehammer, storage box, exhaust, aerial and vision slits. BUILDING THE MODEL I chose to build the Pz. I because it was a relatively simple, straightforward design; there was no heavy firing mechanism or bridge deployment mechanism, basically just a chassis with a rotating turret and moving guns. The real aim behind it was to test out the new sprocket designs, and to see how they would run on a tracked vehicle weighing above 5kg. In the end I was very pleased with the performance of the sprockets and I will likely be using them on future models. As I will explain, they are an enormous upgrade to the rubber tyre system that I was previously using to engage the tracks. Otherwise, the tank is sturdy and looks good, although the suspension is somewhat fragile. I am very happy with its overall performance and I hope that fans of early German inter-war and WWII tanks will be pleased to see it. SPROCKETS As you may already know, my specialty here is large-scale tanks and tracked vehicles, weighing in the range of 4kg upwards. Building at such a large scale allows me to incorporate a great amount of detail and functionality into my models, however this requires me to use custom Lego tracks built from axles and lift-arms instead of the conventional Lego-produced caterpillar tracks, which are limited by their width and sprocket size. I have been using these types of tracks for about four years now, however since there was no specific sprocket design available for them, and certainly not at the required sizes (10st/12st/14st diameter), I have instead used Lego wheels with rubber tyres as the driving wheels, since, at least for lighter models, the friction between the tyre and the track is enough engage the track and drive the model along. In April 2020, I built my A34 Comet tank model, the weight of which was roughly 5.9kg. It was driven by two PF-XL motors connected to tyres at the rear, but had some trouble steering and reversing as the tyres were slipping on the tracks. The solution to this problem was provide front and rear drive, increasing the number of PF-XL motors to four. I first used this setup in my Vickers Mk. E model in August 2020, and the slipping problem was fixed; it worked very well on that particular model. But since then I have built a variety of other vehicles of different weights and sizes, using the same setup, and a number of problems have come up: 1) Weight Distribution -My most recent model, the AMR 33, was particularly rear-heavy as motors had to be installed at the back (in addition to the front), where the turret was. 2) Historical Accuracy -There was excessive bulk on my Matilda I model caused by the front wheels requiring a drivetrain connected to motors. The front lower glacis on that model is too far forward to make room for the drivetrain. This was not necessary on the real-life vehicle, which simply had idlers. It was a similar case for the rear idlers on my Vickers Light Commercial tanks models. 3) Track Tensioning -Having track tensioners means the motor, direct drive connection and the wheel itself all need to be movable, which adds unnecessary complication. 4) Heavy Vehicles -Even with both wheels driven, heavier vehicles will still suffer slipping between the wheels and the track, especially on rougher terrain. My Bridge Carrier model weighed between 7.7kg and 9.4kg, was powered by six PF-XL motors and suffered from this a lot. Moreover it could not actually drive onto its own bridge because the wheels kept slipping and the tracks would come off. 5) Steering -Tracks of course would not always be locked in properly by the rubber tyres. This wasn’t a problem on most of my models, but I remember my T.13B3 and Vickers M1937 occasionally threw their tracks when making tight corners. The solution to these problems was to develop a sprocket that would engage with the custom track properly. And here they are: https://imgur.com/a/q71kRuh (I will try to make some building instructions for these) I had not yet come up with a design due to the complicated geometry of custom-built wheels, and the difficulty in building with Lego elements accurate to the millimeter, however with some inspiration from Milan’s excellent Brick-built wheels book, I have designed two sizes (12st and 10st diameter) of custom sprocket that work smoothly with the custom track. Everything is built from 100% genuine Lego elements, no illegal connections or 3D printing is required. The first that I built was the 12st diameter sprocket. This uses 1x2 plate hinges arranged in a decagon, which is held taught by rubber connectors fitted in the center. Each tooth is built using two Bionicle pieces. In between each tooth there is a rubber connector which helps keep the track round as it traverses the sprocket. The principles of the 10st diameter sprocket are the same, however the hinges are arranged in a nonagon, and each tooth is made using one Bionicle piece and a 1x2 flat lift-arm. There are only four teeth on this sprocket, meaning there is a gap of two on one side. This has no effect on the sprockets performance so long as a gap is left every link on the track rather than every two links. It is this size of sprocket that my model of the Pz.Kpfw. I Ausf. B uses. These sprockets certainly have great potential and I am confident it is possible to construct them from at least 8st diameter and upwards. With the correct arrangement/modification they should also be able to fit any width of track of at least 5st, and any arrangement of track teeth (Either one row in the center or a row on each side). This will be extremely important for my future models as historically tanks have had sprockets of a great variety of different sizes. IMAGE GALLERY More images can be found over on Imgur, I shall put some up on my Flickr shortly, too. https://imgur.com/gallery/jyhtIhN -
In the near future, conflicts are still the same. Mankind battles over land and resources. But warfare itself has changed. Next to traditional weapon systems like tanks etc, a new weapon begins its reign of the battlefield. Highly advanced exo frames, conciousness-controlled humanoid robots, mark the peak of ground combat units. They are used by military, but also scattered through PMCs. Due to the relativley small size of exo frames, they lend themselves better for modern warfare. Fast, highly costumisable, and becoming less expensive by the day, military experts predict a rapid rise in exo frame numbers. CO.EX.FR. by Henrik S, auf Flickr A Frame undergoing maintenance work CO.EX.FR. - Patrol by Henrik S, auf Flickr Troops patrolling, supported by an Exo Frame This is the first Mecha Design i´m happy with, hope you enjoy!
-
Introduction Time for another clone bricks review. No not the Star Wars™ soldiers. Today I am looking at a Chinese clone. Specifically the Kazi M1A2 Abrams main battle tank. While I have seen a few video reviews of it, I could not find any in-depth written reviews of this set. I aim to change that. Set Information Title: M1A2 Abrams Number: KY10000 Released: 2016? Part Count: 1463 Price: Varies Links: Amazon AliExpress Packaging My tank was shipped to me without a box. It took roughly 15 days to process and ship from China to Idaho, USA. The bags and instructions were tightly wrapped in bubble wrap to protect them during shipping. With the exception of the tracks and some larger pieces, all of the bags were numbered. I also received a small bonus sticker sheet, for some reason. There were two instruction booklets, one for the tank, and for for the all-terrain humvee (review coming soon). There is no DSS, as all of the details are printed parts. Instructions The instructions are clear with excellent parts differentiation and directions. Minifigures Five minifigures are included with the set. They are (from left to right): Militia Grenadier Militia AT (Anti-Tank) Gunner? Driver Commander? The Militia grenadier is armed with what appears to be a M32 MGL. The Militia AT is armed with a RPG-7. The gunner has a UMP 9mm with removable(!) suppressor. The driver and commander are unarmed. The figures only have front printing and good articulation. The M1A2 Abrams SEP It is a a very large tank coming in at 27cm long (35cm to tip of barrel), 10cm tall, and 14cm wide. Here it is compared to a Sluban/Oxford tank and the taxi from set 60233 Donut Shop Opening. It absolutely dwarfs the taxi with it's menacing size. The turret spins 360 degrees and the M256 120mm smoothbore gun moves up and down. The turret is also fitted with a small rod to represent the gunner's coaxial M240 machine gun (mounted beside the cannon). The side mounted smoke grenade launchers and commander's independent thermal viewer (the drum-thingy in front of the loader's hatch) are also present. The tank commander has access to a M2 Browning 50 Caliber machine gun while the loader has a LSAT caseless light machine gun mounted over his hatch. (A Brickarms M60 would have been a better choice for the loader's weapon). Unfortunately, the hatches are too small for minifigs to fit in. There are also 4 slightly larger-than-life ammunition boxes for the M2 machine gun mounted on the rear of the turret. The Coalition Identification Panels (the panels with black angles on them) and the battalion markings (F2 panels) are the only printed pieces in the set. Interior The driver's position is well detailed, but there is no way to easily remove/put in said figure without taking apart the front of the tank. The tank does not feature a turret basket, instead it has a space for two minifigures in the middle of the hull. The pair of white tiles are supposed to be data screens/controls. The minifigs can only fit if the are reclining backwards. A small rack of what appears to be SABOT anti-tank shells is also modeled. Behind this is the engine compartment. The gas turbine engine (similar to that of a jet) is well detailed and includes some minor details. I do not particularly like the inclusion of the transparent blue tile, as it seems to clash with the rest of the tank and feels out of place. The only way to open the top engine hatch is to remove the turret. The engine can also be accessed through a pair of doors on the rear of the tank, like the real thing. Exterior Looking at the bottom of the tank, the is no working suspension, even though it is modeled. The tracks roll very smoothly, but only on rough surfaces, like carpet or cloth. Having no suspension, the tank simply rides high over obstacles. How it should actually happen. Here we see a short scene following the crushing of the car. One of the road wheels is swapped for a new one by a repair team. Meanwhile the commander berates the driver for his reckless behavior that damaged the tank. A special forces team provides 360 degree protection throughout the whole process. Not wanting to interrupt the commander, the gunner chats with the leader of the special forces team. With the repairs done, the special forces team escorts the repair crew back to the forward operating base (FOB), while the tank returns to it's original mission. Destroyed Building Included with the set is a destroyed building, in which a pair of militia men have set up an ambush. The building has three floors and looks excellent. A stoplight(?) has been modeled as well as a barrel and signpost. Some TNT and a backpack are provided for the hostile soldiers to presumably use as a makeshift IED. Amusingly, the position of the soldiers will result in the grenadier being back-blasted by the RPG when it is fired. The building has some minor structural details that make it pop and look unique. Summary As far as tank sets are concerned, this set is amazing. It has tons of detail, plenty of playability, and overall good looks. The figures could be better, as well as some of the accessories provided. The mold quality of the parts is rather high, however one of my parts was melted. Do I like the tank? Heck yeah! It is bada** and looks great displayed on my shelf next to it's 1/16th scale brother produced by Tamiya. Would I recommend it? Definitely, as long as you can find it for a reasonable price. Pros Realistically detailed Well made Tons of playability Cons Lack of suspension Odd minifigures Melted piece Score How do I rate this set? Design - 8/10 Looks like the real thing and features plenty of realistic design details Building Experience - 5/10 Not too boring, but not very exciting either. Building the tracks was rather laborious, as expected. Features - 8/10 It has all of the functions that the real tank has and even includes multiple minifigures. Playability - 7/10 I had fun setting up the repair diorama and enjoyed rolling it back and forth when testing the tracks. Parts - 7/10 This set is a decent parts donor with a good variety of unique pieces and accessories Value for Money - Variable I got mine on sale for $35 with free shipping. Your experience may differ. 8/10 - A fantastic replica of the venerable M1A2 Main Battle Tank and good addition to any fighting force. Thank you for reading through my review. C&C are always appreciated and needed, as I am constantly working to improve my review and presentation skills. I leave you now with the view that many Republican Guard tank crews experienced during Operation Desert Storm.
-
[MOC] 1:8 Renault AMR 33 Light Tank
Tarix819 posted a topic in LEGO Technic, Mindstorms, Model Team and Scale Modeling
This is my latest model which I have managed get done over the Christmas period - The Renault AMR 33, a Light Cavalry Tank used by the French Army from 1933 to 1940. History The Renault AMR 33 (Auto-Mitrailleuse de Reconnaisance) was an early French Light Cavalry Tank designed between 1931 and 1933, entering service with the French Army in the latter year, and would be used up until the fall of France in 1940. It was a two-man vehicle designed for reconnaissance and equipped only with a MAC 31 machine gun, in a similar manner to the early British Carden-Loyd Light Tanks that were entering service around the same time. Model Features -Weight: 4.9kg -Scale: 1:8 -Full drive, each track driven by two PF-XL motors. -Twin PF battery boxes for powerplant, the model is controlled using two SBricks. -Working and historically accurate suspension - the central bogie is suspended with vertical coil-springs, whilst the front and rear roadwheels are suspended using the French crank-bell system, which in this model uses a rubber band (Though the vehicle is quite back-heavy, so the rear roadwheels are assissted also by coil-springs). -Working rear light. -Functional track tensioners. -360-degree rotating turret. -Vertical and horizontal traverse of the machine gun inside the turret. -Accurate detailing, including spare wheel, grills, exhaust, hatches, vision slits. Building the Model This vehicle was another one which I was very constrained on time to build, which was the reason I chose such a small, basic, machine. I was back from University for just three weeks over Christmas, and whilst I already had a plan and even a very early chassis ready when I came back, vehicles of this size usually take me at least a month to build and have filmed, so another week or two of refinement wouldn't have hurt. The rubber band suspension for example is one thing I would have changed had I had more time, but it works well enough as it it. In the end I was pretty happy with how the model looks and functions, and the vehicle was an appropriate choice for my first model of a French Tank. Like some of my other models I intend to make instructions for this vehicle, which I have about 60% built in Studio 2.0, but since I haven't had the time, I will finish these later in 2022. Images More photos can be found over on this Imgur album: https://imgur.com/gallery/tYodhmr There are also some in-development photos of this model on my Instagram account, (tarix819technic) going back to October 2021. I will also post some others on my Flickr in due course! Thanks for reading! -

[Freebuild] The dragon clan watchtower on the edge of the village of Marginea (Avalonia)
Sympatik Brick posted a topic in Guilds of Historica
On the edge of the forest in the native village of Walt Herboï, the dragon clan has installed a watchtower to provide protection to the villagers. However there are counterparts, the village regularly brings food to the soldiers, sometimes manufactured objects and more rarely men to swell the ranks of the clan. Today, Walt takes over from his late father and comes to deliver his letter of commitment to the dragon clan. -
FILE: Project Thunderbird (2071 – 2085) Developed by Ætheon (a high-profile private military company/"PMC"), Project Thunderbird was the first successful of instance of “jet trooper” (colloquially known as “Jetters”) being deployed into combat. Using cybernetically enhanced pilots (most of which were former US Air Force and Marines), the company was able to find work in conflict zones all over the world. All jet suits contained an exoskeleton, joy stick controls, and numerous intakes and jets that could be adjusted in real-time for maximum maneuverability. Jet suits varied wildly according the pilot’s rank and personal preferences. Though the suit’s weaponry varied between pilots, the most popular weapons were twin rapid-fire plasma cannons and two pairs of missile launchers. The most famous Jetter was Ariel Vazquez. Joining the program in 2072 at the age of 25, she displayed immense prowess with the suit and made headlines for her heroics in the Long Beach Excursion (2073), in which [REDACTED] surfaced off the coast of Long Beach, California and attacked the water front. Were it not for the timely intervention of the “Jetters”, the [REDACTED] would’ve wreaked untold destruction on the city proper. Vazquez would also participate in the Battle of Bend (2079), in which the nation states of Cascadia and Greater Idaho fought for control of a newly-discovered (and incredibly valuable) lithium deposit on the outskirts of Bend, Oregon. Being a PMC, Ætheon sided with the highest bidder (in this case, Greater Idaho) and wreaked massive casualties on the Cascadian military with their superior airpower. Though effective, Project Thunderbird’s heavy and unwieldly jet suits would ultimately be phased out as the technology improved and became more compact. However, it would leave a lasting impact on military combat (even going into the intergalactic age centuries later), with similar technology being deployed by the Royal Cobalt Space Navy (RCSN) in their “Gunzerker” program. Ariel Vazquez Birthdate: 04/26/2047 Hometown: Santa Ana, California, United States Height 5’11”/1.80 m (without suit) 6’5”/1.96 m (with suit) Weight 155 lbs/70.30 kg (without suit) 82 lbs/37.19 kg (suit) 242 lbs/114.31 kg (with suit) Education Mater Dei High School (2062 – 2066) West Point (2066 – 2070) Primary Military Specialty: Aerial Secondary Military Specialty: Ordinance
-

Eight-wide steam engines and rolling stock of the WXYZ Railroad Wild West MOCs
Murdoch17 posted a topic in LEGO Train Tech
In this latest model series, I decided in order to keep the "toy like" proportions of it's inspirational genesis, set 71044. (Disney train) Now, people who know my design style are probably scratching there heads right now in confusion, as I don't EVER build in 8-wide for trains. But in order to make it look as good as possible with the original 2010 Toy Story figures and their stretched appendages, I had to do 8-wide. My current setup... minus a few things on the other table not shown. This scene will change, as the freight 4-4-0 needs revision on the tender, and the passenger 2-6-0 and it's train need heavy work done, as you will see! Loco Number 1 - 2-6-0 Mogul w/ passenger train This 1890's style train is to be pulled by my revised Western 2-6-0 steam loco, and will be made from my older three yellow train cars. These newer cars are four studs shorter, so I can fit a fourth car in the storage box with the extra space. Also, the sidewall closest to the camera comes off on all the cars so you can get at the inside details. The coal-burning straight stack-styled locomotive is a mish-mash of two steam locomotives, the 4-4-0 from the Toy Story 7597 set and a British 2-6-0 train model designed by Block Junction. I repainted the British engine into a Toy-ish color scheme, then added 8-wide late 1800's American-style features with printed parts from set 7597. Oh, and I built a brand new small size tender from the rails up, which uses new red wheels from BrickTracks.. The rear of the engine features a coal tender with a ladder from the water tank-top down to the magnetic coupler. This tender is smaller than before, as it looked very silly next to my 2-6-0 IRL, and even worse next to my blue Western 4-4-0, which currently has an exact copy of the earlier tender version as well. The baggage car features two sliding freight doors in red along with two non-functional passenger doors in black. The side wall comes off, as it does on all the cars, to reveal seating. In this car, that means lots of luggage room and two seats. The two coaches are identical in every way, and are also quite similar to the parlor car at first glance. The inside features side seating, as in LEGO set 71044's Lilly Belle car... this also allows for easier moving of figures, and placing them in any of the five seats per car. The observation car features a rear platform, plus a red drumhead ready for the train's logo. The inside is the same as the two coaches, with five seats. Loco Number 2 - 4-4-0 American w/ freight train This freight-hauling locomotive is meant to be built from sets 7597 (Western train Chase from Toy Story 3), 71044, (Disney Train and Station) and set 10014. (Caboose from the My Own Train series, albeit a bit bigger width-wise!) I also used set 10013 (Open Freight Wagon, also from My Own Train) as a guide for the pipe-carrying car, plus model 15 (Tanker) from set 10183, Hobby Trains for the tanker car. This loco shares the same tender as my other Western 8-wdie loco from this time period. The engine itself, however, is an enlarged version of 7597, in yellow and blue. It's also meant to have inside pistons as it's an early-to-mid 1860's locomotive. (thus the lack of visible pistons!) The locomotive is missing these printed parts. They are as follows: The four yellow 1 x 6 bricks are supposed to be printed with this number 2. while the headlamp is supposed to have two of these printed yellow 1 x 1 tiles. The firebox door requires this print. This boxcar is an enlarged to 8-wide and recolored boxcar from set 3677 (2011's Red Cargo Train). The printed doors (not shown) and from set 7597. (2011's Western Train Chase) The coal-filled 8-wide gondola was inspired by a sub model from set 10183. (2007's Hobby train) This water tanker is a version modified of set 2126's (Train Cars) design with newer reddish brown tanks instead of the vintage 1998 brown of the original model, and now in 8-wide. This model was built from instructions seen at the Old Workhorse's Lego Ideas page as seen here. (I am not affiliated with the creator of that page, I just used their free instructions, visible further down in the updates section, to build the traction engine seen here.) This car is a mashup of set 10013 (2001's Open Freight Wagon) and the bed area from set 60059. (2014's Logging Truck) This caboose was inspired by set 10014 (Caboose) except this versions is 8 wide and the main two colors are reversed. Loco Number 3 - 4-10-0 Super Mastodon w/ military train This entire eight-wide military transport train was inspired by sets 71044, 60052, 79106, and 79111. It is inspired by the 1975 film "Breakheart Pass", which features an US Army resupply train traveling to a Western frontier Fort under siege. This train also has a couple play features, such as a rotating Gatling gun, moving steam engine side rods, and a exploding jail car wall, among a few others. This engine is basically a stretched version of my Western 2-8-0, with another driving axle and a four wheel truck in front. The wheel diagram show which six wheels will be blind and which four will be have a flange. I've tried a similar (albeit reversed) setup on my UK 2-10-0, so I know the wheel arrangement works in it's basics, I'm just not sure how the magnetic coupler will like this new arrangement. (My 2-10-0 doesn't like having a magnet, so it's hard-connected to the tender by a lift-arm on that MOC.) I included the working pistons, and a more cohesive color scheme of red and green, with a splash of yellow as on the previous 2-8-0 steamer. Big Ben bricks' medium size wheels, 4 with flange and 6 blind, are meant to take the place of the gear wheels in the order shown above. You can buy them at his site here. The tender and cab walls are supposed to have four of this printed red 1 x 6 piece inserted into them: The front headlight is supposed to have two of this printed 1 x 1 placed on it. This horse car was originally a cattle car from set 60052, (2014 Cargo Train) but I've re-purposed it for my Army officer horses. These cannons are from set 79106 (Calvary Builder Set) and were placed on a generic two-axle flatcar for transport by rail. The rotating Gatling gun you see here was taken from set 79111. (Constitution Train Chase) This car has the basic "look" of the Lily Belle parlor car from 71044, (Disney train and station) but is less ornately furnished due to be a second-hand coach refurbished cheaply for use by the US Army of the 1880's. The right-side wall is removable for access to the inside. The jail / baggage car you see was originally from set 79111, (Constitution Train Chase) with the basic coach styling of set 71044. This car has one play feature that is sure to blow you away: the back wall can be removed to get at the jail cell via the "dynamite" on the outside of the back wall. When pushed back towards the other end of the car, the lever on the left side pops the back wall out and the bad guys can escape! Also, the right-side wall is removable for access to the inside. Loco Number 4 - 2-8-0+0-8-2 Garratt w/ rotary snowplow train This blue train is marked (2-8-0+0-8-2 Garratt, for heavy duty rotary snow plow jobs) number 4, and joins the family of similar mid-1880's engines such as the large 2-8-0 for military transport, the inside-piston 4-4-0 for freight, and the fancy 4-6-0 for passengers. This 8-wide Garratt-type steam locomotive is perfect for use on the mountainous terrain of Colorado Rocky Mountains, with it's double steam locomotive pistons sets. (Before anyone says anything about Garratt loco's not being ever sold into the North American market, I'll say it's an lost experimental prototype to help with a motive power shortage. It may have been seen by the owner as a economical way of sending one locomotive to do the job of two.) This steam powered rotary snowplow was inspired by the real-world Denver and Rio Grande's narrow gauge plow "OY", as now seen on the Cumbres and Toltec RR in New Mexico / Colorado. I've decided to name my plow "YO" in tribute to my inspiration, using four of this part from the original Toy Story sets as a sort of marker. The rear of the plow features the coal tender. This 8-wide engine was originally a SRW locomotive works product, (made by Anthony Sava and formerly available on Bricklink until LEGO sadly removed most of his models.) I reworked the engine to have working pistons and side-rods plus a longer frame. This made it from 2-4-0+0-4-2 to a 2-8-0+0-8-2, among other smaller updates to the engine. I also substituted a Disney train-style boiler onto the engine to backdate it to the mid-1880's or so. Even with the added pistons, the engine can go around corners and switches quite easily. A simple caboose, for the snow plow train. I used a pair interesting windscreen parts for the cupola windows. Loco Number 5 - 0-6-0ST shop switcher Locomotive number 5 is an eight wide model of a generic 0-6-0 saddle tank steam engine from the later half of the 19th century, and was inspired by a @ScotNick build of Stanley from Thomas and Friends for the stripe work, and this build of Percy (also from Thomas) from the L Gauge site for the front of the boiler/ piston assembly. Here is the coal bunker / driving controls shot for this 8-wide yard goat. NOTE: The color scheme is red and yellow, though sadly here red looks pink. Loco Number 6 - 4-2-4T w/ RR office car I created a more realistic version of the 2016 Winter Village holiday train (set 10254) for all the train fans who didn't like the engine. I added working pistons, and more colorful (and less festive!) color scheme plus two more sets of fuel bunker-based wheels on the rear of the engine. The accompanying business car is for the WXYZ railroad president, and features a accessible interior, like the Disney Train (set 71044) it's modeled after. This private car has been given the name "Mount Clutchmore", after the tallest peak and highest point on the WXYZ line, at the tunnel under said mountain in Colorado. This locomotive is modeled after the unique C.P. Huntington of the Central Pacific railroad. The model will be numbered 6 for use on my Wild West railroad, and and features a (small) balloon stack, yellow and blue paint scheme, with red accents. This railroad office car is modeled after the dark red observation car as seen in the Disney Train LEGO set. It has been changed to a blue paint scheme, with red doors/ windows and brown trim, with a black roof. As the car has been stretched by four studs to fit the longer frame, there is more room inside. The Mount Clutchmore office car features three chairs, a table with drinks for investors / newspaper reporters, and a planter on a table at the rear-most end. Almost the whole wall is removable to get at these inside details. Loco Number 7 - Automotive Rail-Speeder The early '50's automotive rail-speeder is inspired by this fairly recent @hachiroku build here and by @Cale's pictures of Ma & Pa RR 101 as seen here. The vehicle is numbered "7", for use on the WXYZ Railroad, and rolls quite well on the track with no problems in stock switches or standard R40 curves. The rear has two coverings almost fully obscuring the rear wheels, in true retro style. This model is designed for track inspector's and high-up executive's to get up close and personal with the railroad. The roof is removable and the doors open, with seating for two figures side-by-side. Loco Number 8 - Galloping Goose (freight version) This Galloping Goose's front half was inspired by @hachiroku and his Indiana Jones staff car MOC, as seen here. The rear of Number 8, with all the doors open. Loco Number 9 - 2-4-0 Old English w/ silver ore and mine payroll train This very short train is based off set 7597, Toy Story 3's Western Train Chase, which my dad purchased for my birthday gift for later this year. I digitally converted the 4-4-0 "American" into a 2-4-0 "Old English" type which I then based off the real world 2-4-0 'Montezuma'. That 1871-vintage engine was the Denver & Rio Grande's first steamer. (which was the basis for the fourth Disneyland loco, the Ernest S. Marsh, by the way.) I had a real urge to name the LEGO version of the engine after Achu, the South-American tribal leader from the Adventurers' "Jungle" subtheme as a tribute to the real-world Montezuma engine and it's namesake Aztec leader. But I didn't think anyone would get the reference, so I didn't... at least not yet! The locomotive as it will be later in the year. I used the basic look of the Disney set 71044's engine for the two wheel tender, as it was too good an opportunity to pass up. (and it's accurate to the real engine it's based on, too!) I also managed to add working pistons, though quartering was not possible, sadly. The rear view of the engine, which will be numbered 9 in my numbering scheme for the Wild West-era W.X.Y. & Z. Railway. (This means it is replacing the 2-6-2 loco on the wanted list.) These three silver ore cars are taking their loads to the U.S. Mint in Denver to be made into coins. The mine payroll boxcar will feature dollars signs on the doors, as in the Toy Story 3 set. The caboose will have printed parts on the sides, saying "GREAT WEST". The inside with the roof removed. The Wichita Xenia Yazoo & Zephyrus Rail-Road (Stock market trade name WXYZRR) was a mid-19th / early 20th century enterprise also known as the Wasted, eXausted, Y bother & Z*. (*No one could figure out an insult to the railroad that started with the letter "Z") The railroad started in Wichita, Kansas in 1868, then went straight through Xenia, Oklahoma, while then meandering into Yazoo, Colorado and barely making it into Zephyrus, New Mexico by 1875. Other stations included several army forts dotted along the route through Oklahoma and Colorado, along with scattered mining camps and agricultural towns across the maps of New Mexico, Oklahoma, and Kansas. The railroad is hardly mentioned anywhere in writings of journalists, except in scathing "letters to the editor" of various newspapers about lack of the promised service on the line in the early years. Also, the much derided company slogan "last railroad you'll ever need" did not work out well for the new railroad, but it did vastly increase questions fielded to the main office about coffin, headstone, and various other memorial shipments from all over the area from which the railroad served. It is therefore shocking the railroad lasted as long as it did, a substantial fifty-six years from incorporation in 1867, to it's sale at auction in 1923! The old WXY&Z railroad had about 35 locomotives on the books at the maximum, but most of these were already very old when purchased and broke down frequently so they were chronically in the workshop for some reason or another. In fact, the seven additional 4-4-0 locomotives purchased third-hand from engine dealers were of the long-obsolete inside-piston variety of the mid-1850's, yet were bought in the early 1870's! However, what the railroad lacked in regular service motive power, it made up for in the snow plow-train department. A single prototype of what would later be called a "Garratt" (a doubled-power-unit steam loco with a single boiler not normally found in North America) was first run on the "High Line" between Fort Legoredo, Colorado and Glencoe, New Mexico in the steep Rocky Mountains. This is where the railroad really shined, in keeping the trains running through steep mountain passes with a single experimental train with a rotary snowplow at the head end... of course, there were other plow trains, but only two rotary trains. (One would work from either end of the Glacier Gulch Pass, and meet in the middle on a passing siding. The Garrett would be on one train, and two regular locomotives pushing the other.) After 1923's closing of the railroad, it was bought wholesale by a consortium of stock brokers from Denver, with plans to redo the line with less sharp grades and more snow sheds. However, during this reconstruction, the 1929 Great Depression began, leaving half the line with old grades though most of Colorado mountains, but new grades on New Mexico were finished in time. The passenger car fleet was upgraded, but the freight engines (downgraded passenger power, really) and rotary plows remained vintage as far back as 1878 for motive power. The older inside-piston locomotives went for sale once the Depression really started up, and one was snapped up for a potential history museum in Glencoe, while the rest were scrapped. Then, a miracle happened: the movie industry intervened, and several production houses bought some of the oldest rolling stock, engines, and the line was given enough cash to stave off it's dismantlement until 1941, when trains of heavy munitions from companies on the line came rolling through for the War effort, making the line the busiest it had ever been. The profits from this, and the later 1950 / '60's movie companies use of the stunningly scenic "High Line" line for motion pictures saved the line. When the good times started to dim in the early 1970's, the railroad was jointly bought by the states of Kansas, Oklahoma, Colorado, & New Mexico for tourists, occasional movie trains, and the freight that still used the line, as the original stock broker consortium had by then been dissolved. The "new" WXYZ railroad, (the town names were shortened to just the initials for simplicity's sake) was thus founded in March 1st, 1971. It has been running, mostly non-stop and is closed during the three winter months of December, January, and February for running of the single remaining rotary snowplow to get the line ready for opening day on March 1st of every year since the early 1970's. (NOTES from the writer: Only Wichita (Kansas) and Xenia (Illinois) are real-world towns, with them being based in name ONLY on real places. Yazoo, for example, is really a river in the state of Mississippi, while Zehyrus was simply because I needed a "Z" name that sounded plausible, and the Colorado Zephyr train was on my mind at the time. The rest of the story is also fiction, as no Garratt ever rode the rails of North America.... ever. Also, the WXYZ logo is an old Union Pacific logo from the early 1910's, while the railroad name's initials have never been used ANYWHERE on a railroad in the USA.) EDITED 8/3/21: added screenshots of engine No. 9 and it's train. I still need to take real-life photos of the private car and 4-2-4T, and now the blue 4-4-0 and it's freight train require photos too. -
[MOC] Bateman Assault Bridge Carrier
Tarix819 posted a topic in LEGO Technic, Mindstorms, Model Team and Scale Modeling
Hello, Finally my latest model is complete and filmed, this time it is of the Bateman Assault Bridge Carrier, an experimental bridge-laying machine of the inter-war period. HISTORY This is an extremely obscure historical military vehicle, and there is very little information about it anywhere, this is just my understanding from traces of information found in different places online: The Bateman Assault Bridge Carrier was an early attempt by the British Royal Engineers at a bridge-laying military vehicle, and the first dedicated bridge-layer, as previous attempts at such a vehicle had been First World War - type landships fitted with an assault bridge on the front. Additionally, the BABC was the first bridge-layer to carry its assault bridge on top of the vehicle. It was based upon the Medium Dragon Mk. I Artillery Tractor, which itself was produced from 1922, and the BABC was trialled at the Premier Dominion Power & Speed demonstration at Camberley, England in 1926, meaning the prototype(s?) must have appeared between 1922 and 1926, being scrapped afterward. The universal scissor-bridge system seen on modern bridge-layers did not appear until the mid-1930s, so the BABC uses a more primitive, rigid bridge design, which is carried on runners and deployed using a hand-cranked winch on the rear of the vehicle. In some instances, a smaller rigid structure is deployed by hand before the main bridge, which is used to better align bridge deployment and increase distance over wider obstacles, however there some photographs show that this was not a vital part of the machine and therefore I have not included it in my model. When retreiving the bridge it must be hauled back by hand once the bridge reaches a certain point on the runners. It is also worth noting that the bridge could only be picked up from one side, and I have kept this historically accurate in my model. THE MODEL I had been building this vehicle since mid-June, and certainly it took far longer than I had expected, mostly due to the problems I encountered regarding the drive and the winching system, but also because I have been busy with work. In the end I was not entirely satisfied with the vehicle, as the machine cannot cross its own bridge due to its immense weight. I spent a great deal of time trying to achieve this goal, include the installation of two additional PF-XL motors to couple at the rear drive wheels, and I managed to get it crossing the bridge up to about 6.5kg. However once I had built the superstructure the weight of the model increased to over 7.7kg, and now the weak point in the drive was the rear axles, which twisted quite badly when put under too much stress. In theory by heavily gearing down all of the drive wheels, I could probably have the vehicle cross the bridge under its own power, however the speed would be so reduced I thought it not worth the bother. I decided I would be happier having the vehicle drive on flat ground at a decent pace, than being able to cross the bridge at snail-pace. A transmission on such a heavy vehicle was out of the question entirely of course. The question may be asked then; Why build it so big and heavy? The answer is that I wanted to keep it in scale with my other Tanks: 1/8 scale, however I mistakenly underestimated how big it would be after planning and draughting it, and honestly being able to cross the bridge at 6.5kg it did look promising for a while that it would still be able to cross when it was finished. Sadly this was not the case, but I had come too far to restart given my limited time. I am still mostly pleased with the result, as the fact that the vehicle being so heavy can still drive at such a speed is already quite impressive, but more so that the model is very detailed, accurate and functional. It is great fun driving around and seeing the bridge-deployment in action. FEATURES -1:8 Scale. The bridge measures 1.1m in length. -Highly detailed, featuring the driver's compartment, mud-chutes, hand-cranks, grill, exhaust pipe, and bridge latticework. It is great to look at with high historical accuracy. I also quite like the strings used to keep the bridge in place when moving. -Unladen Weight: 7.7kg -Laden Weight: 9.4kg -Bridge Weight: 1.7kg -Fully tracked drive: each track powered by three PF-XL Motors, two for each rear drive wheel, one for each front drive wheel. The vehicle is reasonably fast given its size. -One AA battery box per track - each fitted with three Li-Ion 14500 batteries and three dummy batteries. -Powered by two SBricks; one per track. -Functional vertical coil-spring bogie suspension, historically accurate to the real vehicle. -Functional track tensioners. -Functional headlamp. -Functional Armstrong-Siddeley Air-Cooled V8 Engine. -Functional bridge-deployment system using a winch, which is powered by one PF-L Motor. IMAGES More images can be found on my Imgur post: https://imgur.com/gallery/pWfYT98 -
It all started with this small tank based off of the m3 Lee, I wasnt very happy with it but I loved the engine, so I kept it around I later redid the turret to be more round This was the first design that was called the Arnam, named after a famous admiral in the Legion Republic (this is a whole universe my friend and I came up with) despite this being a Senate tank It had 2 main guns, but was very tall (I was still obsessed with the engine) and track protection, I don't have chain link pieces on hand, so the tracks are bare I then retooled it into the Arnam Mk II, which had a decent slope to the from armor, but was built in the same frame as the original tank I had built roughly a year prior This version incorporated a new version of track protection that would be used to this day Finally, after a solid year of redesigns I came to a difficult realization. I needed to reduce the detail of the engine compartment in order to have the tank work both structurally and aesthetically. I removed the old droid bodies and halved the overall height of the model. This is the Arnam Mk V The driver gets in through this hatch in the bottom the engine bay has been reduced to a lever and a telephone piece to allow the height reduction. This is the first tank I will give you the tech specs of. It has 1 AG (weapons manufacturer) TC (weapon type) 413 110mm cannon 3.5 inches of armor on the sides and rear 4.5 inches of armor on the front and turret Crew of 3, commander, gunner, driver (no loader as the gun is auto-loading) Multiple add one for various missions The commander's cupola can be replaced with a 30mm auto cannon and 2 .50 caliber machine guns The missile interference system (MIS) which messes with incoming guided projectiles and makes them not hit their target And the cluster of guided missiles that can be fired at enemy aircraft However there was room for improvement. I felt that the turret was too much like a WWII panther tank and not like a modern tank. So last week I ripped apart the old turret and built the Arnam Mk VII It has 1 AG TC 424 150mm cannon 4.5 inches of armor on the sides and rear 5.5 inches of armor on the front and turret Crew of 3, commander, gunner, driver (no loader as the gun is auto-loading) Various add one similar to the Mk V, with the exception of the MIS, as this is now built into the turret Optional 20mm auto cannon in the hull (adds a 4th crew member) Secondary turret in place of commander's cupola And 2 different sensor packages There are no missiles, as the role of a missile firingntank was delegated to the Honey Badger super-heavy I also added this hinged piece to cover up the gun when elevating The driver's viewport is underneath the 1x2 dark red tile I will likely update with either a stud.io file or chain link pieces, whichever comes first Stud.io model is here. https://www.bricklink.com/v3/studio/design.page?idModel=246061
-
The images for my model are too large to put here, so here's a link to them on Bricksafe This model is a 1:25 scale replica of a ship that served in Czechoslovakia and Germany in WWII. While in Czeckoslovakian service it was named Presedent Masarysk, named after their first presedent. It was a river monitor that was the leader of their brown water flotilla. It was launched in 1932 and in 1936 when Czechoslovakia was annexed by Germany was transferred over to their navy and renamed Bechelaren. It mostly did escorting on the Danube river, however it partook in the German counter-offensive on Budapest in 1944. In 1945 the ship was turned over to the allies, whom disarmed it then gave it back to the newly reformed Czechoslovakia in 1947. It was used as a working platform until it was scrapped in 1978. The model, if built out of actual lego would be exactly 2 METERS long. Despite minifigure scale normally being either 1:32 or 1:45 I've personally found that I prefer 1:25 scale for minifigs. Also it was originally a typo that I didn't catch until I had already finished the model. I made it so that you can remove everything on the deck and take the hull apart by bulkhead. I had to get creative with the interior since I couldn't find anything about it other than how many bulkheads it had. I also kept finding conflicting numbers as to how many crew it had, so I put in as many beds as the largest of the numbers I came across. (43) If you'd like to build the model you can buy the instructions here: https://rebrickable.com/mocs/MOC-81516/Legodudelol9a/bechelaren-presedent-masarysk-river-monitor/#details
-
[MOC] T.13B3 Tank Destroyer
Tarix819 posted a topic in LEGO Technic, Mindstorms, Model Team and Scale Modeling
History Here is my latest model, which is of the T.13B3, a Tank Destroyer used by the Belgian Chasseurs Ardennais from 1936 to 1940. The T.13B3 was to be the third model of the Belgian T.13 series of Tank Destroyers, all based upon the British Vickers model 1931 Artillery Tractor, which were purchased by Belgium in 1934. The T.13B3 of 1936 attempted to improve upon the previous T.13B2 in many regards; the hull was greatly redesigned, with a raised rear idler fitted to improve stability. It recieved a new 360-degree rotating turret to house the 47mm Mle. 1931 Anti-Tank gun, as well an additional crew member to serve as the dedicated loader. These vehicles saw service in 1940 during the Battle for Belgium. The Model This was my first foreign vehicle I have built, but given its British origins it shared many components with some of my previous vehicles I have built before, namely the Vickers M1937 and M1936. The suspension and chassis design were all quite similar, but I still refined and improved it quite a lot - for example I have used the full motorcycle and tyres for the road wheels instead of just the motorcycle wheels. I had only three weeks to build this vehicle after preparing and scaling the design, so this similarity came in handy, and i'm thankful I never ran into any major problems when building it, as I have done on some earlier tanks, as I would not have been able to finish it in such a short amount of time otherwise. I am still finishing off the instructions which will go up on Rebrickable and Mocsmarket within a week with any luck. Features -1:8 scale -6.3kg in weight -Controlled by three SBricks. -Hull is powered by two AA Battery Boxes each containing three 3.7v Li-Ion 14500 batteries and three dummy batteries, giving a total output of 22.2v or 11.1v per track. -Turret is powered by one PF Li-Po 7.4v Battery Box. -Full RC driving - each track powered by two PF-XL motors. -Functional leaf-spring suspension (Horstmann). -Functional track tensioners. -Functional headlights. -360-degree rotating turret. -Elevating and depressing main gun. -Firing main gun with high power and recoil effect - the spent shell casings are ejected after each shot. -Four-shot magazine with short reload time. -High detail, including tools, exhaust, tow-hook and siren. Photos -
 Good Day. Today I present a military tow truck inspired by the JSDF one. The base truck is (Mitsubishi) Fuso Super Great FX 6x6 - the self-defence force exclusive variant. My model has full suspension, with "leaf springs" (flexaxles) all around. Drive is permanent 6x6 with 1x M-motor (was decent without cabin and superstructure, but with those added the performance became abysmal), steering is done via another M-motor downgeared with a wormgear. In-cabin steering wheels is moved via a micromotor with rubber belt drive. The truck is built in Tecnic figure scale, with customised front tires to make up for lack of proper width tires in TLG inventory. The crane is completely manual, with all functions controlled via gears on the outside. The function list is: -Outriggers capable of lifting the rear -Boom elevation -Boom rotation (no gearing, just swiwels with some friction to keep it in place) -Boom extension (with stops via a ratcheted gear and an end-stop to prevent the boom from falling out) -Hoisting -Rear winch All in all a mediocre build, but quite happy about it considering how disinterested I was in building something recently. A major improvement would be a L-motor for drive, but there's not enough space in this chassis, a perfect fit would be the mini motor Efferman shown a prototype of. Steering is a tad floppy as well, it was caused by my preferrance for a higher ground clearance, although even if it weren't floppy, the CV joints have a teenncy to pop out due to all the stress (heavy model with suspension and no differentials). The boom has a low weight limit, topping out at about 200g, heavier loads cause the boom to flex until it breaks - unless it is fully contracted, in which case I was able to lift about 400g. I have a complete chassis with a partial cabin lxf file, but I doubt anyone would be interested in building it, so I'll upload the model as is on [https://brickshelf.com/gallery/LXF/mitsubishiFXtowtruck/mitsubishi_fuso_super_great_fx.lxf]Brickshelf[/url] . Video: Photos: Cya!
 -
US troops, members of the Coalition Forces carrying out Operation Desert Storm, enter a vacant Kuwait City in February 1991. Coalition Forces Enter Kuwait City, 27 February 1991 by Nicholas Goodman, on Flickr Kuwait City by Nicholas Goodman, on Flickr CU_Kuwait by Nicholas Goodman, on Flickr
-
Wild West - Trains, Town, Military and mini-figures
Murdoch17 posted a topic in LEGO Historic Themes
Named for nearby Fort Legoredo, the town of Glencoe was first settled in 1869 by the people following the Wichita, Xenia, Yazoo & Zephyrus Rail-Road through the Colorado on towards it's junction with the Union Pacific to create a branch off of the First Transcontinental Railroad. Usually these towns die off once the construction teams move on, but this town didn't because of one crucial fact: Valuable veins of silver were discovered by the Construction crews in a attempt to tunnel through the side of Raindance Ridge. This new wealth happened to be right up the tracks (about a mile or two) from the City. The town (and fort) continue to have a booming industry in the 21st century, with tourists flocking to the Wild West town, movies being shot on-site, and more recently, the reopening of the silver mines because of advances in mining techniques. (seen above is the town in the 1950-70's TV / Movie boom) The railroad still stops at Fort Legoredo depot (shown above) and the town of Glencoe, with a Native American reservation and the preserved Army Fort nearby. US 1880's LEGOREDO MODULAR TRAIN DEPOT I originally got this basic model from a page on Bricksafe by user @sed6 as seen here. I revised the freight door to be movable, changed the roof color to dark red from black, building color to sand green from tan, plus I added a "cast iron" heating stove and it's chimney flue to the model for late-1800's period look. I have named the Fort Legoredo passenger depot after the famous set number 6761. (Fort Legoredo) The model features the separate entry doors to the station premises for cargo and people on the both the street and track sides. There is also plenty of outside seating on both the left and right sides, yet they are still under the roof awning to be protected from rain. (three seats per side) Inside we have the freight area (on the left) and the passenger area (on the right) with a connecting door between the two. The passenger section also has the heating stove which currently is keeping the coffee hot. (or is it boiling the water for tea?) This part of the station also has three inside seats for weary passengers and a cash register for ticket dispensing. The station is modular, and comes apart in four sections: - Left platform end - Right platform end - Station roof - Station building 1870's LEGOREDO CITY This bank was partially inspired by set 10255 (Assembly Square). The rear of the bank also has a modified safe from set 10217. (Diagon Alley) along with two bank teller's windows and a desk. This barber shop was inspired by set 6765. (Gold City Junction). The barber shop features two chairs taken from set 10246, (Detective's Office) along with a sink and cash register. This general store is supposed to be modeled after the one in set 6765 (Gold City Junction), but with updated parts and expanded collection of items for sale. Inside, we have a cash register and a not-yet-finished interior. Hank Haystack from the LEGO Movie owns and operates this store. This saloon was inspired by the bank in set 79109. (Colby City Showdown) It features a typical saloon swing-open door, a cash register, and several spots to sit down and order a drink and is owned by Doc Brown from Back to the Future. (Hey, he can't drink it, doesn't mean he can't sell it!) Being on a corner, much of the building is left to the imagination as I wanted to avoid lift away floors to keep with the vintage 1990's Western feel. This sheriff's office was taken almost wholly from set 79109. (Colby city Showdown) The rooftop cannon has been removed, and a sticker-based sign from set 7954 (Woody's Roundup) has been placed up there instead. The floor of the building has also been redone, and most of the odd colored part removed. The rear of the building features the sheriff's office and his armory, plus the jail cell with it's exploding front wall. This blacksmith's store was heavily inspired by 2011 Ninjago set 2508. (Blacksmith Shop) I revised the colors scheme, removed the rotating rear wall, and added a holder for the sign. The roof still folds open like the original set. The post office was mostly taken from set 40305 (LEGO brand store), which has been reworked into a post office. There is a hanging sign out front in the shape of an envelope, and the sign on the top of the building clearly defines the building's purpose. (though the inside is empty at this point!) It is off a Frontier church for my Wild West town. I based it partially off set 309 and 1309 (both called "Church") from 1957 / 58's Town Plan theme.. the only official Lego church ever made, as far as I know. The words "Church of the Unmodified Brick" go on some 2 x 4 tiles with custom stickers I'll probably get from my dad's label maker. (as I don't own one) The model features a "golden" bell in the tower, and seven seats for parishioners, while the Reverend has to stand to deliver his fire-and-brimstone sermon on the "evils" of cutting baseplates, third party bricks, and gluing parts together. The rear window has a trans blue / trans orange stained glass window with a cross outline in front of it. The lattice work for the windows is supposed to continue into the square versions using 22 of this part. This church will go along with the gothic graveyard I assembled from both 70420 (Graveyard Mystery from Hidden Side) and 75965 (Rise of Voldemort from Harry Potter.) Also, please ignore the older 4-2-4 steam loco in the back of this photo, it's not important and has been disassembled for a 2-8-0 as seen in the Train Tech sub-forum. (and below) US 1880's TRAIN MODELS - PASSENGER This train is meant to be built from sets 7597 (Western train Chase from Toy Story 3), 71044, (Disney Train and Station) and set 10014. (Caboose from the My Own Train series, albeit a bit bigger width-wise!) I also used the 1955 Disneyland RR passenger car instructions from @TJJohn12, as seen on Flickr here. I just recolored them and simplified them for this model. The coal-burning straight stack-styled locomotive is a mish-mash of two steam locomotives, (both 4-4-0 type) from the Toy Story set and Disney train model. I just stretched out the Disney model, added a blind driving wheel to either side (making it into a 4-6-0), and repainted it into a Toy-ish color scheme. Oh, and I built a brand new tender from the rails up, which will use 1970's red 12v-era wheels. (I hate the new Powered Up wheels without the metal axle, so this was my only choice!) The locomotive is missing these printed parts, which are colored wrong on the model for visibility. They are as follows: - the green 1 x 4 printed number "1" bricks, two on the loco and two on the tender. - a single printed red 2 x 2 brick with "1" print for the headlamp. - one 2 x 2 printed round tile for the firebox door in the cab. This baggage / coach car is styled after TJJohn12's free instructions. I did change the color scheme a bit, with black windows. black roof, and red doors, instead of red doors, reddish-brown roof, and red windows. Two of these are also going to be built, and were designed with TJJohn12's instructions. (with some subtle design changes by me for ease of ordering and a slightly simpler design) Now, I know passenger train's are not supposed to have cabooses, but this one does as I couldn't figure out a good red light arrangement for the rear-facing passenger car. Thus, this 10014-styled caboose was created in 8-wide. The yellow 2 x 4 tile on the both sides of the car are actually supposed to be this printed red part of the same size. US 1880's TRAIN MODELS - FREIGHT This freight-hauling locomotive is meant to be built from sets 7597 (Western train Chase from Toy Story 3), 71044, (Disney Train and Station) and set 10014. (Caboose from the My Own Train series, albeit a bit bigger width-wise!) I also used set 10013 (Open Freight Wagon, also from My Own Train) as a guide for the pipe-carrying car, plus model 15 (Tanker) from set 10183, Hobby Trains for the tanker car. This loco shares the same tender as my other Western 8-wdie loco from this time period. The engine itself, however, is an enlarged version of 7597, in yellow and blue. It's also meant to have inside pistons as it's an early-to-mid 1860's locomotive. (thus the lack of visible pistons!) The locomotive is missing these printed parts. They are as follows: The four yellow 1 x 6 bricks are supposed to be printed with this number 2. while the headlamp is supposed to have two of these printed yellow 1 x 1 tiles. The firebox door requires this print. Inspired by a @wildchicken13 model from Bricklink, back from before Lego bought them out. This boxcar is not inspired by any specific car in particular, and was done freehand without looking at other 8 wide boxcars. The four doors slide open. Model 15 (Tanker) from set 10183, Hobby Trains was the inspiration for the tanker car. It should feature this print on the 2x2 round white tiles. This model was built from instructions seen at the Old Workhorse's Lego Ideas page as seen here. (I am not affiliated with the creator of that page, I just used their free instructions, visible further down in the updates section, to build the traction engine seen above.) The model has been attached to an 8-wide flat car for transportation across the county. This 10014-styled caboose was created in 8-wide for my passenger train, but has been redone in yellow for the freight train. US 1880's TRAIN MODELS - U.S. MILITARY This entire military transport train was inspired by sets 60052, 79106, and 79111. This train also has a couple play features, such as a rotating Gatling gun, moving steam engine side rods, and a exploding jail car wall. This eight-wide model is a complete model of my own design, and is inspired by the steam engine from the 1970's Western film, "Breakheart Pass". I included working pistons, and a more cohesive color scheme of red and green, with a splash of yellow. Big Ben bricks' medium size wheels, 4 flanged and 4 blind, are meant to take the place of the gear wheels. You can buy them at his site here. The tender and cab walls are supposed to have four of this printed red 1 x 6 piece inserted into them: The front headlight is supposed to have two of this printed 1 x 1 placed on it. This horse car was originally a cattle car from set 60052, (2014 Cargo Train) but I've re-purposed it for my Army officer horses. These cannons are from set 79106 (Calvary Builder Set) and were placed on a generic flatcar for transport by rail. The rotating Gatling gun you see here was taken from set 79111. (Constitution Train Chase) This car has the basic "look" of the 1955 Disneyland MOC trains cars from TJJohn12, albeit without the clerestory roof, which instead has a walkway for train crew / soldiers on lookout during fuel stops. The jail car you see was originally from set 79111. (Constitution Train Chase) while gaining the styling of the 1955 Disneyland MOC trains cars from TJJohn12. This car has one play feature that is sure to blow you away: the back wall can be removed to get at the jail cell via the "dynamite" on the outside of the back wall. When pushed back towards the other end of the car, the lever on the left side pops the back wall out and the bad guys can escape! US 1880's TRAIN MODELS - MAINTENANCE OF WAY ROTARY SNOW PLOW This blue train is marked (4-8-0+0-8-4 Garratt, for heavy duty rotary snow plow jobs) is pulled / pushed by an 8-wide Garratt-type steam locomotive is perfect for use on the mountainous terrain of Colorado Rocky Mountains, with it's double steam locomotive pistons sets. (Before anyone says anything about Garratt loco's not being ever sold into the North American market, I'll say it's an lost experimental prototype to help with a motive power shortage. It may have been seen by the owner as a economical way of sending one locomotive to do the job of two.) This steam powered rotary snowplow was inspired by the real-world Denver and Rio Grande's narrow gauge plow "OY", as now seen on the Cumbres and Toltec RR in New Mexico / Colorado. I've decided to name my plow "YO" in tribute to my inspiration, using four of this part from the original Toy Story sets as a sort of marker. The rear of the plow features the coal tender with a ladder from the water tank-top down to the magnetic coupler. This 8-wide engine was originally a SRW locomotive works product, (made by Anthony Sava and formerly available on Bricklink until LEGO sadly removed most of his models.) I reworked the engine to have working pistons and side-rods plus a longer frame. This made it from 2-4-0+0-4-2 to a 4-8-0+0-8-4, among other smaller updates to the engine. I also substituted a Disney train-style boiler onto the engine to backdate it to the mid-1880's or so. The rear of the steam locomotive. This part in black goes on the water tank and coal bunker walls (it's the number 4). Even with the added pistons, the engine can go around corners and switches quite easily. A simple caboose, for the snow plow train. I used a pair interesting windscreen parts for the cupola windows. US 1870's WESTERN MILITARY - FORT LEGOREDO This is an updated and enlarged form of sets 6769 / 6762, (Fort Legoredo) with new parts and some modifications to the original set. These new parts include two cannons which oddly are missing in the original sets. I have heavily modified this model by adding Technic pins to hold the sections together, and by filling in the gaps in the wooden walls. The jail cell has also been enlarged and opened up for play-ability, plus a train platform had bee placed at the secondary gate for loading and unloading soldiers and equipment. The yellow flag is supposed to have this print: http://www.bricklink...35pb107#T=C&C=3 while the tan plates above the main gate are to have printed 1 x 1 tiles spelling out "Fort Legoredo". (which are sadly not in LDD) The back of the fort features the commander's office and jail cell below. I removed the originals set's trap door and enlarged the cell. The main gate has been greatly enlarged to allow for wagons to enter the fort. The secondary gate allows for rapid deployment of artillery and troops off of trains and into the fort. The commander's office is above the jail. I plan on adding a custom Confederate officer into the cell. Not much to say about this part... US 1870's WILD WEST MINI-FIGURES Commanded by General Buford Armstrong, the garrison at Fort Legoredo is ready for anything... or so they think! These Native Americans are of the tribe displaced by the US Army and the silver miners in the Raindance Ridge area back in the 1880s. They went onto reservations, which they then left under cover of darkness for their even older ancestral burial grounds: known only to their lone elder, the much revered Chief Big Bear. When they arrived, they found two people already there: Doctor Emmett Brown and his wife Clara, who had decided to take a 20th-century shortcut through an 19th century world and got lost. Chief Big Bear could somehow tell that Doc Brown was a man "from many sunrises from now" (aka the future), and offered to help him if he could help them. So, Doc drew up the plans for the time train, and, with the help from his inventions and the native americans, worked to keep the hidden valley a secret for ten years, all while getting parts for the engine from opening a saloon in the nearby town of Legoredo City. (He can't drink it, but he can sure sell it!) US 1870's MODULAR EADS TRAIN BRIDGE Here is my final design of the St. Louis bridge, commonly known as the Eads bridge because of it's designer, James B. Eads. It uses Indiana Jones roller-coaster ramps for the arches, which looks pretty cool. The bridge is nine tracks total in length and 19 bricks high from base to track. (this means about fourteen brick of clearance between arch top and floor, so some ships could pass through!) First, a little background info from Wikipedia (which is also where this picture came from): "The Eads Bridge is a combined road and railway bridge over the Mississippi River at St. Louis, connecting St. Louis and East St. Louis, Illinois. The bridge is named for its designer and builder, James B. Eads. When completed in 1874, the Eads Bridge was the longest arch bridge in the world, with an overall length of 6,442 feet (1,964 m). The ribbed steel arch spans were considered daring, as was the use of steel as a primary structural material: it was the first such use of true steel in a major bridge project. The Eads Bridge, which became an iconic image of the city of St. Louis, from the time of its erection until 1965 when the Gateway Arch was constructed, is still in use. The bridge crosses the St. Louis riverfront between Laclede's Landing, to the north, and the grounds of the Gateway Arch, to the south. Today the road deck has been restored, allowing vehicular and pedestrian traffic to cross the river. The St. Louis MetroLink light rail line has used the rail deck since 1993." This is a rough representation, as it is missing a lot, (I.E. no car deck, missing tunnel under downtown, and lack of the East St Louis ramp approach.) Here is the modular component, of which three of these big sections together via eight Technic pins (four per section) to make the whole bridge. The modular component of the bridge's design also makes it a LOT easier to carry as the whole bridge with the three sections weighs about 10 pounds total. US 1870's WESTERN STAGECOACH, TOWN CARTS, SNAKE-OIL SALESMAN VEHICLE, US ARMY CANNON CART + AMMUNITION WAGON "Come one, Come all! Gather 'round for a cure to end the all-too-common cold!" It may say "bait shop" on the side, but it really is a patent "medicine" store, where Anton Dewey Cheatum makes his own brand of lethal cures using rattlesnake venom, whiskey and his special addictive ingredient... one or two tastes, and you'll come back for more until you drop (dead). Usually this happens after he has fled town in his red wagon with the citizens hard-earned cash. This Express Stagecoach model was mostly taken from set 79108 (Stagecoach Escape) from the 2013 Lone Ranger theme. I removed some of the random colors to give it a more unified look, and replaced red with yellow as the main color for this stage while the rear baggage ejection feature still works as originally designed. Here we see inside the stage, with the roof removed and doors opened. The brown box on the roof is the safe hauling the silver miner's pay, disguised as a steamer trunk to fool bandits. These wagons are for my townsfolk and their businesses. The yellow crates hold various liquor bottles for the Saloon, and the other wagon is headed for the mine with TNT and a barrel full of Whiskey. This 1860's US Army covered ammunition wagon with cannon is inspired by set 6716 (covered wagon) from 1996's Western theme. The cannon can come detached from the wagon, and become ready for action very quickly. Revered among the west are the lawmen, the get-it-done type of folk, like Wyatt Earp, for example. This is the ride of not a single one of those type of men. The wagon you see here is the official Mayor's carriage of the town of Fort Legoredo. This wagon was used for the second though fifth mayors, with the first (the one who died before this wagon was delivered) being the only truly honest and good one in the bunch. He was pushed off of Boulder Cliff Canyon in 1872 by cattle ranchers for giving the Native Americans a fair share of the land they were owed in a treaty that was signed by all involved.... unfortunately, this mattered not to the ranchers. The next eight years and four mayors were full of lust, greed, bullets, and backstabbing. It wasn't until 1880 that a real era of economic boom and social change began in the Fort Legoredo area. (The snake oil delivery wagon, mayor's wagon and the two town wagons were designed by Baskerville bricks (seen at this Bricklink store here.) with some added flourishes by me.) WILD WESTERN STERN-WHEEL STEAMBOAT The captain of the Proud Mary is Thaddeus Sweeney, better known as "Old Man Sweet-tooth", for his habit of chewing saltwater taffy when the going gets tough and and giving candy out to the little children whenever he lands at small towns and native american villages such as Lone Tree, Nebraska, or Fort Legoredo, Colorado. He usually plies his brand-new-for-1872 stern-wheel steamboat up and down the Rapid River, with the Missouri River in Iowa at one end, and the the mighty cliff face of Showdown Canyon Springs at the other end in the middle of Colorado. Thaddeus is the only one he trusts to handle his ship, as he says the Rapid River is too treacherous for many newer pilots, as the wrecks that litter the shoreline prove. However, even Captain Sweeney admits from time to time that age is catching up to him, and he has been looking for a suitable first mate for the Proud Mary for some time. The name of the ship is the Proud Mary, after the Creedence Clearwater Revival song of the same name, as I figured it would be appropriate. The rear paddle moves around 360 degrees and simultaneously slides the gray piston parts in and out on both sides. WILD WESTERN RAILROAD TRUSS BRIDGE This through-truss bridge design was originally downloaded by me (I don't remember the name of the original designer who created the bridge) from the LEGO Factory / Design By ME page in 2010-ish and was never built in real life due to questions about it's strength. I came across it again while looking at my MOCpage account's older files and made it into the version seen above using newer parts and a longer frame quite a while ago. (and as to those original questions about it's strength: It's built like a safe, as I can pick it up with a single finger by the top..... just don't drop it, because the reddish brown parts won't survive the landing!) More recently, I revised the deck where the track goes to be able to take the RC track up and be able to put down 9V down more easily. (We run 9V trains at shows in Gateway LUG.) In short, the track is now more easily removable to become 9V, 12V, or even a road bridge. The bridge fits any of my trains, and should fit all official LEGO trains except for double stack containers such as sets 10219 (Maersk Train) and 10170 (TTX Intermodal Double-Stack Car). WILD WEST RAILROAD WATER TOWER This model was inspired by fellow builder @Pdaitabird and his water tower, as seen here on his Flickr page. I have re-purposed the model for my Wild Western town / railroad. The tower top rotates a full 360 degrees with the water pipe, allowing the engineer to pull up, get his loco full of (imaginary) water, shove the pipe away, and move on. US 1860's WESTERN SILVER MINE AT SKULL ROCK This Wild West model was originally LEGO set 79110 (Silver Mine Shootout) from the 2013 Lone Ranger theme. I added a more reinforced right wall and a real base-plate to support the model, as I know from experience it can be pretty flimsy if handed wrong. I also added the collapsing water tower from set 79111 (Constitution Train Chase) to the front corner as another action play feature. The model has also been heightened by five bricks to allow for regular train cars to pass through, but unfortunately it still isn't wide enough for custom locomotives with side-rods to fit through. (yet!) The natural rock formation (the skull) on top of the mine gives it it's name, and features a carved out section for two cannons to protect the mine, either from Native Americans wanting their sacred mountain back, or desperadoes looking to cash in on the (supposedly cursed) silver. You can see many more details on the mine can be seen in this topic. NOTES ON THE POST EDIT 1/16/21 Added new 8-wide trains and new overall pictures of the Western town / Army fort. As usual, comments, Questions, and complaints are always welcome! -
So I'm looking for help with a build I made, I designed a gatling gun but have no where to put it. I need ideas and/or help building a new build around or for this gun. I could not upload a picture of the gun so I'll give a description: power functions motor with a 6 shot revolving automatic stud shooter attached to the front with a three srud long axle and a triple A power functions battery box with a power functions two way switch connecting the motor to the box. I'm new to Euro bricks so please go easy on me
-
[MOC] Lego Technic RC A11 Matilda I Light Infantry Tank
Tarix819 posted a topic in LEGO Technic, Mindstorms, Model Team and Scale Modeling
Hi, I wanted to show my latest model, which is of the A11 Matilda I, a British Infantry Tank that was in production from 1937 until 1939. It saw brief service at the beginning of the Second World War with the British Expeditionary Force during the Battle for France in 1940, probably the most famous battle it participated in was the Battle of Arras, where it was found the Matilda I was almost inpenetrable to most German anti-tank guns, having 60mm of frontal armour protection. After the withdrawal of the British Army from Dunkirk, the Matilda I was seen as obsolete and withdrawn from service. Features: -1:8 Scale. -6.4kg Weight. -Powered by four PF-XL Motors for the tracks. -The Hull is powered by two SBricks and two battery boxes fitted with 14500 Li-Ion batteries, providing 22.2v of power for the hull. -There is an SBrick and 7.4v Li-Po battery box in the turret which powers only the Commander's Periscope. -Nine motors in total, 4x PF-XL, 5x PF-M. -The Engine is a Ford V8 Model 79, accurately represented in the hull. -Functioning headlights. -The turret can be traversed 360 degrees, and the main .303 Vickers Gun can be elevated and depressed. -The Commander's Periscope can be traversed 360 degrees, the Driver's Persicope can be rotated with limited traverse. -Functional track tensioners. -Functional and accurate leaf spring bogie (Horstmann) suspension. More images: -
Pictures are at the bottom of the post. The Osprey is the world's first production tiltrotor aircraft, with one three-bladed proprotor, turboprop engine, and transmission nacelle mounted on each wingtip. It is classified as a powered lift aircraft by the Federal Aviation Administration. For takeoff and landing, it typically operates as a helicopter with the nacelles vertical and rotors horizontal. Once airborne, the nacelles rotate forward 90° in as little as 12 seconds for horizontal flight, converting the V-22 to a more fuel-efficient, higher speed turboprop aircraft. STOL rolling-takeoff and landing capability is achieved by having the nacelles tilted forward up to 45°. Other orientations are possible. It has a ferry range of over 2,100 nmi. Its operational range is 1,100 nmi. Composite materials make up 43% of the airframe, and the proprotor blades also use composites. For storage, the V-22's rotors fold in 90 seconds and its wing rotates to align, front-to-back, with the fuselage. Due to the requirement for folding rotors, their 38-foot (11.6 m) diameter is 5 feet (1.5 m) less than optimal for vertical takeoff, resulting in high disk loading. Most missions use fixed wing flight 75% or more of the time, reducing wear and tear and operational costs. This fixed wing flight is higher than typical helicopter missions allowing longer range line-of-sight communications for improved command and control.[24]
-

[MOC] Small Scale RC 8x4 APC
SaperPL posted a topic in LEGO Technic, Mindstorms, Model Team and Scale Modeling
Some time ago I've build a minimal scale control+ 8-wheeler. The shape isn't perfect, but I hope it's interesting: I hope you'll find it interesting. Also check out my channel, more cool stuff out there, I promise :) -
[MOC] Lego Technic RC Vickers M1937 Light Tank
Tarix819 posted a topic in LEGO Technic, Mindstorms, Model Team and Scale Modeling
Hello, Here is my latest model, which unfortunately I didn't manage to finish filming before the New Year: The model is of the Vickers M1937 Light Tank, a vehicle designed and produced by British arms manufacturer Vickers-Armstrongs in 1937. This was to be the fourth member of Vickers' line of commercial light tanks, coming after the successes which were the M1933, M1934 and M1936 (the latter which I have already built). The turret was to be enlarged, and a Vickers 40mm Anti-Tank gun fitted, providing the anti-armour firepower that the M1936 lacked. It had a crew of two men (Commander and Driver), and 9mm of armour protection. The vehicle only entered service for a short time in Latvia, before it was quickly outclassed by more modern designs. The only surviving vehicle remains at Kubinka Tank Museum in Russia. I decided to build this Tank because it shared most of the components with the Vickers M1936, and I didn't have much time over Christmas to build, so I thought this would be perfect. I intend to also make building instructions for it, although this takes time, I decided to get the video out and then finish the building instructions afterwards. Features: -1:8 Scale, the vehicle weighs 5.6kg. -High mobility - the vehicle is powered by four PF-XL motors for the tracks. -The hull is powered by two SBricks and two battery boxes fitted with 14500 Li-Ion Batteries - this is unchanged from my previous two models (Vickers M1936 and Vickers Mk. E (B)) and provides a total of 22.2v for the hull. -The turret is powered by one SBrick and one 7.4v Li-Po battery box. -There are nine motors in total; three for the turret and six for the hull. -The firing mechanism is powerful and features a recoil effect that functions even more smoothly than on my Vickers Mk. E (B) and A34 Comet. The spent shell casings are ejected into a collection tray inside the turret, and the magazine can hold up to four shots. This firing mechanism is a smaller, more reliable version of the one I fitted in the Vickers Mk. E (B). -The engine is a Meadows ESTE Six-Cylinder, which I have accurately represented in the hull from the few pictures of this particular engine online. -The headlights and rearlights are functional. -The turret can be traversed 360 degrees and the main gun elevated and depressed a few degrees each way. The turret bustle at the rear is slightly raised as it was in real life, so that it does not hit the driver's compartment at the front of the Tank. -Track tension can be adjusted using the track tensioners, which there is one for each track. This makes it easier to remove the tracks if need be. -The suspension is a type of Horstmann suspension, with there being four bogies each with two roadwheels, fitted with coil-spring shock absorbers. The shocks are the extra-hard type, to support the heavy weight of the vehicle, though I have replaced the yellow part with the equivalent black part of each shock absober for aesthetic purposes. -The two battery boxes can be removed through a hatch in the rear of the vehicle, and can be switched on/off through two hatches to the right of the turret. I didn't demonstrate this in the video, however I did demonstrate largely the same process in my Vickers M1936 video. -The vehicle also has other details, such as a fire extinguisher, exhaust, vision slits, vents and hatches. Pictures: -
[MOC] Lego Technic RC Vickers M1936 Light Tank
Tarix819 posted a topic in LEGO Technic, Mindstorms, Model Team and Scale Modeling
For photos, see the Imgur gallery: https://imgur.com/gallery/rBwm0Pi Hello, My newest Tank is a model of the British Vickers M1936, a member of a line commercial light Tanks developed by British arms manufacturer Vickers-Armstrongs from 1933-1938, designed for the export market. The Vickers M1936 was sold to the Netherlands, and as such earned its nickname 'Dutchman'. The vehicle also saw service as a training platform for the British Army during the Second World War. Building Instructions can be found on Rebrickable: https://rebrickable.com/mocs/MOC-51517/Tarix819/vickers-m1936-light-tank/#admin Now, usually, I include a firing mechanism in my Tanks, as I had done with my A34 Comet back in April and my Vickers Mk. E (B) in August, however this was the first vehicle I intended on designing building instructions for, so I wanted to keep it simple. Whilst the Tank was far easier to build than the Vickers Mk. E (B), the instructions were somewhat challenging to make on Studio 2.0. This one took less than a month to build, compared to the almost four months it took me to complete the Vickers Mk. E (B). This is probably due to the greater simplicity. Features: -Weight: 4.9kg -Scale: 1:8 -Pieces: 4855 -Suspension: Coil-spring bogies, or, the less specific name, Horstmann. The 9.5L soft shock-absorbers give the vehicle a sort of 'hop-along' impression when travelling at full speed, however they are almost at the limit of their strength. -Two AA battery boxes each with three 3.7v Li-Ions and three dummy batteries, giving an output of 11.1v per track, and ultimately making the vehicle incredibly fast. This is also because the drive wheels have 10-stud diameters. -Seven motors in total: Two PF XL for each track, and three PF M for turret traverse, gun elevation and the engine. -The engine is a realistic model of the Meadows ESTE 6-Cylinder engine used on the real Vickers M1936 and many of the interwar British Light Tanks. -The vehicle has functional Headlights and Rearlights. -The turret can traverse 360 degrees, although rather slowly, as it is a one-man crank-operated turret. -The main .303 Vickers Machine Gun can be elevated and depressed. -On each side of the Tank there are track tensioners for tensing each track. -Detailing; exhaust, fire extinguisher, periscopes, vision slits and covers, handles, doors, vents, etc. -
I needed a cozy little riot van for my custom Lego city (that is a feminist police state). And I wanted it to be cute, but still a bit menacing. As inspiration I looked at Turtles Party Wagon. Here's some pictures, and at the bottom there's a Let's build video.


.thumb.jpeg.3c7eee727c70cd91bd59be0787f124db.jpeg)