Search the Community
Showing results for tags 'jeep'.
Found 63 results
-
[MOC] RC Jeep Wrangler - 42129 alternate
gyenesvi posted a topic in LEGO Technic, Mindstorms, Model Team and Scale Modeling
Hey Guys, I'm back with my second alternate model of the Zetros set (42129). As you might remember from the presentation of my Unimog alternate, I was originally entertaining the thought of rebuilding the Zetros into a Jeep, but I passed since Tim has already built one. However, as I kept thinking of how I would do it, it became clear that I had quite different ideas in mind, and it was just too tempting to do it, so I gave it a go. Here I will write down the design process as that seemed to be something interesting for you guys in case of the Unimog as well, and I also prefer such presentations. Features - 3-link floating axle suspension with Panhard rod at the front - simplified rear floating axle suspension with 2 links of limited degrees of freedom and a Panhard rod - 2-speed gearbox with coupled RWD/AWD selector (hi gear is RWD, lo gear is AWD) - smooth and highly colour consistent bodywork - openable doors, bonnet and trunk - detachable hardtop - detailed interior with green accents, built seats - detailed engine, snorkel, minor extras (roof rack, jerry can, fire extinguishers) Here's a real 2-door model in dark grey color which I used as a visual reference: I also used a blue print to roughly set the proportions in a 1:10 scale. Bodywork Interestingly, this model started out from the bodywork, which I don't do often. As a fan of Jeeps, I have long been wondering what the best ways are for replicating its characteristic details, such as the hood and the grill with Lego parts. My Willys Jeep (alternate of the Defender) uses system parts for the (flat) hood and a simple vertical grill, but I wanted to build one with technic panels as well, replicating the slanted surfaces. I have seen two major techniques, one with the long wing-shaped panels (such as the models of @Madoca 1977 and @rm8), and the other with the long curved panel, mainly the classic model of @Sheepo. Since this set has those curved panels in DBG, and the wheels are about the same size as on Sheepo's model, I was wondering if a similar front could be built from the set, especially the angled placement of the curved part, along with the downward slanting of the whole hood, which also needed to be openable. It turned out that with quite a few alterations here and there, the hood could be built, and even better, they could be built using a few large panels only, which makes it look more clean and uniform.. Some arches needed to be redesigned, and the whole became 2 studs narrower, but the proportions worked fine. Then I moved on to the front and the grill, where much more redesign was needed due to different parts available, but after a few iterations with increasing the width and height of the vertical 'bars', I found the one that fit nicely with the smaller lights in the set and the newer curved small panel extenders (and as far as I can tell, newer Jeeps has such bigger grill, so it seemed fine). From there, I moved on to the sides. I knew it was critical to use the BDG panels carefully, because otherwise there would not be enough DBG beams to build the whole body, and I wanted a clean and colour consistent body. I quickly concluded that the doors can easily be built with the large panels, and the windows can also be built with the DBG connectors. The next critical point was to use the thinner long DBG panels in the rear part above the fenders. The difficulty was that they only left one possibility to mount the pieces of the fenders, so I had to use all those black angled beams there, and I had to build the fenders a bit wider so that I can actually connect the two ends to make it a stable piece. Fortunately, the wider fenders also made it possible to build the front ones from black beams at the same angle, even without more available angled beams using triangulation. The last critical piece was to use the small BDG panels in front of the doors, which just fit there tight. If I had to build that section from beams (as I started out), it would have cost too many beams and connecting them to the chassis would have been difficult as well, but the panel solved both problems (unfortunately, it has a drawback as well, which I will cover later). The remaining DBG panels were used in the back, also allowing for an opening trunk. The last tricky part was the rear corners with the lights. I wanted to make them more rounded with the curved panel extenders, but they would have screwed up the proportions, so I just used a slightly curved system brick to give it some curvature. Also I managed to use the black arched beams to replicate the characteristic rear roll bars, and the black tubular parts to build the roll cage, along with the 15L flip-flop beams, which proved to be critical for mounting the roof. The many flat black panels of the set were enough to build the whole roof, along with the side windows in a way that the whole hardtop is detachable from the roll cage as a single piece. Later, when it was more clear what parts remain, I also added the two bumpers, and even a nice snorkel and minimalistic roof racks were doable to give it more interesting details. Gearbox After being satisfied with the rough bodywork, I started designing the functional parts, which I also wanted to put emphasis on, since that's what technic is all about. However, since my Unimog alternate was about the suspension, this time I wanted to focus more on the RC gearbox and build a less articulated suspension which takes less space. I have been tinkering with the idea of a coupled 2-speed gearbox and a central diff-lock for a while (and @Pattspatt also teased me about it), but I never managed to design a compact one, where the drive motors are also placed conveniently. When I looked up a Jeep Wrangler drivetrain, I found this image, which was particularly interesting for me because of the front wheel drive that can be decoupled. Being offset to the side, I thought this could actually be nicely reproduced with lego clutch gears (something similar I already did with my Willys Jeep alternate, not knowing that it's done similarly in real life). After a lot of juggling with the placement of the motors and the gearbox components, I came up with this quite compact drivetrain setup with the gearbox inside the 11x7 frames, which not only includes the drive motors, but the steering motor too (later on that as well). The key ideas regarding the overall chassis structure are the following. First, I use a simplified (limited degrees of freedom) rear suspension, which requires only one CV joint, which makes the rear part of the drivetrain shorter, making more space for the gearbox, which is placed a bit to the back. Second, I placed the motors to the front of the middle section, and use the back of the motors as the mounting point for the front lower suspension links. Thus, the motors play a major structural role in the chassis. Here is the central part: And here is the whole drivetrain without the motors and the frames: As you can see, the rear part is short, and the front is offset to the side, and can just be routed between the drive motors, under the steering motor. Another interesting thing about it, is that it actually has two shafts (yellow axles at the front) coming from the two drive motors (but they are coupled by the red gear in the middle), and one of the shafts powers the 2-speed gearbox, that then goes to the rear axle, and the other shaft powers the the front axle, so the front axle drive does not pass through the gearbox, as it's only active in low gear. The orange selector switches both the gearbox and the RWD/AWD switch at the same time, activating the front of the drive train when low gear is selected. As with my Unimog, the placement of the gearbox motor was again difficult, as a lot of additional elements (end stoppers, clutch gear protection, down-gearing) need to be placed, so the gearbox motor had to be routed out to the trunk. Suspension As I outlined above, the rear suspension is a somewhat simplified live axle. I saw this trick first in @nico71's Ford F150 alternate, but builds of @rm8 use it as well. It is like a ball-joint based suspension, but without the ball-joint as support that prevents the axle from rotating forward/backward. In case of non-motorized models or smaller RC ones with less powerful motors, the joint itself is enough to keep the axle from rotating, but it was not enough in this case (the coupled motors could just rip apart the driveshaft), so I had to fix it explicitly. I opted for a suspension link that does not let the axle rotate forward on the far end, only tilt sideways (not using towball pins, just regular axles). This setup provides strong enough support to prevent the torque from ripping the driveshaft apart. A Panhard rod further stabilizes the axle to prevent sideways movement. Unfortunately, it's still not as solid as a ball-joint would be, and does not relieve all friction from the driveshaft. On the front, I used a similar 3-link suspension as the Unimog, but I had to move the Panhard rod behind the axle as the space was even less in the front, and managed to move the springs further in, giving it a softer and longer travel. It actually came out too articulated and had to be limited, as the wheels hit the fenders. Also, I used a better steering geometry than the Unimog (no anti-Ackermann geometry), and the max steering angle became very good, too good actually, as the wheels hit the bodywork at max angle, and can get stuck in it, so I limited the angle a bit, but is still better than the Zetros (the limiters are just half pins, which can be taken out to get a lot of steering angle, at the cost of risking the front wheel getting stuck in the body at max angle and max articulation, but work pretty good on flat surface). So the suspension is not bad actually, limited a bit by the bodywork, but the model still drives around quite okay on real terrain. Also, I wanted to experiment with a different steering setup, not placing the steering motor onto the axle. As said above, I found it a nice place between the drive motors, and using the CV joints there was just enough space to route it to the axle. It works okay, however, the two joints already introduce some lag in the steering, which is most noticeable when trying to automatically return to center, it does not center totally. But it's still okay and can be controlled with fine adjustments. Interior As the seats in the Zetros set were too small for this scale I needed to build bigger ones. Since I did not want to use the green beams on the outside, I used them as accents on the inside, they were enough to build seats and to be used in the middle console. I entertained the idea of making the steering wheel functional, since the steering motor is not on the axle, but there was not enough space to route it to the steering wheel, and furthermore, the curved panels used as a dashboard just block the way, and otherwise they are important structural elements that hold the front and the sides, so I did not want to alter them. The battery is placed between the B columns, as there was no other convenient place, and there it's easily accessible. The seats can be folded forward, to give room for replacing the batteries. The engine details are just some imaginary ones built from the remaining parts (nothing working). But the snorkel tubing continues on the inside :) Here is the whole chassis with the interior: And here are a few more renders and photos of the complete model, but much more is available on Bricksafe. Building instructions are available on Rebrickable. Let me know how you like it! Cheers, Viktor -
[MOC] [WIP] 42122 Technic Jeep Rubicon Remake/Upgrade
Fluwoeb posted a topic in LEGO Technic, Mindstorms, Model Team and Scale Modeling
Hello everyone, This is Evan here with my first Eurobricks topic! I decided as soon as I obtained the 42122 Technic Jeep Rubicon set to massively upgrade it (similar to what y'all did here, here, and here). The only difference is that I am starting from scratch and rebuilding the whole vehicle based on the original set to not only be more functionally proficient (which is the focus of this venture), but also to look a little bit more aesthetically appealing;) As per my preference, I will start with the functionality. Since everyone else put the differentials in the axles, I decided at first to take a different route and take them out of the axles and instead put them in the cabin. See the following pictures of the front axle: Maybe this idea will work for you in a different project, but I quickly found out that it would not work for my MOC after making a few test chassis assemblies. By displacing the differentials from the axles to the center of the vehicle greatly increases the area that the drivetrain takes up in the cabin of the Jeep, so I decided to go with the differentials in the axles. As you can already see, I went with the CV joints for the steering drive connections just like Zerobricks did. However, I decided to go with the mustang wheels to center the steering pivot more. Also, I added Ackerman geometry to the steering system out of necessity. See the following pictures: I used this piece to connect the steering gear to the axle frame with the gear that drives the differential. It works quite well. Also, the steering rack is held in place by the actual "U" technic frame. Please let me know what you think of it so far, I will continue to update it until I finish it! -

Lego Mini Jeep Wrangler 1:15 MOC
dpi2000 posted a topic in LEGO Technic, Mindstorms, Model Team and Scale Modeling
Mini Truck Model 8, Jeep Wrangler 1:15.No play Lego in over half a year, now 'Jeep' coming...At the same time,I would pay respects to Madoca.L motor +new wheel hubs, BuWizz normal.Infomations:L28xW14.5xH15cm, Weight: 970G,Still, simple and good playability, like RC, like real Jeep. instructions for free: https://rebrickable.com/mocs/MOC-79593/dpi2000/lego-mini-truck-wrangler-115-moc/#detailsThanks, again! Trial video This chassis part was built last year. -
Hi all, I'm happy to present you my Airwolf 1:25 scale model ! I started this project in 2013, inspired by Lego's 9396 Technic Rescue Helicopter. Seeing its front end, I thought "at last ! It must now be possible to make a convincing Airwolf model out of Lego !". I used Technic panels to get the aerodynamic shape properly, and have had good fun since then improving the model with new parts (the curved slopes for the exhaust for example). The model is based on the Universal Studios blueprints. It accepts 3 minifigs inside - Stringfellow Hawke, Dominic Santini and Caitlin O'Shanessy. Weapons can be displayed in or out, like the landing gear - I considered making those articulated, but at this scale I just could not figure out how to do this so these are add-ons parts. At the time I wished Lego would accept it in their Ideas project, but I got a reply that "being a military vehicle, Airwolf would not be allowed Lego support". I was quite gutted and just kept it for myself. Anyway, I'm happy to share it now ! After completing my Airwolf model, I felt I needed to make a full set of toys to make it more playable. The Bell 206s are based on the factory blueprints - also at 1:25 scale - and my first version of the Jeep was loosely based on Zed's MOC Jeep Wrangler Rubicon. Since 2013 it has evolved quite a bit, though ! Also, it was good fun reproducing Archangel's limousine FIRM 1 ! As a Cadillac Seville owner in the eighties, it was nice trying to get the lines of this Fleetwood Brougham limo properly. I wish Lego would make studless wings for the front end, though !!! You will note that I could not resist creating minifigures for Archangel and his lovely bodyguards ! You might even recognise Marella and Gabrielle ;) I still feel compelled to show my models with Ukraine colours as the war is raging on. It must stop ! I remember watching Airwolf episodes where the Russians (the usual villains, the Cold War was still on) were pictured as normal people just wanting freedom and democracy. I hope this is still true ! You can see more pics Flickr album of course : I wish I could make nicer renderings, as the photos are far from perfect. But I still can't manage chrome and transparency properly with Blender. Talk about a learning curve... Anyway, I hope you will enjoy the pics !
-

[MOC] Lego Jeep Cherokee
filsawgood posted a topic in LEGO Technic, Mindstorms, Model Team and Scale Modeling
Hi all! My new model - is realisation in Lego - off-road custom based on the legendary american SUV - Jeep Cherokee (XJ). Everything according to the canons - axles, a rear differential lock, winch, snorkel, fenders, footrests, thick-walled pipe bumpers, an expeditionary trunk, chandelier and big wheels. -

Lego Biosyn Jeep Gladiator [Jurassic World Dominion]
legOtaku_official posted a topic in LEGO Licensed
So what happened was... This whole venture started approximately two years ago. I was looking at leaked behind the scenes images of Jurassic World Dominion and I saw these tricked out Jeep Gladiators loitering around in the background. I immediately guessed that Lego was going to make their own toyified version (which became 76951-1 Pyroraptor and Dilophosaurus transport). But I wanted something that did the onscreen vehicle justice. After several incredibly unsuccessful attempts, I produced this. The parts finally arrived a few days ago and it feels incredible to have this absolute unit in the palm of my hand. The vehicle features 4 opening doors and seating for two minifigures. The roof rack also comes with two crates. If you would like instructions, they are available here. Please feel free to leave feedback! Onscreen film references: -
Hello Eurobrickers, Finally I am ready to present my latest MOC, the so called Bruiser Conversion of the 4-door Jeep Wrangler. The real thing is done by JK Crew, it looks like this (more awesome pictures here): The conversion includes pimped up suspension, a longer body on the rear part, turned into a pickup, and larger wheels. As for the scale, the real Jeep Wrangler has around 80 cm wheels, and the conversion has around 110 cm wheels. I thought this would be an excellent material for an alternate build from the 42110 Land Rover set because of the color match and the available parts (like those rear mudguards), and the 80 mm wheels of the Defender, and the 107 mm Lego tractor tires result in a good 1:10 scale match. I thought it would deserve the large tires and a motorization, all available in the set 42099. So I ended up with two versions: - Manual version, pure alternate build from 42110, with an optional raised geometry and large tires - RC version that is a dual alternate with 42099 I will present both versions below. They are identical on the outside, they differ in the chassis build and the gearbox / drivetrain. Manual version (42110 alternate) I wanted to build something from the Land Rover that has a more aggressive suspension with large articulation. I have been playing with the idea of 4-link suspensions on both axles, and the 8 A-arms in the set are just enough for that. However, I had to do it with short springs only, so I used similar geometry as the rear axle of Grohl's stadium truck, but with longer lower links on both axles. Furthermore, I wanted to build it in a way that works both with the stock Defender wheels, and with larger ones. So I built a chassis in a way that the springs can be positioned in two places, and the suspension geometry becomes lower or higher. Along with this, the front axle is also moved one stud to the front, to make space for the steering of the front wheel (just like in the real version). As such a suspension requires a lot of space (if you want large articulation), the actual useful space in the middle of the model becomes relatively short. I wanted to preserve the same functions of the gearbox as in the Defender, so I had to compact it. Taking ideas from the Pimp my Land Rover project I managed to create a version of it that fits into the available space, keeping the same layout of the controls. Furthermore, I have included a functional V8 engine (the real one has a V8 Corvette engine). One part that I struggled with a lot was the HoG steering, as it was quite hard to bypass the gearbox and the front seats as well. Finally I managed to do it under the seats, but I could not fit a functional steering wheel as the chassis structure that holds the front suspension was just in the middle of its way. The interior came out quite clean and also replicates the real one quite well I think. The seats are similar to those of the Defender, but I had to make them shorter, as the roof is also shorter: On the outside one key point is that the real thing (at least this version) has its doors made of steel bars (which gives it a great look I think). This is good as the Defender would not have enough green panels to build 4 doors, but the bar doors could be built (at first I did not think I could get such a clean look, but I am quite happy with the result). On the front, I reused some ideas from my Willys Jeep, but changed it to a bit more modern look. On the rear part, the fender piece was an obvious fit, and I wanted to emphasize the bed with system parts, which also came out nicely I think. At first the A and B pillars and the roof was tricky to make solid, as it is only built from a few liftarms. But the final assembly is super strong, thanks to the column in the middle that goes through the gearbox (that was a key structural element to make). The model can be lifted safely with the roof. Some side panelling was also tricky to get into place, but I am satisfied with the overall looks. The doors, the hood and the tailgate are openable. The spare wheel fits nicely in the bed. One last feature I could add thanks to the Defender parts is the front bullbar with a compact functional winch (with rachet mechanism). Here are some side-by-side images for a comparison. I think it works well with both wheel options. More info, pictures and building instructions are available on Rebrickable. RC version (42110 + 42099 alternate) For the RC version I decided to use components from set 42099 as it has everything required: XL motors for torque, heavy-duty CV joints, planetary hubs, more A-arms and hard springs for suspension and the few extra parts in black color. First of all, I wanted to motorize it in a way that I keep the interior and the functional fake engine as well. Second, I wanted to add a simplified gearbox. The placement of the battery was obvious in the bed, the steering motor would go onto the front axle, but the space required for the two (coupled) XL motors was less obvious. Finally, I could squeeze them under the rear seats, and place the gearbox in front of them into the drivetrain. As for the gearbox, incorporating a 2-speed one (hi/lo gear) was simple, but I wanted to do something more with the available parts. Finally, I managed to add an RWD/AWD switch. For this, gearbox routing is a bit tricky, going through itself through idler clutch gears, and returning later. Furthermore, the front and rear parts of the driveshaft rotate in opposing directions, which is resolved later by the proper placement of the differentials on the axles. It was really challenging to brace the whole gearbox properly so that the gears cannot skip anywhere, I had to rebuild and test it several times (those two coupled XLs have a lot of power). On the downside, I suspect the relative complexity of the gearbox add some friction to the system. As I wanted to maximize ground clearance, the front axle was tricky to build, since the planetary hubs can only be connected with ball joints when steered. For this, I applied the trick used by other as well, that slants the lower A-arms a bit, resulting in very slightly non-vertical front wheels, but it is so negligible I bet you'd never notice. The resulting axle is fairly slick, I am happy with the result. As the steering motor made the front axle higher, the functional piston engine had to be minimized as well, and I could only do a mini V6 with the available parts. Unfortunately, this small construction does not run super smooth in a V configuration (sometimes the 2L liftarms in the main shaft kind of collide into the half pins that make up the pistons for a moment, instead of smoothly pushing them up; the inline configuration with the same technique works smoother). For this reason, there is some friction resulting from driving the fake engine as well. Here is the final chassis, and one more image about the ground clearance at the rear: Although the final gearbox construction is strong enough not to let the gears skip, there is one weak link: the driving ring can move out of the clutch gear under very high torque (although in my tests the model sooner went up the wall if not blocked). This is because the gear stick does not firmly hold it in place. However, it can be solved by fixing it into one position with a linkage coming out of the center column. This issue made me think how much more powerful it could be if the gearbox and the fake piston engine was bypassed, and eventually led to the construction of a heavy-duty variant (in which the gearbox is still kept, but instead controls the speed of the fake engine, when not in neutral). The heavy-duty variant is further geared down a bit to have even more torque. It can climb almost everything if the ground clearance permits, as you can see quite a few cases in the video. A few more images about the whole model: More info, images and building instructions are available on Rebrickable. Let me know how you like it! Cheers, Viktor
-

42126 | Jeep Gladiator Gravity
CrazyKreations posted a topic in LEGO Technic, Mindstorms, Model Team and Scale Modeling
Hi everyone,I present to you a Jeep Gladiator Gravity-inspired vehicle made out of only the parts from the Ford F150 Raptor! Now it was a real challenge to design some parts of this model only using the parts available in the Raptor however, I really believe that this model looks good and that its suspension (highlight of this model) surpasses the Raptor.This model is based on a variety of different custom jeep designs but its main inspiration is the Jeep Gladiator Gravity!Features Steering via a gear at the top Simple, matching and pleasant interior NO DOORS (Preferred for a better 'offroad' look) Opening tailgate and large bed Opening hood with working engine Solid 4 link axle front and rear suspension Amazing flex Great design! Conversation Starter! Full description, more photos and a video here Instructions: https://reb.li/m/101856 -
[MOC] Willys Jeep from Land Rover
gyenesvi posted a topic in LEGO Technic, Mindstorms, Model Team and Scale Modeling
Hi everyone, I have finished my Willys Jeep alternate of the Land Rover set, so I'd like to summarize the final model here. Features: - Live axle suspension with imitated leaf springs on both axles. It uses one shock absorber per wheel, also positioned realistically. I also tried to construct the core frame as is in the real life car. - Manual 4-speed gearbox in a classic H-shape. Additionally, there is a Hi / Lo gear switch and an RWD / 4WD switch, just like in the real car, and the positioning of those switches is as realistic as I could get with the limited space. The whole gearbox is in the middle of the chassis. - Working inline 4-piston engine as in reality, I tried to add engine details modelled after the real engine. - Functional steering wheel and also HOG steering in the back (which had to pass through the gearbox). - Foldable windshield and opening hood with stander included. I managed to get the windshield folding joint similar to reality. - The interior is clean and I tried to get the shape of the seats as close to reality as I could, although the square and flat front seats were hard to reproduce with the available parts in that color. - Detachable roof, again, I tried to reproduce the shape of the tubing. - Extras: Jerry-can on the back, and of course the spare wheel. More details about the design process are given on Rebrickable. Here's a video showcasing the functions: And some renders and photos: Building instructions are available on Rebrickable. Feedback is welcome! Cheers! -

4 Door Jeep Wrangler with Big Wheels
zumaidi posted a topic in LEGO Technic, Mindstorms, Model Team and Scale Modeling
What do you think about this ? - all existing features of 42122 are still there - big wheels from 42124 Off Road Buggy Thanks for your feedback. -
[MOC] Epic Alternate Pack for 42099
gyenesvi posted a topic in LEGO Technic, Mindstorms, Model Team and Scale Modeling
Hi, I think 42099 is a nice starter RC set of the PU line, so I set out to test what else can be brought out of all its parts. I'd like to share with you my set of 5 alternate builds from it. It has been a great exercise for experimenting with different options for suspensions, drivetrains and bodyworks, testing the versatility of this medium-sized set. In the end, all of the alternate models came out with quite different shapes, suspension techniques and motor/gearing setups, and I think I even managed to use those large turntables in some interesting ways. During my builds, I found that the set has a good array of structural elements, of course good drivetrain components, but is a bit limited on gears, axles and body panels. Nevertheless, once you get used to it, more configurations are possible than you would think :) Here are my builds in chronological order. Much more design details and images of each are accessible on the link behind each name. Here I shortly summarize the features and the differentiating factors of them.1) JeepyThis model was inspired by the release of the Jeep Wrangler set and its pendular suspension using the small turntables. - Pendular suspension using large turntables, both front and rear- 4WD slow drivetrain for good climbing, separate front and rear drive- Jeep-like exterior, focusing on the shape of the hood and the grill, plus the roll-cage 2) BuggyInspired by the release of the RC Buggy set, with this model the goal was to test how fast the the two XL motors can be geared up, along with creating a slick bodywork. - Independent long travel suspension with longer swing-arms both front and rear, high ground clearance- Fast up-geared rear wheel drive, independent for left and right wheel without differential- Positive caster angle at the front axle- Light-weight curvy bodywork, custom built seat 3) BeastyThis model aimed to test the possibility of building a live axle rear suspension using the large turntable, along with coupled motors for a stronger drivetrain. - Live axle rear suspension with push-rods for extreme articulation, independent front suspension- 4WD drivetrain with coupled motors driving both front and rear axles, adjustable gearing- Rough exterior, minimalistic interior 4) QuadroThe goal of this model was to build something other than a car, and to experiment with an unconventional motor setup. - Independent front suspension with positive caster angle, trailing arm rear suspension- V-engine built out of the joined drive motors, rear wheel drive- Functional steering rod- Chubby bulldog-like quad shape, bullbar 5) TrophyWith this model, I wanted to push the live axle possibilities further, creating long soft travel using only the short springs, and to find a sweet-spot in the up-gearing of the motors. At the same time aiming to create a larger-looking bodywork with the limited array of panels. - Long soft travel live axle rear suspension, independent front suspension- Rear wheel drive with motors built into the rear axle, independent left and right drivetrain without differential, faster gearing- Trophy-truck like exterior with curved front and long tail, imitated spare wheel All models can be controlled with the stock Control+ App, and the batteries can either be directly accessed from the bottom, or can be removed after detaching a few panels. All models are available separately or in a 5-in-1 pack on Rebrickable. I hope this makes you value your 42099 sets even more :) Let me know what you think! -
The Crumbling Bridge Last November I built a MOC in which two weird guys lived 30 feet in the air in minimal but cozy stilts. It was called Stilt Houses precisely. In the diorama there was also an off-road vehicle for which I wanted to build a small dedicated setting. Recently I came up with the idea of creating an ironic scene with some building techniques that I had never used, such as the rocks made of many dark bluish gray slopes and inverted slopes. The diorama is quite small but cute, and it manages to get a smile, in this period there is a need… It is mainly composed of three parts: two rocky blocks covered with shrubs and a crumbling bridge that joins them. In the middle the all-terrain vehicle is crossing the bridge escaping from the hungry bear to take shelter on the stilts. Hope you like it! Thanks for stopping by!
-
[MOC] 42099 alternate 'Jeepy'
gyenesvi posted a topic in LEGO Technic, Mindstorms, Model Team and Scale Modeling
Hi All, I'd like to introduce my alternate model for 42099. It was inspired by the recently released Jeep Wrangler, in that it has a small turntable based suspension on both wheels. Since 42099 has the two large turntables, I thought I'd try and build a similar suspension. Also, since it has yellow-ish parts, I thought I'd build a body with Jeep-like features. Of course, not enough yellow parts for a full body, so I focused on the front (hood and the grill to be somewhat Jeep-like) and used to rest to make a consistent body at least. Building instructions are available from Rebrickable: https://rebrickable.com/mocs/MOC-62435/gyenesvi/42099-c-model-jeepy Some details I have opted for a simple suspension design by moving the turntables as close to the two axles as possible. The drivetrain is also very simple, putting the drive immediately to the differentials, resulting in slow speed but high torque on the wheels. The left and right arms holding the wheels are fixed, the whole front and rear axles are rotating and are damped by the springs. Due to the large turntables, a single pivot point is enough to hold the axles at both ends. Naturally, the size of the turntables is a bit of a problem for ground clearance (about 3.5 studs in the front and 4 studs in the back), but not as much as I expected (see below).A major challenge was to mount the steering motor on the front axle in a small space under the hood and to create a strong enough steering rig using only one side on the front of the axle (as opposed to the two-sided rig in the original model). The next challenge was to create a chassis rigid enough to hold the end points of the springs in a small pivoting mount to enable the lengthening of one side when the other one shrinks. Naturally, the arched pieces available in the model are useful for this purpose, with further reinforcements later on. The battery is placed in the middle of the chassis, providing a low center of gravity with easy access to turn it on. It is not a structural part of the model, so it can be taken out easily after removing a few body panels. Also, there's plenty of empty space inside the chassis to hide the cables.On the outside, I wanted to replicate some Jeep-like features with the few available yellow-ish panels. I decided to focus on the front, creating an arched hood with a massive front grill and lights. I wanted a consistent yellow body, so I used all yellow pieces for doors and hoods, and none were left for a roof, so I decided to build just a frame. Luckily, the curved corner pieces and the long black axles available could be pieced together for a consistent frame, that matches the style of the front grill. I think the overall proportions of the model came out quite well. I was also able to include a quite clean interior. As for actual performance on real terrain, see the video for my own off-road tests. Surprisingly, the large turntables are less often a problem in terms of ground clearance as I expected. I suspect it might be because with the fixed-arm pendular suspension, as one wheel is lifted, it also lifts the turntable half-way, so it is less likely to hit something on the ground. Also, with locked differentials it can climb quite well. Be careful however, on real rocks, it is possible to scratch the bottom of it, including the motors.The model can be controlled with the Control+ App just like to original model. More pictures Let me know what you think! Cheers -

[MOC] BUGGY - 42122 Model B
eric trax posted a topic in LEGO Technic, Mindstorms, Model Team and Scale Modeling
During a break from building agricultural machinery, I created a cute Buggy from 42122 set :D I had to buy this kit. I knew very well that the new tires were too small for a tractor, but they are perfect for my other WIP model, which has been on the shelf for almost a year. I did not follow a specific buggy model. I was inspired by various vehicles, their proportions and appearance to create my version. I associate it most with desert vechicles. The functions that have been added: HOG control and independent rear suspension, which works nice and soft. Unfortunately, the attempt to use the turntable to create the front suspension failed. This idea changed the appearance of the vehicle a lot, so I gave it up with that. I used 577 items out of 665 available in the set. My first building instruction is also available at: https://rebrickable.com/mocs/MOC-61843/M_longer/42122-buggy/ https://sellfy.com/m1longer/p/42122-buggy/ Hope you like the model :) -

[C-MODEL] 42030 Rescue Jeep
jyd80 posted a topic in LEGO Technic, Mindstorms, Model Team and Scale Modeling
Dear all, With the arrival of the new Volvo set, I felt like rebuilding my old 42030 front loader. The problem was that I still had a MOC built, standing in the cupboard since 2016 :s So I finally built some instructions for it (available at Rebrickable), and made a short video. Here is a presentation. The C-Model is a Jeep-like car (with Volvo colors ;) ) As the A model, it is fully motorized. The L and XL motors are connected to the transmission, and the servomotor ensures the steering (with Ackermann geometry, and working steering wheel): The two driving motors are connected by a differential, which allows combining their rotations. If we note x = 220 rpm the speed of the XL motor and y = 390 rpm the speed of the L motor), we can emulate 4 gears: L forward, XL backward: V = y - x = 390 - 220 = 170 rpm, XL forward, L off: V = y = 220 rpm, L forward, XL off: V = 390 rpm, XL forward, L forward: V = 390 + 220 = 610 rpm. The differential is also connected to a V6 fake engine, and the rear axle is pendular: Finally, the M motor is used to power a crane: Here is a small video to show it in action: Hope you like it! -

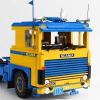
[MOC] Jeep Wrangler Pickup 1:10 motorized
Brickzone52 posted a topic in LEGO Technic, Mindstorms, Model Team and Scale Modeling
Hey Guys Jeep Wrangler custom Pickup „Bandit“ 1:10. The model is full motorized and radio controlled. More pics: instagram.com/brickzone_52 1 by Dani Brickzone, auf Flickr 2 by Dani Brickzone, auf Flickr 3x by Dani Brickzone, auf Flickr 4 by Dani Brickzone, auf Flickr 5 by Dani Brickzone, auf Flickr 6x by Dani Brickzone, auf Flickr 7 by Dani Brickzone, auf Flickr 8 by Dani Brickzone, auf Flickr 9 by Dani Brickzone, auf Flickr 10 by Dani Brickzone, auf Flickr 11 by Dani Brickzone, auf Flickr 12 by Dani Brickzone, auf Flickr 13 by Dani Brickzone, auf Flickr 14 by Dani Brickzone, auf Flickr 15x by Dani Brickzone, auf Flickr 16 by Dani Brickzone, auf Flickr 17 by Dani Brickzone, auf Flickr -

[MOC] Jeep Wrangler Expedition - Update: Instructions and manual version
HorcikDesigns posted a topic in LEGO Technic, Mindstorms, Model Team and Scale Modeling
Hi, ___ EDIT __________________________________________________________________ __________________________________________________________________________ HERE ARE INSTRUCTIONS FOR CURRENT VERSION: (description later in this topic) https://rebrickable.com/mocs/MOC-28281/Horcikdesigns/offroader-for-overland-adventure/#bi ___________________________________________________________________________ ___________________________________________________________________________ This is my latest attempt at building offroad car. JEEP Wrangler Expedition by Horcik Designs, on Flickr Introduction and Motivation I built it for the Kostky.org TROPHY, adventurous event and AFOL meeting that is inspired by Camel Trophy series, and was held by Kostky.org (CZ+SK LUG) at 5th August 2017 for the very first time. It was awesome day, and I hope that there will be more. Here is the the official video from the event. There were really great cars there. The car itself The car was built to fit the rules of the competition. That means reserve "fuel" in the car during whole race before refuelling, remote control (no wire connection between truck and controller, S-bricks allowed) and representative appearance. So I decieded to go with the force, and installed two XL motors for the drive, geared down in 3:5 ratio, and two L motors, each for the winch (1:8) and steering (mini LA). I also reduced gearing to the minimum, due to minimal energy-consumption. (I nearly did the whole race to single Li-Po BB) The car is not perfect, it is very heavy (approx. 1500g), so it does not allow to use CV joints in the front axle for smooth wheel rotation. They managed to withstand the race, but in the finish (before the big uphill from the first video) they were strongly damaged, mostly because of big steering angle. Well, I hope that the video will say enough, if you have any questions, feel free to ask me. :) Photos: JEEP Wrangler Expedition by Horcik Designs, on Flickr JEEP Wrangler Expedition by Horcik Designs, on Flickr JEEP Wrangler Expedition by Horcik Designs, on Flickr JEEP Wrangler Expedition by Horcik Designs, on Flickr JEEP Wrangler Expedition by Horcik Designs, on Flickr -
 Hello, Madoka's JEEP Wrangler for me is most beautiful JEEP build from LEGO ever. That was a love from the first sight. And it is also fit my favourite scale - 15 stud wide body, like my Toyotas. Since I saw it - I want it on my shelve. Comparing to Madoka, who's every new model is a Challenge and he never use previous model's elements (no matter body design or internal structure of chassis), I am quite conservative. My every next model is evolution of previous if talk about chassis. Madoka's JEEP Wrangler chassis is awesome, but I prefer my own with springs, links and gear rack steering. So I stretched his Jeep from 3 door version to 5 door, added rear seats with foldable backs. Put it on the Hilux chassis with minor changes and that's my "own" JEEP. specs - Driving - XL motor - Steering - Servo motor - Body removable from chassis - Openable doors - Removable 2 section hardtop roof - Suspension on both live axles - 4x4 transmission - LED lights - Smart Brick for RC with iPhone / ДУ через Sbrick - 1 stud lift possibility - Winch is fake (like all beautiful things in modern world:)) The hardest part for me was rear doors. That sounds funny, but making them tapered with the right angle was impossible using standart angle connectors. So I have to cheat and use LEGO System bricks and inverted slopes. No, I never miss this bricks while playing Jeep, but this element is still bothering me. May be someone could offer better design - I will be glad to use your idea. Front axle is little bit long, shifted forward may be half or one stud, than should be. But this was done to fit larger wheels, because stock wheeled JEEP Wrangler is the worst looking offorader in the world, especially long wheelbase version I also left possibility for body and chassis to be connected on two ways: standart and 1 stud lifted. This is lifted verison with 74 mm tires from RC4WD Jeep is modular like real model with removable doors and 2-section roof, thanks Madoka for design. Front lights are still LED ready. Expeditional stuff increases the weight of the model, but this is Jeep's calling to be like that. Roll cage, roof rack, spare wheel holder, baggage and cans, fake winch, extra lights, snorkel and extendable rain/sun tent. With minor changes in the axles, model can stand on RC 1:10 tires that have wide variety to choose from And my favourite: Buggy Mode with RC4WD Mickey Tompson Baja MTZ tires about 81 mm diameter. And this is not just shelve model, because Jeep without roof and doors is really light. If you put Buwizz in it - you will have a lot of fun with it ;) Many more photos here My advice to novice builders: don't hold your sets under the dust on shelve, and don't try to build your own model from scratch. Modifiying sets and models of other designers is the easiest way to increase your skills. Don't afraid, just try:) You can also see some other wheels variations in the next video. And of course, test drive in different conditions, including rocks, mud and water. Have a nice time;) How it performs with BUWIZZ? Check it out p.s. You can also watch review of Madoka's model. TURN ON SUBTITILES. or original video Jeep Wrangler (red) designed by Madoka
 -
2019 8865 B Model Homage
Legotyres posted a topic in LEGO Technic, Mindstorms, Model Team and Scale Modeling
Here is another variation of my long endeavour to create proper homage to the b-model of 8865 which has to be my most favourite technic model. Even this model has gone through a few changes, although I feel Its complete. This model has an identical wheelbase and track as the original, the seating area is a little larger to fit in the 5+r gearbox in plus its a proper 4x4 model unlike the original. It has a fake V8 plus a tiny fan at the front taken from Legos boat propeller. The live axle at the rear is both compact and has a larger movement than the original. I'm still using a macpherson struts at the front which seem to work very well. Enjoy the photos anyway -
 So here's the idea: seeing as all large and complex Technic submissions have failed on LEGO Ideas so far, I set out to create a very small and simple, yet fully functional 4x4 crawler. This is the result, which can be considered the 9398 set on a budget ;) as it offers pretty much the same functionality in a considerably smaller package. If you're willing to give this project a shot at becoming a set (a Technic Ideas set would be nice, at long last), please support it here: https://ideas.lego.com/projects/ba4cebf3-1f80-497d-9ecb-faee2dbc1df3 Photos and description: http://sariel.pl/2018/11/4x4-jeep-wrangler-trailcat/
 -
-
When the adventure gets tough, it's time to break out the rough-and-tumble Dark Green Jungle Machine! As soon as I started building, I knew I wanted to use dark green as the main color. I included a few details here and there to maintain a connection to the Adventurers theme. See if you can spot them; I've used older pieces as well as newer ones (including old shapes in new colors). In addition to a tail gate, the jeep features working suspension: You can view a demonstration of the suspension feature in my Flickr album!
-

[MOC] Jeep Mighty FC
Technonsense posted a topic in LEGO Technic, Mindstorms, Model Team and Scale Modeling
I wanted to build a small rc version of a Jeep Mighty FC for a long time, and finally managed to do so: My main goal was outdoor performance, so I've used a XL motor geared down 1:2.78 for propulsion. A servo motor was used for steering. With only 12 studs between the insides of the wheel hubs, I had to squeeze in portal axles for the front and rear. Of course we also have suspension: The belly-shot: And the video(sorry for bad resolution): The chassis can be separated from the bodywork and battery in about 10sec. Although it was only possible to build in yellow, I tried to include as much detail as possible and did my best to hide most of the interior. I hope you like it. Feel free to leave your comments and criticism! -
Kasjmir, 1938 My dearest Lester, The news has reached me that you are about to embark on an adventure, how wonderful! It seems you have inherited your father's wanderlust after all, which joys me greatly. He would have been so proud, and so am I. It has been a while since I last saw you, when was it again; before I left for Nepal I suppose? In any case, your uncle is looking forward to explore haunted tombs with you! Alright, enough with the chitter-chatter. You are in need of proper equipment. Travelling India is like a walk in the park, except there are no benches, no paths, more bushes, more mud pools, and all dogs are replaced by tigers and venomous snakes. In all honesty, it matters not what I write down here, I cannot prepare you for all that lies ahead of you. Yet, I do happen to have acquired a globe-worthy vehicle, a Mehadja Inspector no less, from an acquaintance in Delhi. It will get to you in little more than a month, so I advise you to start packing your luggage... See you soon! Kindest regards, your Uncle, Samuel Eon Hi everyone, here is my entry to the Lester contest! It was fun to once again step out of my genre and try something different. I interpreted the content guidelines quite freely: a vehicle that can travel the world, roughly the same theme and scale as the example vehicles. As you can see, it's sort of a jeep-truck. The 7-wide wheelbase and working suspension make this a very terrain-worthy machine, it can do slopes of 40 degrees without tipping over, by far the most fun feature here in my opinion! I hope this is a qualifying entry! More pictures can be found here on Flickr: https://flic.kr/s/aHskCwM8GW. Thanks for looking!
-
After seeing lots of different takes on the Land Rover (of various eras) I was inspired to design a minifig-scale version of the Series 2 for my nascent 1950s British village. LDD instructions are available here: https://bricksafe.com/pages/Zetroc