Search the Community
Showing results for tags 'gearbox'.
Found 167 results
-

4x4 Raid Buggy V2 with 2-speed Gearbox and BuWizz motors
Another Brick in the World posted a topic in LEGO Technic, Mindstorms, Model Team and Scale Modeling
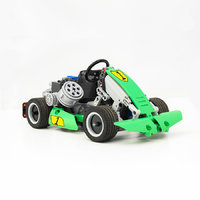
Hello again, Back in March 2023 I started my YouTube channel with my Raid Buggy. Granted, it look somewhat crude and it was quite slow, but it was my first model with BuWizz motors and bricks so it has a special place my heart. Recently it was the 1 year anniversary of it, and I decided to make a remake of it to prove some how much my LEGO building skills have changed and to honor the original model and channel. So enough with the backstory, let's get to the details: Features 4 Wheel drive with a 2-speed gearbox steering with double steering racks Soft double-wishbone suspension Working gear stick Bodywork built to resemble the original model One of the things that I wanted to show with this model was that you don't necessarily need 4+ BuWizz motors in order to make a good fast off-roader. For this, I decided to make use of a 2-speed gearbox, which has a low gear with the same gearing as the Raid Buggy V1 and the high gear which is some 67% faster (6.2 km/h). The gearbox design was heavily based off @Zerobricks's excellent Simple Off Roader but modified to fit my needs. Another benefit of this is that it has a neutral gear, which is very useful for downhills. From then, I finished it off with the axles of my Monstermog and the chassis was done! from there, I had to build the bodywork, the part that I had been dreading the most For me the body was a very important part, as I wanted to make it reminiscent of the original yet it would have a more sporty look and a stronger construction. Just like the first model, it uses many connectors in @Attika's characteristic style. In the end, the bodywork suffered many changes but I consider them for the better, as it now has a more imposing look and a much more sturdy connection so it can be rolled over without having to fear of breaking it. And now a few more images: The model ended-up being a very good off-roader, with a somewhat high speed (6.2 km/h) yet with some torque left for harder off-road. I pretty much had no issues with it, except the front open differential which sometimes got in the way when off-roading in the low gear. It's otherwise a model more focused on high-speed on uneven terrain so I'm happy with it If you would like to build this model, you can download the .io file at rebrickable here. And as always, here's a YouTube video containing some off-road footage, functions showcase, and some nice Punk Rock music Feel free to post a comment about what are your thoughts about it, and see you in the next one! -

Simple Off-Roader + Instructions
Zerobricks posted a topic in LEGO Technic, Mindstorms, Model Team and Scale Modeling
Many people have been asking me for a simple, easy-to build and most importantly cheap Off-Roader. When I started this project, I've set myself the following guidelines: Use a single BuWizz 3.0 and "only" 2 BuWIzz drive motors Implement a 2 speed gearbox Maximize the ground clearance by using a pendular axle (this way the independent suspension doesn't have to loose ground clearance when going over obstacles) The model has to be built from under 500 parts All the parts have to be standard and in current production Keep the number of different parts as low as possible Use color coding to simplify the building process Design the model so that it can easily be modified by other builders Create proper building instructions And this is what I came up with in the end: I managed to successfully realize the all the planned functionality, features and more: All wheel drive 2 speed gearbox Pendular front axle Independent suspension on all wheels Openable doors for easy acces to the charging port Interior with seats and a steering wheel The dimensions and specs are as following: Built out of ~460 parts 27 x 20 x 13 cm ~ 850 grams Top speed of 7 km/h As usual there's a video showcasing the model in more detail: But just building the model and recording the video was only half the story. I also taught myself how to create the building instructions using the Studio which can be found here: https://bricksafe.com/pages/Zblj/simple-off-roader Since these are my first such instructions, they may not be ideal... So in a case of any issues, confustion, or such I also uploaded the .IO and .LXF files which can be found in the corresponding Bricksafe folder: https://bricksafe.com/pages/Zblj/simple-off-roader All in all this was a great learning experience, I'm always happy to learn a new skill and being able to create my own instructions sure is a good skill to have as a LEGO builder. To conclude; using this as a base, I wonder what kind of tweaks, improvements and crazy mods other builders will come up with! -
Hello!! Long time no MOCs - and here it is: GAZ-21 Volga Model info: - Size: 34L x 15W x 14H, cm - Weight: 682g Features: - 2-speed gearbox with column shifter - Independent front suspension - Leaf spring rear suspension - Working 4l-engine - Working steering wheel - Opening doors, bonnet, trunk - Modular construction - Folding front seat - Moving wipers - Moving sun visors - Opening glove compartment Video: The main feature there is the gearbox shifter mounted near the steering wheel. I haven't seen it in Technic models before. So it became a challenge. Turned out simple: More pictures: Instruction: https://boosty.to/paave/posts/7339c02e-2476-4aac-9178-4c76b1fd4c45 Partlist: https://bricksafe.com/pages/paave/gaz-21-volga
-
Ultimate 6+N+R Sequential Gearbox
Anto posted a topic in LEGO Technic, Mindstorms, Model Team and Scale Modeling
INTRODUCTION This gearbox is the successor of my previous 8+N+R-gearbox. It is based on the new parts released on the Yamaya MT-10 SP #42159. Thanks to these, I could make a new and better gearbox for 1:8 manual supercars. Thanks to the 8 positions by rotation, I made a 6+N+R gearbox. The best arrangement I found was to put 2 cylinders between 2 shafts, each cylinder controlling 2 forks. Thus, I would need 2 cylinders to make the 8 positions I wanted. VIRTUAL DESIGN I started with simulations in Excel when the parts were not available yet. The purpose was to virtually recreate the functioning of the new rotary cylinders to find out a configuration that worked. So, I reproduced the sequence of the cylinders. Then, I created an offset between the 2 cylinders. To make the best gearbox possible, it was necessary to obtain: Reverse gear on an extremity of a shaft Not 2 gears engaged at the same time on the same shaft EXCEL TABLE The Excel table may seem hard to understand, but the main difficulty is because I made written in French! The first column represents the positions of the rotary cylinders. The second column is used to create an offset between the 2 cylinders. I tested all the configurations and keeped the ones that respected the criteria above. Then, I used the supposedly working configurations to calculate the possible gear ratios. The sub-table called “Transitions” corresponds to the ratio between the two main shafts. Then, on the sub-tables on the right, I put the gears on the primary and secondary shafts to get 3 different ratios on each shaft, placed in the correct sequence, for each remaining possible configuration. I got only 2 possible configurations (A and B). Other configurations exist, but they are symmetries of these two configurations, so they are useless. I finally came out with only one possible configuration, which is the one I realized in Stud.io and in real life. IMPROVEMENTS Compared to my previous gearbox, this new version features: Way better efficiency More compact, easier to integrate into a chassis More reliable gear selector More realistic and easier to understand The shifter can be less robust The input and the output are centred, and can easily be moved It is reversible, meaning that you can power both the input and the output Gears better staged HOW IT WORKS? The way it works is close to a dual-clutch gearbox - however, the exact same operation cannot be achieved due to the way the sequence of a rotary changeover cylinder is made. The ratios are better staged than the ones of my previous gearbox. The reverse gear is situated between the 1st and the 2nd gear, making it more realistic. R: -0.375 N: 0 1st: 0.25 2nd: 0.45 3rd: 0.50 4th: 0.75 5th: 0.90 6th: 1.50 A simple mechanism prevents from shifting from 6th to reverse gear. This mechanism can easily me moved to another place (for instance close to the shifter) though. The centre changeover cylinder is used to create a 45° offset between the two other cylinders. However, to spare a part, you can use one of the following assemblies. VIDEO REBRICKABLE LINK Here is the Rebrickable link if you want to test this gearbox! https://rebrickable.com/mocs/MOC-171508/Anto/ultimate-6nr-gearbox-with-forks/#details I’m wondering what the gearbox on this summer’s supercar will look like. It should either be pretty similar, or totally different. What do you think? -
45° Stepper Mechanism.
Anto posted a topic in LEGO Technic, Mindstorms, Model Team and Scale Modeling
I'm back with something new! For my new gearbox, I needed a 45° shifter. At first, I reproduced the one of the Yamaha MT-10 SP, but I was not satisfied with it. Indeed, I didn't like the feeling (you have to assist the lever until the gear is shifted, it doesn't feel like a keyboard touch) and the return to center doesn't work properly. This is why I decided to work on a new shifter having the following features: "Keyboard" touch Uses only one 8 tooth stepper gear More compact 45° lock-mechanism Working return to center The architecture is based on the one of the shifter from the Bugatti Chiron, using 135° connectors. Here, I used a tile round with bar holder to obtain the right distance between the connectors and the gear. The result is a compact shifter with a nice feeling, a working return to center and that only uses one 8 tooth shifter gear. Link to Rebrickable: https://rebrickable.com/mocs/MOC-175515/Anto/45-stepper-mechanism -
Universal 4x4 off-roader
Zerobricks posted a topic in LEGO Technic, Mindstorms, Model Team and Scale Modeling
This model (and it's prototypes) are a result of the following topics: Basically the idea behind this project is to make an offroader capable of driving on all kinds of terrain with a simillar perofrmance as the Wildcat 6x6 but having a lower weight So, why would I want to reduce the weight? While the wildcat 6x6 works great most of the time, it's high weight of 2,5-3 kg has some drawbacks: The model requires a lot of expensive electronics (12 BuWizz motors, 6 BuWizz 3.0 bricks) High part count (1869 pieces) Tendecy of front wheels falling off at hard landings High wear and tear of the individual components, which lead to premature failure - planetary hubs, CV joints And lastly high wear and tear of the handler due to it's heavy weight Of course decreasing the weight also means decreasing the power to weight ratio, since there will always be components which are needed regardless of the number od drive motors like wheels, hubs, steering system, suspension and frame. The first protoype, which I simply call Light 4x4 used only 2 BuWizz motors coupled to a 2 speed gearbox: While the model worked good in low gear, the high gear proved much trickier. The single gearbox put a lof of strain on the drive axle in high gear, causing it to melt, even with lubrication. Another issue was the high load of the motors in high gear, resulting in them overheating, while the motor could not even remotely apporach the 15 km/h top speed of the Wildcat 6x6. But not all was bad, I really liked the free-moving front suspension which acts like a suspended pendular axle, while having a much lower unspring weight. While I could make the rear suspension act like a pendular axle instead off front, i decided agaisnt it, since most of the weight is shifted back when crawling and I wanted to keep the rear stable. With that knowledge, I went back to the drawing board and decided to up the power for the next version... Medium 4x4 prototype: This version used 4 BuWizz motors coupled in a manner simillar to my 1:10 Acura NSX which negates the sideways load on the output axle of the gearbox. As you can see, this version was quite bigger and it used the reinforced differentials. The increased power drastically improved the performance, the top speed and overall power being simillar to the Wildcat 6x6. BUT the model had a few problems, main being the exposed gearbox which would get clogged and jam while driving outside. This version was aslo wider compared to the first prototype. Medium version prototype 2: This is another concept where the entire front axle is designed to pivot, but I ultimately decided to go agaisnt it due to the higher center of gravity and higher unspring mass. The final, universal 4x4 model: I have built and tested the model, but have yet to make any media, that's why I'm using LDD photos for now. I had to way to make the model more ingress resistant and narrower. This is where I came up with the idea of using the new, reinforced differentials as 28 tooth clutch gears for the high gear of the gearbox: This way the gearbox's output axle was moved a stud lower, allowing me to cover the bottom of the model with panels which prevent the dirt from getting into the gearbox without sacrificing ground clearance: The model inherited the front axle from the prototypes which acts like a free pendular axle. This keeps the weight even on both side of the suspension sosimple open differentials sufficed without a need for lockers. The gear ratios are a bit of a compromise comapred to the Wildcat 6x6, with low gear being 0,89x the ratio and high gear being 0,83x the ratio. Even with these differences, the model still reaches a very simillar speed in high gear, probably due to lower friction losses and lower rolling resistance. All in all I think this is a worthy successur to the Wildcat 6x6, even though it may not be as flashy, massive or functional (no skid steering). Final part count is 774 pieces which is 41% od the Wildcat 6x6 and the weight has been reduced to around 1,4 kg - around half of the Wildcat 6x6. I will be creating a proper in-depth video about the finished models and the protoypes, so I suggest you to watch this space for more upcoming details. -
1:10 Scale Motorized Acura/Honda NSX Supercar
Zerobricks posted a topic in LEGO Technic, Mindstorms, Model Team and Scale Modeling
After building the 1:8 scale Spano GTA, I wanted to make something more compact, yet even more functional for the BuWizz camp 2021, which got postopned to 2022. The rules behind this model stated to build a 1:10 scale representation of a real existing car, which has to have a working gearbox, fake engine and working steering wheel. After researching different types of super and hypercars, I chose the Acura/Honda NSX since it had several good pros compared to the more famous brands like Ferrari or Lamborghini: The real car has a smaller profile, which means a lower weight It uses a hybrid AWD system, which would come in handy for the LEGO model for accelerating and braking on all wheels Engine powering is a V6, which doesn't take as much space as the typical V8, V10 or even V12 Since it's a less known supercar, my LEGO version could be the first one in such scale I used a simillar technique as with Spano GTA where I imported the 3D model into the Lego Digital Designer and used it as a 3D reference. Using this technique I ended up with a really close representation, and it really shows: As you can see in the gif above, not only does the model look very good, it's also full of functionality: 4x BuWizz motors for driving All wheel drive 2 Speed gearbox Working fake V6 coupled directly to the drive motors Working steering wheel 2x BuWizz 3.0 for control Double wishbone suspension on all wheels Dimensions and weight ended up as following: Length: 45 cm Width: 20 cm (without mirrors) Height: 12.5 cm Weight: cca 1,5 kg Here is how the model's underside looks like, drive motors are driving two independent gearboxes in order to evenly spread the mechanical load. This kind of a setup also cancels out any side forces on the central drive axle, thereby reducing friction and wear: In order to cram all the powertrain components in the rear the drive motors are placed in a V shape. This way there is just enough space between them for a functional V6 engine and a PU medium motor which switches the gearbox: Thanks to the compact powerline and driveline, the interrior is very spacious and both seats are almost 1:8 scale sized, measuring 6 studs wide. There are even stoppers and interrior details on the doors themselves: ž The end performance of the model is higher than what I expected, there is enough torque to freespin all 4 wheels, jump over ramps and top speed in high gear is almost 20 km/h! You can see how well it performs the video: To conclude, this is my first 1:10 scale supercar which also ended up extremely compact, functional, robust and good looking. I also think a 1:10 scale may be beneficial when it comes to reliability and robustness, since models tend to weight half the weight of their 1:8 counterparts while still incorporating a simillar level of functionality and details. Having said that, this will not be my last 1:10 supercar and I think for the next one I will ditch the gearbox and simply drive the wheels directly from the motors without any weak differentials. -
Universal off-roader 4x4 V2
Zerobricks posted a topic in LEGO Technic, Mindstorms, Model Team and Scale Modeling
As soon as I saw the new parts in the 42159, I knew I just have to use them to upgrade the previous version of the Universal 4x4 off-roader. After tinkering for a few weeks in LDD, and actually building it IRL yesterday, it is officially finished: The V2 has a big list of upgrades comapred to V1. Dual independent drive, one for left and other for right wheels - allowing skid steering Two 3 speed gearboxes - that's right, this is my first off road vehicle with 3 gears for optimal performance Improved steering system - much more direct, accurate and responsive Highly modular design - easier access for maintenance and charging Top speed has been increased by 40% both in low and high gear - the previous version had ample torque, so I geared up all the ratios by 40% and added a middle gear Increased suspension travel at the rear - first time I'm using 11 studs long suspension arms Improved drive motor mounting - now they are no longer at a weird angle Similar part count to the V1 - even though it's 2 studs longer and has way more functionality it has only 20 or so extra parts, totalling at 796 (I tried to keep it under 800) Here you can see how the model looks in LDD: Overview of drive, switching and steering drivelines: The dual driveline is powered by 4 BuWizz motors, 2 motors for each side. The lower PU L motor moves the steering rack via an 8 tooth gear. A second, higher mounted PU L motor spins 4 wave selectors via 8 and 28 tooth gears which in turn switch between the 3 gears. The gearboxes have the following gear ratios: First gear is 20/16 = 1,25 - totalling 4,32:1 gear ratio from motors to the wheels Second gear is 24/12 = 2 - totalling 2,7:1 gear ratio from motors to the wheels Third gear is 28/8 = 3,5 - totalling a 1,37:1 gear ratio from motors to the wheels Thanks to the 3 speeds gearboxes, the model has plenty of torque to climb at 45°+ degrees angle, yet can also reach a speed of over 18 km/h, making it my fastest dedicated off-roader to date: Testing it outside, jumping over pump track course, driving through tall grass, etc... I have yet to encounter any major issues. The model is reliable, fast and can take a beating/rollover with ease. So far I'm really happy with it and can't wait to record more media and publish it soon, so stay tuned! -

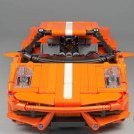
[Intructions available] Ferrari F40 1:10 (V2)
sebulba56 posted a topic in LEGO Technic, Mindstorms, Model Team and Scale Modeling
Link to the instructions : https://rebrickable.com/mocs/MOC-144042/Sebulba56/ferrari-f40-supercar-110-scale/#details Here is my latest creation, a 1:10 scale replica of the iconic Ferrari F40. This project was a true labour of patience, and I am proud to say that I was able to incorporate all the functions that make a supercar and to capture the essence of the design of the F40. I already worked on the F40 and posted it almost 2 years ago (link right below). It was a cool model but I still had always that feeling that I could do better. This feeling was emphasized by the other people of this forum that worked on this Ferrari like @lnteknik or very recently @Lox Lego. So I went back to my pieces and started to work from scratch on a new iteration of this legendary car. To sum up : I changed almost everything. One of the key features of the Lego model is the functional 5+R gearbox, which allows the car to shift through its gears just like the real-life F40. This was a particularly challenging feature to implement, but it really adds to the overall playability of the Lego model. The gearbox is designed to be smooth and efficient, making it easy to shift between gears and control the fake engine’s speed. The gearbox was inspired by GrayGear from Eurobrick, here is a link to his topic : His gearbox is a 6 speed, I worked on it to implement a reverse gear. Note that I reproduced the particular patern of the F40, the R replace the 1, the 1 replace the 2 and so on. In addition to the gearbox, I also included a functional opening mechanism for the doors, front trunk, and rear engine hood. This was a challenging aspect to incorporate into the design, but I am thrilled with how well it turned out. Users can easily open and close these components, further enhancing the interactive and realistic nature of the Lego model. Those components can also be retired to reveal the chassis of the car in a modular-ish way. Attention to detail was also a top priority for me during the design process. I made sure to include accurate design elements such as the air intake on the doors and the sharp, angular lines of the car's bodywork. I also ensured that the proportions of the model were as true-to-life as possible, making it instantly recognizable as an F40 to car enthusiasts and Lego fans alike. I am also extremely pleased with how the engine and its details turned out in the model. The attention to detail and accuracy of the design truly showcases the iconic engine of this legendary car. Furthermore, I the steering mechanism can be controlled by the steering wheel or by a removable HOG, which adds to the overall control of the Lego model. The steering is designed to be responsive and smooth, allowing to easily maneuver the car in any direction. Finally, I included the iconic pop-up headlights, which can be activated using a small wheel in the dashboard. This adds a fun and interactive aspect to the model, and further enhances the overall attention to detail that went into the design. Overall, I am extremely proud of this creation, and I believe that the inclusion of these unique and functional features truly sets it apart from other Lego Technic models. The attention to detail, accurate design elements, and functional components make this model a true tribute to the iconic Ferrari F40. Link to the instructions : https://rebrickable.com/mocs/MOC-144042/Sebulba56/ferrari-f40-supercar-110-scale/#details -
[MOC] Unimog U5000 Trial Truck
Teo LEGO Technic posted a topic in LEGO Technic, Mindstorms, Model Team and Scale Modeling
Hey everyone! After almost a year and a half of working on it whenever I had time, my model of a Unimog U5000 truck is finally complete. It has the following functions: 4x4 Drive with 2 PF XL motors Steering with PF M motor and linear actuator Remote diff locks, front and back, using pneumatic actuators Remote 2-speed high-torque gearbox BuWizz power More photos on my BrickSafe: https://bricksafe.com/pages/Teo_LEGO_Technic/unimog-trial-truck The whole idea of this model was to build a truck that could both travel at a fairly fast speed as well as work very well offroad, which meant it needed a gearbox. It also meant it needed differential locks so that turns could be taken smoothly at high speed with diffs unlocked, and offroad terrain could be tackled better with diffs locked. The main goal of this model was to create a drive train that wouldn't allow any gear slippage or breaking even under tension in low gear. My solution for this was to use @Sariel's heavy-duty gearbox (http://sariel.pl/2011/02/2-speed-heavy-duty-linear-gearbox/), as well as the new differentials from the 43109 Top Gear car. However even those differentials can't take as much torque as I wanted to put on them, and neither can the universal joints leading to the axles. For this reason, I decided to speed up the transmission before reaching the universal joints and differentials to reduce torque, then slow it back down afterwards between the diffs and the wheels. This would cause a bit of power loss to friction due to the increased number of gears, but it would reduce the torque on the sensitive components and allow me to send more total torque to the wheels. The result is that the 2 powerful XL motors are sped up 5.01 times or 1.8 times (in high and low gear respectively) before reaching the diffs and universal joints, and then slowed down 11.67 times at the wheels. Therefore the final gear ratios in low and high gear are as follows: High gear - 2.33 : 1 Low gear - 6.5 : 1 The result is that the drivetrain is indestructible and never breaks even when run with a BuWizz on ludicrous mode and the wheels come to a standstill. The most complicated part of this build was fitting all of the functionality in the front axle - linear actuator steering placed close to the pivot to increase the range of motion, lots of gear reduction, portal axles, and a differential locking mechanism. Although the result is quite good in my opinion - thanks @Zerobricks for the custom portals - the final construction wasn't as sturdy as I would have liked, and this was the main issue with the final model. The steering has less power than I would have liked with the small actuator, and the custom portal axles bend outwards under pressure when steering over rugged terrain. Overall however I'm quite satisfied with the final result Thanks also to @functionalTechnic for the advice, and to everyone else who contributed to the WIP thread: Enjoy! - Teo -

[HELP] FWD with Transversely Mounted Engine and Gearbox
AttentionSpanner posted a topic in LEGO Technic, Mindstorms, Model Team and Scale Modeling
Hi everyone, This will be my first project in a while, and my first project here. I want to try and make a 2WD (hopefully FWD, but RWD is fine if things get difficult), 4-cylinder car with a transversely mounted engine and gearbox assembly, and hopefully as a studless construction. I started mocking-up some of the gearbox in LDD (I know, not the best tool), and the results have not been too encouraging (space-wise). I haven't yet figured how to post photos, but I will when I do -
 Hi guys! At least I has finished my next MOC and want to introduced the finished model to all of you! Welcome my International Lonestar truck! It's dimensions are: - Lengh: 101 stud or 80 cm - Width: 31 studs or 25 cm without mirrors - High: 37 studs or 30 cm excluding antennas and exhaust pipes. It consists of more than 5000 Lego parts, including 9 motors. It has: - Great Charbel's 8 speed gearbox, modified by me to the 16 speed one by adding high/low gear to the main output. It has a special shifter. It's all RC. - Independant powerfull pneumatic brakes on each wheel. Inspired by Sheepo's Peterbilt. - Pneumatically controlled fifth wheel. - Independant suspencion on front and dependant one on the rear axles. - Suspended driver's and passenger's seats, doors with locks and shock absorbers. - Detalized interior. - Inline 6 cylinder engine like the real truck. Power functions is described at the picture below, I think this is more interesting than just to read. Also I include pneumatics sheme. Enjoy the pictures please, I hope some video will apear nowadays. Unfortunately, rear differentials can't cope with such a huge torgue and truck cant drive fast on the floor, sorry. Please visit my Bricksafe page for more photo. Building instructions are available here: https://rebrickable.com/mocs/MOC-9788/OleJka/international-lonestar-truck/#comments VIDEO AVAILABLE NOW!!
 -
Here's a model I actually completed a year ago in order to be unveiled in time for the BuWizz picnic back in 2021, but we all know how things went... Anyway since the picnic did happen last weekend, I decided to unveil my most powerful offroader. The basic design is based on the Wildcat 4x4, but this version adds more power, a 2 speed gearbox and a third axle to the formula. As with the older version, each axle has independent suspension, plus the entire axle can pivot or swing, effectively giving this model double suspension setup. Indepedent suspension is great at absorbing small bumps when driving quickly, while the axles pivot along the terrain when crawling. The driveline was quite a challenge. In order to transmit the power from 12 motors to the wheels, each wheel ended up having it's own dedicated 2 speed-gearbox. The final driveline is extremely compact and efficient, with only 3 gears engaged at any given time. There are also no differentials or perpendicular drives, so nothing that can break or skip. Each gearbox is actuated by a PU M motor using worm gears, which prevent any unwanted skipping out of the gear. This way each wheel is powered by 2 BuWizz motors via a dedicated gearbox: The following gif shows how the front axle is designed along with the whole model: Here you can wee, how the front axle tilts in order to adjust to the terrain: The rear axles are made in the same way as the front axles, minus the steering. Rear axles are also designed to work in tandem, when one goes up, the other goes down. When one tilts left, the other tilts right. This way the rear suspension is extremely flexible: And finally here are some specs of this beast: Length: 52 cm Width: 26 cm Height: 20 cm Weight: 2,5 kg Top speed: 15 km/h (rounded up) To complete the presentation, here's a video of the model in action, a big thanks out to @braker23, @Sariel and @kbalage for the footage. Final thoughts... this is my most potent offroader to date. The sheer amount of power, torque and speed is hard to wrap your mind around for a model made entirely of small plastic pieces. Having said that, I think there are still few areas to improve: Tendency of the front wheels to fall off at hard bumps - A lighter version would help to reduce stress on the hubs and wheels. Could use a higher steering angle - Would have to find a way to integrate steering racks inside the transaxles. Protection againt depbees and dirt entering the drivelines - Something that would also not reduce the ground clearance, tiles might work.
-

[MOC] 42131 alternate: snow groomer
jyd80 posted a topic in LEGO Technic, Mindstorms, Model Team and Scale Modeling
Dear all, I would like to present my latest MOC, a one-set MOC for the Cat D-11. It was my first experience with the Powered-Up system, which I have to admit, was a bit painful :p Yet here it comes: The snow groomer is fully functional, featuring a configuration similar to the D11: two independent angular motors for the tracks, and two large motors to control a gearbox distributing four functions: raising/lowering the blade, opening/closing the blade, turning the blade, raising/lowering the tiler. By construction, the four functions cannot be operated simultaneously. The model also features a working L6 engine and tiler. They are both linked to a central differential, so that they will not move if the two tracks operate in opposite directions, but I guess snow groomers do not really turn on site like excavators or bulldozers, do they? The hood can be opened to show the engine, and the cab can be tilt to access the battery box. And here is a video: Instructions (of a further improved version) are available at rebrickable! -
.thumb.png.116032e930e483fb4ebbfdc62183bd34.png)
Understanding LEGO 4-speed sequential gearboxes
Didumos69 posted a topic in LEGO Technic, Mindstorms, Model Team and Scale Modeling
I finally took the time to write down the things I have come to understand with regard to LEGO 4-speed sequential gearboxes. I am receiving many questions about gearboxes and I hope these understandings can help you reason about a gearbox layout while you're building one or trying to design one. I hope this also answers a question I received from @nerdsforprez more than a year ago, which I did not answer yet. Gearbox layout Let's take a look at this 4-speed sequential gearbox layout. Black is input, red is output and orange is control. The main input is divided over a high input (black) with high input ratio and a low input (white) with low input ratio. The high input ratio is 1:1 (via a 12:12 mash) and the low input ratio is 1:2 (via a 8:16 mash). This makes for a combined ratio of (1:1) : (1:2) = 2:1 between the high and low inputs. I will refer to this ratio as the primary ratio. In fact this ratio is the ratio between the two driving rings. Both driving rings have a high output (green) with high output ratio and a low output (yellow) with low output ratio. For both driving rings, the high output ratio is 1:1 * 2:1 = 2:1 (via a 16:16 mash and a 16:8 mash) and the low output ratio is 5:3 * 1:2 = 5:6 (via a 20:12 mash and a 8:16 mash). This makes for a combined ratio of (2:1) : (5:6) = 12:5 between the high and low outputs of each driving ring. I will refer to these ratios as the secondary ratios. Rotary catch and quadrants Even though I will explain things in terms of the gearbox layout described above, the first understanding I want to address, applies to practically all 4-speed sequential gearboxes with 2 driving rings. Let's take a look at the rotary catch and driving rings from above and divide the layout into four quadrants. Each quadrant represents one of the four gears of the 4-speed gearbox. When we turn the rotary catch clockwise (seen from the left) with 90-degree steps, it will always make the following path through the four quadrants. From the path the rotary catch draws, we can see that it toggles from one driving ring to the other driving ring for every 90-degree step. So if we want to obtain a useful gear sequence (either a 1-2-3-4 sequence or a 4-3-2-1 sequence) along that path, we need to tie gears 1 and 3 to one driving ring and gears 2 and 4 to the other driving ring. Otherwise the rotary catch can never 'toggle' between subsequent gears. Now let's take a look at all distributions of the four gears over the four quadrants that meet this requirement. Starting top-left, this will produce a 1-4-3-2 sequence. Repeating the sequence will give 1-4-3-2-1-4-3-2-etc., which effectively boils down to a 4-3-2-1 sequence. Starting top-left, this will produce a 1-2-3-4 sequence. Starting top-left, this will produce a 3-4-1-2 sequence. Repeating the sequence will give 3-4-1-2-3-4-1-2-etc., which effectively boils down to a 1-2-3-4 sequence. Starting top-left, this will produce a 3-2-1-4 sequence. Repeating the sequence will give 3-2-1-4-3-2-1-4-etc., which effectively boils down to a 4-3-2-1 sequence. Starting top-left, this will produce a 2-3-4-1 sequence. Repeating the sequence will give 2-3-4-1-2-3-4-1-etc., which effectively boils down to a 1-2-3-4 sequence. Starting top-left, this will produce a 2-1-4-3 sequence. Repeating the sequence will give 2-1-4-3-2-1-4-3-etc., which effectively boils down to a 4-3-2-1 sequence. Starting top-left, this will produce a 4-3-2-1 sequence. Starting top-left, this will produce a 4-1-2-3 sequence. Repeating the sequence will give 4-1-2-3-4-1-2-3-etc., which effectively boils down to a 1-2-3-4 sequence. Surprisingly, every distribution that meets the requirement, will produce either a 1-2-3-4 sequence or a 4-3-2-1 sequence. What this tells us, is that it's enough to tie gears 1 and 3 to one driving ring and gears 2 and 4 to the other driving ring, to obtain a useful gear sequence. Nothing else matters! Primary ratio vs. secondary ratios The next understanding I want to address, concerns the relation between the primary ratio (the ratio between the high and low input) and the secondary ratios (the ratios between the high and low outputs of both driving rings). We have already seen that in the gearbox layout at hand, the high and low output ratios are the same for both driving rings. One thing we can say about 4-speed gearboxes in general, is that the ratios between gears 1 and 3 and between gears 2 and 4 need to make a bigger difference than the ratios between gear 1 and 2 and between 3 and 4. Now when we take into account that gears 1 and 3 need to be tied to one driving ring and gears 2 and 4 need to be tied to the other driving ring, and we use the same high and low output ratios for both driving rings, we can say that the secondary ratios, which constitute the ratios between gears 1 and 3 and between gears 2 and 4, need to be bigger than the primary ratio, which constitutes the ratios between gears 1 and 2 and between gears 3 and 4. The gearbox discussed in the beginning of this post has a primary ratio of 2:1 and secondary ratios of 12:5, so it meets the above requirement. Check! Swapping and reversing If we go back to the distributions we listed above, we can see that half of them generate a 1-2-3-4 sequence and half of them generate a 4-3-2-1 sequence. When we study them more thoroughly, we can see that all 1-2-3-4 distributions have a horizontally flipped counterpart with a 4-3-2-1 sequence. In other words, if we flip the distribution horizontally, we reverse the gear sequence. Example: Swapping 1-3 with 2-4 in a 4-3-2-1 sequence produces a 3-4-1-2 sequence. Repeating the sequence will give 3-4-1-2-3-4-1-2-etc., which effectively boils down to 1-2-3-4. Example: Swapping 1-3 with 4-2 in a 1-2-3-4 sequence produces a 4-3-2-1 sequence. What this tells us, is that when we mirror the gearbox layout left-to-right (top-down in the quadrants), which boils down to swapping the high and low inputs, the effect is that we reverse the gear sequence. Practical value: If you find yourself in a situation where you want to swap the upshifting and downshifting directions, simply swap the high and low inputs, like in the image above. Finally, if we take one more look at the gear distributions above, we can see that when we swap gears 1 and 3 or gears 2 and 4 in any distribution, we get a distribution with the reversed order. 1-2-3-4 will produce 4-3-2-1 and 4-3-2-1 will produce 1-2-3-4. When we swap both gears 1 and 3, and gears 2 and 4, we reverse the order twice and get again the same order. Example: Swapping 1 and 3 in a 1-2-3-4 sequence produces a 3-2-1-4 sequence. Repeating the sequence will produce 3-2-1-4-3-2-1-4, which effectively boils down to a 4-3-2-1 sequence. Example: Swapping 2 and 4 in a 1-2-3-4 sequence produces a 1-4-3-2 sequence. Repeating the sequence will produce 1-4-3-2-1-4-3-2, which effectively boils down to a 4-3-2-1 sequence. Example: Swapping 1 and 3, and 2 and 4 in a 1-2-3-4 sequence produces a 3-4-1-2 sequence. Repeating the sequence produces 3-4-1-2-3-4-1-2, which effectively boils down to a 1-2-3-4 sequence. What this tells us, is that when we mirror one side of the gearbox front-to-back (swap the high and low outputs of one driving ring), we will reverse the gear sequence. When we mirror both sides front-to-back (swap the high and low outputs of both driving rings), we won't affect the gear sequence. Practical value: If it's more convenient for the rest of your build to mirror your gearbox layout front-to-back, like in the image above, you can do so without any consequences. If it's more convenient to mirror only the left side or the right side of your gearbox layout, you need to also swap the upshifting and downshifting directions. If you want to inspect the gearbox used in this post in 3D, here it is in Stud.io format and here in LDD format. -
Hi All, im currently in the throes of building a transverse fwd Lego moc. It’s in its early stages at the mo, it it has an ultra 4 speed gearbox, engine and differential all mounted transversely. Ive still to do a bit of work on the gear selector to make it a little easier, but here’s a small video of it in its current state if if you see bits of your Lego Design in this model, thanks for the inspiration
-

[MOC] Remote controlled 4-speed AWD gearbox
harriedegroot posted a topic in LEGO Technic, Mindstorms, Model Team and Scale Modeling
A compact sequential heavy-duty 4 speed remote controlled AWD gearbox Each gear of this remote controlled gearbox approximately doubles the speed of the previous. The output shaft contains an integrated lockable differential for AWD. See the video for a WORKING DEMO | FREE INSTRUCTIONS below. GEAR RATIOS 1st 6:1 2nd 3.3:1 3rd 1.8:1 4th 1:1 FEATURES compact remote controllable sequential gearbox 4 transmission speeds evenly distributed gear ratios differential output (AWD) differential lock single rotary catch many mounting points no half studs INSTRUCTIONS [PDF] https://bricksafe.com/files/hdegroot/remote-controlled-4-speed-awd-gearbox---with-perfect-gear-ratios/remote-controlled-4speed-awd-gearbox-with-differential-lock.pdf [3D MODEL] https://bricksafe.com/files/hdegroot/remote-controlled-4-speed-awd-gearbox---with-perfect-gear-ratios/remote-controlled-4speed-awd-gearbox-with-differential-lock.io REBRICKABLE: https://rebrickable.com/mocs/MOC-83457/hdegroot/remote-controlled-4-speed-awd-gearbox-with-perfect-gear-ratios BRICKLINK: https://www.bricklink.com/v3/studio/design.page?idModel=244834 -
 Hello everyone, Let me introduce ma latest creation, a Jannarelly Design 1 at 1:9 scale. Jannarelly is a French car manufacturer based on Dubaï : https://www.jannarellyfrance.com/histoire. We feel a lot of Cobra Shelby or Ferrari 250 Testa Rossa design inspiration. It is a Neo-retro style : New materials on old shape ! SPECIFICATIONS : - Dimensions in cm (L x l x h) : 44 x 20 x 12 - Dimensions in studs (L x l x h) : 54 x 25 x 18 - Ground clearance: 1,3 studs - Weight : 1,3kg - 2 000 parts FEATURES : - 5+R gearbox - HOG (at the back) + working steering wheel - Openable cockpit canopy - Transverse V6 engine - Independant suspensions - Front axle: Ackerman steering, caster angle, steering radius : 55cm - Openable doors, front trunk and engine cover - And a cool stripe ! On picture below we can see elementary features : The HOG is connected to a gear reduction 8t/24t to enhance wheels rotation. Front axle has a positive caster angle. I re-use @T Lego one from La Ferrari : https://bricksafe.com/pages/T_Antonie/ferrari-laferrari The cockpit canopy can rotate to see interior details and give a better access to gearbox lever : The gearbox is a 5+R architecture like Shelby @Sheepo : https://www.sheepo.es/2013/10/ford-mustang-shelby-gt500-14.html. The main column is taken from @Charbel Volcano RS design. Ratios are : R - 1:134 1 - 2.1:1 2 - 1.67:1 3 - 1:1 4 - 1:1.33 5 - 1:1.667 Back 3D view below : Each driving ring (middle, left and right) has its own linkage (pink, green, blue). There is no "no back" system like @Gray Gear https://www.eurobricks.com/forum/index.php?/forums/topic/177499-how-to-6speed-manual-transmission-with-safeshift-system/ or NK03 gearbox design because too big to fit in. INSPIRATIONS : Nico71 : http://www.techlug.fr/Forum/viewtopic.php?f=5&t=9776 Jeroen Ottens : https://rebrickable.com/mocs/MOC-2927/Jeroen Ottens/alfa-romeo-4c-spider/#comments T-Lego : Charbel : https://rebrickable.com/mocs/MOC-9613/Charbel/volcano-rs-supercar/#comments CONCLUSION : It was a real pleasure to work on this car : design working and features implement were a good challenge ! HD photos on this link : https://flic.kr/s/aHsmR3ZYCx Thanks for reading, I hope you will appreciate this creation ! See you !
 -
[MOC] Rugged supercar - Hammerhead (1:9 scale) - Revisiting
Didumos69 posted a topic in LEGO Technic, Mindstorms, Model Team and Scale Modeling
Rugged supercar - Hammerhead (1:9 scale) This project was not something I started very consciously. Also for me it evolved into something special. I was especially happy with the interference (in a positive way) of other builders. A big thank you to this community, for pushing me in the right direction on several occasions! The most special part - to me - of this build, is the chassis. It combines a simple 4-speed AWD transmission, a flawless sequential shifting mechanism and advanced suspension setups with Ackermann steering, anti-roll bars, torsion bars, 2 studs ground clearance and 2 studs suspension travel. All wrapped together in a very flat yet rigid and coherent structure with a mid-console width of only 5 studs. I did not want the bodywork to make any compromises to these features. I wanted the body to continue the line of durability set in by the chassis. Flex-axles do not fit that image, hence no wheel arcs. They would also sit 2 studs above the hood - not very elegant. The result is a car that does not only look fool-proof; it is fool-proof. After a rough treatment, you don't need to tighten connections or fine-tune gears to avoid friction. You can carry the car by the sides, by the trunk door (rear wing), by the nose and by the bumpers without displacing any parts. You can even grab the 2Kg build by the roof and turn it upside down to see the bottom side without a problem. So I did not intend to level with great bodywork builders. To me the biggest compliment is that some have referred to this model as the successor of 8865 and 8880. Drive train AWD with 3 differentials Sequential 4-speed gearbox One-finger shifter V8 fake engine Suspension Double wishbone suspension Anti-roll bars (front & rear) 2 studs suspension travel 2 studs ground clearance Steering Ackermann steering Gear-rack sliders Working steering wheel HoG steering Chassis Sturdy and durable Integrated bumpers Adjustable seats Narrow mid-console (5L) Bodywork Sturdy and durable Integrated roll-cage Lockable doors Openable trunk Liftable By the roof By the sides By the nose By the trunk door Instructions are available on Rebrickable. There is a full-featured version called 'Rugged supercar' and a chassis-only version called 'Flat AWD chassis'. The chassis-only version confines itself to part 1 of the instructions of the full-featured version. Special thanks to @Blakbird and @BusterHaus - with Blakbird being the driving force - for taking on the task of making these beautiful instructions! Making instructions for a build like this is a tremendous amount of work. Even more so, given the fact that I have been very demanding in sticking to my original design. - 32005a (Link 1 x 6 without Stoppers) - used for the anti-roll bars and steering tie rods - is preferred over 32005b (Link 1 x 6 with Stoppers), because each link has tow-balls inserted from both sides. 32005b can be used too, but in that case each link will have one tow-ball that needs quite some force to insert. - 32056 (Liftarm 3 x 3 L-Shape Thin) - used for the door locks - is preferred over 32249 (Liftarm 3 x 3 L-Shape with Quarter Ellipse Thin). 32249 can be used too, but makes it more likely to accidentally lock the door while it's open, which is not a big deal of course. - 76138 (Shock Absorber 6.5L with Soft Spring) - used for the door locks - should be soft springs. They are quite rare in red, but you could also use two LBG soft springs. - 85543 (Rubber Belt Small (Round Cross Section) - used for the 90 degree limiter and the return-to-center of the gear shifter - should be relatively new, say max 2 years. Not that they wear out quickly, but the older ones are slightly less tight. Images of the full-featured version can be found here. Images of the chassis-only version can be found here. See the entry on The LEGO Car Blog! P.S. Where real cars start with a sketch, evolve into a professional design and finally have their technical details filled-in, this project started with some technical details, evolved into a complete design and ended up in a sketch ;-). By @HorcikDesigns (http://horcikdesigns.deviantart.com/gallery/). -
Multi Function Gearbox using a single motor MOC
TechnicBrickPower posted a topic in LEGO Technic, Mindstorms, Model Team and Scale Modeling
Hi there, this multi function gearbox implements two separate functions using just a single motor. It implements the two functions by exploiting the direction of rotation of the motor and implementing one function for the forward direction and a function selector in the reverse direction. The reverse selector can be used to select between between driving one of the two outputs in either the forward or reverse direction. This means you can build a remote controlled car or device that has two functions that can be remotely controlled with just 1 motor and just 1 channel of your remote transmitter and receiver combination. -
Ultra Compact 8+N+R Sequential Gearbox
Anto posted a topic in LEGO Technic, Mindstorms, Model Team and Scale Modeling
This gearbox is an upgrade of my ultra compact 8-speed sequential gearbox. The 8-speed gearbox was nice but it was frustrating to know that the 2-speed gearbox took as much space as the 4-speed gearbox. I thought about transforming the 2-speed gearbox into a 2+N+R one. I had an idea about how to transform this gearbox but I didn't really think about how to activate the reverse and the neutral. Maybe by doing something with the knobs... I spoke with @Charbel and he gave me the idea to use the Bionicle parts I already used on my previous gearbox. Then I ended up with this: I used large frames as in the Lamborghini Sian. They make the whole gearbox stiff and now you have just to build a chassis arount the 'box! The neutral was extremely simple to do. See by yourselves: The reverse was more complex to create. For every foreward speed, the 2+N+R-speed gearbox rotates the 4-speed gearbox by the red 16t at the bottom. The reverse doesn't use the 4-speed gearbox, it uses the blue 20t at the top of the picture below: To engage the neutral and the reverse, I fixed two Bionible parts on the left knob. So they act as a smaller knob, with two teeth, and at a point 1/4 turn of the right knob makes the left knob rotate by 1/4 turn, whereas for all the foreward speeds, the left knob does 1/4 turn every turn of the right knob. Reverse engaged: Neutral: First: There is a stop not to shift from the 8th to the reverse. The engine and the gearbox wouldn't appreciate. The wheels have to be connected the the red axle and the engine to the grey one. It's possible to use this gearbox for a 4WD vehicle easily since the red axle goes through the gearbox. With this gearbox you don't have to use a 8-speed gearbox and a DNR one anymore, as in the Chiron or the Sian. It saves space, and you can't engage the 4th speed whereas you are in neutral - all the speeds shift into a logic order. I will make instructions when I have time! -
Dual Function Gearbox
TechnicBrickPower posted a topic in LEGO Technic, Mindstorms, Model Team and Scale Modeling
Hi Everyone, I have just created a video about my dual function gearbox allowing you to remotely drive and change gears using just one motor - i.e. the one motor implements two functions. The gearbox implements two functions at once by exploiting the direction of rotation of the driving motor and implementing one function (driving) for the forward direction and gear changing in the reverse direction. -
transparent.thumb.png.64c75cc99e499bf757c13576b785e380.png)
[MOC] Compact gearbox with reverse
BrickDesignerNL posted a topic in LEGO Technic, Mindstorms, Model Team and Scale Modeling
I'm working on a small model that needs to revers it's pattern when it hits the end, and again when it's at the start (like auto-reverse in an old cassette deck). This is the first concept draft I made using only pieces from 51515-1 and no clutch gears and driving ring, and utilizing the "double bevel" feature of the gears. Resulting in a 2.5L instead of 5L gear width. How it functions The long axle turns, the 12 gear double bevel on the yellow axle can be pressed in two sides, press left and it turns in the same speed and direction, press right and it will turn in the opposite direction of the black axle. Part list and building instruction can be found here: https://rebrickable.com/mocs/MOC-65251/BrickDesignerNL/easy-push-to-reverse-gear/ TODO I would like the reverse to turn in the same speed as the forward. - so size will change -

8110 - Unimog - MODs and Improvements
tripletschiee posted a topic in LEGO Technic, Mindstorms, Model Team and Scale Modeling
I think, it would make sense to open a new thread for the Unimog 8110 U-400, that includes all the MOCs, changes, improvements on the Unimog. It should also contain all the new attachments, equipments, that people build. It should show their ideas and what they are creating for this cool set. I am looking forward to see your creations! I'll start today. I implemented a pneumatic driven cargo bed. It is driven by the original motorized pump and works pretty well. The lifting angle could be better. So there is still room for inmprovments. For more pictures of this MOC plesae vistit my Flickr-page or (after publishing) my Brickshelf-folder. Regards, Gerhard -
7+R sequential gearbox (DCT)
Leviathan posted a topic in LEGO Technic, Mindstorms, Model Team and Scale Modeling
Hi everyone, Lately, I read topic on Audi R8 from Jeroen Ottens (https://www.eurobricks.com/forum/index.php?/forums/topic/178368-wip-audi-r8/) and it remembers me that I had such a prototype of a sequential gearbox. It's an improved version of my sequential gearbox used on my Bugatti Chiron 1/8, lighter and more compact. I use 4 orange rotary changeover selectors. I just want to say that is only a prototype version unfinished that I wanted to share with you. Please do not judge assembly design, but system core. How does it works ? - The main shat is the center one and it's made the dual clutch shaft - On each side, there is 1 half-gearbox. One with odds speeds (1, 3, 5, 7) and the other one with even speeds (R, 2, 4, 6). - On main main shaft, there is an offset of 90° between the 2 orange changeover. Its engage only at time one of the half gearbox. The real secret of the gearbox is the offset between each half gearbox. I used a factory wheel with 2 pins with tow ball to create this offset. See the picture below : Of course, the gearbox has a end stop to prevents 7 to Reverse shifting. Ratios ; R : 1,2 1 : 0,6 2 : 0,75 3 : 1 4 : 1,67 5 : 1,8 6 : 2,1 7 : 3 The reverse speed is too fast. I worked to an improved version too, smaller that prototype. The arrow shows the right way to shift up. Finally the video to understand the mecanism : I hope you will like it ! See you soon !
