Search the Community
Showing results for tags 'motor'.
Found 136 results
-
(1).thumb.png.b4d6c907fe73903aec1adfd3cd481a19.png)
First? linear actuator engine I4
glowytheglowbug posted a topic in LEGO Technic, Mindstorms, Model Team and Scale Modeling
uses spike for programming and there are 2 versions using small and medium linear actuators, the code isnt perfect though and the small one skips easily, getting carbon axles for better accuracy when retracting and expanding the actuators so i dont get a big explosion of actuators and twisted axles again one medium actuator suffered :( planning to get some metal uni joints for turning this into some crawler beast -
Hi, guys! I know that, there is February yet and we're before March release, but let's start new topic! So, at first I want to say that 2023 wave is amazing. New brand, new mudguards, new windscreens! Whoah! And there are my speculation/cars I want to see in Speed Champions 2024: ~ Porsche 911 GT2 RS Clubsport 25 ~ Porsche Taycan ~ Audi e-tron GT ~ BMW M6 ~ BMW M4 GT3 & BMW M3 1991 ~ Ferrari 499p LMH ~ Ford Focus RS 2021 ~ Honda Civic Type R ~ Cadillac LMDH What do you think about my cars? What cars would you like to see? Show your speculation/wishlist.
-
I've been looking for a suitable replacement 12v DC motor for the Grey Era train motors since I opened 2 of mine and found that both had broken commutators, and haven't found anything so far. However, today I had an idea. Has anyone opened up one of the 12v motors from the Blue Era? Those were also manufactured by Buhler and ran on the same voltage, and I was thinking there might be a possibility that they could be used to replace the ones in the 80s motors. I may try this myself if I can get my hands on one of those motors. Thoughts? Or, if anyone has opened this type of motor, does it look like it could be swapped?
-
Hello, I would like to present to you my MOC of Santa's Sleigh. Initially it was supposed to by more typical endeavor but my local LUG (WAWLUG) held a small contest to build whatever using Stuntz motors. It only had to go half a meter, which gave birth to idea of a Diesel Sleigh :) The sleigh is pulled by three Stuntz motors and one regular and on very even surface can go up to about 1,5 meters. The biggest problem is the fact the sleigh have only one wheel that is used to "ring" two bells it has. Those will swing back and forth as the sleigh go. I hope you'll enjoy this little piece of X-mas, even though it is a bit late :)
-

Semi trailer with sliding curtains
functionalTechnic posted a topic in LEGO Technic, Mindstorms, Model Team and Scale Modeling
Hi After bricking bavaria 2022 I could finish my trailer with remote controlled sliding curtains, landing legs and parking brake. the mechanism of the sliding curtains works with one PU L motor for each side and two winches at the front and rear of the trailer. Over the winches a cable runs trough the floor of the trailer which pulls the sliding curtains. I'm really happy how the mechanism works :) But check it yourself in the video: The instruction for the model can be found here: https://rebrickable.com/mocs/MOC-130914/FT-creations/trailer-with-sliding-curtains/#details And some renders because I could not make any resonable pictures until now: -
Hello EB, I don't think I have seen much information on the internet about this, so I thought I'd make a video (and share it here). Often when you're running 12v trains, metal rails and motor contacts become dirty with "black dust"- dust that settles on the rails and then is burned from the friction between the metal of the motor contacts and the metal of the rails. I am sure that other experienced 12v train fans out there know this and have your own way of cleaning the rails. I made a tutorial on how to clean rails and contacts, with easy to acquire materials- I use rubbing alcohol on a rag. Hopefully this video will help some of you, now and in the future, who are having difficulty with maintaining your 12v components!
-
Stupid name, I know. It wasn't intended to stick, but here we are... This MOC started out as a chassis test and grew from there. I was trying to build as compact a steam based driveline as possible, similar to my Powered Up Shunter from a while back. While that was the smallest I felt I could go with a Diesel (using strictly LEGO parts and legal techniques only) this was kind of the same exercise but with a steam locomotive. Obviously I couldn't hide a battery box in the loco anywhere, so I made a tender. Not prototypical, I know, but this isn't based on anything in particular. It's fantasy for a fictional railway that doesn't really even exist outside of a couple of locos with the WFLR initials on them! That being said, here is my design process so far. Power Tank Engine MOC on Imgur. Sorry for the whole external host thing. Maybe I'll modify the post once I get time to manually resize all the images and embed them from the Imgur links. For now, the external link will have to do. Sorry! I may convert this into a proper tank engine at some point with a coal bunker on the back and a boxcar for the battery box, but I'm pretty happy with it for now.
-
Digital Twin in Web3 by Crypto Accelerator with Oracle for IoT
-
I have made this topic to share my train designs with the Eurobricks community. Here is a quick Moc I made this morning in Bricklink Studio before breakfast. It is a simple diesel shunter with no motor and old style wheels. I will be making a motorized version to and will put in in this topic once completed along with more train stuff. I also will try to make the studio files for most trains available. Here are some pictures; studio file HERE.
-
 Watch the Footage The Mecanum wheel is an omnidirectional wheel design for a land-based vehicle to move in any direction. The Mecanum Wheel is based on a tireless wheel, with a series of rubberized external rollers obliquely attached to the whole circumference of its rim. These rollers typically have an axis of rotation at 45° to the wheel plane and 45° to the axle line. When spinning generates a propelling force perpendicular to the roller axle, which can be vectored into: + a longitudinal component + a transverse component Minions use Pulse Width Modulation technology to adjust the speed of their vehicles. Minions change the running direction of each wheel or motor with H-bridge technology and control the movement of their vehicles by combining different wheel directions. Camellia Mini could control all motors synchronously, which keeps 4 Mecanum wheels changing direction or speed simultaneously, thus making the vehicle perform perfect omnidirectional running. www.camellia.xin Copyright © Camellia Café 2016-2021 Camellia Café and its LOGO are registered trademarks.
 -
Hi all, since it's now published on Brick Model Railroader group, I can finally present also here in EuroBricks my second entry, this time in "MOW vehicle" section: You already know it from the WIP thread - it's a small little patchwork of two Fiat 600T/850T vans and a FIAT 500 499,5cc (21HP) motor. Here's the full story! And here's some bonus content!!! Presentation for Octrainber ends here , but there are some other photos: Transmission is on only one axle, as in the prototype, and it's using (again!!! ) the twisted rubber band transmission. The battery is a 200Mah Li-Po, connected to a small circuit in order to charge-discharge and manage the output to the motor. It can be recharged with an USB Adapter (in this case a serial to USB adapted I had at home). And two videos, showing the rubber band transmission and a small track with the 500 in action! https://www.flickr.com/photos/138174786@N04/51670350725/in/album-72157720126403108/ https://www.flickr.com/photos/138174786@N04/51673059120/in/album-72157720126403108/ I hope you like it! Ciao! Davide P.S. for reference! For more information, please refer to this site (it can be translated) https://scalaenne.wordpress.com/2017/07/29/draisina-fiat/ and to this video, showing a restoration of the Fiat 500 Draisina - which inspired the Giovanni and Giorgio story (Italian only, sorry, maybe it can work with subtitles) https://www.youtube.com/watch?v=X7vwRs0Akkk&t=211s
-

Strange Power Functions Issue
jshuiting posted a topic in LEGO Technic, Mindstorms, Model Team and Scale Modeling
I bought a set from bricklink a while ago and tested out the electronics, only to find that they were acting really strange. I'll try to explain it is as clear as possible but i may mess up a bit. So the set came with 4 motors, one of each kind, XL, L, M and Servo, and these all work perfectly fine on my own battery packs and recievers. But now i hook them up to the included recievers, so XL on red, L on blue, but then only the XL motor works. Now i'll switch them arround, but yet again it's only the XL motor that works, but now on the red channel. The L motor does function correctly when hooked up to a different reciever or straight to a battery pack. Further testing shows the XL motor works on all my recievers, both red and blue channels. The L motor works on 2 out of 4 recievers but only on either red or blu side, not both sides on the same reciever The Servo motor worked on none. And the M motor worked on 3 out of 4, also on just one side per reciever, either red or blue. And again all the motors work directly on the battery pack, or when hooked up to known good reciever. So what's going on here? How does one motor work on a reciever, but another does not? Can i throw away the motors or are the recievers at fault here? It's really frustrating because i am in the midst of making a deal with the seller aswell, but i can't without knowing exactly what's broken. It's like the recievers are picky in which motors they want to actuate and which ones not, but how's that even possible? -

Best motor for angle measurements
Andman posted a topic in LEGO Technic, Mindstorms, Model Team and Scale Modeling
Hi everyone, I'm searching for the best motor to measure angles. Since I don't have all motors, I'm depended on those, who have them and could a comparison. Requirements: The motor must be compatible with the C+ Technic Hub, used for example in the 42100 The resistance, when turning the motor manually, has to be as low as possible When the motor is turned manually and you stop turning, the motor should not continue to turn with too much swing. 2. has more priority than 3. I have tested the C+ L and XL motor so far. I also have the large angular motor, but it is simply too large. The internal resistance of the C+ L motor was way to high. The C+ XL motor delivered quite ok-ish results. It is just too bulky. Perfect shape and size would be the Medium Angular Motor, which I don't have. Another alternative would be the Boost Medium Linear Motor. I would appreciate, if someone, who has these motors, could do a test for me. A little teaser why I'm looking for this info: I'm building a truck with pneumatic suspension. I using the angles of the suspension arms to detect and control the height. First proof of concept in PoweredUp is already written and working. -

Odd NXT Servo Behavior
pdmarsh posted a topic in LEGO Technic, Mindstorms, Model Team and Scale Modeling
One of my NXT servos is exhibiting some odd behavior. I had to replace a servo for a different reason and this might be the replacement, but I'm not entirely sure as I didn't mark it as such. In any case, I'm curious if anyone else has seen this and knows the cause. With two servos that act as expected, I can place a single Move block in the program and use any of the duration settings and both servos will run and stop when programmed or run continuously if "Unlimited" is selected. However, when one servo is replaced with the misbehaving one, regardless of the duration setting, the latter servo will run continuously and the good servo will twitch as if it's about to run, but stops immediately. I have to end the program to get the "bad" servo to stop. If I place the Move block inside a Loop set to "Forever," the above behavior will be identical except for one scenario. If I set the Move block duration to "Unlimited," both servos will run and can be controlled by the Loop's "Control" setting, i.e. they will either run continuously or run and stop as set by the loop control setting. Simply using individual "Motor" blocks to control the servos does not solve the problem. There are good and bad programming scenarios with those as well with regard to the bad servo. The best guess I can come up with is that the bad servo is either not sending or not receiving a feedback signal, maybe both. I did wonder, though, if these servos have any firmware in them that might behave differently depending on when they were made. This isn't a fatal flaw as I can use the servo, but I am curious what might be going on. Thanks, Paul -

42121 Heavy-Duty Excavator Full RC MOD
Seo-onDaddy posted a topic in LEGO Technic, Mindstorms, Model Team and Scale Modeling
I converted the 42121 Heavy Duty Excavator to a RC version that can be driven and moved. * Instructions are being distributed by Recrickable. https://rebrickable.com/mocs/MOC-69683/Seo-onDaddy/42121-heavy-duty-excavator-full-rc-mod/#details * A 4-port receiver such as 'MOULDKING' receiver or, 'CaDA' receiver or 'Buwizz' is required, and case separation is required.'MOULDKING' receivers do not require any work other than case separation.The 'CaDA' receiver or 'Buwizz' must be removed from the case and the battery must be replaced in a small size.Battery size should be less than 14mm x 25mm x 50mm. * I modified some parts of the exterior because the space was cramped. * fixed the range of operation of the arm operation. -
You can find a sneak preview od the 3D printed sample on our IG: https://www.instagram.com/p/CLAKIt3B0PG/ Performance is around 10% faster RPM and torque compared to the 5292 motor (cca 20% more power). The polyfuse protection will be increased from 0,9 A to around 1,35 A - still testing the balance between performance and longetivity. Improved attachment possiblities, everything fits as it should in the studless building system The final version color will be between LGB and DBG. It will come with a 30 cm long PF cable plug, so it's compatible with BuWizz 2.0 and PF. Preorder here: https://buwizz.com/shop/buwizz-motor/ More info when it becomes available.
-
Hello everyone ! So I spent 1 month building an entirely functionnal Kit-Cat Clock with Studio. It's not totally finished yet because I would l'll need to buy the parts on Bricklink for making it IRL, but it's theorically viable. I already submitted the project on Ideas and will update the design as soon as I buy the pieces. Do you guys have any tips on the mechanism for making it more reliable ? If you are interested you can support my project here ;)
-

[WIP] A novel 3D printed Lego mini motor for the PF system
896gerard posted a topic in LEGO Technic, Mindstorms, Model Team and Scale Modeling
For long, I've wanted a small strong mini Lego Technic motor, smaller than an M-motor. As I recently learnt how to draw Lego parts and had the opportunity to use 3D printed nylon (using laser sintering) , I decided to try a small motor as well. As the PU motor stuff is getting big and heavy, this is my response: a small easy-mountable motor with a case of only 5 by 2 by 2 studs. 70% of the motors in Lego Technic models don't have to be large. Only the mount of this tiny motor is 2x3 studs. The mount is tailor made for Technic applications: if you build often with M-motors you will know that an M-motor always must be connected to a 1L beam to ensure that the gears won't slip and to mount the M motor securely. The mount design of this new motor eliminates the need for the beam, so that's one stud saved already. Because the motor is only 2 studs wide, 3 mini motors can be in the space of 2 M-motors. Also, 3 mini motors take up the space of one XL motor.. The exterior design is derived from a PF M-motor, because I like the design and want to keep using the PF looks. This is still a work in progress as I need to mount a 9V connector and insert the inner electric motor(already in stock here). I also need to do some more painting and sanding. Nonetheless, the printed parts are quite accurate. I will give an update soon when the motor is working. The motor gets internal electrics that work up to 12V so also third party remote control bricks will be allowed to use their boost modes. My big hope is that TLG understands that we need small motors and remotes, not big ones. The length of 5 studs makes this motor very easy to put in all kinds of leftover spaces. Thanks for reading. I'm open to design improvements! -
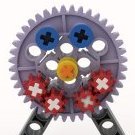
Hello everyone While I was testing my HLE 21 Locomotive moc, I noticed that the speed seemed very slow. It uses 2 L-motors that are gearend with a 20 tooth gear and a 12 tooth gear. This is then connected to another 12 tooth gear that drives the other 12 tooth gears connected to the wheels
-
 Hi, a few weeks ago I started a tutorial series on youtube. It's about how to program the lego powered up hardware with the Powered Up App (Lego Boost, lego Control+ and the wedo 2.0 sensors are part of the powered up hardware). The complete tutorial is 100% free. So far most of the stuff is pretty basic but it will get much, much, much more complicated later. I promise that ;) (People that saw the german version of the tutorial might know that already) There will be a new part each wednesday.
 -
Torque in Practice
TechnicBrickPower posted a topic in LEGO Technic, Mindstorms, Model Team and Scale Modeling
Hi all, here's a video I did where I use a 10 level torque gadget I created to run some torque experiments to help improve my automatic gearbox designs. Hope you find it interesting. -
Hello, I'm a huge train fan and have a section in my city where I have e a narrow gauge. Does anyone have a File or instruction file for a chassis? I really need one as I am very bad with the technic system. also, If you want, just send me a pic of the underside. I will figure it out from there.
-
Torque and power - some insights
TechnicBrickPower posted a topic in LEGO Technic, Mindstorms, Model Team and Scale Modeling
Hi all, I have created a video of some generic torque and power insights in relation to trying to create a high performing 2 speed automatic gearbox for a vehicle. The most interesting insight for me was the realization of an optimal operating point for electric motors to achieve maximum output power from the motor. I also derive the power distribution of a split path torque transfer design, and demostrate some experimental results using it. Hope you find it interesting. -
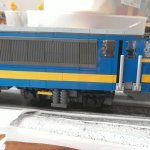
This weekend I challenged myself to upgrade a 9 volt train motor with powered up functionality. The result can be seen in the attached pics. I discovered that the train motor only needs 2 wires connected to the hub to actually run , only the 2 PWM signal wires. , or pin 1 and 2 on the connector. This enabled me to used the other 4 wires for power transfer from the wheels to a bridge rectifier and a 7809 voltage regulator before feeding it back into the hub. The track is powered from the switch port of the 12 V speed regulator. which puts out 16 volt.
-

Custom Technic pull-back motors
Greenstar posted a topic in LEGO Technic, Mindstorms, Model Team and Scale Modeling
Hello does anyone have any advice for building custom pull-back or clockwork motors using technic pieces? I’m trying to build one for a custom armoured train since I don’t have the money for all the fancy motor pieces. Thank you


.thumb.jpeg.bf849dde081326724141a48f3f7b3ad2.jpeg)
