Search the Community
Showing results for tags 'excavator'.
Found 86 results
-
[MOC] Excavator. Single motor, fully functional.
McMarky posted a topic in LEGO Technic, Mindstorms, Model Team and Scale Modeling
Hello guys, Do you like oldschool Lego Technic with a single motor and many functions? I hope you would like my excavator. It has only a single PF L motor and is fully functional. It can drive and dig. Enjoy the show 😀 -

42055 - Bucket Wheel Excavator - MODs and Improvements
Imanol BB posted a topic in LEGO Technic, Mindstorms, Model Team and Scale Modeling
Well, so now we have seen some reviews of the new LEGO models, and modifications and improvements of the other ones, and i think its time for the 42055, so lets start: My first modifications would be improve the force of the bucket, because as far i could see, the bucket is driven by the chains of the conveyor belt, so even an small object is able to stop it (like Sariel showed in his review), i would put an axle going from the gearbox directly to the bucket, or even a motor behind it, so there would not be too much power loss. Another modification i would like to do is in the tracks, i would like to put an small gearbox in the lower frame (i think there is enough space there), to select between some driving types, maybe something like a subtractor gearbox. And for the last, i would improve the turning system of the lower conveyor belt, as we can see in the review of Sariel, there is an small backlash in the system when the excavator changes the turning direction. So post any more idea or suggestion you have for this huge and impressive set. -
 I again wanted to go big on this build. Like BIG. So I went 1:16 scale the best I could. I started with an existing design from a failed build. The plan is to have 2 PF-L motors for the drive, PF-XL for the boom, and PF-M for the rest. Please note that I'm almost done with the build, but I am making minor adjustments to the build to help with function and/or weight support. I will be posting here to "show my work" of sorts and get feedback. I have been busy catching up on other things and building the excavator. (not much free time for posting/commenting on here) This was the first version of the bottom: And the start of the upper: It was looking good, sort of, I had to redo all of it as I add the battery boxes and arms it had a weak structure and was "clunky" in functions. I have remade all of the above and will post more in the morning to not have too many pics in a single post.
 -
 This Posting is dedicated to - the TLG which offers this great set - Juergen who has build the ultimate 8043 and also has posted some small improvements to the original design - all of you who are somehow disappointed by the original design (out of sync LAs, hard moveable boom etc.) IMHO the original design is awesome and needs only very few (and cheap!) and punctal improvements to work like a charm. Remark: some of the mentioned improvements come from this vey helpful posting from Juergen (http://www.eurobrick...showtopic=45133), but i have not installed all of them. well, here is the list of improvements i have installed: 1. Switching driving-rings (from Juergens post, s.a.) Juergen: The first time I built the 8043, it had some trouble switching the driving rings. Most of the time, the motor had to run twice to completely flip the switch. So I geared down the motor by replacing the 2 16-tooth gears with a 12-20-bevel-gear setup. I also replaced the blue axle-pin with friction (step 35, book 1) with a tan axle-pin without friction. 2. Rubber belts to help the boom (from Juergens post too) Juergen: To get some weight from the boom, I added rubber-bands. They reduce the friction the LA's which is caused by the weight of the boom. I didn't think of this myself but read it in this eurobricks-thread. (I have choosen 6 black rubberbands ("Black Rubber Belt Medium (Round Cross Section)", part-no x37 at Bricklink), which work very well and look IMO better than the blue ones). But this doesn't destroy the very good aestetic of the model and make the operation of the main boom very good - also with the standard batteries! This MOD can be also applied very easy after finishing the build - so you can compare the effect. 3. Improving the rotation point ot the original bucket (Stolen from barman) (in both pictures: left the original, right the improved version of barman) It improves bucket operation a lot and is very cheap and simply to build from the pictures in its brickshelf folder: http://www.brickshel...ry.cgi?f=432777 - very recommended. 4. Making the left track running smoothly This is done by replacing the 4L with stop axle in step 36 (book 1) with an axle 6L - this prevents that driving axle from canting under load 5. That's it. With all this small and cheap improvements i must state: i overall prefer the "original" 8043 over the ultimate of Juergen, though the latter one is an outstanding mod and very well done - chapeau Juergen! But why i prefer the original: simply because of the cleverness of the mode-switching between arm-operations and propulsion/slewing - which allows 6 functions with just 4 motors. Well, of course the Ultimate of Juergen is a "cost no object" excavator and is a little bit more realistic to operate because all can be done simulaneously, BUT: this is not really necessary - the playability of the original design (with the improvements listed above) is also very high and has only very small restrictions - quite ignorable IMHO. But this mode-switching design is really clever and makes more fun to build and view and operate as the 6-motor-version - at least in my personal opinion ;-) Or let me cite Juergen: "One of the reasons for me to make this topic (Kumbbl: see link above) and video is to show that this model, when constructed correctly & precisely, operates quite well" SO: IMHO its is not really necessary to spend a lot of money for additional motors, receivers, controllers to make this model work well, some bucks for some cheap parts are sufficient. But of course there is one basic and important requirement: it is essential to build this model perfectly, means controlling after each step if all(!) gears and axles are running perfect and smooth - and "perfect" means perfect!! and the main boom LAs must be installed in perfect sync (but then IMHO it is not necessary to switch some gears or something else...just build as in the instructions) Finally: chapeau to the designer of this set - on of the best in the studdless aera! BTW: this praising is from a man who normally prefers pneumatic over LAs ;-) Just my 2 cts.
 -

42144 Mod - demolition excavator
mpj posted a topic in LEGO Technic, Mindstorms, Model Team and Scale Modeling
Hello, I show you my latest build. It is a mod of set 42144. I was really disappointed by the aesthetic of 42144 material handler, but I think that the arm and the turret has been well designed. And I changed everything else. New tracked undercarriage, new tilting cab (not lifting) and new grapple (too look more similar to a demolition grapple). I tried to minimise the use of extra parts at the strength necessary. Instructions are available on rebrickable: here I hope you like it! -

[MOC] Mining Dump Truck - Lego Technic 42114 Model B
eric trax posted a topic in LEGO Technic, Mindstorms, Model Team and Scale Modeling
Building B-models between major projects has become quite normal for me. Such a break and playing only with Technic bricks is a very good way to reset my mind 😊 This time it was the 42114 set and the Mining Dump Truck was created as an alternative model, for the excavator from the 42100 set. The plan to build this vehicle from the 42114 set appeared a few months ago. I put it off for later, because I thought I wouldn't have enough panels to build a nice dump box. Over the weekend, I sat down with bricks and in a few hours the first version of the tipper was created. I liked it so much that the final version differs from the prototype only with minor changes. The biggest difficulty in building this model was its size of frame. When planning, I insisted that the model must use the original app, because that could be easily configured and played with it immediately. The machine has double wheels on the rear axle, so the frame basically contains the engines, gearbox, and a rear axle. In addition, the set has only long actuators so placing them in the dumper was also not easy. At the end, everything was packed into a pretty nice model, which uses over 78% of the set elements. The tipper was supposed to look good with the R9800 excavator from the 42100 set. So I scaled the Liebherr T282 to 1:42 scale and built the model on it. The appearance of the dump truck is a combination of the previously mentioned Liebherr and CAT 793F. It is not an exact copy, but there are similarities. Building instructions: https://rebrickable.com/mocs/MOC-76959/M_longer/42114-mining-dump-truck/ Check out photos and a short video presenting the model's functions: Video: -

[MOC] 42148 Excavator
ilyabuilder724 posted a topic in LEGO Technic, Mindstorms, Model Team and Scale Modeling
My First aternative build for the 42148 set. A simple Excavator. I hope you're gonna enjoy the build! Feel free to share your pictures of assembled model! FEATURES Working Tracks Working Excavator arm -
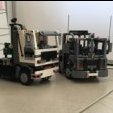
Earthmoving plant package
BIGRIG2005 posted a topic in LEGO Technic, Mindstorms, Model Team and Scale Modeling
My new MOC consists of a couple of items to form a big earthmoving plant package. 1. 42078 c model, Renault AE Magnum tipper and dual axle plant trailer. Truck -HOG steering -tilt cab -opening doors -working E9 V8 Mack Diesel engine -tipper with lockable tailgate -hitch at the back to couple to a wide range of different trailers. Trailer -floating pin hitch -folding legs -droppable rear ramps via small actuators -bed toolbox to store wheel chocks, chains etc. 2. 42053 c model, backhoe -4 wheel steering -quick hitch on the loader -tilting hitch on the loader -outriggers -sliding back actor with pin locks to hold actor in place. -quick hitch bucket on back actor -swinging actor with locks to hold in place for transport purposes -lift and extend functions for back actor -pneumatic functions for back actor and front loader tilt hitch -manual functions for back actor bucket angle and front loader lifting and lowering. 3. Mini excavator made from my spare parts box. -lifting and lowering as well as extension of excavator boom -front blade -swinging of main frame -tilting bucket Altogether this creates an ideal construction and earthmoving plant package. Hope you all like it. -
 Alright, I'm a little late to the game, but I want to play. I confess I am still on the fence about doing a front end loader, so I'll give my draft one more go this weekend, and make a decision about if to move forward with it. But, ever since @Jundis started his Mecalac 12MTX WIP, I, like many of you I'm sure, have been spending a lot of time on the Mecalac website. They have a lot of fun little machines. Each would make a fun little project. For this contest, I wanted to see if I could do a little skid excavator. I finally got a little time to build this week, and here is what I have so far. It's pretty basic (and sorry I burned out my photo lights today), but it is a good start to see what I can fit. The MOC is currently 26 modules long, 20 modules tall, and 17 modules wide which equals 8,840 cubic modules/studs. I planned the project at 29x20x17 (9,860), so I should be fine. I suspect the MOC will get a little longer and taller, so it is good I have a little bit of space to expand if needed. Currently I have the following functions, all of which are manual: Front Plow up and down Slewing from HOG Boom 1 up and down Boom 2 up and down Boom 3 in and out Bucket scoop Interchangeable bucket I have a lot of room in the back, so I hope to do something else with that, and the cabin will have a door or something. Everything right now is a rough placement, but the movement of the boom is acceptable, so the pivot points might be effectively "fixed" at this point. We'll see where this goes....
 -
[MOC] Poclain HC 300
Leviathan posted a topic in LEGO Technic, Mindstorms, Model Team and Scale Modeling
Hi everyone, Today I want to introduce to you my latest MOC : a Poclain excavator, the HC 300. Poclain is a French company (bought in 2000s by CASE) leader in 60-70s in hydraulics excavators and engines. The HC 300 was the bigger excavator in the world in 1968 ! Specifications : I wanted to control the model with a smartphone so I used Control+/Power up applications. The excavator has also manual features. I used electrical linear actuators instead of pneumatics to enhance playability. The excavator must be able to rise one track from the ground by using the bucket and his motorized arm. Inventory is mainly based on #42082. The main design is based on 8043 set. The drive train is powered by 2 L motors and a dual differential drive : more informations on @Sariel video : https://www.youtube.com/watch?v=f5_OQooBxdY. This kind of transmission allows control by only one joystick one smartphone screen instead of two sliders. Configuration : 6 motors : 5 L motors (https://www.bricklink.com/v2/catalog/catalogitem.page?P=bb0959c01#T=C) and 1 XL motor (https://www.bricklink.com/v2/catalog/catalogitem.page?P=bb0960c01#T=C&C=85) 2 electrical hubs 2 000 parts Features : - Toggling cabin with mechanical locking system - 360° turret rotation : One battery box is placed in drive train and the other one is placed on turret. No cables through the turntable, only a shaft to transmits rotation from drive train to the V12. - Technical compartments : a lot of openable elements very useful to store tools and tracks components. The grid at the back can be opened to reveal V12 engine. - The entire bodywork is removable. It is only set on the turret by gravity. The entire of the excavator is modular in order to make disassembly easier. - V12 engine works when the excavator move. I add a maximum of details to make it more realistic. - The dual differential drive : Each motor drives one kind of motion, straight-line motion or rotation. Get more information here : http://groups.csail.mit.edu/drl/courses ... ldiff.html. You can also combine motions to get curved directions. Tension on tracks is maintained by springs. Originally made by @Anto : https://www.techlug.fr/Forum/viewtopic.php?f=5&t=11548 Inspirations : https://rebrickable.com/mocs/MOC-1312/yannmar/motorized-hydraulic-excavator/#detailshttp://www.techlug.fr/Forum/viewtopic.php?f=5&t=11548http://www.techlug.fr/Forum/viewtopic.php?f=5&t=11878&p=192932&hilit=excavatrice#p192932https://www.techlug.fr/Forum/viewtopic.php?f=5&t=11343&p=185867&hilit=excavatrice#p185867https://rebrickable.com/mocs/MOC-19850/Mowlwurf/42006-full-rc-mod-undercarriage-with-transverse-subtractor/#comments Conclusion : The video will come soon ! Building instructions too ! I hope you liked this creation, I tried to mix up realistic details and common excavator's features. Only displacement is slow because of a total weight of 2kg. HD pictures here : https://flic.kr/s/aHsmVM6rX2 -

excavator Liebherr 984 LEGO Model Team
amon161 posted a topic in LEGO Technic, Mindstorms, Model Team and Scale Modeling
I present to your attention the Liebherr 984 excavator. Liebherr 984 Model weight 6.5 kilograms Model width 30 stud Chassis control two M motors with separate BB Pneumatics control three M motors and an XL motor for turning the tower as well as with B For pneumatic pumps a separate L motor with BB -
 This is something I came up with after starting a build of wheeled excavator from scratch. My previous model had overcomplicated design of the chassis and used small linear actuators for arm movement which was pretty bad for a manual model due to the amount of cranking required. I also got rid of steering elements I often used in my previous builds as they are not that common anymore. The one of the arm controls use single lever for two arm movements - bucket movement and arm movement - this is made possible by differentiating the torque required for string pull with a wheel. The video shows building of the chassis and operation of this excavator arm prototype I'm planning to build a full excavator model on this, hopefully with full fledged instructions, but it'll take some time, so stay tuned if you like it.
 -

42100 Liebherr R9800 Excavator
Ngoc Nguyen posted a topic in LEGO Technic, Mindstorms, Model Team and Scale Modeling
LEGO Technic 42100 “Liebherr R9800 Excavator” Price 449,99€ 4108 parts new control system CONTROL+ 7 motors (CONTROL+) 2 CONTROL+ hubs new parts: Linear Actuator long (12 studs?) big gear wheels dbg (grey) (like in 42095) new liftarm frame 11x7x1 no B-model at the moment Go nuts -

[MOC][WIP] Excavator
gvo25 posted a topic in LEGO Technic, Mindstorms, Model Team and Scale Modeling
Hello All, Recently I bought the lego 42114 volvo dumptruck and before I would build that I wanted to build an excavator to go with it. While Flybums excavator is a very good one I wanted to try myself to build an excavator. Here are some WIP pictures. As you can see the top part of the excavator uses the normal power function motors. 1 x L-motor for swinging, 2 x L-motors for the main boom, 1 x L-motor for the stick and one m - motor for the bucket. The main boom houses two motors and is my own design, the stick is an exact copy of flybum's excavator. The motors use use two AA-battery boxes and the AAA battery box is used for ballast, and will later power the lights. The crane uses a normal turntable, as i find the big ring gears too big for this scale of excavator. The top part wobbles a bit while turning but it's definitely within limits. The trackbase uses 2 control+ XL-motors integrated into the tracks with a worm gear and normal gearing. The battery box is situated just below the turntable. -

42121 Heavy-Duty Excavator Full RC MOD
Seo-onDaddy posted a topic in LEGO Technic, Mindstorms, Model Team and Scale Modeling
I converted the 42121 Heavy Duty Excavator to a RC version that can be driven and moved. * Instructions are being distributed by Recrickable. https://rebrickable.com/mocs/MOC-69683/Seo-onDaddy/42121-heavy-duty-excavator-full-rc-mod/#details * A 4-port receiver such as 'MOULDKING' receiver or, 'CaDA' receiver or 'Buwizz' is required, and case separation is required.'MOULDKING' receivers do not require any work other than case separation.The 'CaDA' receiver or 'Buwizz' must be removed from the case and the battery must be replaced in a small size.Battery size should be less than 14mm x 25mm x 50mm. * I modified some parts of the exterior because the space was cramped. * fixed the range of operation of the arm operation. -

NEW LEGO VOLVO EXCAVATOR 2020 MOC
Flybum posted a topic in LEGO Technic, Mindstorms, Model Team and Scale Modeling
Inspired by the Volvo EC750 Excavator with the new Powered Up motors All motors in the rotating platform Tracks with subtractor mechanism and two differentials Tensioner regulated tracks -
 Hello everyone: I am glad to share this project, the mining excavator, based on Cat 6090. Phisycal Configuration: The Lego Cat6090 is a motorized digger on tracked wheels, 2 XL motors provided enough torque. On the track frame is placed the main structure, and a heavy duty turntable allows good rotations, without fricctions. The turntable is rotated by means of 1 XL motor. The main structure contains: the XL motor for turntable, the air compressor, 4 servos for pneumatic valves and the controller. The design is ultra compact in order to meet the requierement of size/scale. The tracked whell is ultra rigid structure, designed to resist extreme load. The air compressor has 4 XL motor and 2 pneumatic pumps, in order to provide a constant air flow and high pressure, both pumps are de-phased 180° in order to reduce vibrations. 4 PF-servos open/close 2 way air valves, to command all pneumatic actuators. The boom has 2 large pneumatic actuator. Due to heavy height of the boom, 4 spring supply extra force during the elevation. 2 large pneumatics actuators push/pull the arm, those actuators are placed below the arm. 2 large penumatics actuators dedicate to rotate the bucket. 1 medium pneumatic actuator, open/close the bucket. Electrical configuration: Three 18650 batteries provide an average of 11.1 V, the compressor are suplied with 11.1 V, and the servos, lights and turntable motor are suplied with 9V. A BMS (Battery Managment System) manages the charge and the discharge durgin the operation. The tracked frame is steering by the use of 11.1 V, and as well is manage by the use of a BMS. On Board System (OBS): The name given to the controller. There are two systems, one for the main structure, and the secund is used to move the tracked well. The main controller, is a server TCP/IP protocol. The controller has a ESP8266 microcontroller with a TCP/IP stack, this controller is able to be programmed in arduino languaje (also micropython) - Teh ESP8266 is used as a sever, Motor driver: used to control the compressor The 4 PF servos are controlled by means of digital outputs, and the lights. ld293d, this is a H-bridge used to control the turntable motor. The second controller, is a ESP8266 as a client, and controls the speed of the tracks. Also, it has a BMS in order to regulates the charges/discharge of the batteries Accessories: 1) Josyticks: Two joysticks, with 4 dof (degrees of freedom) each of one plus a on/off button, are connected to the server module. 2) App: An application developmented under Android studio is used to visualizate the air pressure and electrical current, this app is WIP (work in progress). Conectivity: The comunication used is socket TCP/IP- Main features: maximun pressure reached: 52 psi (358 Kpa) Voltage bus: 11.1 V Compressor electrical consuption: 23 W Weight: 6 kg Length: 30 cm width: 20 cm height: 30 cm Here some pictures, during the construction and commissioning Note: my apologies for my primitive english
 -

Generic mining machine
jorgeopesi posted a topic in LEGO Technic, Mindstorms, Model Team and Scale Modeling
It will be a front shovel or a excavator or both. My challenge is not to have reference, I want to do it strong and playable with the less pieces I can. I started with the tracks and it was not easy at all... all the weight rest over the six small wheels to have less friction on the track gears and you can take off easy the turntable, each undercarriage and the center part. I would like to know if the small tracks will be a good idea to move the machine, I think I will have to do a test with a lot of weight to test it. I did not like at all the 42100 tracks because they are too big I wanted mine just 9 studs high. I still have a lot of work to do so I am quite happy. -

[WIP] Telescoping boom excavator
howitzer posted a topic in LEGO Technic, Mindstorms, Model Team and Scale Modeling
While excavators are long-time favorite of Technic, I recently saw something new in a construction site nearby: an excavator which had a boom that telescoped and rotated around its axis, instead of articulated jib. I then learned that a company called Gradall makes those, here's an example: So I set out to build one, though I make no attempt to replicate the looks exactly as some parts of this machine are next to impossible to replicate in Lego, at least in reasonable size. The first problem was the triangular cross-section of the boom, but very soon it became clear that it's not feasible so I settled for squared cross-section. Considering the functions of axial rotation, luffing and telescoping it also became clear that the motor driving the telescoping action would have to be located on the boom, and hoses for the pneumatically operated bucket would have to run the length of the boom and exit at the back so that there would be room for extension. I wanted to extend it as much as possible, and some 11-12 studs seems to be reasonable maximum. Here's a photo of one stage: Next in line was an attempt to build a superstructure which would support the batteries, pneumatic controls and gearbox for the axial rotation and luffing. At this stage I didn't even think of full motorization or remote control, I don't have PF parts for that and it was already complex enough. I got it as far as testing the motorized boom functions which more or less of worked, but I wasn't satisfied with the performance and there was a lot of problems with the gearing anyway. Here's a photo: At this point I was at sort of a crossroads: take apart and rebuild the superstructure to fix the aforementioned problems with gearing and try to finishing the thing OR make it even more ambitious with the Mindstorms Robot Inventor set that I just recently bought. It would have 4 additional motors (to complement the two PU medium motors I already owned) and hub with 6 outputs which could be controlled much better than what PF allows, enabling perhaps full RC control with proper programming. I chose the latter so that's what I've been doing recently. And it hasn't been easy. First I needed to decide how to use my motors and how to connect them to the functions. With motorized drive (2x tracks) and slewing in addition to the boom controls (axial rotation, telescoping, luffing, bucket switch and pump) there are more functions than the hub has outputs so some sort of gearbox would be required. The 8043 Motorized Excavator acted as an inspiration with its 6 functions for 4 motors, and I decided to try similar gearbox solution where 4 two-position selectors are moved with one motor at the same time so that in one position you can drive and slew and in another position all boom functions can be operated. I also stole the coaxial drive mechanism for tracks from the same set. Here's where I'm now in photo: And in digital model: I recently realized that it's almost impossible to use the angular motors in driving the boom extension, so I ordered a C+ L motor for that purpose and I'm waiting for that now. I also ordered a new type of pneumatic switch, so that it's easier to operate with motor. Some problems at this stage: Is there any way to make the boom support narrower? The problem is the gearing for axial rotation, which seems to be pretty much impossible to fit in between the turntables in any narrower configuration than this: Another problem is the gearbox construction, how to route all the functions to their places while still having the gearbox to be properly supported and smooth so everything works fine. Especially the axial rotation seems to be hard to achieve as there is a lot of resistance in the thing. With the earlier PF iteration I tried routing the gearing to both sides so that both turntables would rotate and while it sort-of works it of course introduces a lot of gears and friction. Turning just one turntable would have the force directed through the boom to the other turntable and that requires a lot of force too so it's probably not feasible. And of course I haven't even touched the programming side of things with the RI hub yet, but I suspect that'll be much easier. Any thoughts or tips? -
.thumb.jpg.2335d10c31c9ffa7029728589340e12f.jpg)
[TC10] MTS Dino Suction Excavator
efferman posted a topic in LEGO Technic, Mindstorms, Model Team and Scale Modeling
My Truck sucks.....not. This is a function which i can not replicate Picture Source I am building these things since 6 years in real and the new double length pneumatic actuators now make it possible to build a lego one. -
This excavator is one of many I've built over the years, but the first I've shared. It came about from looking at Google Image search results for "road rail excavator", with a good helping of inspiration from @Hod Carrier's excellent model. It's not based on any single prototype - the build was mostly dictated by what parts I had available! I decided to incorporate a series of strings to control the main boom, the dipper and the attachment, from gears on the side of the superstructure. Elastic is used to return the dipper and attachment when the string is slackened off - or it was, until the one I was using for the attachment split before I took these photos. It should be fixed between the black and DBG plates and at the top of the cylinder, to represent the hyrdaulic ram. The cab took several revisions before I was happy with it. It uses some frankly ridiculous offsets and SNoT, which I'm sure anyone with a wider parts selection could build much more efficiently! Hey, it works, and I managed to include an opening door so I'm happy. The rear side isn't particularly interesting; I incorporated the control gears into the grille areas so they don't stand out quite so much. Finally, thanks to an extra manual hinge point (just behind the spotlights), the boom can be folded up fairly compactly for transport... ... yet still has enough reach and stability to be able to lift and lay track panels. Thank you for looking! And if anyone's interested, more photos and the LDD file are available in my Bricksafe Folder: https://bricksafe.com/pages/Collet22/road-rail-excavators
-
Hello! This is my latest model: Volvo EC750E in 1:22 scale. Starting point is the 8043 "ultimate" with 6 motors for 6 functions. The undercarriage is 90% the same, I only had to make it 4 studs longer, and added some details. It also has tracks tensioners. 2 of the motors are hidden in the panel-built arm. In this way, I removed the universals joints in the pivot of the main boom, so it works more fluently, and the arm can be thinner (3 studs at the beginning, then 5 studs). The LAs are a bit shorter for this excavator, but I'm quite satisfied by the range of movement. The battery box is on the back and acts as a counterweight. The stickers are home-made. Pneumatic tubes are fake of course... I will make a video in the next days (and better photos). Happy new year to everybody!
-

Chassis for excavators
qwest70 posted a topic in LEGO Technic, Mindstorms, Model Team and Scale Modeling
Hello! Not so long ago, I became interested Lego technic and decided to assemble my own excavator based on 8043. I began to design a chassis on Lego Disigner. And now I present to your attention a new chassis. I made it completely independent on radio control with two M motors that can be changed to L motors, and a two-speed transmission, for better cross-country ability, which is switched manually. The gear ratio is 1 : 1 and 1.5 : 1. The chassis has become 3 cm longer - it is 20 studs and 20 cm, faster and more passable than 8043. I want to know your opinions, ideas and suggestions for improvement. https://photos.app.goo.gl/pLWJAhrkLgbQsicx9 https://photos.app.goo.gl/u9BBHzmuTSy9ownA7 https://photos.app.goo.gl/UtGjoYUEW6Aj4gzc6 https://photos.app.goo.gl/pD2fxTxMAZBFhk9b6 https://photos.app.goo.gl/vCrHdsWXX5dWx3pQ8 https://photos.app.goo.gl/xFhtM5JCXkzqVDfw7 https://photos.app.goo.gl/ViqR7qVG8FfWWggM6 https://photos.app.goo.gl/TVUwKgE8TWrpRN2R8 https://photos.app.goo.gl/JFmRJjed1vA3BnP4A https://photos.app.goo.gl/AXv7u1MQ4RnDmCDV9 https://photos.app.goo.gl/HVCucWCKUY3Gae8U8 -

Two very small steering mechanisms
blueShinyApple posted a topic in LEGO Technic, Mindstorms, Model Team and Scale Modeling
About two black ages ago I came up with a mechanism to add steering to very small models, and I worked on two models based on it. I have never been able to finish them to my satisfaction, and I'm realizing the current black age I'm in will probably last until retirement, or at least until I get a bigger living space, so I'm posting what I have now. I should probably have posted about the mechanisms years ago, but I wanted to have some neat models to show off with it too so I never did. Last time I searched around the web for anyone else who had shown the mechanism off I didn't find anything, so I don't think it's a well known thing. Here's an album with pictures it this post: https://imgur.com/a/ixZOK0s Overview of the two mechanisms. Vertical and horizontal variants of the small mechanism on the left and bigger one on the right: Small mechanism with vertical axle: Same mechanism with horizontal axle: Here's the bigger mechanism with vertical axle: Here's a WIP wheeled excavator based on the smaller mechanism. The bottom right picture is another control scheme I was exploring. I'm mostly satisfied with the model, it's only the arm and bucket I don't like. Here's a bigger WIP model. This one uses very tightly packed pneumatics. It's missing the cab and arm, but I'm otherwise pretty happy with what I've got. I was never satisfied with the arms I managed to build. They were either too bulky or too fragile. This model feels very nice to roll around on the desk, it has some a weight and grounding that the smaller one lacks, and the turning is pretty satisfying too, even though it can't exactly turn on a dime. Lastly, here's a half scale model of the 8049. Lacking fenders, seat, lights and the trailer. I would like to get the two excavators finished one day so I can have them hanging out under my monitor, but my hobbies have shifted to electronics and plants, and I'm lacking in desk space anyway. Maybe one day though :-) Hopefully these mechanisms can help you in your builds! As a bonus, here's my collection of all technic excavators, except for the Liebherr, which I'm hoping to find used for cheap. Note the blue excavator from the 8888 idea book! If imgur decides to stop hosting the pictures, contact me on BL where I have the same username and I'll get them hosted somewhere else. -

[MOC] 42094 Alternate Builds
TGBDZ posted a topic in LEGO Technic, Mindstorms, Model Team and Scale Modeling
Long time no see! Some of You maybe remember my love for excavators and alternate models - 5 years ago I participated in the TC5 challange for alternate builds with an excavator and thanks to Your support I won the competition. Recently decided to challange myself again with the same task of creating an alternate model of the excavator using a middle sized set. 42094 was a no brainer as the best choice - tracks, turntable, some gears, mini actuator - most of the major components necessary for a successful build. The biggest problem was the lack of the wormgear - it would increase control and strength of the extended arm. Nevertheless, I found a solution, and in the end I'm pleasntly surprised how the MOC turned out. Functions: Working tracks (duhh) no suspension, no boogeys, more stable that way Upper structure rotates, sadly didn't manage to attach a knob, so it's done by grabbing the upper part Working boom similar to my previous build Possible to change the height of the whole boom Bucket and the second section of the arm works together - If You reach further, bucket opens, and vice versa - if the arm is getting closer the bucket closes Arm and boom function is operated by a black knob made from small sprocket pieces, to gain easier access, the rear can be opened. Both of the functions can be switched using a LBG connector that switches the clutch piece. So guys, what do You think? Also, what other alternates You would like to see made from this set? And If You want to get the LDD file than check Rebrickable or link below: MODEL INSTRUCTIONS Cheers!
.thumb.jpg.19742e89790e473128572b8d3969c36d.jpg)