Search the Community
Showing results for tags 'vw'.
Found 45 results
-
Back again with another 8 studder, this one being the VW bus featured in the BBC sitcom "The Cleaner", starring Greg Davies. Complete with crime scene clean up kit in the back, accurate decals, and a plethora of SNOT techniques, the free instructions can be downloaded on Rebrickable One of my personal gripes with other LEGO models I've seen with rear wheel spats or "fender skirts" for the americans, is that the rear wheels are recessed by a non insignificant amount compared to the front wheels. My primary aim was to ameliorate this by means of using the half-stud thick panel piece mounted upside-down. Thus, the front and rear wheels are collinear, without sitting too far into the arches. Full photoshoot on my Bricksafe
-
My attempt at making a minifig scaled Volkswagen Beetle, couldn't do it all in red like I Initially wanted, but I think this colour combo makes it looks sporty. One minifigure can be seated inside although I did not provide proof of that. Lego Volkswagen Beetle by legomanijak, on Flickr Lego Volkswagen Beetle by legomanijak, on Flickr Lego Volkswagen Beetle by legomanijak, on Flickr
-
Hello, I would like to present to you my MOC of Santa's Sleigh. Initially it was supposed to by more typical endeavor but my local LUG (WAWLUG) held a small contest to build whatever using Stuntz motors. It only had to go half a meter, which gave birth to idea of a Diesel Sleigh :) The sleigh is pulled by three Stuntz motors and one regular and on very even surface can go up to about 1,5 meters. The biggest problem is the fact the sleigh have only one wheel that is used to "ring" two bells it has. Those will swing back and forth as the sleigh go. I hope you'll enjoy this little piece of X-mas, even though it is a bit late :)
-
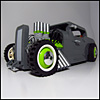
After my rusty train, I was wondering if I can give the same treatment to a car. I wanted to build a beetle for so long, but I don't wanna copy other's work, and also wanted to make some weird stuff, it's a kinda trademark that I have :P After Several hours of designing, I came out with this Baja Rat Rod based on a Beetle The suspension and steering are fully articulated and posable, but they won't work as real suspension/steering, considered this more like an action figure that you can do some dynamic poses to take some cool photos. Even though most of the car is gone, I tried to keep the recognizable beetle profile.
-

[MOD] 10279 VW Bus T2 Remote Controlled
Cyrix78 posted a topic in LEGO Technic, Mindstorms, Model Team and Scale Modeling
Lego released a new Creator veichle and as a tradition I have motorized it with remote control. A bit easier to hide all electric parts this time as the car is really big. But it is also heavy and slow with only one L motor for drive. There are some small changes to the interior, but all details are still there. I have created instructions to build it with Powered Up parts, but if there are any interest I might add instructions for other power systems later. Rebrickable Instructions Youtube Video -
Here's my MOC (rather old, actually) – VAG BUG (vw beetle buggy) Features & Functions: Opening doors (with locks), cabin interior with roll cage, v8 fake-engine (operates via M), very soft independent suspension. PF: 4L (single motor for each wheel), M, servo, 2x LiPo, 2 sbrick, 3x lights. Video: More images:
-
The latest incarnation of my VW Beetle MOC, in minifigure scale. Incorporating new backend shaping to assist with the difficult matter of the curves. Enjoy
-

[MOC] Lego Technic VW Golf GTI TCR
Nura posted a topic in LEGO Technic, Mindstorms, Model Team and Scale Modeling
MOC Volkswagen Golf GTI TCR in Lego Technic Dear friends of the LEGO Technic theme world, in this post I present you my latest MOC of the VW Golf GTI TCR. The model has an elaborate front axle for the front-wheel drive, a 4-speed DSG transmission, steering, brake and a pneumatic lifting system. I used two SBricks for control. My version is built with 3d printed wheels, but lego wheels fit, too. Drive: 2 XL motors Steering: 1 servo motor Gearbox: 2 servo motors Brake: 1 M motor Control: 2 SBricks Light: 3 pairs of LEDs First, I'll show you a picture and the YouTube Video In the following I would like to introduce you to the individual functions and the history of the project. Preparations: In 2017 I saw a photo of the prototype for the first time and as a VW fan I knew directly that this would be my next project. Because there were no blueprints from this vehicle, I took the blueprints of the basic model, VW Golf 7, and overlaid it with appropriate pictures of the vehicle. The scale was set with the choice of tires (Wheel 56mm D. x 34mm, Tire 68.8 x 36 ZR (15038 / 44771)), to 1: 9. After that I converted all dimensions into studs. Construction of the front axle: Now it was time to get the bricks out of the boxes. First, I built the front axle. The model has a front-wheel drive with Ackermann geometry, caster, stabilizer, suspension and brake. The drive axle for the fake engine runs in the lower part of the axle to couple directly to the XL motors in the back. Without consideration of the Ackermann geometry, I have created a YouTube video for the front axle. For the construction manual I am not sure if I should install the Ackermann geometry there. Some used parts are very rare and expensive. In the video you can also see how the brake works. By rotation, two rubber bricks are pressed against the differential. With the SBrick control, I have created a sequence that first lets the M motor press against the differential and releasing it again. Due to the scale a disc brake was not possible in the wheel. The suspension was massively strengthened in the course of the project, so that the vehicle weight is held up. Unfortunately, the stabilizer (red) has no longer a technical function. YouTube - Front axle Construction of the rear axle: For the rear axle, I initially had the idea that the wheels should have a slight camber. I have implemented this as followed. Maybe someone else can use this. However, this was implemented later due to the vehicle weight and the desire that a multi-link axle by VW is represented. Construction of the 4-speed DSG transmission: The construction of the transmission took the most time. I wanted a transmission that could be controlled blind with the smartphone. It should work reliable and without constant monitoring of the moving parts. In addition, it had to be so small that it fits "between" the front seats (The model has like the original only a driver's seat.) and under the seat, but in front of the drive module. Overall, it was very limited. Here is a photo of the final version, which is very trivial operated with two servos. One servo controls the 1st and 3rd gear, and the other servo controls the gears 2 and 4. This allows quick and smooth switching. An extra video is also available. YouTube - Gearbox Construction of the pneumatic lifting system: At that moment I was done with the chassis. However, the pneumatic lifting system fascinated me and in other MOCs something like that was already realized. Since there was still room for the necessary works, I developed and installed three modules with cylinders. Here's an example of how I built the front left cylinder. In general: I built and organized the entire model in modules. The chassis is subdivided into the following submodels: front axle, transmission module, drive module and rear axle. The rear lifting cylinder is integrated in the drive module. The front lift cylinders connect to the transmission module. Then all modules can be assembled to the entire chassis and fastened with a few connectors. Other modules are the fake engine and the dashboard with steering gear for the moving steering wheel. The conclusion has formed the body. Again, I worked with many submodels, so you could always work on small to medium sized submodels. This has especially facilitated my work in the Stud.io program. The entire model is already built in BrickLink’s Stud.io with all building steps. I am still considering whether I should offer the construction manual for sale or keeping it unique. Too many companies are copying MOCs and do not refer to the artists. You can find more pictures on BrickSafe or my Social Media channels on Facebook and Instagram. Give me a feedback and ask your questions here in the thread. I like to explain the things even further in detail. I love the render function in Stud.io :-) -

minifig scale reworking of TLG classics [MOC]
bamsham363 posted a topic in LEGO Technic, Mindstorms, Model Team and Scale Modeling
Enjoy, my scale reworkings all 6 wide -

What do you think is going to happen to LEGO VW sets?
Collector245 posted a topic in General LEGO Discussion
Hello, I am curious what will happen with the LEGO and VW partnership. What sets do they have left to make. They have already made a few VW Beetle sets and a VW bus. What more could they make? I don't think LEGO will want to give the partnership away (considering that they have had it since the 1950s). William -
It's 1964. Vietnam is starting. Martin Luther King receives the Nobel Peace Prize the year Nelson Mandela is jailed. Sony introduces the Video Cassette Recorder, and the computer mouse is invented. Richard Burton and Elizabeth Taylor marry for the first time. The Beatles are riding high in international charts, but I want you to put I Get Around by the Beach Boys on your internal gramophone, grab your shorts and the keys to your Bug, and head on over to Californ-eye-ay coz' we are going surfin'! Apparently. The VW Beetle, or Volkswagen Type I, was already over 25 years old in 1964. It was conceived in Germany in 1938, but let's gloss over that part of its history; production didn't pick up until 1945. Over the car's 65 year production span, an astonishing 21 million were built; it is unsurprising therefore that the Beetle was named in 1999's Car of the Century competition as the fourth most influential car of the 20th century (after the Citroen DS? Really?) and that may explain its inclusion as the logical LEGO follow-up to 2014's 10242 Mini Cooper, which came second in that competition. Review: 10252 Volkswagen Beetle This is not The LEGO Co.'s first VW Beetle set. Believe it or not, it's not even the second - many of you will remember the largely studded 10187 from 2008. To find the first, we have to go all the way back to the first year of LEGO mass-produced toys - 1958 - when an ambiguously numbered die-cast metal 260 VW Beetle was available; several iterations of the Beetle featured in the early days of LEGO metal cars, including one from 1964, but I believe 10187 was the first to be built in LEGO bricks. This latest offering joins the Mini in the recently introduced LEGO Creator Expert range. It's a very different bucket of worms to the last Beetle, making use of curves and angles rather than its predecessor's studs-up sculpture, and ascends to the mainstream another peripheral colour: Dark Azure. Set Information Name: Volkswagen Beetle Number: 10252 Theme: CREATOR Expert Release: 2016 Parts: 1167 Figures: N/A Price: EUR €89.99 - 104.99 | GB £69.99 | US $99.99 | AU $149.99 | CA $129.99 | DKK 799.00 Links ... LEGO Shop ... Brickset ... Bricklink The Box Click for a larger full-frontal image The minimalist Creator Expert packaging shares more in common with the Exclusives sets than the main CREATOR range, but it's smart and allows the set picture to dominate. Here a surf-equipped Beetle drives itself (hilarity ensues) down a sandy track. The set manages to stand out even against the similarly-coloured sea; the choice of surf theme for the set really dictates the box art. I wonder whether the set's colour scheme was decided by the reference image, or whether the artist hunted around for a suitable image. If the latter, they found one, and it's displayed on the right hand side: Click for a larger image Judging by the roof rack, I think the set designer must have used this image for inspiration. It also affects the set's historical accuracy: the real-life Beetle here is a pre-1965 model, given the smaller window apertures. On the back of the box, the sentient car parks itself among the dunes, and leans its surfboard against a conveniently-placed inset of the set features: Click for a larger image I love that. The board even casts a shadow on the inset! The insets show off the set's salient features well, though the main image is rather similar to the box front and I would have shown the car's rear off here. The box measures H 279 x W 478 x D 72 mm (11" x 19" x 3" approx) and weighs 1352 g (3 lb). It is tape-sealed . On the underside is the Volkswagen licensing information, interestingly in the official VW typeface. As is customary for CREATOR sets, the set inventory is displayed on the box top. The Instructions Now, I was under the impression that The LEGO Company had listened to the whinges of its die-hard fan-base, and endeavoured to wrap the instructions and sticker sheets of the more expensive sets to prevent bad things happening. Not so here. My instructions were loose and crumpled in the box. I hope that is just because I have an early promotional copy of the set, and that this doesn't represent a policy change. The single, perfect-bound volume has a cover similar to the box front. There are no technical or historical tidbits, unlike the LEGO Ideas or Architecture sets; I'd like to have seen a bit of information about the Beetle, but not if it would inflate the price of the set. The instruction steps are clear, with part call-outs, and a handy yellow line to show you where new bits are added. This doesn't help when you miss an entire step, as I did! The only other problem I encountered was trying to identify the colour of a 1x1 round stud which looked either white or grey (but probably meant to be flat silver). Sticker Sheet Mercifully, my sticker sheet was only crumpled but not damaged by its journey loose in the box. There stickers are handily numbered, though not unfortunately in the order you apply them. There's a lot of redundancy here, so you can get away with applying as few as 12 of the 24 decals: stickers 13 - 16 are duplicated, and the instructions suggest only applying one of each. You can choose which country's registration to use, though I was delighted to find that there are tiles enough to allow you apply all of them, and change the registration plate to enable a James Bond escape or something. The countries represented are USA, Australia (I think, assuming 'QLD' is Queensland), the UK, and (West) Germany. The Parts The parts are divided into three modules, of 3, 2, and 3 polybags each, as shown here, and the tyres were loose in the box. My first task was to confirm the colour - having not read the official LEGO blurb, I did what I always do when confronted with an unfamiliar colour, which is compare it to a part in a known set. Most of our LEGO is packed away, but fortunately the kids came to the rescue. So Duplo confirms this blue is Dark Azure. The three modules' parts are laid out below. Click each frame for a close-up It's great to see such a large choice of parts in a relatively rare colour, previously found mostly on minifigs and Duplo, or, more recently, in Basic Bricks sets. Prior to this Beetle there were no plates available in Dark Azure. Whether this means there'll be an abundance of regular sets in this colour remains to be seen; I had high hopes for Bright Green after the CITY recycling sets a few years ago but nothing came of that. Unlike, say, Dark Green or Dark Red, I can't see that there'll be much demand for Dark Azure amongst MOCers, though it might make a nice base colour for a re-imagined Classic Space. Otherwise, there are a load of handy SNOT bricks and plates of various kinds, and a few parts of interest: The dark azure corner brick is a new part, ID 24599, and I think would be described as Brick, Round Corner 5x5. Its curvature matches that of the Brick, Modified 1 x 2 x 1 1/3 but it is only three plates high. The 24246 heel-print tile is new this year in a few Mixels sets, and only in white; 23443 bar holder with handle is new, and listed on Bricklink but not yet appearing in any sets. New to me are the 1 x 1 x 3 brick, though it's been around since 2014 and quite common, the Technic axle 3 yellow, and the Ring pull tile, which I can see being very useful. The Round 1x1 tile with gauge featured of course in the Mini and several other sets. The clippy plate is shown only because of the mold difference: both types occur in this set (or my copy, at least) - they are I believe Bricklink types b and d. Then of course there's the new VW print tile. The tile is light bluish grey with a slightly reflective 'negative' print; I would rather have seen a shiny VW 'positive' print on a darker tile, buy hey. There are two spares in this set and I can see these being useful for CITY cars. Finally, there's the vaunted 'updated windshield design': I didn't even notice this until I read the blurb when writing the review: hence the stickers are already on! The mold is a stud less deep, but still quite sturdy; this design would have been quite handy for the Mini whose older design windscreen is also shown here. The Build The build starts with the chassis and is largely pedestrian until towards the end of module one, where SNOT begins to be applied in more detail and things quite suddenly get exciting. In the interest of brevity, I will not describe the build process in detail here, but it is shown in detail on my flickr; I will instead show a few interesting techniques. This is the back end of the car, late in module 1: A large chunk of tan and bley plates and bricks has been inserted, studs facing to the rear, with male and female clips pointing upwards. It's not until module 3 that you find out what the clips are for - they attach the rear window and engine cover. Behind that, a light bley 2x2 SNOT plate tessellates perfectly with a dark bley 1x1 SNOT brick with two 1x1 bley plates: these hold the tail lights; this technique is used in a few places in the set. Interesting SNOT abounds (*thinks of children* ). Here the rear (centre) and front (right) seat uprights are made; the rear one makes use of a stack of headlight bricks alternating studs right/studs up to make a stud reverser that is exactly 3 plates wide; when combined with the left and right halves, this makes 20 plate-heights or exactly 8 brick widths - so the seat rear fits neatly in the gap. I'll remember that technique! The front seats use 1x1 bricks with studs on two sides; these seats are slightly wider than 4 bricks each as they don't need to fit into a confined space - see here (you can also see where I missed a step - the bley plates either side of the rear seat should be a brick higher ). The entire front end of the car is initially attached only via the front axle, and at a half-stud offset: This is then corrected with the judicious application of jumper plates. You'll be able to see more when we look at the underside later. More delightful SNOT-work builds the front wings, including a repeat of the tessellation I pointed out earlier: The small construction I have removed here contains a SNOT plate that is used to correct the sideways-facing studs shown in the picture. I love that sort of thing! You can also see how the headlights are attached, with a technique similar to the Mini's. You'll be able to see more when we come to the features, or check my flickr. The Finished Car I've chosen the German plates for my car, partly because it's a German car, and partly because I put the British number plate stickers on badly. Plus I built it left-hand drive before thinking about it (you can very easily convert it). It does also mean that I can point out The Significance Of The WOB. The bonnet boot luggage compartment cover (from now on, it's 'luggage cover' and 'engine cover', mkay?) has popped open in the above picture, which happens all too easily. Here it is from the reverse angle with the cover closed: The designer has gone to extraordinary lengths to recreate the challenging curves of this iconic vehicle. Look at the nearside headlight: below it is a SNOT-mounted 1x2 cheese wedge; above it a regularly-placed 1x1 cheese next to a 1x3 bow; the contour these form almost perfectly matches the curve of the new 5x5 cover piece forming the wing. The entire wing then marries reasonably neatly to the luggage cover, itself a two-part design attempting to recreate the curves of the real thing. Conscious as I am that the stuff on the roof distracts from the car itself, I removed it: You can see a bit more clearly how the wing curves of the 5x5 corner bricks matches the 1x1 modified bricks at medial ends of both front and rear wings. Strangely, without the roof stuff, the wheels and wings themselves start to look a little too chunky to my eye, but we'll do a formal comparison shortly. Note the use of the new bar with handle parts to mount the door mirrors. From this view, the problem with the car's windscreen is becoming increasingly apparent. There's something I just don't like about it, but it's hard to put my finger on what. Here's a comparison shot of a '64 Beetle: Image from photogallery.classiccars.com It's not a perfect comparator. The wings are indeed a little too chunky on the LEGO version, but that's not the problem with the screen; '64 Beetles had flat screens with an arch shape, which the dark bley tile above the screen fails to recreate convincingly. Let's look at it in more detail from the side: Image from lehnan.hol.es The rake of the windscreen is too steep. It's a small difference, and it ought to be subtle, but combined with the relative loss of curvature of the front end of the roof, it has a dramatic effect making the windscreen look more like a Citroen 2CV than a Beetle. However, aside from the chunky wings and steep windscreen, the overall shape is otherwise remarkably good. Let's move rearward, where things start to get better again. The wonderful curves continue towards the engine compartment: You can see how the tapered door pillar gives gradient to the side of the car, and the 4x4 corner slope helps to smooth the lines from the wider sides to the narrower rear. This part sits, incidentally, on one of these, which defines the slope of the rear window. The engine cover uses a SNOTty construction to achieve a half-plate step, giving the (faint) illusion of a lateral curve. The curves of the rear wings are a little fussier than the front ones, but they still create nice effect even if they are not quite as flared as the real thing: Image from foundonthestreet.net The LEGO version uses grille tiles to depict the iconic air-cooled engine intakes; the effect is not entirely successful, and I wonder if they might have been better off using these (or even these, if they were still available). I do like the rear lights; I'm tempted to replace the deeper of the two bley 1x1 plates under the amber light with a body-coloured one (there are spares in the set!). Front-on, the gap between the luggage cover and bodywork starts to show, but this is the only angle from which it's noticeable. The windscreen, again, looks odd, but the wing curves look great. The tyres are possibly a little too wide. This view isn't quite so forgiving of the rear, which looks better from oblique angles, but I still think the rear is the car's best side. Note the bumpers, made with modern curved pieces, with a hinge to help at the rear; they are nice (but they're crying out for some chrome). I'm conscious at this point that I'm being quite critical. Take a look at this shot from above: Look at the apex of the luggage cover at the front, and follow the ovoid line of the bodywork backwards, round to the side, and in again at the rear, and then back again; then look again at the curves of the wings, especially at the front; then compare to the schematic: It is a remarkable feat to get anything near to the shape of this delightfully contoured car in LEGO. And back down to earth, quite literally: The underside is remarkable for one point, which I alluded to earlier: the axles are not threaded through the chassis as you might expect, but attached almost independently until the structure is built around it. You can also see how the front end of the chassis sits at a half-stud offset, I think in order to accommodate the spare wheel. Features Now let's have a look in a bit more detail. We saw this earlier, but here's another look at the elaborate work going in to get the wings looking as smooth as possible. It's not the most elegant solution, perhaps, and not perfect, but reasonable. Behind the wheel you can see some studs facing outwards - these are from two inverted brackets that form the walls of the luggage compartment; the studs don't connect to anything. Talking of which ... ... here it is, and looking roomier than in real life. The black bit with the VW badge is the fuel tank. The spare wheel just sits there; it rattles around a bit. Being the same size as the Mini spare wheel, it's also too small when compared to the main tyres! Some fiddly jumper plates go to make the door attachment, but the result is smooth and surprisingly sturdy, if a little unsightly. The seat construction is gorgeous, and I like the telephone door handles. The gauge behind the steering wheel is the sole instrument on the dashboard. No radio? I've removed part of the roof to give a better view of the interior. Again, the seat construction is highly effective; it's not obvious here but they are mounted on jumpers to give a brick-wide gap between in which sits the handbrake. Towards the front is a gearstick, made simply from a classic space aerial, but which sits on a semicircular curved brick representing the transmission tunnel ... ... and which continues to the rear: Both front and rear seats flip forward; behind the rear seat is a luggage shelf - true to life - in which the Picnic Rug is stowed. Note further clever SNOT supporting the door pillars. I alluded to this earlier, but here is how the rear window and engine cover are fixed: The upward-pointing male clips hold the window; the two flat silver (these are the ones that caused me trouble in the build) 1x1 studs prevent the window collapsing in. It looks fiddly, but it comes together easily and is remarkably durable. And here's what's in the rear: This is a simple but reasonable facsimile of the VW aircooled engine of the original Beetle. It looks like it might be a rotary engine but it's actually a flat 4; the larger wheel looks like it might be the fan, but it's actually the fan pulley - the fan being in the round black thing behind. In case you wanted to know! I think the LEGO version works really well. Finally, there's the window-dressing: A cool-box containing two green bottles and a green can with a ring-pull top, nicely made with simple but clever SNOT, and a surfboard that looks a little thrown together - I think it would be possible to make it without the white protrusions at the tip and the tail, but it's a minor thing. You might also just be able to make out the lip of a white 1x1 tile in the exact centre of the board - why they didn't use a plate here, I don't know. It all fits snugly on the roof rack, the box via one stud, the board by being wedged between the edges and those black rubber cheating-pieces: Comparison to 10242 Mini Cooper I don't have the 2008 Beetle, and anyway this set's immediate ancestor (and main competitor) is 2014's Mini Cooper. How do they compare? Next to the clean Mini, the Beetle's lines do look a little fussy. The Mini also highlights another minor complaint about the Beetle - the lack of chrome (or metallic silver, at least); though I understand that the Beetle would require a lot of silver parts or it would appear mismatched. The front end of the Mini is so good that meaningful comparison is lost; the Beetle is, after all, a much more difficult shape to render in LEGO. This really isn't a fair comparison! Everything about that Mini is spot on - probably the only thing about it I would change is the tinted windows. So how do they sit together on the shelf? Pretty well, actually, though the scale is off, and the Mini is noticeably larger than it ought it be compared to the Beetle (I estimate it would need to be 3 studs narrower to be at the correct scale). But who cares about that when they look so good! If you had to choose, which would you buy? The Mini, despite slightly fewer pieces, is more expensive, though only just - this may be a licensing issue. The Beetle is a more interesting build, even if the end result isn't quite so good. Here is how I would sum up this comparison: people might say of the Beetle, 'Wow, that blue LEGO car looks like a Beetle!' But they would say of the Mini, 'you know, that Mini model is actually made of LEGO!' But is that a good thing? Maybe it's all down to the Battle of the Picnics: Conclusion This has been a really difficult set to review. Inspired in no small way by the joy that is the Mini, I was eagerly anticipating this set, and really wanted to love it. I like it, but do I love it? I'm not so sure. The parts selection is interesting and useful, and largely in an unusual colour. The build is fun and instructive. The way those curves are achieved is delightful ... but it's just not quite accurate enough. I've been spoiled by the Mini's near-perfection, and this is a much more difficult and less forgiving original, so it's understandable - but disappointing all the same. Design 7 It's just not quite a Beetle, though it's close. Parts 8 A useful selection and unusual colour. More chrome or silver would be welcome. And what's with the crumpled instructions, TLG? Build 9 Fun, engaging, and instructive. Features 7 Opening compartments, doors, folding seats, picnic stuff, but this is a display set, really, and the cool box and surfboard are actually a bit of a distraction. Give me chrome instead! Value 9 At under £70 this is really good value - in the UK, at least. Overall 80% My Score 7/10 Do I like it? Yes. Do I love it? No. Would I buy it (if I didn't already have it)? Oh yes. Do I want to see more classic vehicles? Absolutely. I just wish they'd tilted that windscreen ... Thanks for reading! I hope you enjoyed the review. Comments welcome. Rufus Resources 1. VW Beetle on Wikipedia 2. VW air-cooled engine My flickr album
-
A new home for my VW Collection, be it old or new or rodded, enjoy
-
i suprised myself with a new version, with opening bonnet (hood) and boot (trunk), and of course doors, as per prev models roof can be hard top or soft top and fits 2 mini fig in front and one in back, 2 at a push if roof is down, comments thoughts welcome, is a work in progress as would like to enhance the engine/roof etc etc
-
My version of the famous bug, Wip, as never satisfied, so keep on updating This is based on my real build beetle moc, all comments welcome, old rear end. rally version (i believe this is Gulf oil racing colours) classic version
-
Ive built a vw beetle minifig scale, just ordered all the parts so will post pics when i get to build it for real, but am having difficulty with joining the roof parts, the scale is great but am needing thin plates to join them, are there such pieces? images from bluerender can be found at this link https://rebrickable.com/mocs/MOC-13350/bamsham363/vw-beetle-revision/#comments its almost 100% complete however im about 1/2 a flat out on getting a minifig in with hair, bald hes fine, its now bugging me, as doesnt look so good if raised one thin higher...im sure ill get there but its at that stage where its bugging me, and wishing lego could invent a new piece, so all help comments would be appreciated.
-
My MOC that was completed couple months ago, able to sit 3 minifigs in there :) Thanks for viewing ! Regards, KMP FB : www.facebook.com/kmpmocs Flickr : www.flickr.com/photos/149274215@N03/
-
The future version of the vw beetle, "The Space Bug", travel for the future
-

[MOC] Esso Gas Station 1953
Norton74 posted a topic in LEGO Technic, Mindstorms, Model Team and Scale Modeling
Put a tiger in your tank!* - Part 2 Few days ago I presented the Volkswagen T1 Esso Service that was the first part of my latest MOC. Today I'm happy and proud to show you the second part: a classic Esso gas Station designed in 1953 by Dutch modernist architect Willem Marinus Dudok. My LEGO Dudok Esso gas station has the same features of the real one: an elegant design, a v-shaped roof on both sides, two gas pumps on a dark grey platform, different advertising signs and other stuff. The shop is on the front of the station; a detailed service garage is located at the back. There are a lot of details both outside and inside the building, let's take a look. In the shop you can find a big desk with a vintage phone, a cash register and a architect lamp. A big clock is positioned on the wall close to the shelves where you can see the oil cans and an old radio. Two neon lights and a fan are hung on the ceiling support. The garage at the back features a lot of utensils, advertising signs and other stuff. My VW Type 2 T1 decked up in Esso livery fits perfectly in this scene. Take a look at the Michelin Man (Bibendum)...I love it! The design of Dudok was simple and brilliant simultaneously. According to the mission he received from ESSO Netherlands, the station had to be functional and inexpensive to produce. It was just after World War II and raw materials were scarce. At the same time the road network grew and pumping stations had to be placed anywhere. 112 Dudok Esso stations were placed along the Dutch highways. Below an overview. Below you can see the real Esso station photographed at the National Automobile Museum Collection Louwman (The Netherlands) where was placed in 2004. I built this brand new MOC last winter and I’m particularly fond of it. More pics and info on my flickr photostream. *Put a tiger in your tank! was the Esso slogan during the sixties and seventies. All the best and happy building! Andrea - Norton74 -

LDD/RC/PF VW T1 Camper Van(VW T1 BUS) 10 wide
moonein posted a topic in LEGO Technic, Mindstorms, Model Team and Scale Modeling
New LEGO/ Lego MOC, VW T1 BUS (VW Camper Van) Is still 10 grain width, the new version is not based on the past version of the upgrade, I refer to a large number of original drawings and objects, re design details, body length, internal structure, and customized manual spraying (silver effect) parts. The new version of the T1 will be a series of my design, I will be based on this chassis for a variety of T1 modified car design (such as: pickups, SUVs, racing cars, trailers and so on, of course, will also consider the static model). T1 is a classic, multi-purpose models, it is worth pondering, I hope there will be more based on the design of the personal style of the modified car appears, I will always maintain this series of drawings sharing. The current version is 1.1, the design will be updated at any time, with the design of the trailer will be released, welcome to communicate with me through MocPages, Sina (Weibo) and other social platforms. http://weibo.com/moonein http://www.moc-pages.com/moc.php/438905 https://rebrickable.com/mocs/MOC-8059/moonein/rcpf-vw-t1-camper-vanvw-t1-bus-10-wide/ -
A couple of weeks ago, I finished my long planned VW T1 Microbus. Working steering, openable backdoors and a full interior in a 6-wide body. by OutBricks by OutBricks by OutBricks The instructionvideo: And a speedbuild:
-
1960s VW Beetle - Custom
drdesignz posted a topic in LEGO Technic, Mindstorms, Model Team and Scale Modeling
This is a redesigned, custom version of Creator Beetle (10252), which I've wanted to do since it came out. A lot of people complained, saying the Lego model looked more like a Citroen 2CV. I personally think it's a great model, with all its details. I have nothing against it. That said, I do think the shaping could look more a little more like the real thing and I wanted to give it a shot. It's quite the challenge, with all its curves. There are only so many dark azure pieces to work with. I figured lowering it as much as possible would also add to that difficulty (not to mention it's hilarious). It took a lot of time and figuring out, but this is the result, which I'm mostly happy with, considering what I had to work with, the goal, and the comically large new fender pieces. All chrome is original Lego, except the wheels. They're real Lego wheels, chromed by another company (randomly found browsing Bricklink one day). The 8-ball shifter knob is from Killer Croc Tail-Gator (70907), the shifter stick from Frightening Knight (CMF s15), the tinted windshielf from Mini Cooper (10242), and the "love" tile on the dash is from the Yellow Submarine (21306). These pieces are unique to those sets and relatively recently produced for the first time, along with many of the Beetle's dark azure parts. Meaning this car couldn't have been built at all a couple years ago. -
It's Christmas time... What if Santa couldn't find his sleigh? I'm sure he'd drive a Vee Dub T2 full of gifts... Merry Christmas to all of you! Andrea Lattanzio | Norton74
-

[MOC] VW Crafter flatbed van
TomasHubik posted a topic in LEGO Technic, Mindstorms, Model Team and Scale Modeling
Hi Guys!, today, I would like to present you medium scale VW Crafter flatbed. It has not much functions but driving this van is really fun. It use 2L motors for propulsion with fast gear reduction and Servo motor for steering. It dispose with independent front axle and live rear axle with good light height. What do you think? More at http://lego.tomashubik.com And one bad quality video as usual ;) -
Hello fellow City friends, I've just finished a Volkswagen T3 camping edition "Westfalia", "Caravelle CL" and a standard. The scale used is 1/42 and regarded by myself as minifig/city scale, for it uses 1,70m for a minifig being 5 vertical studs high (including head pin). It frankly wont fit any minifigs properly, since its 5,6 studs wide (1,80m) and i needed a lot of interiour structure for the roof and windows to stay in place In some renders i used non-transparts windows to give better contrast (bluerender aint good with trans! ). Critique and feedback always welcome, feel free to enjoy the pics Cheers, Ron. New lands.... by Ron Dayes, auf Flickr T3 Westfalia side view by Ron Dayes, auf Flickr T3 Westfalia back view by Ron Dayes, auf Flickr T3 Standard by Ron Dayes, auf Flickr T3 Caravelle Cl by Ron Dayes, auf Flickr
-

Speed Champions VW Van?! - 24 Hours of LeMons Edition
droomangroup posted a topic in Special LEGO Themes
So my friend Eric built a 24 Hours of LeMons race van from a 91 VW Vanagon and a 2.5 subaru legacy motor. I helped out with making the Polizei decals but overall it was a sweet deal for me because all I really had to do was show up and drive. It was my first LeMons race and my first time on a track in an actual road race, and it was FUN. If you haven't heard of the series, check it out here... http://www.24hoursoflemons.com/ Our van even got some great press on roadkill.com... http://www.roadkill.com/lemons-sears-pointless-vans/ http://www.roadkill.com/sears-point-lemons-winners/ Anyway, my friend spent a lot of money and hours building this awesome van so I wanted to do something nice to thank him for his hard work so I made him a LEGO version of our van to say thanks. Obviously this box is just a mock up, but I did make these designs into an actual box using a LEGO box I turned inside out and covered with some large photo prints from my 13x19 printer...I just forgot to take a picture of it before giving it to him. Since I knew he'd appreciate building it, I made the van into a kit with instructions made from photos since making actual quality instructions is a huge pain in the megablocks... http://odometer.org/polizei/ I really like the minifig fez as an aircleaner... Overall I'm super happy with how it came out, it was my first attempt at a larger vehicle and I think it worked out well. I did cheat a bit with the black decals to make a wider grill, but I figured if TLG can use a sticker for the middle divider on the split window of their VW bus, then I can get away with that. Here's some pics of the real van in action...