Search the Community
Showing results for tags 'motorised'.
Found 12 results
-

Motorised Johnny 5 MOC <Not an Alternative Build>
RJ BrickBuilds posted a topic in LEGO Technic, Mindstorms, Model Team and Scale Modeling
01 by RJ BrickBuilds, on Flickr Hello, Bozos! You can support Johnny 5 on Lego Ideas to turn him into an Official Johnny 5 Lego Set here: Johnny 5 on Lego Ideas Who is Johnny 5? Those who don’t know him, Johnny 5, also known as “S-A-I-N-T Prototype Number 5” or Number 5 for short, is a very lively and inquisitive military robot prototype who’s perpetually hungry for more “input”. He is the star of the 1980’s movies Short Circuit and Short Circuit 2 and a TV special called Hot Cars. He became sentient when he was luckily struck by lightning during a combat demonstration. Although he is designed to serve the military as a robot prototype, he has an adorable child-like behaviour and has a great respect for life. He is a peace-loving robot and refuses to use his military capabilities to harm others. Despite being very intelligent and inventive, his naivety and trusting nature has been taken advantaged of on several occasions. Design This model is fully motorised using Powered Up motors and hub and controlled through a mobile device using the Powered UP App. It uses Technic parts to ensure stability of the structure, and System parts to capture the look and form of Johnny 5. The following are the playable features of the model: Movement – This model can move around on tank tracks and uses skid steer to change directions. Body – Johnny 5’s body can tilt using a Powered Up L motor and controlled using a mobile. Arms – Arms can be raised and lowered individually using the Powered Up App. The fingers can be adjusted manually as well as the elbows. Head – The head can be tilted and turned using the Powered Up App. Eyebrows – Eyebrows can be manually adjusted to suit the desired facial expression. Laser – The laser at the back can be raised and lowered using the Powered Up App. Watch the YouTube video here to illustrate these functions better: Johnny 5 on Youtube Total Pieces: 2,711 Dimensions: Studs: W 68.4 x L 36.1 x H 73.5 Inch: W 21.5 x L 11.4 x H 23.2 cm: W 54.7 x L 28.9 x H 58.8 Weight: 99.8 ounces or 2.83 kg Johnny 5 MOC Pictures: 02 by RJ BrickBuilds, on Flickr 03 by RJ BrickBuilds, on Flickr 06 by RJ BrickBuilds, on Flickr 05 by RJ BrickBuilds, on Flickr 04 by RJ BrickBuilds, on Flickr 07 by RJ BrickBuilds, on Flickr 08 by RJ BrickBuilds, on Flickr 09 by RJ BrickBuilds, on Flickr 10 by RJ BrickBuilds, on Flickr -
Stupid name, I know. It wasn't intended to stick, but here we are... This MOC started out as a chassis test and grew from there. I was trying to build as compact a steam based driveline as possible, similar to my Powered Up Shunter from a while back. While that was the smallest I felt I could go with a Diesel (using strictly LEGO parts and legal techniques only) this was kind of the same exercise but with a steam locomotive. Obviously I couldn't hide a battery box in the loco anywhere, so I made a tender. Not prototypical, I know, but this isn't based on anything in particular. It's fantasy for a fictional railway that doesn't really even exist outside of a couple of locos with the WFLR initials on them! That being said, here is my design process so far. Power Tank Engine MOC on Imgur. Sorry for the whole external host thing. Maybe I'll modify the post once I get time to manually resize all the images and embed them from the Imgur links. For now, the external link will have to do. Sorry! I may convert this into a proper tank engine at some point with a coal bunker on the back and a boxcar for the battery box, but I'm pretty happy with it for now.
-

[Mod] RC Motorized Ghostbusters 10274 Ecto-1 with Powered Up
recklessGlitch posted a topic in LEGO Licensed
I got the Ecto for christmas and I felt the urge to squeeze in some remote controlled Motors. The new Powered Up have just the thing (although they are badly documented) One month after christmas I had it up and running. Tell me what you think. • quasi invisible • minimal invasive - all gadgets work • Battery replacement with no dissambling • light and sound kit still fits in • Lego POWERED UP Bluetooth Remote Control • no discontinued Power Functions • complete Instructions on rebrickable I made my first video about that: For this motorization I used LEGO's Powered Up Large Technic Motor for steering. That thing is just made to be used for the steering. It can act like a servo, because it has an internal position sensor. It is slim and dark bluish gray so it replaces that kardan drive below the front seat perfectly. Aditionally I didn't want to take it appart every time I change the batteries, so you can reacht it from the bottom. -
[MOC] [C-Model] RJ's Johnny 5
RJ BrickBuilds posted a topic in LEGO Technic, Mindstorms, Model Team and Scale Modeling
This is an alternate build of the Lego Set 42100, Liebherr 9800. Parts list used in the MOC is listed so you can opt to just buy the required parts instead of buying set 42100.Motorized features include: Tank drive for both tracks Arms upward/downward movements Head turn Head tilt Body tilt Manual play features include: Upper and lower eye flaps can be moved to show facial expressions. Finger movements. Limited manual arm movements Here's a link to the YouTube video to showcase its movements: RJ's Johnny 5 YouTube Video If anybody is interested, building instructions are available at Rebrickable. -
Johnny 5 is on Lego Ideas
RJ BrickBuilds posted a topic in LEGO Technic, Mindstorms, Model Team and Scale Modeling
Johnny 5 needs your support to become an OFFICIAL JOHNNY 5 LEGO SET. Click the link below to support and feel free to share. - Link Removed - Who is Johnny 5? Hello, Bozos! Those who don’t know him, Johnny 5, also known as “S-A-I-N-T Prototype Number 5” or Number 5 for short, is a very lively and inquisitive military robot prototype who’s perpetually hungry for more “input”. He is the star of the 1980’s movies Short Circuit and Short Circuit 2 and a TV special called Hot Cars. He became sentient when he was luckily struck by lightning during a combat demonstration. Although he is designed to serve the military as a robot prototype, he has an adorable child-like behaviour and has a great respect for life. He is a peace-loving robot and refuses to use his military capabilities to harm others. Despite being very intelligent and inventive, his naivety and trusting nature has been taken advantaged of on several occasions. Why Make a Johnny 5 Lego Set? In Short Circuit 2, Johnny 5 set up a new business with his old friend Ben Jahrvi that builds and sells toy robots made in Johnny 5's likeness. This little robot never made it into actual production after the film. Johnny 5’s popularity and the unavailability of access to these cute little Johnny 5 robots made people clamour for this toy. To date anyone can google sites for 3D printing Johnny 5 robots and websites dedicated to producing both life-like and miniature Johnny 5’s. Johnny 5 is one of the iconic fictional robots in cinema to date. He’s part of every child who’s lived through the 80’s like me who are now AFOLs and longed for the Johnny 5 toy that never came out. Design This model is fully motorised using Powered Up motors and hub and controlled through a mobile device using the Powered UP App. It uses Technic parts to ensure stability of the structure, and System parts to capture the look and form of Johnny 5. The following are the playable features of the model: Movement – This model can move around on tank tracks and uses skid steer to change directions. Body – Johnny 5’s body can tilt using a Powered Up L motor and controlled using a mobile. Arms – Arms can be raised and lowered individually using the Powered Up App. The fingers can be adjusted manually as well as the elbows. Head – The head can be tilted and turned using the Powered Up App. Eyebrows – Eyebrows can be manually adjusted to suit the desired facial expression. Laser – The laser at the back can be raised and lowered using the Powered Up App. Total Pieces: 2,711 Dimensions: Studs: W 68.4 x L 36.1 x H 73.5 Inch: W 21.5 x L 11.4 x H 23.2 cm: W 54.7 x L 28.9 x H 58.8 Weight: 99.8 ounces or 2.83 kg -

8868 Air Claw Redux Now With Free Instructions
Cardboy posted a topic in LEGO Technic, Mindstorms, Model Team and Scale Modeling
Finlay finished the instructions you can now download them for free here Air-Claw With a new Pneumatic truck possibly on the horizon, I decided to give the Redux treatment to one of my favourite models.This is due to its complexity and that it was the first large model that i bought for myself that was not a Christmas or Birthday present. And judging from a recent post on the forums a lot of you like it as well. I have still to model the tubing from my IRL model but I may have to switch to LDCad as stud.io is still not the best at this. As with most of the models of the old studded times, to convert to studless you have to switch the width from even to odd so the truck is now one stud wider. I have tried to keep as many details from the original and made changes where the new beams demand it or where newer parts allow a better build. With the redux models I make I always try to use the most current parts available so people who don't have the original have a chance to build it as well. Please let me know what you think especially the front of the truck as I have employed a few odd techniques to keep it looking like the original. Plans will follow eventually when i get the tubing done. -
All Lego Super Cars Features In One
Cardboy posted a topic in LEGO Technic, Mindstorms, Model Team and Scale Modeling
The instructions are now available through Rebrickable Here This my attempt to distil features from all my favourite Lego Super cars into one. Nearly all of them have steering, suspension, engine and gear box so these are the other features I’m trying to incorporate with a few extras of my own. 8860: Car Chassis – Chassis view (all the body work can easily be removed for a full chassis only model) 8865: Test Car – Pop up head lights, adjustable seats (sadly was no room for this feature) 8880: Super Car – 4-wheel drive and steering 8448: Super Street Sensation – Automatic doors, Convertible and modular build 8070: Super Car - motorised functions 42056: Porsche 911 GT3 RS – Sequential gear box and Orange! 42083: Bugatti Chiron – 8 speed gearbox Additionally, I have added adjustable ride height and a motorised roof Pictures of the chassis and body panels her are links to the motorised functions Suspension Roof Bonnet Lights More images https://bricksafe.com/pages/Cardboy/super-car-mrk-3 It is based loosely on the 42083 floor-plan as the gear box and shifter are nicely placed and allowed a route for the 4 wheel steering. I used jb70’s layout for the gear box (in the pimp my Bugatti thread) as I have never been good with ratios but heavily modified the casing and redesigned the gear limiter. I hope you like and please let me know what you think of the model or any questions you may have. -
(640x480).thumb.jpg.97b97cf52b621694f8ece5448230e728.jpg)
Motorized Harry Potter Clock Tower with Pendulum 75948 (Instruction)
Gideon8 posted a topic in LEGO Licensed
I have always wanted the original 4757 Hogwarts Castle because it had a clock and a pendulum! I found its clock works to be a GREAT mystery until I could look into its instruction manual! Lego was so gracious to create the new Clock Tower and release it! I loved it very much. However, a great feature was missing: the pendulum! I decided to make minimal modifications for adding a pendulum and even motorizing it! My Clock Tower's clock work would not be a GREAT mystery because I made a video which showed how I built it! -
Bucket Wheel ExcEV3tor - a Mindstormified BWE (EV3)
The_Icestorm posted a topic in LEGO Technic, Mindstorms, Model Team and Scale Modeling
I created this modified Bucket Wheel Excavator some time ago, and I thought I would like to share it on this forum. After building the original BWE, I wanted to try to incorporate some Mindstorms functions into it. I managed to motorise all the active functions, using both an EV3 brick and motors, as well as some PF motors. Functions can be preprogrammed, or can be remotely controlled using an EV3 IR remote. Here is a list of the functions: Bucket wheel rotation and main conveyor belt - PF XL motor Lower conveyor belt - PF medium motor Boom arm elevation - EV3 large motor Lower conveyor swivel - EV3 large motor Superstructure rotation - EV3 medium motor Driving - EV3 medium motor Since I owned an NXT as well, I used it to motorise the small mining truck that was included in the set. There are also some LEDs that illuminate the 'work area', but they don't really do a good job, its just a nice thing to include. Here is a video of the excavator in action, as well as the mining truck (sorry about the poor resolution and bit rate): More info about the machine can be found here: https://www.us.lego.com/en-us/mindstorms/community/robot?projectid=3e125a5b-475c-4a4c-b3ed-e4b4f2192907 Let me know what you think of it in the comments! -
BMW S1000RR iPerformance Concept Bike
TheMindGarage posted a topic in LEGO Technic, Mindstorms, Model Team and Scale Modeling
This is my entry to the Rebrick BMW Motorrad competition. Its goal is to balance both performance and sustainability to show that high-performance vehicles have a future in a world concerned with emissions and fuel consumption. I used double wheels on both the front and rear in order to make this model driveable. The wheels are made from 36 chain links bent "the wrong way" - they are around 16cm (20 studs) in diameter. The whole model is about 55 studs long and 13 wide. The drivetrain consists of a PF Large motor geared 1:1 and a PF XL motor geared 5:3. They are hard coupled - yes, I know this is frowned upon but it provides a compact solution, and the load on the motors is no different to driving a car up a hill. The motors are mounted inside the rear wheels to save space and simplify the drivetrain. The motors are connected to an IR receiver which is mounted inside the main body. The battery pack is positioned at the very bottom to lower the center of gravity and increase stability. There is a shaft connecting a 4-cylinder piston engine to the wheels. This piston engine runs on E85 bioethanol which is derived from plants. This means it is renewable and carbon-neutral - the carbon dioxide released when burning it is compensated for by the plants used to make them photosynthesising. It also has a higher octane rating than gasoline, meaning it can actually provide better performance than the fuel it replaces. E85 biofuel engines already exist - all recent Koenigsegg vehicles are capable of running on both gasoline and E85, and these engines can produce up to 1 megawatt from a 5-litre V8. I believe biofuel is the future for high-performance vehicle manufacturers such as BMW. The front suspension uses a Duolever setup where the front fork is suspended on two parallel wishbones. The front wheel is able to move up and down and steer, while having the shock absorbers mounted on the wishbones rather than as part of the forks. A steering linkage allows a PF Medium motor to control the front wheel. The rear suspension uses a similar system called Paralever. It is essentially one half of a car independent suspension, complete with universal joints. It is sturdy and keeps the rear wheel's motion vertical when the suspension compresses. The front and rear wheel arches use the bucket wheel parts from 42055 as an internal structure. I used pneumatic hoses as part of the structure to give the flared appearance of the rear arch. greenshotcertificity.com Every part of the motorbike is designed with the BMW brand in mind (honest, it's nothing to do with the lack of turn signals ). The panelling (especially the side intake) is inspired by the BMW i8, a hybrid supercar by BMW. The suspension matches the types used on current BMW motorbikes, and inline-4 engines are commonly used on both their bikes and passenger cars. Here's a video showing the bike's drifting and burnout capabilities. Music is composed by me. Enjoy! -

Compact Sequential Stepper
Attika posted a topic in LEGO Technic, Mindstorms, Model Team and Scale Modeling
Hello fellows, Let me present my idea for a stepper mechanism for sequential gearboxes (4 speeder). Please forgive me giving such a a short description, but I wanted to share this idea before I take of to my hollyday. I didn't even packed yet and I depart tomorrow So I'll insert the video and copy its description here. I'm going to try to get online every day and react on questons and comments. Finally let me say a big thank you for Didumos69 and his 90 degree limiter for the inspiration. This video meant to demonstrate the stepper, not the gearbox. The nature of this design allows it to be used with almost any kind of gearboxes. I'll make instructions for the gearbox later however I've been trying to show it from every angle in the video so you can attempt to reverse engineer it. It isn't that complicated. Stepper: I've got the inspiration from an other idea what Diederik van Leeuwen came up with. He goes by the name of Didumos69 on the Eurobricks forum. Click on the link below to see his post: http://www.eurobrick.../forum/index... The reliability of this stepper depends on the right rubber rings. For the limiter I was using the small lego silicone ring and for the stepper (the green ring) a non lego one that is much weaker than the white. If it is too strong it pulls the knobwheel back instead of sliding trough on it when it returns to the basic position. So find the right combination by experimenting. It requires the frictionless driving rings in the gearbox. The motorisation can be solved by using PF medium motor combined with return to center mechanism too. Sorry for the lack of quality, it was a hasty work. I hope the point I was gonna make gone trough. If there is any question, please use the comment section. I'll try to answer it as quick as I can. Thanks for watching an reading. Hope you find it usefull. There is a few failed changes in the video, those wre caused by applying shorter route on the handle. This design requires to be turned to the end point (about 65 degrees). UPDATE Gearbox instruction video is uploaded: -
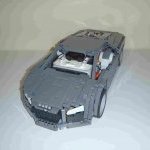
[MOC] My First MOC - Holden Commodore Ute
veryrusty posted a topic in LEGO Technic, Mindstorms, Model Team and Scale Modeling
Everyone, It's taken me a while to get this up here, but this is my first ever MOC. I wanted to build a car, but I wanted to build something unique. Then when I was flicking through a car book I was inspired. Something Australian (like me) , and unique (like me). A ute. Even more relevantly, they will be stopping manufacture in a couple of years time. My MOC is based on approximately the VE Commodore, which when it is not made of plastic, is still made of plastic and steel and looks like this: It is RC, and uses two XL motors for drive and a servo for steering. No gearbox. That's a bit scary. There's also a fake V8 motor, driven by the two XL's. It also has an opening boot lid using a linear actuator. And the moment you have been waiting for, the pictures. I think my picture taking is improving. It is built mostly from 8070, 42000 and 42029, since I'm still building my parts collection. Lets hear it for cheap red panels. I'm very keen for everyone's feedback. 2014-12-27 18.01.21 by veryrusty82, on Flickr 2014-12-27 18.07.07 by veryrusty82, on Flickr 2014-12-27 18.04.08 by veryrusty82, on Flickr 2014-12-27 18.06.01 by veryrusty82, on Flickr 2014-12-27 18.03.35 by veryrusty82, on Flickr 2014-12-27 18.02.16 by veryrusty82, on Flickr There are a couple of more photos in my flickr album. No video, it's beyond my current skill.