Search the Community
Showing results for tags 'moc'.
Found 5705 results
-
Hello Ferrari and Speed Champions fans, The Ferrari Daytona SP3 is a limited production mid-engine sports car produced by Italian automobile manufacturer Ferrari, unveiled on 20 November 2021 for the 2023 model year. The design references to 1960s race cars, it is a modernization of the 330 P4, with the body work consisting distinguished low driver's seating position, raised front and rear wheel arches, and the Targa top design. Building instructions are available on the following links: https://rebrickable.com/mocs/MOC-131689/_TLG_/ferrari-daytona-sp3 https://www.mocsmarket.com/lego-mocs/ferrari-daytona-sp3/ It is a studless build in the new, 8 studs wide Speed Champions style. I wanted to create a sleek model which is as accurate as possible in this small scale. I prefer the brick built solutions to keep the flexibility of the used parts in further builds, and therefore only Ferrari logo and simple light gray head lights stickers are used. My intent was to keep the width-length-height ratio of the real car and this size makes it possible. The model contains lots of details: for example the emblematic front and hood grilles, the side and rear intakes, the side view mirrors etc... Maybe the most challenging one was the brick built narrow black and red lines on the front. I tried to fill every unnecessary gaps and therefore some tricky build techniques are used. On the pictures the red grills on the front are connected only by half studs. However, if you prefer more sturdy models, then full connection is usable too, it is a bit less accurate, but looks decent too. It is a very low build, an can roll well only on flat surfaces. The model has space for two minifigures. I suggest to use helmets, or small hairs, and the upper part of the seats have to be removed in this case. Thanks for visiting, _TLG_ Ferrari Daytona SP3 - instructions 1 by László Torma, on Flickr Ferrari Daytona SP3 - instructions 2 by László Torma, on Flickr Ferrari Daytona SP3 - instructions 3 by László Torma, on Flickr Ferrari Daytona SP3 - instructions 4 by László Torma, on Flickr Ferrari Daytona SP3 - instructions 5 by László Torma, on Flickr Ferrari Daytona SP3 - instructions 6 by László Torma, on Flickr Ferrari Daytona SP3 - instructions 7 by László Torma, on Flickr
-
A LEGO recreation of the classic Muppet Show sketch Mahna Mahna, featuring the Snowths on BVs and a special guest appearance from Kermit the Frog. Flickr gallery
-
Growing up in the 90s, the Black Knight's Castle (6086) from '92 has always been the quintessential LEGO castle to me. With its big 3D baseplate it was a really massive presence and it had everything that to this day still defines a stereotypical castle for me, a big gate with a working drawbridge and portcullis, well-defended towers and walls, a cozy house with beautiful yellow tudor framework and red roof and a neat little back entrance, together with the cool glow-in-the-dark ghost and a dungeon inside the base accessed via a trapdoor. One of my biggest and most favourite sets as a child, I built this a lot over the years. Jump forward almost 30 years and even before the huge 400€ nostalgia castle there's another cool castle within the Creator 3-in-1 series. And while that's of course only a 3-in-1 playset, it works really well as exactly that and still looks really nice for what it is. So I asked myself, what would the almost 3 decades older legend of LEGO castles look like in the style of this new 3-in-1 castle? Well, wonder no longer, because that's how it might actually look like: Now keep in mind this is a deliberate attempt at porting the style of the 3-in-1 castle over to the architecture of the old castle, so it isn't going to sport the most elaborate building techniques. However, I still took the liberties of refining the 3-in-1 style a bit more for a more rounded composition as well as nicer battlements and roofs. But while I tried to use as many parts as possible from the 3-in-1 set, I explicitly decided against a pure alternative build, as that would have limited the part selection too much and when in doubt, it was usually aesthetics over part reuse. You'll note it also uses the old 3D baseplate, which I think is an integral part of the Black Knight's Castle's design and appeal. Other than that, it wasn't too difficult porting the sets over, as both quite rigorously use a 6-high storey design. But of course I didn't want to just capture the old castle's architectural features but also its play features, and combine them with the new castle's. Most of the interior and furniture is directly taken from the 3-in-1 castle, so we have the blacksmith with his workshop, the throne and fireplace, the food stall, as well as the dungeon complete with removeable wall. Only for the watermill and its mechanism there wasn't any room anymore. From the old castle we got the floor dungeon with trapdoor as well as the back entrance to the house and of course the good old ghost is there too, together with the skeleton from the new set. The gate uses the string-based drawbdrige from the old set, but with the automatic locking mechanism from the new set. It also ports this mechanism over to the portcullis, which in the old set was manually operated (the only reason I use a newer part here is aesthetics, the old big portcullis piece would fit just as well). Using string, while maybe not as beautiful or modern, has the advantage that the unlocking and falling mechanism of the drawbridge works a lot more smoothly than in the Creator set. Of course the whole thing also comes with building instructions on Rebrickable. The Creator 3-in-1 castle is a good starting point, covering about half of the 1800 pieces. From the others only the 3D baseplate (if you don't own the original castle) and the 2x5 bricks with the portcullis rail might be a bit problematic, since they're a bit rare in dark bluish grey. The figures are of course only a "serving suggestion", but using the ones from the Creator set makes sense (and the MOC uses the same Black Falcon theming of that and other recent castle revivals).
-

[WIP] Lamborghini Aventador SVJ 1:8
ibessonov posted a topic in LEGO Technic, Mindstorms, Model Team and Scale Modeling
Hi everyone, this time I want to show you another work-in-progress MOC, but this one is more recent. The reason why I want to do this is quite obvious - LEGO releases their Lambo this year, and I am also aware of at least one Aventador MOC coming soon. We should have even more Lamborghinis, they are awesome and I can't wait to see these models. My version is a dark blue + white model in 1:8 scale with some basic functions: Steering with working steering wheel. Openable scissors doors. 7+R gearbox. Remote control using a single Control+ hub: 2 coupled XL motors for drive; L motor for steering; L motor to change speeds. This time I decided to build everything independantly and simultaniously. It actually helped me to become much more productive. I'll start with the bodywork. It's not completed and is built around a very crude carcass. I'm trying to concentrate on the shape only. There will be enough space on the inside, I'm taking this into account while building. As you see, it's about 60% completed. Front section is not done yet, but the back looks almost completed and I really like how it turned out. Reminds me a "snowboard glasses" a little (don't know how to call them but I'm sure you get what I mean): Of course, these gaps will have black background in the future and I will add some filler to them as well. Rear wing also looks completed, it might be my favorite part of the build, here you can see it from another side: Now I want to show a door closely. I tried to replicate scissors mechanism as closely as I could. First version used shock absorber and was way too big. The proble is that it has to be very close to the front wheel, it's pretty hard to do. Second version required 3 small rubber bands to hold door's weight. On the following photos you will see a third version. This is how it looks being closed: This is the first step of opening when you open it just like a regular car's door: And this is how it looks when you open it in a different plane. It holds itself locked with two rubber bands that you can see at the bottom: Here's a shot from the front with both doors opened. You can see that the door on the right has "old" design, I improved on it already: Next two pictures are showing caliper on the front wheel. I wanted it to be angled just like on the real car so I had to be creative: Yes, this is a sausage piece. Calipers on the rear will also be angled, but with more conventional build. I don't have it right now so the picture will be in one of the following updates. Now car's internals. Here you can see a gearbox and rear wheels. 3 motors are clearly visible. 4th motor will be in front of the hub. The idea is that L motor will change speeds by rotating by 180 degrees, this can be done programmatically rather then mechanically. But it doesn't mean that the build is simple, because it's not. I used only one of those new orange "wave selector" gears, everything else is basically a huge improvement over the gearbox from my LaFerrari MOC, but it's 1.5 times bigger because of that "reverse" speed I added. It's actually pretty fun that I managed to use a 40 tooth gear in this model. I guess I could use 36 + 2x28, but I don't have 28 tooth gears yet: Here's a view of the bottom. A huge con of the model can be seen here - it has no central diff, but still I expect all 4 wheels to be driven. On the other hand, I left a lot of holes so I can see gears turning: This construction is not rigid enough in several points, I think I will have to completely rebuild it and ensure that it is strong enough. It's already pretty smooth and if motors won't be able to handle the weight then I can play with the gear ratios from motors - there are dedicated places in the gearbox for this exact purpose. I hope that it will become a good model and you'll like it. Thank you! -
Hey everyone, Here is my latest modular design! The building on the left is a jewel/gem shop with an apartment above. The building on the right is a pizza parlor with an arcade on the second floor! I always struggle with roofs in my builds, but I'm really happy with how these two came out. Jewel Store - not sure if I've figured out the best layout for this yet. Small Apartment Pizza Parlor - I am going to come back to this in a bit and work some different patterns in the floor to take advantage of the SNOT floor. Really not much more than a kitchen and a place for people to pick up their orders from. Arcade above the Pizza Parlor Isolated Shot of the Arcade Games
-

Technic ans Scale models at Bricking Bavaria 2022
functionalTechnic posted a topic in LEGO Technic, Mindstorms, Model Team and Scale Modeling
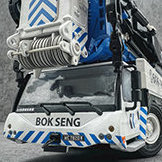
Hi everyone Last weekend the Bricking Bavaria 2022 took place in Fürth, Germany. LEGO builders from around Europe travelled to Fürth to show their models. This year large cranes, lang heavy load transporters and even a technic locomotive in scale 1:17 were shown. It was really inspiring to meet other builders and learn about their building techniques, concepts and how their model work. For all people who had not the possibility to come to BB22 I cut a video with as many models in action as possible. -
Finally, I finished it! My biggest MOC, until now. TREASURE ISLAND. It took me nearly 3 weeks to create it from scratch. I used about 6,000 parts. Some days I got stuck a little bit, because I had no plan how to continue. Additionally I ran out of parts, so that I immediately ordered new ones! The island is divided into 2 modular bases (48x48). Can also be connected to my LEGO IDEAS creation "Imperial Outpost" (You can vote here for it please, if you like LEGO IDEAS - IMPERIAL OUTPOST ) Features: Path to the top Secret waterfall with "surprise" at the bottom (The people say, there a crocodile awaits its victims) Rock prison (can be revealed by removing a part of the rock) Suspension bridge Hidden treasure cave with illuminated diamond wall (can be revealed by removing a part of the rock) Fountain lake on top Hatching of the sea turtles Hope you'll like it!? Attached to the IMPERIAL OUTPOST So, now it's time to go to sleep!
-
[MOC] MAN 8×8 Off-road RV
dls7223685 posted a topic in LEGO Technic, Mindstorms, Model Team and Scale Modeling
Hello everyone, this is the latest work from MTC: MAN 8×8 Off-road RV Designed by Lance Deng Special Notes: The cab of this MOC is mainly based on the MOC-2918 MAN dump truck, based on which the design was further developed Here is the video, hope you can enjoy it! Function Description: -2x XL motors for driving-1x Servo motor for steering-2x Sbrick for Bluetooth Control-1×M motor for Pneumatic device -1×M motor for Motorcycle bracket lift -4× Pneumatic Cylinder 1 x 11 for roof lifting Next, we will also share with you another off-road RV, which is based on a Mercedes-Benz Unimog chassis.And we will share the details through a new topic. -
As an absolute fan of the original trilogy, I had to build more Empire ships in Midi-Scale. I decided to start with my favorite TIE model, the TIE Advanced. This 496-piece TIE Advanced features a fully SNOT and detailed surface. It also includes rear engine thrusters at the back of the cockpit dome. Most importantly, being able to design smooth but razor thin wings was the key to making this build look proportionate and realistic. The same applies for the rear section of the fuselage which, being only 1 tile-high, ended up looking just a thin as the original prop model. Logically, the ship scales well to my previous TIE Reaper - I'll keep exploring more of these in the same scale, and maybe one day have a whole fleet of Midi TIE ships! ► Instructions will be available at Rebrickable soon. More pictures on my Flickr page. ♥ Patreon ♦ Instagram ♦ Rebrickable ♦ Eurobricks ♦ Reddit
-
[Update] Ladies & Madmartigans, the Willow project on LEGOIdeas has recently been updated & reached almost 9.5k votes. You can find some pics of the upfate below this text & some more Willow creations in the in the comments. I'd also like to take this opportunity to say thanks for your great support and also as a last call. A vote for a goat! Link: Willow on LEGOIdeas Sincerley, Toni aka MM [Original Post] Dear Eurobricks community, as you are the biggest LEGO forum, I would like to "officially" present my current creation to you and release it for discussion. Briefly about me: I am a 36 years old German AFOL and fan of classic fantasy and sci-fi, from. I particularly like the castle (including LOTR) and pirates theme, but I also enjoy many other sets. About my creation: As a child of the 80's I grew up with classic fantasy movies and also the mentioned LEGO themes. So I wanted to build a creation that reflects both. This is the castle "Tir Asleen" from the movie Willow from 1988. Maybe some of you know the original or the trailer for the new series. Val Kilmer as Madmartigan is iconic to me personally. I wanted to build something that was more detailed than usual released sets - but a little less MOC-alike than possible. The idea was to add it to my fantasy film collection, but also let my little stepson play with it. Therefore, some game functions are also built in. I hope they are well represented in the pictures. But details from the film should not be underrepresented either. [deleted] [deleted] What do you think about the creation? - What do you like, what not? Where can I still improve something? Do you know the original movie? Do you recognize scenes? Which ones have I not sufficiently considered? BTW, there is also a small Easter Egg for all castle fans ;) The project is also posted on Ideas. This isn't meant to be a call, but I don't blame anyone who supports it secretly ;) https://ideas.lego.com/s/p:2083518f81ae404c88198126c5ad7868 I look forward to your feedback and thank you for your attention. Sincerely Tobi aka. MontyMatte More pics: also on flickr: https://www.flickr.com/photos/195027856@N06/albums/72177720299713109 [deleted] Figs [deleted] Action & functions [deleted]
-

[MOC] Unimog U400
MajklSpajkl posted a topic in LEGO Technic, Mindstorms, Model Team and Scale Modeling
Hello everyone! I can't believe it's been 18 months since my last MOC actually finished. Well, here is the latest to join the party: Unimog U400... and no, it isn't a MOD of 8110, that one is two times bigger ? Sadly, I don't have the 8110 to shoot them side by side, but I will try to borrow it so that the "daddy&son" bonding moment can be documented Maybe I'll be good enough to even finish the video until New Year... but then again, probably not so soon, not to mention the instructions...? Unfortunately, I move in a much slower time dimension ? Features: TRUCK: • Should be around 1:16ish, scale, tires as a starting point, • Buwizz powered, • XL for drive + fake 4in line engine with fan, • servo for steering with working steering wheel, • M motor for front and rear PTO, • L motor for compressor, pneumatic attachment front and rear, • M motor for bed (activated with PF switch), on the same buwizz output as the compressor, bed can be raised in all three directions, • cabin tilt (manually, a bit poor - two orange tiles below direction light must be removed), • detailed cabin with opening doors, • live portal axles, front with “floating” differencial • 3 differentials • trailer hitch with additional PTO, CRANE • Crane outriggers and rotation over a PTO, • 3 manual pneumatic valves for operating the crane, WINCH • manual clutch to cut off the PTO, • automatic brake against unwinding, PLOUGH • pneumatic valves for raising and switching sider, GRITTER • PTO powered double auger (two salt compartments) + rotating dispenser, • manually operated stands WINTER IS COMING! I hope you like it. Please be patient about the video...I will prepare it as soon as possible. Best regards, Miha P.S.: Some more photos of the axles and the under side can be found here. -
Hello, I finished my latest MOC, the Sierra Railway No. 3 Locomotive a.k.a. the Central Pacific Railroad Locomotive 131 (known from Back to the Future Part III). This is my first train MOC, I've mainly stuck to making cars so far as they have been a bit easier subjects but as a long time Lego Trains fan (7740 being my all-time favorite Lego set and my prized possession) a train MOC has been high on my wanted list. I chose the Sierra Railway No. 3 Locomotive as my subject as I like steam locomotives, and in my mind the looks of the No. 3 is more or less the exact definition of a classic steam locomotive. It's also a bit smaller in size compared to later steam locomotives, so after some initial sketches and trials I felt it would be well suited to build in 8-wide scale. It was a fairly long process to complete, I had the basic knowledge of Lego trains but had to study quite a bit and learn about the pitfalls of Lego steam locomotives especially. I wanted to use the Powered Up components to motorize it, and initially I settled on the idea to take the "easy route" and have a regular train motor and battery box in the tender, as it would be the reasonable thing to do. However, after some trials I quickly realized it's not going to work, the axle spacing and the general look of the tender was not compatible with the train motor. Then I considered using the train motor as the front bogey of the locomotive, but it didn't really match that either and moreover, the battery box would not have fitted into the boiler above the front bogey to give the traction needed. All these things you more experienced train builders would have probably been able to tell me straight ahead... So I was left with the solution of installing a PU Technic L-motor and the battery box directly into the chassis of the locomotive and make the big main wheels driven. With that, I also chose to make the cab and boiler detachable from the chassis to be able to change the battery. That setup also needed quite a lot of testing with different options to figure out what kind of wheel base and configuration I can use so that the train will still be able to go through the curved Lego tracks. Turns out as you increase the wheel base, the friction starts increasing surprisingly quickly. So I settled with the configuration as seen in the pictures, which I think is the maximum to have the train still run reasonably well. It already slows down a little in the curves like this, but it's not too bad yet so I felt it was a decent compromise between looks and function. One challenge was also creating the gearbox and the connecting rods for the wheels, I experimented with many different ways with having the motor drive connected to one set of driving wheels and the liftarm connection rods driving the rest of the wheels. I suppose you already know that it didn't work at all in Lego form, seemed to be mainly caused by the fair amount of play in the liftarm pin connections. So the solution that finally worked well was to couple all three axles with gears so they rotate synchronized, and have the connection rod as a "display piece". That also enabled me to use the tehcnic axles instead of liftarms (the connections won't come off), which I felt looked better. The piston rod is still a liftarm, and it's connected to the front driving wheel instead of the middle like in the real locomotive, but that I accepted as a compromise I can make due "Lego limitations"... I wanted to use regular Lego parts at least for now for my first train build, so I wanted to keep it relatively simple. At some point of the build I realized that if I have it motorized, why not lighted as well, and there is another port in the battery hub to add the PU light. However, it had 2 lights and I only needed one above the boiler in the front, so had to figure out where to hide the other light. So out of necessity became an idea to attach the other light to the other end of the boiler to mimic the glow from the fire burning in the furnace of the boiler. That worked out quite nicely, but mostly by accident... The only problem with the light is that there doesn't seem to be a way to control it perfectly; when using the regular remote it can be switched on/off but the motor is also only on/off, which works but it's not very convenient. When using the Lego app (for the Crocodile Locomotive) the motor can be run with different speeds but there is no button for a light. So might need to look into creating some simple control app myself at some point. I experimented with different gear ratios for the Technic L-motor, but in the end I found using 1:1 ratio seemed to be optimal. It's the same ratio as used in the Crocodile Locomotive, so this one is also not very fast. But on the other hand it gives a fair amount of torque which also helps in keeping the locomotive going around the curves with minimal speed loss, and it can pull at least a few cars without major issues. I created a small video to show how it goes around the corners: https://www.youtube.com/watch?v=QSolg3vHgTQ And finally, I of course had to make a small diorama after changing the decals to the Central Pacific Railroad 131 version, it's very simple for now but maybe I'll try to make some enhancements at some point later on: It was quite a challenging project overall but I enjoyed building it quite a bit and finding out many new things about Lego trains in general. I will probably look into making some train cars for it as well at some point but no concrete plans yet. I also enjoy creating instructions for some builds I make, for this I initially thought I probably won't make them as it would be quite a lot of work due to the size and piece count (948). But in the end I decided to try it out anyway, and yes It was a fair amount of work but I had quite a lot of fun, it's a bit like pretending making a set (with much much less restrictions than real sets I presume...). You can check out the end result here. Thanks for checking out my train build!
-
Led by enigmatic eccentric Dr. Victor Strangebuild, the crew of Pioneer-74 is on a long-running quest to document the mysteries of deep space. Their goal is to explore unknown worlds, encounter fantastic creatures, and meet brand-new civilizations. Thus, they boldly venture forth into the great final frontier, never looking back towards home. THIS IS THE STORY OF PIONEER-74! So I built this spaceship Halloween in about two hours. I call it Pioneer-74 because I like naming things after old space probes (Pioneer, Odyssey, Voyager, etc.) while the "74" part of the name is because that's what year it was launched. (It has a certain retro look to it, almost like it came from Space: 1999) The brick separator solar arrays and engines have been built IRL for years with nothing interesting to tack them onto, so finally doing something with them makes me happy. The rest is heavily inspired by two CITY space sets (60227 and 60349, respectively) in orange for the LEGO Universe-inspired space theme, the Nexus Force. Pioneer-74 is completely modular, so it can be extended if I wanted later on. (This should also make transportation easier when built in real life.) A look at the vessel from above. NOTE: two figures are missing from the above picture... and it seems one of the finished ones has to get his head in the game as well! Credit where credit is due: @jan kusters ongoing space epic inspired this build, and to my brother for the two awesome renders! UPDATE 12/7/22: It's done! Sorry for the cruddy picture, it was the best I could do. It's far too long for my normal picture taking places! More pictures to come as soon as I can! Thoughts?
-

[MOC] Batman™ The Animated Series BrickHeadz (Product Concept) - Tribute to Kevin Conroy
Rui Miguel posted a topic in LEGO Licensed
Batman™ The Animated Series BrickHeadz (Product Concept) By Rui Miguel “Does the hurt ever go away?” - Dick Grayson “I wish I could say yes. But it will get better in time for you. That I promise” - Bruce Wayne This LEGO Brickheadz concept is a homage to the amazing Kevin Conroy. A way to bring Batman: The Animated Series to our hearts in LEGO and remembering the eternal voice of Kevin. Every time I look at this project I will hear his Batman voice. Thank you Kevin Conroy for all the moments and lessons you shared with the world. You will be deeply missed but never forgotten. Rest in peace Dark Knight. In here you’ll find the PDF files of the building instructions. Its four separable books fit for multi-person building experience. I have also added the Bricklink studio file of the model so you can upload to Bricklink and generate a wanted list of the LEGO parts needed to order. Download Link (Google Drive): Building Instructions | Printed Parts PNGs | Studio File - Here Book 1 Catwoman (5.4 MB) Book 2 Batman (6.1 MB) Book 3 The Joker (6.1 MB) Book 4 Harley Quinn (5.5 MB) Bricklink Studio file (249 KB) Features: - 496 pcs/pzs (4 figures and 4 stands) - Removable and playable If you have the opportunity to build for yourself, hope you have a fun time building, playing and displaying. If you are a Kevin Conroy’s Batman fan like me I hope this brings you consolidation and remembrance of him. -
Antique Princess ____________________________________________________________________________________________ Be wary of the beasts that haunt the junkyards. All they see is food. Be wary of the despots that curse these lands. ____________________________________________________________________________________________ Instagram Imgur Gallery
-
[MOC] Zetor 25K - vintage tractor
rhplus posted a topic in LEGO Technic, Mindstorms, Model Team and Scale Modeling
Hello all, I would like to present here my latest creation - the historic Czechoslovak tractor Zetor 25K. Series K is derived from original model 25 which was manufactured in many modifications in years 1946 to 1961. Features: 2 cylinder fake engine drag link steering towing joint three-point-hitch operated from the cockpit rear PTO connected with gearbox to drive train, switchable by lever from the cockpit I also want to build some attachments to make model more playable. -
Hello everyone! This is my entry for the Sky's The Limit category of the Wandering Skies contest over on Flickr. It's a modular steampunk house on a floating island with full interior and lights, so come with me on a complete tour of it! On the outskirts of the Lower Islands on a small floating island, there lives an eccentric inventor called Dr. Wasserdampf. In his secluded workshop covered in various steaming pipes and whirling contraptions, he spends his days alone working on new inventions to improve the lives of the people of the Wandering Skies. Lights can often be seen shining from his workshop long after the sun goes down as he tinkers away into the night. While he mostly keeps to himself, many of the Low Islanders know him well and they know they can always come to him if they need any kind of mechanical solution. One of his best inventions includes his incredible balloonless flying machine which he keeps parked on a floating rock attached to his island by a rope bridge. Meet Dr. Heinrich Wasserdampf and his trusty mechanical dog Rusty. Here, the inventor is working on his steam jet powered flight pack. Let's take a closer look at his house, starting at the top. On the side of the tower is crane for lifting up water barrels and other heavy objects to the upper floors. To avoid having to crank it himself, the inventor connected it to a windmill mechanism. On starry nights, the inventor likes to relax on his self-built deck on the roof and chart the stars using his big telescope. There is a giant gear sticking out of one side of the house. It was meant for rotating the top part of the house so that it faces the wind like a windmill, but Wasserdampf couldn't get it to work, so now it lays dormant here, serving as a place for birds to setup their nest. The attic is where the inventor sleeps and showers. He cleans himself using a prototype showering device which heats up water and pours it onto his head using a steam pump. He calls it a "shower". The second floor is where the inventor lives. Up on the fireplace is a portrait and an urn of the inventor's late wife Hilda. She was a brilliant chemist, but fell terminally ill one day and they couldn't afford the state-of-the-art doctors in the Imperial City who could have given her the treatment she needed. She was the love of his life and the only person he couldn't help. He now honors her memory by helping as many people as he can with his inventions. There is also a small dinner table, a bookshelf, and a kitchen with a coal oven. In the inventor's workshop, there is a wall next to the workbench full of Dr. Wasserdampf's inventions that are designed to make life in the wandering skies easier, including a grappling hook, a flight pack, and a pneumatic wood chopping axe. The house used to belong to a blacksmith, so it has a forge in the workshop which the inventor occasionally uses to make metal parts for his contraptions. Next to it you can see another one of his inventions, the flight cap! In the center of the workshop, there is a trapdoor with a ladder that leads to the basement levels. In the basement, there are various stored goods including coal, a water boiler, a lamp, and the steam-powered wheelchair that the inventor built for his wife before she passed away. If you go down the ladder further, you get to a rope bridge that leads to the landing pad of the inventor's flying machine. That concludes our tour of the Inventor's house. What is your favorite part? Let me know in the comments! Thanks for stopping in.
-
...so here's a half-finished one! ...hey, it's more than there were before, I call that a win. I used my usual inelegant method of throwing bricks at the wall and seeing what shapes work. The main thing I'm not happy with is the nose, I think it needs to be shorter but not sure what I can remove. Also not thrilled about how gappy it looks. I am happy with how I managed to add the little blue Ford logo in front though. I really don't want to change that. Also happy with the mosaic-like build on the roof. Suggestions welcome! Also, does anyone have pictures of this van's electric motors? I saw one picture but it doesn't show exactly how long they are or much details at all. (This is Ford's all-electric Supervan 4) Supervan 4 WIP by Henchmen4Hire, on Flickr Supervan 4 WIP by Henchmen4Hire, on Flickr
-
Chibi, from Emeraldas. Gravity Saber with NPU part N°2614 Fishing Rod, Cosmo Gun/Cosmo Dragoon with NPU part N°36752a Wand, & Leiji Matsumoto Chibi - Emeraldas by Horlack, sur Flickr
-

[MOC] MOC-Hunter | Buildable Figure Series from Star Wars the Bad Batch
coreyschaaf posted a topic in LEGO Star Wars
MOC-HUNTER + (ALT HEAD BUILD) My third release in the buildable figure series from The Bad Batch. The scale of the figure is the same as my other MOCs of Tech and Crosshair. Both the helmet and alternate head version are done in the same scale as the official buildable Harry Potter buildable figures by LEGO. Creating Hunter's signature mullet was a bit difficult but I'm happy with how it turned out. The helmet version features a similar build style to crosshair with a different layering style to capture his unique helmet style. Echo and Wrecker are in the works with the possibility of a surprise figure. Instructions are available on BrickWars.net or follow me on Instagram for more original creations. Specifications for Helmet version + Alt Head Build Pieces: 1,655 Weight: 41.3oz | 2.58lbs Width: 19 cm | 7.5 in Length: 20.5 cm | 8.1 in Height: 27.4 cm | 10.8 in Estimate Part Costs: $170 - $200 Alternate Head build using custom UV printed parts on genuine LEGO pieces. Group Image with Alt Head of Hunter Group Image with Helmet Version of Hunter Upgraded Gear System The upgraded internal gear system allows arms and legs to be posable. If you plan on posing the legs, it may be necessary to attach the feet to a plate as the weight of the backpack and knives can change the center of gravity. The Clone force 99 Shoulder pads can be removed for more additional range of motion. While the helmet version of Hunter does rotate almost 280 degrees, the alternative build of the head has minimal movement due to the thickness of the neck. Custom Printed Clone Force 99 Emblems for Shoulder Pads. Details of Hunter's Signature Bandana (giving off some Rambo vibes). Sample Instructions Professionally produced, high resolution, step-by-step instructions of Hunter from Star Wars The Bad Batch. Custom printed face, Clone Force 99 emblems and skull bandana are included with the alternate build of Hunter. Instructions available at BrickWars.net -
After my rusty train, I was wondering if I can give the same treatment to a car. I wanted to build a beetle for so long, but I don't wanna copy other's work, and also wanted to make some weird stuff, it's a kinda trademark that I have :P After Several hours of designing, I came out with this Baja Rat Rod based on a Beetle The suspension and steering are fully articulated and posable, but they won't work as real suspension/steering, considered this more like an action figure that you can do some dynamic poses to take some cool photos. Even though most of the car is gone, I tried to keep the recognizable beetle profile.
-
So this was something I did out of pure boredom. Back in October, I had ordered the 7638 Tow Truck off of eBay for a good price, but then I thought that it didn't really match well with my gas station. Recently, City has been doing nods to a lot of its classic sets in current city sets. In 2015, there were two nods. One was a tv chopper in set 60097, which was rather eerily similar to the TV Chopper from 1998. There was also this space set, which was a nod to a classic set. But I don't remember what it was. 2018, they did 60183 Heavy Cargo Transport and in 2021, they had the 60289 Air Show Transport; both of which were obvious nods to the 6357 Stunt Copter N Truck. It came to my mind of.....what would a revival of the tow truck from the 6337 Fast Track Finish set look like. So with that being said, here is a pic of my nod to the old Octan tow truck. For the side stickers, I had some Xtra sticker packs where I got the Octan labels from plus another Octan label that I got from eBay. My method to making this MOC, which is basically a recolored 7638, was really just to replace all the orange with white and all the bottom with red and green. I also replaced the blue lights with orange lights as those are what we use as warning lights here in the states (Just to clarify to our members from other countries). This MOC was pretty simple come to think of it. Now the tow truck is ready to help out any car that is broken down in town. https://www.instagram.com/p/ClbQHRxrfrO/?utm_source=ig_web_copy_link
-
Man that sword, ye cowardly swab! Off to sail the rol-lic-king sea. Not a ship we wou-ld not rob. Pirates all are we! Ahoy!
-
LEGO MOC Tutorial#28 Claw Machine / Crane Game, クレーンゲーム, 娃娃機 Claw machine It is a popular game machine in Asia. So I build one for my Lego town too. The claw is movable. If you are interested to build one, I posted the building instruction in my video: More MOC on my homepage: https://www.bricksboy.com/moc
-
LEGO MOC#92 Halloween Skull Truck Halloween is coming soon. It is time to build another Halloween creation. This year I designed this skull truck. I hope you will like it. I also created a stop-motion animation for this MOC: More MOC on my homepage: https://www.bricksboy.com/moc