Search the Community
Showing results for tags 'Mod'.
Found 469 results
-

[MOC/MOD] 42064 Ocean Explorer as a Technic Set
Erik Leppen posted a topic in LEGO Technic, Mindstorms, Model Team and Scale Modeling
42064 Ocean Explorer is subject to a lot of complaints about the lack of functions. While I agree that the set is sorely lacking in functionality, I also find complaining too easy. The hard part is suggesting an alternative. So that's what I want to do: convert 42064 to a Technic set. Edit: for the finished model, see here: (end of edit) First, the plan. Let's ditch the heli and mini sub - these could have been €10 sets, and only eat up parts budget here. The helipad can go too. The superstructure can be reused as a module later. Let's remove the crane, the gray platform in the back, and generally everything else, keeping nothing but an empty hull. Now, part of the challenge of designing a set is staying in budget. As there's plenty of room, let's make it shorter. Ok, the functions. First, there are no propellors. Let's connect the front wheels to some propellors. This requires redesigning the steering module with the rudders. (As you see, I use color coding for functions in MLCAD.) The structure inside the bow that holds the curved panels is very voluminous and can be reworked provide a nice open space, that perfectly fits a V8 cylinder engine, also connected to the front wheels. So that's the basics. Now, what functions to add? Elsewhere I read about the lack of an A-frame gantry. So let's add that. It has two functions. Move crane with LAs, and a winch (not drawn). How will this be driven? Manual is nice, but why not try and fit in PF? The space above the engine is perfect to fit a battery box. The bridge will be right behind that. The gearbox to select the functions can go below the bridge. With this in place, there's only one thing from the set missing: lifeboats. The orange 1x3 beams from the set received some flak as well - these can't be serious attempts at lifeboats. So I built slightly bigger lifeboats, with the orange panels from the mini-vehicles. First, I wanted to put them on the superstructure, but after looking at some pictures of ships on the internet, I figured they could be at the sides of the hull too. There's room behind the superstructure. With a mini "crane" (just a 4x4 bent beam), the lifeboats could be deployed. This is the third motorized function. This means the space below the bridge is the only palce left to put the function-switcher gearbox. The only place for the PF motor I could find was between the white angular panels. A perfect spot, if you ask me :) The gearbox has four outputs, so one of them (drawn purple) is unused right now. Maybe it can operate a small ramp at the back, between the blue 3x6x3 panels. Of course, all this is merely some digital designing and virtual doodling. The next step is building this in real bricks, which will certainly pose problems with things not fitting or not working. So I will try to build it and make everything actually work. I'll keep you informed when I have notable progress :) -

7997 - inspired railroad station - expanded and improved
Murdoch17 posted a topic in LEGO Train Tech
I built this station with set the 2007 CITY set 7997 in mind. I got the original set in 2007, along with a double rail crossover for my Birthday that year. I wanted to make it a full building but didn't have the parts. By 2008, I had discovered Bricklink, but the station was in pieces by then and was not re-created until early 2012. The station was a stock set, while I searched for ideas. Eventually, I came across a build by a fellow Eurobricks user named Lazarus that incorporated a modular basis, a full building (street & track-sides) & a appealing design. I saved a picture of it and made my own design based on his. I included really neat features, (such as the arched lattice windows made with a fence) but I went too far and made it impossible to transport to train shows and LUG meetings. The platforms were very flimsy om the XL baseplates, and during the move to my families current house, it shattered into small chunks. So, I went back to the drawing board, scrapping everything but the building itself. Here is the end result, which is strangely near where I started with set 7997. It has one platform, plentiful outside seating on the platform, and is red instead of yellow. There are many changes from the set, (no stairs on the platform, for example.) but the heart and soul of that 2007 set is still there. The row of studs on both track and street sides should say the station name in printed 1 x 1 tiles. This sign currently says "IRONWOOD", as that's the name of my city layout. The model is now 8 studs deeper, allowing for more room for my hands when being worked on. Here we can see the street side of the station with it's new wheelchair access ramp. Here we can see the interior of the station, with blue ticket machines, seating, and snack bar on the first floor. The train tracking / switching controls are located on the second floor along with the employees - only coffee machine with paper cups.. This printed part here provides the computer display screen. Here you can see the modular breakdown of the model, which includes the following: -Station building (lower floor) -Station roof and Tower control room (upper floor) -Tower roof -left platform section -right platform section The LDD file is here, in case anyone wants to built their own version. (I will be building this version soon, most likely before Christmas.) Comments, Questions & Complaints welcome! -
Hello all, I present to you my newest creation : Uni-kitty's Enchanted Castle. Featuring an excellent fruit juice and salad/sandwich bar on the ground floor, with penguin slide and waterfall, pineapples and general craziness. The castle was designed by Uni-kitty one day when he smoked too much of a special plant. He's growing this plan on top of one of his castle turrets. To be a bit more serious, I've combined two of Cloud cuckoos palace, together with the Friends fruit juice bar and also several friends animal packs. What do you think? PS - "too many colours' nu uh it's meant to be crazy :)
-
So... I finished my modification of the bus from 60154. I'm really happy with it. It's based off of an Optare Versa which is a really common type of bus in the north of England. It's 8-studs wide which is a little bigger than I wanted it to be, but given the parts usage was unavoidable. The entire front is built upside down and held in with friction, but seeing as this is a static display model I'm okay with that. I tried a few different ways to change the direction of the studs and connect it but none of them worked out with the space and alignment that I have. It's got a full, though simplistic, interior. The original set basically had nothing inside of it, so this is a huge step up in my mind. It seats 11 mini-figs and one driver. Would love some thoughts and any suggestions for improvements that people might have.
-
remove
-
Hey guys! I posted this a week or two ago over at the Star Wars Lego subreddit, and figured I'd post it here for my first posted topic! I decided to modify my Sith Fury, and I found @billyamy's post before photobucket held it for ransom and stole a bunch from it took inspiration from it. Let me know what you think, criticism is always welcome! I'm pretty freshly out of my dark ages, so there are a lot of parts and building techniques that are still new to me. Not seen is a bunch of structural changes I did to the interior, filling holes and generally reinforcing the model. The pictures aren't amazing, but I hope they're okay! The first mod I did was to fill in the interior of the wings with a plate and some light greebles. Seeing inside of the wings really bugged me in the stock model, I wish Lego had done something to fill it in. Next was to replace the flick-fire missiles with black telescope parts on a SNOT bracket, with a TIE wing circle tile for detail. I don't really like flick-fires, and I don't need the play feature, so out they go. I also switched the old cockpit with one of the new TIE cockpits. Not exactly canon, but I like it better! I also changed the top, but there'll be more photos of it later. Here's a view of the ship from the front. You can see the (slightly out of focus) black slopes covering trans-red plates on the tips of the wings, which I added for fun, but later found out that the in-universe ship has something similar! Here's that top view I was talking about. I'm not super thrilled about the tiles and slopes around the cockpit, but it's what I settled on. Ideas are appreciated! You can also see that I've replaced the click hinge portions over the cockpit and troop area, I don't really need to get into those areas and I like them better covered with plates and greebling. The former troop area is now a reactor area, so I added vents and an engine block above that area. However, I feel like there's too much black. Next is a cockpit interior shot! I've added some joysticks and some printed panels, and you can see at the top is a mudguard piece. I copied this from @Bricks Feeder's amazing TIE Advanced Prototype post, where he used it right on top of his TIE windshield. I have some issues with the offset of my windshield here, since I can't make it sit in deep enough... If you guys have ideas on how to fix this, I'm all ears. Anyway, the mudguard lets it sit slightly more evenly on the part where it touches the ship. Next is the back, where I took a lot of direction from @billyamy again. I realize it doesn't look nearly as nice as theirs, nor as nice with the wings folded out, but it lets in more light. I added octagon modified plates with clip plates around the engines to give more detail to the nacelles, and some slopes, vents, and assorted greebles around the engines as well. Here's a not-so-great shot of the technic mechanism that @billyamy used in their post to open up the back of the ship. I think it's brilliant and blends in much better with the ship Instead of troops, you get this! It's a smashed-together engine/reactor thing. I looked around and didn't find many ideas, so I cobbled it together. What dyou guys think? It's a mess of trans red studs, some curved slopes, some vent pieces, and some gumption. That's it for my first topic! I hope you guys like it, let me know if there are more photos that you want.
-
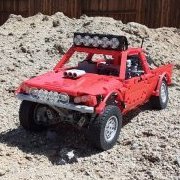
 Hello everybody! A long time ago I got my 41999 and decided to turn the hull back to the car that it was initially - a classic American muscle car. Initially it was just the same car with a lower chassis, but I preferred to make it more authentic and more detailed MOD (and a bit MOC ) saving as much as possible original solutions and parts. There were a lot of speculations of the exact model (41999-question), but I like Dodge Charger R/T 2nd generation ('68-70), so it's the final target and magic has been started... First of all, I started with modifications of 41999 Crawler. It's a great model and I was just happy to see how Egor turned the car shapes into the curved panels, but Boss Crawler was too high, so lowered the chassis by 4 studs (removing the bottom section with Servo and two 5x7 frames), added a front axle with an independent suspension and a rear live axle. Both of them uses a shorter shock absorbers, meanwhile the front axles has a torsion suspension in the real live. I've made a draft of it and will add to the model some later... So, the result is following: v1. The chassis. Muscle Car 41999 MOC v1 Chassis.lxf v1. A road version. Muscle Car 41999 MOC v1 Road.lxf I's a default hull with some minor visual modifications, mounted on a lower chassis. However it's still too high, in my opinion. v1. An off-road version. Muscle Car 41999 MOC v1 Offroad.lxf I liked @efferman's Station Wagon and @NOS_Dylan's modification, that better meets a lower chassis. v2. A major modification. And finally the better version that I've made so far: even more lower than version 1, wider by 2L and now has a Big Block - fake V8 engine. To be continued...
 -
Ever since I got the HE I started considering doubling up as temptingly shown on the back of the box. The train just doesn't look quite right running with an open passenger carriage back end. As my train room (or as my girlfriend prefers; our 'study') is pretty small I was worried about it being rather long though, and spending it's entire time turning corners in a not very 'express' fashion. However, when I saw that people were charging almost 70GBP on ebay for just the power car, I decided it would be far more cost effective to buy a second set and perhaps sell off the middle two passenger carriages- 4 was just too long and I didn't like the non-Jacob's join in the middle. But 2 cars looked equally silly so I set out for 3. First step was to modify the centre car undercarriage to stretch the distance between two Jacob's bogies: However something still didn't seem right! The doors- the middle car and hence the train was not symmetrical. But now having two full sticker sets and one donor car I could remedy that: For this I had to dig in the spares box. To get the windows in I had to borrow 2x technic 1x1 brick with hole to replace the 1x1 with headlight holder on side so that the snot would not obstuct the doors at one end. Then I had to borrow some black 6xn plates to make the removable roof segment (the originals were too long): I was pretty happy with the result overall, long enough for the feel of a sleek express, short enough to fit in my house, and even with a single PF motor, still fast enough to scare the cat! Comments? Suggestions? Anyone else doubled up their HE? A quick search of the forums suggests from your signature blocks and discussions of doubling the no of motors suggests yes but I found no pics or descriptions.
-
I tried to recreate the bus from 10259 and then thought it would be neat to also have a different livery, somewhat more like the English busses. And here is the render of the 'original' version. And here they are together. The drivers seem to have a casual chat about the weather road conditions or some other driver related thing :). Kudos to msx80 for his render tool! Works perfect on macOS Sierra, I used it to render the images. In here I have made some comments on what parts are different from 10259. I needed to guess for some parts, but I came quite close I think.
-
This started out as a 9493 that I picked up second hand, but complete. I was surprised how crude it looked after more recent sets, so I began tweaking it here and there, and then it just sort of got out of hand, and I don't think there are two bricks of the original set still in their original configuration! I'm not a quick MOCer by any standards, I tend to come back to things and tweak a bit, rummage through the spares, get inspired by others builds etc. There are plenty of things I could have done for greater accuracy, but I wanted it to be a tough build, and whilst there are techniques that would allow the shaping to be more screen accurate, they tend to be quite fragile, which is a compromise I was unwilling to make. Anyways, on with the pics The wings open and close in much the same way as in the originally set, though much of the mechanism has been messed about with and changed. The knob for opening has been relocated to the rear, and the rubber bands have been made a little more discrete, though I think if any further development on this happens, i may ditch it and revert to the wing mechanism used by many other x-wing MOCs. Tried to get the shaping on the underside as close as possible without it being too fragile, I think the shape is ok, but the slope section could do with being a little more secure. It doesn't fall off, but it's only connected at the rear. The gap in the underside is to accept the stand which is designed to hold the ship at an angle so it looks a little more dynamic. So yeah, it's not finished, I keep doing things to it when I find different or better solutions to things. I feel the rear of the fuselage might be a stud too long, so that's something I might look into. The greebling could be more accurate, but that's not a major worry. I realise the shaping is a little more rounded than some, but it's also a little less "studdy" too. I'd like to incorporate some landing gear but at this point I wanted to make sure it looked right, and the stand makes gear less vital for display. Overall I'm quite happy with it, but I'm also open for suggestions on improvements.
-
This gunship is owned by Snake, former member of the Black Hole Gang. The ship is named the Atlantis II and is used by Snake as his personal transport in his new line of work. Snake became a member of the resistance after the demise of the Black Hole Gang and the destruction of his species home planet by the Space Police IV forces into a radioactive wasteland.\ In reality, the model the ship is a heavily modified Bounty Hunter Assault Gunship (set number 7930.) This ship features six guns, a ton of cargo space and rotating engine for flight or landing modes. The cockpit is also accessible via a roof hatch. The ship in flight mode, with the engine pods rotated 90 degrees. The rear of the ship, with the cargo area access hatch. The opening cockpit features a seat for the pilot figure. Two of this part go on either side of the cockpit where the 2 x 2 tiles in yellow are. The sides of the ship open up for easier access to the inside. The pilot of the ship, Snake. Not much is known about him, except he was a member of the Black Hole Gang and his home-world no longer is safe to travel to. The is available to download here. I'm thinking about buying this at the same time as my futuristic house I uploaded, as the same Brick Link seller has most of the parts I don't already have in real life. As usual Comments, Questions, & Complaints are always welcome!
-
Excited to share my first mod on a set; the U-Wing! It's small compared to other efforts, but I'm just getting started. I'll also have a video if I'm allowed to share that. Anyway, I've added a second pilot seat, removed unnecessary technic to allow more space in the transport, and extended the wings from 40 studs long to 44 studs long. Then additional greebling, replaced stud shooters, and changed the rear top behind the cockpit to remove the pop open feature and add detail. I would love to hear thoughts and feedback! Thanks! Removed the cockpit pop open play feature to add detail, greebling and accuracy. Since I wasn't changing the base hull of the ship, I took inspiration from the Republic Gunship to add a second pilot seat. Another view of the two pilots. The additional pilot now "floats" in the lower window. A very simple dark gray plank with a slope piece for flare allows a second pilot without altering the width of the set. Underside view of the transport window showing additional plank for second pilot. Larger view of underside. The transport with the second pilot fitted on; stud shooters have been removing, now acting as weapon racks, and technic poles have been removed to free up some space. After removing the technic bar a simple detail piece from the Millennium Falcon was placed in the center. Closer view of the pilot The original printed tile was placed on a flat piece to free up space, and two additional yokes were added. An upright view of the yokes. ___________________________________ May the Force be with you!
-
Hello everybody and let me present my version of a modified 42005 Monster Truck. It was my second set after my "dark age", that I've bought many years ago, after 42029 as supplementary set with a lot of useful pieces and planned to use for a live axle suspension and some other features for 42029 model. However, I liked the set as a simple and functional model and re-assembled it several times. Here is the model and later I'll provide the all details: A month ago, when I tired of infinite attempts to turn 41999 into a Muscle Car (the chassis isn't rigid enough, but I already did a great progress and hopefully will share it once) I returned to this model and set the task to motorize it adding 4WD, but keeping 4 wheels steering and current suspension (keep the original construction as possible as I can). First, I've analyzed the all existing attempts that I could find over EB, Rebrickable and YouTube and it happens that there were several MODs by different authors: First of all, it's @Splat’s MOD with all steered and driven axles (see topic here). I see no reason to duplicate its description, so let me just note that he saved the necessary features with adding Servo + L-Motor mounted under the hood and trunk. The chassis configuration is 4x4/4 or 4WD-4WS. It’s the best motorized model, I think, because of amazing simplicity and performance, but unfortunately it has a kind of “articulated” steering that isn't real, so was trying to made a "real" 4WD-4WS version, using this model as reference. Another one is Jan Dvorak’s (is he on EB?) MOD with all original features supplemented by on-axle L-Motor that drives the rear wheels and Servo for the 4WS. He added an additional 5X7 frame with differential that provided a necessary rigidness. The chassis configuration is 4x2/4 or RWD-4WS. Personally I don't like such a long axle sub-frame. However I've found a good idea of vertical gears inside the central shaft. The third one is @codefox421's MOD, inspired by Splat’s version, with the original front axle and non-steered custom rear axle with on-axle L-Motor. His custom rear axle, based on two portal hubs, is a quite compact and simple, but has no steering. The chassis configuration is 4x2/2 or RWD-FWS. It looks trial-ready with the portal hubs, but it's nearly impossible to add the steering here, so I got nothing from this model. An unusual @Tommy Styrvoky's MOD with an interesting feature: he modified the front axle, not the rear one, by adding a solid drivetrain with worm gear and on-axle M-Motor, so result is a front-wheels driven Monster Truck with oversized fake engine. The chassis configuration is 4x2/4 or FWD-4WS. Very aggressive! WRRRRR Daniel Wirasantosa’s (is he on EB?) MOD that differs from the previous ones by using of chassis-mounted L-Motor that drives the rear axle (that has a bit low ground clearance due to the 5x7 frame) and, moreover, he used a custom steering shaft that comes directly to the steering rack. The chassis configuration is 4x2/2 or RWD-FWS. Starting this version, I got a more or less defined plan: 4WD with off-axle (chassis-mounted) L-Motor that drives the both axles through the existing “drivetrain” (former steering shaft) and the off-axle Servo that steers the both axles through the custom steering shaft above the driveshaft. There were two more versions: Michael M’s stretched one and LEGOTechnic360’s solid-chassis version with no suspension, but they didn't help me with any new ideas. Nothing personal, guys, if you're reading it, I just had a full and consistent vision of my further MOD: Hull - the original with no changes. Axles geometry - original. I tried to save the all things like the wheels location, suspension mounting points, ground clearance, steering angles (that are even bigger a bit now)… And I still can't believe that made it, after a thousand tries! Suspension - original, with no changes. However I put the hard shock absorbers in the rear end, as the default ones were too weak to keep the BuWizz battery. Wheels - original. I decided to keep the original wheels and tires with no giant crawler ones or even Claas, that are too big even for a Monster Truck. Frame - mostly original, but possibly modified since it will have an L-Motor and Servo mounted above the axles (right under the cargo platform and hood). Drivetrain - it must be the ex-steering shaft that comes through the cardans inside the "big" ball joints to the both axles, connected to the L-Motor via the set of normal and clutch gears. Steering - for the all wheels, like in the original model, but the steering shaft comes above the drive shaft, in parallel with it and can slide a bit while the suspension moves. Enough the words...The most interesting part starts here. Following my plan, the bigger challenge was to modify the original axles - I tried several options, even trial-like with solid axles, but 4WS provides an amazing maneuverability due to big steering angles, so axle diffs are likely vital for such model (solid axles were making a permanent clicking noise in the transmission even with motor stalling sometimes) and I decided to make a fast Monster truck, not a slow crawler with a high torque. The drive train. There you can see how I did it: L-Motor rotates a set of 8T and 16T normal and clutch (required for the steering shaft) gears and then the main horizontal shaft, that were used for steering in the original model. After that the shaft rotates the 12T double bevel gears (ex-pinon gears from the original model), than 20T gears below, single-bevel 20T and the differentials. As result, the gearing ratio is 1:1.667 X 1:1.4 = 1.2334, and provides about ~100 RPM with 15.12 N.cm torque. The wheels connected by a wheel hubs, since I wasn't able to use the universal and CV joints with affordable steering angles, wheels position (I kept exactly the same position as in 42005) and rigidness. The steering. Here you can see the servo (mounted upside down in order to provide more space for the battery block above, steering shaft that goes above the driveshaft, 12T gears (pinions) and 13L racks joined to the wheel hubs. In order to allow the suspension travel, the gears has 1/2L offset from the racks and slides together with the shafts along the mounting points when the suspension compresses. It's a fully legal, but still allowed in LDD and works like a charm! The only mistake that the hubs must be from Claas, but they aren't presented in LDD unfortunately: Just to explain why I used the clutch gears (but with no gearbox actually, ha-ha ), the drive and steering systems intersects so hard, so followed TLG way and used the same solution that they did in the official models (42029, for example) - passed the one through the other. Green is a drive subsystem, blue - steering. The Axles. Here you can see how the steering shaft slides by 0.5L (notice the gap between the 12T black gear and LBG liftarm) - it provides about 1L suspension travel for the both axles. Other images, the story of a modified hull (by Phil), LDD file and instruction in PDF are coming soon...
-

[MOD] Lego 42041 Black Race Truck
Nebulaire posted a topic in LEGO Technic, Mindstorms, Model Team and Scale Modeling
Hello, I modded the Lego Technic 42041 Race truck. Here are the modifications : Full black color with grey pin's New exhaust Trucks wheels (2 in the front and 4 in the back with a modify rear axle) French flag on the front intercooler Yellow and red colore on the back intercooler (in reference to the Wroclaw's speedway club) Differents curved 3x11 panels on side One stud lowered trailer attached Some pic's -
.
-
Here is my MOD for the LEGO 2017 Milano! It's pretty shabby but I did it quickly. Crucial though: You need 2x of this piece: 1x1 round with bar First, comparison photo of the old and new. (I added eyes). Since Nebula can go to the back, the main cockpit now sits four Guardians (can't add Baby Groot :( ) Now we go to the back of the Milano (I added an engine MOD as well) Remove the roof piece And put Nebula inside! If anyone is interested, please PM me your email and I will send you the LDD. Thanks for looking! VaderFan2187
-
[MOD] 10248 Ferrari F40 Stanced
offroadcreations posted a topic in LEGO Technic, Mindstorms, Model Team and Scale Modeling
First off, I apologize if this is in the wrong forum. I thought this would be the best place for this topic since this is more of a Model Team set. Mods, please move this if you see fit to do so. Hello everyone! Today I am presenting a tiny MOD to the set 10248 Ferrari F40 to make it stanced and turn it into the drift supercar you know you always wanted! And yes, it does roll. Here are some quick pics of what I did: Tell me what you think! Anything from "I love it!" to "How could you! You ruined my favorite supercar!" is fine! -
"Clang, clang, clang went the trolleyDing, ding, ding went the bell" - The trolley song (as sung by Judy Garland in the movie "Meet me in St Louis".) This 1930's PCC (Presidents’ Conference Committee) streamlined streetcar was originally designed in LEGO by Flickr user jwolfe7. I copied some of the design using his helpful instructions and added side skirts inspired by James Mathis' design from over a decade ago. Combined together, these features provided the groundwork for this streetcar, which is in 1940's St. Louis Public Service Company colors. The James Mathis-designed wheels can turn a complete 360 degrees. There is a slight gap between the car-body and wheel-set, but that is a price to pay for this design. See here for the original Brickshelf page for the wheels, dating from 2002. Here is the rear of the car. The pole on top of the car moves up and down signifying when the car is in operation (pole up and in contact with the "wires") while down represents the car is not in operation due to technical problems or in storage in the car barn. Below in the spoiler tag you will find my original version of this car from 2014. The LDD file for the newer version is here. Comments, question and complaints welcome!
-
 Hi all, even if this probably doesn't draw anybody from the woodwork today in the age of the Arocs 42043 ;-), i have - inspired from the better performance of the Arocs crane - recompiled my full featured Unimog 8110 from 2014 (http://www.eurobrick...00#entry1964626 and some following posts) and eliminated some remaining weak points: - better bracing of the XL propulsion drive train (now 100% reliable without any crackling gears) - double airpump now mounted the two pumps with offset to each other so the compressor delivers continuously pressure within a turn - replacing the M motor with a L motor which fits perfectly into the same location - preserving tiltable cabin even with battery pack placed within the cabin... So i have decided to rebuild the Mog from the scratch and to document the needed modifying steps with detailled photos, s.b. link... some parts of the following text and pictures are just a replication of some other postings by me in the Unimog Modification Thread but because these posting have a somehow WIP character which makes hard to recognice the final solution i have decided to present the whole final stuff in an own new thread - so if someone searches for a full-featured Unimog-MOD it can be found at one location. @moderator: if you think that this doesn't deserve an own thread, please feel free to move/merge this to the Unimog modification thread - sry for inconvenience! So here is the writeup of all the new features and improvements integrated in the Unimog. Here is the complete overview of the new features / improvements: New features: openable doors and windscreen wipers working steering wheel 3-side tiltable bed with real loading gates with locking mechanism Remote control for driving and steering - and this feature preserves the working steering wheel as well as the 3-side tilting bed and also the fake engine below the cabin. Basic requirement is 100 reliable steering and driving - Motors and receiver are quite invisible from the outside and do not badly influence the appearance of the Mog. rear PTO pass through (with PTO driven trailer, sb) so rear PTO can used even when the crane and outtriggers are rear-mounted flashing beacons on the cabin roof - activated when driving Improvements: PF switch for for better operating of the functions-motor, so you have not to change direction with the battery switch (which is very annoying) Double airpump compressor incl. airtank for more lifting power and constantly high pressure during crane and attachment operation. Airtank gives you also more flexibility during crane operation because cause of the air reservoir you can simultaneously move the pneumatic stuff and turning the crane smoother steering by fixing some steering issues Better weight balance (the standard Unimog is not really well balanced cause of the heavy battery box on the left side) More motor power for the functions and the compressor by replacing the M-motor by a L motor --> really a big improvement, strongly recommended! Attachments: - some front attachments: 8848 style pneumatic scoop pneumatic front-loader, PTO driven mower, PTO driven street cleaner - 8063 inspired trailer with PTO driven bed and deployable stand Primary goal was adding all these features and improvements but not to change the overall appearance of the 8110 because IMO this is very very good. In addition all standard features like fake engine and tiltable cabin should be preserved. Also the basic design with the gearbox etc. should be preserved. So all new features should be integraded homegeneously and - in best case - invisible. At this final state of the Unimog MOD i'm quite pleased with the result because all goals have been reached - IMHO ;-) Important remark: Some of the integrated mods are not my own but have been basicly "developed and designed" by others people, mostly eurobricks members. See the credits at the end of the posting! Pneumatic driven bed which can be tilted to all 3 sides - including real loading gates with locking It is strongly inspired by the driven 3-side beds of eurobricks members barman and tripletschiee - many thanks to both of you for your very well done solutions! . There were no instructions available but there exist a bunch of photos of both solutions so i could reverse-engineer the tilting mechanisms. Most important concepts are a rotary cylinder base (based on barman's solution) a flexible connection to the bed ((completely "stolen" from tripletschiee, a very simple and intelligent solution ) and a "sub-bed" which allows to unlatch one of 3 possible tilting sides (rear, left and right): For easier rebuild i have documented the whole stuff with many detailled shots - see links section at the end. For the loading gates (see photo above) incl. a nifty locking mechanism i found a very good inspiration from EB member stefan_betula_pendula. - in this posting i have already described all deatails incl. many photos: http://www.eurobrick...00#entry1972050 Double offset airpump compressor with airtank A Double airpump compressor incl. airtank provides more lifting power and constantly high pressure during crane and attachment operation. The dual airpumps are mounted with offset to each other so the compressor delivers permanently pressure. Supported by the airtank the whole system now offers in each situation enough and high air power so the crane operation has now always enough lifting power and quite fast response time. This offset needs some more space so this improvement needs one quite deep modification of the chassis which can not be applied to an already build unimog: More motor power for the functions with a L motor The M motor can quite easily replaced by a L motor if the unimog is build from scratch for all this mods. This is really a big improvement and it is strongly recommended! Turning the crane or driving something with one of the PTOs has now much more power. For the new double pump compressor (s.a.) the additional power is also appreciated. But one Remark to the pictures above: better use a standard 24th gear instead of the shown clutch - the double pump compressor appreciates the full power (with a clutch something gets lost within the clutch when airtank is almost full and no pneumatic operation takes immediately place) - with i standard gear i never get a stalled motor but always full air power... RC for driving and steering incl. a working steering wheel Today all stuff has to be RC - and even i'm not really into it i saw the challenge to integrate RCing into the Unimog together with the tilting bed (s.a.) - this tilting bed prevents from using the typical solution be placing the XL motor for propulsion in the middle of the chassis - there is simply to room for it. After a lot of try&error solutions i finally managed an RC-solution which integrates very well and is quite invisible from outside (btw: thanks to EB member Pat Ard for his initial idea placing the XL into the original battery compartment --> battery has then moved into the cabin) drives without any crackling of gears steers as well and reliable as the direct-servo-solution-on-fron-axle (steers also very well when not driving!) - a return-to-center is really not necessary with such slow vehicles... preserves the full suspension travel of the front axle (with the servo mounted on the front axle the travel must be reduced by the height of a 1x2 plate to prevent the servo from colliding with the pistons of the fake engine (from below) has a working steering wheel has a quite invisible IR receiver Integration of the XL motor: Overall the steering-motor, the accu battery and the IR receiver can be integrated very well into the cabin - the cabin then simply has a typical center console (M motor), a build in refrigerator box (gear reduction for steering) and a tool cabinet (accu at the back of the cabin): One remark to the steering solution: Here the servo motor was not an option for me, despite the fact, that the steering performance of the servo is perfect when mounted direct on the front axle - as shown e.g. by EB member Pat Ard. But this solution allows no working steering wheel because it is simply impossible to connect a universal joint and the steering CV joint (cause of too steep angle and too short distance). Running the servo from within the cabin by driving the standard steering gear-train of the 8110 is also no solution because then the steering performance is somehow mediocre: the servo has enough power but IMO the steering gear train from motor to the rack is too long with too many gears involved so there is to much backlash - and because the servo can just spin a 1/4 for a full steering lock and because of very much friction caused by the big tires this 1/4 round of the servo is partly somewhere lost in the steering gear train... These problems can all be avoided with my final and very well working solution: Steering driven by M motor with a quite high gear reduction in the cabin performs excellent, but only with a double clutch gear (because only one is too weak for a powerful and fast enough response steering even during stop cause of the high resistance of the big tires): For the working steering wheel i have 99% applied the solution of tripletschiee, simply because it works like a charm and is very well integrated in the cabin Openable doors they were inspired by the solution of EB member Pat-Ard but slightly improved by adding a second hinge so now the doors are guided very well and stable... Using a PF switch switching direction via battery box is always a pain --> therefore i have added a PF switch - IMHO quite well integrated (and nowhere stolen ;-) Fixing steering issues There are two problems which needed being fixed: a) better steering lock/angle: This can be done by replacing the 4 3/4 pins (DBG) by 4 1/2 pins (LBG). Removing the pins completely is not the best solution because then the tires can rub on the chassis when suspension is compressed and you will steer... b) making the steering easier - out of the box it is way to hard - this is not only cause of the high friction of the tires but also cause of 4 red friction pins involved. In addition the whole front axle has a strong bump steer. well, i have tried several solutions: - Nicjasnos complete new front axle: this one has by far the best suspension and steering and reduces the bump steer a lot. BUT: it looks to bulky and therefore the look isn't realistic for a Unimog... therefore i have discarded it after building, installing and testing - applying the full fix of Junkstyle Gio (http://www.eurobrick...1) which replaces all 4 friction pins with frictionless-replacements: this makes the steering indeed very easy but on the other side now each grain of dust colliding with a front wheel can change the steering angle...it's too easy.. Therefore i have applied only the half of the fix of Junkstyle Gio so its a mixture of friction and frictionless pins --> IMHO is the best compromise of easyness and stability for the steering and the look of the front-axle: Adding a PTO pass trough for the crane - switchable between turning the crane and passing through the PTO This enhances the flexibility of the Unimog a lot beause now you can add any PTO powered trailer even with back-attached crane. There is a switch which allows to switch between spinning the crane and runing the PTO pass-through. PTO 1 has same speed as the PTO of the chassis, PTO 2 is slightly geared down (12:20) This mod is not from myself but it is from EB member dr_spock. A very well done solution, works like a charm and the full modularity of the crane and the outriggers are preserved. Highly recommened! Thank you, dr_spock, for providing me some detailshots. Trailer with dumping bed driven by the PTO pass-trough This trailer is inspired by the 8063 Trailer and by a trailer made by EB member dr_spock (which is also the designer of the pass through PTO as mentioned above). In fact: It is the 8063 trailer with slightly wider bed, bigger wheels and ability being connected to a mechanical PTO. In addition the tilting still can be manually operated. The clever coupling is from dr_spock. But the full power-gear train is completely my own MOD. The original 8063 trailer has a nice stand that can be deployed via a lever mechanism that keeps the trailer upright when it is not attached to the towing vehicle. I wanted this stand being preserved because it works well and it is simply necessary for a trailer with such an axle layout: Preserving this stand makes a it little bit tricky to integrate a well braced and geared down gear-train from the coupling to the LA-base but i succeded: Details can be found in this posting: http://www.eurobrick...00#entry1948575 Flashing beacons i ordered them by EB member Zmei_gorini4 (Kirill) - they work perfectly and look very good - IMHO they are worth the price...good job, Kirill! More details can be found here: http://www.eurobrick...25#entry1976100 Links to many many detail shots: Modded chassis: Building the modded chassis from scratch with all the following new features integrated: 3-side tilting bed, XL motor for propulsion (RC), L motor as replacement of the original M motor, double offset mounted air pump, preparation of airtank mounting plus hose guidings and covers for both motors (XL and L). Rear axle is 100% original and front axle has only applied the known steering fix for smoother steering movement and greater steering lock (s.a.). Of course in both axles you must switch the gear ratios vice verca in the portals (with 8:24 the Mog drives very well)! You can rebuild it with the photos found here http://bricksafe.com...ll-mods/chassis together with the original BI of the 8110. Modded Cabin: Detailed photos how to integrate RC steering: http://bricksafe.com...ontrol/Steering Detailed photos of the working steering wheel: http://bricksafe.com...l and PF switch Detailed photos of openable doors: http://bricksafe.com.../Openable doors Because these 3 mods have been done at different states of the Unimog modding there can be some inconsistences between some photos - build carefully together with the original 8110-BI because these 3 cabin mods slightly influence each other! Flasing beacons: http://bricksafe.com...lashing beacons Rear PTO pass-through: detailed photos can be found here: http://bricksafe.com...TO Pass through Trailer with tilting bed driven by the PTO: detailed photos can be found here: http://bricksafe.com...Unimog/Trailers - together with the original BI of the 8063 trailer you can easily rebuild it. Front loader attachment: detailed photos can be found here: http://bricksafe.com...ts/Front Loader 8848 style scoop: detailed photos can be found here: http://bricksafe.com...pneumatic-scoop PTO driven mower and street cleaner: Photo instructions can be found here: http://www.technic-d...odell=126&bid=c and http://www.technic-d...odell=126&bid=d) Inspirations and credits: New features: openable doors were inspired by the solution of Pat-Ard but slightly improved by adding a second hinge so now the doors are guided very well and stable... For working steerng wheel i have 99% applied the solution of EB-member tripletschiee, simply because it works like a charm and is very well integrated in the cabin - modified by me to work together with my RC steering solution The 3-side tilting bed It is strongly inspired by the driven 3-side beds of eurobricks members EB-members barman and tripletschiee - many thanks to both of you for your very well done solutions! RC is completely my own solution and design, for steering as well as for propulsion The rear PTO pass-through is from EB member dr_spock. A very well done solution, works like a charm and the full modularity of the crane and the outriggers are preserved Flasing beacons are bought from EB member Zmei_gorini4 - integration in the cabin by me Improvements: PF switch is completely my own design Double compressor with offset airpumps is completely my own design steering fix is inspired by the solution of EB member Junkstyle Gio but modified by me better weight balance by placing the battery box with in the cabin is completely my own design replacing the M motor by a L motor is completely my own design Attachments: The 8848 style pneumatic scoop is 100% the design of EB member thomol (http://www.eurobrick...75#entry1164528) The pneumatic front loader is build based on the design of EB member Tim S. PTO driven mower and PTO driven street cleaner i have found here: http://www.technic-d...odell=126&bid=c and http://www.technic-d...odell=126&bid=d) Trailer with PTO driven bed is inspired by the 8063 trailer and by a trailer of EB member dr_spock. The clever coupling is from dr_spock. But the full PTO-gear train is completely my own MOD
 -
Hi all! I hope I'm doing this correctly?! I don't usually find my way over to the Star Wars section but wanted to share my Slave 1 with you all! I snagged the idea from a guy on Reddit who added white lights into his Slave 1 to light up the engines, and I loved the look! I knew I had to do it myself. To make it more of my own take on it I decided to change the lights to orange to try and match the engine colour better. I've also swapped out the trans-blue 1x1 tiles on the top engine for trans-orange, and have some trans-orange discs coming to replace the lower blue ones. Anyway, I hope you guys like! I plan on getting some more lights into the cockpit at some stage but didn't think orange would suit in there. You can just about see the battery pack sitting on the stand underneath with a bit of wire showing. I plan to try and hide this a bit better at some point. Signed by the main man himself :) Played around with the photo a bit as it was still light out when I took pictures... Lastly, the back! I might try and fill the last 3 holes with either more LED's to make the bottom engines brighter but if I did 6 at the bottom I'd only have 8 for the top (there's currently 14). Bonus pic - quick photo of just after I put them in. I pulled the curtain shut to try and get it a little darker but even then it was still quite light and they stand out ok. I need to change the 8x1 brick at the top for a flat 8x1 so it sits flush again, but other than that, and swapping trans-blue for trans-orange I've not amended the build. I hope you guys enjoyed!
-
Hi all, this is my first MOC of the Lord of the Rings theme. It needed a lot of work and I'm quite proud of it. I built it starting from the original set and taking inspiration from different mocs that i found on web. Hope you like it!
-
While waiting for more building materials for Inferno HQ we decided that it was time the Agents of Godwins Hollow upgraded their vehicles. The first two are some basic MODs/repaints to vehicles from existing sets but the third is a MOC dropship allowing the Agents to get significant numbers of personnel into the fray quickly. The 4x4 All Terrain Attack Vehicle Agents of Godwins Hollow - Vehicles Agents of Godwins Hollow - Vehicles The 'Spyder' Assault Speedster WP_20170603_22_25_59_Pro WP_20170603_22_25_26_Pro WP_20170603_22_22_51_Pro WP_20170603_22_20_13_Pro WP_20170603_22_19_53_Pro WP_20170603_22_16_43_Pro The 'Bulldog' Armored Personnel Dropship WP_20170603_22_11_22_Pro WP_20170603_22_07_44_Pro WP_20170603_21_51_06_Pro WP_20170603_21_51_03_Pro WP_20170603_21_49_49_Pro WP_20170603_21_49_44_Pro WP_20170603_21_49_37_Pro WP_20170603_21_47_51_Pro WP_20170603_21_44_46_Pro WP_20170603_21_44_36_Pro WP_20170603_15_56_11_Pro Everybody all together... WP_20170603_22_15_55_Pro WP_20170603_22_14_13_Pro by Stewart & Sydney, on Flickr There are more pics on Flickr if you're interested and always, your comments are appreciated. Thanks for taking a look.
-
The U-Wing is probably my favorite thing to come out of Rogue One. I got the official set back in December and while it is a great build, I needed more. My goal with this build was to create a more accurate "system scale" (dubbed by Inthert) model built on the the official model. Some of the UCS models on here are fantastic but a little too blocky for me. The U-Wing has some tough angles and the interior is very challenging. Another thing I did differently with this build was I sat down with the official model, pulled out all my parts, pulled up some reference images and started tinkering section by section. I had a blast, felt like a little kid again building this way. Recently I have started everything in LDD, and methodically optimized the model, ordered parts, etc. It was nice to go old school. A huge shout out DarthTwoShedsJackson as his model was a big inspiration... if he ever uploads an LDD file or breakdown I may have to build one. Also, Inthert's recent model minifigure-ish scale model is fantastic. Go to my flicker page for a few more pictures and breakdown of some components. DSC03557-Edit by James Eilers, on Flickr DSC03560 by James Eilers, on Flickr DSC03556 by James Eilers, on Flickr DSC03559 by James Eilers, on Flickr DSC03554 by James Eilers, on Flickr DSC03562 by James Eilers, on Flickr
-
Hi all! First post from me, I've been hopelessly hooked on the new Star Wars Lego for a few years now, modding a few like Poe's X-Wing, but I wasn't sure about posting pics since that one especially has been modded to death :) I got the new Milano for my birthday (thanks kids!), it's an amazing little set but I think it just needs a couple of obvious tweaks to finish it off. Here's my effort, it's no movie replica but I've tried to build up the rear of the top to make it more substantial and added some fins. I also changed the main engine for a revolver stud shooter thing, added a couple of engines to the wings and turned the empty lower rear part into a hold for all the minifig weapons, Groot's boombox and Starlord's helmet. The annulax batteries went straight in the spares box with that horrible pink tentacle monster, yeuch! Lastly I filled in some empty internal gaps, like inside the ships 'chin', and changed those yellow hinge parts inside the wings for black ones. Hopefully the photos show off the big changes. I think it's a fun little set that was sadly missing some finishing touches, but with a few spare parts added looks so much better!
-
I decided The Nexo Knights Volcano Lair playset needed a little something extra... I added a Skull tower with a throne and a platform for adding ingredients into a cauldron for mixing up magical mischief... Work in progress image... Best picture I could get of the throne