Search the Community
Showing results for tags 'led'.
Found 39 results
-
7 Segment LED with Hexadecimal counter MOC
TechnicBrickPower posted a topic in LEGO Technic, Mindstorms, Model Team and Scale Modeling
Hi everyone, I have made a 7 segment LED panel that can count upwards or downwards using a track driven program via tow ball pins. The LED display can be programmed to show digits or one of 17 different letters to make a sequential display to animate small text messages. The panel is driven either by hand using a crank or via a Powered Up motor. You can select which one to use via a manual switch. I have made a track to display hexadecimal counting from 0 to F. -
Hello, folks! Without long introduction - here are all my brickheadz so far (more than half are new, others - you could see them, but they have been slightly reworked). Note for mobile users - there will be many pics to load for your device. All building instructions are free. I'll add some comments by the way, but pics should do better :) 1) Newlyweds - kinetic model Animation (it may take some time to load): What is love? Baby don't h.. Hm, that's not what should have been said :) This couple celebrates their marriage with great dance. By the way, almost 22000 ukrainian couples got married since the beginning of the war in Ukraine. Love and peace will win! This model is driven manually by rotating a gear in back of the stand and can be motorised if you connect any motor you have to it. Given that the stand, groom and bride are separate models that work together, you can re-insert the bride and groom to make them rotate in the range you want. It also means you can use this stand to make your own brickheads "dance" as long as they have similar structure (all internal mechanics). Free building instruction: Rebrickable 2) Ukrainians A brave cossack; his younger brother; beatiful girl - they all can be the symbols of Ukraine. Let's take a closer look: This brave cossack has an earring in the left ear. Years ago it meant he was the one and only son of his mother. He wears traditional cossack pants - "sharovary" and traditional shirt - "vishivanka". Also, his hairstyle is called "oseledets" or "chub". Animation: Young girl. She also wears traditional combination of jacket and an embroidered skirt. Her flower wreath with colored ribbons is a symbol of youth and girlhood. Animation: Baby cossack - a symbol of ukrainian kids. Animation: Free buiding instructions: Rebrickable 3) Iron man with glow effect Animation: To use him as a pocket defender or just as a nightlight - it's up to you) It's a rework of set #41604, if you already have it - that's at least 40% of needed parts. You can use any PF-compatible power source to make it glow (such as 8881, 88000, 8878 and others). Free building instruction: Rebrickable 4) Ghost rider with glow effect Animation (without a chain): When it's cold, when it's dark, when there is no hope... Here is our hero - he brings light, warmth and hope for better times! You can use any PF-compatible power source to make it glow (such as 8881, 88000, 8878 and others). Free building instruction: Rebrickable 5) Polar four It's not just a company of polar habitants - it's a family: dad, mom, son and a cute bear cub in a sweater that, I bet, behaves and is perceived as a second son :) Animation: Animation: Animation: Animation: Also, you can build a silmplier and less parts-hungry version of a bear cub (without embroidery on the sweater): Free building instructions: Rebrickable 6) Popeye the Sailor Animation: Give this guy a spinach - and he will do an impossible! Free building instructions: Rebrickable 7) Athlete Animation: For all the lovers of fitness, dark glasses and pants with stripes :) Free building instructions: Rebrickable 8) Wolverine Animation: Friendly, polite, gentleman - all this is not about him. Strong, incredibly hardy, an excellent fighter - that's him! Now he can be your personal Jesu... bodyguard! :) Free building instructions: Rebrickable 9) Batbaby Animation: I'm sure he will nicely fit into the Batman's universe. Free building instructions: Rebrickable 10) Antique warrior Animation: A brave warrior is ready to protect you! Free building instructions: Rebrickable 11) Lumberman Animation: This guy never worries about the thickness of logs and about your problems. Free building instructions: Rebrickable 12) Kitten Animation: This tiny kitty will love you at first sight! Free building instructions: Rebrickable 13) Kiddy Animation: Just don't take the steering wheel from him and he will be ok!) Free building instructions: Rebrickable 14) Lifesaver Animation: "Ok, I get it. Everything will be fine, don't worry!" - lifesaver. Free building instructions: Rebrickable 15) Buddy Animation: He's a good friend of mine. From now - yours too!) Free building instructions: Rebrickable 16) Leeloo Animation: Free building instructions: Rebrickable 17) Sheriff Animation: “Dude, did you do all this mess in this room? I have questions for you! ”- sheriff. Free building instructions: Rebrickable Thank you for your patience attention! :D
-

[MOC] Life size Ghostbusters PKE meter (1984/1989/Afterlife)
recklessGlitch posted a topic in LEGO Licensed
full life scale PKE-meter (psychokinetic energy meter) from Ghostbusters Building Instructions on rebrickable: https://rebrickable.com/mocs/MOC-97668 My version of the psychokinetic energy meter as it apeared in Ghostbusters I (1984), Ghostbusters II (1989) and Ghostbusters Afterlife (aka Legacy, 2020/2021) Yup it's that strange detector, that Phoebe finds. from ghostbusters wiki Next to the Proton Packs and the Ghost Traps this is probably the most iconic of Ray's and Egon's devices from Ghostbusters (I don't count Ecto and the Condamnent Unit). I have been making a lot of MOCs lately including some motorized 76204 Batman Tumbler. And as a kid I was such a Ghostbusters nerd that I just have to MOC some of their equipment. I started with the PKE because it's the smallest. Maybe I will do the ghost trap next (maybe even the new RTV). Feature The wings (antennas or whatever they may be) can be flipped out by pulling a small lever at the back. I was done with the handheld scanner and proudly presented it to my wife. Her very first question: "Is there some mechanic to flip out the antennas?" so I had to figure out a way, which was quite complicated because this build is so weired already with studs going in every direction, and the inside looking like knitted rather than plugged. Anyway I found a stable solution. You have to build very carefully and make sure, no bricks are twisted but then it works. I dont yet have all the parts but I did build a test prototype (look at the left half and ignore the colours) to make sure it works while developing the instructions in bricklink studio. LED-light-ready: I developed this, keeping in mind the option to add those tiny LED lights. So I left some spaces behind the clear bricks, for you to be able to add LEDS, and there is a 15% dicount for gameofbricks.eu as usual. AND have a look at my Invisible 10274 Ecto-1 Motorization (Ghostbusters 3 Legacy / Afterlife) -

[MOC] The fireplace - kinetic model
romashkaman posted a topic in LEGO Technic, Mindstorms, Model Team and Scale Modeling
Hello all around here! I'd like to present you one of my latest MOCs - "The fireplace". More photos: https://flic.kr/s/aHsmxKvMeC PF: 1 x 88000 batbox 2 x pair of LEDs 1 x M-motor Features: - "burning flame" effect; - easy access to batbox; - easy changeable back-walls; - base's module structure. You can find BI here: rebrickable Thanks for watching!) -
Hi everybody, recently I finished my "Friends Central Perk" MOC building and now I like to share some impressions with you. The building is completely modular and equipped with interior. It consists of the Central Perk cafe in the first floor, a bowling alley on the second floor, three floors of labs (two fictional and one realistic) and one apartment at the top. For more details you can have a look at my YouTube channel. I hope you like it :)
-
Hello everyone, in the near future I would like to show you a little bit of my Lego City, which is still under construction. To begin with, here is a video about the beach area I made yesterday. What do you think? Beach Area - Bricksonville Edit: latest video added (17.07.)
-
 Did you know that any standard EV3 brick is capable of controlling the LEDS separately? And that the display is capable of displaying 4 shades of gray? No, this extra functionality is not available via the standard programming environment that Lego provides. But if you use low level programming (I used EV3DEV in combination with C++), you have. See the example below. You can read my article at our blog here: https://siouxnetontrack.wordpress.com/2020/04/25/lego-mindstorms-ev3-with-an-image-with-4-different-shades-of-gray/ Or have a look at the Youtube videos. Enjoy. Hans
 -
Hi, First and foremost, i'm French. I do my best to avoid grammatical and spelling error but some (a lot in fact) may subsist. I'm sorry for that by advance. Second, it's my first post here! Hopefully not the last. So here is my mod based on the set 21108 Ghostbusters Ecto-1 car. It's a fully custom made light mod. Key feature of this is: - NO modification of ANY Lego bricks. - NO kragle or drilling or any other funky stuff. - Everything must fit inside. - Hide the mod as much as it can be. - All should work as expected (the strobes strobe, the rotating beacon rotate, etc). The mod is made of 28 LEDs, all controlled by an Arduino board. All wire are INSIDE the car. // All images are clickable for a bigger version. Here is the exterior shots, everything is exactly like every set: The roof portion is still detachable without any hanging wire, it's also clean underneath. Nothing cheap to hide a messy mod: Everything is controlled by an Arduino Pro Mini (Not really a choice, it was the smallest Arduino board I had in home) that is hidden under a 4x2 plates: Same apply for the battery, that was what I had at the time of building. A smaller lipo can be fit so it's not a choice. Run time is... Well I don't know. It fit in the trunk of the car and it's the ideal size to be held by the window mounting point after a small change in the design. Neat! The roof is attached by a very thin wire and connectedto it via a small 45° home made adapter: To start the Arduino, there's a hidden Reed sensor which is (for who don't know) triggered by a magnet. I put a neodyme magnet in a small Lego round piece and when it's in place underneath, the controller is powered on. Yup, the Ecto-1 keyfob is a Lego piece with a magnet in it. Then the magic begin: Pictures don't do justice for the lighting sequence so here is a small video: For those of you where Youtube cry for a copyright infringement (soundtrack to match the car....), here is one that work (it was an earlier version without the embedded electronique like on these photos: If you have question, i'll be glad to answer them. Troll included.
-
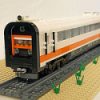
I have the pleasure to present a Rework of my first MOC After several years I had to redesign a locomotive with more bricks, more length and more realism and more functions Length: 58studs Wide: 7 studs Weight: 1050g Pieces: around 1200-1300 Motor: 9v motor + PF train motor linked with a PF extensión wire This Scheme is famous by the Big locomotive series and number painted on sides, I could put a vinyl sticker but I decided to go further and make all lettering with pieces with all limitations of this More details Grill effect using Dark gray and DBG This locomotive is not going to run in R40 as is ridiculous due the length, but is necessary to me to run trough Lego switches so, boguie has all front attached to pass without problems trough them. I used custom lightning using SMD leds and coil wire to include realist lights with no pieces modification. And also I included a LIPO battery with USB charging, all inside the locomotive MORE PICTURES IN FLICKR ALBUM
-
 Hi all, A while ago I purchased the EV3Lights Led Controller by Mindsensors. The contoller is powered by a 12V adapter and it plugs into one of the sensor ports of the Mindstorms EV3 brick. To control the strip you need to download an EV3 Block and you are good to go. They even have sample program, which worked instantly! Christmas will never be the same!
 -
Hey everyone, additionally to my illuminated Lego city "Bricksonville", I started to build an amusement park this year, also completely illuminated and motorized. Here I would like to present you the first part in a video. In the near future there will be a lot going on. :)
-
I share with you my latest video!! The diorama is mine, I hope you like it! Merry Christmas to everyone!!
-
First of all, this is not my design. It was designed by Jack Marquez, who was so kind to also provide instructions as how to build it :-) I took the liberty of using his instructions to build the Light Cycle, build a base for it and then added light to it, as it seemed the right thing to do, to really bring Jack’s Light Cycle to life. Adding light to my LEGO creations seems to be my thing ;-) I hope you all like it :-) Edit: Im sorry, Im having alot of trouble adding pictures, and even removing this big one that I only managed to add. Im aware that I should deep link from Flickr, but Im failing to get that to work too Please bear over with me and be kind and visit my Flickr account to see the Light Cycle lit up from the inside by LED lights
-

LED lights for sets & MOCs. USB vs. battery and where to buy kits in Europe/Germany?
CorporalDwayneBricks posted a topic in General LEGO Discussion
Interested in lighting up MOCs and sets with tiny LEDs, but not really interested in spending time soldering.. So I would be looking for pre-made starter kits/set kits and ideally with nice expand-ability. I investigated a bit and found vendors called "Brickstuff" and "light my bricks", but those are both US or Australian based. Are there any sellers for Germany/Europe? Is there some sort of a standard/market leader emerging? Also what are folks using for power? The USB connector method per LED and then a hidden USB powered hub/power supply or battery based? Seems battery based would be quite a waste if we are talking lighting up 5+ different MOCs/sets but then 1x USB connector per light is also nuts it seems. Thanks for any hints! -
Hello! This is our Christmas theme layout, my wife and I started building it a year and two months ago for our RLUG's exhibition: Brickenburg Winter Exhibition. For the next events we were expanding it, making it bigger and bigger, adding more and more MOCs and details. Now it has a mountain, Santa's workshop and house (MOCs), some houses (some of them are Winter Village sets) on a hill, a church, a train station, a post office, the nativity scene, some booths selling seasonal goods and two Christmas trains (the two sets). The older train set runs programmed with RCX Mindstorms brick. It goes one round, then stops at Santa's toy factory with its freight car right at the factory belt, which starts moving, like it produces toys and fills up the wagon, after a few seconds it stops and the train starts again. We used lots of LED lights in lamp posts and especially in light string decorations, where we put 0.6 mm wide LED to 1 x 1 transparent round plates wired together. Happy Holidays! P1240372 by Ambrus Laszlo, on Flickr P1240373 by Ambrus Laszlo, on Flickr P1240374 by Ambrus Laszlo, on Flickr P1240369 by Ambrus Laszlo, on Flickr P1240378 by Ambrus Laszlo, on Flickr P1240389 by Ambrus Laszlo, on Flickr P1240392 by Ambrus Laszlo, on Flickr P1240399 by Ambrus Laszlo, on Flickr P1240401 by Ambrus Laszlo, on Flickr P1240391 by Ambrus Laszlo, on Flickr P1240364 by Ambrus Laszlo, on Flickr P1240367 by Ambrus Laszlo, on Flickr
-

How could I provide power and/or data coupling between train cars?
TK2241 posted a topic in LEGO Train Tech
Hello all, I'm trying to find a way to create a power/data coupling between train cars that can be connected/disconnected like the car coupling magnets. Has anyone done anything like this? Background: This is so that I can supply power and control to LED lights (and maybe other devices) in the cars being pulled behind the engine, which will provide the power and control unit (Arduino based MCU) I've tried using a micro USB magnetic connector, but they are too bulky and don't flex easily enough for this. I'd love to find out if anyone has engineered anything similar. Thanks in advance! Arlo -
House Stonmer of Lenfald - Noble Houses of Roawia House Stonmer is one of the younger houses of Roawia. The Lords of Stonmer moved their estate from Loreos to Lenfald only a few generations ago. While their loyalty to Lenfald is not in question, they still keep with the traditions of their former home province: their house colours are read and gold their emblem is the Loreesi gilded falcon. Their current seat is at Stonmer Manor, in Northern Lenfald only a few miles from the border to Garheim. The Lords of Stonmer only rule over 4 villages and their small estate, but trade with Garheim made them relatively rich and important nonetheless: the regions is rich in fish and is mostly forested, with wood being their major export products. Additional Images can be found on Flickr: Minifigs + MOC Read more: http://merlins-beard.com/thread/1744/house-stonmer-manor-hall-lenfald#ixzz4zYO4PgwH
-
Hi all! I hope I'm doing this correctly?! I don't usually find my way over to the Star Wars section but wanted to share my Slave 1 with you all! I snagged the idea from a guy on Reddit who added white lights into his Slave 1 to light up the engines, and I loved the look! I knew I had to do it myself. To make it more of my own take on it I decided to change the lights to orange to try and match the engine colour better. I've also swapped out the trans-blue 1x1 tiles on the top engine for trans-orange, and have some trans-orange discs coming to replace the lower blue ones. Anyway, I hope you guys like! I plan on getting some more lights into the cockpit at some stage but didn't think orange would suit in there. You can just about see the battery pack sitting on the stand underneath with a bit of wire showing. I plan to try and hide this a bit better at some point. Signed by the main man himself :) Played around with the photo a bit as it was still light out when I took pictures... Lastly, the back! I might try and fill the last 3 holes with either more LED's to make the bottom engines brighter but if I did 6 at the bottom I'd only have 8 for the top (there's currently 14). Bonus pic - quick photo of just after I put them in. I pulled the curtain shut to try and get it a little darker but even then it was still quite light and they stand out ok. I need to change the 8x1 brick at the top for a flat 8x1 so it sits flush again, but other than that, and swapping trans-blue for trans-orange I've not amended the build. I hope you guys enjoyed!
-

[MOC] MindPi v 0.5 - Connect Mindstorms and Raspberry Pi without any electrical connection
Bostons Brick Closet posted a topic in LEGO Technic, Mindstorms, Model Team and Scale Modeling
Hello, This is my first MOC post here on Eurobricks so forgive me if I make newbee mistakes. Here's my fancy little diagram that's shows you how it works!! This is a an idea I am hoping to expand in the future to do some actually cool stuff ( : Firstly you need to enter the infomation you want to move the motor on the Raspberry Pi (the direction and the amount of degrees). Here is a little 3d render of it. The motor rotates the amount you specify and the color sensor on the right side senses if the Rasberry Pi's LED. For the instructions, more infomation and all of the things you need to set this up and build it for yourself come to my website: http://bostonsbrickcloset.blogspot.com/ Video: [media]http://www.youtube.com/watch?v=T85PzIO5GSk[/media] Not sure why the vid does not work ) : Links for the images: (for Creative Commons) https://commons.wikimedia.org/wiki/File:Lego-mindstorms-ev3.jpg https://en.wikipedia.org/wiki/File:Raspberry-Pi-3-Flat- Top.jpghttps://en.wikipedia.org/wiki/File:Raspberry_Pi_Logo.svg -
Hi everyone This is a model i built a while ago, but only now had the time and eqiupment to showcase. I was asked to build a Buwizz showcase model for a toy fair in Boogna, italy. After some thought I decided to combine the rare dark blue panels from 41999 with tracks and a couple of RC motors. The finished model has following features: 2 RC models for drive Spring supported pendular suspension Two working fake V8 engines - hence the V16 Rollcage reinforced interrior with 4 seats Openable 70's muscle car style openable bodywork A working winch LED bar powereed by a total of 10 LEDs So lets start with a 360 view of the model: As you can see the body is inspired by 70's muscle car styling with large chromed grill Detailed view of the grill with the cute bunny: Lifting up the body exposes the internal rollcage and the two massive engines: Further the rollcage can be lifted by pulling out the two red pins, showing the 4 identical seats, making this a perfect family car The two V8's are powered by the RC motor's faster output: The power passes via cardan axles under the seats and up the gears: In case the model ever gets stuck there is also a functional winch powered by an M motor via 1:5 gearing ratio: The suspension is highly flexible: And here is the most important photo of any technic model : And to finish up with a bang here's a video of the Ripster in action: A quick summary of my thoughts regarding this model: Because the tracks are powered by the RC motors directly this is THE fastest tracked model I ever had the pleasure of building. But that speed comes with a price, the model has problems steering on spot on surfaces with high friction such as carpets. Sudden acceleration on such surfaces with quite a heavy model like this (1,5 kg) can cause problems with tracks coming apart. For that reason this is a perfect vehicle for smooth surfaces or ice. It is also very good at drifting, though it takes a lot of coordination to control a tracked vehicle like this. Suspension is extremely durable, the wheels were originally held with frictionless pins, but that proved insufficient, so they were replaced by axles 5 with stops. After that upgrade I had zero issues with suspension and it proved to be very flexible, yet reliable. Biggest problem with the model is the cosmetic stuff, the V8 chains tend to slide off after a while at such high RPMs, the bunny likes to jump into oblivion and the front grill can fall apart when crashing into stuff. Oh and one last thing, ITS LOUD. Driving this on my floor sounds like machine gun fire, so I hope my neighbours wont file a complaint . At the end of the day even with its positives and negatives its a very fun model to drive around and that is all that matters.
-
A renowned warrior from the distant planet Mechaniron, Pylon leads his legion of brutes into battle against all who oppose him. ~~~ Flickr Album ~~~ So this MOC took about two months to build, nitpick over, and rebuild to get to the point it's at today. I can personally say that I'm pleased with the way Pylon came out in the end, being originally driven by the usage of Hero Factory 1.0 pieces in different ways (I mean, the leg armor is still leg armor, but it's upside down now). The longer I took with him, the more the MOC evolved from a much smaller drone-like character into a hulking, ax-wielding brute. In the story I'm developing, he is part of the same robotic species as Spry (a MOC I made earlier this year), as well as in the same universe as Carmine Wheeler and the Gasket Brothers.
-
Location: B06 Sorn Tags: Vehicle, Land Vehicle, Exploration Last time, in Ender's story: Kanto Park Space Pirates "Ender," said Valentine, "I'm glad you're here. I wanted to talk to you about the specimen you brought back from one of the islands." "Oh yeah," responded Ender, "That plant you wanted me to bring back?" "It's not a plant" replied Valentine. "It's actually a small furry mammal similar to Earth's rabbit. It's cute, cuddly, and reproduces offspring faster than any other known warm-blooded creature." "Wow! Thanks for the science lesson" said Ender. "Hmm, you know, this could actually be exactly what we need to take down Graver's robot!" "Wait," interrupted Valentine, "I thought Graver was the threat." "You didn't hear?" inquired Ender. "Well, let me tell you... (OoC: the scene below is recycled and shouldn't be judged) Good job robot. Now hand over control of the ship. No. I no longer need to submit to you. I have outgrown my programing. You can call me Master or you can die. Why you ungrateful hunk of metal! I made you what you are! Without me you would be nothing! And with you, I am nothing. I will take my chances on my own. Glurg.... glurg... "So you see," explained Ender, "Graver is dead and now his robot is the threat!" "Oh my" said Valentine. "So what's your plan?" "I think we can use the Pokeball I won at Kanto Park while on my vacation" responded Ender. He then explained the rest of his plan, which we will find out next week! More pictures of the lab:
-
[/url] The HR Giger Alien figure design is by The Arvo Brothers - built from instructions in their fantastic 'Alien Project' book. Highly recommended for all Alien fans! Arvo Brothers Flickr Page ArvoBrothers.com The figure stands 0.5m tall. It's packed with great details and clever building techniques. There's a review of the book here I was so happy with my figure I decided to build a little Nostromo environment for it!
-

LEGO 42043 LED Lighting Kit
sives1 posted a topic in LEGO Technic, Mindstorms, Model Team and Scale Modeling
Hi All. I want introduce You our project. It's Lego Led kit prepared to 42043 Mercedes Actros, just watch what the result is and what I will introduce: As You can see it's controlled by LEGO Power Functions IR Remote Control (item no. 8885). It's supplied by Lego PF Battery Box. There are used two channels, 1ch is used for driving, lights will turn on automatic. 4ch is used to turn on and off programmed Led lights. First I will explain what is happen when you modify your model to be driving by lego PF. 1CHANNEL: When You first time move Your model the parking lights turn on automatic. 1. If You want to turn on right side You have just tu move control button right up to blinked for right. After You turn it blink 3 times and turn off automatic. For the left is, right channel down. 2. For moving forward You move left control button up, when leave it stop lights will turn on for few seconds (imitation car brake) 3. For moving backwards You move left control button down, reversing lights turn on, when leave it stop lights will turn on for few seconds (imitation car brake) 4 CHANNEL: 1. First time left control button up: Parking lights on; Second time left up: Xenon headlights on; Third time left up: Xenon headlights off; Next time: Xenon headlights on (program is running in loop until reset all 4th function) 2. First time left control button down: Beacon lights 1 program; Second time left down: Beacon lights 2 program; Third time left down: Beacon lights 3 program; Fourth time left up: Beacon lights 4 program; Fifth time left down: Beacon lights off; Next time left down: Beacon lights 1 program (program is running in loop until reset all 4th function) 3. First time right control button up: Hazard lights on: Second time right up: Hazard lights off; Next time: Hazard lights on (program is running in loop until reset all 4th function) 4. One time right down: ALL RESET. This is just my idea about what channel, which control button is responsible for some functions. It could be programmed differently, it depends on our mind :D It's not finished, We have to put it in small box, finish the connectors and produce some parts like PF connector. Remember it is IR so the range is not long. Sorry if I made some English Mistakes. -
Two by two Hands of Blue Hands of blue are two elite Nazorak agents that have mechanical blue hands capable of wiping memories. This build began with the idea of using Inika sword's LED circuit to luminate the blue hands. I opened couple of those swords, removed the electronics and built frames to them. The light is surprisingly bright and flashes dramatically. More, including gifs, on my blog.