Search the Community
Showing results for tags '42043'.
Found 44 results
-
 Hi everyone, I've finished trying to RC my 42043 and it seems that the PF L motor has issues providing sufficient power to drive the set? I obtained instructions from the creator of this video (https://www.youtube.com/watch?v=BpP_05uxKqs&t=22s&ab_channel=PawełWojnarowski) and also checked PPUNG DADDY's 42043 RC video (https://www.youtube.com/watch?v=O8easq7ueIo&ab_channel=PPUNGDADDY(뿡대디)-LEGOTECHNICRC), both used an L motor with no problems. Here's a video of the issue: https://youtu.be/J8P13WLPzN8. As you can see in the video, the motor loses power after driving for some time, eventually being unable to drive at all. The problem is worsened when I try to drive and steer at the same time, it's almost impossible to drive and turn. I have tried swapping the tyres around, changing batteries, trying a V1 and V2 IR receiver, switching positions of the motor and servo cables, and using a new L motor. But the problem still persists. Here's a photo of the L motor: Could it be because of excess friction introduced in the rear axles during construction? Because I noticed when I lifted up the rear axles, the motor spins the wheels at its standard rpm, BUT only 1 wheel on each axle spins, the other is stationary. Then when the wheels contact the floor, the motor suddenly seems to struggle with driving the thing. Hence I was thinking could it be that I built the differential too "tightly"? Appreciate any help from the technic experts in this forum, thanks in advance!
 -

Weak Pneumatics 42043
Rebel_Lego posted a topic in LEGO Technic, Mindstorms, Model Team and Scale Modeling
Hi, I stored my MB Arocs for about half a year. I rebuilt the B model into the A model, but the pneumatics just won’t work. I looked for any kinks in the hoses, tried the pump, tried the cilinders with nothing attached, and it all works fine. The cilinders are also re-oiled. If I attach the first section of the crane, it works fine. However, if I put the second section on, the cilinder can’t lift the crane. The problem lies just with the first cilinder. I even swapped the cilinder for the second section with the cilinder for the first section, but both cilinders seam too weak for the weight of the crane. I’m not really experienced or anything with this kind of stuff, I just build and play, and if I make MOCs its certainly not with pneumatics. I read several forums but all the solutions given there were the things I already tried. So, has anyone an idea what this might be? Maybe because I stored my Arocs the cilinders caught too much dust? PS. I also thought about adding an air tank, but I don’t know if that solves the problem? -
PF lights two studs wide
Rebel_Lego posted a topic in LEGO Technic, Mindstorms, Model Team and Scale Modeling
Hello everyone, I have purchased a lego power functions led light on Bricklink, to light up my 42043 MB Arocs. On real life trucks you often see that the rear lights are ‘double’. I modified the rear bumper of the Arocs to create this ‘double’ lights. But, the Lego LED light has only one light bulb for every side, so it will not shine trough two holes of a technic liftarm. Anyone any ideas how to achieve this? -
 REVIEW - 42043 - MERCEDES-BENZ AROCS 3245 INTRODUCTION So here we are, finally. Last year the Volvo review was published at the beginning of June, so you all needed to wait a little bit longer for this one. Rumors started early December of a licensed Mercedes set. What could it be, a truck, a car? Christmas Eve revealed the LEGO Technic 42043 Mercedes-Benz Arocs 3245. The eager anticipation of news about a new model always has its special moments. This time Paul (Boratko) had seen a first glance of the model. This resulted in one or two questions being asked. What's the color scheme? Does it have pneumatics? Does it have new pneumatic parts? Does it have double wheels on the rear axles? Does it have front suspension? Does it have this, does it have that? Was I excited at the moment? Hmmm not really. To be honest; I figured this would be the Unimog all over again. It's a public secret that I am not the biggest fan of the Unimog. A pneumatic crane that doesn't work too well, flaws in the steering mechanism and the model is leaning to one side, because of the battery box. Don't get me wrong; it is a decent model, and it definitely looks great, but it just doesn't cut it for me. So my initial thought was "will this be better than the Unimog?". We will find out at the end of this review The model is designed by Markus Kossman, who is lead designer at TLG and is known for some other flagship sets (among other models): 8421 - Mobile Crane (2005) 8275 Motorized Bulldozer (2007) 8110 - Mercedes-Benz-Unimog-U-400 (2011) 42009 - Crane Mk II (2013) It's safe to say that Markus has some experience when it comes to designing trucks. At the beginning of each stage, I state how long it took me to finish it. Mind you, that when I'm building for a review, I lose a lot of time shooting pictures. So your building time will probably be 70% to 80% of my time. Note: Pictures, taken with a Canon 70D with 50mm Canon prime lens, can be clicked for hi-res versions. SET INFORMATION Number: 42043 Title: Mercedes-Benz Arocs 3245 Theme: Technic Released: 2015 Part Count: 2793 Box Weight: 4455 gr Box Dimensions: 57,8 cm x 47,8 cm x 12,2 cm Model Dimensions: 54 cm x 23cm/51cm x 15cm (wo crane/w crane) Set Price (MSRP): Approximately € 200 Price per Part: Approximately € 0,072 per part Links: Brickset THE BOX The box is the same size as last year's 42030 - Volvo L350F (review). It's huge and it's heavy. Weighing in at almost 4,5kg, this actually does feel like the biggest Technic set ever. Unfortunately my box was severly damaged upon delivery. Even the outer box was damaged, and looked like someone had opened it. Luckily, the actual box was only damaged, instead of opened, so all the parts where still there. FRONT SIDE The front of the box shows the model (nothing new here), the Power Functions logo AND the new Pneumatics V2 logo. Hopefully we will see the last logo more often in future sets. Under the Pneumatic logo, all new pneumatic parts are shown. Three of the five parts are simply redesigned parts, but the two 11L cylinders (1x1 and 2x2) are brand new. INSIDE The inside of the box shows most of the features and functionality, combined with some fun facts about the real Arocs. The model will measure 54 cm upon completion. SIDES One of the sides shows the model and the two logos, while one of the other sides shows all the Pneumatic V2 and Power Functions parts. CONTENT OF THE BOX Being the biggest Technic set to date, means lots of parts. 2793 to be precise. 2 bags with 6 wheels 1 bag with instructions and stickers 1 bag with pneumatic parts 1 bag with L motor 1 battery box unbagged 4 bags #1 2 bags #2 5 bags #3 2 bags #4 6 bags #5 2 bags #6 SQUARE BOUND BOOK Like the 42039 - 24 Hours Race Car (some of them) this set has a square bound book sealed in a bag together with the sticker sheet. I really do like a single bound book, but when TLG divides the build into 6 stages, providing 6 booklets also makes sense. This would make building with your children a great deal easier. The instructions for the A-model count 105 steps, covering a whopping 471 pages! The sticker sheet with stickers for the A-model and two stickers (#25) for the B-model, apparently a Mercedes-Benz Actros 1845. For the first time (to my recollection) the 62.4mm D. x 20mm Tires are packed in bags. Normally they are scattered between the sealed bags. The new Pneumatic (V2) parts have been neatly packed together in a single bag. The hoses are cut to length, which makes assembly more straightforward. There's no need to measure and cut the hoses yourself. The L-motor comes in a bag, while the battery box doesn't. Normally the battery comes in a bag too. Since it has a slightly different color than the previous version, maybe the manufacturer or manufacturing process has changed. NUMBERED BAGS A total of 21 numbered bag, divided over 6 build stages. You can click on the bag to show a hi-res version of the picture. HIGHLIGHTED PARTS This chapter describes the interesting and/or new parts in this set. BATTERY BOX The color of the new battery box is slightly different than the old one. The dark bluish grey is much darker and the light bluish grey seems to be slightly different too. VERY SMALL SMOOTH PANELS IN WHITE For the first time a set comes with very small white panels (#21) and very small white panels (#22). These two panels complete the range of white panels available. WHITE PANELS Four other types or white panels are used in the cabin. NEW 60T TURNTABLE That kinda looks like a new turntable under the crane. Allanp was absolutely right about the introduction of a new 60 teeth turntable, resembling its smaller brother (bottom and top). As you can see in the comparison shot below, it's not much bigger than the old version. The design is much better, resulting in a smoother operation. The potential downside is that the new turntable doesn't have teeth in the inside, which can be limiting. That being said; I still think that this design is better than the old one, so thanks to TLG for bringing us this new turntable! Hopefully TLG will some day release an XL version with this design. TIRES Nothing special about these tires, besides coming in a sealed bag. So, why am I showing these tires anyway? It has nothing to do with the tires itself, but with the quantity. For the first time an official LEGO set contains more than 10 of these tires. The 42009 - Mobile Crane Mk II counts 10 of them and the same goes for the 8285 - Tow Truck from 2006. The latter also had double wheels on both rear axles, but it only had two front wheels. CRANE AND OUTRIGGER LIFTARM BRACKET AND GEARRACK I'm not sure what the part names will be, but crane arm outside and crane arm center are used for similar parts in the City theme. I will stick to Liftarm Bracket and Gearrack. These two new parts are perfect for outriggers and crane sections, but I am eager to see what MOC-ers come up with. I do see an application for Mindstorms Robots or TC7 Contest entries. The red section, containing the gear rack, is 15L. The gear rack itself is 14L. CLAMSHELL BUCKET Two clamshell buckets are introduced in this set. After the Grabber Arm Claw, this is welcome addition for crane enthusiasts. PNEUMATIC V2 Save the best for last, the new Pneumatic parts! Some people like pneumatics, some people don't. Nonetheless, it's great that TLG hasn't abandoned Pneumatics in favor of Lineair Actuators. They have redesigned some of the existing parts and even designed brand new ones. Some people on this forum will be so thrilled with these new parts. The outlets of every element have been redesigned in a way that the hose will be easier to attach. This means the existing elements do have new moulds too. SMALL PNEUMATIC CYLINDER The Small Pneumatic Cylinder isn't a new part, but it has been redesigned with new outlets. On the right you can see a comparison between the old (right) and new (left) cylinder SMALL PNEUMATIC PUMP 6L Like the small cylinder, the Small Pneumatic Pump 6L has also been redesigned. And TLG has used blue again, instead of the Unimog pump, where they used grey. I do like the blue version better, although you will probably not clearly see the pump in the finished model. The right pictures shows the three different versions of the pump. NEW 2x2 11L PNEUMATIC CYLINDER The new 2x2 11L Cylinder is 4 studs longer than the old Pneumatic Cylinder. I wonder if TLG will release a new version for the 7L cylinder as well. The picture on the right shows the 7L (right) and new 11L cylinder (left). NEW 1x1 11L PNEUMATIC CYLINDER When you do need length, but not a lot of power this new 1x1 11L will perfectly fit your needs. PNEUMATIC SWITCH The new version of the switch is simply a redesign of the old Pneumatic Switch with modified outlets. The pictures on right shows the comparison. PART LIST The part list, spreading over 3 pages, counting 2793 parts. THE BUILD The build consists of 6 stages: Front-end of the chassis Outriggers and gearbox Rear-end of the chassis Crane Cabin Tipping bed STAGE 1: FRONT-END CHASSIS Bags: 4 Duration: 120 minutes You start by building the front section of the chassis, with a small part of the cabin. No new parts are introduced in this stage, except for some newish parts from 1H 2015 and 2014, like Pin and Pin Hole and 3L Axle Pin with 1L Axle. The Arocs has a 6 cylinders inline fake engine. Of course the piston will move when you drive the vehicle. Here's a picture of the actual engine, used in the new Arocs. New 6-cylinder in-line engines with a particularly robust design and a longer life. An 88003 - PF L Motor is placed behing the fake engine, facing backwards. This motor is connected to a gearbox, which we will build in the next stage. This single motor will power all the motorized functions. Below you see the first front axle, with suspension. The 9L Technic Link is used to steer the front wheels. The front suspension uses the yellow Hard Spring Shock Absorbers, resulting in pretty stiff suspension. When the assembly is connected to the chassis, the 9L Technic Link is connected to a pivot point. Rotating the pivot point will move the link back and forth causing the front wheels to steer. The second axle is connected to the chassis. This axle uses a 6L Technic Link for steering. Using different links results in different steering angles for both axles. I did notice a strange anomaly; the front axle does have 1L Round Pin Connectors, while the second axle doesn't. The leftover parts only show one extra?! The video below shows how the steering mechanism works. Make sure the 12 Teeth Bevel Gear on the right is placed properly. I placed the gear in the same position as the one on the left, resulting in one of the lights making the model steer to the left side when turned right, and vice versa. The two pictures below show the model after stage 1. The build is okay so far. The most interesting thing about this stage is obviously the steering mechanism, attached to the pendular suspension. The mechanism is unlike steering mechanisms found in other models, so this required some out of the box thinking. STAGE 2: OUTRIGGERS AND GEARBOX Bags: 2 Duration: 45 minutes The first step of the second stage starts with the new bracket and gear rack. The outriggers could easily have been designed without this new gear rack, but since TLG designed it for the crane (probably); why not use it here. The stabilizers on the outriggers are operated manually. It would have been great to have motorized pads too, but it's not a big deal. The two outriggers are linked together in opposite directions. The new parts provide a compact solution, but there are no fixed mounting points for the driving gears. The gearbox consists of two layers with gears. The lower part of the gear box contains the Pneumatic Pump, much like the one found in the Unimog. Two black 12T Bevel Gears are driving the gear racks. The upper layer of the gear box contains the white Clutch Gear. This gear prevents the motor from stalling and overheating when the end of a function has been reached. At the end of stage 2 the gearbox and outriggers are connected to the front-end of the chassis. The truck is slowly taking shape. At this stage I was still not 100% convinced what I would think of the complete model. STAGE 3: CHASSIS REAR-END Bags: 5 Duration: 135 minutes With 135 minutes, the second longest stage in the build. In this stage you will build the rear-end of the chassis, with suspension and drive train. Four Flexible Rubber Axles are used in the base of the chassis. I am not entirely sure why TLG used these parts, since you will lock the assembly using liftarms. Possibly, it's a construction used in the real Mercedes, or these parts will be used in the B-model. I would love to hear your thoughts. The tilting mechanism for the bed uses a Linear Actuator, instead of Pneumatics. I have made a mistake by placing two of the Pin Connectors in a wrong angle. Won't be the last error with these connectors. The Rear suspension on the real Mercedes is actually a leaf spring suspension. TLG is mimicking this suspension type, by using the relatively new Steering Arms found in the 42021 - Snow Mobile and 75060 - Slave 1. Picture of the real rear suspension. The steel suspension on the Arocs impresses in every situation with its robust, solid construction, high performance and loadability. Two differentials are linked together using a small turntable. Although being linked together, the two axles still have the ability to move independently. The model will have two live axles, linked together by a drive train through the small turntable. Live axle vs Dead axle A live axle is a type of beam axle in which the shaft (or shafts, since live axles, while connected to move as a single unit, are seldom one piece) also transmits power to the wheels; a beam axle that does not also transmit power is sometimes called a dead axle. While typically used in vehicles with Hotchkiss drive, this suspension system can also be used with other types of power transmission. Or, to quote Allanp, who was right again: The rear axles are a single unit (suspended by 4 springs) that pivots longitudinally to allow the two axles to twist independently from each other by means of a 28t turntable piece allowing full suspension and both rear axles to be connected to the engine whilst all fitting between the dual rear wheels. Simples! Here's a video showing the rear suspension and drive train. WARNING We've all been there, a model with two differentials and one of them is turning the wrong way. TLG has published an explicit warning in the building instructions. Pay attention to the position of the differentials! After building the rear-end of the chassis, you will be merging it to the front-end of the chassis. This was the point where I needed to move my camera backwards a lot. The model is growing big. Double rear wheels on both axles, suspension and two live axles is quit a feat, especially regarding the limited available space. For me this stage was the turning point in the build. From now on you actually see the impressiveness of the model. STAGE 4: CRANE Bags: 2 Duration: 120 minutes Only two bags are provided for this stage, but it still took me quite some time. Connecting the pneumatic hoses does take more time than simply adding connectors. This stage did offer a variety of new parts, like the Pneumatic V2, new Turntable and the two Clamhell Buckets. Pre-cut hoses are quite convenient. The instructions clearly show which length you will be needing. There's little difference between 216mm and 240mm so watch out. The new 60 Teeth Turntable is mounted on the base of the crane. It turns a lot smoother than the old version. TLG really nailed this one! Normally I build in my LEGO room, but this time I was building in the living room. I was building, combined with reading topics on Eurobricks. At that moment I was reading Drakmin's response in the Technic Photography topic. He stated that he'd like to see making of pictures, combined with the end result. This made me take the next picture, where you can see my working place. And as you can see, sometimes a LEGO model needs a little spicing up The bottom view of the crane shows lots of tubing, which will add difficulty when you connect the crane to the chassis. The tubing is touching one of the gears, so you need to push the hoses aside. There's quite some stress on the hoses, so it can be difficult to get everything into place. A lot of Pneumatic Hose Connectors are used to guide the various tubes alongside the jib and booms. Instead of using a single longer hose, the sections are linked together using these connectors. The picture below shows the complete crane assembly. Normally I am not the biggest fan of pneumatics or building the crane on a truck, but I had a lot of fun building this one. Not sure why, but the size of the crane is very impressive and the techniques/parts used are pretty cool. STAGE 5: CAB Bags: 6 Duration: 150 minutes Stage 5 is the longest stage in the build. And it's probably the most rewarding, since you will see the truck come to life. You start by building the front bumper. The rear view shows how the slanting grill is achieved. The name Kossmann is clearly visible on the plate, making no mistake that Markus Kossmann designed this model. The front bumper is connected to the chassis by simply using connectors. The axles with the gears are sliding into the 7L liftarm, keeping them in place. At this point the chassis with crane is mostly done. You only need to add the rear bumper, before you can start building the cabin. The cabin grill is comprised of lots of Perpendicular Double Split Axle and Pin Connectors. I really like the design of the seats, because of its simplicity. The printed Mercedes logo adds a lot of value to the cabin. Here you can see another mistake I made with the pin connector. No way the steering wheel will fit like this. The Mercedes introduces two new white panels. They are used as "cab side edge turning vanes", which improve aerodynamics. There was some discussion about the looks of the cabin, but seeing it in real life, I can only draw a single conclusion; this cabins is one of the most beautiful cabins LEGO has ever designed/released. The front view is stunning! Here you can clearly see that I accidentally moved the head rests and didn't return them to the proper position. You will see this discrepancy returning in multiple photo's. I found a mistake in the manual, which can be somewhat confusing. I didn't look at the image when connecting the cab to the chassis, but when I did take a look when I was shooting pictures, I noticed this small flaw. The circle with the arrow, doesn't match the outlined image on the right. The circle with the arrow needs to be placed lower than its current position. Here you can see the tilting mechanism on the actual model. Front view of the cabin and grill. It does make you wonder whether this could have been the right moment to introduce a Dark Bluish Grey 11x3 Curved Panel. The front is instantly recognizable as a Mercedes. Obviously the Mercedes emblem helps a lot, but without the star it would have been clear too. At first I wasn't too happy with the white and dark bluish grey color scheme, but seeing it in real life makes a world of difference. Here's a picture of the actual cabin. The main difference is that the LEGO version only has three bars, instead of 4. I can live with this. The bottom front section of the cabin seems to be some sort of metal, so maybe Markus was right by using the light bluish grey panel. The radiator grille designed in a bucket tooth look lends the Arocs a striking, unmistakeable face and underlines its power and robustness. The leftover parts, I forgot to add to the previous shot. STEP 6: TIPPING BED Bags: 2 Duration: 30 minutes This is by far the easiest stage of the build, consisting of mainly grey panels and liftarms. The intersection shows the simple construction of the tilting bed. The finished bed looks....well uhhmm grey. A cool thing about the tipping bed is the lock at the end. This locks the tailgate of the bed to prevent cargo falling out. FINISHED MODEL After 10 hours of building the model is finally finished! I reckon most of you will do this in 8 hours (or less), if you don't rush the build. Markus delivered a great looking model, which is even more impressive in real life, than in pictures. As you can see in the picture below, there is quite some strain on the base of the crane assembly, where the pneumatic switches are mounted. Some of the hoses at the base can probably be cut a little shorter, to save space. BOTTOM VIEW The bottom view shows the entire chassis, with suspension, steering and drive train. Some of you said the wheels are too small and there's too much space between the wheels and the arches. Looking at pictures of the real Arcos, the second front arch, could have been placed a stud lower. Those minor details set aside, the finished model resembles the Arocs a lot! Even the rear view gives you the feeling you are looking at a real truck. With extended outriggers and stabilizers and operating the crane. I forgot to put the wheel chocks between the rear wheels for extra safety. My reviews always contain pictures taken in a photo studio. Unfortunately, this doesn't do this model real justice. That's why I left my comfort zone and went out to shoot some pictures at a local construction site. A friend of mine is the manager of the site and he happens to be building his own new house over there as well. There's no better excuse to take the Mercedes for a drive in his natural habitat. And while we are at it, why not let the Volvo tag along for the ride. FEATURES AND FUNCTIONS This set has quite a few features and functions. Controlling them is done by a combination of using the L-motor as a pump for the Pneumatic functions or by switching it to control three other functions. Switching is done by moving the levers on either side of the model. Reversing the function is done by the switch on the battery box. In the beginning this can be quite confusing. Since you are used to using a lever to switch between back and forth, I ended up switching between functions, instead of reversing the current function. MOTORIZED FUNCTIONS The Mercedes uses a single L-motor to motorize 4 functions: Rotating the crane Extending/retracting the outriggers Tilting the bed Compressor pump PNEUMATIC FUNCTIONS When the motor is driving the compressor, again 4 functions can be operated (as shown in the two images above): Opening and closing the bucket(s) Lowering/raising lower boom section Lowering/raising upper boom section Extending/retracting the jib MANUAL FUNCTIONS There are also quite some manual functions on this model: HoG Steering Tilting cabin Working fake enginge Wheel chocks Opening doors Stabilizers Tailgate tilting bed lock FEATURES Below is a list of the most important features: Double wheels on both rear axles Leaf sprung suspension on rear axles Two live rear axles Independant pendular suspension on front wheels OPERATING THE FUNCTIONS The long list of functions and features is great, but the most important question is "do they work properly?". Operaring the functions takes a little getting used to. Maybe it's just me, but I tend to get confused on whether to move the switch on the battery box or the lever on the side. For example; when you extend the outriggers and you want to retract them, you need to switch the battery box, instead of the lever, resulting in rotating the crane. Actually, I know that I am not the only one, since the guy demonstrating the model, didn't quite get it right too. Of course, after making the same mistake several times, you get used to it It helps a lot when you manage to use the right switches and levers. All the motorized functions work perfectly. The pneumatic functions do work a lot better than the crane on the Unimog, with a side note that movement can be a bit jerky sometimes. This is caused by gravity or strain on the pneumatic hoses. Besided the incidental jerky movement, you can actually fully operate the crane, which is something you'd expect from a flagship like this. Before we go any further, let's take a look at a video I shot demonstrating the functions: The video seems to be slightly out of focus. Sorry for that. As you can see in the video, I still need to find my way around the functions. The jerky and sometimes slow movement of the pneumatic functions is also visible. However, I still think the crane is as good as you will get using LEGO and Pneumatics. Lifting the entire crane simply requires a lot of power. All in all I am very pleased with the playability of the model. Here's an extra image, showing the truck with the cabin and bed tilted. B-MODEL Since the building instructions are not available yet, I couldn't build the B-model. This appears to be a Mercedes-Benz Actros 1845, as you can see on the back of the box. The cabin has more or less the same design, but the chassis is different. SUMMARY Here we are, at the end of this review. The main question I posed at the beginning of this review "Is this set better than the Unimog?" can be answered with a loud "Yes!". Your milage may vary, but the pneumatic crane is more advanced and it is working better than the one on the Unimog. There's no problem with the model leaning to one side and steering, although not perfect on this model either, works better than the Unimog. Which brings us to the obvious next question. Is this set also better than the 8258 - Crane Truck? The 8258 is absolutely a fantastic set (probably the most highly acclaimed truck to date), but to be honest; I think the Mercedes just kicked it from the throne. Without stickers, the 8258 doesn't look nearly as good as the Mercedes. Add the ongoing list of functions to the mix and the only possible conclusion is; the Mercedes is the best LEGO Technic Truck TLG has ever released. Aren't there any negative remarks? Of course there are, but they are minor. Because the steering mechanism uses more gears than usual, there's more torsional strain on the axles. Pneumatic control of the crane can be a bit jerky or slow. There are a lot of hoses between the switches and underneath the base of the crane, which requires applying some force when you attach it to the chassis. You also need to be mindful that the gear on the chassis doesn't touch one of the hoses. Here's a complete list with Pros and Cons: PROS The model looks awesome Biggest Technic set to date New Pneumatic (V2) parts 4 Motorized functions 4 Pneumatic functions The crane actually works Double wheels on rear axles Leaf sprung rear suspension Pendular front suspension CONS Steering causes torsional strain on axles Pneumatic controls can be a bit jerky (or slow) Lots of hoses underneath the base of the crane The last question I need to ask myself, is this set better than the Volvo L350F or the 8043 - Motorized Excavator? I'm not sure about that, but I will conclude this review by saying that the Mercedes did land a spot in my Top-3. SCORE How do I grade this set? 9 DESIGN Resembles the real deal a lot. 9 BUILDING EXPERIENCE The model grew on me during the build. 9 FEATURES Packs a ton of features. 9 PLAYABILITY The model offers lots of playability 9 PARTS Pneumatics V2 and lots of other interesting parts. 9 VALUE FOR MONEY You get a lot of Mercedes for your money. 9 BEST TRUCK TO DATE Thanks for reading and feel free to ask questions! More pictures can be found on my Flickr page. FINAL WORDS For those of you who are interested, I have tracked the time working on this review. I ended up putting around 35 hours in it, divided over: 2 hours of unboxing and taking pictures of contents 10 hours of building 3 hours of photo processing 18 hours writing the review 2 hours on construction site
 -

Technic 42043 Pneumatics
Vin posted a topic in LEGO Technic, Mindstorms, Model Team and Scale Modeling
Part way through the build on this one got to the point where power pack is in so wanted test all was working in movement. Everything is fine apart from the pneumatics they just don’t work have rechecked all connections no kinks etc. One thing when I switch power on there is a short movement but not constant. Should the gig attached to the blue pump constantly move round to create the pressure. Just not sure what the issue is? Can anyone help -

Lego Technic Toyota Land Cruiser FJ70
maciej posted a topic in LEGO Technic, Mindstorms, Model Team and Scale Modeling
Hello to all, I am new here and wanted to share my very first creation with you. This is Toyota Land Cruiser FJ70 pick-up. I build it by using bricks from following sets 42000,42030,42042,42043. I took inspiration from RM8 creations but also in the past I was driving this car quite a lot in raw conditions and I have big sentiment related with this Toyota model. Pix and Video are not pro quality as this is my very first approach to build and share LEGO creation so please don't judge me too harshly form this point of view. I hope you will enjoy looking at this model. In the near future I have plan to make simple video how to build it. Under the below links you will find pix and video. https://www.flickr.com/gp/156725712@N06/bP6n4Q Below is video instruction for Lego Technic Toyota Land Cruiser FJ70 - body (part 2). Unfortunately due to file size restriction in my camera, there is missing small part of the video where is shown how to build roof and back side of the body. However this two missing bits are easy to reproduce based on the pix. For those who would like to built this body it can be also good opportunity to put a bit of own invention. -

[MOC] Manitou Telehandler (42043 C-model)
ace_klimax posted a topic in LEGO Technic, Mindstorms, Model Team and Scale Modeling
https://rebrickable.com/mocs/MOC-30791/klimax/manitou-telehandler-42043-c-model https://bricksafe.com/pages/klimax/manitou-telehandler Inspired by Manitou mlt telehandler, including color, shape and functionsBuilt only from parts of 42043 Merceder Benz Arocs setKey features: HOG double axle steering Opening engine hood Opening drivers cabin door Tilting and extending arm with tilting option of attachments 6 simple exchangable attachments: Forks Construction bucket Agricultural grab bucket Bale clamp - 3 sizes or versions (all atachments functions are held in place by friction pins and can be built at the same time) Trailer with palletes for buckets See those videos, so you could compare all small details presented on model:https://www.youtube.com/watch?v=Zdtu7zKfezUhttps://www.youtube.com/watch?v=UcLDUUyb1lsAttachments:https://www.manitou.com/en/lp/VPBMxi8AAC0AW-v3Functions, that didn't fit such small model: Crab and single front axle steering Moving steering wheel while steering Arm is located little higher on chasis to allow steering, decentered 0.5 stud to the right All functions manual, no motor or pneumatic 85 pages of generated instructions (A4 landscape orientation) - sample on bricksafe It goes straight to my 42043 c-model alternatives collection I have built or finishing building, see bellow -
[MOC] Caterpillar M322D wheel excavator (42043 C-model)
ace_klimax posted a topic in LEGO Technic, Mindstorms, Model Team and Scale Modeling
https://rebrickable.com/mocs/MOC-28810/klimax/caterpillar-m322d-wheel-excavator-42043-c-model https://bricksafe.com/pages/klimax/caterpillar-m322d-wheel-excavator-42043-c-model Wheeled excavator built just from 1 model parts (42043 Mercedes Benz), with many functions FUNCTIONS: unique: 2 functions transfered from base to superstructure through big turntable - steering and engine drive manual functions: HOG steering via beacon light stabilizing legs (2 side on front, 1 working as shovel at back) operated with the same beacon light (not enough power to lift excavator :( ) gear for rotating superstructure working 6piston inline engine driven by rear wheels + openable hood handle to operate function of the attachment (*1 , *2) motorized functions: motorized pneumatic piston battery box working as counterweight pneumatic function: 4 pneumatic pistons raising boom, dipper and attachments attachments: *1 grabber shovel *2 pneumatic hammer *3 big excavator bucket *4 smaller excavator bucket (all of them use smaller pneumatic piston, so it can't be built at the same time) Superstructure bodywork inspired by official lego 42006 except 42043 model, you would need: * 2 loom bands (front stabilizing legs operation) * 4697b pneumatic T-Piece from 42043 spare parts 183 pages of generated instructions (A4 landscape orientation) for base, superstructure with boom, 4 attachments and tubing schema - sample on bricksafe Suited for experienced builder! 3 downsides: * not enough gears for front stabilizing legs operation so not enough power to lift excavator :( * superstructure is heavy due to motor and battery box and is leaning towards left side * boom is heavy, even though it is raised via 2 pneumatic pistons it takes time function color mapping schema orange x motorized pneumatic piston dark blue x supersturcture rotation azure blue x rear wheel engine drive green x operation function of attachment red x base functions operator --------> gray steering --------> pink stabilizing legs -
[MOC] First Responder (42075 alternate, 42043 C-model)
ace_klimax posted a topic in LEGO Technic, Mindstorms, Model Team and Scale Modeling
https://rebrickable.com/mocs/MOC-26188/klimax/first-responder-42075-alternate-42043-c-model https://bricksafe.com/pages/klimax/first-responder-from-42043 Inspired by official lego 42075 with enhanced functions:* HOG front wheel steering* rear and front suspension* opening hood, doors and back side compartments* flat 4-piston engine connected to rear axle* front winch with hook* rear fire hose* elevated boom with spotlight2 variants:* fire in unavailable area - big water tank* vehicle accident - small water tank + surveillance drone, traffic cones, water pumpExcept parts from 42043 set, you would need string53 pages of generated instructions (A4 landscape orientation) for both versions - sample on bricksafe -
I have just turned 30 years old! Celebrate with me and get 30% discount on all my instructions, today and tomorrow: Go to my Sellfy Store: https://sellfy.com/m1longer Or to Rebrickable: https://rebrickable.com/users/M_longer/mocs/
-

[WIP] 42043S (RC Arocs 3245 with SBrick)
Sphexish posted a topic in LEGO Technic, Mindstorms, Model Team and Scale Modeling
Greetings! After coming out of my Dark Ages and tackling both the excellent Ultimate 8043 & 42009 (see below) designed by Jurgen Krooshoop, I was hungry for another Lego Technic challenge. But I felt rather lost at this point: without a large collection of loose Technic pieces at my beck and call, motorized MOCs which weren't heavily based on existing Lego sets would require some hefty Bricklink investments from my part. Fortunately, a fifteen-percent-off-everything anniversary sale at a local toy store with an expansive Lego section made the choice for my next project a lot simpler: they had the 42043 Arocs set that had already been calling out to my wallet since way back in oh-fifteen. They also had a certain little gizmo called an SBrick in stock, which I had heard quite a few things about. My previous builds had involved standard PF receivers and remotes, so it seemed like an interesting new challenge to incorporate this new-fangled blue-toothed thing-a-ma-jig into my already-slightly-more-challenging attempt at "RC-afying" the Mercedes. I'm already a little way into the project, but I've already made a few false starts and moronic missteps, so I figured it might be educational for others to document my frantic flailing about experiences, so that they might avoid my (myriad) mistakes. The first thing I did, of course, was to order the necessary PF components: a Servo Motor, an L-Motor, an 20cm extension cable, and a couple of PF lights. In hindsight, this already turned out to be my first mistake: I hadn't done my research properly and hadn't realized that the SBrick requires an extension cable to be hooked up to a battery box. This meant I was probably going to be one cable short, since I didn't think the cable for the L-motor used for drive would reach. While I waited for these crucial parts to be delivered, I began preliminary work on the Arocs proper. After completing most of bags 1 to 3, I had three loosely connected main sections of the truck - the cabin housing the 6-cilinder engine and the L-motor that came with the set, the gearbox with the outriggers, and the rear section with the dumping bed and the differentials. In my mind, I could already see a problem arising: there was a drivetrain going from the rear wheels all the way to the engine in the front of the truck, which would obviously make the pistons move as you move the truck along. I already guessed I would be severing this connection by remove the driveshaft with the CV joint and attaching an L-motor in the center somewhere. Which would render the engine, the drivetrain, etc. utterly useless. This was not acceptable - not in the last place because my kids had unanimously decided that seeing the pistons in my 42009 mobile crane move was officially The Coolest Thing Ever™. So I fiddled about a bit before connection these three main sections, and eventually came up with this: Might be a bit hard to see, but... Basically, I placed an additional small gear directly in-between the L-motor and the gearbox, which allows it to power the axles and gears connected to the piston engine when in use. So, it wouldn't be connected to the drive anymore, but at least there could be some motorized eye-candy when one swung back the cabin and fired up the main engine. It wasn't long before my motors and such arrived, so the first I tried to accomplish was to connect the L-motor for the drive somewhere. One nifty solution I'd found involved replacing the engine in the front and using the long drive-train to power the rear wheels -- a technique I thoroughly rejected for several reasons: It seemed inefficient, and COOLEST. THING. EVER. So I figured I'd just bolt the bloody thing directly to the rear diff, as I'd also seen in this fascinating and classically scored tutorial vid by RC-master PPUNG daddy: It didn't sit right with me to just attach the motor with two pins like that though, so I have attempted to support it a little bit better without messing up the way the rear suspension works too much. Right now, it looks something like this: Not exactly perfect, but it seems to work well enough, even when I give the suspension a bit of a work-out. Next came the steering. My first attempt was based on this extremely helpful Youtube video by yu shine: Basically, this involved just connecting the Servo directly to the standard HOG steering mechanism for the Arocs, just below the two orange lights-slash-knobs at the top which you're supposed to turn. It seemed the most simple and elegant and -- being but a simple soul -- this naturally appealed to me greatly. It also didn't require the purchase of any additional parts, and left the mechanically unique way the steering on the Arocs model works intact. At this point I was able to put together a sort of prototype for the RC driving, by dangling the SBrick from the battery box and just hooking everything up in a makeshift manner. After installing the app, setting up the official 42043S profile, and playing around with my handiwork for a bit, I discovered the following issues: The L-motor was supplying quite a bit of power, making the truck actually pretty hard to control. Of course, there was a lot of weight left to be added at this point, so I was willing to reserve judgement for the time being, but given that my kids no doubt want to play around with this thing as well it'd be nice if I could prevent them from semi-accidentally ramming a massive Lego vehicle into, well, practically everything. Not sure how I could address though, other than from the software side. Placing the Servo motor where it was, behind the battery box, didn't actually fit all that well. The battery box itself actually pushed up against the servo when inserted, bending it back by at least a stud, which also frustrated my attempts to secure it in place a bit further. The steering was a bit... inadequate. The problems regarding the steering I recalled Sariel already mentioning in were only exacerbated here. It felt imprecise and rather unresponsive, and it didn't help that there was quite a bit of play in the wheels even with the Servo hooked up, meaning they weren't necessarily centered even when it was. So in the end, I stripped the away the steering mechanism and the wheels up front until I was left with this: After that, I decided to pony up and order the parts which -- after careful visual inspection of PPung's tutorial -- I figured I'd still need to mount the servo at the bottom, between the two sets of front wheels. So, mostly a set of gear racks and gears, in addition to some beams and various connectors used for bracing. This also gave me the chance to simultaneously order an extra extension cable from the same supplier, since it was pretty clear I was going to be needing it if I wanted to have any hope of hooking up the drive motor to the SBrick up front. And now, we wait... Although, to pass the time, I busied myself with rebuilding the back of the cabin, which I had previously taken apart to place the servo motor. I didn't need all the gears used for the steering mechanism, of course, and I figured I'd be better off trying to mount the SBrick in this space instead. For the moment, I came up with the following: I did notice the two black Technic pins still sticking out back there, and peeking ahead in the manual revealed that these will be used to help brace the pneumatic crane, once the time comes to attach that beast. As far as I can tell, that should still be possible even with the SBrick where it is, but no doubt I'll have screwed up somehow. We'll find out in the next update, hopefully! (Assuming, quite optimistically, that there is actual interest in such a thing. ) -
[MOC] Volvo Articulated Truck (42043 C-model)
ace_klimax posted a topic in LEGO Technic, Mindstorms, Model Team and Scale Modeling
Inspired by official lego model 8264 Hauler with enhanced functions: * Openable hood with fake 3-piston engine (driven by front wheels) * Independent rear swinging suspension * Articulated chasis with big and small turntables in the centre - HOG controls turning, tilting of the model copies surface it runs on * Bigger manually operable dump bed with automatic closing back side via string * white bodywork, black cabin, gray dump bed There is no motor and battery box (as in original model), I wanted to have all functions operated manually, it gave me place to create exhaust system behind the cabin Except parts from 42043 set, you would need at least 30cm string 74 pages of generated instructions (A4 landscape orientation) details and instructions: https://rebrickable.com/mocs/MOC-23454/klimax/volvo-articulated-truck-42043-mercedes-benz-arocs-3245-c-model-inspired-by-8264-hauler more pictures: https://bricksafe.com/pages/klimax/volvo-articulated-truck-8264-alternate-42043-c-model Model sturdyness tested by 3 years old child :) -

Mercedes Arocs 42043 (MOD)
Hubbo posted a topic in LEGO Technic, Mindstorms, Model Team and Scale Modeling
Hello, I am new here, this is my first post, and my english isnt perfect, so sorry for any mistakas ;) I was worked on this project for long time (its still not finished...), and now I can show some pics. Its cabin from Arocs 42043, but all the rest is my design ( I would like to notice, theres some designs, from people on youtube, this forum etc, because if something is good, I dont want to invent it a second time :D ) Soo... TRUCK Cabin has suspension - rubber blocks Drive - 6x4 - XL motor Steering - Ackerman system - Servo motor Suspension - Front - Solid axle on leaf springs (this springs are made by Efferman, you can buy this parts on Shapeways) -Rear - Solid axles on leaf springs and air assist ( system, that minimizes stress, works like tandem-axles, air pistons are connected all together, so if one axle is going up, second axle is going down without pressure change) You can change height of rear axle/rear part of truck, like real one) 2x air connections for trailer 1x connection for trailer engine TRAILER (its not perfect, I want to use power from truck, so theres no battery box etc) Suspension like in truck, but no air assist Detach deck by pins, they are moved by air piston I will rebuild it, because I want make it better. any Q just post it, if You want more pics etc i will try to make it for You. I have no instructions, because I like to build like "sit & build" no programs, projects etc, but, i will try to help, if someone want ;) PHOTOS > https://bricksafe.com/pages/Hubbo/ -

10.000 Subsribers special - Mashup
Zerobricks posted a topic in LEGO Technic, Mindstorms, Model Team and Scale Modeling
First if all I totally forgot to post this model here on the forum, guess better late than never Now to explain a bit about the motives behind this model before I go into specific details. Counter on my youtube channel was nearing 10.000 so I wanted to make something trully special. I was not sure what kind of a model I want to make, a sportscar, offroader, construction machine, so the decision came to MAKE ALL AT ONCE. The model would also incoporate ideas from the last decade of Lego technic product to go along with my 10 years on youtube. Starting with the design, the front end is heavily inspired by 42083 and 41999. Notice the front wheels are from 42056. The first motorized function is adjustable front suspension inspired by 8297: The front end can raise by 3 centiemetrs to allow the model to negotiate rough terrain. Continuing towards the cab, which was inspired by 41999, we can pop up the hood to find a green colored 10 cylinder engine inspred by 42030: Cab doors are inspired by the doors from 42069, which open at the angle. Opening the doors you can find a full interrior with two adjustable seats andworking steering wheel: In the center of the cab there is a gearbox which movel lineary to switch between 3+R gears using a special mechanism. This emchanisem translates the sliding action into usable inputs for the gearbox: Going further back, there is a section holding the battery box and, orange lever and utensils on the left side. I will explain the function of the orange lever later. On the opposite, right side there are 2 M motors powering all the motorized functions. Notice the mysterious red lever which is used for switching motorized functions. Notice the pump used to power the pneumatic functions. There are also two electric switches to reverse the two driving M motors. If we continue towards the back, we can see there is a pair of linear actuators used to manipulate the container. The red lever switches power from one of the M motor between the adjustable front suspension and linear actuators. But not only can the linear actuators tilt the container, but they can also pick up and load the entire thing. To switch between tilting or picking up, the orange lever is used to lock the individual segments of the lifting arm. This function is inspired by 8052. The arm can reach out and pick up the container with ease: If we continue and look at the photo of the back side you may notice a PTO output along with a strange mechanism with rubber bands: Same motor that powers adjustable front suspension, linear actuators also powers the PTO output via 24 tooth clutch gear. Notice that the PTO output uses a CV joint in order to slide the axles into it without friction. The rubber band mechanism is used to hold the rear attachment. This was inspired by 8110 and 42054. Here is a sum up the functions of the model so far: 1. Motorized functions Adjustable font suspension Tilting of the container Picking up and lifting of the container Pneumatic compressor and storage provided by two air tanks powered rear PTO 2. Manual functions: 10 cylinder engine powered via rear wheels through a 3+R gearbox 3+R gearbox Steering controlled by steering wheels inside the cab AND the light on the right side of the roof Openable doors Openable hood Adjutstable seats Independent front suspension Solid live axle assembly in the rear - inspired by 42043 Features: Both front axles are at a positive cats angle, allwing the fat Porsche wheels to self-center Due to the immense weight, each rear solid axle is supported by 4 yellow very hard springs The 3+R gearbox is derived from my diagonal gearbox featured in the Dominator TRS Due to its framed design the gearbox provides a very rigid backbone to the model A 5 tubed exhaust seemed appropriate for the 10 cylinder engine I hope this photo helps you understand all the functions and features a bit better. Each color of the model's chassis represents a different module. Next we will look at the rear attachment built for this model. The attachment is multifunctional, combining linear actuators, pneumatics and 4-way switchbox to actuate all the functions: In total the attachemnt features following functions powered by a PTO via 4-way switchbox: Extension of the control arms via small actuators and a lever mechanism Lowering of the control arms via large actuators - inspried by 42009 Rotation of the arm Spooling up a winch which allows the arm to be used as a crane arm - inspired by 8258 Additionally there are 4 pneumatic function powered by the compressor and air stored in the two pneumatic tanks on the truck itself: Raising of the primary arm joint Raising of the secondary arm joint Tilting of the showel - inspired by 8043 Closure of the blue pneumatic claws - inspired by 8110 Some intersting facts about this attachment module: All of the penumatic functions + rope of the winch pass through the turntable. Rotation of the turntable is limited to some 350 degrees to avoid all those tubes and rope tangling up The structure of the arm with diagonal arms is inspired by crane arms Frictionless 8 tooth gears allow the white 16L axles to slide with ease while powering the two large actuators used for support legs The 4-way switchbox is one of my most complex and sense assemblies and it took me 2 days to design with support of LDD. Winch uses a friction pin to keep the rope from unloading when the winch function is off. The blue claw uses rubber bricks for better grip Combining the main model with the atatchment resluts in a model which weighs around 5 kilograms and is over a meter long! Some facts about the design, and build of the model: The whole model took me over 2 months to design and built, biggest challenging being the gearbox, container arm and rear attachment switchbox. A lot of care was placed into keeping all the functions working reliably with a limited power source (M motor) and safely with no gears skipping or breaking. The model uses around 16 universal and 3 CV joints to transfer the power to the suspension lifting mechanism, PTO, both steering sytsems and drive axles. Each rear axle is capable of supporting the whole model's weight, the weak point are the Power Puller tyres which sag quite a lot, especially on the third axle. Thanks to it's stiff gearbox, this model has one of the stiffest central frames I ever built allowing the model to be easily picked up by diagonal front and rear wheel without excessive flex. Gas canisters and first aid from 42069 are featured on this model The hood ornament is a bunny from a Lego Friends set This is my first model to use the white pneumatic air tanks for it's intended purpose. The model is covered with glow in the dark parts close to its edges, so its visible at night - useful when you are wandering around your building area at night A photo of the mashup's total of 8 glow in the dark bionicle claw/eye pieces: You can see the model in action in the following feature video: Finally I would like to thank you for reading through this massive post and for helping me reach 10.000 subscribers. -

Lego 42043 Model B issues
mikis posted a topic in LEGO Technic, Mindstorms, Model Team and Scale Modeling
So I've recently built model B from scratch (taking everything apart and not using anything from model A) of Lego 42043. And after I finished itI noticed that my pneumatic pump is not working as intended, it stutters and then stops. I though it may be some pipes in crane that is blocked so it cant pump, but no everythings fine, then I rechecked gears and loosened them so they make as little friction as possible yet nothing changed... In model A the pump is going so fast even when its not pumping air to the crane, but in model B (the one I built) it cant even pump for 2 sec when connected to crane. So what im asking is, has anyone gotten this problem where in model B the air pump is not working as intended and is there a fix without rebuilding the whole trailer? -

[MOC] Harbor Crane: 42043 C model
BrickbyBrickTechnic posted a topic in LEGO Technic, Mindstorms, Model Team and Scale Modeling
My latest C model: harbor crane from 42043. It features 6 functions, 3 powered and 3 pneumatic. Video: Normally I would write a lot here, but now I write a blog post for my MOCs on my new website: https://legobricksarecool4.wixsite.com/brickbybricktechnic I would appreciate if you visit it! And now, some pictures: Thank you for reading and watching. Once again, please check out my website! BbBT -
 Hi, so I got the MB Arocs 42043 in January, and have been loving it! But now I want to make a C model. Previous attempts have failed due to my now apparent lack of skill at making well proportioned frames. But now I want to try one thing, and stick to it, right now I need to figure out what machine to do as a C model. I've decided on a 4 axle (including steering) heavy duty rotator tow truck Ideas were: Pics will be posted sometimes tomorrow.
 -
.
-
[WIP] 42043 Car Transporter (C model)
BrickbyBrickTechnic posted a topic in LEGO Technic, Mindstorms, Model Team and Scale Modeling
My next 42043 C Model! This is gonna be a big one! I will have 3 power functions and 4 pneumatic functions. Power functions will be for the truck, pneumatics for the trailer. Here's what I have so far: In case you're wondering, that's the immediate front of the truck. It is built for the 42043 cab, which I will be using. Seen above is the frontmost car lift. Here's the master gearbox. Some mechanics for the frontmost lift. That's a video of the mechanism for the front lift. Like the other lifts will, this uses variable axes to control the movements. (NOTE: CLICK ON THE VIDEO TO PLAY IT) P.S: This is based on the Eddie Stobart (video of it below): More pictures should be coming soon. Hope you enjoyed, and leave some comments so I can implement them in this MOC. Thanks for your time! BrickbyBrickTechnic -
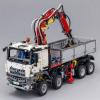
42043-D Mercedes Benz Unimog U4000
madsen1997 posted a topic in LEGO Technic, Mindstorms, Model Team and Scale Modeling
So this will be my second topic on eb beside my 42043-C Zetros topic. This time it will be a D-model for 42043 Arcos set, and like the C.model I will continue the Mercedes Benz theme. The D-model will be an Unimog U4000 only build with parts from the 42043 set. facts: Mercedes Benz Unimog U4000 (4x4) 4 Inline engine Lenght: 5410 mm wide: 2336 mm Height: 2612 mm tyre size: 335/80 R 20 so if the model should be in a perfect scale of the IRL unimog, it would be a 1:16 build acording to the 62.4/20S lego tyres, because those are the one we have in the 42043 set. that means the 42043-D Unimog U4000 will be Lenght: 34 Studs (+-) Wide: 19 Studs (+-) Height: 20 Studs (+-) Pictures of my "don't think or calculate, just build" progress below Update will come.... -
42043 MOD: Digger, UDS
BrickbyBrickTechnic posted a topic in LEGO Technic, Mindstorms, Model Team and Scale Modeling
Presenting my latest MOC: 42043 UDS! Thanks! BrickbyBrick -
42043 MOD: Digger UDS style
BrickbyBrickTechnic posted a topic in LEGO Technic, Mindstorms, Model Team and Scale Modeling
Hello everyone! Presenting my new MOC:\ Thanks! -
[MOC] 42043: Crawler Edition!
BrickbyBrickTechnic posted a topic in LEGO Technic, Mindstorms, Model Team and Scale Modeling
Totally inspired by Sariel's Mini Cooper videos, I present 42043: Crawler edition! Features 4x4 drive and steering while retaining the functionality of the cabin. Thanks so much for checking it out! C&C PLEASE! BrickbyBrick -
[C Model] 42043 Articulated Tractor & Trailer
Mantarri posted a topic in LEGO Technic, Mindstorms, Model Team and Scale Modeling
Hi, this is my C Model for the 42043 - MB Arocs, It's an articulated tractor with a tipping trailer! Tech specs: 1x L Motor 3x Pneumatic cylinders, 2x 11x2 to lift & lower the trailer bed, and a 1x5 cylinder to open & close the trailer flap. 10x Wheels, 8 on the tractor in a dually configuration, & 4 on the trailer. Well, now on to pictures! All pictures & more are available at my BrickLink http://bricksafe.com/pages/XtremeBuilder/c-model-42043---mb-arocs---articulated-tractor--trailer -
[WIP] Which should I build: 42043 crawler edition or the "boom" supersonic jet?
BrickbyBrickTechnic posted a topic in LEGO Technic, Mindstorms, Model Team and Scale Modeling
Not sure which to build: 42043 crawler edition or the "boom" supersonic jet from virgin airlines. Reply with a choice if you can and thanks for the help in advance ? BrickByBrick