Search the Community
Showing results for tags 'PF'.
Found 253 results
-
.thumb.gif.ad7c8d88b264ee812194946c07404504.gif)
[TC12][MOC] The Banana Scorpion
mocbuild101 posted a topic in LEGO Technic, Mindstorms, Model Team and Scale Modeling
Question: What do you get, when you cross a tank, with a banana, a scorpion, a V8 engine, and a bunch of stud-shooters? Answer: The Banana Scorpion! Color scheme: Yellow, with some black and grey. Driver: A Big Giant Banana-eating Tiger! (this one) Powered Functions: Drive: Tank tracks - powered by 2x M-motors. (also used for steering) Steering: Tank type skid steering. Engine: A massive V8 - powered by a high speed motor. Wacky function 1: Lifting hull mechanism - powered by M-motor. Wacky function 2: High speed spinning sweeper - powered via V8. Wacky function 3: The ability to tank-wheelie!!! (with some help...) Manual Functions: (aka: weapons) Cannon: A giant cannon mounted on the end of the adjustable scorpion tail. Stud-shooters: Front: 2x six-round, and 2x single-round - Rear: 4x single-round. Spring-shooters: 2x rear-mounted. (can be triggered by driver) The story of how The Banana Scorpion was built: -
 Hello everybody and let me present my version of a modified 42005 Monster Truck. It was my second set after my "dark age", that I've bought many years ago, after 42029 as supplementary set with a lot of useful pieces and planned to use for a live axle suspension and some other features for 42029 model. However, I liked the set as a simple and functional model and re-assembled it several times. Here is the model and later I'll provide the all details: A month ago, when I tired of infinite attempts to turn 41999 into a Muscle Car (the chassis isn't rigid enough, but I already did a great progress and hopefully will share it once) I returned to this model and set the task to motorize it adding 4WD, but keeping 4 wheels steering and current suspension (keep the original construction as possible as I can). First, I've analyzed the all existing attempts that I could find over EB, Rebrickable and YouTube and it happens that there were several MODs by different authors: First of all, it's @Splat’s MOD with all steered and driven axles (see topic here). I see no reason to duplicate its description, so let me just note that he saved the necessary features with adding Servo + L-Motor mounted under the hood and trunk. The chassis configuration is 4x4/4 or 4WD-4WS. It’s the best motorized model, I think, because of amazing simplicity and performance, but unfortunately it has a kind of “articulated” steering that isn't real, so was trying to made a "real" 4WD-4WS version, using this model as reference. Another one is Jan Dvorak’s (is he on EB?) MOD with all original features supplemented by on-axle L-Motor that drives the rear wheels and Servo for the 4WS. He added an additional 5X7 frame with differential that provided a necessary rigidness. The chassis configuration is 4x2/4 or RWD-4WS. Personally I don't like such a long axle sub-frame. However I've found a good idea of vertical gears inside the central shaft. The third one is @codefox421's MOD, inspired by Splat’s version, with the original front axle and non-steered custom rear axle with on-axle L-Motor. His custom rear axle, based on two portal hubs, is a quite compact and simple, but has no steering. The chassis configuration is 4x2/2 or RWD-FWS. It looks trial-ready with the portal hubs, but it's nearly impossible to add the steering here, so I got nothing from this model. An unusual @Tommy Styrvoky's MOD with an interesting feature: he modified the front axle, not the rear one, by adding a solid drivetrain with worm gear and on-axle M-Motor, so result is a front-wheels driven Monster Truck with oversized fake engine. The chassis configuration is 4x2/4 or FWD-4WS. Very aggressive! WRRRRR Daniel Wirasantosa’s (is he on EB?) MOD that differs from the previous ones by using of chassis-mounted L-Motor that drives the rear axle (that has a bit low ground clearance due to the 5x7 frame) and, moreover, he used a custom steering shaft that comes directly to the steering rack. The chassis configuration is 4x2/2 or RWD-FWS. Starting this version, I got a more or less defined plan: 4WD with off-axle (chassis-mounted) L-Motor that drives the both axles through the existing “drivetrain” (former steering shaft) and the off-axle Servo that steers the both axles through the custom steering shaft above the driveshaft. There were two more versions: Michael M’s stretched one and LEGOTechnic360’s solid-chassis version with no suspension, but they didn't help me with any new ideas. Nothing personal, guys, if you're reading it, I just had a full and consistent vision of my further MOD: Hull - the original with no changes. Axles geometry - original. I tried to save the all things like the wheels location, suspension mounting points, ground clearance, steering angles (that are even bigger a bit now)… And I still can't believe that made it, after a thousand tries! Suspension - original, with no changes. However I put the hard shock absorbers in the rear end, as the default ones were too weak to keep the BuWizz battery. Wheels - original. I decided to keep the original wheels and tires with no giant crawler ones or even Claas, that are too big even for a Monster Truck. Frame - mostly original, but possibly modified since it will have an L-Motor and Servo mounted above the axles (right under the cargo platform and hood). Drivetrain - it must be the ex-steering shaft that comes through the cardans inside the "big" ball joints to the both axles, connected to the L-Motor via the set of normal and clutch gears. Steering - for the all wheels, like in the original model, but the steering shaft comes above the drive shaft, in parallel with it and can slide a bit while the suspension moves. Enough the words...The most interesting part starts here. Following my plan, the bigger challenge was to modify the original axles - I tried several options, even trial-like with solid axles, but 4WS provides an amazing maneuverability due to big steering angles, so axle diffs are likely vital for such model (solid axles were making a permanent clicking noise in the transmission even with motor stalling sometimes) and I decided to make a fast Monster truck, not a slow crawler with a high torque. The drive train. There you can see how I did it: L-Motor rotates a set of 8T and 16T normal and clutch (required for the steering shaft) gears and then the main horizontal shaft, that were used for steering in the original model. After that the shaft rotates the 12T double bevel gears (ex-pinon gears from the original model), than 20T gears below, single-bevel 20T and the differentials. As result, the gearing ratio is 1:1.667 X 1:1.4 = 1.2334, and provides about ~100 RPM with 15.12 N.cm torque. The wheels connected by a wheel hubs, since I wasn't able to use the universal and CV joints with affordable steering angles, wheels position (I kept exactly the same position as in 42005) and rigidness. The steering. Here you can see the servo (mounted upside down in order to provide more space for the battery block above, steering shaft that goes above the driveshaft, 12T gears (pinions) and 13L racks joined to the wheel hubs. In order to allow the suspension travel, the gears has 1/2L offset from the racks and slides together with the shafts along the mounting points when the suspension compresses. It's a fully legal, but still allowed in LDD and works like a charm! The only mistake that the hubs must be from Claas, but they aren't presented in LDD unfortunately: Just to explain why I used the clutch gears (but with no gearbox actually, ha-ha ), the drive and steering systems intersects so hard, so followed TLG way and used the same solution that they did in the official models (42029, for example) - passed the one through the other. Green is a drive subsystem, blue - steering. The Axles. Here you can see how the steering shaft slides by 0.5L (notice the gap between the 12T black gear and LBG liftarm) - it provides about 1L suspension travel for the both axles. Other images, the story of a modified hull (by Phil), LDD file and instruction in PDF are coming soon...
 -
Addendum to “Electrify your train switches” Dear all, much has been said and shown about ways to electrify LEGO 9V/PF train switches. Along with the EB electrify your train switches thread and some other posts on EB and elsewhere there hardly is anything interesting to add. But then … as said before, I am just wrapping up more than a decade of years of fun with my train layout. My switch electrification approach is far less driven by achieving “to scale modeling” or “most elegant solutions”, it is governed by “using as many diverse LEGO motors as possible” on a more or less standardized and simple drive base design “using as little parts as possible”. I simply like to make efficient use of the stuff in my LEGO boxes – since there are about 30 switch points on my layout. There are a couple of my personal design lines: Since some areas of the layout are rather “dense”, the footprint of the drive mechanism should be as small as possible A clearance that is a little greater as compared to the original configuration with the manual switch stand installed. The reason is that some of my rolling stock MODs/MOCs have a fairly large “overhang” in curves and thus need some additional clearance when passing switch points The switch drive should not fall apart even after prolonged operation as almost half of my tracks are hidden behind bookshelves and other furniture. No modification of the switch – this means that the force required to throw the switch is often considerable. The rendering below shows one very simple base design for my switch drives. It consists of a couple of Technic as well as plain bricks and plates. The rendering is already 5 years old – time is flying. This particular drive mechanism has one serious disadvantage: Operated with the full torque of the PF motors (e.g. with the PF bang-bang remote #8885) it falls apart after five or so cycles. This issue is rather easily overcome, when the torque of the driving motor is adjusted via power control and pulse timing using a programmable brick as for example an RCX or Scout. It took me ages to figure out how to accomplish that: Adjust the length (e.g. 0.3 s) and the power (on LEGO’s 0 – 7 range) for the motor “on” state. This LDraw file contains all the above varieties; the individual sub models combine to any of the drives shown. (Note that you may need to install the unofficial LDraw library as of 2016 to correctly load the files). Alternatively, paying more careful attention to the original EB switch point electrification thread entry (https://www.eurobricks.com/forum/index.php?/forums/topic/44821-electify-your-train-switches/&page=3) would have told me that Jonathan uses his NXT to do exactly that – and for long! The switch is thrown by a lever, which fits into the space between the two mounts for the manual switch stand. By small variations of the actual gear configuration, almost all typical LEGO motors can be attached. The geared varieties [e.g., PF M motor (#8883), Technic mini motor (#71427, #43362), Technic motor geared (#47154), or even the Mindstorms MicroScout PBrick (#32344] are driving the lever with none or low additional gearing ratios; the ungeared Technic motor (#2838) requires higher gear ratios to work properly. The advantage of this drive design is the footprint (as measured on the floor, not height!), which is 3(x6) studs for clearance and 5(x6) studs for the base = 8(x6) studs. The picture below shows two MicroScouts on the bridge operating the two switch points on the right. There are light fibers plugged into the MicroScout’s light sensors; these do transmit the VLL code generated by a Scout PBrick (not visible) to control them. MicroScouts operating as “intelligent motors” for switch drives are fun. The “forward/reverse” “switch” is somewhat unique: When the MicroScout is put into “P” mode it pays careful attention to its built-in light sensor. In this mode, the MicroScout understands some VLL (LEGO’s Visible Light Link protocol) commands such as “motor on forward” etc. In other words you can operate the switch using optical signals from a VLL source. The rendering below shows a Scout controller operating 4 MicroScout switch drives. This version of a switch drive has the smallest depth I could come up with to securely operate unmodified switch points: I used that one on my layout here: Here is the link to the LDraw file. In the mean time I have slightly modified the “RailBricks #9 challenge” drive (a number of ingenious train experts have contributed to this one – see the "Challenge reveal" article by Benn Coifman in RailBricks #12, page 37) and reduced the size to 5-wide at the base. This drive never falls apart, regardless how much torque is exerted on the driving axle. The design is simply amazing! I have retrofitted almost all of my switch points with this version. When a MicroScout is operating the drive, it should be oriented such that you can easily get access to the buttons (on/off, select, run). There are several drive versions to attach the MicroScout in such way that is does not interfere with the required clearance on the point and good access to the buttons. Here are some real world examples: This folder contains all LDraw files Best regards, Thorsten
-
 This is a fully functional prototype of a brick (2 x 4 x 1) that we developed to make it easy to control PF motors with Arduino boards. It has a PF connector on the top to connect the PF motor and a 4PIn cable to connect to the Arduino board; it has 8 anti studs on the bottom to connect it to LEGO bricks. It allows controlling the direction and speed of the PF motors. We tested it with the M-motor, L-motor, XL motor and the train motor. This is the brick in action with an M-motor: Let us know what you think or what you would use it for!
 -
Hi everyone. I was wondering if anyone has any experience with taking a 9v battery plug and joining it with a PF wire. Just like this MiniZip. Any suggestions, tutorials, or discussion is much appreciated. Thanks.
-

[MOC] LEGO Forwarder XXL
morson1 posted a topic in LEGO Technic, Mindstorms, Model Team and Scale Modeling
Hi all, A little presentation of my LEGO Forwarder named XXL for obvious reasons :) It has been a project in my spare time for some years now and still not finished (probably never will be...) Most basic facts: Weight: 6,7 kilograms Dimensions: 95xx36x50 studs Drive: 8 XL motors + hub reduction Steering: Forced by controlling front left with rear right and the other way around (because of the weight in combination with the huge friction from the wheels) Wheels: From 8466 (4x4 Offroader) Some vids from Youtube: Feel free to comment or ask questions, I´ll try to answer them :) -
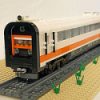
From the MTM (MTR Train Mocs) i have the pleasure to present my latest creations This is my first incursión into functional narrow gauge. A challenge for me and pushed by the narrow station of Ponferrada from my colleague Blastem. In this case i tried to represent the most significative material of the steam era of the spanish line from Ponferrada to Villablino the “Ponfeblino Line” and in 6w to be in the same scale from all my standar gauge trains. All this material is fully functional by PF. Thanks to the master Sheepo to help me with the PF wagon. Only him can do it easily to accommodate 2 L motors, 1 Lithium battery and 1 PF receiver. The locomotives PV-1. A small steamer for cargo uses. And with water deposits in both sides of the boiler PV-31. A small locomotive used for passenger services Wagons Cargo. With all PF mechanism to move the whole train Coal wagons . Mail Wagon. Saloon Wagon. First and Second class Wagons. 2 Trains in Ponferrada Station And some comparisions with the original ones. Full gallery Flickr
-
Custom boom lift (pnuematic) [moc]
Aventador2004 posted a topic in LEGO Technic, Mindstorms, Model Team and Scale Modeling
Oops, @Milan can you close this topic, it double posted itself. Thanks! -
hi all, I have just started into the world of Lego trains and controlling them with Arduino and i'm afraid it's become somewhat of an obsession! I have always loved Lego and trains since I was a child but could never afford it. I have a son who's 6 and shares my love of trains so I figured now was a good time to start! :-D I have limited amount of Lego at the moment, and have been mucking around in LDD and Stud.io building some signals, etc..this also includes using Arduino to control lights as well as trains..my first try with using some IR transmitter LEDs worked, but not real well which made me wonder whether IR is really the best method of control..I have read alot of comments already from people that RF is really the way to go so I will try that next when the 433Mhz Tx and Rx pair arrive. This led me to think of the next weakest link in the chain..the battery, which only lasts so long and is a pain to have to pull out and change..I know Lego and even third party companies have a rechargeable battery, but I'm buggered if I'm gonna pay $100-120 for each one!!! I've never had any 9v or 12v rail-powered Lego, and the way I understand it, you switch on the control, it powers the rail so much and makes the train go...but what if the rail was powered on all the time and you still controlled the train with an internal controller (like the RF receiver). Any thoughts on this? Sorry if I sound like a noob, since I have no experience with how the track-powered system works. sPy from Oz.
-

SBrickPad (SBrick-Controller) for iOS progress update
BarakRL posted a topic in LEGO Technic, Mindstorms, Model Team and Scale Modeling
Updated: The (almost) final version of the app is ready, app renamed to SBrickPad. For now, you can download the source from my GitHub page: https://github.com/BarakRL/SBrickPad If there will be enough demand I'll make it available for download from the App Store. The app supports MFI and iCade gamepads, on-screen gamepad will be added later this month. More videos coming soon. --- Well it's not done yet but it's getting there. I've added support for both iCade and MFI gamepads and many other features: precision controls (you can even set the easing curve if you want) SBrick connection recovery multiple actions per button event (press/release/value change) so you can control multiple motors with one button or simply play an engine sound while the car is accelerating load/save (and share) action sets import sounds many other things I can't think off right now Do do: Edit actions UI (you can now only edit the json file) On screen virtual gamepad (so it can replace the SBrick app for people without gamepads that still want more control) Make it pretty Documentation etc. The app is still in development, but the source is available to download from my GitHub if you want to play with it already: https://github.com/BarakRL I would love to hear your feedback! -

Lamborghini Gallardo
legotechnicisawesome posted a topic in LEGO Technic, Mindstorms, Model Team and Scale Modeling
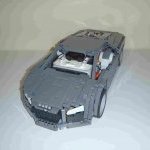
hi eurobricks! i started this topic a bit late i know, but i still havent finished yet! here is a photo of my progress so far: i need some ideas for the the dash and centre console as a car is not a good car with out a good interior! here is my progress on the inside: any help with the dash and console would be greatly appreciated! thanks! -
[WIP] Tracked Digger
Aventador2004 posted a topic in LEGO Technic, Mindstorms, Model Team and Scale Modeling
Here is my latest creation!! The tracked crane! I recently bought a bucket and 2 l motors so I thought I would build a crane, logically . The crane goes up and down with a LA, and the bucket moves on a LA both connected to separate m motors. The drive is through direct driven l motors on tracks. This is in no way final, and I would like to make instructions for the final model. What do you think? better pics soon. -

LDD/RC/PF VW T1 Camper Van(VW T1 BUS) 10 wide
moonein posted a topic in LEGO Technic, Mindstorms, Model Team and Scale Modeling
New LEGO/ Lego MOC, VW T1 BUS (VW Camper Van) Is still 10 grain width, the new version is not based on the past version of the upgrade, I refer to a large number of original drawings and objects, re design details, body length, internal structure, and customized manual spraying (silver effect) parts. The new version of the T1 will be a series of my design, I will be based on this chassis for a variety of T1 modified car design (such as: pickups, SUVs, racing cars, trailers and so on, of course, will also consider the static model). T1 is a classic, multi-purpose models, it is worth pondering, I hope there will be more based on the design of the personal style of the modified car appears, I will always maintain this series of drawings sharing. The current version is 1.1, the design will be updated at any time, with the design of the trailer will be released, welcome to communicate with me through MocPages, Sina (Weibo) and other social platforms. http://weibo.com/moonein http://www.moc-pages.com/moc.php/438905 https://rebrickable.com/mocs/MOC-8059/moonein/rcpf-vw-t1-camper-vanvw-t1-bus-10-wide/ -
Bucket Wheel ExcEV3tor - a Mindstormified BWE (EV3)
The_Icestorm posted a topic in LEGO Technic, Mindstorms, Model Team and Scale Modeling
I created this modified Bucket Wheel Excavator some time ago, and I thought I would like to share it on this forum. After building the original BWE, I wanted to try to incorporate some Mindstorms functions into it. I managed to motorise all the active functions, using both an EV3 brick and motors, as well as some PF motors. Functions can be preprogrammed, or can be remotely controlled using an EV3 IR remote. Here is a list of the functions: Bucket wheel rotation and main conveyor belt - PF XL motor Lower conveyor belt - PF medium motor Boom arm elevation - EV3 large motor Lower conveyor swivel - EV3 large motor Superstructure rotation - EV3 medium motor Driving - EV3 medium motor Since I owned an NXT as well, I used it to motorise the small mining truck that was included in the set. There are also some LEDs that illuminate the 'work area', but they don't really do a good job, its just a nice thing to include. Here is a video of the excavator in action, as well as the mining truck (sorry about the poor resolution and bit rate): More info about the machine can be found here: https://www.us.lego.com/en-us/mindstorms/community/robot?projectid=3e125a5b-475c-4a4c-b3ed-e4b4f2192907 Let me know what you think of it in the comments! -

Using L-motor to power crawler
Rooneypower posted a topic in LEGO Technic, Mindstorms, Model Team and Scale Modeling
Hello all, I have a few questions regarding the use of 2 L-motors for powering a crawler. I have done some research and have not been able to find many MOCs that use L-motors for drive, does anyone have any advice on using them instead of 2 XL motors for drive. I know the torque output will be less with the L-motors but the overall speed will be quicker. If geared properly couldn't a L-motor be able to closely match an XL motor, but spin faster? Netting me more of a buggy type of crawler instead of a pure crawler? Also if I were to use L-motors I can keep the overall size of my axles smaller. One of the downsides is the power draw from the 2 L-motors will be too much for a Lipo battery setup, correct? I'm building some custom axles in LDD and cannot make up my mind which way I should go with my PF, XL drive or L drive motors. I have designs for both size motors, any advice or experience would be welcome, thank you! -
 I recently bought several PF items from the online Lego shop, including 2 of the Control Switches (8869). The advertised item on shop.lego.com looks just like the one on the Specifications page of the main Lego website (https://www.lego.com/en-us/powerfunctions/articles/8869-control-b71751d95f0a422da2838a91c9093874) which has a small black direction switch as well as the main large orange switch, and the webpage specifically refers to the direction switch. However, both of the switches I was sent are missing the black direction switch! Other than that, they look identical to the design of switch on the two webpages. I have emailed Lego to say I am not happy with this, but I also searched online, expecting to find that they had changed the design, but I found nothing about it. Does anyone know what is going on? Have I been sent very old stock (the date moulded on the bottom is 2007) perhaps from before the switch was added? Or have they recently changed the design to remove the switch, but sneakily not updated any of their own marketing pages to reflect this? I can easily envisage a situation where I would need to use the direction switch to get the desired result, so I'm definitely not happy that my switches don't have them.
 -
Im new to this forum so hi everyone ;) i have fun with PF from few months, and i want to buy a li-po and customize it to lego, i got two of real power hungry buggy motors, and i want to feed em' as much as i can :D I only need to know which voltage is maximum for motors, and for reciever, i have maken a research across internet, and ive heard that motors can handle max 16volts , and reciever just 9 volts, but ive heard too that motors can handle max 12 volts and that reciever too, on many forums i have read different numbers, so i have to ask here :) i have found light and small 14,8 volt li po 850 mah, in good price and i like it, but i dont want to burn my buggy motors and rest of PF, im wondering too about rc unit voltage, if it have 6 aa 1,5v bateries fully charged, it could generate 9v as normal pf battery box but when i compared them, rc unit is way better, and buggy motors are way faster, i hope that someone can help me :)
-
Here's my first attempt at making a small switcher that is PF powered. There are no special techniques in play the design should be self evident in that the PF components drove the design, though I think it turned out OK. I was even able to put in working headlights though they are a bit large. and for good measure, here is my reference photo:
-
Another smart brick is in the making. Jason Alleman is one of the persons behind this initiative. This time the emphasis is on sound and lights. More info on Kickstarter: PFx Brick More info on: http://fxbricks.com/
-
[MOC] Mercedes-mini with trailer
super-jaschka posted a topic in LEGO Technic, Mindstorms, Model Team and Scale Modeling
Hi there, after assembly 42043, I wanted to make a little copy. It turned out for me or not, it's up to you. Motorized functions. - Steering (Servo motor) - Driving and tilting of cargo bay (L motor) Manual switching functions "driving - tilting of cargo bay". When cargo bay is lifted, the side automatically opens. The cargo bay is mounted on a separate frame and fixed to six connectors to the truck chassis. So you can easily replace it with another element. The trailer is made similar to a truck. http:// http:// http:// http:// http:// http:// http:// http:// http:// http:// http:// http:// http:// http:// http:// -
(wip) pf 1:10th warrior supercar
Aventador2004 posted a topic in LEGO Technic, Mindstorms, Model Team and Scale Modeling
may i introduce my latest wip supercar the WARRIOR SUPERCAR it was going to feature 4ws but was very hard to make without taking out the diff i so far has steered wheel in cabin, suspension, 2 xl's geared up 2:143:1 through the diff as my first supercar on this site it is not too advanced however it is not my first..... full gallery here tell me your thoughts aventador -
Faulty Power Functions Parts
Aventador2004 posted a topic in LEGO Technic, Mindstorms, Model Team and Scale Modeling
i have been wondering a bit whether any of you have had a faulty pf part i thought of this because i had a pf remote with a faulty control stick tell me your thoughts aventador -
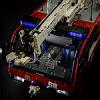
[MOC] Crane Truck
Lucio Switch posted a topic in LEGO Technic, Mindstorms, Model Team and Scale Modeling
Hi to everybody! I'm here to present my new Moc. I started building this crane truck about 6 months ago with the main idea of solving the problems related to a failed attempt of a crane for my previous truck. IMG_1608 by Lucio Switch, su Flickr Starting from the cab...despite the undeniable resemblance to the cab of the dump truck (with a bit of the tractor truck), it has slightly different dimensions, and the add of some new details/functions, forced me to revise it completely. In fact, in addition to the "standard" opening doors, this time, as on real trucks, the cab is suspended, while maintaining the tilting function and the working steering wheel and the front grid is openable. Moreover the seats are pneumatically suspended via 2 (1+1) 1x5 pneumatic cylinders. The chassis has the tractions on the 2 last axles, they are driven by 4 XL Motors and uses 2 Servo Motors to steering the first two axles (with different turning radius). The first two axles use independent suspensions. In this case I was inspired by the Mod of the chassis of my Tractor Truck done by Efferman ... that has a perfect shape for a fake v8. On the back there are 2 live axles (with a total of 24 hard shock absorbers). Between the first two axles there are two small pneumatic pumps moved by two L Motors. In addition to that, on the chassis are present 2 Li-Po Battery, 5 Leds for lights and 2 SBricks. Behind the cabin there is the base of the crane, it contains the front stabilizers, extendable via a M motor (connected to one SBrick), 6 pneumatic valves, moved by an M motor each, 4 IR receivers to control the 6 valves motors plus 2 other M motors, one to rotate the crane and one for the winch. The 4 receivers take power from a port of an SBrick. Finally the crane ... well, the classic design of this type of crane with the upper arm offset (as on 8258 for instance) built on this scale, gave me big problems twisting the whole structure ... and a lot of headaches. One day I came across by chance in a truck with a Cormach crane, it presented a unique design that would solve the twist problem. So inspiring to this design, I have developed my crane, which consists of a telescopic upper arm (extension via 2x 1x11 pneumatic cylinders) supported by two side arms moved by 2+1 2x11 pneumatic cylinder each. It isn't able to lift heavy loads, but it works and, considering the masses involved, I'm fine with that. Now some numbers: Length: 86,4cm 108studs Width: 24,8cm 31studs, 28cm 35studs with mirrors Height: 39,2cm 49studs Weight: 8.6 kg Total number of parts: 8000 PF elements: M motor: 9 L Motor: 2 XL Motor: 4 Servo Motor: 2 PF LED: 5 Lipo Battery: 2 ..and a couple of wire extensions Pneumatic Elements: Small pumps: 2 1x5 Cylinder: 2 Medium Cylinder old: 4 Medium Cylinder new: 2 1x11 Cylinder: 2 2x11 Cylinder: 6 Valve: 6 ..and several meters of pipes. For more pictures check my Flickr Album: Crane Truck Flickr Album And this is the video: To conclude, I would say that, in some way it was a new and interesting experience for me. Due to circumstances beyond our control, I was forced to transfer my Lego room in the basement, comfortable although perhaps a bit rustic but not directly connected with my apartment. This, coupled with the fact that my free time has been drastically reduced, has led me to review my usual workflow. So this is my first model built before digitally and then physically. This way allowed me to use better my free time and to select and pick up only the needed parts to build, reducing drastically the mess in the living room. Also part of the work for the BI is already done, I'll done them for sure, but I don't have idea when they will be ready. I'm afraid that it will be a huge job! I hope you like it! -
Hello fellow builders! I felt that it was finally time to share with you all something that I've been working on/ playing with for a while now: My L-Motor Frame. L-Motor Block Types by Nick Jackson, on Flickr The concept for this project was to create a stable platform on which (primarily) steam engines could be produced with less motor& cable obstructions. L-Motor Block Types by Nick Jackson, on Flickr This would then allow the engine's body to be built relatively free of electrical components, or crammed with them in the case of tank engines. L-Motor Block Variants by Nick Jackson, on Flickr I think that the most interesting part of the frame is the fact that it is easily modifiable, and can essentially go from 2 to 7 axles! At the time of writing this however, I've only dared to go up to 4 axles for a related project. L-Motor Block Variants (2) by Nick Jackson, on Flickr Hopefully these frames and their different gear ratios will inspire you to make a steam engine! Although, there are a great many European engines that are not steam, but employ connecting rods for their drive wheels. L-Frame with Medium-Large wheels by Nick Jackson, on Flickr Lastly, here are some alternative wheel sizes that you may be interested in. These are made possible by the work of BigBen Bricks and @Shupp. The smallest feasible size would be the Medium-Large drivers by Shupp. These would need a bit of reworking from a standard L-Frame in order to clear switches and such. New Wheels!!! (2) by Nick Jackson, on Flickr Here, a set of XL wheels from BigBen fit nicely on a standard frame. L-Frame with XXL wheels by Nick Jackson, on Flickr And, by upgrading to the longer frame size, you could even accommodate 6 of Shupp's XXL wheels! Hopefully this post will benefit everyone, but moreso people who've had a difficult time getting into trains, and especially steam! Please, let me know your thoughts, and definitely share your ideas for a potential future build that might benefit from this design! Oh, and here's the link to the files: https://drive.google.com/open?id=0B9xAgBdzDImZaFFsM2lGVkdmcEk Thanks for reading, ~M_Slug357~
-

ROBOT WARS: Pulsar vs Carbide
PKW posted a topic in LEGO Technic, Mindstorms, Model Team and Scale Modeling
hi all, some months ago i made this video of lego battlebots, and now i'm posting it there because maybe you could be interested also for TC11, you'll find all the bot info in the video but i'll clone them here too, hope to bring up a brickshelf folder asap for the two bots (but i have to rebuild them due to pieces and electronics being used for witch doctor replica, cardiac two, fanmade design, killerhurts and recyclopse chassis, and other 3 500g class bot an grabber a lifer and a flipper) PULSAR weight: 700g size: 23x27x9studs weapon: 73g spinning drum with two single teeth 1900rpm strenghts: really effective wedge shape used to go under the opponent and lift them with the drum energy weaknesses: the drum isn't enough fast to launch the oppnent on the air, wheelholders may break off easily, weak wepon belt CARBIDE weight: 730g size: 32x32x9 studs weapon: 84g spinning bar 750rpm strenghts: great power and though armor, effective rear wedge weaknesses: the armor can e warped or bent and increase friction in the drivetrain, hard to control, high battery consumption here a photos from Ellis (pulsar builder) about size comparison here the video: NB it is really long, if you want, after presentation, you can skip to 11:02 to skip the fist fight (a bit long and boring) and save time without losing the most of the action! i'm keeping editing this with photos and videos from my twitter, it is hard to find them back but i'll try: CARBIDE PULSAR