Search the Community
Showing results for tags 'truck'.
Found 657 results
-

Trial Truck "Rhino"
1nxtmonster posted a topic in LEGO Technic, Mindstorms, Model Team and Scale Modeling
After my most recent toyota hilux trial buggy build, I wanted to build a simple trial truck that was very strong. My goals were: No gear "grind" in steering or drivetrain Powered by XL motor and steered by M Normal battery box (non-lipo) No special parts so that many people can build The strongest (in my opinion) suspension type is ball-joint with reinforcing link. So I used my ball joint suspension idea with internal gear reduction from last year: Total gear reduction is 3:25 on 1x PFS XL. It has very good suspension and climbing capabilities, as well as meeting all my goals of no gear grind in steering or drive. Video: -
Lego tatra T813 4x4 RC Trial Truck V4
The Ghost Racer posted a topic in LEGO Technic, Mindstorms, Model Team and Scale Modeling
Lego Tatra T813 4x4 RC Trial Truck V4 The famous Tatra T813 in Lego remote controlled version, versatile and durable as the original. Modular Design The scale model, made by me after several months of work, contains most of the features found in the real version, to significantly affect its performance are the axle shafts, transmission, suspensions, chassis structure and weight distribution. Specifics -weight: 2Kg -height: 225,0mm, 22,50cm -lenght: 400,0mm, 40,00cm -width: 215,0mm, 21,50cm -3 XL Motors (2 for drive, 1 for sterring), 2 IR Receviers, 2 Battery Boxes Motor For Lego Tatra T813 I opted for the use of two XL Motors, which provide a high torque with an average consumption of energy, but low number of revolutions per minute. There are two transmission shafts (the real Tatra T813 uses one), each connected to a single engine, split the load energy, strengthen the chassis, but also to divide the stress that every engine needs to support. In the gear shaft there are numerous gear reductions with anti-snapping patented by me (final gear ratio 9:1). Suspensions Independent half-axles suspensions for each wheel, all-wheel drive and anti-snapping system between gears for maximum traction, unlike the original model, Lego Tatra T813 does not use differential: between Lego bricks there is no type of limited-slip differential, then, by inserting a differential whatever, at the first hurdle would stop the vehicle, and this should not happen. Axle shafts New axle shafts very strong, with anti-snapping system patented by me, gear reductions, increased torque transmitted to the wheels (final gear ratio 9:1), and steering (in the front). Wheels Individual tactical tires on each axle (94.3 x 38R). Comparison with the real model The Lego model made by me is very similar to the real one, in particular, the design of the cabin faithfully reproduced it based on original designs. Youtube's Video The video is of the V1 version, I will soon be making a new video. My blog's page For more information and news about this incredible model, please visit my web page dedicated to it,, http://gtathecomplet...trial-truck-v4/ -
Lego Tatra T813 4x4 RC Trial Truck
The Ghost Racer posted a topic in LEGO Technic, Mindstorms, Model Team and Scale Modeling
Lego Tatra T813 4x4 RC Trial Truck The famous Tatra T813 in lego version remote controlled, Versatile and durable as the original. Modular Design The scale model made by me after several months of work, contains most of the features found in the real version, to significantly affect its performance are the axle shafts, transmission, suspension, chassis structure and weight distribution. It's powered by two powerful xl motors through a four-wheel drive, it has half-axles and various gear reductions. The Article of my blog To learn more about this amazing truck, visit the page dedicated to it on my blog, at the web address: http://gtathecomplet...trial-truck-v2/ -
Eightball Why have one vehicle when you can have eight? The Eightball is a specially designed vehicle perfect for long-haul trucking, ocean voyages, mountain travel, construction, urban transportation, and space travel. Stats: Length: 108 studs Width (widest points): 78 studs Weight: 9.8 lbs. Build time: 2.5 months Pieces: ~4000 High resolution and additional pictures on flickr. Come see it in person at Brickfête this year.
-
"Still Alive" My next project Tatra 6x6 coming soon
KopMaister posted a topic in LEGO Technic, Mindstorms, Model Team and Scale Modeling
Greetings, fellow builders! i am happy to announce that i will be featuring my most resent build in this very topic. And as the title states it will be a Tatra 6x6 with following features: - Propultion 2x NXT motors. - Steering 1x L-Motors. - All wheel drive. (duh :P) - Full Tatra suspension with 4 wheel steering (the first two axles) - 1x battery box. pictures and hopefully a video will follow shortly. -

Second attempt, Magnum and trailers.
aqaz posted a topic in LEGO Technic, Mindstorms, Model Team and Scale Modeling
Here are some pictures of my Magnum AE500 6x4 and the trailers I have built so far.... There are a lot more pictures here: http://www.brickshelf.com/cgi-bin/gallery.cgi?m=aqaz Comments or questions are welcome. -
Renault Magnum AE500 6x4
aqaz posted a topic in LEGO Technic, Mindstorms, Model Team and Scale Modeling
Finished my Magnum! Retired at New Year, took up Lego again after nearly 40 years, used to do a lot with my son. Anyway, I always wanted to build a remote control big scale Magnum after having an AE450 6x2 in the late 90's... Was going to do Tamia or Wedico but they don't make a Magnum and I don't have the equipment to manufacture all the parts, and they are just so so expensive..... So, decided to try it with Lego. Scale had to be 1:17.3 by working back from the size of the only realistic and correctly proportioned wheel and tyre, took a couple of weeks gathering pics working out dimensions and so on. Then a month back in China, then three months trial and error, build and rebuild, give up and make a trailer, buy more job lots off e-bay, wait for vital bits from bricklink (best discovery ever) research how others solved particular problems then adapt from there, that's how I found this site,...... etc, etc, etc. I could not tolerate a lack of windscreen or mirrors so I made these and the suzies but all the rest is purely Lego. Oh, I had to halve some 'treads' for the footsteps, and back the lights with kitchen foil. I also had to make all the stickers my own 'company' real Magnum panel. This was far and away the hardest part, cutting 4 mm strips of high conspicuity foil and applying it to my reefer van took quite literally hours. I will do another thread with the trailers built so far. Feel free to comment. Andrew. Just discovered that I can not upload my pictures. I will join MOC pages or Brickshelf and put them there. -

Volvo FH16 Ampliroll Hook lift
achuyman posted a topic in LEGO Technic, Mindstorms, Model Team and Scale Modeling
Based on 2013 Volvo FH16 6x4 its equiepted with ampliroll or hook lift system [media]http://www.youtube.com/watch?v=Bx8kawBn1Io[/media] Features: 1 M motor for steering 1 XL motor for drive 1 M motor and 1 linear actuator for the sliding/locking mechanism 2 Recievers 1 Standard battery pack 1 Flat bed 1 Wood log carrier 1 Open dump body? (i dont know how to call it) And openable doors Some more info: It uses 2 linear actuators for the jib but in order to make it work i needed to get more range so i used 2 tipper scissor style mechanisms to achive it. The sliding/locking mechanism uses a 12t to 24t because the jib flexes at the middle and its only got 2 fixed points this also means that it can only be powered when the jib is in the lower position something that real trucks use to prevent the jib from being accidentaly disengaged when its at the tipping position which could cause damage cause the body would fall down. The rear pendular suspension is achived by meshing a 12t to 20t gear so that they can rotate at the mesh (this is something i saw Zblj do in his videos) Things that can be improved: The rear chasis flexes cause it only uses 2 beams at the rear where the wheels are connected The linear actuators are too slow specially the sliding cause it uses a worm gear but i didnt have more room for other thing Since i build it i was told that in the real ones the 2 parts of the jib when they are in the hook position the jib has a contac point and then both of them move together so that the lenght of the point where it pivots to the point of the hook changes to have more power in the initial part of the lift http://www.brickshel...ry.cgi?f=527652 -

KZKT 7428 Rusich Tank Transporter
Sariel posted a topic in LEGO Technic, Mindstorms, Model Team and Scale Modeling
Need a ride? Need to tow a glacier somewhere, too? Photos, reading & the RobotC control program are here: http://sariel.pl/201...kt-7428-rusich/ Remember, it's powered by NXT, but fueled by vodka ;) -
I love LEGO® trucks. I just can't help myself when a new civilian range comes out; last year's range was great, and this year's looks set to continue the current trend. My love of, specifically, petrol tankers can be traced back directly to this set - one of the first sets I remember owning, and ground-breaking for its time. But time has moved on, and LEGO sets have become far more intricate. The release of an Octan tanker relatively soon after 2010's 3180 Tank Truck is rather surprising; in this review I'll check out the latest offering and see how it compares to its (slightly) older sibling. Incidentally, 3180 was one of the first sets I reviewed early in my EB Reviewers Academy career. If you compare to my earlier review, you can see how I've (hopefully) improved! Review: 60016 Tanker Truck Set Information Name: Tanker Truck Number: 60016 Theme: CITY Release: 2013 January Wave Parts: 191 Figs: 1 Price: GB £17.99 | US $19.99 | EUR 19.99 - 22.99 | AU $29.99 | CA $24.99 | DKK 179.95 Links Brickset ... Shop@Home ... Bricklink ... Peeron (not yet listed) The Box Click for a full-frontal view in various sizes Once again, Orthanc dominates the LEGO CITY skyline, while our Tanker breaks the fourth wall into the familiar blue CITY livery. It's a tried and tested formula, dating back a full ten years to the advent of World City in 2003, but still looks fresh. The box is deep, measuring 260 x 188 x 70 mm (W x H x D); it's the same height as 3180 but considerably narrower and shallower. This set is GB £3 pricier than 3180, which had 30 more pieces; the smaller box size therefore represents an environmentally-conscious move by TLG (or, for the cynics among you, a cost-saving in logistics ). HEY! Look at these features! Ladder, gun-on-a-hose, coffee mug replete with petrol fumes, ladder again, and cab the dude can sit in! What more could you want? We'll examine these features in depth in due course. Click for larger sizes The usual CITY modular build is alluded to, rather than demonstrated this time: we are shown two bags falling from the box but not what they build. However, LEGO's new subversive 'Pokemon' Collect Them All! strategy once again appears, but there are only two other civvy sets this year, so you'll have to go back and complete your collection with last year's. And you should - they're good! The little petrol pump that accompanies the tanker gets its moment in the limelight on the top of the box: Quite why it's isolated in a field on the City outskirts is anyone's guess, and I'm still uncomfortable with the driver's delight at drinking coffee in the close proximity of flammable liquids, particularly as it occurs to me now that the black tubing might well represent Diesel. At least he isn't smoking! Apologies, by the way, to Americans: please substitute 'gas' for any appearance of the word 'petrol'. Contents The thumb-tab box opens to reveal two polybags, instructions, and sticker sheet fitting quite snugly inside. They are accompanied by two loose parts: the hose-and-gun combo. Only one is required in the set; whether the second will appear in everyone's, or I've just been lucky, remains to be seen. Decal Sticker Sheet Oooh, shiny! The sticker sheet is printed on white material that is rather reflective, and required careful photography to remain clear. As has been the trend of late, the front of the cab is stickered, but as we shall see it doesn't entirely replace the usual grille tiles. There's a sticker for the petrol pump (top left); the rest go on the truck. The Instructions The single booklet is of good quality, and features a display very similar to the box front, but with a slightly broader panorama. The Gagne Kid guards the rear, presumably to deter people from sneaking a look at the inventory. The Modular Build is demonstrated on the inside front cover: Bag Two's cab and tank builds don't connect directly without Bag One's chassis; obviously the disembodied wheels don't. Having looked at this page, naturally by now you would have poured all the parts onto the carpet, albeit in separate piles. Too late, the opposite page warns us not to do this. Winding the hose onto the reel could prove challenging to younger kids; or at least doing it neatly (it's tricky enough for adults). Maybe I'm underestimating the capabilities of the average 6-year-old. I should remember that programming the VHS caused young Rufus far less trouble than his elders! [VHS = archaic system for recording moving pictures onto magnetic tape, for those interested in ancient history.] You might have noticed the part call-outs on the previous picture. Yes, they are present throughout: This surprised me, in such a small set. With typically only 1-3 parts per step, it isn't strictly necessary, but I for one won't complain. Towards the rear we find the latest CITY range diorama, showcasing the new yellow cement mixer , and the strange 1950s-throwback recovery truck : The two sets from 2012 promoted in the 'Collect Them All!' series also feature here: 4433 Garbage Truck and 4432 Dirt Bike Transporter . The latter is a great set! I'm secretly hoping the garage at the left appears as a set soon. The set inventory is found on the last two pages: you can see them here and here. The Parts Bag One builds the chassis, along with the petrol pump and solitary figure: There isn't a huge amount of interest here. Most of the incongruous blues and browns will be buried in the final model. I'm pleased to see the black flexible tube make another appearance here; it was in 3180 too. The yellow taps, not surprisingly, are the modern variety, without the little hole at the end; one of them is spare. I have a sudden inexplicable desire for spaghetti carbonara followed by biscotti with Vin Santo: Opening bag two, I was momentarily alarmed at the prospect of flick-fire missiles appearing in CITY sets. Fortunately, that is not their use here, though the cynic in me wonders whether TLG is trying to demonstrate alternative uses for these ubiquitous pieces. Otherwise, there isn't really anything of note here, with the possible exception of ... ... this piece, which is found once in both bags: It's a 2x2 brick with studs on one side. It's new to me, but I note that it first appeared in Bag End at the end of last year, and in several sets this year. It's potentially very useful for SNOT work. The Figure The sole figure included in this set wears blue overalls, unlike the 'Oil' jacketed figure from 3180. Let's call him Diesel Dave. He has a rather bland, amiable countenance; I'd rather he had an unshaven scowl. The torso is nice, with some lovely detailing; the black vest under a medium blue shirt, all surmounted by the darker blue (presumably denim) overalls with wrenches and a pencil in the pocket. But it's nothing new: this torso first appeared in 2006. The back is featureless. The Build The first thing built is the little free-standing petrol pump. We'll see it complete later; here I've part-disassembled it to show a simple but nice technique: Three 2x2 white jumpers are used to centre the upper part, and allow attachment of the bluish-grey wheel. The 2x2 black tile is attached to the two white 1x1 bricks with stud on one side; I had wondered why one of the new 1x2 bricks with side studs wasn't used, but you can see that another of these white 1x1 bricks is used in the model, and it makes economic sense to use as small a part variety as possible. The black tile itself will be stickered, and represents the pump's display; the whole is capped by a 2x4 tile offset via its centre anti-studs. The black tube is a little too rigid to allow posing of the figure holding the pump unless both are connected to a baseplate or other studded surface, unfortunately; about the only viable pose on a smooth surface is shown here. Building the chassis will be a familiar routine to anyone who has experience of LEGO's trucks. Long plates form the spine; 2x2 axle plates are separated by either 1x2 tiles or plates; I'm not sure why the tiles were used rather than the 1x2 green plates along the length. Note the black 2x6 modified SNOT plate at the end: this is surmounted by a 1x4 SNOT brick, forming a 2x4 grid of studs for the secure attachment of the rear SNOT panel. The spine is strengthened with more long plates and the rather incongrous brown bricks, which don't show in the final model. I didn't think the 'mustard dispenser' would fit into the cupboard, but it does! Getting it out again requires nimble fingers or vigorous shaking. The front-end SNOT panel has a green modified 2x6 SNOT plate; the top studs mesh with the black 2x4 tiles for extra strength. There's a lot of tiling (or part-tiled plates) on the upper surface here; this allows the cab section to be removed easily should you wish too. The rear end is topped by a 4x10 plate; this leaves a gap underneath which would indeed be found on many trucks, but there's a visible red plate under there. In the final inset you can see the rear-end SNOT panel; the grille-tiled area is a plate lower, which looked a little odd, but there's a good reason for this, as we shall see. I took a lot of extra pictures; if you want to see more steps, check out the pseudo-timelapse in the Flickr display in the spoilers: Bag Two starts with the cab, which is based on a green 6x6 plate. Two friction cylinders form the exhausts; it is into these that the flick-fires will go. I remember a lot of complaints from about three years ago about the lack of doors on LEGO CITY vehicles; it's good to see that TLG has listened and they appear to have returned to stay. The rear of the cab is formed from large wall panels; this leaves a couple of gaps but they aren't too obvious on the finished set. Note the use of the 1x2 SNOT brick here, allowing placement of the steering wheel, and permitting easy reconfiguration to right hand drive for those parts of the world where British influence persists. Yet another of those rather useful modified SNOT plates allows a strong attachment of the windscreen: The obligatory coffee mug takes pride of place, and the whole is capped by the usual 4x6 wedge panel. I like the new wing mirror technique; it means the mirrors can't be adjusted, but this also means they're unlikely to get knocked out of place when you're posing for display or photos. The tank itself is an Octan-themed sandwich which will be familiar to owners of 3180. There is a slight difference: the red plates are the same length as the big green bicurved slopes, meaning that the front and back halves can be separated until the top 1x8 tiles are applied. The two bluish-grey wheels on the top are an aesthetic improvement over the 2x2 round plates on 3180. Cab and tank are applied to the chassis, the wheels are attached ... ... and the truck is complete! We'll look at the overall appearance in the next section. The Complete Set Look! I put the stickers on! Actually, I enlisted the help of a passing monkey who did a demonstrably better job than I'd have done. Let's take a look around, starting with the sides. Both sides are similar; the right side has the 2x3 cupboard and a dark bley grille brick in place of the reel and clip found on the other side: The lines are smart; there are a few exposed studs above the reel/cupboard sections, but at least they are a consistent colour unlike the rear section of 3180. I particularly like the step in the red stripe from the cab to tank sections. The back end is a little 'square': made more apparent by the slight inward slope of the ladder. This can of course be corrected, but as we shall see the ladder tends to prefer this position. The cab looks quite imposing from the front, and is very realistic. It's helped by the sticker over the white 2x4 tile; if you look back to the first picture in this section, you can see how the sticker continues neatly the red and green stripes from the sides. From the back, you can see how the recessed grille tiles of the lower SNOT panel accept the end of the ladder. This is the cause of the inward-sloping ladder; if you don't like this, you can easily insert a 1x4 plate under those tiles, but this will cause the ladder to slope slightly the other way. You might prefer this. The exposed Technic holes of the large green and white curve-slope blocks are a little ugly - a fault carried over from 3180 - but it isn't too obvious. Features Now we can analyse how the features so proudly espoused by the box rear stand up to scutiny. Dude sits in cab, and doors open. As is frequently the case with LEGO trucks, getting the dude into the cab takes a little work - often you have to remove the windscreen as well as the white roof panel, which means the doors will come off too. In this shot, the gap in the black layer between the front headlights is a little obvious, but it isn't the end of the world. [There should be a little recess under between the two sets of headlights, caused by the cab suspension in this type of vehicle, but it's more pronounced because the black plates at the sides are set a stud back from the tiles; I don't think it would be possible to correct this. - Thanks Phazon for pointing this out.] Dave climbs the ladder in the second shot. I don't have much else to say about this. The hose-reel is really the centre-piece of Tanker sets. I remember being amazed by the hose in 1978's 671 Shell Tanker. As I recall, that one was simply a length of hose that you had to stuff into the cupboard - no winch mechanism there - but it was an awesome feature. Here, as in 3180, the reel winch is super. Dave's got a bit tangled here. Fancy a hot dog? Dave has mustard if you need it. Yes, I know, it's a fire extinguisher. As I mentioned before, it can be a little tricky to remove. It's not really an intentional feature, but the flick-fire parts atop the exhausts can be extended slightly for that 'RC' look, should that take your fancy. The bley parts on top of the black exhausts look a little odd. This is a good angle to admire the roof on the tank: the wheels are a smart improvement over 3180. Again not a feature, but it needs pointing out: The rear axles have an open space above, which exposes a red plate from the chassis. On the plus side, with the white 2x2 jumper and green 1x2 plates, this continues the Octan theme; I'd expect a real truck not to be painted in this area, and you can easily substitute these parts for bley or dark bley if the exposed colours bother you. Comparison I never applied the stickers to 3180, so in the interest of fairness I've made the comparison with the 'bare' 60016. To see the stickers on 3180, there's an official picture on Brickset. I actually prefer the newer cab front - even without the sticker, it's neater and more imposing than the heavily-grilled 3180. Here you can see the difference in the wing mirrors; each method has its advantages: 3180's mirrors are adjustable, but more fragile and prone to getting knocked; 60016's are longer, which may be more realistic, and rigid. Obviously, 3180 is a tractor-trailer (semi-container) arrangement compared to 60016's single chassis. 3180 is therefore longer, and more manouverable; in addition, it is perhaps a little more realistic: while examples of both types exist in real life, in the UK at least most tanker trucks you'll see on the road have a tractor-trailer configuration. The single-chassis tankers might be found more commonly at airports, for example. Less obvious is that 60016 is a taller model. It's also neater: a complaint of mine about 3180 was the exposed studs at the rear (see this picture from my rather embarrassing early review). As I've mentioned previously, the white tiles and bley wheels on top of the tank are smarter than 3180's studded round plates. Sadly, the little pump from 3180 has done a runner so I can't compare those. The difference in height is made clear in this front-to-front comparison: 3180's cab livery is a little fussy. I prefer the staggered red stripe on 60016; the red stripe on 3180 is absent at the front. 3180 gets a point for having a footplate enabling easier access to the cab; 60016's dark bley wheel arches are arguably less jarring than 3180's white ones. I'm not really sure about the necessity of orange beacons on the cab roofs of either; however, the rounded lights on 60016 are more realistic - and less obtrusive - than 3180's cones. Visible here are 3180's gearstick, and the provision of both mustard and ketchup! Conclusion 'Here - that'll be £2.98 for your five millilitres of petrol, sir.' Tanker trucks are a staple - a necessity - of the LEGO Town/CITY range and have been since 1978. 2013's latest addition provides a smart, attractive addition to the range, and its Octan livery is compatible with other fuel-carrying vehicles or features from the CITY and even Trains lines; it will even sit quite happily alongside the earlier 3180. As a standalone set, it's a little lacking in play features, though perhaps there is no less than we should expect; it is crying out for a new Octan petrol station to be added to the CITY range - we haven't seen one since 2007. I hope you'll agree 60016's tanker is a beautiful truck - the livery is clean and flatters the shape of the vehicle; its lines are smart and a definite improvement over some of 3180's rough edges; even the stickers look great! My only real criticism, aside from the somewhat lacklustre figure, are that as an single-chassis vehicle it lacks a degree of realism compared to most articulated tanker trucks that I see on a typical British road. Scores Design: 10 I think this is a beautiful truck. I simply love the colour scheme, which is brought to life by carefully-designed stickers, and which flatters the clean lines of the truck. The cab's front is tastefully rendered, and the whole very realistic - you could almost imagine you were looking at a scale model. Build: 8 Never repetitive, and with a few interesting techniques, it's a fun build, albeit perhaps better suited to a younger builder if you prefer a challenge. There are a good few tricks in SNOTting to be admired, and a minor lesson in offsetting in the build of the pump. Parts: 6 There really isn't much you probably don't already have in your collection, especially if you own 3180. The figure is rather old-hat and a little disappointing if you're on the lookout for new faces or torsos; I'd have preferred a quirkier set of facial features, for a start - as he is, Dave is a little devoid of personality. Playability: 7 Compared to some other CITY vehicles, there isn't much to do with this set on its own. It comes into life as a service vehicle for a larger town, and would be particularly happy accompanying the recent Airport set... but most of all, it's pining for a new Petrol Station. Please! Value: 7 £17.99 represents a significant hike of this price niche. The similarly-sized 'Collect them all!' sets from 2012 were all £14.99, as indeed was the 30-piece larger 3180. Inflation sucks, and I'm sure TLG knows what it's doing, but it's a little pricey for the collection of parts. The whole, however, is a thing of beauty, and I for one won't regret the outlay. Overall: 75% My score: 9/10 Aesthetics wins over arithmetic here - I love this. I think you will too. Thanks for reading - I hope you enjoyed the review! Please leave comments. Rufus Compare the evolution of the Octan tanker and my reviewing skills in my 3180 review! My flickr set If you like my reviews, and would like to learn how it's done, please consider joining the Reviewers Academy:
-
While some people build their brick cities with more and more cars and planes, I always want mine to be more than that. It should evolve with new technology. I bought the set 7686 for some parts, but what was left was for something more intriguing. I always have the idea to make a more futuristic plane. C'mon, with Tony Stark in my city, I guess the city can benefit from his technology! Haha, so I recreated the "chopper", and embrace the future with a new design! I did some sketches first, all based on the plane Orca in C&C computer game. So the team reassembled! The orange rescue and repair team now includes the standard flatbed truck 60017, and on the right it is my another MOC Wheel-lift Wrecker, and this time we are to see the middle truck, the Orca Carrier and its plane! I imagine that this technology is just new, and in later years when the world war breaks out again in the C&C era (like 2050-21XX I guess), the Orca is transformed to an attack fighter. Anyway, that means this little plane is a precedent to the Orca fighter! The truck, while carrying the plane and transporting it, also provides tools and supply for maintaining the plane. Hey man, time for a little flight test! Two full throttle engines make this plane fly better than a chopper, probably! Overview of the plane... The tail...you can also see the engines now move to horizontal position, which is a flying mode. There is a landing gear at the tail that can be folded up. The two floodlights are perfect for search and rescue work! The truck also has an outdoor-use radar and computer system, that helps the pilot to locate himself on the plane during rescue missions. Did you see the little + hole in the middle of the plane? That is where the "tool clips" are installed for different missions. I will show you more later here how that works!
-
Time has now come for me to put some vehicles in what is threatening to become a full layout After milling around these forums for a while and gathering inspiration, I have ventured to start my own projects. Some of you (forgive me, I am horrible with names....) have been upgrading classic Lego vehicles, and I couldn't help but to want to try it myself. Specifically the tv-van, one of my all-time favourite sets, caught my attention, so that is where I started. TV-van Here is my take on a 6 wide version. I struggled a bit with fitting two minifig's next to eachother and fitting in seats, but I think I managed allright. It's gotten a bit boxy, and seems quite short, but I find that I quite like that. From the front right: Rear left: Obviously the antenna folds out. And the van easily holds a camera and film rolls. Containercarrier: (Or whatever it is called... ) Luckily, my brother visited me and got the same idea, only with a different set. (I am working on bringing him out of his dark ages, and I am starting to succeed ) Here is what he came up with. It wasn't easy to make the loader work with a longer container, but he managed very well, I must say. We both agree that it is a bit too red in red, but for a first build in a long time, I think he did very well! Semi: And here the third and last one. A semi to pull the trailers of Lego Town. Again, it seats two minifigs, and I find it turned out quite well. And I found a place to use my chrome parts! It's always a bit of a struggle for me to fit the wheels in without the arches I see many use. (And have very few of...) But for a semi, this solution works fine for me. And lastly a picture of them all together! Hope you like it! Comments and suggestions are welcome Bregir out
-
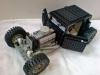
Not many people like 8-wide, but I'll keep making them anyway lol Here's not just a Super Duty, but Ultra Duty truck! I wanted to make more big 6x6 vehicles (like wreckers) but didn't want to keep buying bricks for all of them. So, the next best thing was to make this base truck and only build different modules for the bed. I kept the construction simple to maximize customizability. Notes -Going to add fender flares, I just need some 1x2 cheese slopes to stick on there -Can easily add extra axles, extend cab or bed, etc. -Can easily swap out modules to put on the bed -Can easily attach other things to front bumper by removing a few pieces -Roomy engine compartment This is a 6x6 version Here's the underside, very simple. Just use technic beams of a suitable size and reinforce them where needed. Use long 3L technic pins (I think they're only made in blue) to connect the wheels/chassis/axle together. Here's a shot with my Vactor 2100 and Wildland Ultra XT 6x6
-
I tried to get the best of both and make a mini Unimog container truck. This is the final result.
-

Zoli's Jumbo Ford F650 is a beautiful brute!
Saberwing40k posted a topic in LEGO Technic, Mindstorms, Model Team and Scale Modeling
So I was browsing Brickshelf recently, and I saw this: User Zoli made this, and here's his description: Maybe I wont build the whole truck. I only would like to test this type of chassis. I think with this idea I can build stronger and more realistic trucks. zoli_2004@freemail.hu It's big, and the chassis uses some very interesting construction techniques. Also big are the Brickshelf gallery pictures, so I'm going to have to provide a link instead of posting them in this thread. http://www.brickshel...ry.cgi?f=503056 Disclaimer: I did not create this model, I am merely posting it on this forum for the viewing pleasure of some of the members. All credit goes to the original builder. -
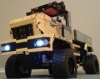
Some of you may have seen my Avengers Truck, and so I will make a little post about this MOC which was made quite some time ago :) Seeing the whole set of Avengers vehicles from Lego having only a plane (Quinjet) and a jeep (and now Nick Fury's car which I turned it into dark blue color to join the original color scheme), I feel it needs something a little more solid to complete the line. So I had the idea of a mobile command center, a truck. And it is coming! The truck built is actually quite easy, borrowing all the techniques you may have seen in different "great vehicles" from Lego City line. The back is built like in 7733 set. You may notice that the built of the truck head is different because of the height of the doors. I took them from the original Avengers jeep, and so the doors cannot be fitted in under the windshield normally. I therefore reverse the construction to make it work. The tail is a little different. I feel that the back bumper area of many Lego trucks are not well done. After many experiments I came with this 7-stud wide approach, giving it more solid protection and a more sturdy feel to the truck. Inside we have a a little command center with computers, and a gun rack at the back. No idea why Tony Stark always occupies that space for his suit transfer, but that can be the second use of the truck. (note the foot stand for Iron Man, the pointed piece indicates Mark VI suit which has triangle core at the chest; the other one is for Mark VII) The gun rack can actually be taken out (a little different you see here from above because recently I modified it :) the picture above is more recent). One can change the rack for different arrangements and types of guns as long as the width and height is maintained to be kept in the truck. I also modified the jeep as you see, because the original is just harmless! Now, the firepower is back for the Avengers! Hope you guys like my set!
-
 As part of SeTechnic's 16th Contest, PG52 / PG5200 posted this great Lego Technic Fire Truck which has both Lego Pneumatics and Linear Actuator mechanisms. His (narrated in French) shows it in action. Read more about it on SeTechnic (in the original French and in this English translation). One can change the Google Translate "To" language to match your native language for better understanding.
 -

Did someone try 2 L motor on an axle instead of a differential?
midengineaddict posted a topic in LEGO Technic, Mindstorms, Model Team and Scale Modeling
In my next 8x8 crawler project I have the intention of trying a setup with the two rear axle with 2 L motor each (a motor for each wheel). the two front axles only will steer with a servo, an L motor and a differential on each axle... and all axles will be floating with 4 links and horizontal chock absorber. Did someone know if its a goon idea or if a topic already talk about this setup? -
My winter village pub! Do you remember how terrifying it was being pulled about on a sled by a motorbike? I do... I always see great entries, and think, "I don't have enough bricks for that." My collection at university is only about 4000 bricks, but I figured it was about time to just dive in. So what if I don't have so many options, it means I have to use what I have better! I'm chuffed with how the lorry came out. It easily seats a minifig, and with a simple parts change (for a couple of pieces I don't have) it'd fit 2 side-by-side! And there's the delivery lady hefting a package from Santa. This is an exceptionally well-armed pub. The chimney is a cannon, and the mistletoe is actually missile-toe - mounted on flick fires! It's a pub worthy of calling itself the Brick Arms! For my accessory, I wanted to do a feed the homeless type thing. That's what Christmas means to me :) I'll try get some indoors shots up on my Flickr soon. I didn't have access to the camera for long, I'll keep you posted! Roughly 900-1000 pieces. 5 minifigs + 2 more inside who you haven't seen yet!
-
Do you ever get tired of the whiteness of winter? Come see some green inside the florist's shop! This entrepreneur provides flowers for every anniversary, wedding, prom, funeral, and holiday in Lego Town. The trusty delivery man sends out gifts to everyone in the town, while the roasted chestnut vendor sells his wares. Here you can see the entire layout, featuring the florist's shop, the delivery truck, and the roasted chestnut vendor. It looks like the florist has gotten in the holiday spirit with his wreath! Above the shop window, you can see the nursery where his seedlings are grown. This is where the magic happens. It looks like the man in yellow is buying mistletoe with his special someone in mind! When packages need to be delivered across town, the trusty delivery truck is always ready. With room in the back for large packages and space in the front seat for delicate parcels, the truck is ready for any delivery. What's in the package? The boy doesn't care, he just wants chestnuts. Thanks for viewing my MOC. For additional hi-res pictures, check out my Flickr gallery. I had fun building this, and C&C is welcome.
-
5 Huge Car Transporters
Ape Fight posted a topic in LEGO Technic, Mindstorms, Model Team and Scale Modeling
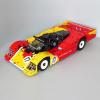
I thought this picture might interest a few Eurobricks truck builders. From left to right; Scuderia Ferrari (Ape_Fight), Ecurie Ecosse (TechnicNick), JPS Lotus (DeTomaso77), Alan Mann Ford (MortalSwordsman), Salzburg Porsche (DeTomaso77) Other MOCs in this group can be found here. -
Hello. I want to present you my new creation - Trial Crawler. The idea to make the crawler for trial appeared long ago, but had neither the time nor the energy, ideas. Having studied many designs, I decided at all costs to build model for trial. The main problem that I faced was the suspension. To reduce friction loss, I decided to put the motor on the axle. Patency at a decent level, but sometimes clings motors of obstacles. Features: - 4x4 with XL-motor - Steering with Servo-motor - IR-receiver v2 Suspension: That's all. Thank you for your attention. Your Sicil. Sorry for my bad english.
-
Micro RC truck
Tamas Juhasz posted a topic in LEGO Technic, Mindstorms, Model Team and Scale Modeling
I uploaded my smallest truck few days ago: Folder: http://www.brickshelf.com/cgi-bin/gallery.cgi?f=520763 My purpose was a very small trailer truck with remote control. The PF RC system rquired the trailer, in the tractor truck there is only space for one micromotor and the suspension. Total length is 42 stud, width is 5 stud in the truck, 6 in the trailer. The trailer's height is 10 stud at maximum. One old 71427 motor drives the rear wheel of the truck with universal joint: Then, 6 of the 12 tooth bevel gears make connection with the rear axle: The steering is done with micromotor. There is 4 functions in this moc: 1 driving 2 steering 3 Led lights in the back 4 suspension There is one receiver for the leds, so they(orange and red) can be controlled individually: Except the truck's driven axle, all axle has suspension. Front: http://www.brickshelf.com/cgi-bin/gallery.cgi?i=5733797 Trailer - the red suspension parts are from the city theme, I like these small live axles, they are perfect for here: The most tricky part was the tractor truck of course. Fortunately I have two large red doors from an old set, so I could do the truck with this looking: I know that the wheels are a bit small for this body, but who cares. If we take a look at this( http://www.autospies.com/images/users/cawimmer430/5678_1.jpg ), then it's not so big. The trailer is full with PF parts. From the front part there are: 71427 motor - AAA battery box - two PF receivers - leds. The few metallic silver grill plates cover the receiver's infra parts, so you can't see them, but the communication between them and the remote controller is still good: For the control the 8879 remote control is recommended, as can be seen in this video: Hope you like it. -

Building Drive: Secret Agents Support Truck
Kristel posted a topic in LEGO Action and Adventure Themes
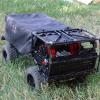
By popular demand ( i.e. a lone request from Captain Nemo ), I present my first ever MOC vehicle, the Secret Agent Support Truck! On the outside it looks like any other City truck modified into a refrigerated food transport / delivery truck: However, this truck is packed with the latest and greatest in surveillance and telecommunications equipment to support the modern secret agent, and enough flick fire missile power to blast any baddie into oblivion: A closer look at the state of the art surveillance equipment and the stash of spare flick fire missiles: Just in case there is any confusion, this is a support truck for the good guys. C&C welcome. This was a lot of fun to build, but I will fully understand if you feel a need to tell me that I should just focus on modular buildings! -
Here is my latest 6 wide. This time it's a delivery truck - i was looking for something to build for my wife's latest town setting and came up with this. This will be one I brick for sure as I have little (read none at all) in commercial vehicles in this scale. I just have to decide what I want to do colour wise, I'm limited in the side panel colour choices as well as the rear hinge/door assembly. All images link back to larger versions on my flickr feed. From the side: Some random but valid colour mixes: and lastly a POV Ray rendering of the front and back An LDD download can be found here on my MOCPages account