Search the Community
Showing results for tags 'LDD'.
Found 891 results
-
For my first post I'd like to share something I built a few months back. This is my first actual post so please do be gentle :P I decided to design a much more fleshed out version of the 60051 High Speed Passenger Train by adding various types of new custom passenger cars and locomotives. I implemented some ideas from the 10233 Horizon Express, which is quite noticeable from the pictures below (such as the all-black 10233 inter-car bogey). Firstly I wanted the design to be much more detailed and to use more advanced building techniques such as those seen in 10233 than what is standard for a City set. For instance, I wanted my passenger cars to be intermodal articulated (cheers Duq :P) to really catch that high speed train vibe. Additionally, it had to have functioning doors and fairly detailed interiors. However, common limitations prevented me from doing particular designs such as a restaurant car as an interior four studs wide simply would not be enough for me to create a bar/lounge that didn't look like it was being choked by the walls of the car. If anyone wishes to build/use the designs, I'm more than happy to upload relevant .lxf files for you all :) just be sure to credit me properly. So without further ado, have at it! 1. Inter-car bogey (10233 design in all-black) Express2 - Bogey by Bartybum, on Flickr 2. Short end coach Express2 - Coach End Short by Bartybum, on Flickr 3. Short coach middle Express2 - Coach Short by Bartybum, on Flickr 4. Short locomotive Express2 - Engine by Bartybum, on Flickr 5. Long coach middle (No end coach as of yet, as I'm yet to design one) Express2 - Coach Long by Bartybum, on Flickr 6. Long locomotive Express2 - Engine Long by Bartybum, on Flickr 7. Super locomotive (uses inter-car bogey and is therefore inseparable from the rest of the consist) Express2 - Super Engine by Bartybum, on Flickr At this point I asked myself, why stop at one storey? Why not follow the footsteps of the Metroliner and go double decker? Naturally I did :) 8. Two storey coach Express2 - Two Storey Coach by Bartybum, on Flickr 9. Two storey transition coach Express2 - Two Storey Transition Coach by Bartybum, on Flickr Obviously since this is Lego, you can switch around cars if need be, so you can make whatever configuration you want. Two examples: Express2 by Bartybum, on Flickr Express2.1 by Bartybum, on Flickr Since LDD doesn't do stickers the abrupt disappearance of red and dark grey from the nose looks just a bit jarring. Keep in mind that these designs are built with the implication of the stickers on the nose already being there. Now that all's said and done, just hit me up in the replies if you'd like .lxf files, more than happy to give them out :) EDIT: .zip files in reply section
-
The Hagah were an elite group of Toa assigned to Makuta Teridax. When his betrayal was uncovered, the six went rogue. All of them, except for Norik and Iruini, were captured and mutated by Roodaka into Rahagah. Norik and Iruini lasted a little longer before surrendering to the Vortixx and succumbing to her powers. The following designs are based off Demitsorou's drawings, particularly this Toa Hagah lineup. Norik, a Toa of Fire, was the leader of the Toa Hagah, Possessing infinite patience, unusual for a Toa of Fire, Norik was an exemplary leader and a hero. He wears the Great Kanohi Pehkui, Mask of Diminishment. Bomonga, a Toa of Earth, was the deputy leader of the Toa Hagah. He used to be a quiet type, preferring to work alone and employing stealth tactics. Despite that, got famous for wrangling a Tahtorak Dragon by using his Mask Power to become as large as the beast itself. Bomonga wears the Great Mask of Growth, shaped after Great Kanohi Hau. Iruini, a Toa of Air, may seem grim and even cynical, but deep inside he cares a great deal about his teammates. He used to be the only Toa Hagah to ever raise a concern over Rahi, showing his devotion to the safety of the Matoran. Iruini wears the Great Kanohi Kualsi, Mask of Quick Travel. Kualus, a Toa of Ice. Always eloquent and classy, even as mutated Rahagah, Kualus enjoyed the company of avian Rahi. He wears the Great Kanohi Mask of Rahi Control shaped after Great Rau. Gaaki, a Toa of Water, wears a Great Mask of Clairvoyance, shaped after Noble Kanohi Ruru. The mask has an unfortunate habit of activating on its own and impose great stress on its wielder, which made Teridax’s betrayal all that much painful for Toa Gaaki. Pouks, a Toa of Stone. He’s loud and boisterous and believes in direct approaches in everything, which makes him come off as brutally honest at times. Pouks wears the Great Mask of Emulation, shaped after Great Kanohi Elda. All models are made in Lego Digital Designer, rendered in POV-Ray and post-processed in Adobe Photoshop.
-
How to apply custom decals on LDD renders
BEAVeR posted a topic in Digital LEGO: Tools, Techniques, and Projects
You may have encountered it: you built a nice model in LDD, but it looks surreal because it lacks decorations on e.g. the minifigs. This tutorial is here to help you with that. In this little tutorial, I will try to explain how you can enhance the POV-Ray renders of your LDD models with custom decorations. You can design entirely new figures for example, or you can apply the decorations that aren’t available in LDD. My example in this tutorial will be a stormtrooper minifig. This figure lacks all decoration in LDD, and is commonly used in digital Star Wars builds. It gives me the opportunity to explain how to decorate surfaces that aren’t directly accessible in LDD, how to fit custom decals and explain the general principles. This method doesn’t involve any hacking and doesn’t require any sick programming skills (although the custom decorations might need your artistic talents…). And the best of all: all programs I use here are entirely free! I’ll be using Lego Digital Designer, LDD2POV-Ray, POV-Ray and Inkscape. So let’s get started! Decorate the target pieces in LDD LDD2POV-Ray, the program that will eventually place your custom decorations, can only replace already applied decorations. So firstly, you need to give the pieces you want to decorate a replacement decoration in LDD. Make sure to use different decorations for each surface, so that you later can keep track of which filler to replace with which substitute. Also, taking a screenshot for reference is not a bad idea to support your memory. But wait a minute… Some parts don’t allow for any decorations at all in LDD! Minifig torso’s are not a problem at all, but things like helmets are a whole different story. But luckily, there is an easy way to apply decorations that will work in most cases (no guarantees though!). You have to export your .lxf file to the LXFML format (File -> Export Model). This .lxfml file is actually a textual representation of your model. Among others, it contains a list with the placed parts, including their color(s) and decoration(s). To find your part, use the search function (Ctrl + F / Cmd + F) and type in: in which you replace 30408 (the designID of the storm trooper helmet in this example) with the designID of the part you desperately want to decorate. You can find this ID by clicking on the part in LDD and looking at the bottom left corner. If multiple of these parts are available, you can give the specific part a different color and check for the one that says materials=”26” in which you replace 26 with the number of the color you used (you can find this number by hovering over the color in the color menu in LDD). The key part is then to change the part that says decorations=”0,0,0” in which the amount of zeros dictates the amount of surfaces that you can decorate. If the line isn’t present at all, you’re out of luck and won’t be able to decorate your part. Otherwise, replace the zeros with valid decoration ID’s. It’s best to take decorations that are square and detailed (I will explain why later), so I suggest using the decorations of the 2x2 flat tiles. You can find these ID’s by placing some of these decorated tiles in your model, and check in the LXFML file what number is filled in in the decorations line of those parts. To make it easier for you, here are some handy decoration ID’s you can use: 73023, 63708, 99825, 55350, 63404, 601245 Then, save your file, and open it with LDD. You’ll see your parts are looking very ugly with those random decorations, but you’ll be happy to have decorations. You can copy these parts to a ‘normal’ .lxf file, and get rid of the parts you used to find the decoration numbers. Now we can move on to step 2! 2. Open your model with LDD2POV-Ray LDD2POV-Ray is a program that converts your LDD model into a file that can be rendered with POV-Ray, a ray tracer that simulates the behaviour of real light to simulate a realistic effect. You can set lighting etc, but more importantly, you can set your own decorations. To do this, go to the “Decorations” tab, and check the box “Use custom decorations”. A list will appear at the bottom, showing all the decorations you used. Clicking on them will reveal a thumbnail. Now you’ll be happy that you used different decorations to know which is which. You’ll notice that the decorations (unless they are square) are a bit stretched out. That’s because the program only accepts square decorations. So to load your own decorations, you’ll have to make sure they are square. Otherwise, they won’t cover the whole area you intended. If you already have your decorations (you found them on one of the indexes of the customisation forum here, for example), you can skip to step 4. Otherwise, I’ll give a brief account on how to make your own decorations in step 3. 3. Create your own decorations Personally, I make my decorations with Inkscape. It’s an easy to use vector based program. That means you can easily create very clean, smooth and crisp shapes. I’ll leave it to others to educate you in this nice software, but I’ll show you some general strategies to make accurate decorations. When working on complex curved shapes, like the storm trooper helmet, you won’t know for certain how your image will be mapped to the surface. That’s when the screenshot you took comes in handily. Because you have used decorations with a lot of detail (if you’ve been following properly!), you can easily see how the image is deformed and placed on the surface. You can identify the regions where you want your details to come, look to what part of the placed decoration it corresponds, see what it looks like in its flat state (you can see this in the thumbnail in LDD2POV-Ray), and place your detail in the according place. So in the example of the storm trooper helmet, you can see that the mouth should somewhere at the center of the graph. LDD2POV-Ray shows that that graph is a bit above the, so now you know you have to place the mouth around the center of your decal. When you’ve finished your decoration, you have to make sure your decoration is square. This will most certainly occur when you’re designing decorations for minifig torsos. If you leave it in its actual proportions and plug it in LDD2POV-Ray, you’ll see that the image doesn’t fill the whole area, compared to the stretched out decoration you have to replace. So you resize your decoration. In Inkscape, simply go to the top, where you can enter dimensions. Then you go to File -> Export Bitmap and a dialogue box will pop up. Make sure to select ‘from selection’, and that the amount of pixels of your image is high enough. Otherwise it will look pixelated in the render. Finally, chose .png as file format, and remove the background color of your decoration. Because it might look like the right color in Inkscape, but in your render it will look like the decal has a different color than the body, which isn’t what you wanted. So now you have your parts temporarily decorated, and you got your custom decorations ready. So time to replace them and render them. 4. Render your decorated model Firstly, you have to load your new decorations in LDD2POV-Ray. There are multiple ways to do this, but the easiest method is to select the decoration you want to replace and then click on the empty canvas. A window will pop up to allow you to select your decoration. Just select it. Repeat for the other decorations, making sure you replace the right decoration with the right replacement (that screenshot will come in handy now, especially since you can’t have both LDD and LDD2POV-Ray open at the same time at this moment!). Then you can fiddle around with different settings like lighting etc. For test renders I suggest to place in the first tab the slider on the lowest positions: ‘LDD geometry’. This will result in slightly less good, but much faster renders, allowing you to quickly get feedback about your decorations, so that you can adjust placement and proportions. For flat parts this won’t be necessary, but it can help for curved parts. That’s why I included the TIE pilot in the render. You can see the ensignas are slightly deformed. That’s not my intention, but I already predeformed the circles in the decal, so that it looks more or less round on the surface. You’ll have to experiment a lot with these ones. Anyway, when you're satisfied and feel the need for a more glamorous render, you can turn 'render with visible bevels' on in the slider bar, and wait for some time. You'll get something like this. Hopefully now you know all about rendering your custom minifigs, making your models more realistic. I hope to see some around! Anyway: happy rendering of your minifigs! If anyone is interested in downloading the decorations I designed for the stormtrooper (for now without back printing) and the TIE pilot (torso printing already present in LDD), have a look at this page. Hope you've found this useful. -

HELP! LDD crashes upon saving!
Lyichir posted a topic in Digital LEGO: Tools, Techniques, and Projects
For the past two days I've been experiencing a never-before-seen issue with Lego Digital Designer, and while I previously mentioned it in the bugs and brick errors topic, that got no response and I think the issue is significant enough to merit its own topic. Basically, whenever I try to save a new file on LDD, the program crashes. Generally this happens partway through saving, resulting in a tiny, unreadable LXF file with the name I had chosen for the new file. I can load, edit, and save previously-made LXF files just fine, but if I try to "Save As" under a new name, or save a new model for the first time, the program crashes. For reference, I'm using LDD 4.3.8, the current version (which I did try uninstalling and reinstalling to see if it fixed the issue—it did not). My computer is a mid-2012 15-inch MacBook Pro, running OSX Yosemite version 10.10.2. My computer was recently serviced at an Apple Store, where the AirPort wireless receiver was replaced, but I don't know how that could be to blame—particularly considering that saving new files with other programs works normally, and LDD itself functions properly apart from the inexplicable and crippling inability to save new files. Google has been no help at all in terms of finding a solution (or even anyone who can corroborate the issue), and while I have contacted Lego customer service to see if they could report the issue to the LDD team, I'm unsure whether they'll be able to figure out the cause of my problem. As such, any assistance from the Eurobricks community would be greatly appreciated! -
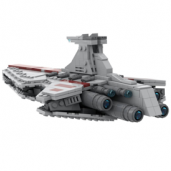
Post #1 - October 6, 2018 I was originally inspired by @krisandkris12's Venator. While waiting for his instructions, I decided to give the venerable ship a try, albeit at a slightly smaller scale. The ship is currently 37 studs in length, which makes me even more excited for @onecase's ISD instructions as they'll scale very well together. This is a rough pass at it, and a lot still needs to be improved. A couple of future changes include... -Turrets needs to be spread out more -Backside taper of the bridge is too shallow -Trenches are currently hollow -Needs more engine detail -Nose turbo lasers need a hull recess -A myriad of other subtle inaccurate details Update - October 10, 2018 Summary of changes - Fixed tail - Changed bridge from brick build to plate build - Added detail around turbo lasers - Added trans blue 1x2 to side hangar bays and closing doors - Changed engine detail and layout Update - October 14, 2018 Summary of changes - Lowered the top two hull pieces by one plate to make the spine protrude and to make a shallower profile front and back. -Switched to stud.io since LDD didn't have the 2x2 corner tiles. Update - October 17, 2018 Summary of changes - Made the tail taller -Changed length of small and large engine - Moved the command tower forward and added tiling on the side - Filled in the trench a little better -Widened the ventral hangar bay
-
I downloaded LDD just 48 hours ago and got right to work on designing a hopper car. Well eight hoppers to be exact. I know they just look like simple color changes but the first one took me the better part of eight hours. Then I spent many more hours getting familiar with groups and templates. Simultaneously I hand keyed them into Bricklink and spent many more hours getting them from about $90 per car to the to $40-$50 range with careful parts and color editing. So now I have a choice to make, I'm going to order parts for three cars and want your input. Which colors combinations do you like the best and why? Most favorite and least favorite? I also welcome any opinions, or suggestions. They are 24 studs long and I won't be making any changes to their length. Thanks in advance, hope you like! -Scott Link to .lxf file. https://drive.google.com/file/d/1e9qqypkfY-aygmPB61na6wNFS1eNDONc/view?usp=drivesdk Link to a high quality pic. https://photos.app.goo.gl/MgeiD3S4d71siK5c2
-
This is a modified version of 75193, designed to look like the Millennium Falcon as seen in Solo: A Star Wars Story. Featuring its signature blue and white color scheme, this model includes a Lando Calrissian minifigure that can be seated in the cockpit as well as a detachable front pod. Please leave your comments or suggestions below! I'd love to hear what people think of my creations!
-
As requested by Inkpanther in my last thread on the EAS Agamemnon, here's another B5 MOC! This time it's just in LDD/LDraw, but the renders give a pretty decent idea of how it might look IRL. Front (got guns?): Side (oh yeah, don't forget the missile launch tubes as well as the guns ): Top shot (new greebles, new parts, another view of dem guns): If you're familiar with the reference material, or if you've seen the other thread, the Nova-Class Dreadnoughts are predecessors to the Omega Class Destroyers - without the rotating section but with a ridiculous quantity of guns and slightly fewer Starfuries. This beastie is for takin' names and kickin' megablocks. As a result, it wasn't much work to translate the Agamemnon into what I want to call the Schwartzkopf. The reference images I used are the Antares, but I prefer the one that was a topical reference (well, it was at the time!) to Stormin' Norman. Stats-wise, this one is 104 studs long (still legally a SHIP, right?), 30 tall and 20(ish) wide - or about 83x29x16cm. It contains 3720 parts, almost exactly 1000 less than the Agamemnon. I don't think I'll build this one in the brick (I'd have to make a UCS plaque) but just in case, I put the plaque holder on the opposite side of the stand from the Agamemnon so that they could face each other head-to-head on display at home. The model has 5 not 7 "ribs" in the midsection compared to the reference shot of the Antares but I'm fine with that - it fits my scale better so I'm taking artistic license. After placing the side-panels in the LDraw version, I can tell there could be some brick alignment issues with them around the midsection that would require a minor redesign of those, but they could probably do with a minor tweak anyway. The full Flickr album is here. As well as the renders there are a few reference pics I cribbed from the web, including a side-by-side comparison of a Nova and an Omega. Hope you enjoy it!
-
Due to the suggested image size limitation, the images will be redirected to a gallery.
-

[LDD Technique] "Clip Drag"
The Mugbearer posted a topic in Digital LEGO: Tools, Techniques, and Projects
I have decided to record a little trick I am using in LDD to finely position my MOCs. I hope you'll find it useful. -
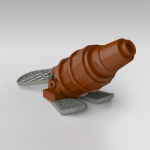
This model is the last of the original Museum of Transportation vehicles I have planned on buying, but that doesn't mean I won't have more in the future... who knows what may happen. This model will be built at some point in 2019. Real World Background: Here is Union Pacific rotary snowplow 900081. It was designed and built in 1966 at the UP Omaha shops, and is the heaviest rotary snowplow ever built, weighing 367,400 lbs. Three or four diesel locomotives, which were controlled from the non-propelled plow, pushed it at four to six mph. The snowplow is powered by an EMD 16 cylinder 3,000hp turbocharged diesel engine that drives an electric generator, which provides power to turn the 12’ rotary blades at up to 150 rpm. A steam generator provided heat to the cab and can thaw out the blades if they became frozen. This rotary snowplow was last used in Green River, WY in the mid 1980’s, and it was donated to the Museum of Transportation in St. Louis, Missouri in 1994 by the Union Pacific, where it is still seen today. LEGO model notes: I was inspired by Dr_Spock_888 and his rotary snowplow to build my own way back in 2014. Needless to say, it the originally 8 wide model didn't come out quite right at that time, so I put it aside for quite some time. I just recently remade the model into a 6 wide body with a 10 wide blade section, and have have smoothed out the roof studs with tiles. As before, the words "UP" (the initials of the former owner Union Pacific) should go on the studs towards the middle, while "900081" should go on the studs in the center in printed 1 x 1 tiles, right below the two UP tiles. The blades are actually part of Dr_Spock_888's design, but mine do not move with the train like his... mine are not connected to the wheels on the track, and do not move unless you spin them with your hand. Inspiration: (Photo by Wampa-one from Flickr, not me) Complaints, suggestions, thoughts, & compliments are always welcome!
-
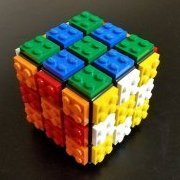
This...is not finished yet. I have yet to make the lobby floor, and create the antenna tower. For now I'm fairly stuck at the lowermost and uppermost areas of both the Studio Center (smaller building) and Broadcast Center (larger building). I also think it looks far too slab-sided to work in a realistic setting. I have ideas (like grafting chunks of the building), but what else can you give me?
-
I'm a big fan of police cars, and the Lego Movie uses one that I intially thought was custom made for the movie. This is the four wide police car that is used mostly in background scenes, though it does show up en masse after the escape from Bricksburg. After spending some time reverse engineering it from the various scenes, I realized that the model is actually a slightly modified civilian car that was released in 2012 as 4435 Car and Caravan (the trailer hitch is the giveaway) with influences from 4436 Patrol Car. The car appears to be Black and Light Grey in the movie, which I changed to white because some of the main parts don't exist in light grey, such as the wheel arches. I also added red and blue lights behind the main headlights, though these were my personal preference. Interestingly enough, the roof piece in black does not yet exist and won't until the release of 60097 City Corner later this year. When that set is released, I'll be building several of these to put in my own town. EDIT: Turns out Mark2 has an error in the lights. Instead of using two 99780 Inverted brackets and one 1x2 plate, it should have been one Bracket 1x2 - 1x4 and two 1x4 plates stacked on top of each other. Mark5 has this corrected. LDD File: Lego Movie Police Car - Mark5.lxf Lego Movie Police Car - Mark2.lxf
-
The Battle of Utapau... one of the penultimate battles of the Clone Wars. Obi-Wan Kenobi and the 212th Battalion fight to destroy the CIS and General Grievous in a massive assault. This MOC acts as a playset, including environmental elements and both sides of the battle with a variety of play features to boot! Contains 337 pieces 3 Minifigures Obi-Wan Kenobi 2x 212th Clone Troopers LM-432 Crab Droid 6 individually-poseable legs Octuparra Tri-Droid 3 individually-poseable legs Rotating head 3 stud shooters Platform Minifigure catapult I would love to here your comments and suggestions regarding this model! I also have the .LXF file available upon request, just PM me!
-

Help needed with ordering parts for an LDD Model
Bricked1980 posted a topic in Digital LEGO: Tools, Techniques, and Projects
Hi everyone I have a model set up in LDD and I am now at the point where I'd like to order parts to build the model with real bricks. The problem is that many of the parts are not available in the colours I've used. Does anyone know of a simple way of showing the parts that are unavailable so that I can swap them out for colours that do exist? Or is it simply a case of painstakingly going through the model and checking each brick one at a time? I wasn't sure if there is a way of uploading the model to Bricklink so that it automatically highlights the missing parts and shows alternative colours that are available instead. Sorry if this sounds like an obvious thing to most people. I'm a bit of a novice with this though and although I've built lots of models in LDD I've never actually ordered parts for the models before and have quite limited experience of using Bricklink as well. -
 In this topic you can ask help if you don't find a piece in LDD. You can also ask here about any doubt regarding part IDs, duplicate parts and the use of a specific part present in LDD. Before asking, try the hints listed below. Ensure that the Extended Mode is active The extended mode allow access to all the bricks included in LDD in each colour. To activate Extended Mode go to: Menu -> View -> Theme -> Extended Mode . . . [Image] Use the Search Field The search field is the textfield above the Bricks Palette. . . . [Image] Enter there the ID of the brick you are looking for, or any plausible word that could identify the brick you are looking for. Note that the IDs and the descriptions in LDD are the official LEGO ones, and could differ from those you can find consulting other sources such as Bricklink, Peeron, etc... Check the work of other users As last resource, check the index of the Official LEGO Sets made in LDD topic looking for the sets that uses the part you need. If you find it you can select it and read its Design ID in the bottom bar, then easily find it using the LDD integrated search function. Other Useful Tools LDD Part Finder (beta) Could be you can find useful this little software developed by the user DrFalken. You can find more informations here. Bricklink and LDD Manager If you know a set that uses the brick you are looking for, you can: - Obtain the part ID from Bricklink - Use the "Brick Finder" function in LDD Manager to convert the Bricklink ID to the LEGO Element ID Otherwise you can use LDD manager function "Search for attributes". Old related topics: Where to find these pieces in LDD Finding a dinghy in LDD CMF Decorations in LDD 4.3.6, Series 1-9 ...
 -
Hello! Maybe someone remembers that digital Invisible Hand MOC I made a year ago. I still made some digital MOCs in my free time. This time I have made a digital MOC based on the Nebulon-B escort frigate. It was a ship I always wanted to see released as an official set. Sadly, TLG have focused more on unknown Clone Wars vehicles in the last years. But knowing the inaccuracies the hypothetical official set would probably have, I decided to design my own version. I want this model looks closer to a real set than a MOC, so I have included some features for minifigures to make use of the internal space. It contains a small surgery suite, a bacta tank, the cockpit, and there was even space for a small Hoth rebel carrier. I have also made a small Millennium Falcon for size comparison, like some UCS sets. I hope you like it. Otherwise, write your discrepancies in the comments. Brickshelf folder
-
Hell again, wanted to share another moc I made, this one was more ambitious, and contains a lot of pieces for such a small model. I quite like trucks, semi's etc, so I did a whole series of them in LDD, and took the plunge to get the actual bricks to make one, the Shell Tanker. It's a little nod to set 671 Sgell Petrol Tanker which I had as a a kid. It's a small model only 4 studs wide, but I tried to put as much detail as I could in it. such as the mirrors on the cab, smokestack, shovel for spills ;). I had an idea for the trailer, borrowed from the small enterprise I did, which worked out well for a rounded brick based tanker. The cab on it's own, with the mirror showing, it's own petrol (gas) tanks, smoke stack and shovel ;) The trailer has a kick stand to support it on it's own when detached from the cab, and I tried put in some details as best I could such as the control gages tile and valve in this shot; On the other side, the hose connectors to supply the fuel at the Lego Town petrol station: A last shot of the whole tanker, from a different angle: A few more photos on my Flickr: MOC Shell Tanker Thanks for looking again, and hoped you liked it. As a final thought, with some colour changes, this could become an Octan Tanker as well.
-

How to connect housing and gear-rack in LDD
hodib posted a topic in Digital LEGO: Tools, Techniques, and Projects
Hello, I have a question about Lego Digital designer. I would like to connect these 2 elements, housing 2x15x3m (#18940) and gear-rack 14x2m (#18942). Can somebody know if is this possible or not? Thank you in advance. Regards, Mark -

[Recurrent Requests] Make an assembly in LDD (Ask here for help)
legolijntje posted a topic in Digital LEGO: Tools, Techniques, and Projects
This is a general topic for everyone to ask for help making a certain assembly in LDD. We have a topic like this for finding parts in LDD, so a topic for this would be useful too. [Hopefully, I can fill this first post with tips and tricks I can find in the forum in the next days/weeks.] Anyway, if you need to assemble something, you can ask here for help! -
Pictures of the new Conveyex Transport Set are on youtube for about an hour now which is a nice set. I´ve built a model of it two days ago. Because this was my first project completly built with LDD and I´m not very familiar with LDD, I´ve only built the upper half of the train and without any tracks. The train itself: The inside of the cockpit: The inside of one the waggons: A Coaxium Storing-Box: UPDATE: Edited Trail and second train (for more pictures look at my comment below)
-
This is a WIP of a project I'm excited for.. So far,I've built a computer area, and driving strip for the Batcave.
-

LDD Tip: Controlling "floating objects"
swijak posted a topic in Digital LEGO: Tools, Techniques, and Projects
I have created a brief example of how to manipulate "floating objects" in LDD on flickr here: Enjoy! -
Bluerender Colors Grey and Silver
swijak posted a topic in Digital LEGO: Tools, Techniques, and Projects
I created a grey and silver reference for those that are interested: I'll post other colors as time permits. Enjoy. -
Help with Digital Renders
Bricked1980 posted a topic in Digital LEGO: Tools, Techniques, and Projects
Hi everyone I'm a regular on Eurobricks but this is the first time I've posted anything in the digital building forums. I've recently started to design MOC's using Lego Digital Designer and this is my first creation... All the images were rendered using Blue render which I like because it's fairly fast and incredibly easy to use. I was quite happy with these images but then I saw a few other renders that people have created online and am blown away by the quality of them. Some of them are so good that it's hard to tell they aren't built from real bricks. Can anyone suggest to me, the best software or method of rendering images from models created in LDD. I've tried POV Ray but am not that impressed with the results. Even in top quality the renders seem to have a fake looking sheen that makes them look artificial and almost as if they've been shrink wrapped in plastic. It also takes hours to render the images on my PC using POV Ray. I've been pouring over other threads in the forum and have read a lot about people using Blender. As far as I can tell though the only way of getting LDD models to open in Blender is by converting them to LDraw files first. When I tried this though it messes up a lot of the bricks in my model. Similarly I tried importing them in to Mecabricks but this messes up any bricks that have printed elements on them. Does anyone know of another way of getting LDD files in to Blender directly without it messing up the models? From what I've seen, Bluerender seems to be the most user friendly option for creating renders. I read somewhere on here that a "Sunflow" patch had been created for Bluerender which gave a more realistic result with better detail and the Lego logo on each stud. When I followed the link to download this though it redirected me to a different site, so I assume this patch has since been removed. So I'd be very grateful if anyone could suggest anything I can do to make my renders look more realistic or suggest any other software or methods that might give a better result. Thanks!