Search the Community
Showing results for tags 'decal'.
Found 40 results
-
Hello, I have been designing some custom LEGO stickers lately and I'm really enjoying it, I have found this place near me that prints good quality vynil stickers. The problem is that these stickers are quite thick, so they won't work for example for the legs, cause they come off when the leg bends. Same for the heads when putting on hair. Is there thinner vynil sticker paper that would work for the legs? What's your experience? I'm also considering waterslide decals, I've read the tutorials here on the forums. I couldn't find any recent example of custom minifigures made using this technique, can anybody share some hi res photos? Also, is there any way to print light colors on dark pieces with waterslide paper? Thanks! ;)
-
Getting official minifigures into studio 2.0?
YourLocalJedi posted a topic in Digital LEGO: Tools, Techniques, and Projects
Can I get them by anyway? I tried with importing from sets but it didn'twork out. I could do with part designer if I had decals but I don't know where to find them. -
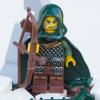
Hi everyone, Here are some custom decals I created, based on the official LEGO Rohan Soldier design. Feel free to use (and modify them), but please give me credit if used for commercial purposes. Thanks, ~RBC MODS/ADMINS, FEEL FREE TO ADD THESE TO THE CASTLE DECALS INDEX. Thanks!
-
So I've felt inspired and decided to get back into making custom minifigure designs. Joaquin Phoenix's Joker More to come!
-
How to apply custom decals on LDD renders
BEAVeR posted a topic in Digital LEGO: Tools, Techniques, and Projects
You may have encountered it: you built a nice model in LDD, but it looks surreal because it lacks decorations on e.g. the minifigs. This tutorial is here to help you with that. In this little tutorial, I will try to explain how you can enhance the POV-Ray renders of your LDD models with custom decorations. You can design entirely new figures for example, or you can apply the decorations that aren’t available in LDD. My example in this tutorial will be a stormtrooper minifig. This figure lacks all decoration in LDD, and is commonly used in digital Star Wars builds. It gives me the opportunity to explain how to decorate surfaces that aren’t directly accessible in LDD, how to fit custom decals and explain the general principles. This method doesn’t involve any hacking and doesn’t require any sick programming skills (although the custom decorations might need your artistic talents…). And the best of all: all programs I use here are entirely free! I’ll be using Lego Digital Designer, LDD2POV-Ray, POV-Ray and Inkscape. So let’s get started! Decorate the target pieces in LDD LDD2POV-Ray, the program that will eventually place your custom decorations, can only replace already applied decorations. So firstly, you need to give the pieces you want to decorate a replacement decoration in LDD. Make sure to use different decorations for each surface, so that you later can keep track of which filler to replace with which substitute. Also, taking a screenshot for reference is not a bad idea to support your memory. But wait a minute… Some parts don’t allow for any decorations at all in LDD! Minifig torso’s are not a problem at all, but things like helmets are a whole different story. But luckily, there is an easy way to apply decorations that will work in most cases (no guarantees though!). You have to export your .lxf file to the LXFML format (File -> Export Model). This .lxfml file is actually a textual representation of your model. Among others, it contains a list with the placed parts, including their color(s) and decoration(s). To find your part, use the search function (Ctrl + F / Cmd + F) and type in: in which you replace 30408 (the designID of the storm trooper helmet in this example) with the designID of the part you desperately want to decorate. You can find this ID by clicking on the part in LDD and looking at the bottom left corner. If multiple of these parts are available, you can give the specific part a different color and check for the one that says materials=”26” in which you replace 26 with the number of the color you used (you can find this number by hovering over the color in the color menu in LDD). The key part is then to change the part that says decorations=”0,0,0” in which the amount of zeros dictates the amount of surfaces that you can decorate. If the line isn’t present at all, you’re out of luck and won’t be able to decorate your part. Otherwise, replace the zeros with valid decoration ID’s. It’s best to take decorations that are square and detailed (I will explain why later), so I suggest using the decorations of the 2x2 flat tiles. You can find these ID’s by placing some of these decorated tiles in your model, and check in the LXFML file what number is filled in in the decorations line of those parts. To make it easier for you, here are some handy decoration ID’s you can use: 73023, 63708, 99825, 55350, 63404, 601245 Then, save your file, and open it with LDD. You’ll see your parts are looking very ugly with those random decorations, but you’ll be happy to have decorations. You can copy these parts to a ‘normal’ .lxf file, and get rid of the parts you used to find the decoration numbers. Now we can move on to step 2! 2. Open your model with LDD2POV-Ray LDD2POV-Ray is a program that converts your LDD model into a file that can be rendered with POV-Ray, a ray tracer that simulates the behaviour of real light to simulate a realistic effect. You can set lighting etc, but more importantly, you can set your own decorations. To do this, go to the “Decorations” tab, and check the box “Use custom decorations”. A list will appear at the bottom, showing all the decorations you used. Clicking on them will reveal a thumbnail. Now you’ll be happy that you used different decorations to know which is which. You’ll notice that the decorations (unless they are square) are a bit stretched out. That’s because the program only accepts square decorations. So to load your own decorations, you’ll have to make sure they are square. Otherwise, they won’t cover the whole area you intended. If you already have your decorations (you found them on one of the indexes of the customisation forum here, for example), you can skip to step 4. Otherwise, I’ll give a brief account on how to make your own decorations in step 3. 3. Create your own decorations Personally, I make my decorations with Inkscape. It’s an easy to use vector based program. That means you can easily create very clean, smooth and crisp shapes. I’ll leave it to others to educate you in this nice software, but I’ll show you some general strategies to make accurate decorations. When working on complex curved shapes, like the storm trooper helmet, you won’t know for certain how your image will be mapped to the surface. That’s when the screenshot you took comes in handily. Because you have used decorations with a lot of detail (if you’ve been following properly!), you can easily see how the image is deformed and placed on the surface. You can identify the regions where you want your details to come, look to what part of the placed decoration it corresponds, see what it looks like in its flat state (you can see this in the thumbnail in LDD2POV-Ray), and place your detail in the according place. So in the example of the storm trooper helmet, you can see that the mouth should somewhere at the center of the graph. LDD2POV-Ray shows that that graph is a bit above the, so now you know you have to place the mouth around the center of your decal. When you’ve finished your decoration, you have to make sure your decoration is square. This will most certainly occur when you’re designing decorations for minifig torsos. If you leave it in its actual proportions and plug it in LDD2POV-Ray, you’ll see that the image doesn’t fill the whole area, compared to the stretched out decoration you have to replace. So you resize your decoration. In Inkscape, simply go to the top, where you can enter dimensions. Then you go to File -> Export Bitmap and a dialogue box will pop up. Make sure to select ‘from selection’, and that the amount of pixels of your image is high enough. Otherwise it will look pixelated in the render. Finally, chose .png as file format, and remove the background color of your decoration. Because it might look like the right color in Inkscape, but in your render it will look like the decal has a different color than the body, which isn’t what you wanted. So now you have your parts temporarily decorated, and you got your custom decorations ready. So time to replace them and render them. 4. Render your decorated model Firstly, you have to load your new decorations in LDD2POV-Ray. There are multiple ways to do this, but the easiest method is to select the decoration you want to replace and then click on the empty canvas. A window will pop up to allow you to select your decoration. Just select it. Repeat for the other decorations, making sure you replace the right decoration with the right replacement (that screenshot will come in handy now, especially since you can’t have both LDD and LDD2POV-Ray open at the same time at this moment!). Then you can fiddle around with different settings like lighting etc. For test renders I suggest to place in the first tab the slider on the lowest positions: ‘LDD geometry’. This will result in slightly less good, but much faster renders, allowing you to quickly get feedback about your decorations, so that you can adjust placement and proportions. For flat parts this won’t be necessary, but it can help for curved parts. That’s why I included the TIE pilot in the render. You can see the ensignas are slightly deformed. That’s not my intention, but I already predeformed the circles in the decal, so that it looks more or less round on the surface. You’ll have to experiment a lot with these ones. Anyway, when you're satisfied and feel the need for a more glamorous render, you can turn 'render with visible bevels' on in the slider bar, and wait for some time. You'll get something like this. Hopefully now you know all about rendering your custom minifigs, making your models more realistic. I hope to see some around! Anyway: happy rendering of your minifigs! If anyone is interested in downloading the decorations I designed for the stormtrooper (for now without back printing) and the TIE pilot (torso printing already present in LDD), have a look at this page. Hope you've found this useful. -

How to Obtain Custom Stickers? Boeing 10177 , F1 8458
fcp4life posted a topic in LEGO Technic, Mindstorms, Model Team and Scale Modeling
I just picked up the Boeing 787 Dreamliner (10177-1) and the Silver Champion (8458) and was wondering how I can go about adding my own livery to each of them? or if at all possible? Such as getting custom stickers created? is there a website or program that would be helpful in creating custom stickers for these sets? **UPDATE COMPARISON BETWEEN SILVER CHAMPION 8458 AND MCLAREN MP4/14, MERCEDES MGP W01, F1 CARS** LEGO F1 SILVER CHAMPION 8458 1999 MCLAREN MERCEDES F1 MP4/14 2010 MERCEDES-PETRONAS F1 MGP W01 -
I've recently come out of my Lego "dark age" and started rebuilding some of my old sets. I was never one to keep sets together very long, so naturally i've lost a lot of stickers. One of my other hobbies is classic bicycles, which often share the dilema of missing or damaged art. This method for producing decals was taught to me by a clever artist on a popular bicycle forum, so he really deserves any and all credit. This method is simple and inexpensive and much of the materials are common. I assume the trickiest part for most people will be producing the art. I happen to have Adobe Illustrator at home, so I am able to create my own vector art files. I believe other cheap, maybe even free software exists. Sometimes high quality art can also be found as images on the web. On to the step-by-step: 1) Produce the art. Use a laser printer and any cheap printer paper. Laser printing is key... if you don't have one, you could try any of the copy shops around. As mentioned, I used Adobe Illustrator. I am replacing the decals for 6594 Gas Transit. DSC04389 by mkeller234, on Flickr 2) Cover the art with packaging tape. DSC04390 by mkeller234, on Flickr 3) Burnish the tape onto the image. I use scissor handles and rub over the tape surface. You will be able to see which areas have bonded well. It doesn't take much effort. DSC04391 by mkeller234, on Flickr 4) Cut the decals out. The closer, the better. I usually follow the shape of the art, but it doesn't really matter. DSC04392 by mkeller234, on Flickr 5) Submerge in water DSC04393 by mkeller234, on Flickr 6) Once the paper is saturated, it can be rubbed away with light pressure from your thumb. Remove as much paper as possible. DSC04394 by mkeller234, on Flickr As you can see, the decals are clear. This is both a blessing and a curse. I happen to be positioning these over white bricks, so the colors will look nice. For use with dark bricks, you will need to either paint the back with white paint, or find a printer that can print white (ALPS). DSC04395 by mkeller234, on Flickr 7) Place the decals on your model. These decals are very forgiving and can be slid around easily. They stick on their own without glue. Make sure you allow them to dry completely before really handling them. 8) Admire your work! DSC04399 by mkeller234, on Flickr DSC04398 by mkeller234, on Flickr Ahhh... the teeth marks of my youth. DSC04400 by mkeller234, on Flickr Lego trucks sure have changed since I was young. I love the detail in these new models! DSC04401 by mkeller234, on Flickr
-
Hey, all! here is my collection of decals, i will add a reply with every finished decal. These are full minifigure decals only. If you want to use them, just let me know and make sure that the width and height stick in proportion when resising, and that the width is between 3 and 4. you may need to adjust according to the computer/ document program you use. Enjoy! also, luxor, if you could add these to the database. I will give a title for these and a genre, so yu can put them in the correct spot. Thanks!
-
Hi I'm using lego digital designer and I hope I'm not the only one who does this, but I love making my own brick decals or "stickers" by using this method:http://www.rockraidersunited.com/topic/5399-tutorial-adding-custom-decals-into-ldd/ or some other website I forget. But I cant add a decal to this door piece, (58381) I do what the instructions from the link above told me, It works for most pieces but not this one please help.
-
Hi Over the course of the past month I've been learning the basics of LDD, LeoCad and Blender to make a Minifig portrait of friends. My first attempt turned out pretty good, so I've decided to do some more for other friends and family. I use LDD to make the models, then export to LeoCad to tweak and then export to Blender to render the final image. The first couple have gone okay, but I've hit a problem that I can't get around. I've searched the web and mostly this forum but as a novice I may be looking in the wrong place. Exporting from LDD there are some pieces that are not in the LeoCad library. I've tracked down some pieces and added to my library successfully, but it seems some head and torsos are missing and I can't find them anywhere. (See image below) How can I get around this? Any help would be greatly appreciated.
-
-Redimensionne(25)-MozillaFire.thumb.jpg.24c9fc6c3fc4cb0b5a56446772e229b7.jpg)
The BATMAN's ROBE from Lego Batman, the movie (robe de chambre)
DEFCON SHARK posted a topic in Minifig Customisation Workshop
Hello Everyone ! Long story short : After i watched Lego Batman the movie i wanted to see if the robe was real or only virtual. It was only virtual. So i decided i was going to make it real. Here is the preview of the file opened in Inkscape : Result once on the minifigure : Progress from the prototype to the last version : And here is the PNG file to print in A4 format : It took some time and work to do, so i hope you will apreciate and enjoy it. Remember that it was not possible to have Batman's robe before i do it and post it online. Don't cut your fingers and have fun with it ! (tags: LEGO Batman the movie , LEGO robe de chambre , batman , fanmade , paper robe , printable robe for LEGO minifigure , non official ) -

[WIP] Galen Erso decals (now with face)
Cody Startale posted a topic in Minifig Customisation Workshop
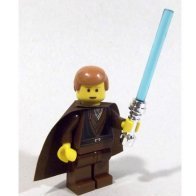
Update 2: grey lines and wrinkles for better visibility when printed, added binoculars. Update 1: Added face, back. Hi there, I am currently working on decals for Rogue One's Galen Erso and am finished for now with the torso, so I thought I would share my progress here in case anybody wants to use them, since there is no official minifig (yet). This is his farmer outfit from the trailers: This served as my template. I hope I can come up with a good face, too, and eventually post it here. Let me know what you think, c&c welcome! -

Does anyone know a dimension of minifg's leg backside
sniky3 posted a topic in Minifig Customisation Workshop
Hi guys~ I'm trying to customize my legos. but I'm having trouble to find minifig's legs dimension. I just found front and side dimensions of legs. I'd like to apply decals to back part of legs. however, I can't get the dimension.. does anyone know about this? or is there another way of solving this decal issue..? -
Hello custom-izers! I've been wanting to make some custom clones (or at least design some decals). Before I start, I'd like to know if anyone has, or knows, a good decal for this kind of clone: http://alpha.brickli...ode 2]#T=S&O={} That torso is used (I think) on all the new phase II clones as well. When I search the EU index, and the web I can only find decals for this kind: http://alpha.brickli... Wars]#T=S&O={} Also, which is you're favorite? Thanks!
-
A while back I posted my first decal of the new Joker from the upcoming Suicide Squad film. I've spent a bit of my free time tweaking that first attempt and making some more. I'll probably add to this topic as I create them. Any feedback/criticism would be great. Enjoy! Suicide Squad (2016) The Joker Harley Quinn Final Fantasy Series Terra (Final Fantasy VI) Cloud (Final Fantasy VII) Squall (Final Fantasy VIII) Zidane (Final Fantasy IX) TV Shows Ash (Ash VS Evil Dead)
-
Hello, For my recently completed MOCs of Invisible Hand and Venator, I need two emblem stickers for each one. For Venator, I found matching sticker sheet from set 75038 that fits my needs perfetcly for 'Open Circle Fleet' emblem applied on 2x2 LBG tile. However, for Invisible Hand, I need very tiny 'CIS emblem' onto blue 1x1 chese slope and I wasn't able to find any matching sticker within SW sets. Is it possible that there is some existing that I missed? If not, I'd need some advice on how to print a custom sticker. I personally do only have black laser printer but I think I could get acces to color one. Unfortunately I have no idea about what paper/foil to use, whether there are some pre-glued sticker sheets to print on... lacking any knowledge in general. Thanks for any recommendation or advice :)
-
Hello there, I'm not entirely sure if this is the correct forum to post this in, but I am a brickfilmer, and few friends and I would like to create a Lego animation which features dialogue and also facial animation. In the past this has typically been done in post, but I would like to give it a try actually manipulating the faces. I came across some really terrific decal templates by Capt. Kirk a number of years ago, but they do not contain all of the basic mouth positions essential to animation: http://0.tqn.com/d/animation/1/S/7/2/mouthpositions.jpg Just wondering whether there are any graphic designers out there who might like to help me out? And if you'd like to see the sort of animation my friends and I have done in the past, here is an example: Cheers, Jayko
-
siries 3 octan driver decal (request)
pittpenguin123 posted a topic in Minifig Customisation Workshop
request for Tribolego -
Ian Malcolm (jurassic park/world) (decals)
pittpenguin123 posted a topic in Minifig Customisation Workshop
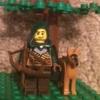
This took be about a week to make and get perfect. First up is regular Dr. Malcolm And the best version of him.... SHIRTLESS All the ladys want him. Hope u like them. fixed vertions -
So, I've seen people saying; "Man, I really wished I had a minifigure of Lowery, the cool guy with the Jurassic Park t-shirt in Jurassic World!" Well guess what. You can have him. That's right, for my first ever decal design, I have designed Lowery's torso! Below will be the torso decal for you; just copy it in to a word document and it should be the correct size. Print however you like to make your minifigure and you'll have your very own Lowery! Please post pictures if you do use it, and make sure to comment how I can improve my decal designs! ----- Here's my test with the decal! My printer is rubbish, so imagine what you could o if you have a quality printer!
-
Just signed up today to post this. Decided to make a decal for Jared Leto's Joker as he's appeared in a few leaked photos from the film. This is my first ever attempt at making a decal so enjoy and feedback would be awesome :)
-

High Quality Sticker/Decal/Label Paper? (not looking for waterslide)
enkeybo posted a topic in Minifig Customisation Workshop
Hi there, I've been looking everywhere for some high quality sticker paper for customizing minifigs. I'm seeing in videos and pictures everywhere that people are using clear sticker paper on minifigs, but they're not waterslide. I've searched all over the place, and I haven't found out anything about it. Not even the Eurobricks search function can shed some light on this! Anyways, I'm hoping to find some that are reasonably priced, high quality, easy to apply, and work with an inkjet printer. I don't really like the idea of waterslide decals because it seems to take a lot of skill and time commitment, both of which I really don't have much of. While white paper seems to do well (especially since you can't print white), but I'd prefer to use transparent (obviously I'd need white paper when I would need to print bright colors also, so yes, I guess I am going to need both white and transparent). I have been hearing a lot more recently about "labels". What are they? Is it just another name for a decal or sticker? Or is it literally using the materials that were originally meant for labeling for minifigure customization? Or is it something different altogether? I've seen professionals online use transparent stickers amazingly. TheCooperWorks and those old BrickForge decals from a few years back have proven that sticker paper is a suitable alternative. So please, if there any reasonably priced, high quality, easy to apply decals that work with an inkjet printer that you know of, I'd love to hear about it. -
any way here is my attempt at making a decal its the timer from the TV show sliders i hope you guys think i did good
-
Hey Guys - Here is my first shot a making a couple of customs. I used the waterslide decal technique. I think these came out ok, but I am planning on doing a second draft to perfect them. Any feedback would be great so I can improve the second time around. Huge thanks to floed (Alfrid) and DarkKnight7 (Faramir) for the amazing decal patterns!! ALFRID FARAMIR
-
Hi all, My first post :) Where is the best place to buy inkjet decal paper or is there any brands to avoid on ebay??? Thanks Simon