Search the Community
Showing results for tags 'remote'.
Found 53 results
-
ROBOT WARS: Pulsar vs Carbide
PKW posted a topic in LEGO Technic, Mindstorms, Model Team and Scale Modeling
hi all, some months ago i made this video of lego battlebots, and now i'm posting it there because maybe you could be interested also for TC11, you'll find all the bot info in the video but i'll clone them here too, hope to bring up a brickshelf folder asap for the two bots (but i have to rebuild them due to pieces and electronics being used for witch doctor replica, cardiac two, fanmade design, killerhurts and recyclopse chassis, and other 3 500g class bot an grabber a lifer and a flipper) PULSAR weight: 700g size: 23x27x9studs weapon: 73g spinning drum with two single teeth 1900rpm strenghts: really effective wedge shape used to go under the opponent and lift them with the drum energy weaknesses: the drum isn't enough fast to launch the oppnent on the air, wheelholders may break off easily, weak wepon belt CARBIDE weight: 730g size: 32x32x9 studs weapon: 84g spinning bar 750rpm strenghts: great power and though armor, effective rear wedge weaknesses: the armor can e warped or bent and increase friction in the drivetrain, hard to control, high battery consumption here a photos from Ellis (pulsar builder) about size comparison here the video: NB it is really long, if you want, after presentation, you can skip to 11:02 to skip the fist fight (a bit long and boring) and save time without losing the most of the action! i'm keeping editing this with photos and videos from my twitter, it is hard to find them back but i'll try: CARBIDE PULSAR -
Hi guys I just finished my newest project: 2 AT-TE MOCs and want to show you all AT-TE Info Sheet by sunnyxi, on Flickr AT-TE 33 by sunnyxi, on Flickr I started building blue one in summer and finished the red one just a month ago. The blue one is just a simple MOC but the red one is much more complicated as it is motorized and can transform into a landing platform. AT-TE 19 by sunnyxi, on Flickr AT-TE 14 by sunnyxi, on Flickr It also has flood lights for night combat. AT-TE 1 by sunnyxi, on Flickr AT-TE 6 by sunnyxi, on Flickr The blue one has more space to carry troops and kyber crystals. AT-TE 27 by sunnyxi, on Flickr AT-TE 35 by sunnyxi, on Flickr AT-TE 5 by sunnyxi, on Flickr Thanks for viewing at my newest creations and make sure you watch the video! Comment and criticisms are welcome :D Full album and more pictures: https://www.flickr.com/photos/63137442@N05/albums/72157680455243206
-
Lego Trump is back, bigger, better and president of USA. Let's build big Mexico Wall. https://www.youtube.com/watch?v=fcgaQVOlMbw
-

[MOC] Waving goodbye to 2016 with this little RWD drift car!
896gerard posted a topic in LEGO Technic, Mindstorms, Model Team and Scale Modeling
As a last goodbye to 2016, I present this small red car. It is not really built to be particularly good looking (I used a wire bodywork to have a low weight) or to have a particular high speed. But what it does, is put a smile on your face. Technics are kept simple, there's an RC buggy motor next to a PF lipo batterybox in the middle, a PF medium steering motor before the front axle and an IR V2 receiver to enable 1 metre of infrared range when going outside. Please Lego... Please... do something about it. The frustration and anger about this appalling range is powering companies like S-brick. And that's why my future cars are having an S-brick, leaving this model as one of my last PF IR remote controlleds MOCs... We're making a fun car, right? So there is a silly spoiler and huge rear tires. By the way, these wide tires provide excellent traction in dry conditions, which is important for low-weight cars like this. The interior had to be sacrificed to have a low position for the drive motor and battery box. Because of this measure, the handling was quite good, but made much worse by the slow PF IR remote. In the end, of course there is the video: The longer story can be read on MOCpages and better photos are on Brickshelf. Have a nice 2017! -
 Hello everybody! It is no secret that the Power Functions system allows smooth control of motor power and regulation of the angle movement of servo motor. I have studied this issue and developed a proportional remote control system which was first designed for the management of wheeled and tracked models. But in fact it is a universal device, which can control any Lego models with PF IR Receivers. The system is not a control panel by itself. It represents a set of sensors, control unit and an infrared transmitter module which are made in the form factor compatible with Lego Technic. Here's how it looks Сontrol unit: Sensors of various types: IR transmitter: All this is connected together by wires and must be installed in the transmitter model made from Lego Technic. The device can be fully configured using the front panel buttons but a lot of functions and menu system are difficult to obtain. I wrote a manual, but did not translate it into English yet. Here is a short video showing the basic idea. I'm sorry, my comments are in Russian. At the beginning of the video I configure my system for a specific console design (the system remembers the maximum deviation of controls in this design). At the end of the video I run track model with the remote control, which is shown at the beginning of the video. To manage such a model i have made a special control mode, which converts the signals of throttle and steering into the power of left and right caterpillar motors. I want to find out, whether it can be interesting to someone?
 -

MOD - 42008 Service Truck full RC with pneumatics
Chilekesh posted a topic in LEGO Technic, Mindstorms, Model Team and Scale Modeling
Hi, Here's my modification of 42008 Service Truck set, fully motorized and remote controlled. I decided to keep the original functions (including pneumatics) exactly as they are while adding some extra features as well. The additional functions are driving, tilting of the driver's cabin, headlights, steering and working-tilting steering wheel. I tried my best to keep the original looks (with some visual improvements though) and made the structure as rigid as possible. The PF elements used are: - 1 L-motor for 8x4 driving (with single, shared differential) - 1 M-motor for steering - 1 M-motor for tilting the cabin - 1 M-motor for functions (included in the original set) - 4 M-motors for switches - 2 for pneumatic switches and 2 for mechanical switches - 4 IR receivers - 1 Rechargeable battery box - 1 Led light set, - 2 x 20 cm extension cables, one for the large motor and one for the battery box. Rebrickable: http://rebrickable.com/mocs/Chilekesh/42008-service-truck-full-rc Bricksafe: http://bricksafe.com/pages/Chilekesh/42008-rc (*.lxf file can be downloaded here) Any suggestions on improvements are very welcome. Cheers and happy building! -
[MOC] RC Camper Van with SBrick - 4 Studs Wide
SevenStuds posted a topic in LEGO Technic, Mindstorms, Model Team and Scale Modeling
So this was a quick, fun project. I gave myself the weekend to build the smallest RC car I could. My goal was 4 studs. This seemed reasonable since a battery box and SBrick are both 4 studs wide. With the width set in place, I quickly realized that making two connected parts would be the way to go so the model naturally became a camper van/RV with a trailer. The main car holds 2 micromotors and the trailer has 1 old-style battery box with the SBrick directly on top. More photo's here. Assembly photos are here. PS: I must also thank Mbmc as some of his micro RC MOCs were a good inspiration for this project. -

BuWizz - an interesting alternative to the SBrick
Sariel posted a topic in LEGO Technic, Mindstorms, Model Team and Scale Modeling
Hi guys, I've had a chance to test a prototype of a BuWizz - an interesting device that combines remote control unit which allows controlling stuff with your phone AND a power supply which is surprisingly powerful. My video test is below, keep in mind that this is a prototype and you can make the finished product happen by supporting it at Kickstarter: https://www.kickstar...for-lego-models Project website: http://buwizz.com/ -
[MOC] Remote Control "RHM Wutzwerg" Supercar
Rage_Hobbit posted a topic in LEGO Technic, Mindstorms, Model Team and Scale Modeling
Link to MOCPages: http://www.moc-pages.../moc.php/426649 VIDEO FOUND HERE: Hello, this is my first post on Eurobricks. Anyway, here I present my custom supercar RHM (Rage Hobbit Motors) Wutzwerg. Note: this model is on Lego Ideas, the link for which is here: https://ideas.lego.com/projects/136011. I'm not really expecting the model to get either the necessary votes or to get turned into a set, but hey, I like to be surprised. Propulsion: 1 x L motor Steering: Front wheel with 1 x Servo motor and working steering wheel Drive Type: RWD Transmission: 4-speed sequential synchronized V2 Weight: 1.3 kg (2.87 lbs) Length: 41.5 cm (16.3 in, 52 studs) Width: 18 cm (7 in, 22.5 studs) Height: 10 cm (3.9 in, 12.5 studs) Power source: 7.4v 8878 Li-Po rechargeable battery box Estimated part count: 1800 pieces Suspension: All-wheel dual-wishbone independent Opening hood, doors, and engine V10 piston engine connected to drivetrain through transmission Build time: ~60 days Short Description This is my first vehicle to be built without a real subject vehicle in mind. It has less of a focus on performance than my other vehicles, with only a single L motor for propulsion. It also has front-wheel steering with a working steering wheel, a new version of my 4-speed sequential synchronized transmission (link here: http://www.moc-pages.../moc.php/422999), and a motorized rear wing. Introduction For this car I was trying something a little bit different. I had just designed a new version of my 4-speed sequential synchronized transmission (link here: http://www.moc-pages.../moc.php/422999) and I wanted to use it in a car, but I also wanted to build something a little less performance-oriented than usual and thus fit in more functions. This time, there is no original vehicle; make what comparisons you will, this car is entirely a product of my imagination. I think. Drive Train Part of my plan for this vehicle was to eliminate one of my customary 2 drive motors, leaving only a single L motor for propulsion. This freed up space for another M motor, as well as allowing room for the V10 piston engine. The V10 piston engine located behind the front seats, and was connected to the drive system through the transmission; as such, it varied with whatever gear the transmission was engaged into. Because of space restrictions, I had to replace the usual cylinder brackets with a custom rig, after spending a solid hour determining the exact geometry of the original brackets. The transmission used in this vehicle works off of the same principle as my previous 4-speed sequential synchronized transmission; this transmission is also a dual-sequential transmission. What this means is that the transmission actually contains TWO separate transmissions which are shifted in such a way as to produce 4 distinct speeds. What differentiated this transmission from the previous versions is that the switches were not hinged: instead, they moved back and forth in a straight line. This can be seen and understood better from the video above, and you can expect instructions sometime sort of soon-ish. The transmission itself was shifted by an M motor geared 10:1. Because of the lessened power from using a lone L motor, the motor had a gear reduction of 1.25:1 before being fed into the transmission, and then another reduction of 2:1 before the differential at the rear wheels. The car wasn’t fast, but it did pretty well for a single motor. Steering and Other Motorized Functions Steering was simple as usual - with a Servo motor and rack-and-pinion system - but this time I added a working steering wheel. That’s just about all there is to say for the steering system. The final M motor was for the rear wing. This was no fancy job, just a linear clutch and lever mechanism to raise the rear wing, but again space restrictions made the implementation of this system difficult. The rear aesthetics were somewhat compromised to make room for the rear wing & mechanism. Aesthetics With this being the first time I’ve ever come up with my own large-scale car, I didn’t really know where to start, and all the online comments saying “Making your own car is SO hard!” were not particularly encouraging. The front was actually the first area to be built (because of the awkward and inconvenient position of the battery box) and the rest of the car was built using the front as a reference point. Obviously, I can’t give my own unbiased opinion on the car’s aesthetics - many hours spent designing it have probably compromised my opinion as well - but I think the aesthetics turned out pretty well. Please, give me your honest opinions in the comments section! Reflections Not bad, I think, for a first attempt at making my own vehicle. Space was a little bit cramped because of the scale I chose to build it in, but everything mostly fit together in the end. It functioned really quite well: the transmission, rear wing, steering, and propulsion systems all worked without malfunctioning even once in the final vehicle, despite considerable use. That may be a first for me. Despite having fun crafting my own vehicle, I can’t see this as being something I’ll repeat frequently. That’s not to say I’ll never do it again, but I do enjoy recreating existing cars, and of course brand familiarity with my viewers gives people something to compare to. Enjoy the pictures! -

How to Motorize the LEGO Mars Rover?
sir_launcelot posted a topic in LEGO Technic, Mindstorms, Model Team and Scale Modeling
I am looking for some suggestions. My daughter is building the Mars Rover set (go here for the details: http://www.eurobricks.com/forum/index.php?showtopic=98222) for a presentation at school and I told her I would help make it operate by remote control with one of the power function kits. Problem is that it is a lot more complex than I thought. (I have no experience at the expert LEGO building). I think I can maybe get it moving with a remote, receiver, and simple motor attached to one wheel, but I do not have any idea how to do the steering and don’t know how to move any of the other functions (camera, antenna, robotic arm). see It was not designed to be converted to power functions / motorized. Here is a photo of the underside: I am not sure the easiest / best way to add power for drive and steering. It just has to move a little bit in the classroom, not drive outdoors in all terrain. I posted in another forum and a member suggested that I post here. Any suggestions to help me figure out what I need to do and what to buy to easily make this work would be much appreciated. Thanks much! -

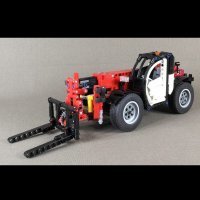
[MOC/MOD] AROCS SCV:pRC
Pluto_MkII posted a topic in LEGO Technic, Mindstorms, Model Team and Scale Modeling
After my fork rake and the tractor I present you the AROCS SCV:pRC - Specialized Construction Vehicle: partially Remote Controlled Today I would like to present my modification of the Lego 42043 MB AROCS to you. Yes, the setup is unusual for a typical construction truck. I decided to choose this setup because I like the crane setup from the old 8868 truck. The room between the specialized setup, which is inspired by the 8868 crane cabin, got filled with a side tipping bed. I moved the original tipping bed to the trailer. But first, let me tell you what functions it has inside and which of them can be controlled by RC. 1) RC package, supplied by one AA battery box: Driving (XL-Motor, RC) Steering (Servo, RC) Supporting stand (L-Motor, 2 small linear actuators RC) Tipping (L-Motor, 1 big linear actuator for each tipping bed, RC, switching between the two tipping beds possible through gearbox) The RC functions are limited to functions needed while driving the truck or getting ready for working with the clamshell. Because of the heavy weight of this model and the strong XL-Motor I had to replace the cv-joint with a cardan joint. 2) Clamshell package, supplied by one AA battery box: Compressor (shares the M-Motor with the rotation) Rotation (shares the M-Motor with the compressor) The rotation of the clamshell setup can be changed or stopped through the red lever, which you can see on the right side, slightly under the cabin. If you switch on the battery box the M-Motor will run permanently and so will the compressor do. Only the rotation can be turned off through the gearbox. All functions of the clamshell setup are integrated, so there is no cable or tube running through the turntable to the truck. There is no limited turning radius. More pictures are available at my brickshelf album. Please use the thumbnails below, because the brickshelf album is not yet public. -
I'm not really a regular truck builder, but I like to think of new systems that do not exist in real life yet but that do improve the life of, for example, truck drivers. When something like a big tarmac machine has to drive onto a trailer to go to the next building site, the slope of the trailer should be very small. That small slope is nowadays achieved by making very large ramps that fold up vertically for transport, causing massive air resistance and therefore unnecessary fuel consumption. A way to make these ramps shorter is to decrease the bed height, because that asks for smaller vertical ramps. The second option is making the wheels below the bed smaller. But decreasing the wheel diameter increases the rolling resistance. Another way to solve the problem is placing the bed betweeen the wheels, so that it can be much lower, but that limits the cargo width: the tarmac machine can never be wider than the bed width, which is not handy if truckdriver x has to transport many different tarmac machines. Read the rest of the story and how I solved these problems with my my DAF CF with 3-axle trailer on http://mocpages.com/moc.php/421622 Or watch the video here: To give an idea of the model, I have posted one photo below, the others can be found on http://www.brickshel...ry.cgi?f=560197 in a better resolution.[/font][/size]
-
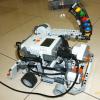
Hi there, I'm new, and this is my first robot on this forum! So today, I'll be showing you the EV3 Camera Bot! This robot is controlled by remote, and it can move by wheels, and even press the trigger by remote! It IS actually a pretty practical robot, as it can get into places where humans can't squeeze in, such as under a bed. Anyway, just check out the video below!
-
Hi, I have a very special problem: For an exhibition (the day after tomorrow) I will use 12V-lights at my train station. I tried this function with a gray 12V transformator and the switch with the train crossing pattern: (set 5083). Everythings worked and I was happy. Right button turn the lights on, left button turn the lights off. Everything is fine. But: Now I need this remote Control switch to use the train crossing, but I had another set 5081 - remote control witch SIGNAL pattern. I opened (because it was sealed (ovp)) and I tried to use ist. But it doesn't works. I think, it isn't broken. I think the reason is to find into the different between these both switch. The signal one stayed "down", after I pressed the button, and when I press the other button (red or green), the first button comes up. The switch witch train crossing pattern works so: If I pressed any button, the button comes up immediately. Also the train crossing has 2x three holes and the backside, the signal switch has 1x five holes and 1x three holes. Could someone help me to understand the function. And: Why I couldn't connect normal light bricks with the signal switch. Does set 5080 works (Remote control for switch). Or does the switch in set 7862 works? Please help me. Michael
-
The Luctor is back! And it's back with a bang hitched to it. A €600, 2.5kg, 2500pcs, one year build-time bang. And the video is on YouTube. Check out a more elaborate review on http://www.mocpages....moc.php/414168. To give you a hint: this is the first ever forage wagon made out of Lego bricks that can actually pick up grass and dispose it when the cargo is full. It took over one year to build, the pickup system for the grass alone cost me a full-time week! A picture says more than a thousand words, click here to see them all on brickshelf: http://www.brickshel...ry.cgi?f=556822 Watch the video here: More about the Luctor itself (this video has already sometime ago been posted here)
-
 This is a fully functional, remote controlled subtractor drive with independent turn and drive function which are separately powered. It is up on LEGO Ideas - support it if you like it, there you will find some more high-resolution photos :) https://ideas.lego.com/projects/101126 This is a fully functional, remote controlled subtractor drive with independent turn and drive function which are separately powered. It features: - robust design with custom-made differentials that can handle larger forces - transparent, "airy" and parsimonious design - "invisible" electricity, all integrated into the mainframe - front and back lights with light switch integrated into the mainframe - quadruple L-motor power (two linearly coupled blocks of two motors each) - front shield - triple speed freely hanging piston motor - self-stabilizing and self-balancing design - can be mounted with any superstructure, e.g. cranes, hoists, levers Constructed to an 11/15 measure, fully compliant with the rules of LEGO. Only official LEGO parts are used and no parts are modified or altered. Weight: about 4 lbs, dimensions ca. 30 x 25 x 30 cm The chassis can be used as a basis for basically any vehicle that has to traverse difficult terrain, e.g. building machines, bulldozers, search & rescue vehicles, etc. It is designed to provide a multipurpose solution for a variety of tasks. If fitted with different superstructures on top, countless models can be constructed.
 -

More than 8 remote channels?
Omikron posted a topic in LEGO Technic, Mindstorms, Model Team and Scale Modeling
Hello, is it possible to use more than 8 channels with current power functions RC solutions? I'm interested in original LEGO (no 3rd party) The problem that I encountered is - LEGO receivers have only 4 channels, thus you can power only 8 individual channels. If one needs more channels and adds more receivers - some of them will eventually use the same channel and trigger unwanted simultaneous function use. I didn't have much time to think about this, so maybe there is a simple answer that didn't came to my mind straight away. Could anyone suggest a solution that won't include manual gearbox switches? -
A midscale trial jeep
Appie posted a topic in LEGO Technic, Mindstorms, Model Team and Scale Modeling
Here's a creation I put together in a couple of evenings after Wall-E to enter in a trial contest at a LUG meeting: The contest had a few rules: - Use the 62.4 Lego tires (which do look a little small for the height on this model) - Make it 17-20 studs wide - Use 1 IR reciever - Use 1 or 2 motors for drive - 1 motor for steering Everything else was pretty much free game. It features quite a load of "stolen" ideas: - Zblj's little portal hubs (thanks for that nice idea, though I should brace them more since they can get seperated a little under force as I found out at the trial) - Snipe's limited slip diffs with rubber bands (though obviously more people used this idea, I am not sure who used it "first", I only know I saw Snipe's post first. Either way: thanks) - TLG's 9398 steering setup (which I only made a little smaller) While I know diffs aren't a good idea on trial trucks, I refused to have no diffs in my model. So I looked at other options, came across something called "torsen diffs" but I couldn't fit them in a 20 stud wide vehicle with portal hubs (21 is the best I got). Then I came across this idea for a sort of limited slip diff, which worked pretty well at the trial. You can also see the steering axle has some free play (and 2 bevel gears) so the steering would still work when the suspension is at an angle. On a rare occassion, under force the bevel gears would skip on the gear rack since on the other end are 2 universal joints, so bracing isn't the best at it could be. Also given the fact that due to the suspension the steering axle's range of motion isn't even fully utilized I could have probably braced it in the given space, but I didn't find out until the trial that this actually needed some better bracing Trying to keep the weight low and balanced I learned that a battery loaded AAA battery box is about equal in weight to a XL motor and servo motor. So having the 2 motors on one side and the battery box on the other seemed like a good idea.The XL motor ended up with a gear reduction of 1:7. Which means it certainly isn't the fastest, but it runs up a steep hill until it would simply fall on his back before gears would grind. Gears did grind however at the trial, but that was partially due to lack of skill from the driver and especailly one very annoying (yet awesome, because it proved to be the most challenging) obstacle After I had a functional chassis, I pretty much slammed a body on top of that with a little interior. I didn't have much time left before the meeting to make it really fancy. In hindsight I would have probably made it a little bit lower and cover more of the chassis, but I still think it turned out all right The guy who organized the trial at the meeting said we had to keep a space open on the model for a 2x4 tile. He made these nice 2x4 tiles with a custom print. Of course you would like a video, but at home I don't have much obstacles suited for "trial". However at the meeting, the guy who organized it made a video, but he hasn't released it yet. I hope to see it soon so I can link it here -
I was really happy to know that 8369 and 8675 sets are somewhat compatible with Technic. A lot of time passed since I acquired a copy while thinking what can I build around it. Yes, build and test it! Youtube videos show these models are very powerful and probably are the fastest LEGO ever. So there was LitLUG & LatLUG meeting where you normally need to bring something with yourself to show off . So there was a deadline and all of a sudden interesting idea came to my mind. Also there was a quite big area, just about right for the model to run - no way I would miss such opportunity! There's just no place at home for such beast. I used default 8369 as a base to build my MOC, there is a standard front suspension with adjustable shock absorber, but the back has no suspension. Since I wanted to build a drifting car and there was a very smooth floor - basically there was no need for rear suspension at all. Model is quite heavy (2Kg) - it is all because of the base as the outer shell doesn't add much, but weight is not an issue. Car is drive-able on the lowest gear only, when using other two it still can go straight, but just drifts when trying to make a turn while still on a smooth surface. The power. I had two batteries, and made sure they both are charged - just to have a lot of fun during the event! However it turned out I had just 5 minutes with each battery, that's 10 minutes. Not much to have fun , looks like batteries are quite old and lost their capacity. Sorry for the lack of photos (I rarely have access to proper camera). Below you can see the only picture taken while on event (he-he, you won't find me on this photo): 13_12_2014_RJTC-71 by latlug_lv As you may notice RDR01 has proper test racing driver - The Stig You can check how models drift on this very short video, while batteries were still alive. I hope to share more photos soon, including a swap with black tires. I wonder how RDR01 would look with red tires as well...
-
I don't know if anyone else has done this, I did do a (quick) search on this forum and couldn't find any posts, but I've hooked up 2 12v signals to my 9v tracks to get fully operational remotely controlled, albeit old fashioned wire style, signals controlling the 9v track in the station. Here's the pic, with an explanation below. DSC00221 by andyglascott, on Flickr I used the 9v wire/contact piece on the same side of the track with a small piece of paper wedged in the join between two 9v track pieces to break the circuit. The two contact pieces are visible, one in the white wall and one under the platform just in front of my Irish Rail loco. There is a second piece of paper similarly wedged further down the track to create the block of isolated track. To switch between 9v and 12v connections I used 1 of these electric wires, took one of the 2 x 2 connectors off and replaced it with 12v plugs. That connects to a 12v signal switch, connected to a regular 12v transformer. There's video on of it all working, complete with the familiar clicks of the 12v switch in the background.
-
[MOC] Lego Technic fast buggy | Mud racer
896gerard posted a topic in LEGO Technic, Mindstorms, Model Team and Scale Modeling
Hi guys! My latest creation is this mud racer. It was not designed to be art, but to have fun. Therefore the frame and bodywork was kept very light and it has the light 8878 accu. This added up to a weight of just 600 grams! The steering happens by an PF m-motor because the servo motor was too slow for the speed this racer evolved. The front axle is pendular to keep the rear wheels always on the ground, this was vital for driving in grass, stones and mud. The rear axle has a differential - but not always. Watch the video for details. Read the full review on: http://www.mocpages.com/moc.php/398114 to see photos of the drivetrain or watch the video below. I have personally learnt much from this great little car, you can expect more soon. -
896gerard Lego creations
896gerard posted a topic in LEGO Technic, Mindstorms, Model Team and Scale Modeling
Hello, I am 896gerard, a passionate Technic builder. I would like to extend my activities to Eurobricks. Youtube channel: https://www.youtube....X_uErOTcGpZg8Ug MocPage: http://mocpages.com/home.php/52513. One of my new creations is the Ultra low cargo bed truck. I have not found this model in reality, so I built it. The complete review is on http://mocpages.com/moc.php/396635 and the video is below. Another creation is The Easiest Parking Car In The World: this is my own genuine idea, maybe some others have had the same idea right now... The review can be found on the given Mocpages address. You may always reply if you don't like it, my MOCs will probably get better of it. -
PF remote using smartphones
zweihander posted a topic in LEGO Technic, Mindstorms, Model Team and Scale Modeling
Hey everyone, First, I considered using my raspberry pi to create a DIY customizable PF remote. Then I read somewhere that someone had done it, and sometimes it failed because of raspberry pi not being real time and missing some IR emitting intervals. Then I found this article. It explains how to record IR signals as audio stream using 2 IR LED's and a headphone jack, and replay them. I want to give it a try, and if it succeeds, develop an app for smartphones that can be used with a DIY emitter and used as a customizable PF remote. Has anyone tried this before? What do you think? -
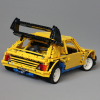
Hi When I had been building (in March, I think) other things, that are going to appear soon, I have recognized, that I have parts to make a great chassis for simple buggy-ish vehicle. However, then I have seen some musclecars here in Technic forum, so I decieded to build one too. This one is the final product of that build - it is not prepared, I've been building it instantly according to my thoughts. Hope you like it. ;) it is propulsed by one 5292, and for steering it has one servo. It's steering wheel doesn't move, it is just decoration, and at "RC car" it was "redundable mass"... Video: More photos: https://www.flickr.c...57644613626038/ musclecar by Horcik designs, on Flickr musclecar by Horcik designs, on Flickr musclecar by Horcik designs, on Flickr musclecar chassis by Horcik designs, on Flickr
-

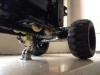
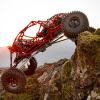
8x8 Trial Truck Chassis
1nxtmonster posted a topic in LEGO Technic, Mindstorms, Model Team and Scale Modeling
Hi guys. I'm back with my latest ongoing build, an 8x8. Each axle has it's own ball-joint suspension, so the ground clearance and articulation are both very good. Independent steering on the two front axles using two M motors. Two XL motors for drive with a final ratio of 3:25. Overall a very sturdy and well-performing truck.


-Mini.thumb.jpg.03594ed3626ab4a4b625a32af4d03d5f.jpg)