Search the Community
Showing results for tags 'rc'.
Found 537 results
-
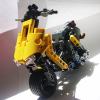
Hello everyone! I was wondering if it was possible making a bike that was fun to drive around while keeping it low price so i came up with this: it's a baja bike, it runs on an L motor geared up 2:1 and like the other bikes i've been making it shares the same principle to keep it upright. These new tires are awesome, they have an amazing grip and the rounded shape makes em really good for motorbikes! I hope you'll like it, here are some pics and the video i shot :)
-

[MOC] Stig's Pickup Lowrider [Free Instructions]
LForces posted a topic in LEGO Technic, Mindstorms, Model Team and Scale Modeling
Hi, guys Remote controlled Pickup with Top Gear Rally Car profile Lambo doors, adjustable height of the rear axle (manual) Download for free at lforces.com Happy Easter! -

[MOC] Off-roader UAZ 3151 [instructions available]
keymaker posted a topic in LEGO Technic, Mindstorms, Model Team and Scale Modeling
Hi, I would like to present my newest MOC. It is off-roader with look based on UAZ 3151 and equipped with functions available in off-road game Snowrunner. Main functions and some details are listed below. If anybody is interested with some more technical detailes (and I believe there are people here, which are more focused on technical aspects of the MOC rather than the look), which are hard to show in short video, then I encourage you to scroll down, below photos. If not, then I believe that video and some photos should serve just fine. I also added short video to present couple of tests of Uaz frame and powertrain. Instructions will be available in the future :) Details and main functions: scale 1:10,5 dimensions LxWxH: 38x16.5x18.5 cm weight: 2.44 kg (without additions) 4x4 drive (2xL motors) steering with ackermann geometry (servo motor) adjustable height of suspension for both axles (M motor) lockable differentials on both axles (mechanism without pneumatic, secured with clutch, M motor) live axle suspension, front and rear working inline four piston engine with fan and detailed engine bay lights: front, rear, roof - controlled by manual hidden switch openable hood (with support rod), trunk, four doors locks in all doors and trunk working steering wheel with realistic number of turns and with adjustable position easy removing the whole body easy change to version with or without the roof adjustable front seats - leaning and moving back and forward split rear seats with folding backrest to increase trunk capacity openable glove box easy access to battery pack for replacement Instructions: https://rebrickable.com/mocs/MOC-75601/keymaker/off-roader-uaz-3151-aka-khan-39-marshall-4x4-rc/#details More photos: https://bricksafe.com/pages/keymaker/7.-uaz-3151 Drive I designed the drive to be balanced between speed and torque. Main idea was to make drivetrain strong and reliable. I used the strongest differentials, new reinforced CV joints and bevel gears whenever possible. What is more I tried to keep high speed – low torque rule as long as possible when designing the drive train. As the result, the biggest reduction is placed on axles – on differentials. Thanks to that and reinforced construction you will stall 2 L motor rather than hear some gear slipping. Look In case of look, I keep in mind to avoid blue pins whenever possible, keep nice, clean one colour chassis which can be seen underneath and focus on small details, both inside and outside. Also you will not see many holes in the body or ugly cables, despite the fact that there are 5 lego LEDs there. What is more, all lights, along with the switch are integrated into one piece removable body and can be easy removed only by disconnecting single cable. Performance The plan was to make it very capable when off roading. And it is, when you remove the body. The look and those many details and manual features, all related to the body come with obvious price – weight. UAZ weights 2435g in basic configuration, but only the body itself weights 855g. So if resign from features, which are related stricte to the body and replace the body with some light weight one, then you will get very capable machine. But even with the body, thanks to drive train design, off-road capabilies of UAZ are pritty decent, as showed on the video. If you have more questions, do not hesitate to ask. And keep MOCing! :) -
My new creation: Lighthouse Size: 12L, 11W, 53H, cm Parts: 400 Weight: 600g Features: - Working lights - 360° rotation - Opening door - PF: 2x LED, M-motor, LiPo-battery, IR-receiver Video: The instruction is free, it's inside the video. Check the Rebrickable page for the inventory: https://rebrickable.com/mocs/MOC-70910/paave/lighthouse/#details More Photos:
-

42121 Heavy-Duty Excavator Full RC MOD
Seo-onDaddy posted a topic in LEGO Technic, Mindstorms, Model Team and Scale Modeling
I converted the 42121 Heavy Duty Excavator to a RC version that can be driven and moved. * Instructions are being distributed by Recrickable. https://rebrickable.com/mocs/MOC-69683/Seo-onDaddy/42121-heavy-duty-excavator-full-rc-mod/#details * A 4-port receiver such as 'MOULDKING' receiver or, 'CaDA' receiver or 'Buwizz' is required, and case separation is required.'MOULDKING' receivers do not require any work other than case separation.The 'CaDA' receiver or 'Buwizz' must be removed from the case and the battery must be replaced in a small size.Battery size should be less than 14mm x 25mm x 50mm. * I modified some parts of the exterior because the space was cramped. * fixed the range of operation of the arm operation. -

[MOD] 10295 Porsche 911 Remote Controlled
Cyrix78 posted a topic in LEGO Technic, Mindstorms, Model Team and Scale Modeling
I continue my mission to motorize the Creator Expert fleet, have already done a bunch other of them. I always try to make the motorization as inivisible as possible, you should not be able to see any electronics without looking very carefully. As the Porsche is pretty big and heavy I used ad Buwizz and a Large motor geared up 20/12 to give it the power that a Porsche deserves. If you do not need Turbo Power it could also be powered with a cheaper CaDa system. Since the PF servo is so big and bulky, i have used an M motor with a rubberband return to center function instead. Also added 2 pairs of Power Function lights, altough I am not totally happy with the front lights, but this was the best I could come up with. Because I am creating instructions for other to build this, I have not used any rare/expensive bricks and tried to reuse as many bricks as possible in new locations. It only requires about 150 extra bricks and electric parts. If there are interest, I might create Power Functions and/or Powered Up versions later. I have some ideas to hide the IR reciever and there is still space for a slightly larger battery and motor. Youtube video Rebrickable Instructions -
 Hi everyone, I've finished trying to RC my 42043 and it seems that the PF L motor has issues providing sufficient power to drive the set? I obtained instructions from the creator of this video (https://www.youtube.com/watch?v=BpP_05uxKqs&t=22s&ab_channel=PawełWojnarowski) and also checked PPUNG DADDY's 42043 RC video (https://www.youtube.com/watch?v=O8easq7ueIo&ab_channel=PPUNGDADDY(뿡대디)-LEGOTECHNICRC), both used an L motor with no problems. Here's a video of the issue: https://youtu.be/J8P13WLPzN8. As you can see in the video, the motor loses power after driving for some time, eventually being unable to drive at all. The problem is worsened when I try to drive and steer at the same time, it's almost impossible to drive and turn. I have tried swapping the tyres around, changing batteries, trying a V1 and V2 IR receiver, switching positions of the motor and servo cables, and using a new L motor. But the problem still persists. Here's a photo of the L motor: Could it be because of excess friction introduced in the rear axles during construction? Because I noticed when I lifted up the rear axles, the motor spins the wheels at its standard rpm, BUT only 1 wheel on each axle spins, the other is stationary. Then when the wheels contact the floor, the motor suddenly seems to struggle with driving the thing. Hence I was thinking could it be that I built the differential too "tightly"? Appreciate any help from the technic experts in this forum, thanks in advance!
 -

Custom RC Semi-Tractor truck
CrazyKreations posted a topic in LEGO Technic, Mindstorms, Model Team and Scale Modeling
Hello Eurobricker's I just wanted to show you one of my latest builds. Its an RC semi truck that has the ROOF based on a Scania Crew-cab! Love it or hate it here it is. Features Differential in the rear. Opening doors Spacious Cabin Detailed Interior Full RC L Motor and an M motor Working 5th wheel Easily removable battery box. Love it or hate it there it is. Please give me some feedback, I haven't made instructions yet as I don't know if anyone will be interested in building it! -

Wait what's going on with the set 8369?
AI toothbrush posted a topic in LEGO Technic, Mindstorms, Model Team and Scale Modeling
I was searching for offers on the out-door suspension and noticed that there are only two sets that include it but I only knew about the bike one. So I checked the building instructions of the 8369 set and omg what is that system? Is that even qualify(of course it does because it's Lego) as Lego? So if anyone can provide info about this strange system I would be really thankful. -

[WIP] 42123 McLaren RC
FriedlS posted a topic in LEGO Technic, Mindstorms, Model Team and Scale Modeling
I got the 42123 McLaren and decided to build a rc version of it. Here is my actual step: It has got no suspension but positive caster angle at the front. 😊 -

[MOC] 42099 C model Buggy
gyenesvi posted a topic in LEGO Technic, Mindstorms, Model Team and Scale Modeling
Hi, I'd like to share my second C model for 42099, inspired by the recently released off-road buggy. The design goals were 1) faster speed 2) responsive and long suspension travel 3) lightweight and curved shape.The wheel hubs and the differentials perform down-gearing, so I decided to apply 3x up-gearing by a ratio of 5:3 and skip the differential to make it faster than the original. Since the differentials are not used, the small gears can be used for up-gearing with perpendicular meshing of gears, which is smoother than the parallel meshing of the 20 and 12-tooth gears. I decided to use rear wheel drive only, one motor driving each rear wheel. I managed to compact the drive-train with the following setup: For suspension, I wanted a long travel and a wider wheel base, so I tried to increase the length of the swing-arms. The rear suspension seemed simple with 7L beams, but the front suspension was more difficult, as I had to increase the length of the 6L steering arms in the set by 1 stud, so I had to apply some tricky workarounds. Furthermore, I wanted a lightweight axle with a positive caster angle, with the steering motor integrated closely to the axle. The result has more than 6 studs of ground clearance and 3 studs of travel and is quite responsive: The battery is integrated into the middle of the model to distribute the weight between the two axles, and to provide easy access from the bottom. The whole base looks like this: The bodywork proved to be the most difficult to get right, since the panels available in the model are hard to use to get the light-weight frame-like body that I wanted. After taking some inspiration from the shape of Madoca's Blue Lightning buggy, I got the hang of using the arched pieces and the flexible hoses to build the curves, and used some of the panels to finish the body with a simple roof and hood. The roof is attached very strongly to the base, so the car can be lifted by it.As the small grey seats in the original just didn't feel like a match to the overall shape and scale of the model, I gave building a custom seat a try. Luckily, the few available red pieces were just enough to make a black seat with two red stripes :) I think it adds a lot to the overall look of the model.Here are a few more pics: Finally, here's a video of it in action: Building instructions available on Rebrickable. Let me know how you like it! Cheers, Viktor -
RC Trophy Truck with brushless motor
FriedlS posted a topic in LEGO Technic, Mindstorms, Model Team and Scale Modeling
Here is my first attempt of building a rc trophy truck: Thanks to @brickosouch for the Inspiration and sharing the stl files for ball bearing lift arms! -

[MOC] Small Scale RC 8x4 APC
SaperPL posted a topic in LEGO Technic, Mindstorms, Model Team and Scale Modeling
Some time ago I've build a minimal scale control+ 8-wheeler. The shape isn't perfect, but I hope it's interesting: I hope you'll find it interesting. Also check out my channel, more cool stuff out there, I promise :) -
[MOC] Christmas Tree (of Doom)
teetertater posted a topic in LEGO Technic, Mindstorms, Model Team and Scale Modeling
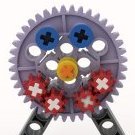
Hello, I got back into Lego during quarantine and decided to try something unique in the holiday theme. Here's my driving, spinning, Christmas tree. The top part is made with three turntables, with rotation driven by motors at the base. Frictionless pins and/or axles allow the "branches" to raise or lower with centripetal force. I know it's ugly, but I was aiming for a freaky vibe so that worked out Here's a short demo, with some videos of the inner workings too: View from underneath: Side detail closeup More photos: https://www.flickr.com/photos/191824083@N05/with/50858767061/ Happy to hear your feedback and design tips. I lurked this forum for a while and learned many building tricks. -
Hi, I am building next MOC based on model which can be found in the game Snowrunner. I picked KHAN 39 Marshall - it is based on real world vehicle - UAZ 3151. I would like to ask for your advice with one of my biggest problem in mocing - creating a decent looking body. When you see the photos and think "It doesn't look like UAZ..." then YES - you are right and: I wish to focus on body and look (I don't want to discuss functions here, they are there and they are fine). As you can see, the main color is picked (some parts in proper colors are missing, but is not a problem when bricklink is around, the same goes for some missing obvious parts), but any smaller recolors are possible. The biggest problem I have is the front grill. It looks almost ok, but as the grill for Jeep or Land Rover, not the UAZ. I tried to recreate UAZ grill, but I failed miserably. As you can see, there is no much space for it and I am also very pleased with perfect connection of the front and the hood and I definitely will keep that. Important factor is also the fact, that body needs to be as one piece, which can be easily removed, so the body demands some rigidity. Also I plan to add front and rear lights, but at first I need to be sure that the body is right. So, could you help me a little to improve the look so it would be closer to UAZ body look? :)
-
Lego Technic RC 3 Speed Manual Gearbox
TechnicBrickPower posted a topic in LEGO Technic, Mindstorms, Model Team and Scale Modeling
Here I've created my first attempt at a RC 3 speed gearbox allows you to change gears up and down using a power functions remote control. The gear changing mechanism is implemented using two parallel axles each with gears arranged in such a way that shifting one of the axles to one of three possible positions meshes the gears with 3 different gearing ratios. The gearing ratios implemented are 3:5, 1:1 and 5:3. The gear shifting axle is controlled by a lever mechanism driven by the 4 state stepper from the bugatti chiron set. This mechanism in turn is driven by a medium power functions motor activated by the remote control. Hope you like it. -

[MOC] - RC 3 Speed Transmission for Land Rover Defender using Powered-Up app.
NikosSprocket posted a topic in LEGO Technic, Mindstorms, Model Team and Scale Modeling
I am building a RC version of the Lego Land Rover Defender (42119) and it will include a 3 speed sequential Transmission. It will be operated from the Powered-Up Lego app. using 3 buttons and it includes a dial that shows the selected gear. I am using a Technic Hub (88012) and a Technic Medium Angular Motor (45603). The Remote Control has 3 buttons; up-shift, down-shift and neutral. When the application is started it calibrates the shifting axle to be at the "neutral" gear and sets the angle to 0. Pressing the up-shift button will engage the 1st gear, then if pressed again the 2nd until it reaches the 3rd gear. If you press the up-shift button more times it will not move the shifting mechanism but will make a "clanking" noise. Pressing the down-shift button will sequentially shift to the next lower gear until it gets to neutral where again will make a "clanking" noise trying to go lower. To the right of the 3 buttons there is a dial that indicates the gear is selected. [Media] -
This buggy contains a 3600KV brushless motor (2838). It has a pinion made from a LEGO axle and it runs a seriously good working drive-train. Together with the new 42109 differential and a (new?) 2D suspension method it turns out to be a fun car to drive. Please watch a video here. Especially the suspensions are worth having a look. More and more I'm using custom springs to create all sort of applications. Useful and useless. Almost useless is the spring-lock to open the hood. Very useful are the long front springs and the two-dimensional rear springs. Please let me know your comments. No building instructions available yet. If there is a need, let me know.
-

RC bike counter-steering demo
janssnet posted a topic in LEGO Technic, Mindstorms, Model Team and Scale Modeling
In an attempt to create an RC LEGO motorbike, I had to figure out a steering method. Moving a weight from left to right was (successfully) done before, but I couldn't find LEGO bikes with counter-steering. Inspired by the videos of many real RC bike lovers, I came up with this LEGO-ish implementation. It's not for LEGO purists, it contains modified parts. But it demonstrates pretty nice how counter-steering works and how it can be implemented on a LEGO bike (using a servo). I therefore thought it might be of interest to some of you. If modifying LEGO parts makes you sick, please skip this video. If you enjoy creating new parts (out of other LEGO parts), great! Let me hear your thoughts. On this matter, I personally start to enjoy the use of custom springs more and more (will do a separate video on this subject) and ... I'd love to make a case for an axle with one ball socket. Together with a (custom) spring, can be used in almost any vehicle for suspension or anything else. Have a look at the video and you'll see what I mean. Was an essential element to create this steering. Enjoy watching, looking forward to hear your comments. https://youtu.be/AZQkJCd0VKg -

[MOC] RC/manual wrecker and car transport trailer
johnnym posted a topic in LEGO Technic, Mindstorms, Model Team and Scale Modeling
It's been some time since I provided an update on models from my Turbo Racers vs. Police Interceptors series here, most (22 cars + variations and a "dyno") are on Rebrickable now: https://rebrickable.com/mocs/?tag=10127&include_accessory=on&include_bmodel=on&include_subset=on Because the models I want to present today are not strictly racing, I thought about starting a new thread for them: TG Power wrecker This is a wrecker truck based on a modified body of the F A H R T-Laster with the following functionality: Selectable AWD/RWD (propelled by RC Buggy motor (Chinese replica installed ATM), steering by PF Servo motor, power and control by a BuWizz 2.0) manual front winch manual rear boom (closely based on the one from the 42079 B model but with manual double winch) rear PTO (motorized by PF M motor) rear towing hitch Colors are not final yet, e.g. the currently red boom mechanis will become LBG. This wrecker is pretty fast. I experimented with the new diffs to make it stronger instead, but I couldn't avoid gear slipping with a 12z bevel gear against the 28z bevel gear of the rear diff when driving it perpendicular. The propulsion motor then sat half a stud higher but was still only kept in place by pins and could be pushed up over time. Do others perhaps experience gear slipping with the new diff when driving it with a 12z bevel gear in perpendicular fashion? Can this work reliably at all? This video shows an application for the PTO, i.e. driving a small car lift: Car transport trailer This features: double winch at the front for pulling cars onto the platform (can be driven manually or from a PTO) tiltable platform (using two small LAs, manually driven) extendible ramps Except for the coloring I consider it pretty final. Hope you like it. -

[MOC] JCB 1CXT- Mini RC+Pneumatics Tracked Loader
CalimeroLego posted a topic in LEGO Technic, Mindstorms, Model Team and Scale Modeling
Hello everyone, Please let me introduce to you my first MOC on this website. I've been building for a while and finally I decided to share something; some of you that saw me in the Decreasing number of Mocs topic may be happy to see it. by Guilhem Martineau, on Flickr The 1CXT is a mini backhoe which particularity is to be driven by tracks and not wheels. As a mini backhoe it features a skid steer loader front and a rear mini excavator arm. The tracks allow for lower ground pressure, greater maneuverability and higher pushing or climbing power. Discover more about it here : JCB 1CXT This build has been almost 1.5 years in the making as i don't have much time in engineering school. I designed it using blueprints of the real machine and the scale of it is approximately 1:10. The model is 33 cm long without attachments and the rear arm folded, 78 cm long at maximum length with the fork, 22 cm high and 16 cm wide. by Guilhem Martineau, on Flickr This MOC is an hybrid of pneumatic and RC. I. RC : With the IR receiver you can control the drive with independent tracks control, and the movement of the front loader. The first receiver is for the tracks. They are driven by one L-Motor each. There is a 12:25 ratio so it's enough to move around. The tracks feature a tension system with one soft spring on each track. by Guilhem Martineau, on Flickr The second receiver is for the loader. One L-Motor controls the arm via a 20:12 ratio but I'm not happy with that, I can't figure how to fit a bigger ratio to gain some power. Because there are two big linear-actuators it's good enough. The attachment is tilted thanks to an M-Motor, directly hooked with two 12:12 90° transmission. then two mini linear actuators give the wanted movement. I am quite happy with the tilting range but not with the height, even tho I really can't do anything given the space that I have. by Guilhem Martineau, on Flickr II. Motorized : By turning the switch on the left side of the cab on, you start an XL-Motor and grant power to a second switch. The XL-Motor powers a pneumatic pump and a two way gearbox in the rear of the backhoe. With a red knob you can actuate the outriggers in either way without having to make the XL-motor run in the other direction. The two big outriggers are strong enough to lift the entire machine off the ground. The second switch is located in the roof of the cab. By turning the beacon left or right you rotate the excavator arm via an M-Motor and a worm gear setup. by Guilhem Martineau, on Flickr III. Pneumatics : The pump powered by the XL-Motor is hooked up to 4 switches that control the excavator arm. There are two of them in the cab and two sticking out of the roof. The one on the right hand side of the driver controls the first section of the arm and the one on the left the second section. The second section features an extension via a 1 stud thick cylinder controlled on the left when you are facing towards the arm. It takes the section from 15 to 20 cm to give the bucket, actuated by a 7 stud cylinder, a better reach. by Guilhem Martineau, on Flickr IV. Conclusion : Overall I am quite pleased with myself. The function setup might seem strange but there was no room for full RC and this was the best compromise I could find. The play-ability turned out to be great, my little brother loves it! You can find more pictures on my flickr account! Thank you for reading me and checking out my little loader! -
 Here's a wee little project I've spent the last 12 months on. Yes, it's a 3+ meters long LEGO ship that floats (without a drop of glue), moves and recovers sunken submarines, occasionally ripping them apart in the process. There's really too much to describe here so allow me to present you with a video covering all the details:
 -
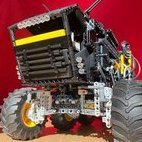
Hi everybody, I always wanted to make Madoca1977’s Baja Trophy Truck or something similar…. Well here’s my result. Now here you can see it in action…. I wanted to use buggy motors to drive the Baja buggy. (Unfortunately I only have 1 Lego Buggy motor, but for this model I bought 2 buggy motors from CADA). The front of the Baja Trophy Truck's chassis is the same as Madoca. The rear wheel drive is my own design. This also applies to the seats and cabin. The cabin is not as strong as Madoca's and also lacks the roll cage. I wanted to see if this model has a bit of speed and agility. As it turns out, I can barely drive the model because it is so fast. It drives on all kinds of terrain. The buggy drives fine with the normal 1.2 volt rechargeable batteries. But driving through the grass is a bit difficult. I once read a topic on this forum about lifepo4 batteries and thought let's give it a try. And to my surprise, it really drives everywhere like crazy. Topic "do-you-use-12v-or-15v-batteries" The buggy has : 1 Servo motor for steering 2 Buggy motors for driving (1 on each rear wheel) SBrick for control Battery box with 3x LiFePo4 and 3x dummy batteries (Work also fine with normal (reachable) batteries but has not much speed when driving through grass or very rough terrain) Building Instructions Nowadays I want to be able to rebuild my own models when I break them down, so I make a digital copy of the model. I always did this in LDD but since it is no longer updated I switched to Stud.io. It took some searching but now I am able to build the models and making the instructions is also easy. Here are some examples Since Madoca has provided his Baja Trophy Truck with free instructions, I want to share my Baja Buggy's instructions with everyone for free. Here you can find the Building Instructions and Studio file I'm not good at designing beautiful bodywork, but building this Baja Buggy has given me hours of building fun. Making the instruction toke me a lot of evening hours, but I like the result. Sorry for the experienced builders, the instructions are step by step as Lego does nowadays, this means that there are a total of 663 steps (about 500 pages). It is certainly not a professional design, there are some steps in the Studio file that do not fit completely, but it fits perfectly when building. Some work in progress Compare Here are some pictures showing the model compared to the famous 8466 4x4 Off-Roader and the 42110: Land Rover Defender. And a few renders of the Baja Buggy More pictures can be found here.
-

[MOC] Ford F-150
mktechniccreations posted a topic in LEGO Technic, Mindstorms, Model Team and Scale Modeling
Hello everybody, my latest iteration is the pick up truck. The ford F-150. I am questioning a bit if its Creator or Technic, but chassis and power train is technic aspect and body is made of system bricks to deliver that specific look. It has 2 RC functions, drive and steering, steering is possible by virtual pivot point for narrow fenders look of system bricks, and only few manual options, as openable doors and rear cargo door. More photos are either on my FB page or Bricksafe page Bricksafe page Facebook Page most of all, from my MOC´s sales i am able to continue to build more creations, so it would be great if you support me this way if you like the model. Instructions are available here : Iinstructions Also can be fitted with Buwizz for more power : Buwizz -

[MOC] 1969 Ford Mustang Boss 429
Hogwartus posted a topic in LEGO Technic, Mindstorms, Model Team and Scale Modeling
I'd like to share my most recent model - 1:10.5 replica of 1969 Ford Mustang Boss 429. Boss 429 was the high performance variant of first generation Mustang, equipped with a powerful 7.0 V8 engine. Only 1359 were made, and now there is one more :D Watch it in all its glory: Functions: RC drive - RWD with differential, 2x L motors RC transmission - 4 speeds, sequential, M motor Detailed V8 engine replica with fan connected directly to propulsion motors RC steering - with moving steering wheel, M motor Front suspension - double wishbone Rear suspension - floating axle Openable hood with lock controlled from the cabin Openable doors with locks Openable trunk Adjustable seats (sliding forward - backward and seatback angle adjustment) RC front lights Please watch the video to see this machine in action and for more details. I am quite happy with how I managed to include all the functions without compromising on proportions and interior in a relatively small model (46cm long). The biggest challenges were to fit piston engine over the suspension with the blue air intake under the hood without lifting it (as the result I had to make the hood hollow below the external air intake but still it was tight) and to fit interior over the gearbox. For that purpose I made the transmission very flat with gear shifting shaft actually crossing the drive shaft... (can be seen in action in the video - 2:30) I hope you liked this model.