Search the Community
Showing results for tags 'RC'.
Found 538 results
-
Porsche 911 RSR [RC MOC]
Daniel-99 posted a topic in LEGO Technic, Mindstorms, Model Team and Scale Modeling
Hello everyone! Im very glad to show my RC Porsche 911 RSR. As always, story begins far far in the past... My childhood dream was to get an RC car... Some time ago I shared with you a Corvette RC mod, and that was the "first step" in my dream coming true! In that project I understood, that a lego car can go a decent speed especially with the Buwizz 2.0. BUT... But the speed uncovered a another problem, that is the lack of control! Lego bricks have too much wobbling... Searching for the solution of this problem in the internet I found several buggy projects with technic bricks that has a positive caster... Ant I instantly understood that the positive caster is the thing I need in my car. Also, I was struggling a lot with gigantic scrab-radius. But in that time all rims produced by lego was symmetric. Finally, the Land-rover set has arrived... And the new rims give me some hope... Now I was going to build a 1:10 scale car. But the Land-rover set itself was a bad candidate for motorization due to it`s mass and a wobbly chassis. Due to the lack of skills in bodywork I decided to modify the lego set. I choose a Porsche 911 RSR set for my needs. One would ask me: why you call this RC mod a MOC? Well, the cassis of lego sets are totally inappropriate for making RC cars - most of them are too wobbly and weak. Moreover I wanted to build a positive caster. So I decided to build a custom RC chassis that will for to the bodywork of the initial lego set. Here is a front suspension. Yeah, that is my first "finished" chassis with suspension. Do you see some unusual ideas? I managed to build a double steering arms in order to make the steering system stronger. Moreover, I made a double steering rack steered with a single gear... On the back I decoded to build a live axle with motors connected directly to wheels: no friction on gears, no weak universal joins... I used the original instructions to check the dimensions! Here you can see the finished chassis - nothing special! I placed several smaller wheels for comparison. I would like to mention, that my first RC car was build with the smallest wheels (the very right wheel on the photo). The main reason why I build a car with small wheels was the lack of power the lego motors have (as I thought back then I was at the very beginning of my lego technic build experience). The main question for now: will the motors have enough power to move this big chassis? I made the first drive, and the car really goes well! Unfortunately I did not make a video, but it was going about 7-8 km/h - that was not a bad speed comparing to the 9398. After finishing the chassis I started the bodywork. Then I build front and back parts of the body (with a lot of changes from the original) I decided that it would be great to have a single body-unit that sits on the chassis on several attachment points. And this is the result: The main reason why I build a detachable body is because I was going to make modifications of chassis! Hope you like my post and the car ;-) Feel free to comment on technical aspects. P.S. one fan fact about this car: this RC car has only one gear! - sounds crazy, isn`t it, -
Fitst PF technic car [MOC]
Daniel-99 posted a topic in LEGO Technic, Mindstorms, Model Team and Scale Modeling
Hello everyone, today I will tell you a sad story about my first attempts in lego technic RC. Lego technic set 9398 was my dream since I like really like both RC cars and lego. And then I get one I was totally disappointed! 9398 set was a slow turtle that stops in front of any "decent" obstacle. At first, I tried to deal this problem by changing gears and it gives a result, but the car became a super-slow turtle... After that I decided to motorize a 42029 Pick up set with motors from 9398 set, but the car had not enough power as well... The wheel were too big and heavy for two motors... (at least I thought that in my early days). Finally I understood that the smaller wheels car has, the easier it will be for motors to move the car... And I decided to build a car with the smallest wheels possible! The car is assembled form the 3 sections: front wheels with steering rack, rear axle and the middle part with all the motors emplaced. Technical specs: 1 steering with servo-motor 2 propulsion with L-motor 3 PF battery box and receiver Here you likes it... This is my first "finished" motorized technic MOC ! -
Chevrolet Corvette 42093 [RC MOD]
Daniel-99 posted a topic in LEGO Technic, Mindstorms, Model Team and Scale Modeling
Hello everyone, in this post I want to tell you about my motorization project I completed about 2 years ago. The set 42093 brings the wheels to the technic community. I always wanted to build an RC car with lego bricks but I had no experience neither in bodywork nor in building RC chassis, so this project was my second "successful" attempt. Technical specs: 1 steering with Servo-motor 2 propulsion with 2 L-motors 3 powered by Buwizz 2.0 I also made some improvements in bodywork. Enjoy the build! As you can see, I improved the roof by making a higher A-pillars and adding grey arches on the sides. A full gallery is available by the link: https://bricksafe.com/pages/danil.nig/motorized-chevrolet-corvette-42093 -
Book Review (Review by Thorsten Benter) Almost a year has passed since initial publication of this book. There are a number of on-line reviews available – this one on EB seems to come in a bit late. Well, I don’t think so, in contrast. This book is a comprehensive how-to-build-a-train resource rather than a compilation of what is out there. And this sets the book aside from so many others. It will be up-to-date as long as The LEGO Company produces bricks and sets. Plus, with the arrival of the Powered Up system, more space becomes available inside the train body as compared to comparable PF functionality: The dedicated receiver becomes obsolete and no line of sight is required for communication creating some additional space – space for sophisticated building techniques! This books tells you everything you need to know about the historical LEGO train theme development at TLG, about scales and widths, about pivot points, microstriping, SNOTing and offsetting, and so much more with relevance to train building! (Note: A PDF copy of this review with higher resolution pictures will be shortly available at Holger’s website) Summary: A must-have for every LEGO train fan, for people entertaining the idea of getting into LEGO trains, and for people who still don’t know that they will become train fans after reading the book Superb photography of LEGO models, outstanding renders of CAD models In-depth analysis and assessment of the different LEGO train eras Demonstration and teaching of advanced building and design skills My personal LEGO book score: 10/10 About the book: Author: Holger Matthes Published: Oct. 2017 by No Starch Press Inc., San Francisco, CA, USA. Hardcover, 135 pages + 90(+) pages reserved for 4 full building instructions (ICE train, gondola car, Swiss Crocodile, and a vintage passenger coach), 150+ most relevant and educational figures (excluding the beautiful chapter openers or page breakers as well as the set building instructions), 20+ tables including bulleted lists. ISBN: 1-59327-819-5 Price: € 14 (Kindle edition, Amazon); € 23 (Print edition, Amazon) both as of 9-2018. $ 19 (ebook only), $ 25 (ebook and print edition, nostarch.com) both as of 9-2018. The present English edition published by No Starch Press is based on the initial German edition “LEGO Eisenbahn – Konzepte und Techniken für realistische Modelle”, which was originally published by dpunkt Verlag Heidelberg, ISBN: 978-3-86490-355-7. The initial German edition of the book based on Holger’s manuscript composed in 2015/16 caught the attention of foreign publishers: It began with the present English edition in 2017. It then took a bit longer until the Chinese publisher “Posts & Telecom Press” (who has already published a bunch of LEGO books written by fans) very recently released the Chinese version: http://www.ptpress.com.cn/shopping/buy?bookId=0ed0cd68-ca59-41fc-9bf9-193b06089996 (ISBN: 978-7-115-48419-2): After publication in 2017, No Starch Press’ English version became the reference for further translations. In summer 2018, the Spanish (“LEGO TRENES”; LEGO TRENES https://www.amazon.es/TRENES-Libros-Singulares-Holger-Matthes/dp/8441540179) and the Italian (“TRENI LEGO”; https://www.amazon.it/Treni-Lego-colori-Holger-Matthes/dp/8868956411) editions became available. And the Russian version is on its way (sorry, Holger couldn’t tell me any further information about its availability): (Note that the Russian cover on the right is purely made up by me – Google translator says the Cyrillic headline reads “in preparation” – but who knows …) About the author Holger Matthes is a hobbyist who has been building with LEGO since 2000. He was involved in the creation of various official LEGO projects such as the Hobby Train set #10183 and frequently presents his models and gives workshops at LEGO exhibitions worldwide [copied from Amazon website]. Table of content of the book (short version) Part 1: Overview and history Introduction A history of LEGO trains Part 2: Building your own train models (My own creations – MOCs) Basic principles Designing your own models Case studies in design Part 3: Building instructions A note on the included building instructions Appended to the body of the book, you’ll find four high quality and carefully composed instructions in addition to two free online instructions: Inter-City Express (ICE; driving and trailer cars, PF motorization, windshield designs) Gondola car Swiss electric Be 6/6 “Crocodile” Vintage passenger car Steam Engine BR 10 (as bonus online available at http://holgermatthes.de/bricks/en/br10.php) Steam Engine BR 80 (as bonus online available at http://holgermatthes.de/bricks/en/br80.php) There is further information available online. Holger directs you to https://www.nostarch.com/legotrains; but most of the very valuable stuff is actually hosted on his website. I highly recommend to visit his site: http://www.holgermatthes.de/bricks/en/index.php. You will find a wealth of background information, tips&tricks, how-to, and much more. The Book Let’s face it: Almost one year after initial publication, Holger still sets the stage with this book for LEGO train fans. It will be tough to get it much further; not on 135 pages (not counting the instructions pages), not with regard to the topics covered, not with regard to the width of the audience addressed. This book provides diverse perspectives on the art of building LEGO trains, coaches, and rolling stock – and is at the same time always determined, focused, and addresses most relevant “issues”. Train builders repeatedly face tough challenges: A train is not a building, which simply resides in all its beauty; rather trains are work horses – either hauling heavy cargo loads or endless passenger coaches, or switching rolling stock for hours and hours in a train show – or on your personal layout. At the same time, a LEGO train is “beautiful” and “esthetic” in the recognition of a train fan - as a building is for City fans. However, to be able to render real trains into LEGO models, regardless on the scale used, requires some serious knowledge about the myriads of LEGO bricks available, about advanced building techniques, and even electrical wiring skills. There simply isn’t much space in a LEGO train. Space as in “Space … is big. Really big. You just won't believe how vastly, hugely, mind-bogglingly big it is. I mean, you may think it's a long way down the road to the chemist's, but that's just peanuts to space.” [Douglas Adams, The Hitchhikers Guide to the Galaxy, 1979]. It is usually >extremely< packed inside a LEGO train model, particularly when electrifying it. Shaping the outer appearance with advanced building methods such as SNOT or angled and carefully secured pieces usually eats up all the space inside the hull. And lastly: Trains need to be sturdy. They not only haul heavy loads – they also have to run endless distances on track – in the best case on long stretches of straight track and smooth curves, here and there a bit bumpy – in the worst case negotiating endless and sharply bent curves and switch points in complex rail yards. This is exactly what Holger addresses in his book: How to achieve a sturdy, reliable, and at the same time esthetic and beautiful train. And we should just get it straight from the very beginning: Stickers are frequently recognized as the “icing on the cake”. And this is certainly true. BUT: Believe it or not, you can also legally “build” tiny lines, sloped coloring, narrowly split windows and much more when using advanced building techniques! And that sets aside this book from so many postings, building instructions, and other resources: Holger shows us how to accomplish “brick-built stickering” by using the endless variety of bricks and plates to build streamlined and nicely accentuated and smooth surfaces – rather than using the bulky, essentially non-LEGO-philosophy-but-by-TLG-released ICE #55768 nose with stickers attached all over it … There is so much more in the book. This is what I am trying to highlight in the following. Holger’s book is a must for us all: Beginners, advanced builders, as well as Train Tech gurus! And those who believe that they already are. One more thing to add: Photography and CAD image rendering. Or: A picture is worth a thousand words. Holger says: “The biggest thank you goes out to my old friend and master photographer Andy Bahler, without whose pictures this book would have been useless. His commitment, night after night, was above and beyond expectation …” The pictures are spectacular – you will notice right away. Organization of the book There are three parts in this book, although there is no such explicit assignment in the table of contents. Holger tells us on page 2 though: “The first part of the book gives an overview of LEGO trains over the different eras, covers some history, and answers questions about how to combine old LEGO trains from the attic with today’s kits. The second part of the book is about building your own LEGO train models, also known as My Own Creations (MOCs). Using my many years of experience building LEGO models, I’ll show you how to create proper train models, covering both the possibilities and the limitations. Finally, the book ends with step-by-step building instructions for several models.” Usually, the table of content is a good starting point for the organization analysis. However, this book is extremely focused and self-contained in each of the chapters of the three parts. This is very helpful (and also very different from other books), as the LEGO universe, including train worlds, is as diverse as it possibly gets. The number of pieces alone currently available through TLC’s official channels such as LEGO sets, PaB, and LEGO stores – or even more so – through the uncountable BrickLink stores around the globe is truly mind-boggling. Well, it is not only the sheer number, but more so the endless combinations possible – and what you achieve with such. Chances are: One gets rapidly lost and a little frustrated. Exactly this is NOT happening when “reading” this book. OK. We do it differently – as it seems appropriate for a “different” book: We walk through, as the very nice and focused organization of the book simply allows that. Part 1 “INTRODUCTION Decades ago, the toy designers at LEGO likely never imagined how durable their work would be. Today, parents can dust off their childhood LEGO trains and play together with their children who have just received their first brand-new LEGO train set. And fans of all ages can revive older sets and parts to create entirely new models.” In order to prevent such an almost natural “disorientation” or lost in parts and ways to connect them, in part one the book begins with a review of on-line resources. Information-, instruction-, and brick-availability-wise. Holger lists only the most relevant internet locations. Start here and progress further on your own. It makes your building life so much easier. As with every printed book, online references may become outdated at some point in time. Holger names thus only most reliable web portals, which will most probably exist for a long time. “A HISTORY OF LEGO TRAINS Let’s explore the evolution of the LEGO train systems from the earliest set to the present.” Next, there is a historical review of which type of train system was available at what time defining an era. This is rather significant. First of all, this approach results in a theme classification rather than a temporal evolution of sets: The blue, grey, 9V, RC, and PF era. As the pieces from different areas are naturally largely interchangeable (otherwise it would not be LEGO!), you may mix them as you see fit. Nevertheless, each era has a certain typical appearance – if you want to capture that, you need to know what was going on during that particular era. As an example, people in love with the grey (12 V) era often capture the look and feel of that time – for example studs everywhere, not many curved bricks/diverse slopes (as they were not available at that time) – rather limited colors schemes, black, red, and yellow ... The reader learns what has been produced when and in what color scheme. There is also ample of information on the technical features of each era – it appears as if the author is deeply involved and well connected in the LEGO train community – all the way up to participate in the design of selected sets. Holger shares his knowledge with the reader – always in a concise and focused way. It is pointed out that Holger is not even attempting to compile a complete list of sets available within the different eras – in contrast, he is summarizing the unique era characteristics and features. He focuses on power sources, tracks (including switches and crossings), and other elements (wheels, baseplates, in addition to unique features, such as trucks, couplings and buffers). The grey (12 V) era sections stands out of course, as this was the most diverse and most creative train theme ever (IMHO, of course!). Here you will find an – again unique – compilation of “remote-controlled accessories”, “windows and doors”, “light bricks”, “weighted bricks” … What I personally find extremely useful – and it must have been a considerable effort – is i) a summary table, listing the most important features of each era, and ii) Holger’s evaluation of these features he headlines as “Seen from today’s perspective”. Even long-time and experienced train enthusiasts will surely find valuable information in this chapter! Part 2 “BASIC PRINCIPLES Let’s dive into the world of LEGO elements and explore the endless ways to connect them.” Now that one knows the individual features of the different eras, Holger opens part two of the book with a compilation of relevant LEGO pieces for train building. It is really surprising how many there are! I have built trains myself – seeing all the various elements nicely grouped and organized makes it so much easier to get an overview of individual pieces, select the ones you may want to try out – and compare them to other options. This section is extremely helpful when you start off with a new model – or when you want to overhaul an already existing train. In the following section, Holger introduces typical train specific building techniques (although you can use many of them throughout the entire LEGO universe!). And is not surprising that there are eleven dedicated pages on SNOTing and fractional-plate offsetting in all three dimensions. These are the most crucial techniques when shaping the look of a train. SNOT (studs not on top) is a powerful technique and has become very popular among train fans. Originally rather restricted to a few elements, which allowed to “reverse” the building order, the LEGO Company has released a broad variety of SNOT elements over time. These are of course also shown in the preceding chapter on relevant LEGO train pieces. I’d say that this chapter is extremely important for beginners and of great interest to experts as there are various approaches shown side-by-side. At least for me this chapter is highly inspiring. The same is true for plate offsetting, i.e., building with only one half stud or even less displacement off the stud grid. First, the look of a train becomes much smoother even when not using curved bricks; secondly, this technique allows you to literally “build” colored surfaces with fine structures and even thin stripes (called microstriping). Without using stickers that is … Ever used minifig guns to create pantographs? Or ice skates as door handles? No? Well – Holger shows you! “DESIGNING YOUR OWN MODELS You might be wondering if you’re ready to begin making your own models. Which train should you build? Maybe you should start with the commuter train that takes you to work every day, or a freight train? And who hasn’t dreamed of a beautiful steam engine in LEGO?” Now we are getting down to business. The following two chapters of part 2 are not about “building a train” – they are about “how to do it right”. We are talking about scaling and modeling rather than “pushing along”. Before Holger goes into details though, he points out the importance of thoroughly choosing a scale. This is an extremely important decision to be made when attempting to model a real-world train. How much detailing is required? How much abstraction is allowed? Citing Holger again (page 73): “Building a recognizable model isn’t about scaling every part exactly, although proportion matters. Intentionally omitting some details or exaggerating others is usually necessary. Scale modeling with LEGO is a bit like drawing a caricature: the end result may not be an exact likeness, but it is recognizable and undeniable.” We learn about model scales (1, L, O, HO …), alternative approaches (scaling by wheel size) as well as choosing a model width (6-, 7-, 8-stud-wide). Don’t mix these up – almost any scale may be used for any track width! There are so many diverse examples here on EB. Holger narrows the scope of widths covered in his book to 6 - 8 stud wide (see cover page of the book), as these are the widths most builders choose – in addition to the official 6-wide LEGO models. He discusses the advantages and downsides of each of these widths in detail. A very important aspect when designing and building a LEGO train – regardless of the model scale – is the official LEGO track geometry. Maximum distances of fixed axles, alleviation of this rather restricted distance using articulated single trucks (a theme repeatedly discussed here on EB), sliding middle axles in three axle trucks – you will find all the answers in this book. When it comes to attaching cars to each other – even more design aspects have to be considered, which are all discussed: Pivot points vs car distance, additional pivot points to reduce car distance, the effect of pivot points on design issues, to name a few. And then: Steam engine design: 7 full pages! As far as I am concerned, steam engines are the most challenging models to render in LEGO. To say it with Anthony Sava’s words: “I'd buy a set with a steam engine in it, but I have little interest in buying a box on wheels.” (EB Forum, April 2nd 2018). Holger shows us all the challenges and caveats. The remaining sections in this chapter are: Power and Control, discussing mostly the implementation of PF elements, Modeling Details, and Track Design and Layout. Again, extremely valuable information and guides are given. One comment on third party suppliers: At the time of writing this book, both SBrick controllers (as a replacement for PF receivers, featuring wireless Bluetooth connectivity) as well as ME Models (as a supplier of wider radii curves) were actively present on the market. As of now (i.e., August 2018) though, the new LEGO Powered Up system introduced lately makes SBricks for trains almost obsolete – and Me Models have gone out of business some time ago. There are a good number of very good 3rd party alternatives for additional track pieces – large curve radii, complex switch point geometries to name only a few. They come as superb injection molded pieces which are almost indistinguishable from original LEGO track, as well as 3D printed varieties. I believe that a book of the format Holger has chosen simply does have to deal in-depth with such developments as they are much more volatile than almost any LEGO product. Taking aside the LEGO RC interim solution of course. But again, Holger gives a full account of why RC happened at all and why its lifetime was even shorter than that of many 3rd party small businesses. I really enjoyed this section very much. Regarding very recent developments by TLG naturally not covered in the book (the original German manuscript was written in 2015/16): The introduction of the Powered Up system leaves much more space within a train engine so that all the building tips and tricks provided in Holger’s book become even more intriguing! It appears as we can even more freely combine advanced power/remote control options with the present advanced building instructions. Which makes this book even more valuable! “CASE STUDIES IN DESIGN Armed with the tools and knowledge about LEGO modeling covered in the previous chapters, we’ll now take a closer look at the actual design process using some of my own builds as a guide.” This chapter needs to be explored – interpreted – by yourself. This is – as far as I am concerned – the heart of the book. Here you will learn how to begin designing a model. I find this part the most difficult: How to begin – looking at the all the bricks, plates, slopes, clips, there are so many of them … so we should take this to our heart: “Designing a model is a creative and personal process: there’s no right or wrong way to build a successful model. The guidelines in this section are meant to get you started. You’ll certainly develop your own strategies along the way.” Along with: Decide on a scale and choose the width: 6-, 7-, or 8-wide? Decide how the train will be powered and what type of track it’ll run on. Choose a target audience: should it be a realistic, recognizable model, or are play functions more important? You will notice: This is about >you<! Nevertheless, you will also learn a lot in this chapter. Holger has chosen a regional express train (Bombardier double deck train), a powerful electric locomotive (Siemens Vectron engine), and a (well, Holger is German after all …) steam engine (BR 10) as case studies. This is a very clever selection – as the techniques he shows apply to almost every engine I am aware of – including American diesels as well as American steamers … or all the various European trains, Emanuele (EB member LT12V) is currently presenting here on EB … And finally … Part 3 “BUILDING INSTRUCTIONS! Get inspired with these step-by-step instructions for building an Inter-City Express, a simple gondola, a Swiss Electric Locomotive Be 6/8 “Crocodile,” a vintage passenger car, and a steam engine.” From page 136 to 227 you will find first class, high(est)-quality building instructions for the above referenced models. There is nothing more to add. As said: This book is a must … Play Well! @Jim Thank you very much Jim for giving me the opportunity of writing this review for EB - it was a great pleasure. And for sending me this wonderful book! @HoMa Thank you Holger for writing this book. And for all the additional information you gave me when writing this review and for your comments! Thanks for reading, Thorsten
-
Stupidly Overpowered City Car
piterx posted a topic in LEGO Technic, Mindstorms, Model Team and Scale Modeling
Hi everyone! After building some bikes me and friend (who's gonna post his entry one of these days) challenged each other to make the smallest RC vehicle possible and why not, also make it ridiculously overpowered :) So I made this little city car, it has some brutal power given by the buggy motor connected with the fast output and geared up to 1.666. It should travel at around 10kmh but given the high center of mass, like a city car thrown at 160kmh as soon as you try to make a sharp turn it rolls over... wich I admit it's pretty fun! Indoors it performs crazy drifts and it's really enjoyable to drive around, probably geared 1:1 it would be even better for indoor usage. I hope you'll like it !!! Features:- 1 Buggy motor - 1 Buwizz Measures:19.3cm x 11.8cm x 8.1cm350g weight I'll post a video as soon as it stops raining like crazy as it is these days :D -

[MOC] RC Toyota Corolla TE72 Wagon
Danifill posted a topic in LEGO Technic, Mindstorms, Model Team and Scale Modeling
Hi! This time I'd like to show you this model of a Japanese car - Toyota Corolla TE72! It is really simple and it has only tow functions: driving (buggy motor) and steering (Servo motor), but it is also possible to install working front lights. It is pretty fun and quick, though it doesn't have any suspension. It is almost the same scale as the 42109 TopGear car set. The goal was to make a recognizable model, so I hope you will like it. :) Video link: Photos: Thank you! -

[MOD] 10279 VW Bus T2 Remote Controlled
Cyrix78 posted a topic in LEGO Technic, Mindstorms, Model Team and Scale Modeling
Lego released a new Creator veichle and as a tradition I have motorized it with remote control. A bit easier to hide all electric parts this time as the car is really big. But it is also heavy and slow with only one L motor for drive. There are some small changes to the interior, but all details are still there. I have created instructions to build it with Powered Up parts, but if there are any interest I might add instructions for other power systems later. Rebrickable Instructions Youtube Video -
-kpia.thumb.png.a265cddff9575859eea3a4d2aad663c2.png)
MOC RC Hägglunds BV 206 ATV
Technic BOOM posted a topic in LEGO Technic, Mindstorms, Model Team and Scale Modeling
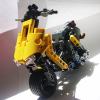
Please suport my project on Lego Ideas. https://ideas.lego.com/projects/bc17ae38-b3e7-4cb2-b804-401e0bcc7aef Power functions: 3x L-motor 1x IR Receiver 1x IR Remote Control 1x AAA Battery Box 1x Control Switch 1x Extension Wire Description All openable doors. Model have fake motor V6. Color: Black and Yellow Number of Pieces: 800-100 Thank you very much for your support! Military version: Hägglunds BV 206s -

[MOC] Rock Crawler "Hornet" [free building instructions]
keymaker posted a topic in LEGO Technic, Mindstorms, Model Team and Scale Modeling
Hi, Here is my take on rock crawlers – I present to you an unstoppable and fully customizable rock crawler: „Hornet”! I called it unstoppable and fully customizable not without a reason. You can find out why in the video and in extensive list of features, details and links below the video. Instructions can be found HERE, they are free of charge, I hope many of you will be able to build it and have fun playing with it outdoors as I did. Without further talk, please enjoy the video! Details and main functions: • dimensions LxWxH: 36x22.5x19.5 cm • weight: 1.55 kg • 4x4 drive (3xL motors) • steering (M motor) • live axle suspension, front and rear • openable doors • easy removing the whole body with locks hidden in bumpers • it fits Lego Technic Figure Configuration options: 1. Drive and steering • Power version: 3xL PF motors for drive and M PF motor for steering front axle • Agile version: 2xL PF motors for drive and 2xM PF motors for steering on both axles 2. Body • „Hornet” – default body, more build-up, with opening doors • „Red Ant” – alternative body, more open one, 25% lighter than „Hornet” body 3. Suspension • Four independent, clearly visible mounting points available for each shock absorber • Multiple mounting points allow to configure four parameters of the suspension and the whole MOC: - suspension stiffness (from soft to hard) - suspension travel (from long to short) - body height (from low to high) - body style (from rock crawler to monster truck) • suspension can use both long and short shock absorbers Other features (which you may or may not spot on the video): • both bodies are equipped with two seat simple interior with steering wheel and some minor details • both available bodies are prepared in a way to avoid visibility of blue pins • frame is also prepared in a way to avoid blue pins • blue pins in frame are used mostly to high light mounting points for suspension and point out the front of the frame • frame prepared to be allow easy pairing with any new bodies • frame is equipped with simple cable management to avoid damaging motor cables during off-roading • changing connections of shock absorbers to the frame is fast and easy • MOC can be easy carry on both via body or accessable handle at the bottom of the frame • center of the mass is located at the center of the MOC • center of the mass is located low, most of the weight is present in axles • drive doesn't use differentials to maximize off-road capabilities • both axles are secured with panels to protect axles and drivetrain against any dangerous objects (grass, rocks, etc) • high ground clearance for both axles even with using planetary hubs • L motors are connected to planetary hubs without any reduction – this provides both speed and necessary torque • approach angle is 90 degrees, front and rear More photos you can find HERE -

[MOC] RC 1/11 Autozam AZ-1
syclone posted a topic in LEGO Technic, Mindstorms, Model Team and Scale Modeling
Good Day. Today I present you another japanese car in 1/11 scale - Autozam AZ-1. This kei class sport coupé is one of the most recogniseable/famous ones outside japan in spite of it's poor sales due to the high asking price and the burst of the bubble economy at the time. It also forms part of what is known as "Heisei ABC Trio" (Autozam AZ-1; Honda Beat; Suzuki Capuccino). The real car was developed by Mazda (Autozam being their brand focused on Kei car and sales of rebadged vehicles) with the F6A engine (in-line 3-cylinder DOHC turbo) coming from Suzuki. It was sold in the standard, Mazdaspeed and special editions (such as M2 1015) as well as under Suzuki badge as "CARA". Following the japanese kei class category standards, AZ-1 has 64ps (47'8kW) and is quite small at 3295 x 1395 x 1150 mm. To put that into perspective, here it is against a "small" european car: Some of the reasons why this car stands out so much are the gullwing doors and the MR layout. This model represents the standard edition, with a low factory spoiler(wing?), in it's iconic two-tone red+gun metal colour scheme. Initially it was intended to use the 43.2 wheels, but after making the Daihatsu Hijet in 1/11 scale with the 49'5x14 tyres, I wanted to make them in same size. This allowed me to cram both more detailing and functionality. The final model's features are: - M-motor for drive (with differential) - Servo for steering - Front independent MacPherson strut suspension with positive caster angle - Rear independent MacPherson strut suspension - Working steering wheel - Working fake engine - Working headlights - Detailed dashboard with AC vents, stereo and gauges - Detailed interior with gearlever, emergency brake, seats and door detailing - Openable doors, boot and bonnet I've tried to replicate the general look the best I could and to make the model more or less consistent overall. Hence the use of liftarms placed onto flexaxles for front quarter panels, as bare flexaxles stood out too much. The side intakes took some time to make as well, and even though I've tried using the 1x2 grille tiles, in the end the bionicle tooth piece ended up being my go to solution. The lower door sills actually use a bit of inherent slack coused by frictionless pins to archieve that slight inwards angle towards the bottom, but it is quite sturdy and doesn't damage any parts. Presentation video: PDF instructions available on Rebrickable: https://rebrickable.com/mocs/MOC-86177/syclone/rc-autozam-az-1/ Photo gallery (and an extra at the end of post): I've actually forgotten to take an underside picture, so here's a render instead to make up for it. Although red is definitely the most iconic colour for the AZ-1, there was also a second factory-available colour - blue. Unfortunately TLG's Technic colour palette has barely any blue parts, and having Bruno's Ferrari as parts donor the choice was already made, but if you don't mind ordering 3rd part parts, here's what it'd look like: Hope you've enjoyed this small model - C&C is most welcome as always))) -
 Hi everyone, I've finished trying to RC my 42043 and it seems that the PF L motor has issues providing sufficient power to drive the set? I obtained instructions from the creator of this video (https://www.youtube.com/watch?v=BpP_05uxKqs&t=22s&ab_channel=PawełWojnarowski) and also checked PPUNG DADDY's 42043 RC video (https://www.youtube.com/watch?v=O8easq7ueIo&ab_channel=PPUNGDADDY(뿡대디)-LEGOTECHNICRC), both used an L motor with no problems. Here's a video of the issue: https://youtu.be/J8P13WLPzN8. As you can see in the video, the motor loses power after driving for some time, eventually being unable to drive at all. The problem is worsened when I try to drive and steer at the same time, it's almost impossible to drive and turn. I have tried swapping the tyres around, changing batteries, trying a V1 and V2 IR receiver, switching positions of the motor and servo cables, and using a new L motor. But the problem still persists. Here's a photo of the L motor: Could it be because of excess friction introduced in the rear axles during construction? Because I noticed when I lifted up the rear axles, the motor spins the wheels at its standard rpm, BUT only 1 wheel on each axle spins, the other is stationary. Then when the wheels contact the floor, the motor suddenly seems to struggle with driving the thing. Hence I was thinking could it be that I built the differential too "tightly"? Appreciate any help from the technic experts in this forum, thanks in advance!
 -

[MOC] [C-Model] RJ's Johnny 5
RJ BrickBuilds posted a topic in LEGO Technic, Mindstorms, Model Team and Scale Modeling
This is an alternate build of the Lego Set 42100, Liebherr 9800. Parts list used in the MOC is listed so you can opt to just buy the required parts instead of buying set 42100.Motorized features include: Tank drive for both tracks Arms upward/downward movements Head turn Head tilt Body tilt Manual play features include: Upper and lower eye flaps can be moved to show facial expressions. Finger movements. Limited manual arm movements Here's a link to the YouTube video to showcase its movements: RJ's Johnny 5 YouTube Video If anybody is interested, building instructions are available at Rebrickable. -
Johnny 5 is on Lego Ideas
RJ BrickBuilds posted a topic in LEGO Technic, Mindstorms, Model Team and Scale Modeling
Johnny 5 needs your support to become an OFFICIAL JOHNNY 5 LEGO SET. Click the link below to support and feel free to share. - Link Removed - Who is Johnny 5? Hello, Bozos! Those who don’t know him, Johnny 5, also known as “S-A-I-N-T Prototype Number 5” or Number 5 for short, is a very lively and inquisitive military robot prototype who’s perpetually hungry for more “input”. He is the star of the 1980’s movies Short Circuit and Short Circuit 2 and a TV special called Hot Cars. He became sentient when he was luckily struck by lightning during a combat demonstration. Although he is designed to serve the military as a robot prototype, he has an adorable child-like behaviour and has a great respect for life. He is a peace-loving robot and refuses to use his military capabilities to harm others. Despite being very intelligent and inventive, his naivety and trusting nature has been taken advantaged of on several occasions. Why Make a Johnny 5 Lego Set? In Short Circuit 2, Johnny 5 set up a new business with his old friend Ben Jahrvi that builds and sells toy robots made in Johnny 5's likeness. This little robot never made it into actual production after the film. Johnny 5’s popularity and the unavailability of access to these cute little Johnny 5 robots made people clamour for this toy. To date anyone can google sites for 3D printing Johnny 5 robots and websites dedicated to producing both life-like and miniature Johnny 5’s. Johnny 5 is one of the iconic fictional robots in cinema to date. He’s part of every child who’s lived through the 80’s like me who are now AFOLs and longed for the Johnny 5 toy that never came out. Design This model is fully motorised using Powered Up motors and hub and controlled through a mobile device using the Powered UP App. It uses Technic parts to ensure stability of the structure, and System parts to capture the look and form of Johnny 5. The following are the playable features of the model: Movement – This model can move around on tank tracks and uses skid steer to change directions. Body – Johnny 5’s body can tilt using a Powered Up L motor and controlled using a mobile. Arms – Arms can be raised and lowered individually using the Powered Up App. The fingers can be adjusted manually as well as the elbows. Head – The head can be tilted and turned using the Powered Up App. Eyebrows – Eyebrows can be manually adjusted to suit the desired facial expression. Laser – The laser at the back can be raised and lowered using the Powered Up App. Total Pieces: 2,711 Dimensions: Studs: W 68.4 x L 36.1 x H 73.5 Inch: W 21.5 x L 11.4 x H 23.2 cm: W 54.7 x L 28.9 x H 58.8 Weight: 99.8 ounces or 2.83 kg -
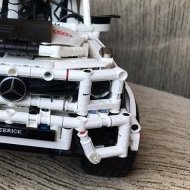
 Hello all Technic fans, let me present you my tribute to the famous Mercedes-Benz G-Class iconic car series. As a relatively new member, I must introduce myself. My name is Igor, I'm from Russia. Adult Fan of Lego, but I usually do this hobby with my 12 year old daughter. In fact, I'm too lazy to upload my MOCs anywhere, but this time I finally decided to do it. As it turned out, creating an instruction also takes a lot of time and is not as fun process as it might seem at the beginning. My MOC is not really an original model. This amazing MOC by Artyom Gabbasov strongly inspired me to build my own MOD. For some reason, it looks like this MOC has not yet been presented here. Basically, what I built was a deep modification of it. I disfigured the hood with system and added a couple more motors. Here is a short video review so that you could form an opinion on the look and functions. Sorry for the video quality, I'm just an amateur with an old smartphone. A few words about the details... Body. Still, time goes on and it seemed to me that the old body was no longer cool, so the choice fell on the new body of 2018-2021. In addition, I decided that it would be a BRABUS tuning. In my opinion, the 2018 body looks really modern and I really like it. The body of the G-Class is square, so it won't be possible to work it out on this scale. Therefore, I focused on such details as the bumpers, the radiator grille, as well as the rear of the car. I especially wanted to make the new optics of the car recognizable, so it took me so many LEDs. The hood was conceived in the BRABUS style, but how successful it is for you to judge. Perhaps some of the parts in the MOC will be rare, but I wanted to make the body as black as possible, without blue dots from pins, etc. Interior. Here I tried to work it out as much as possible on this scale. Moreover, I wanted to keep the rear row of seats, so I managed to fit two BuWizzes in the trunk. Wheels. I used RC wheels in this model because they looked better and were more suitable for drifting. I'm sorry this is certainly not original Lego, but the choice of 62mm Lego wheels is not as huge as we would like. Functions. The car was originally designed for racing, drift and fun. But after thinking for a while, I decided that converting the MOC into a boring regular version shouldn't be too difficult. As the extra functions, in the end, I decided to make the front L-motors removable so that you could quickly change the main transmission ratio. And I also decided that the quick-release rear axle would fit too. So that during the game you can change it to a regular axle (with a differential). I also made two color variations of this car. I like blue even more, but some details in this color are even rarer (shock absorbers, e.g.) You can find higher resolution photos here: https://www.flickr.com/photos/193022960@N03/collections/72157719220016393 If you decide to repeat it, then a free instruction is available here: https://rebrickable.com/mocs/MOC-77314/igor1/mercedes-g63-brabus-2021 Feel free to share your opinion about the MOC or ask something further about it. Thank you for your attention.
 -

[MOD] 76139 1989 Batmobile - Motorized with all functions
recklessGlitch posted a topic in LEGO Licensed
Hey folks, another Motorization: all Functions of the 1989 Batmobile (LEGO 76139) RC controlled - yep the Batman again... Without sacrificing any of the nice details: Cockpit is still there, steering wheel works, just all motor driven and I motorized the guns and the roof and even made a tailored sbrick profile. Building instructions: Motorized LEGO 1989 Batmobile on rebrickable Driven by 2 LEGO Power Functions L-Motors (1:1 transmission) steered by a LEGO Power Functions Servo Motor guns engaged/disengaged by Motor roof opened/closed by Motor special Sbrick profile with programmig and grafics included a lot of space for up to 2 battery boxes/control hubs easily reachable under the trunk hatch (details on my rebrickable MOC page) Watch a Review of my motorized 1989 Batmobile on youtube: The Batmobile from Tim Burton's Batman 1989 with Michael Keaton is definitely one of the coolest, it's not as funky as the 1960s TV version and not as tank as the Nolan version but in my opinion it's simply a beaute! The 1989 Batmobile is using over 3,300 pieces, and over 60cm long. I added a few hundred bricks, mainly LEGO Technic and reused some others. So I ended up with over 3500 parts and (batteries included) almost 3.5 kg. That's heavy! So I needed a powerfull drive. I was thinking about the buggy motors but these are large and I wanted to put the batteries into the trunk. So i went for a pair of LEGO Power Functions L-Motors. These are some of the strongest LEGO motors and very small and efficient for their power and speed. The 1989 Batmobile is sleak and lies very deep on the road so it is geometrically impossible to move up any small hills (or even carpets). It will get stuck with its floor height of less then a brick. So it will only drive on a flat surface anyway. So it can be build for speed instead of torque power which the 1:1 transmission of the two L-Motors will do: It's a speed build, literally. One reason to put the batteries into the trunk was, to reach it easily for changing/recharging or simply switching on. Another reason was, to not put them into the beautifull cockpit with its nice self opening windshield - self opening? Yes, now it is motor driven ofcourse. And you hardly see the mechanics on the floor. Okay, the Batman minifigure included is way too small for the car but I found a Batman LEGO LED light, that fits into the car. Just be carefull when closing the cockpit to not get stuck. Slide-open is no problem. The car’s turbine exhaust by the way does not drive the machine guns anymore (it does in the original) because now a motor engages them. So I could make the jet exhaust it look like a real jet engine - the only exterior I changed. To make the two machine guns hidden, under the hood pop up, just press a button now. The Batmobile comes with nice little Bat emblems printed on the wheel rim - try not to lose them while driving, they are rare parts. The set of specially designed tyres for the front wheels is steered in a very specific geometry. I took care to keep that working the exact same way because it works very well for steering. The Build was complicated, took me weeks to get it right. I didnt want to change the exterior and as few as possible from the cockpit. You shouldnt see the opening mechanics. And I wanted to have all the features working, even the steering wheel (though steering is handled by a servo motor now) Every time I thought I got it, something else made problems, untill finally it all worked out. You can skip the trial and error (and breaking old LEGO gears) part: I made instructions and made them easily readable, so you can have it speed build in no time. I believe everyone should be able to build a LEGO set and try to make my instructions like that. Now it's hard to say, which one is the best batmobile motorization I ever made: The Lego 76139 1989 UCS Batmobile has more functions: motor driven MGs and a motor driven roof, the remote controlled motorized Lego 76023 UCS Tumbler I modded however has a full steerable front suspension for the independen wheels. my special Sbrick profile with some automated scripts is included I even made a cable layout for the power functions cables and extentions if you ended down here you may also be interested in or -
[MOC] Rock Crawler - 42114 C-model
mic8per_ posted a topic in LEGO Technic, Mindstorms, Model Team and Scale Modeling
RC Rock crawler. Features AWD drive without differentials using 69730 "Large angular position motor"(As it has realy good torque), Steered by L-motor, and springless suspension (concept by superkoala). Lack of differentials gives nice off-road perfomance, but the crawler has big steering radius due to that.42114 C-model. You can buy instructions here: https://rebrickable.com/mocs/MOC-81106/mic8per/42114-rock-crawler/#details Video: -

6x6 Truck (Built in 1 DAY)!!!
CrazyKreations posted a topic in LEGO Technic, Mindstorms, Model Team and Scale Modeling
Hello, fellow Eurobrickers! I designed this 6x6 truck today as I challenge and I didn't think much about it but It turned out to be a success (in my eyes). I hope you guys like it. The design was inspired by a mix of old offroad 6x6 military trucks. I say it just needs to do the job and it doesn't need to look pretty while doing it. Here is a list of its features: 6x6 drivetrain springless suspension Modular design Remote control Powered by 2L motors Steering by 1M motor Removable tray (all sides can be dropped. Openable bonnet Openable doors 2 speed gearbox Hi-Low gear For more photos please go to our Bricksafe Page here Please go easy on the look it was built in one day, I would love some feedback. Happy Mocking CrazyKreations -
Hi everyone! I´m happy that I can present my newest creation! It´s the next piece of my minifig scaled RC collection. This time I decided to build a Flixbus. After Flixbus bought the rivalry Eurolines, it became maybe the cheapest way for poor students from Hungary (or not only from Hungary) to travel across Europe. At least for me it was the perfect method at that time! Hope you like it! Unfortunately the last time I travelled somewhere by a Flixbus was in August 2019. But hopefully it will change in the near future! Flixbus came often in the middle of the night, just as the Knight Bus did in Harry Potter. That´s why it stands on the destination screen Before you start reading about the boring technical facts and irritating things during the building period, please watch the video! It took approx 4 months long to build the bus. It´s not the first tiny RC I build. Despite of it I can´t say it didn´t challenge me. Yes, I´m speaking about the lettering and arrows on the sides. Maybe you still remember of the Milka Truck. That lettering has only vertical or horizontal building techniques. That´s why it was possible to do the lettering on each side only 1 stud deep. It was important, because it allowed to put the battery box (the biggest and most inflexible element) between the two walls and staying with the width in 6 studs at the same time. But “FLIXBUS” is more difficult. It is also not always possible to have stud connections (for example letter X, or the diagonal arrows). In this case the letters have to have inside some bigger parts on them, which simply doesn’t allow them to fall out. It means it stays only a two-stud wide space in the middle. That’s enough for the technic chassis, but not for the batteries. And also not for the motors… So only the half of the lengths stayed for the functional parts. For the steering and propulsion I stole the method from the Milka truck (with vertical motors), where they´ve already proven, that they work really well. The only possible (long enough) space for the battery box was at the back. Fortunately right above the driven wheels. They need the weight on them to increase the friction between the tires and the street. Another positive feature is, that the Sbrick is small enough to be above the letters, so I didn´t have to make the whole bus longer. Another part of the challenge was to create the diagonal white lines on the front. There was almost nothing inside, which they could be attached to. The reason is, that the moving parts of the steering are there, so it´s simply impossible to put there any other parts without disablement of the steering. Other reason is, that the upside-down parts of the front have already used the space there. At the end I decided to use the rubber bands, without being irritated by the fact, that it´s possible to see them outside, too. The bus has three axles. The third one is again an axle with some kind of fake suspension. It is just hanging there and doesn´t hold anything, so in theory it can never happen, that the driven wheels leave the ground. Please notice the detail that there are brackets instead of plates on the top of the third mudguards. It creates a bit bigger space in the mudguard for the wheels with the fake suspension. It means, that the bus can win against bigger obstructions. All in all I really enjoyed working on the bus. Hope you like the result, too! Thanks for watching and reading! Feel free to visit my Photostream on Flickr, to see some of my other creations: https://www.flickr.com/photos/gabor_horvath/
-

[LEGO IDEAS] Motorized pirate ship: The "Rolling" Dutchman - New 1k+ Update!
Stoertebricker posted a topic in Pirate MOCs
Ahoy, seamates! I have started my LEGO-Ideas Project 2-3 months ago and now I want to present it to the specific lego pirates community! Would be nice to get your suppport but even more I am looking for some advice what I can improve on it. SUPPORT NOW Please take a look on the ideas website or at my flickr https://flic.kr/s/aHsmMnLn6a for more fotos! Here is the text from ideas: Welcome on board of The Rolling Dutchman! Since I have been a child I always wanted to control my LEGO Red Beard Runner without pushing it around and now my dream has come true. I have build a motorized Version of the famous Flying Dutchman which is my favorite pirate ship, too. I have seen the original swedish Vasa which has given the idea for the Dutchman with its marvelous bow and stern. So I managed to combine them with my own creative ideas into this "rolling" Dutchman! Please have a look at the features in the video and the pictures! Video: Update 2: Thanks for your 1k supports so far! I have worked on the main picture a bit and now added a picture of the crew and one showing the functions as well. Update 1: New rotten Sails! (Picture 7+8+Video still with the first sails) Motorized Features: Rolling movement caused by waves (1. M-Motor) Two motorized triple-barrelled chasers in the bow (1. M-Motor) Motorized steering with simoultaneously rotating ship´s wheel, rudder and steering mechanism (S-Motor) Motorized movement for- and backward (L-Motor) Motorized sail trim with turning capstan and changing sail position of all square sails (M-Motor) All features can be controlled by rc-control via 4 channels and two receivers All features use the Power-Function System but could easily be adapted to the new Control+ System which can lead to advanced handling of the functions The battery box can slide out easily to switch on/off and change batteries General Features: Minifigures: Davy Jones, Jack Sparrow, Elizabeth, Bill Turner, Barbossa and more. (I am not familiar with the movies in english so I would like to ask you to tell me the names in the comments section!) Two decks with cannons (one side the lower deck is closed to store the motors) The two tripple-barreld chasers can manually slide backwards and then the gun ports can be closed Removable deck at the stern to take out the steering wheel Removable lower balcony´s on both sides Handmade sails Two functional anchors Upper cabin minifigure size with Jack stealing the heart (illuminated) Lower cabin with Davy Jones organ (illuminated) Two torches at the stern (illuminated) The capstan can be removed The ship is based on the sturdy hull parts, the complete 2 lower rows of bricks can be removed with the steering and driving wheels to use it as "normal" push forward ship or display model The main mast and the mizzen are both slightly tilted backwards Correct rigging and sails due to the movies The ropes between the masts can be removed easily to take them apart for transport It would be an honor to receive your support. Aye! I have to thank my friend J-H to help me with some motorization problems and a special thanks to my girlfriend for not freaking out! Thanks, yours Störtebricker from Hamburg, Germany SUPPORT NOW -

[MOC] Range Rover Classic
paave posted a topic in LEGO Technic, Mindstorms, Model Team and Scale Modeling
Here's my replication of the classic Range Rover 3 door Info: Scale: 1:13 Size: L35, W15, H16, cm Weight: 1069g Parts: 1085. Video: Features: - 4x4 - Dependent suspension - Panhard rods on both axles - Opening doors, bonnet, tailgate - Adjustable seats - Modular construction - Remote control with PF: 2L, Servo, IR, LiPo. Original truck: Building Instruction can be found on Rebrickable: https://rebrickable.com/mocs/MOC-79523/paave/range-rover-classic/#details -
[MOC] Mammoet PTC-200-DS RIng Crane
Aleh posted a topic in LEGO Technic, Mindstorms, Model Team and Scale Modeling
Hello everyone, let me introduce my latest MOC – Mammoet PTC-200-DS Ring Crane made of Lego Technic! This particular model attracted me for a long time, but since I saw it on YT installing the highest wheel in the world at UAE, I decided to investigate it’s building.So I started from calculating it’s scale and number of wheels required. Railway ring set up crane’s scale. Then I decided to make 4 ¼ carriers with two 1/8 halves inside, each on 4 train wheels. So, all in all I required 32 train wheels. So, I started to look for them on BL.Building started from these 1/8 carriers. I wanted each wheel to be driven to spread the torque all over the chassis. So each ¼ carrier is driven by L motor. Totally 4 L motors rotate 32 wheels for crane rotation :)Then I started to build main superstructure (half). Build two similar halves and connect them. Then installed winches, counterweight box and booms. There is not too much information about this crane in the network, so my build is based on some youtube videos and browsed images of the crane. I would not able to get any info from the company directly. So the crane may have some differences from the real model. And for some reason I can't say this is a scale model. For examble real crane has two rings with 64 wheels on each. Obviously, I can't build a model on 128 train wheels - this sclae is simply out of my budget.I was dreaming of a crane which would be able to lift up to 1 kilo. Luckily, this crane one can easily uplift even 1,5 Kg 😊Crane is powered by classic PF elements: 4 L motors for drive + steering rotation, 4 XL Motors for 7 winches. I recommend using 4 BBBoxes as a counterweight. Although only one is connected and needs to be charged. It would be simple to switch crane management to SBricks or Buwizzes (as there are five separate functions, you’ll require 2 sbricks or two buwizzes). Installing PU system instead of PF may become a challenge, especially for carriers. If you have only one battery box - this is not bad, crane is stable even with one battery box as a counterweight, but, obviously, it can't lift a lot or make a horizontal poisition. Crane is 210 cm high in the current configuration at it's highest position. Can lift 1500 gramms or maybe even 2000, but I didn't give it a try to save parts from stress. Fully RC with 5 channels with 3 IR receivers. Can be layed horizontally and back to working position without human help. More images Ah, building instructions are already complete and ready: https://rebrickable.com/mocs/MOC-77733/OleJka/mammoet-ptc-200-ds-ring-crane/#details -
[MOC] Off-roader UAZ 3151 [instructions available]
keymaker posted a topic in LEGO Technic, Mindstorms, Model Team and Scale Modeling
Hi, I would like to present my newest MOC. It is off-roader with look based on UAZ 3151 and equipped with functions available in off-road game Snowrunner. Main functions and some details are listed below. If anybody is interested with some more technical detailes (and I believe there are people here, which are more focused on technical aspects of the MOC rather than the look), which are hard to show in short video, then I encourage you to scroll down, below photos. If not, then I believe that video and some photos should serve just fine. I also added short video to present couple of tests of Uaz frame and powertrain. Instructions will be available in the future :) Details and main functions: scale 1:10,5 dimensions LxWxH: 38x16.5x18.5 cm weight: 2.44 kg (without additions) 4x4 drive (2xL motors) steering with ackermann geometry (servo motor) adjustable height of suspension for both axles (M motor) lockable differentials on both axles (mechanism without pneumatic, secured with clutch, M motor) live axle suspension, front and rear working inline four piston engine with fan and detailed engine bay lights: front, rear, roof - controlled by manual hidden switch openable hood (with support rod), trunk, four doors locks in all doors and trunk working steering wheel with realistic number of turns and with adjustable position easy removing the whole body easy change to version with or without the roof adjustable front seats - leaning and moving back and forward split rear seats with folding backrest to increase trunk capacity openable glove box easy access to battery pack for replacement Instructions: https://rebrickable.com/mocs/MOC-75601/keymaker/off-roader-uaz-3151-aka-khan-39-marshall-4x4-rc/#details More photos: https://bricksafe.com/pages/keymaker/7.-uaz-3151 Drive I designed the drive to be balanced between speed and torque. Main idea was to make drivetrain strong and reliable. I used the strongest differentials, new reinforced CV joints and bevel gears whenever possible. What is more I tried to keep high speed – low torque rule as long as possible when designing the drive train. As the result, the biggest reduction is placed on axles – on differentials. Thanks to that and reinforced construction you will stall 2 L motor rather than hear some gear slipping. Look In case of look, I keep in mind to avoid blue pins whenever possible, keep nice, clean one colour chassis which can be seen underneath and focus on small details, both inside and outside. Also you will not see many holes in the body or ugly cables, despite the fact that there are 5 lego LEDs there. What is more, all lights, along with the switch are integrated into one piece removable body and can be easy removed only by disconnecting single cable. Performance The plan was to make it very capable when off roading. And it is, when you remove the body. The look and those many details and manual features, all related to the body come with obvious price – weight. UAZ weights 2435g in basic configuration, but only the body itself weights 855g. So if resign from features, which are related stricte to the body and replace the body with some light weight one, then you will get very capable machine. But even with the body, thanks to drive train design, off-road capabilies of UAZ are pritty decent, as showed on the video. If you have more questions, do not hesitate to ask. And keep MOCing! :) -
Hello everyone! I was wondering if it was possible making a bike that was fun to drive around while keeping it low price so i came up with this: it's a baja bike, it runs on an L motor geared up 2:1 and like the other bikes i've been making it shares the same principle to keep it upright. These new tires are awesome, they have an amazing grip and the rounded shape makes em really good for motorbikes! I hope you'll like it, here are some pics and the video i shot :)
-

[WIP] [Mod] 42109 w/Power Functions
johnnym posted a topic in LEGO Technic, Mindstorms, Model Team and Scale Modeling
Hi there as nobody else yet presented a PF mod of the 42109 car (@ozacek?), I gave it a try yesterday afternoon/evening and did a quick & dirty PF mod. The result is a replica that's not totally identical in all details but comes very close to the original from the outside with considerable changes on the chassis. Differences: * Very obvious, the colors, but that was not important for the intended task. Initially I wanted to build it in red and black, but soon switched to orange and black and later just ignored the colors to save time when searching the needed parts - I have two many models built ATM and hence am low on some essential parts in the initially desired colors. The upcoming digital model(s) will use (a) more pleasing color combination(s). * The beam connecting both sides of the cockpit was moved 1 stud forward and was constructed differently to hold the PF AA battery box in place * As I couldn't find a position for the PF Servo motor that is low enough that the hood can be closed as much as in the original 42109, I used a 1 x 9 bent liftarm to fix the hood at an elevated position, imitating the look of a huge hood scoop. This way the hood is kept shut very tightly btw. * I used curved 11 x 3 panels with 2 pin holes for the side skirts, as I find them visually more pleasing then what was used in the original 42109. * The chassis is somewhat different: Instead of 11 x 7 frames I used 7 x 5 frames as I don't have 11 x 7 frames yet; 8L axles with stop for each rear wheel - so the axles can't be pulled out, but the wheels can still get loose, though I haven't seen this yet during driving and some other minor differences. The car doesn't use a differential but drives each rear wheel with a single PF L motor. Power Functions parts used: * 2 x PF L motor * 1 x PF Servo motor * 1 x PF IR V2 receiver - optional (not needed with BuWizz) * 1 x PF IR remote control - optional (not needed with BuWizz) * 1 x PF AA battery box - optional (not needed with BuWizz) [* 1 x PF control switch - actually not really needed, if the drive lines are set up in a way that both PF L motors can run in the same direction (not needed with BuWizz)] I.e. the PF equipment that came with the 9398 - not that I have one. Enough talking/writing, here are three shots, digital model(s) will come later: Using a BuWizz instead of the PF remote control equipment saves a lot of space and weight and will make this car faster. So far I haven't used it with fresh AA batteries but only with used AA batteries and a BuWizz and even in normal mode the car seems to be quicker, not to speak of fast and ludicrous modes, where the wheels start slipping on carpet and laminate floor when going backwards at full speed in fast mode or both ways at full speed in ludicrous mode. -
[MOD] 10295 Porsche 911 Remote Controlled
Cyrix78 posted a topic in LEGO Technic, Mindstorms, Model Team and Scale Modeling
I continue my mission to motorize the Creator Expert fleet, have already done a bunch other of them. I always try to make the motorization as inivisible as possible, you should not be able to see any electronics without looking very carefully. As the Porsche is pretty big and heavy I used ad Buwizz and a Large motor geared up 20/12 to give it the power that a Porsche deserves. If you do not need Turbo Power it could also be powered with a cheaper CaDa system. Since the PF servo is so big and bulky, i have used an M motor with a rubberband return to center function instead. Also added 2 pairs of Power Function lights, altough I am not totally happy with the front lights, but this was the best I could come up with. Because I am creating instructions for other to build this, I have not used any rare/expensive bricks and tried to reuse as many bricks as possible in new locations. It only requires about 150 extra bricks and electric parts. If there are interest, I might create Power Functions and/or Powered Up versions later. I have some ideas to hide the IR reciever and there is still space for a slightly larger battery and motor. Youtube video Rebrickable Instructions

