Search the Community
Showing results for tags '4.5v'.
Found 22 results
-
-Mini.thumb.jpg.03594ed3626ab4a4b625a32af4d03d5f.jpg)
A Layout in Three Eras - 4.5v, 9v and 12v - Photo update!
Andy Glascott posted a topic in LEGO Train Tech
(Click to skip to the post with the latest photos) The Backstory: For years I've wanted to be able to display my 12v collection at shows/exhibitions/libraries or wherever, but the wiring is a challenge - I reckon on my last full layout there was 250 to 300 feet (75-90 metres) of the stuff, which on a static layout is one thing, but one built in modules for transport is a challenge. Three or four months ago I came up with a solution (more on that below) and the dreaming started. After much playing in Bluebrick, and nostalgic posts appearing here about older era trains, I settled on a plan. I still had a bunch of my old blue track from the 4.5v era, but no motors. Off we go to Bricklink then! The Layout So, here's the plan. Ten years ago I had a small portable layout on 4 modules, each 3x5 baseplates, and over the years have simply added more of these. Following my Bricklink spree, I now have 2 working 4.5v motors, so rebuilt the loco from set 183 and I have the loco from 7720 in progress. These 2 will feature on the 4.5v loop below, which is 3 of those modules. Next to the 4.5v loop will be the showpiece, the main 12v loops. 12v Lower by andyglascott, on Flickr And on the right of the layout will be the 9v loops. Unlike the other 2 eras, I will have 9v track left over, so this is likely to be expanded in due course, particularly as @michaelgale releases motors, power supply etc. 9v Loops by andyglascott, on Flickr Lastly, there will be another 12v loop, elevated, which will run across the back of all three eras. 12v Upper by andyglascott, on Flickr Putting all of those together looks like this (the white baseplates are roughly where the mountains, tunnels etc will be for the elevated sections. The green and grey sections are simply so I could keep track of where the 3x5 modules were to try and avoid having curves/points on more than one module. When it all comes together, in most likely a couple of years, I'll be able to run 6 trains at a time. Whole Layout by andyglascott, on Flickr The Beginning After all the planning, and clearing away of my last (incomplete) layout, I've finally started building the first module, part of the 4.5v loop. I decided to start here as this will be the quickest era to build, and to a large extent, each era can also be displayed as a stand-alone smaller layout. These three modules will be countryside/farmland, and the trains will reflect the farming side of it when they get built. Module 01 Pic 02 by andyglascott, on Flickr The 12v Wiring The solution that I've come up with is fairly simple, but does involve taking a drill to some baseplates.... At each of the 12v points or signals I'll drill a small hole through the baseplate and the wood for each module, thread the wire through and attach either the original Lego plugs or a quick connect/release plug/connector so that when the layout is set up I'll use already measured lengths of wire to go from that point to the control panels, which will be on their own module. This is going to be a heck of a journey, and build, I'll post updates from time to time, particularly at landmark moments such as completing an "era". I always said, growing up, I was keeping my Lego for my kids. It was really only an excuse, and I'm really glad I didn't sell my old blue track even though I didn't, for years, think I'd use it. Sadly my original 4.5v motors, battery boxes, lights and even signals are long gone, but I was only 7 or 8 when I got 7720.... -
I’m trying to get sets 181 and 182 running but 4.5v battery boxes have many poor connections (I’ve checked with multimeter). I would like to fix but first I need to separate top piece of box from bottom piece to get at contacts. Question: how do I take apart a 4.5v battery box so I can adjust and clean bottom contacts? Is top piece glued to bottom piece? thanks for any help you can give!
-
 I've been dealing with 15+ years of hideous sorting now that I have a house of my own and a dedicated space to build and organize my collection. I uncovered my old "weird pieces" box where I dumped stuff that I didn't know what to do with. Among many other oddities, this box had a couple handfuls of old 4.5V light bricks, optosensors, and touch sensors (08010dc01, x1161cx1, and x1167cx1, respectively. I received these from a family who had kept ahold of old Lego DACTA stuff from their job as an elementary school principal. Naturally, they were a little filthy and my young self dunked them into a soapy water bath without thinking. Now it's 15 years later and I'd like to test these pieces to make sure they work, repair them if they don't, and hopefully sell them on to somebody who'll appreciate them more than I will (if anyone is interested, DM me!). (No longer available, they've been passed on to a true 4.5V connoisseur.) I think I have a decent idea of what to expect if the parts are working, but what I don't know is how I can open any of them to perform repairs if necessary. (On the other hand, it may not even be economically viable to repair them given how little they go for online vs. the risk of shattering something). Does anybody know of safe methods to pop these open for the purposes of repair and inspection?
 -
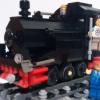
Partly inspired by some recent "retro" style posts, and partly after an idea for my next layout, I decided to see if I could recreate one of my first trains, set 183. I knew I had some of the original parts in my various bins, but obviously it's impossible to say that I only used original parts, partly because the motor and battery car disappeared a long time ago! A Bricklink search turned up both, so I took the plunge and came up with this. I'm missing one of the 1x1x2 windows, but it is available on Bricklink, so will arrive at some point. DSC01211 by andyglascott, on Flickr Like I say, not an authentic replica, but close enough. I did buy 2 4.5v light bricks at the same time and put one in this, I'm not sure if I like it though. I do have the original 1x6 headlight brick I could put in. DSC01214 by andyglascott, on Flickr I have another motor arriving in the next few days that may or may not work, if it does I might have a crack at 7720 as well. I do have video, but it's taking a while to upload from my phone, so I'll add that tomorrow.
-
Book Review (Review by Thorsten Benter) Almost a year has passed since initial publication of this book. There are a number of on-line reviews available – this one on EB seems to come in a bit late. Well, I don’t think so, in contrast. This book is a comprehensive how-to-build-a-train resource rather than a compilation of what is out there. And this sets the book aside from so many others. It will be up-to-date as long as The LEGO Company produces bricks and sets. Plus, with the arrival of the Powered Up system, more space becomes available inside the train body as compared to comparable PF functionality: The dedicated receiver becomes obsolete and no line of sight is required for communication creating some additional space – space for sophisticated building techniques! This books tells you everything you need to know about the historical LEGO train theme development at TLG, about scales and widths, about pivot points, microstriping, SNOTing and offsetting, and so much more with relevance to train building! (Note: A PDF copy of this review with higher resolution pictures will be shortly available at Holger’s website) Summary: A must-have for every LEGO train fan, for people entertaining the idea of getting into LEGO trains, and for people who still don’t know that they will become train fans after reading the book Superb photography of LEGO models, outstanding renders of CAD models In-depth analysis and assessment of the different LEGO train eras Demonstration and teaching of advanced building and design skills My personal LEGO book score: 10/10 About the book: Author: Holger Matthes Published: Oct. 2017 by No Starch Press Inc., San Francisco, CA, USA. Hardcover, 135 pages + 90(+) pages reserved for 4 full building instructions (ICE train, gondola car, Swiss Crocodile, and a vintage passenger coach), 150+ most relevant and educational figures (excluding the beautiful chapter openers or page breakers as well as the set building instructions), 20+ tables including bulleted lists. ISBN: 1-59327-819-5 Price: € 14 (Kindle edition, Amazon); € 23 (Print edition, Amazon) both as of 9-2018. $ 19 (ebook only), $ 25 (ebook and print edition, nostarch.com) both as of 9-2018. The present English edition published by No Starch Press is based on the initial German edition “LEGO Eisenbahn – Konzepte und Techniken für realistische Modelle”, which was originally published by dpunkt Verlag Heidelberg, ISBN: 978-3-86490-355-7. The initial German edition of the book based on Holger’s manuscript composed in 2015/16 caught the attention of foreign publishers: It began with the present English edition in 2017. It then took a bit longer until the Chinese publisher “Posts & Telecom Press” (who has already published a bunch of LEGO books written by fans) very recently released the Chinese version: http://www.ptpress.com.cn/shopping/buy?bookId=0ed0cd68-ca59-41fc-9bf9-193b06089996 (ISBN: 978-7-115-48419-2): After publication in 2017, No Starch Press’ English version became the reference for further translations. In summer 2018, the Spanish (“LEGO TRENES”; LEGO TRENES https://www.amazon.es/TRENES-Libros-Singulares-Holger-Matthes/dp/8441540179) and the Italian (“TRENI LEGO”; https://www.amazon.it/Treni-Lego-colori-Holger-Matthes/dp/8868956411) editions became available. And the Russian version is on its way (sorry, Holger couldn’t tell me any further information about its availability): (Note that the Russian cover on the right is purely made up by me – Google translator says the Cyrillic headline reads “in preparation” – but who knows …) About the author Holger Matthes is a hobbyist who has been building with LEGO since 2000. He was involved in the creation of various official LEGO projects such as the Hobby Train set #10183 and frequently presents his models and gives workshops at LEGO exhibitions worldwide [copied from Amazon website]. Table of content of the book (short version) Part 1: Overview and history Introduction A history of LEGO trains Part 2: Building your own train models (My own creations – MOCs) Basic principles Designing your own models Case studies in design Part 3: Building instructions A note on the included building instructions Appended to the body of the book, you’ll find four high quality and carefully composed instructions in addition to two free online instructions: Inter-City Express (ICE; driving and trailer cars, PF motorization, windshield designs) Gondola car Swiss electric Be 6/6 “Crocodile” Vintage passenger car Steam Engine BR 10 (as bonus online available at http://holgermatthes.de/bricks/en/br10.php) Steam Engine BR 80 (as bonus online available at http://holgermatthes.de/bricks/en/br80.php) There is further information available online. Holger directs you to https://www.nostarch.com/legotrains; but most of the very valuable stuff is actually hosted on his website. I highly recommend to visit his site: http://www.holgermatthes.de/bricks/en/index.php. You will find a wealth of background information, tips&tricks, how-to, and much more. The Book Let’s face it: Almost one year after initial publication, Holger still sets the stage with this book for LEGO train fans. It will be tough to get it much further; not on 135 pages (not counting the instructions pages), not with regard to the topics covered, not with regard to the width of the audience addressed. This book provides diverse perspectives on the art of building LEGO trains, coaches, and rolling stock – and is at the same time always determined, focused, and addresses most relevant “issues”. Train builders repeatedly face tough challenges: A train is not a building, which simply resides in all its beauty; rather trains are work horses – either hauling heavy cargo loads or endless passenger coaches, or switching rolling stock for hours and hours in a train show – or on your personal layout. At the same time, a LEGO train is “beautiful” and “esthetic” in the recognition of a train fan - as a building is for City fans. However, to be able to render real trains into LEGO models, regardless on the scale used, requires some serious knowledge about the myriads of LEGO bricks available, about advanced building techniques, and even electrical wiring skills. There simply isn’t much space in a LEGO train. Space as in “Space … is big. Really big. You just won't believe how vastly, hugely, mind-bogglingly big it is. I mean, you may think it's a long way down the road to the chemist's, but that's just peanuts to space.” [Douglas Adams, The Hitchhikers Guide to the Galaxy, 1979]. It is usually >extremely< packed inside a LEGO train model, particularly when electrifying it. Shaping the outer appearance with advanced building methods such as SNOT or angled and carefully secured pieces usually eats up all the space inside the hull. And lastly: Trains need to be sturdy. They not only haul heavy loads – they also have to run endless distances on track – in the best case on long stretches of straight track and smooth curves, here and there a bit bumpy – in the worst case negotiating endless and sharply bent curves and switch points in complex rail yards. This is exactly what Holger addresses in his book: How to achieve a sturdy, reliable, and at the same time esthetic and beautiful train. And we should just get it straight from the very beginning: Stickers are frequently recognized as the “icing on the cake”. And this is certainly true. BUT: Believe it or not, you can also legally “build” tiny lines, sloped coloring, narrowly split windows and much more when using advanced building techniques! And that sets aside this book from so many postings, building instructions, and other resources: Holger shows us how to accomplish “brick-built stickering” by using the endless variety of bricks and plates to build streamlined and nicely accentuated and smooth surfaces – rather than using the bulky, essentially non-LEGO-philosophy-but-by-TLG-released ICE #55768 nose with stickers attached all over it … There is so much more in the book. This is what I am trying to highlight in the following. Holger’s book is a must for us all: Beginners, advanced builders, as well as Train Tech gurus! And those who believe that they already are. One more thing to add: Photography and CAD image rendering. Or: A picture is worth a thousand words. Holger says: “The biggest thank you goes out to my old friend and master photographer Andy Bahler, without whose pictures this book would have been useless. His commitment, night after night, was above and beyond expectation …” The pictures are spectacular – you will notice right away. Organization of the book There are three parts in this book, although there is no such explicit assignment in the table of contents. Holger tells us on page 2 though: “The first part of the book gives an overview of LEGO trains over the different eras, covers some history, and answers questions about how to combine old LEGO trains from the attic with today’s kits. The second part of the book is about building your own LEGO train models, also known as My Own Creations (MOCs). Using my many years of experience building LEGO models, I’ll show you how to create proper train models, covering both the possibilities and the limitations. Finally, the book ends with step-by-step building instructions for several models.” Usually, the table of content is a good starting point for the organization analysis. However, this book is extremely focused and self-contained in each of the chapters of the three parts. This is very helpful (and also very different from other books), as the LEGO universe, including train worlds, is as diverse as it possibly gets. The number of pieces alone currently available through TLC’s official channels such as LEGO sets, PaB, and LEGO stores – or even more so – through the uncountable BrickLink stores around the globe is truly mind-boggling. Well, it is not only the sheer number, but more so the endless combinations possible – and what you achieve with such. Chances are: One gets rapidly lost and a little frustrated. Exactly this is NOT happening when “reading” this book. OK. We do it differently – as it seems appropriate for a “different” book: We walk through, as the very nice and focused organization of the book simply allows that. Part 1 “INTRODUCTION Decades ago, the toy designers at LEGO likely never imagined how durable their work would be. Today, parents can dust off their childhood LEGO trains and play together with their children who have just received their first brand-new LEGO train set. And fans of all ages can revive older sets and parts to create entirely new models.” In order to prevent such an almost natural “disorientation” or lost in parts and ways to connect them, in part one the book begins with a review of on-line resources. Information-, instruction-, and brick-availability-wise. Holger lists only the most relevant internet locations. Start here and progress further on your own. It makes your building life so much easier. As with every printed book, online references may become outdated at some point in time. Holger names thus only most reliable web portals, which will most probably exist for a long time. “A HISTORY OF LEGO TRAINS Let’s explore the evolution of the LEGO train systems from the earliest set to the present.” Next, there is a historical review of which type of train system was available at what time defining an era. This is rather significant. First of all, this approach results in a theme classification rather than a temporal evolution of sets: The blue, grey, 9V, RC, and PF era. As the pieces from different areas are naturally largely interchangeable (otherwise it would not be LEGO!), you may mix them as you see fit. Nevertheless, each era has a certain typical appearance – if you want to capture that, you need to know what was going on during that particular era. As an example, people in love with the grey (12 V) era often capture the look and feel of that time – for example studs everywhere, not many curved bricks/diverse slopes (as they were not available at that time) – rather limited colors schemes, black, red, and yellow ... The reader learns what has been produced when and in what color scheme. There is also ample of information on the technical features of each era – it appears as if the author is deeply involved and well connected in the LEGO train community – all the way up to participate in the design of selected sets. Holger shares his knowledge with the reader – always in a concise and focused way. It is pointed out that Holger is not even attempting to compile a complete list of sets available within the different eras – in contrast, he is summarizing the unique era characteristics and features. He focuses on power sources, tracks (including switches and crossings), and other elements (wheels, baseplates, in addition to unique features, such as trucks, couplings and buffers). The grey (12 V) era sections stands out of course, as this was the most diverse and most creative train theme ever (IMHO, of course!). Here you will find an – again unique – compilation of “remote-controlled accessories”, “windows and doors”, “light bricks”, “weighted bricks” … What I personally find extremely useful – and it must have been a considerable effort – is i) a summary table, listing the most important features of each era, and ii) Holger’s evaluation of these features he headlines as “Seen from today’s perspective”. Even long-time and experienced train enthusiasts will surely find valuable information in this chapter! Part 2 “BASIC PRINCIPLES Let’s dive into the world of LEGO elements and explore the endless ways to connect them.” Now that one knows the individual features of the different eras, Holger opens part two of the book with a compilation of relevant LEGO pieces for train building. It is really surprising how many there are! I have built trains myself – seeing all the various elements nicely grouped and organized makes it so much easier to get an overview of individual pieces, select the ones you may want to try out – and compare them to other options. This section is extremely helpful when you start off with a new model – or when you want to overhaul an already existing train. In the following section, Holger introduces typical train specific building techniques (although you can use many of them throughout the entire LEGO universe!). And is not surprising that there are eleven dedicated pages on SNOTing and fractional-plate offsetting in all three dimensions. These are the most crucial techniques when shaping the look of a train. SNOT (studs not on top) is a powerful technique and has become very popular among train fans. Originally rather restricted to a few elements, which allowed to “reverse” the building order, the LEGO Company has released a broad variety of SNOT elements over time. These are of course also shown in the preceding chapter on relevant LEGO train pieces. I’d say that this chapter is extremely important for beginners and of great interest to experts as there are various approaches shown side-by-side. At least for me this chapter is highly inspiring. The same is true for plate offsetting, i.e., building with only one half stud or even less displacement off the stud grid. First, the look of a train becomes much smoother even when not using curved bricks; secondly, this technique allows you to literally “build” colored surfaces with fine structures and even thin stripes (called microstriping). Without using stickers that is … Ever used minifig guns to create pantographs? Or ice skates as door handles? No? Well – Holger shows you! “DESIGNING YOUR OWN MODELS You might be wondering if you’re ready to begin making your own models. Which train should you build? Maybe you should start with the commuter train that takes you to work every day, or a freight train? And who hasn’t dreamed of a beautiful steam engine in LEGO?” Now we are getting down to business. The following two chapters of part 2 are not about “building a train” – they are about “how to do it right”. We are talking about scaling and modeling rather than “pushing along”. Before Holger goes into details though, he points out the importance of thoroughly choosing a scale. This is an extremely important decision to be made when attempting to model a real-world train. How much detailing is required? How much abstraction is allowed? Citing Holger again (page 73): “Building a recognizable model isn’t about scaling every part exactly, although proportion matters. Intentionally omitting some details or exaggerating others is usually necessary. Scale modeling with LEGO is a bit like drawing a caricature: the end result may not be an exact likeness, but it is recognizable and undeniable.” We learn about model scales (1, L, O, HO …), alternative approaches (scaling by wheel size) as well as choosing a model width (6-, 7-, 8-stud-wide). Don’t mix these up – almost any scale may be used for any track width! There are so many diverse examples here on EB. Holger narrows the scope of widths covered in his book to 6 - 8 stud wide (see cover page of the book), as these are the widths most builders choose – in addition to the official 6-wide LEGO models. He discusses the advantages and downsides of each of these widths in detail. A very important aspect when designing and building a LEGO train – regardless of the model scale – is the official LEGO track geometry. Maximum distances of fixed axles, alleviation of this rather restricted distance using articulated single trucks (a theme repeatedly discussed here on EB), sliding middle axles in three axle trucks – you will find all the answers in this book. When it comes to attaching cars to each other – even more design aspects have to be considered, which are all discussed: Pivot points vs car distance, additional pivot points to reduce car distance, the effect of pivot points on design issues, to name a few. And then: Steam engine design: 7 full pages! As far as I am concerned, steam engines are the most challenging models to render in LEGO. To say it with Anthony Sava’s words: “I'd buy a set with a steam engine in it, but I have little interest in buying a box on wheels.” (EB Forum, April 2nd 2018). Holger shows us all the challenges and caveats. The remaining sections in this chapter are: Power and Control, discussing mostly the implementation of PF elements, Modeling Details, and Track Design and Layout. Again, extremely valuable information and guides are given. One comment on third party suppliers: At the time of writing this book, both SBrick controllers (as a replacement for PF receivers, featuring wireless Bluetooth connectivity) as well as ME Models (as a supplier of wider radii curves) were actively present on the market. As of now (i.e., August 2018) though, the new LEGO Powered Up system introduced lately makes SBricks for trains almost obsolete – and Me Models have gone out of business some time ago. There are a good number of very good 3rd party alternatives for additional track pieces – large curve radii, complex switch point geometries to name only a few. They come as superb injection molded pieces which are almost indistinguishable from original LEGO track, as well as 3D printed varieties. I believe that a book of the format Holger has chosen simply does have to deal in-depth with such developments as they are much more volatile than almost any LEGO product. Taking aside the LEGO RC interim solution of course. But again, Holger gives a full account of why RC happened at all and why its lifetime was even shorter than that of many 3rd party small businesses. I really enjoyed this section very much. Regarding very recent developments by TLG naturally not covered in the book (the original German manuscript was written in 2015/16): The introduction of the Powered Up system leaves much more space within a train engine so that all the building tips and tricks provided in Holger’s book become even more intriguing! It appears as we can even more freely combine advanced power/remote control options with the present advanced building instructions. Which makes this book even more valuable! “CASE STUDIES IN DESIGN Armed with the tools and knowledge about LEGO modeling covered in the previous chapters, we’ll now take a closer look at the actual design process using some of my own builds as a guide.” This chapter needs to be explored – interpreted – by yourself. This is – as far as I am concerned – the heart of the book. Here you will learn how to begin designing a model. I find this part the most difficult: How to begin – looking at the all the bricks, plates, slopes, clips, there are so many of them … so we should take this to our heart: “Designing a model is a creative and personal process: there’s no right or wrong way to build a successful model. The guidelines in this section are meant to get you started. You’ll certainly develop your own strategies along the way.” Along with: Decide on a scale and choose the width: 6-, 7-, or 8-wide? Decide how the train will be powered and what type of track it’ll run on. Choose a target audience: should it be a realistic, recognizable model, or are play functions more important? You will notice: This is about >you<! Nevertheless, you will also learn a lot in this chapter. Holger has chosen a regional express train (Bombardier double deck train), a powerful electric locomotive (Siemens Vectron engine), and a (well, Holger is German after all …) steam engine (BR 10) as case studies. This is a very clever selection – as the techniques he shows apply to almost every engine I am aware of – including American diesels as well as American steamers … or all the various European trains, Emanuele (EB member LT12V) is currently presenting here on EB … And finally … Part 3 “BUILDING INSTRUCTIONS! Get inspired with these step-by-step instructions for building an Inter-City Express, a simple gondola, a Swiss Electric Locomotive Be 6/8 “Crocodile,” a vintage passenger car, and a steam engine.” From page 136 to 227 you will find first class, high(est)-quality building instructions for the above referenced models. There is nothing more to add. As said: This book is a must … Play Well! @Jim Thank you very much Jim for giving me the opportunity of writing this review for EB - it was a great pleasure. And for sending me this wonderful book! @HoMa Thank you Holger for writing this book. And for all the additional information you gave me when writing this review and for your comments! Thanks for reading, Thorsten
-
All the photos plus descriptions are here: https://imgur.com/gallery/Q90Jehx Finally, all the ordered parts have arrived and I could assemble and build and test it today. These are two 4.5V 70s/80s train motors, one in the tender and one in the 7720 loc. The tender also has a Power Functions receiver and a 4.8V NiMH battery pack. The charger is USB and the batteries can be charged via the plug, no need to remove anything. I tried to push-pull 17 wagons with it, which was succesful (engines in the middle). Then I tried to pull all 21 wagons I own (engines in front), which failed because the magnets wouldn't hold despite added thin neodymium magnet discs. I'll see about uploading a video if the quality is acceptable... Ah yes the roof of the tender wasn't finished yet in the video => And new attempt with all 21 wagons succeeded (23 wagons if you count the engines too): https://youtu.be/8dZ3aVw015E Legotux
-

MOC - Three axle passenger wagon for 12v / 4,5v trains (Umbauwagen 3yg)
Paperinik77pk posted a topic in LEGO Train Tech
Hi all, this evening I prepared a wagon which was in my mind for some time, but I've never built. @jtlan mentioned it in the "castering effect" thread, showing us his two very nice Umbauwagen 3YG, which are built with new parts. Since these wagons are the perfect partners for DB BR78 locomotives, I tried to replicate it in gray era style. It is very simple and straight: the narrow part where the doors should be was not replicated interiors are similar to the 7725 undercarriage is quite simple - since it must leave space to the passive steering system I added a toilet, since it was a nice challenge. It does not have a door in the photos, so the toilet is visible. After some passengers complained, I closed the door. Steering system is very basic, and it leaves space for interiors (I just noted that the two red parts have "Pat Pend" markings - my 60s collection will be happy) . The only part not used in the gray era is the 6x24 train base. It can be made of plates, but I have a lot of them - and this is a good use. I cannot use the green color, but I saw the Umbauwagen was also made in blue as a wagon-lit. Here it is with my 12v BR78 and 7820 . Hope you like it! Ciao! Davide -
Hello, I have 4.5v train motor (https://www.bricklink.com/v2/catalog/catalogitem.page?P=bb07pb01&name=Electric, Motor 4.5V Type A 12 x 4 x 4 with 4.5V stamped on front&category=[Electric, Motor]#T=C) that needs wheels. I have access to a 3D printer and 3D modeling software/knowledge. My question is, does anyone have dimensions for "wheel2a" ?(https://www.bricklink.com/v2/catalog/catalogitem.page?P=wheel2a&name=Train Wheel Spoked for Motor&category=[Wheel]#T=C) I would like to try to make something that goes into this motor and gives it a technic axle, or just recreate the wheel (either all plastic, or using purchased metal rod). Unfinished_Projects
-
Hey guys, Long time no see! :-) I came back to Eurobrick with a new quiz: What train set from 80s misses (train) wheel(s) in its inventory? (can be as regular or alternate) Let''s restrict answer to 7710, 7715,....7760, 7810, 7813, ...,7821 The missing wheel already exists in the catalog of bricklink but it is not added to one particular set yet. You can check bricklink for the inventory of these sets, but other sources are ok too.
-
After a first post some weeks ago I introduced myself just some minutes ago under the right topic. I forgot about that the first time. I'm new to lego train and started to build the smallest of all possible layouts: a circle. I want to do this for a 4,5 V train and make a layout around it. Has anyone ever done such a small layout? I have been reading this forum but didn't find any examples of small layouts. First thing I have to do is make the ballast for the blue tracks, primarily because I want to fix the rails to the baseplates. I didn't find an example of this for curved blue tracks. Maybe this can help someone later: I'm adding 2 pictures showing the ballastplates that fix the old 4,5 V curves to the baseplate. The ballast has to be finished with tiles and other plates now of course. Not spectacular, but I wanted to share it next to my forementioned question.
-
Hello, I'm trying to build a 4,5 V hogwarts express, mostly out of lego 4708. I'm adding a photo of a first prototype (0-4-0). At this time I'm working on a 0-4-2 hogwarts express steam engine (also 4,5 V). Does anyone know a way to connect rods on the driving wheels (other than part x564)? I'm using motor type C (4,5 V): it's possible to make use of the extra hole in the motor to have some rod's moving around but it's not really a sight because they are too far away from the driving wheels. I'm also struggling to give the 4,5 V battery wagon a realistic look. All tips are welcome. I'll post photo's of the newer version soon.
-
Hi all my 4.5V battery train from the mid 70's still works but the wheels spin inside their mounting holes. any ideas? these things are devilishly hard to open up (all glued together) so I don't want to almost destroy it to see what the problem is if there is a simple solution. someone else must have had this prob and worked out an easy solution?
-
Hi all, after a specific request of @LEGO Train 12 Volts, and seeing the last posts on various BR locomotives, I retrieved from the basement an old MOC I built a lot of years ago - it literally comes from the 80's. It is a gray era, and it was made copying the style of the 722 set: It has a troubled story - it was never finished. It started as a multicolor prototype which ran a few times with custom 4,5v wheels adapted on 6 studs Technic axles. Then it was destroyed for something else, then I rebuilt a blue cabin...then it survived until the 90's as a cabin only, then I rebuilt it with a newer Technic chassis and custom wheels, then it was destroyed and re-built again in its actual shape. This last version was prepared in 2001 if I remember well. I put it away to keep it intact, while I was focusing on my current 4.5v / 12v collection. Be prepared, it was made with reeeeeeally basic parts, starting from a few photos I had at the time of the Deltic prototype. I loved it. The small 4,5v motor was put on the "front" and had a cardanic shaft to the gear reduction part on the "rear" of locomotive. I remember I had a big plate, modified with a hole,both to connect and transfer power to bogie trough a vertical axle. All cables are gone (used for more important tasks). The battery holder was REEEEEEEEEEEEEEEEALLY heavy. It was faster than a 4.5v normal train and pulled nicely the 7740 wagons due to its good traction. Another thing I remeber: it was extremely noisy, but - all in all - it was an unwanted tribute to the real one (thanks Youtube for making me hear the real DELTIC power) Am I planning to end it? I do not know. I'm tempted - I have my 3D printed wheels now , and I can make her run again - Let's see - for the moment I'm after by big scale trains I hope you like it, even in this disastered status! Ciao! Davide
-
There has been some rumors that I am not capable to make new quizzes. This is NOT true! I come back with new quizzes. For warm-up, let's stick to 4.5v battery wagons again! After the successful quiz N1: which was followed with a new item on bricklink: https://www.bricklink.com/v2/catalog/catalogitem.page?P=x488c03&idColor=5 now again: what do you find uncommon in this photo? I have told the answer to few friends. Please do not spoil. If you know the answer, you can pm me then I comment that you know the answer so that people can think about this photo for few days. There are gonna be harder quizzes, so prepare for them! ;-) :-) Have fun.
-
Request for technical advice: 4.5V battery box, 12V conducting rail
DameVeraLynn posted a topic in LEGO Train Tech
Having spent the last few days restoring some of my childhood Lego trains, I've run into a couple of problems which I hope the experts on here may be able to help me with! 1. 4.5V battery box (BL Item No: x488c02) This particular box comes from 7722 and was originally used to power a 4.5V train motor. The motor still works (I have tested it by connecting it to the 12V transformer with the control knob inverted) but it fails to run when connected to the battery box (filled with three brand-new rechargeable C batteries). Does anyone have any troubleshooting advice for these battery boxes? Can you suggest what steps I could take to try and get it working again? Any thoughts on the best substance to use to clean the contacts? 2. 12V conducting rail (looks like BL Item No: 2731b) This rail should transfer power to the track when connected to the 12V transformer, but fails to do so. I've tried unscrewing the plug and replacing it with another, but that doesn't help. Rather strangely, it also cuts the circuit when added to a loop! My suspicion is that there's an internal fault, possibly caused by corrosion (it looks nice and clean, but I spent some time rubbing it with a model railway cleaner before testing it!) Has anyone come across a problem like this before? Many thanks in advance for any help you are able to provide! -

A quiz for vintage train lovers: What do you find uncommon in this picture?
Reza posted a topic in LEGO Train Tech
What do you find uncommon in this picture? (do not read other people's answers ) -
Hello In the iconic idea book 7777 there's one diorama with a circus. The train that pairs with it happens to have a battery box car with a clown sticker on it. However, there are no such battery boxes on bricklink from what I can find. I'm assuming the sticker comes from a different set, but I don't know how to find that. Could anyone happen to know what set features the sticker? Edit: found out it's from the 6000 idea book
-
It was built for fun but it still works well :) LEGO Train 4,5v by Severus A, on Flickr LEGO Train 4,5v by Severus A, on Flickr 02tr by Severus A, on Flickr LEGO Train 4,5v by Severus A, on Flickr
-
hi all I have recently got one of these motors http://www.bricklink.com/search.asp?colorID=11&itemID=2396 however there seems to be another speed setting as shown in the gearbox pic, is it possible to move the little brass gear on the motor shaft so it meshes with the bigger gear. thanks
-
Hey guys, I have seen about 3-4 different types of packaging for the old blue 4.5v rails and I am wondering If I can date them easily by the box style without opening it This is my sealed box: Lego 155 MISB with plastic shrink warp fully intact. by Railco1, on Flickr Lego 155 MISB with plastic shrink warp fully intact. by Railco1, on Flickr I hope someone can help me date this without opening it accurately! Thanks -RailCo P.S. Should I open it?
-
Hey Guys! I have an old 1966-1968 sealed (No screws) 4.5v motor. I am wondering if there is a way to actually open it without destroying the casing of the motor? Also is there a way to oil the motor as it is sealed? Is there a good way to clean it? It is very squeaky so I want to oil it so it doesn't kill the motor. Thanks! -RailCo
-
Hey Guys! Everyone has that one story where they find a set for a great price! This is the place to share it! I love to hear stories like these as it also brings up what sites so others may be able to find deals there too! It can be anywhere from when you were a child to present, 60's, 70's, etc. I will start! I bought an MISB 4533 (9v Era Snow plow) off ebay for about $35 this year, the cheapest I have seen them was $45 dollars. Saved me $10 (Hopefully a good investment) Sealed 4533 by Railco1, on Flickr Also on ebay I got an MISB 4541 Road and Rail, for $40 the cheapest I have seen being sold is $65, savings of $25! Sealed 4541 by Railco1, on Flickr I cannot wait to hear everyone's stories. This is meant to be fun and an enjoyable thread. Enjoy! -RailCo [Moderators! this is meant to be an on going topic so if people post on it a year late, that should be okay]