Search the Community
Showing results for tags 'Moc'.
Found 5706 results
-
Hello. I made a post a while ago where I showcased quite a few changes I made to the Brickvault Tie Fighter model. Now I'm back to showcase the same thing with additional Tie Fighter variants from their store, alongside a few I made using other models as a base. I'm not talking about one or two, I'm talking about 24 distinct models. Some ships are heavily altered, while others are unchanged minus one or two tweaks. On top of that, I've probed the depths of Canon and Legends lore for additional color schemes I could apply to some of the models. I've amassed enough pictures to drown a forum post in, so I'm going to do just that. *Because I went into much more detail in my previous topic, I won't talk much about the parts of ships that share the basic Tie Fighter's cockpit or wing designs. I recommend you check it out before continuing, but you don't have to. Tie Interceptor This ship was the obvious first choice for improvement following the Tie Fighter due to the two models sharing the same design for the central pod and wing pylons. As for improvements unique to the Interceptor, I slightly modified the wingtip cannons and added their power conduits using hose pieces. I changed the construction of the wide armor detailing where the wing pylon meets the wing hub for better screen accuracy. I also moved the ribbed detailing where the power conduits meet the wing hubs and rebuilt the sensors between the two wings for the same reason. Finally, I got rid of the grilled bricks on the rear solar panels and made the backside of the wing completely flat. This design also has the most additional color variants with the first being a version belonging to Inferno Squadron. The construction is taken from the Inferno Squadron Tie Fighter I modified in my first post. While not shown in-lore, its existence can be inferred; why would one of the best group of Tie aces still be flying regular Ties in a time when the Interceptor exists? While this isn't a color variant, it's minor enough to be counted alongside them. It's a version using the 6x6 Tie hatch piece that Lego used before downscaling to the newer 4x4. Even though it is less accurate, I prefer to keep the smaller piece because it's much more available and affordable. This is a version belonging to the 181st Fighter Wing, adorned with a brick-built red stripe on each wing. Some of the support for the stripes bleeds through to the other side of the wing, but I tried to keep it unobtrusive. This is a version modeled after Vult Skerris's ship from Star Wars: Rebels, with its sparse red highlights and hemispherical gray cockpit stripe. This is a primarily red version based off the Emperor's Guard paint job from Star Wars: Squadrons. Its construction is nearly identical to the base model, illustrating just how much difference some color blocking can make. Royal Guard Tie Interceptor Despite being listed as a unique model on Brickvault's website, the Royal Guard Interceptor is the same as the regular Tie Interceptor save for the four extra winglets. The biggest change I made is the addition of the mounting brackets for said winglets, something present in the ship's original appearance. Tie Bomber The main feature I wanted to change with this model is the construction of the missile-hole on the front of the ordinance pod. The original is sort of a vaguely defined square and is too large, mostly because of the unique construction of the face. I was able to modify the design to make a 2x2 hexagonal hole using slopes, but I had to use clear tiles to support the shutter arms. Other things I've modified for increased accuracy include remaking the front detailing between the pods, shrinking the thrusters, filling a gap in the bracers that run the length of the pods, and making the front and back of the wings one continuous surface. Here is another variant inspired by the Emperor's Guard paint job. Tie Advanced Another model that's mostly unchanged is the Tie Advanced. I adapted this design to utilize the newer 4x4 hatch piece for consistency with the rest of Brickvault's Tie lineup. I think it does the job well enough, but I don't think it could be any better without completely changing how the central pod is built. I also gave this Tie the updated “bowtie” details on the central pod and the blasters from the regular Tie Fighter. Finally, I beefed up the rear wing pylon construction and flipped the brackets covering some gaps on the rear of the ship to hide their studs. Tie Brute This is the first design I tweaked not made by @Jerac. Despite having its own style of wing construction, I replaced them with my modified version from the regular Tie Fighter because I think they look more accurate. I recessed the wing pylon details by one plate on the front and back of the model and created a gentler armor slope from the central pod using jumper plates and ingots for better screen accuracy. Next, I rounded out the central pod by making the top and bottom out of 6x6 hinged dome pieces. This means I got rid of the newer Tie hatch and replaced it with the old. The ratio of the larger hatch to the central pod is about the same as the smaller hatch to the normal Tie Fighter. I also gave the central pod upscaled “bowtie” detailing and remade the engines for screen accuracy. There's also the variant that uses 4x4 quarter dome pieces for the central pod. Tie Defender The Tie Defender's central pod now has the same updated features as the Tie Advanced. Additionally, the rest of the pod is rounder and free of inaccurate surface greebling. The triangular armor on the wing pylons is more substantial and the rest of the armor has been slimmed down. The biggest changes are the wings. The original ones are based off of older appearances, where the wings are smaller and shorter compared to the pod. I wanted to modify the ones that came with the model, but they're constrained by their use of ball joints for support. I didn't know how to make new ones until I saw a post by @Sylyphics showcasing his own Tie Defender MOC. I bought the instructions and started tweaking those wings too. The new wings have been majorly reworked for added length and build simplicity, while the wing hubs are unchanged. The result is more of an experiment representing my ideal Tie Defender model, uniting components from two great designs. This variant is based off the Elite Tie Defender from Rebels. It adds 6 missiles in between the wings and uses brackets that conceal highlight connections to get the little areas of color at the rear of the wings. This is based off Vult Skerris' personal Tie Defender Elite, basically the same as the above variant, but in yellow. This is another variant based off the Emperor's Guard paint job. Since the wing pylon rings run through the wedge plate detailing, I replicated the latter using jumper plates. Tie Striker This model also received the standard central pod enhancements, though the rear details required some interesting connections to get everything to line up correctly. The wings now come to more of a point and the laser cannons have their long, long power conduits running all the way to the cockpit. The biggest changes are to the top hatches; the 6x6 dome pieces have been replaced with an ovular, brick-built roof piece. It is removable for access to the interior, held in by a few studs while resting on smooth tiles. While not explicitly shown, this Emperor's Guard inspired variant follows the same design rules as the other ships with this coloration. First Order Tie Fighter Thanks to the Tie Series' inherent design similarities, improvements made to one model can be applied to many others. Case in point, the First Order's Tie fleet. This model is envisioned as a “V2” update to the First Order Tie Fighter, similar to the one its Imperial counterpart received. The new model is mostly built off of my tweaked Tie Fighter, but there are a few unique details that make it more a simple color swap; firstly, there are holes near the wing pylon armor, as there are on all First Order Ties. The thruster orientation rotated 90 degrees and there is an antenna on the right side of the central pod. The “headlight” details near the cannons are depicted with small segments of hose. The printed hatch piece has been replaced with a regular 4x4 dish for consistency with the other models. Finally, the interior wing hubs and bracing struts have their bulkier, armored appearance from the movies. This is a custom color variant that can be applied to all First Order Ties. Based on the appearance of the Final Order fleet's livery (and initially an excuse to see new Ties in the classic color scheme), this color scheme asks “What if all the forces of the galaxy-conquering First Order Navy didn't stop existing as soon as Kylo Ren found some shiny, new toys?”. First Order Special Forces Tie Fighter Despite its unique construction, the Special Forces Tie still benefits from some of the standard Tie upgrades, such as rounder pylons, more accurate pylon armor, updated wings, and a more circular central pod. The larger cannons are made using slightly altered construction from the regular Tie. The thrusters are now their correct size and shape, at least as close as it can be for the latter. Finally, the power cell banks on the wing pylons are fuller, more circular, and feature all of the segments in-line with each other This is as variant of the design that replaces the printed 6x6 dish on the rear of the central pod with a brick-built assembly. While it costs 2 dollars in comparison to the dish's 1 and eschews the detail of the printed element, it features a correctly colored rear window and can be built in whatever color pattern the design requires. Here is the requisite Final Order color variant of the Tie/sf. Thanks to the color change, it now features the 4x4 printed Tie hatch for added detail. This variant can only use the brick built rear windshield due to the new coloration. Tie Baron The changes here are mostly minor tweaks made to bring this model in line with the other edited Ties. The central pod received the standard Tie upgrades, including chin cannons, “bowtie” detailing, thicker pod dimensions, and an interior matching the standard First Order Tie Fighter. The wingtip cannons have been remade to fit their correct size and the power conduits have been simplified. The missile launchers have been edited so that the ordinance inside is visible. The wings are free of inaccurate detailing, the front wing pylon armor has been slightly modified, and the internal support “spine” behind the central pod has been made more sturdy. The Standard Tie Baron created by the designer features all the same improvements, but in black. The Special Forces variant now has the turret, chin cannons, and antennae of the Special Forces Tie Fighter. The Final Order variant swaps the gray and black from the Standard version. Modified Tie Whisper The central pod has been replaced with one based off the pod from the Special Forces Tie Fighter in order to correctly depict the two-seater cockpit. It uses some a unique connection to the handlebar element to both represent the red windshield ring and to support the windshield “spikes”. The red protrusions on the central pod have been rebuilt to be 1 stud wide and feature custom vent detailing stickers that can be applied for a more accurate look. The rear solar panels are made using a specific type of wedge plate because it is the exact shape they're supposed to be, though this leaves them covered in studs. The wingtip cannons have been redesigned and the indentations along the rearmost part of the wings has been made smaller. Here is the Final Order version. Those are all the official models I've modified, but I've also used those models as a base to create designs for ships that don't have as high-quality representation as Lego MOCs. Tie Experimental M1 “Bizarro” The first of the new models, and the first of the unmanned Tie Experimental series, is the Tie Bizarro. It was designed as an inverse to the standard Tie Fighter, with 2 pods straddling a single, central wing. Just as the model makers rearranged and recombined parts from a standard Tie to create this design, I've done the same with the Lego model of the Tie Fighter. The pods had to be modified to create a smooth outer curve thanks to their new positioning showcasing what once flowed into a wing pylon. The wing pylon itself is now a singular construction that runs from pod to pod. It's made using the longest 2-wide plates Lego produces for stability's sake. The pylon armor had to be modified as well to fit on the pylon, though this just means it is a plate thicker on each side compared to the standard Tie. The internal of the pod housing the turbolaser has been completely stripped and replaced with a scaffold to support the dish piece that replaces the windshield. This is a variant that more closely follows the “rules” of Tie design, with the vertical pylon armor next to the pods and the horizontal armor by the wing. It maintains the slimmer pylon armor of the Tie Fighter due to its unaltered construction. Tie Experimental M2 “Big Gun” This is a standard Tie Fighter with two large cannons attached to its outer wing hubs. I made the cannons 7x7 studs to depict their relative size to the central pod, but this led to some issues with how to mount them to the wings. I had to redesign the outer wing hubs with jumper plates to connect to the holes on the underside of the plates supporting the cannons. This accounted for the half stud offset required to center the cannons on the hub. Tie Experimental M3 “Warhead” This is a Tie Interceptor with missile pods mounted on the outside of its wings, so I took the modified Tie Interceptor model and did just that. The launch tube detailing on the front of the pods is too fine to be represented using Lego bricks, so I created custom stickers that could be applied over a flat, circular 4x4 area. Tie Experimental M4 “Bomb” This is a ship designed to act as a large missile. Fittingly, it is based off a Tie Bomber with a single pod and is fitted with a massive booster engine. The modification to the base Tie Bomber model was easy enough to make, as I just mirrored the construction already present for one side of the ship. The engine proved more challenging, thanks to its length. I made the smaller shaft out of cylinder pieces, while the larger part is a novel assembly made to display curved slopes on all 4 sides and to recess the exhaust. I've reinforced the engine and its connection to the main ship using Technic axles, but as I've only made a digital model, I can't tell if this engineering would be enough to support the engine in real life. Thusly, I created a stand to act as support for the engine. Tie Experimental M5 “Booster” This is a standard Tie Fighter with an engine based off the Tie Bomb's added to it. However, the Tie Booster's engine is even longer and larger than the one on the Tie Bomb, and is supported by a much smaller central pod. The construction of the engine is similar to the Tie Bomb, but magnified where necessary. The bracers running from the wings to the engine are attached to the rear solar panel strut by a clip-and-bar connection to achieve the correct angle. I also created a stand to support the engine regardless of the design strength, because it would definitely throw the model off balance in real life. Tie Droid This model is based off the droid-controlled fighters that were produced in swarms by the factories of the World Devastators. I based the model off the ship's appearance in the first Rogue Squadron game, because details like the wing size, wing detailing, and windshield color vary wildly across its initial appearance in comics and later illustrations. The central pod and wing pylons are almost entirely unchanged from the base Tie Fighter, save for the two protrusions a the top and bottom of the windshield. The opaque windshield is supposed to feature a horizontal line bisecting it, which would be represented with a thin, rectangular sticker, but the Stud.IO part designer program doesn't apply textures to domed surfaces too well. The standout feature of this design is the blocky wings. They're attached to the wing pylons by two clip-and-bar connections each, which should be enough to support the weight of the wings. The wings themselves are built around an oddly designed core, which supports the tiles of the large, smooth wing hubs. The solar panel detailing and outer edge leave the core mostly untouched, only connecting together in a few places for structural support. The outer edges themselves have been designed in a way to keep the two-plate thick sizing consistent across all sides of the wing. Tie/rc This obscure Tie variant was never given an actual name beyond its factory designation (the obvious Tie Reconnaissance Fighter referring to another ship entirely). It's little more than a standard Tie Fighter with a single cannon and some sensor greebling on the front of the ship, some of which is represented through custom stickers. I made it because it was an easy modification to do, though presumably somebody would be interested in displaying it. Tie Ground Targeting This unique model of Tie was designed to serve as he Empire's initial bomber for planetary bombardment. Given its in-universe existence before the dedicated Tie Bomber, it's built from a modified Tie Fighter frame. However, like a mullet, the front of the central pod is the same as a regular Tie (one cannon non-withstanding), but the rear is cylindrical like that of the Tie Bomber. This proved challenging to make because of its odd-numbered sizing, which needed to be mounted on, and centered to, an evenly-sized studded surface. The rear of the pod is made using a similar construction to the engines of the Tie Bomb and Tie Booster, and has a set of thrusters similar to that of the Tie Bomber. The top and bottom of the pod feature plates that are integrated with the top and bottom cockpit hatches, similarly to the design for my tweaked Tie Striker. The gaps from the regular Tie pod to the cylindrical back half are filled as best as possible, and are mostly hidden by the wings and hatch assemblies. Finally the triangular wing strut armor coming from the central pod has been redesigned to match the ship's reinforced appearance, complete with holes where they should be. Tie Fire Control This is the Tie/gt's other half, and another relatively easy build. This model of Tie was designed to house the sensors required for precise ground targeting, which was then relayed to the Tie/gt fighters it flew alongside. This ship shares its sticker detailing and single cannon with the Tie/rc. Its unique features are the chin mounted sensor arrays flanking the laser cannon. These boxy protuberances are meshed to the central pod as well as can be achieved without sacrificing the quarter dome pieces for something custom built to house the sensors. The sensors even extend into the area reserved for the bottom 4x4 dish, so a brick-built lookalike stands in for it. Tie Heavy Bomber This is a ship based on the Tie Bomber, but with two ordinance pods. I was inspired to recreate this design after I saw a Flickr post by Gingko19 Biloba showing a similar model. Unfortunately, he didn't alter the sides of the pods, which meant they clipped into the model in a manner impossible to build in reality. He told me he used a tile with a stud attached to a tile with a hole in the middle (a stud reversal method) to connect the pods to the central pylon. A plate ran from the core of one pod to the other for structural stability, covered by increasing the depth of the pylon by one plate. With that info, I set out to refine his model into something physically possible. The ordinance pods have been slightly altered in order to evenly meet up with the pylon. Additionally, I increased the height of the wings to extend past the bomb chute, a feature that is actually accurate to their portrayal. Emperor's Guard variant. Tie Interdictor / Punisher The next logical model to make after the Heavy Bomber. This ship basically mirrors the double-pod side for 4 ordinance pods. Emperor's Guard variant. First Order Tie Brute Seen exclusively in an immersive shooting gallery ride at Disney World, this Tie is largely the same as the Imperial Tie Brute. The First Order version has small, red headlights on its pylon armor, the requisite antenna array, and unique thrusters resembling those of the Millennium Falcon. I created the thrusters using custom stickers, including some applied to 1x2 grated slopes, meaning someone building this in real life would have to gently press the stickers on. Also available with small corners. And in the colors of the Final Order. First Order Tie Whisper To end this list of ships, we have the regular Tie Whisper. They are seen during the Lightspeed Skipping chase in TROS and have the wings of the standard First Order Tie Fighter. I reused the central pod and pylons from the Modified Tie Whisper and the wings from the Tie/fo. One detail unique to this ship is the curved, almost dented appearance of the wing hub's armor plating where it meets the wing pylon bracer. This altered construction means this ship can utilize the same wedge plate bracer design as most other Ties despite the extra plate's worth of armor usually blocking it. Final Order Version. Let me know what you think!
-
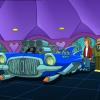
What started out as what to do with 2 chrome fuel tanks has morphed into a monster. Also wanted to design and build a cabover truck so this is what I ended up with. Already have 75% of cab and trailer parts at home. Will get the rest plus forklift parts from Bricklink. Forklift can slide fork hoist back and forward as per prototype. Turning the air cleaner also steers the back wheel.
-
Hello EB members. A short post of my most recent MOC, its a street alongside a canal of European influence. There are a couple of shops within the two buildings with a small grocers along the canal selling plants and various fresh items. Just the one pic this time round; As usual you can find the rest of my MOCs here Thanks again!
-

[MOC][VIDEO] Jurassic Park - 30th anniversary - animation 5 (of 5)
Kalais posted a topic in LEGO Licensed
This is the last animation in a series of five videos made to celebrate the 30th anniversary of Jurassic Park. In fact, the entire production started with this one and various solutions were tested here. It turned out to be the second most popular video of the five with almost 2 million views on the official LEGO YouTube channel. Read more » Full story on my LEGO blog: [VIDEO] Jurassic Park - 30th anniversary - animation 5 (of 5) -

[WIP] Rate my axle setup
damian_kane_iv posted a topic in LEGO Technic, Mindstorms, Model Team and Scale Modeling
I'm trying to design a realistic 5-link axle for an upcoming crawler idea. I wanted to make a genuine 5-link with as much travel as possible and a differential locker. I think I have the geometry 99% there. I also plan to add pneumatic shocks to complement/dampen the coil springs. Lego's new springs were appealing and compact, but the 9.5L springs have much more travel needed for high axle articulation. Let me know what you think/how it can improve: Here you can see the coils, the shock and most of the suspension links. This is a close-up with the pneumatic cylinder removed. The axle is designed for ~1:9-1:11 sized mocs and can be fitted with either a portal axle mounts (pictured here), or traditional ungeared mounts. Here you can see the lower control arms, the panhard rod, and diff locker. Here's a picture of the underside. I based this design off of Madoca's Dacoma axle. This was originally designed to accommodate a power ball joint for a more trophy truck-like suspension, but I have converted it into a 5-link axle design and scaled it up for 1:10 models. Finally, the underside of the chassis contains the upper control arms, mounting for panhard (bottom), and the driveshaft As you can see, this was formerly a powerjoint setup and can be converted back if desired. -
-
-

[MOC] Kai's Elemental Fire Mech
Traykar the swift posted a topic in LEGO Action and Adventure Themes
Wanted to make the mech a bit more unique build-wise while also bringing in multiple elements from the Climber Mech. Also, I feel like the Elemental mechs released this year would have been way better if they had each come with an extra limb to further the mix and match gimmick. -
I have just finished building my food truck empire. 8 USA based food trucks and 8 Italian based Piaggio Ape food/drink/toy selling trucks. Donut Food Truck: Piaggio Ape Wood Fired Pizza Truck: Has a LEGO light brick installed to simulate the pizza oven glow. Popcorn truck: The popcorn machine is from the polybag set so the corn can bounce by inserting finger thru rear door and tapping lever. Piaggio Ape Coffee Truck: Coffee machine this side. Coffee bean grinder and top opening milk fridge. With doors down.
-
While I'm waiting for the parts to do my mod of the official Dune Ornithopter Set, I decided to play around a bit more and try to do the smaller thopter which Paul and Jessica used in the Dune Part 1 to escape the Sardaukar. This is of course still a very early stage. I started with the cockpit and then tried to design a downsized version of the flapping and folding mechanisms which I've basically taken from the official set. I will not include the the cool landing gear though. For one, it would take up too much space and secondly, the landing gear on this thopter works differently than on the one which was the template for the official Lego set. Maybe I can think of something really smart, but in the end, I'll probably just use ball joints, so that the landing gear will have to be put into place manually. Which means that from here on out, the main challenge will be to shape the exterior. One thing I have to admit to is that I have cheated with the colours. Unfortunately, these trans-yellow pieces don't exist. In the end, I'll have the choice between trans-clear and trans-brown. I think trans-brown will look nicer. Here's an interior shot of the cockpit with trans-clear windows.
-
Hi, i built a modificated version of the Town Square set to make it look even better (In my opinion) :)
-
Orders from the Governor, Santo Domingo 1674 Orders from the Governor, Santo Domingo 1674 by Nicholas Goodman, on Flickr Orders from the Governor, Santo Domingo 1674 by Nicholas Goodman, on Flickr Orders from the Governor, Santo Domingo 1674 by Nicholas Goodman, on Flickr Orders from the Governor, Santo Domingo 1674 by Nicholas Goodman, on Flickr Orders from the Governor, Santo Domingo 1674 by Nicholas Goodman, on Flickr
-
[MOC][VIDEO] Jurassic Park - 30th anniversary - animation 4 (of 5)
Kalais posted a topic in LEGO Licensed
This is the fourth animation in the series. My favorite. Mainly because of the rain, which I animated for the first time, as well as the general atmosphere and the story loosely referring to a famous scene from a movie. Read more » Full story on my LEGO blog: [VIDEO] Jurassic Park - 30th anniversary - animation 4 (of 5) -
Hello Corvette and Speed Champions fans, The Chevrolet Corvette (C3) is the third generation of the Corvette sports car that was produced from 1967 until 1982 by Chevrolet for the 1968 to 1982 model years. Engines and chassis components were mostly carried over from the previous generation, but the body and interior were new. It set new sales records with 53,807 produced for the 1979 model year. Building instructions are available on the following link: https://rebrickable.com/mocs/MOC-176144/_TLG_/corvette-c3-stingray It is a studless build in the new, 8 studs wide Speed Champions style. I wanted to create a clean model which is as accurate as possible in this small scale. I prefer the brick built solutions to keep the flexibility of the used parts in further builds, and therefore only two vehicle registration plate stickers are used. My intent was to keep the width-length-height ratio of the real car and this size makes it possible. The model contains lots of details: for example the front bumper, the emblematic side grills, the side view mirrors, the embedded tail lights, the fuel cap etc... I tried to fill every unnecessary gaps and therefore some tricky build techniques are used. The instructions includes some modification ideas, for example front blinker and alternate side grill, see picture 6, and luggage rack, see picture 5. The model has space for two minifigures with helmets or small hairs. Thanks for visiting, _TLG_ Corvette C3 - instructions 01 by László Torma, on Flickr Corvette C3 - instructions 02 by László Torma, on Flickr Corvette C3 - instructions 03 by László Torma, on Flickr Corvette C3 - instructions 04 by László Torma, on Flickr Corvette C3 - instructions 05 by László Torma, on Flickr Corvette C3 - instructions 06 by László Torma, on Flickr Corvette C3 - instructions 07 by László Torma, on Flickr Corvette C3 - instructions 08 by László Torma, on Flickr Corvette C3 - instructions 09 by László Torma, on Flickr Corvette C3 - instructions 10 by László Torma, on Flickr Corvette C3 - instructions 11 by László Torma, on Flickr
-
Captain Fishbone wept as he flew over the once prosperous Caribbean seas. His crew had abandoned him, leaving him with nothing but one ship, his modified flying tugboat called the Rustbucket. My entry to the Eurobricks Space Pirates Contest 'Rum for everybody!' category The Ship is based on Bdubs' fantastic flying tugboat Minecraft build in his Building with Bdoubleo series. https://flic.kr/p/2pB76a5
-
Hi everyone! I present to you the third module of the Medieval Village. Hidden in the forest among large trees with dark trunks, surrounded by vegetation, in perfect symbiosis with nature... there is an outpost, a stronghold where the Forestmen live! These famous archers, children of the forest, live hidden among their trees. Through ingenious secret passages they can reach the village to be able to fight enemy factions and grab gold to survive. This new module connects to the previous one (#2 medieval bridge and water mill) and represents an important presence in the Medieval Village that is gradually emerging. The module is composed of 4 trees typical of forestmen with black trunks. A large waterfall is the protagonist of the scenario which gives life to the stream already seen in the previous module. Next to the waterfall there is a tree with a special branch... if activated it opens a secret door in the rock that allows the Forestmen to reach their outpost through a tunnel carved into the rock that runs along the back of the waterfall. The Forestmen's stronghold consists of a ground floor with a main room with a fireplace, an armory and a wardrobe that can be opened revealing the secret passage to the tunnel. On the first floor we find a dormitory room and another room where the forestmen eat. Above we find a turret used to spot enemies from afar and where a powerful crossbow makes its presence to shoot arrows far away. With a non-LEGO rubber band the crossbow actually works! A further lever behind the base allows you to move two Forestmen children playing among the reeds. There are also Easter eggs. The base is made up of 5,800 pieces, the outpost alone is made up of around 1800 parts. The three floors of the outpost are separable to better observe the internal details. You can view all the detailed photographs of the moc in this Flickr Gallery: https://www.flickr.com/photos/sdrnet/albums/72177720315170655/ I hope you enjoy my latest work and stay tuned for module #4! Sandro, SDRnet Questions and comments are welcome!
-
https://www.bricklink.com/v3/studio/design.page?idModel=523436
-
 This house was digitally built in 2018, really built in 2019, then languished in a WIP state for several years before being finished last month. Enjoy the pictures - this model has been a long rough ride since the beginning, but it was worth it! I was inspired to create this model from the 2018 Jurassic World set 75930, Indoraptor Rampage at Lockwood Estate, with some design cues from set 10228, Haunted House. The dollhouse-style model was built from the set pictures, with the play features removed and opening rear sections added to match the front half. The house folds apart, doll house style, with the rear section opening in quarters up to 90 degrees. (Technic pins hold the model shut for transport and ease of handling) The modular building compatible base is able to be removed from the building to facilitate access to the inside details. The rear of the mansion features a back door (perfect for escapes when the locals get feisty about the scientist playing god again!) and the chimney flue. Moving inside, The bottom floor features the living room and dining rooms, while the second floor is the bedroom, study and pipe organ rooms. The third floor features the laboratory for the study of time travel. The rear door to the outside is in the right rear section, while the safe containing the house's title and family paper work is directly above on the second level. This area also has stairs from first to second floors and what appears to be Frankenstein's monster on the third floor's operating table! The left rear quarter features the fireplace and telephone on the first floor and a bed for the second floor's master bedroom. The stairs to the third floor are also on this side. It seems the time stone from the Marvel Universe is also here... I wonder what the Doctor plans on doing with it? I built the roadster model by heavily stretching set 40532 - Vintage Taxi by about seven studs. This allowed for me to add in mechanical details. I added a covered spare tire at the rear of the car, and blacked out the back windscreen to give the impression of a fabric convertible top. As an added bonus, the car still seats two figures with room in the trunk for luggage. (Any and all resemblance in the mad doctor to moderators, living, dead, or otherwise, is totally coincidental. It is totally not @Professor Thaum in his younger years. ) The rear of the MOC. Inside view of the car, with seating for two and room for baggage. ...and that's all I've got. Thoughts, comments, complaints and suggestions welcome!
 -
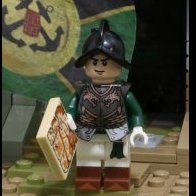
It is a beautiful day. The shepherd just sat quietly by the flock. The sentinels on the wall peer across the fields, nothing to be seen. In the city, life goes on quietly. What a lovely, peaceful day. Inside the walls, life also goes its course. The worst thing that happens is that the little boy trips when he wants to run to his father who is working in the garden. The guards can enjoy it, but fortunately, his mother arrives just then. The other cottage belongs to a somewhat eccentric figure. Not unfriendly, but withdrawn, mysterious. Its signboard is also a mystery; there is nothing on it. But, oh, what a lovely, peaceful day it is! Or...
-

[MOC] 1:48 Pennsylvania Railroad T1 4-4-4-4 Duplex v4 (Power Functions)
Commander Wolf posted a topic in LEGO Train Tech
Hello all, almost ten years ago I posted the first version of my 1:48 scale T1. This was one of my earliest scale models and it was perhaps not that great and/or perhaps limited by the parts of the era. The model underwent many changes over the years, but at least from an aesthetic standpoint it fundamentally stayed the same. Having designed, built, and operated a ton more trains since then, I finally decided to do a complete rebuild of the T1, and this latest version shares practically nothing with the earlier versions save for the overall profile. Most significantly I moved the drivetrain from the tender to the locomotive, after testing a similar setup in my PRR Q2 (behind). This is a much simpler and more performant setup, and unlike the Q2, the T1 has coupled bogies and can navigate R40 geometry. It it also still an almost entirely purist build save for the BBB #11 and #5 wheels. Anyways, see the video for more details and running shots, and have a nice day! -
After a busy last year I finally finished my Lego Lathe. I have a WIP folder sowing most of the changes through the year when I had time to build. I had wanted to do a machinist lathe, but not a huge build like the few videos I had found. So at this scale I was able to fit lots of functions into the build and still be strong. It has: 8 total speeds for the chuck 2 speed for the auto feed, plus forward, reverse, and neutral Moving and lock tail stock Can engage the apron (tool holder part) with 2 speeds or neutral Uses a wrench with a flat end as the cutting tool with the flat part I have made free instructions available here! More pictures here. Please enjoy!
-
This is my entry for the 4th round, a very detailed defensive tower with several elements such as: a improvised stable, a crossbow in the upper part, a habitable floor, etc. The number of pieces is 2991 and it has a modular system so each floor can be built separately. It can even be extended from the 3rd floor. Very easy to build and many possibilities. I hope you like it and if you want to support it (Voting and commenting your feedbacks) -> click on the link below. https://www.bricklink.com/v3/designer-program/series-4/1379/Ballista-Tower
-
Hey there, I'm super excited to share with you my latest LEGO creation the BTL-B Republic Y-Wing in midi-scale! I got inspired to build this after seeing Flyinspace's awesome minifig scale version. But instead of going minifig scale, I decided to try something different with midi-scale. Building this was an absolute blast! Usually, I just try different designs and stick with what looks best, but with this one, I found myself going back multiple times to tweak and redo sections using different building techniques. Check out the evolution of the design from V1 to V3 in the pics I've included. One of the trickier parts was figuring out which version of the Republic Y-Wing I wanted to recreate. There are so many variations out there, with slight differences in shape, color schemes, and details. But in the end, I'm pretty happy with how this one turned out. I'd love to hear your thoughts or any suggestions you might have on the design! Thanks for checking it out! https://rebrickable.com/mocs/MOC-173299/Marius2002/btl-b-y-wing-starfighter/#details V1 V2
-

[MOC] Iveco Streetway 12M
mic8per_ posted a topic in LEGO Technic, Mindstorms, Model Team and Scale Modeling
Time to revive this account I guess... I am now making a LEGO replica of a city bus Iveco Streetway 12M, with currently working drivetrain and steering with a very big angle. The doors are pneumatic, I am planning to put an air tank inside, also the front door and the rear ones will have seperated switches. The rear is not done at all. Same for the interior. I am not really happy with the current look of the lights, does anyone know how to make them smaller? All you can see bellow is a WIP of course. Photos of the real thing: https://seznam-autobusu.cz/en/vuz/111410 -
Hi! I'm back with my 5th project from the Minecraft world! This time it will be: The Frozen Ocean one of the more difficult biomes, large space and icebergs. sounds boring, but it's not! I added a lot of interesting things in my project :) The construction process is available in my video, link below. How do you like my Frozen Ocean?


-min(2).thumb.jpg.89062c1a498f0e11e435e64ef3149476.jpg)