Search the Community
Showing results for tags 'moc'.
Found 5699 results
-

[MOC] Lissajous Machine (but failed)
Carsten Svendsen posted a topic in LEGO Technic, Mindstorms, Model Team and Scale Modeling
Hello everyone I haven't posted a new MOC in a long time, mainly because I haven't had the interest lately. This thing has been with me for years now, trying to get it to work, and it is one of those projects that causes so many headaches and will never work properly, no matter what you do. So this video is the result of straight up agony, and I do not think I'll be revisiting this again. I haven't disassembled it because I hadn't got the time before putting all my LEGO in storage for a few years. So "enjoy" my failure See a few photos here But maybe let me tell a bit about this contraption as if it had worked alright: The first challenge was to figure out a soutable gear ratio. I chose to make the 2nd fastest (orange) the 1:1 gearing from the motor as then the slowest was still able to spin somewhat comfortably. The size of the circles and spacings are all a function of the LEGO brick arches and discs. To get the arms in the right location, I had to offset them by 0.5 studs, which was easy enough with some 4-pin connectors with axle hole. Then the challenging bit - designing the gear ratios to also fit inside the box. It looked like there was a lot of room, but I had to use many more gears than what I thought, so this wasn't so easy either. Also here, I had to space them by 0.5 studs. I had initially only planned to power the red (the fast) ends which would be 3 motors, but there was just no power at the slow end when I did this, so back to the drawing board. I then decided to power each side from either end, which meant I had to add gearing in the small corners - 1:1 for one end, and 1:5 on the other, in some cases. The slow end was the hardest to figure out and need quite a few more gears. Now for the fun part, to see if it works! Turn on the motors and yup, everything is running at a different speed, as I expected. This is not good, as the axles will keep twisting more and more, or gears will skip. So I had to figure out a solution to sync them up. I went with Power Up, and no matter what I did, there was no way to sync them up in software. I had to write my own code, and I'm not good enough for that. It would work sometimes, but mostly just with 3 motors for some reason. So in the very end, I decided to link them up physically, but this was a challenge in itself. They are long distances, what's the best way? I ended up with the ol' steam engine solution and just multiplied that by 4. And it works great! As long as nothing is stalled anywhere, because then gears will tick over and over. In the video, you can hear this, and it's probably because those gears already need a replacement. But it is so darn hard to do. Lastly, decoration - this was already decided on well before I was halfway through with the project. It had to bricks, because of the arches. Building the long panels was easy, but building the corners took some more skill. Not too much it turns out - I looked for help here in Eurobricks and no one would help. What seems simple to you, may not be simple for me. Anyway, I ended up with some lightsabers underneath and some clips to hold the corners in place. They aren't perfect, but I guess nothing in life ever is. Also the large panels move around all the time, I think the tolerances on those arches aren't actually perfectly round, they seem kind of oval. What went wrong with the demonstration though, was that a CV joint on the backside had popped out, and so the whole left side of it wasn't spinning to begin with, thus being the source of most of the issues shown. And then I also only bought a pack of 24 marker pens, when I needed 25, luckily I had one extra lying around that fit the 1x1 LEGO dimensions. And acrylic is not cheap! 2 sheets of 0.3mm each. But I guess that's nothing compared to all of the black panels, liftarms and plates and bricks that I had to buy. Failure all around. If anything it was a good learning experience. -
Hello Chevy and Speed Champions fans, The 1957 Chevrolet is a car that was introduced by Chevrolet in September 1956 for the 1957 model year. It was available in three series models: the upscale Bel Air, the mid-range Two-Ten, and the One-Fifty. It is a popular and sought after classic car. Its image has been frequently used in toys, graphics, music, movies, and television. The '57 Chevy, as it is often known, is an auto icon. This model is based on one of my favorite Matchbox as a child. Building instructions are available on the following links: https://rebrickable.com/mocs/MOC-87788/_TLG_/57-chevy-matchbox-version Kit is available here: https://buildamoc.com/products/57-chevy-matchbox-version It is a studless model in the new, 8 studs wide Speed Champions style. It can be built either with fixed doors, or with openable doors. I personally prefer the fixed door version (Speed Champions style) as it is more sturdy and there are no half plate thick gaps below the doors. I minimized the use of stickers to keep the flexibility of the used parts in further builds, therefore only two standard vehicle registration plate stickers are used. My intent was to keep the width-length-height ratio of the real car and this size makes it possible. I wanted to build the model as accurate as possible in this small scale, therefore it contains lots of details: for example the brick built flame decoration, the emblematic front bumper with the vehicle registration plate and front lights, the side view mirrors and the rearview mirror, the tiltable seats etc.. Maybe the most challenging one was the brick built number on the trunk. I tried to fill every unecessary gaps and therefore some tricky build techniques are used. The model has space for two minifigures on the front seats. There are some space before the rear seats too, but it is enough only for a minifigure without legs. Thanks for visiting, _TLG_ '57 Chevy - INSTRUCTIONS 1 by László Torma, on Flickr '57 Chevy - INSTRUCTIONS 2 by László Torma, on Flickr '57 Chevy - INSTRUCTIONS 3 by László Torma, on Flickr '57 Chevy - INSTRUCTIONS 4 by László Torma, on Flickr '57 Chevy - INSTRUCTIONS 5 by László Torma, on Flickr '57 Chevy - INSTRUCTIONS 6 by László Torma, on Flickr '57 Chevy - INSTRUCTIONS 7 by László Torma, on Flickr '57 Chevy - INSTRUCTIONS 8 by László Torma, on Flickr
-
Welcome to Harry potter custom builds and moc's. I'm loving the new Harry Potter range of sets but there is always room for improvement. Interested to see how people have altered, added to the existing sets or just gone crazy and built something themselves. Looking forward to seeing your magical creations.
-
(Caution, spoilers!) I was really hoping for some official sets from the new movie. IMO this scene towards the end of the movie would have been the most suitable. 400 pieces including Helena, Indy, Archimedes, a Syracusan soldier, and a Roman soldier. Left: Archimedes' workshop. Middle: An armory. Right: A storage room. On top: Two of Archimedes' defensive devices. This is of course built from memory. I'll probably have to correct a lot of things when the movie becomes available on DVD...
-
Here is one of Thomas the Tank Engine's best friends, Bertie the bus, as seen in The Railway Series books and the original Thomas and Friends TV show. You can see LEGO Thomas and his fellow engines and some rolling stock over in my thread in the Train Tech sub-forum. Thomas and Bertie once had a a race, and they both want a rematch, but I don't think they ever will... do you? This model's front end was inspired by 2019 Harry Potter set 75957 (The Knight Bus) and the rear portion by the bus in the 2017 set 10259. (Winter Village Station) The side door opens, and Bertie seats one driver and two passengers (three figures overall). The rear of the friendly bus. You can see the read about the original book version of him here and the TV show here, both on the Thomas and Friends wiki. Any thoughts would be appreciated!
-
Here is my Post Office MOC. It is intended to be a small local post office to serve the modular street needs. The ground floor is the post office itself and the upper two floors are an apartment for the postal worker to live in. Here is the MOC with some of my other MOCs and the Parisian restaurant.
-
Dear all, Another year, another crane. This time it's a crane in the size range of the 42042. The crane hase the same track size and width, and shares more or less the same frame, but this time in black, also I decided for now not to motorize the tracks. The body has also more or less the same size and structure as the 42042, but I tried to make the body less wide. The crane has 4 motors, 2 L-motors for the 2 winches on top, one XL-motor for slewing and 1 angular motor for the 3rd winch. They're all housed in the body and connected to the battery box aft of the main body. The 2 ballast boxes each hold 150grams of ballast. The building showed me it's indeed difficult to make a rugged build, due to the flexing of lego parts because of sideways movement of the crane boom. this was almost complete fixed with the installation of the 2 springs and some additionals beams for support at the front of the body. For now the crane can lift 350 grams in its highest and most comfortable position. The cabin has an openable door and can be tilted upwards(not seen here) I used the good old lego metal hook with 50 g of ballast stuck to it, I didn't use a turntable this time because it would make the hook too bulky and too big Here's a view of the panels removed, you can see the placement of the motors and the winches, the winch of the hook is directly connected to the angular motor, without any gears The last photo is for scale, in it's highest position the crane reaches 1,35 m, additional sections can offcourse be added
-
Hello everyone, I visited the "Skaerbaek Fan Weekend" which was surprisingly located in Skaerbaek, Denmark ;-) Here is a video I made with lots of impressions and interviews. I hope you'll enjoy it :)
-
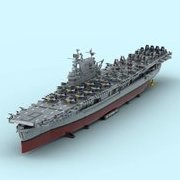
Hello friends at eurobricks! First time poster here so please go easy on me. I would like to take this opportunity to share my Iowa-class Battleship MOC. The model is built to 1:200 scale (accurate to a stud!). The ship features separable waterline hull, fully articulating main and secondary turrets, detailed superstructure, curved bow and stern, floatplanes, and stands. Almost all AA emplacements from 40mm Bofors to 20mm Oerlikons are represented here. This model has taken me well over 300 hours, across several months, to research, design, model and test-build. I am proud to call it my best work yet. Below are studio.io renderings mixed in with some photos (I have yet to accumulate the correct colors for the full physical build and photo shoot). If you have doubts about structural integrity, scroll to the very end for a video demo. Iowa-Class Battleship Cover Photo by Chuck, on Flickr Iowa 1943 vs Missouri 1945 by Chuck, on Flickr Iowa Test Build - Waterline 1 by Chuck, on Flickr Iowa Test Build - Waterline 2 by Chuck, on Flickr Iowa Hull Test Build by Chuck, on Flickr Iowa Shake Test by Chuck, on Flickr Separately I have also built a fully refitted/modernized version of the Iowa-class (BB-63 Missouri in her 1980s to be exact) with various upgrades to her armament: Iowa & Missouri Updated Comparison by Chuck, on Flickr I have created several other ships including the CV Enterprise, battleship Texas and light cruiser Atlanta in this scale before. Below is a snap of the fleet. Feel free to take a look and say hi @: https://www.instagram.com/chucky_in_charge/ https://www.flickr.com/photos/chuckincharge/ Every Ship I've Built in 1:200 Scale by Chuck, on Flickr
-
After a fairly long hiatus designing any new rolling stock it's time to present another one of my Danish State Railways’ (DSB) locomotives redone to 8-wide and digitally rendered. DSB Litra EA The Danish State Railways' (DSB) first electric locomotive was built by Henschel & Sohn in Kassel, Germany (the first two) and Scandia, Denmark (the remaining ones). 22 were built in total from 1984 to 1992. 1 was scrapped. 16 were sold to Bulgaria and Romania from 2007 to 2010 and 4 to Bulmarket in Bulgaria in 2021. The last remaining one (EA 3004) was transferred to The Danish Railway Museum in 2020. Wiki here and irl photo here. My model: DSB 'modern' red & black livery used in the 1980s. Scale: 1:46 Length: 54 studs from buffer to buffer Width: 8 studs Bricks: 1.397 (BuWizz), 1.403 (PU) or 1.401 (PF) Weight: 996g (without battery box) Locomotion: 2 x L-motors (BuWizz & PF) or 2 x M-motors (PU) Power: 1 x BuWizz 2.0 or 1 x AAA PF/PU battery box Control: BuWizz, PU or SBrick Designed: 2023 It has the serial number EA 3024 and is named 'O K Kristiansen' My 6-wide DSB Litra EA from 2011. All renders are from Stud.io with custom decals done in the PartDesigner tool. Access through the removable roof to a quite roomy and fairly correct interior showing the different locomotion, power and control options: 2-axled bogie design with MS Train Wheels from Brick Train Depot which are slightly larger (by one plate) than LEGO standard Train Wheels: Update 22.02.2023 The design is done and the model is currently being thoroughly tested
-
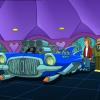
(click for more) Be wary of the beasts that haunt the junkyards. Twitter Instagram
-
 Model of a New Flyer XD40 transit bus in MTA livery. The model has roughly 3800 pieces. Features motorized drive, steering with working steering wheel, passenger doors, and a removable Cummins engine model with moving pistons. Functions/features: Drive Steering with working steering wheel Remotely controlled doors Removable Cummins engine model with moving pistons Instructions available on Rebrickable: https://rebrickable.com/mocs/MOC-153565/JLiu15/2015-new-flyer-xd40-mta-bus/#details Because my NJ Transit New Flyer XD60 model was a huge success, I decided to reuse my design and make another Xcelsior model - this time a XD40 in MTA colors. Unlike my NJT XD60 model which has the livery done entirely using stickers, the blue stripe livery MTA used prior to 2016 is easy to design with blue LEGO pieces. As a result, the model is recognizable as a MTA bus even without stickers, which is why I specifically included "MTA Bus" in the name. The model is not simply my XD60 model cut shorter. The chassis is redesigned from scratch. The front and rear axles are placed at a half-stud offset to allow for smaller wheel arches. The XL motor for drive is placed in front of the rear axle instead of behind it to allow space for the Cummins engine model. The battery is placed much higher and is accessible by removing the upper rear body panel. I added a switch on the roof to allow the battery to be turned on without removing the body panel, so it only needs to be removed for charging. There are also no supports in the chassis for the rear door as the rear door on MTA Xcelsiors open outwards, and the front of the chassis is redesigned to accommodate both the mini linear actuator for the front door and the connection from the steering wheel to the Servo motor for a working steering wheel. Lastly, the chassis is also designed to specifically accommodate for MTA's seating layout, most notably with only a single seat per row on one side in the low floor section. Like my XD60 model, there is also a roof frame that holds both motors for the doors as well as the rear door mechanism (which uses the same general principle as the inward-opening front door despite opening outwards). The roof frame is attached to the chassis using beams, making for a robust "skeleton" that the body is built around. The bodywork has also been redesigned in several places. The wheel arches are now smaller due to the half stud offset of the front and rear axles, although I had to use inverted slope pieces instead of arch pieces to allow the blue stripe to be built entirely in LEGO. This means the wheel arches are not perfectly curved here, but I found it to be a fair compromise for making the entire blue stripe in LEGO. The front lower body panel is one stud higher here compared to my XD60 model, although it kind of makes it look like the front of a MTA Orion VII NG (MTA Xcelsiors in the blue stripe livery have the bottom edge of the front windshield curve downward slightly, and such a curve would be very difficult to model in LEGO at this scale. The rear body panels use a simpler and more robust design, the front roofline curves are angled slightly outward (the space between them was increased by 2 studs), and the side body panels are attached to the chassis/roof frame using white 1x1 Technic bricks with axle hole and part 27940 in white. This allows for a seamless body without pins showing; part 27940 in white was not yet available while my XD60 model was being built. The roof is primarily built using 6x6 tiles this time instead of 5x11 Technic panels - because MTA's 2015 XD40s do not feature a full roofline, the transition from the side body panels to the roof is much more noticeable here which is why I went with the tiles. The model's functions all worked well. The single XL motor was more than enough to power the model, especially considering this model is lighter than my XD60 model. Although the moving pistons on the Cummins engine model are not easily visible (there's one piston visible under the last row of seats), I am happy that I was able to add some additional functionality to this model. And because the pistons are made using half bushes, the engine makes a nice sound while the drive motor is running. While designing my XD60 model I thought there was too little space in the front to incorporate a working steering wheel without compromising the rigidity of the chassis, but I was able to connect the steering wheel to the Servo motor just fine here. There is less reinforcement immediately in front of the front wheels so they don't collide with anything when steering, but the side body panels keep everything robust. I did not test the rear door mechanism before installing it on the model so I was concerned how well it will perform, but it is usually able to open the rear door fully with each door panel rotating 90 degrees. Sometimes the mechanism gets stuck while opening the door, but reinforcing the pieces a little usually solves the problem. While at first glance this MOC looks like my XD60 model shortened and without an articulation joint, it was really a new MOC from scratch. The chassis is completely redesigned and has little resemblance to the chassis of my XD60 model even without accounting for the lack of the articulation joint and a third axle. The bodywork was also improved in several places. All of the functions performed as expected, and the finished model is easily recognizable as a MTA XD40 even without stickers. Speaking of which, I decided to make my model bus 7225 operating out of Grand Avenue Depot in Brooklyn signed for route B62. Overall I am very satisfied with how my second bus MOC turned out, and I plan to continue making bus MOCs in the future, with one already in progress. Video: Photos: Brickworld Chicago Photos:
 -

[MOC] Hancock Merchant Sloop and Morton Imperial Brigantine
CaptainDarkNStormy posted a topic in Pirate MOCs
I recently built two ships designed by Moc Your Bricks. They are the Hancock Merchant Sloop and the Morton Imperial Brigantine. I think they are fabulous designs and I really enjoyed building them. Creating the custom sails was a totally new step for me. I wanted to break down how I did it in case anyone was intimidated by something new (as I was at first.) Most of the builds were straightforward. You purchase the instructions from https://www.mocyourbricks.com/ and use their parts list to create a wanted list on Bricklink. Works the same way as any MOC off of Rebrickable. The more advanced stuff involves the sails and rigging. I bought a yard (this will make a lot of sails) of canvas from a local fabric store. I chose a light tan color and texture I thought would look good. The fist step in making the sails was printing out the sail files from Moc Your Bricks. A few other things you’ll need are string, fabric glue, a sponge brush, good scissors, and a hole punch. Then I cut them out, and traced that onto an old cereal box. You’ll want something thick and sturdy. Once you get all the sail templates onto the cardboard it’s time to trace them onto the canvas. Before cutting apply the fabric adhesive to prevent fraying. I basically traced the penciled lines with the glue then used the sponge brush to spread it. One it dried I flipped it over to do the other side. A few hours later they were dry and ready to cut! I used the original paper templates to get figure out placement for hole punching. Once you finish all the sails, MOC Your Bricks has a YouTube video for each ship that shows how to rig them. I find both of these ships to be simple yet pleasing to look at. They also offer something a little different from the standard Pirates/Bluecoats. I highly recommend adding them to your collection too! -
Here we see a typical oil well and "nodding donkey" pumpjack rendered in LEGO form, ready to start pumping crude oil. (link to Wikipedia for more on pumpjacks, in case you don't know what they are.) The oil well design was heavily modified in design and usage, as it was originally designed as the lower half of a water tower for steam trains! The oil pumpjack features a crank as a play feature, (which could easily be motorized) though it doesn't actually pump anything. My video from Flickr showing it in motion is being stupid and won't embed, so here's a link to it instead. Thoughts? UPDATE 7/10/23: Model finished, real world photos added to main post!
-

[TC 25] 42055 C-Model: Mining tipper truck (rat race)
Timewhatistime posted a topic in LEGO Technic, Mindstorms, Model Team and Scale Modeling
Hi Eurobrickers, I really like the idea of the TC 25 shrinking contest, but unfortunately I won't be able to participate. This contest will give us a lot of creative mocs. In some cases the participants will choose the same set, which will give the opportunity to compare and appreciate the entries. Nice! Back in 2017, I built a simple small C-Model of (part of) the BWE set 42055: A shrinked version of the mining truck which was included in this set. It was also available as a single set (42035) some time before - rather this is the colour scheme my little C-model corresponds to due to the yellow panel. The main challenge was that it needed 4 wheels (= 12 t bevel gears), but 42055 includes (hard to believe...) only 3 pins for that purpose (tan 2L axle pins without friction tan). ;-) So the fourth axle ist a brown 3L axle with stop. Probably it won't meet the specifications of the contest because of the electric function... ;-) https://brickshelf.com/cgi-bin/gallery.cgi?i=6492892 Mining Truck 42055 C-model https://brickshelf.com/cgi-bin/gallery.cgi?f=569964 More pictures I didn't manage to insert a brickshelf-picture in this topic, so just use the links in case of interest. :-( -
Click for more on Instagram Design loosely inspired by various Honkai enemies. Twitter post
-
See more:
-
Hello modular building and City fans, This modular Gothic Cathedral was my entry to Bricklink Designer Program Series 1. I have received many kind comments and support, but unfortunately it has not been selected, therefore I decided to make the instructions available here: https://rebrickable.com/mocs/MOC-148170/_TLG_/gothic-cathedral Kit is available here: https://buildamoc.com/products/gothic-cathedral It is not actually based on a real building, but it contains many typical details: lancet arches, double lancet arch windows, a ridge turret, flying buttresses, portals with series of receding planes, rose windows etc., and there is a matching street lamp too. The roof assembly can be removed as one piece and in this case the internal details are visible: there is an altar with a cross, a candle holder, a church tabernacle, a brick built bible, there are benches, an organ, a holy water stoup etc.. The middle door on the facade and the side doors open outward, and work perfectly, the side doors on the facade open inward and they can be opened if the door handle pieces (the taps) are removed, but it is not se easy to close them in this case. It is a studless build, the unnecessary studs are hidden by tiles. When I started the design, the first version included appr. 4600 parts, so I had to optimized and simplified it a bit, but I am still really satisfied with the result. For example it could be very nice if there was trans color plates in the holes of the window fences, but it would mean too much additional parts (and I am also not sure if it is a legal technique). The building instructions guidelines have been followed. It is built from the palette "BDP Series 1", so there are some color and part restrictions. The part 15744 could be awesome as rose window on the facade, but unfortunately it is not available in black or light bluish gray. However, the technic gear 40 tooth works too. The bells could be pearl gold or something similar, but the best available option is the black which is ok. I hope you like my design, I appreciate any feedback. Thanks for visiting, _TLG_ Gothic Cathedral 01 by László Torma, on Flickr Gothic Cathedral 02 by László Torma, on Flickr Gothic Cathedral 03 by László Torma, on Flickr Gothic Cathedral 04 by László Torma, on Flickr Gothic Cathedral 05 by László Torma, on Flickr Gothic Cathedral 06 by László Torma, on Flickr Gothic Cathedral 07 by László Torma, on Flickr Gothic Cathedral 08 by László Torma, on Flickr Gothic Cathedral 09 by László Torma, on Flickr
-

two 1930s American freight trains with ten new freight car MOCs - real world models
Murdoch17 posted a topic in LEGO Train Tech
I've had these ten train cars built for months now (years in some cases!) and thought I'd better upload them before I forgot again. The two old-fashioned freight trains consist of the following items (in no particular order): - red standard caboose - two boxcars - three generic open-top wagons - flatcar with rail load - OCTAN fuel tank car - livestock car with cow - green streamlined caboose This green 1930's streamlined caboose was inspired by a very similar real-world Wabash caboose located on the Katy Rail-Trail at St. Charles, Missouri. This caboose model (along with the green streamlined one) is inspired build-wise by the Katy Caboose (as in, "The Caboose who got Loose" from the children's book) model I copied in late 2021 from TrainedBricks' MOC. These two nearly-identical boxcars were inspired by set 7597 (Western Train Chase) from the 2010 Toy Story 3 line. They are 99% the same except for colors in a few places, as not many train cars are identical to each other - especially freight! The simplest car of all: a flat car with railroad track / rails strapped to the top in four rows. These three generic wagons cars are actually British Railways plank wagon models, not American at all... but they work well enough for me! These cars were designed by the_chestertonian, but sadly he deleted all his photos. This is just a quickly-mocked up tanker car in OCTAN colors. It's nothing too fancy, but it does look good. (to me at least) This livestock car was heavily inspired by 2014 CITY set 60052 (Cargo Train) but with a roof for more realism. I can now understand why LEGO left it open top in the set, but I managed to make it work. The roof (which was designed with the same look as the boxcars) is even removable and the ramps fold down so you can take out the cow. Believe it or not, the freight cars wouldn't fit in this box in any other configuration! That's all I have... Thoughts? -

LEGO Harry Potter Three Broomsticks Modular Building MOC by Uniqueorn (Pictures)
Uniqueorn posted a topic in LEGO Licensed
As promised, some "fancier" pictures of my modular LEGO Harry Potter Three Broomsticks MOC. Since a lot of you asked - if you are looking to build this yourself or are curious how it was built, you can check the 7 part video series over on my YouTube channel, where the building progress is shown in full detail. https://www.youtube.com/@Uniqueorn/ While you are there, should you feel like it, throw me a like or a comment. It is greatly appreciated! Also, if you like to follow the progress on my other LEGO builds, you can always follow me. Happy building! -
Welcome to the NeRDZ. What is the NeRDZ.? It is more of a concept of myself wrapped in a design that should be as appealing as possible than just a building. The thought behind it is that we live in a time in which we are increasingly forgoing real contacts. We are using digital ways to pursue and share our interests - without necessarily realizing how socially lonely we are. Because comics & e-sports have now arrived in the mainstream and there is also a growing adult community of brick fans, the NERDZ should create an opportunity to bring people together at one place. It's basically a kind of bar where comics, video games, briceks and music are the focus. To linger with old friends, to find new friends and of course to have a lot of fun. It is aimed at anyone who is enthusiastic about these hobbies and would like to meet like-minded people - but also at anyone else who finds fun in these topics or would like to get to know them. Other ideas for this concept that are not incorporated in this project could include: - the organization of regular competitions (e.g. MOCing challenge, karaoke night with movie songs or a tournament with the game console) - A sale of MOCs I Theme days I Sevice employees in superhero outfits (a classic space outfit was used instead in this version) - a lot more About the building: The building was constructed about a year ago. It was actually designed for another competition, but after finishing my project there I distanced myself from taking part again immediately. As it was designed without IP, the BDP represents a suitable opportunity to resume the project. Link: https://www.bricklink.com/v3/designer-program/series-2/763/NeRDZ.-[Comics-&-Bricks]-[Coffee-&-Bar] Real life build: For the BDP, some adjustments were made compared to the real built version: parts and colors were adapted to the BDP palette, some parts (which I didn't own) were used. In addition, the number of parts has been reduced without causing any disadvantages in terms of presentation or stability The set now includes almost 2.000 pieces (1.999), six minifigures (two employees / four guests) and three animals (dog, cat and a spider as signal sign – an Easter Egg, maybe you’ll figure it out). There are no custom stickers - I wanted to keep it simple and used the BDP range instead. The building can be opened completely and the roofs can also be removed - to explore each area extensively. In detail, these areas are: - Front building with outdoor area, main entrance, snack bar with stone oven, bathroom and hallway - Construction corner with brick table and some miniscale MOCs - Gaming and comic/book section - Karaoke area with dance floor As usual, I tried to include a lot of details. Therefore, the list above is certainly to be supplemented. I hope I was able to get you excited about this project and to bring you closer to the idea of the NeRDZ. Of course I would be very happy about your vote and a short comment. Thanks for "listening" and see you soon :) Yours, Tobi aka MM
-
Hello fellow EB members, its been a while but I finally started building again and have put this together in the last couple of months: The Metropolitan club - A 30's inspired bar and nightspot with elements from Art-Deco, streamline and some decopunk fantasy too. A few images to share; They are also hosted on my flickr below; https://www.flickr.com/photos/52656812@N04/ I'll try to answer as best any comments on building techniques or any feedback! Regards Andrew
-
Hi! Maybe some of you have discovered my DB 120 on BRICKS ON RAILS the other day. But there is more to come... Over the last years I made several attempts to design this iconic and outstanding loco which is from a technical perspective mother to all of the modern locos and even to the first ICE generation as well. Every time I dropped the process pretty early although the series 120 was my all time favourit loco in my childhood. All of those angles and slopes on the front gave me nightmares. What happend? New elements! With 37352 it suddenly came all together rather fast. As you can see my MOC can be powered by PF-L-motors and controlled by SBRICK or you can switch to PU-L-motors and PU-hub. But once I was pleased with the first renderings of my 120 the desire for wagons grew. First I came up with some regular Interregio- and Intercity-wagon. Sorry, but I am really poor when it comes to the vast variety of wagon types. Then I moved on to a control cab coach. By that point I was already fallen mad into a strong maniac episode which came to its end with some rolling stock in the famous TEE livery featuring a regular car and a restaurant! I hope you like the result of my latest project. All aboard, summer sneaks around the corner, holidays are in sight. Greetings, Simon! http://DB Intercity und Interregio Ensemble #01 by Simon Jakobi, auf Flickr http://DB BR 120 orientrot mit Lätzchen #1 by Simon Jakobi, auf Flickr http://DB BR 120 verkehrsrot #1 by Simon Jakobi, auf Flickr http://DB BR 120 TEE #1 by Simon Jakobi, auf Flickr http://DB BR 120 drivetrain #01 by Simon Jakobi, auf Flickr http://DB BR 120 verkehrsrot #2 by Simon Jakobi, auf Flickr http://DB BR 120 verkehrsrot #3 by Simon Jakobi, auf Flickr http://DB BR 120 verkehrsrot #4 by Simon Jakobi, auf Flickr http://DB Intercity Wagen TEE #02 by Simon Jakobi, auf Flickr http://DB Interregio Wagen #01 by Simon Jakobi, auf Flickr http://DB Interregio Intercity #01 by Simon Jakobi, auf Flickr http://DB Interregio Steuerwagen #01 by Simon Jakobi, auf Flickr http://DB Intercity Steuerwagen #01 by Simon Jakobi, auf Flickr http://DB Intercity Wagen TEE #01 by Simon Jakobi, auf Flickr http://DB Intercity Wagen TEE Restaurant by Simon Jakobi, auf Flickr http://DB Intercity und Interregio Ensemble #02 by Simon Jakobi, auf Flickr
-
[MOC] Supporting the Resistance, Western France 1944
A_Goodman posted a topic in The Military Section
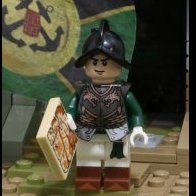
Supporting the Resistance, Western France 1944 Supporting the Resistance, Western France 1944 by Nicholas Goodman, on Flickr Supporting the Resistance, Western France 1944 by Nicholas Goodman, on Flickr Supporting the Resistance, Western France 1944 by Nicholas Goodman, on Flickr Supporting the Resistance, Western France 1944 by Nicholas Goodman, on Flickr Supporting the Resistance, Western France 1944 by Nicholas Goodman, on Flickr Supporting the Resistance, Western France 1944 by Nicholas Goodman, on Flickr -
Old Ben Kenobi's Hut, Tatooine 0 BBY Speeder from Brickvault Old Ben Kenobi's Hut, Tatooine 0 BBY by Nicholas Goodman, on Flickr Old Ben Kenobi's Hut, Tatooine 0 BBY by Nicholas Goodman, on Flickr Old Ben Kenobi's Hut, Tatooine 0 BBY by Nicholas Goodman, on Flickr