Search the Community
Showing results for tags 'minifigure scale'.
Found 24 results
-
Hello. I've been lurking for a while and finally decided to make my first “real” post. I bought the instructions for @Jerac's Tie Fighter about a year ago, but before I bought the pieces, I wanted to try tweaking the design in Stud.IO to better match its on-screen appearance. I've continued modifying the design even after I built the physical model, with each extra tweak expanding the scope of the project. I currently have a Tie Fighter that, while still sharing the original model's bones, is nonetheless significantly altered. Given all the changes I've made, I decided to make a post about them to get some feedback. Wing Struts The armor panels have been remade for more visual cohesiveness and screen accuracy. The space constraints of the new construction necessitated a new approach to the sloped pieces that lie between the panels. The ones near the central pod are now made using 1x4 Slopes and are held in place with only a 1 stud connection. They maintain their stability by resting on top of the 1x2 30 Degree Slopes I incorporated into the struts to give them a rounder look. The lengths of the long slopes and the wedge plates near the wings were changed to better reflect their positioning and size relative to the other visual elements on the struts. While this decision leaves both elements slightly over and undersized, they come the closest that can be represented in Lego using a plate-based construction for the core of the struts. Wings I've redone the visual detailing for the wing hubs while leaving the support structure relatively unchanged. Jerac's construction method emphasized a balance between greebling and overall appearance, but this resulted in noticeable gaps in the hubs and a squished hexagonal shape. I modified the wing hubs to make a gap-less, regular hexagon that fits in an 8x8 space. The wing panels were slightly modified for more stability using groups of 1x1 Bricks w/ Holes connected by Technic pins. These preserve the vertical panel lining of the original while providing as much stability as longer horizontal bricks. Finally, I unified the construction of all the wing panel struts. They are all now 2 plates tall and capped with a curved slope leading into the wing's outermost border. I tried to go for a smoother appearance due to the fact that 1 plate thick wing struts are impossible to make while also serving as support for the wing panels. Central Pod - Front I covered up a small gap in the upper cockpit flap using 1x3 Jumper Tiles. The cannon assemblies use a modified version of the build method I recently saw on BrickVault's Tie X1, though the cannons themselves require the builder commit the ultimate sin of MOC design: part modification. They are made by cutting a length of flex tube to roughly twice the thickness of a horizontal clip piece. This kind of modification is something Lego has instructed the builder to do in some sets before, so I count it as a “legal” move, if not exactly smiled upon. This method results in the most accurate placement, size, and shape of any method I've seen for representing cannons recessed into a curved surface. Central Pod – Bottom A detail of the original model that irked me is that the top hatch sits flush with the top of the central pod and lines up with the slopes on either side of it, while the same area on the bottom of the ship was made with curved slopes. I was able to provide the half-plate recess necessary for a 4x4 Dish on the bottom to mirror the appearance of the top, though this one change required a substantial internal alteration. One of the two connections holding the central pod together stood in the way of creating the recess, but I figured out a compromise. By making the connecting plate 1 stud wide instead of two leaves space under the pilot's chair to run a sort of scaffolding to the 4x4 Dish's correct location. The scaffolding itself isn't very sturdy, but it only has to hold the dish in place; support is provided by all the pieces the dish now rests flush against. Aside from looking good, this construction method is strong enough to support the weight of the entire model resting on its stand. Additionally, the whole pod is now 2 plates thicker to give a more spherical appearance compared to the original model. It's a detail you can't unsee once you spot it, especially when the model is placed next to other BrickVault Ties. Central Pod – Back The original construction of the engines used hollow, round studs slid over the vertical arm of modified 1x2 plates to represent exhaust. While I like the effect, and tried to keep it in my revisions, this method of construction keeps the thrusters from being flush with the central pod's curved surface, as well as either too close or too far apart. I used a modified version of the “bow tie” detailing on the front of the pod to represent the thrusters, a trait shared with the on-screen Tie Fighter models. Regarding the rearmost portion of the ship, the original model uses 1x2 30m Degree Slopes to create the hexagonal rear window. However, the window is shown to be flush with the surface of the central pod in official depictions, meaning a redesign was needed. I wasn't satisfied with any solution I tried that used slope bricks to make the hexagonal window pattern. None of them were flat enough to match the source material, so I had to resort to the second greatest sin of MOC creation: a custom sticker. I think it turned out pretty well. Let me know what you all think!
-
Hello Chevy and Speed Champions fans, The 1957 Chevrolet is a car that was introduced by Chevrolet in September 1956 for the 1957 model year. It was available in three series models: the upscale Bel Air, the mid-range Two-Ten, and the One-Fifty. It is a popular and sought after classic car. Its image has been frequently used in toys, graphics, music, movies, and television. The '57 Chevy, as it is often known, is an auto icon. This model is based on one of my favorite Matchbox as a child. Building instructions are available on the following links: https://rebrickable.com/mocs/MOC-87788/_TLG_/57-chevy-matchbox-version Kit is available here: https://buildamoc.com/products/57-chevy-matchbox-version It is a studless model in the new, 8 studs wide Speed Champions style. It can be built either with fixed doors, or with openable doors. I personally prefer the fixed door version (Speed Champions style) as it is more sturdy and there are no half plate thick gaps below the doors. I minimized the use of stickers to keep the flexibility of the used parts in further builds, therefore only two standard vehicle registration plate stickers are used. My intent was to keep the width-length-height ratio of the real car and this size makes it possible. I wanted to build the model as accurate as possible in this small scale, therefore it contains lots of details: for example the brick built flame decoration, the emblematic front bumper with the vehicle registration plate and front lights, the side view mirrors and the rearview mirror, the tiltable seats etc.. Maybe the most challenging one was the brick built number on the trunk. I tried to fill every unecessary gaps and therefore some tricky build techniques are used. The model has space for two minifigures on the front seats. There are some space before the rear seats too, but it is enough only for a minifigure without legs. Thanks for visiting, _TLG_ '57 Chevy - INSTRUCTIONS 1 by László Torma, on Flickr '57 Chevy - INSTRUCTIONS 2 by László Torma, on Flickr '57 Chevy - INSTRUCTIONS 3 by László Torma, on Flickr '57 Chevy - INSTRUCTIONS 4 by László Torma, on Flickr '57 Chevy - INSTRUCTIONS 5 by László Torma, on Flickr '57 Chevy - INSTRUCTIONS 6 by László Torma, on Flickr '57 Chevy - INSTRUCTIONS 7 by László Torma, on Flickr '57 Chevy - INSTRUCTIONS 8 by László Torma, on Flickr
-
Nuts to the Falcon. The beautiful and graceful Lambda Shuttle has always been my favourite of all the Star Wars ships, and I'm delighted to present my LEGO minifigure-scaled version of this wonder. Didn't you already make one of these, Ru? Yes I did, and well-remembered! It was ten years ago, and a large part of the reason I joined EB in the first place. You can see it here. I revised it a coupe of years later but never publicised the update; you can see it here here (link to flickr folder). I had always intended to go back and tweak the original; however this is a totally new MOC. I started working on it back in 2016, but then we moved house and the LEGO went into storage for a couple of years. front The overall scale of this version is similar to my earlier version, and like the former is based around using the 6x3 vertical windscreen also found in 2015's System-scaled Shuttle Tydirium. The other major factor is the height of the rounded sides of the body: I've used the 4-wide cylinders to give what I think is the best approximation to the real thing. These are attached via a fairly complicated variety of SNOT techniques to a ten plate-high body. Not all the parts are (yet) available in white (the macaroni tiles now are, but not the 4x4 round plates with 2x2 hole), hence the splashes of grey at the sides (or trans-clear in one spot). Starboard The wings are a composite of Technic liftarms and plates. I chose this to keep the weight of the wings down; even built like this I had to work quite hard to prevent the wings flopping down too easily. Some more views: Rear High I've tried quite hard to make this accurate to the movies. There are actually two distinct versions in the movie canon - the sleek ILM model used in the space scenes, and the shorter droopier-nosed version which featured in the Home One hangar scene. The cause of this discrepancy is apparently due to the set designers at Elstree studios in the UK having access only to a few photos of the lambda, but not the ILM model itself thousands of miles away in California. If you are interested, and for a nostalgic reminder of what the Internet looked like in the early naughties, check out Lambda-class Shuttles: the Dimorphism Blooper. I've modelled this one on the ILM studio model. Mostly, I think it is accurate, but I have had to make a few compromises. The cockpit taper - which is only about a stud-width at this scale - is impossible to render without resorting to a solid-black windscreen, and instead is implied by the exaggerated taper of the cockpit sides. The cockpit is a little deeper than the original - required to allow minifigure seating at this scale; the original Kenner toys model did something similar. High close/detail I've take a bit of a guess at the sloping vent-thing under the vertical fin; it is difficult to tell from reference pictures what this is supposed to be. Pressing the silver grille-tile just in front of this operates a latch to allow the body to open. In some places aesthetics wins over accuracy. The bulges on the side of the fuselage should rise to about half-way up the fuselage sides, and should extend back about half-way along the body, but I was so happy with the effect of the mudguard pieces here that I've left them as they are. Detail Front The seven-wide cockpit does not allow a complete set of grille tiles at the front. I may have to resort to a decal on the central tile. The technic skis at the sides would perhaps work better with the pointy-ends at the front but there was no way to attach them that way round (and they could do with being two studs shorter!). There are few canon reference images of the rear. Rather than the usual blanket trans-blue tiles, I have instead tried to show what the engines might look like under the exhaust glow - inspired by this superb render by Thad Clevenger. The vents end up looking a little square; it might be possible to improve this with decals. Rear detail The extremes of the rounded rear end look a bit square, but this is the best solution at this scale, at least until LEGO produces this piece in 2x2. Here's a view from beneath. You can see the taper of cockpit sides, and how the technic skis are a little easy to knock out of position . underside One of the major challenges I faced was attaching the rounded sides of the body SNOT to the studs-up frame. Mostly this is achieved with SNOT brackets, but there was no room for this on the forward sections, which are actually attached via an internal clip. Inside here are two very hard shock absorbers which are intended to encourage the wings to sit in either 'up' or 'down' positions; see here. The smooth sections in the middle are the landing gear doors. An essential feature of any Lambda is that it must be able to fold its wings in order to land. With this, the wing-mounted guns need to fold outwards. I've also included a chin-ramp, though it is hinged a little further back into the body of the ship than on the real thing. Landed front low As you can hopefully see, there is also landing gear, with folding flaps to cover the recesses. It is retractable, as shown below: Landing gear detail The shock-absorber parts act as a kind of suspension when the ship is landed, and provide a spring action when folding to keep the retracted gear in place. It works surprisingly well. Towards the front of the above picture, you can see the cockpit floor is mounted at a half-stud offset, which allows two figures to be seated side-by-side. Having experimented with several ways to allow the cockpit to open, I found that having the nose section slide off provided the best compromise between accessibility and strength. Cockpit interior detail As you can see, the white 4L bars that frame the windscreen are held on by droid arms, and the sloping cockpit sides held in place at the front by 1L bars with claws. It's a bit fiddly to put together. The 1x4 trans tile at the rear unfortunately exposes the asymmetry inherent in any odd stud-width construction; if it were available in trans-black the stud might be better hidden! Access to the inside is easy: the whole top slides off. The red Technic liftarm at the front is a latch to keep the roof in place; it is released by pressing down the metallic silver grille tile. I've also removed a side wall for the photo. Interior I had in mind that this is the shuttle Darth Vader uses to transport Luke from Endor to the Death Star II. It is kitted out for high-ranking officers, with an Imperial Coffee Machine and an Imperial Waffle maker. For a size comparison, here's my Lambda next to the latest official playset version. Comparison to system set I really liked that set, despite is obvious compromises of proportion (and I infinitely prefer it to the hideous UCS set). I like to think that mine is on the same approximate scale to this but more proportionally accurate. The Lambda is the end result of a long process of trial and error, and I'm pleased with the result. I hope you like it too! For more pictures see my Flickr album. C&C welcome! Rufus
-
Work In Progress Ever since I bought the Sail Barge (75020) in 2013, I fell in love with the ship. It quickly became my favorite set. Sadly, recently, I've been taking apart most of my non-UCS sets to make room for the bigger models and to have more pieces to MOC with. I had refrained from wrecking the Barge and the MTT from 2007 because they were my two favorite sets. Eventually, when I got into making car MOCs (Chevrolet Bel Air and Rolls Royce Silver Cloud II), I took both sets apart to make a brown Plymouth Special Deluxe but, after seeing I didn't have enough brown bricks to go through with the project, all the pieces just laid there. Now, while waiting for the UCS Millenium Falcon to come back in stock, I've been having the minifigure-scale fever. I've built a couple of rebel ships (X-Wing (MOD), Y-Wing (WIP), A-Wing (Bought the latest one)) and now, after seeing all he brown pieces I had in stock and all the cool minifigures I wanted to use for some iconic scene, I've tackled Jabba's Sail Barge - The Khetanna. Here it is with my Desert Skiff and the brand new parts that have just arrived: There's a full interior for the barge. Kitchen, droid torture room, "lobby", driver's cabin and, of course, the party room at the back. I'll post pics of the interior as well as more of the outside once I make some progress with the new parts.
-
Hey guys, I decided to create this topic and the main idea came from this and this post (so special thanks to @danth and @Digger of Bricks!). I would like to highlight three things before I start to post inspirational MOCs: I’ll post three staff picks everyday! Please feel free to post your favorite MOCs! Have fun admiring and taking inspiration from those great MOCs Top three MOC’s IMO in Baroque architecture: 1. This incredible Baroque Church by @Jellyeater! 2. This amazingly detailed MOC by @pj_bosman! 3. This greatly shaped modular by @cimddwc! Here are the three best Baroque MOC’s IMO! What do you think about them? Would you buy modulars like those if TLG made? Here are the Steampunk ones: 1. This incredible layout made together by @castor-troy and @domino39 (they also made one MOD of the PR and the MS and two MOD’s of the CC included in this layout. But they look so different that they are more MOC then MOD). EB topic here and Flickr albums with more photos here, here, here and here. 2. These great Steampunk modulars by @adde51! 3. These very interesting modulars by @Zilmrud who as well made great MOD’s of the PC and the BB! Here are the three most gorgeous Steampunk MOC’s IMO! What do you think of them? Would you buy modulars like those if TLG ever made?
-
My entry was selected to the Fan Vote phase of "Build a Vintage car to cruise the streets of LEGO® Modular Buildings!". If you like it, please vote it before Dec-4th, to be an official "LEGO Gift with Purchase" set: https://ideas.lego.com/challenges/bafd4186-bb49-4eb0-903f-910415f04391/application/080bc359-fa49-4bd9-894c-2b627ba2abc7 More details: The title came from the movie "Jailhouse Rock" because of the striped T-shirt of the "bad boy". It is a late 50's muscle car tuning. On the main picture the couple is watching the freshly installed supercharger and on the last one the first try is visible :) One of the most interesting thing about this car is the brickbuilt flame decoration which was inspired by one of my Matchboxes from my childhood. Some tricky solutions were used to build the flame decoration on the hood especially without the supercharger which is visible on one of the pictures. I prefer this solution instead of stickers to keep the flexibility of the used parts in further builds. It is (mostly) a studless build in Speed Champions style which means a 6 studs wide car with a 4 studs wide windscreen. However the front wheels came from a City set to make them similar to the rear ones which are a bit bigger Creator wheels to make the car more dynamic. I hope you enjoy this car. Many thanks for your votes and comments! Jailhouse Romance 01 by László Torma, on Flickr Jailhouse Romance 02 by László Torma, on Flickr Jailhouse Romance 04 by László Torma, on Flickr Jailhouse Romance 03 by László Torma, on Flickr Jailhouse Romance 05 by László Torma, on Flickr All of the selected entries (15 pcs from appr. 1100 entries, sorted by random): https://ideas.lego.com/challenges/bafd4186-bb49-4eb0-903f-910415f04391?challenge_phase=5b9699a1-1e1c-4a9a-896f-d74f4d778836&query=&sort=random
-
I am planning to build some furniture for my modular building. This Office desk in the minifigure scale is the first one. It has a desk lamp, monitor with a rack, laptop with a docking station, keyboard, mouse and cozy chair. My other MOC models: [MOC] Office Desk [MOC] Ferrari F355 [MOC] Toyota AE86 Coupe (2018 version) in Initial D Animation [MOC] Police Motorcycle #2 [MOC] Sport Bike Stop Motion Speed Build [MOC] New York City Police (NYPD) Car [MOC] Lego Mini Cooper [MOC] Japan Tokyo Taxi vol.1 東京無線タクシー [MOC] Ice Cream Truck [MOC] LEGO California Highway Patrol [MOC] LEGO Police Car [MOC] Police Motorcycle [MOC] New York City Taxi / Cab [MOC] LEGO NYC News Stand [MOC] New York City Transit Bus [MOC] Newspaper Rack [MOC] Coke/Beverage Cooler Initial D AE86 Racer AC Transit Bus AC Transit Bus Short Version Ice Cream Van
-
Hi there, I'm barely active anymore but i finally finished my old WIP from the 4011 "Cabin Cruiser" remake from 1991. Its completely brick build without using hull elements. Fits about 6 Minifigs inside. For a scale comparisson i included a 1/43 scale model car i recently finished aswell. Hope you like it, comments and critics welcome, more pics will follow... Cabin Cruiser 4011 - REMAKE by Ron Dayes, auf Flickr
-
Hi all. I've begun a project to build a Minifigure scale Ghost from the show Star Wars Rebels, complete with interior. I've looked online to see if anyone else had attempted the same, but to my surprise I haven't found anything. The closest I've seen is the rather impressive half-Minifigure scale model built by a member of this forum. I'm in the process of organizing/sorting my collection, so build progress will probably be slow until that's complete. So far I've worked out two parts of the ship; the central corridor and the front gunning bubble. I have prototypes of each built in person with mishmash colors, so I remade them in LDD and rendered some images with BlueRender. The front gunner station is the first part I worked out. Sadly, the very piece that inspired this entire build isn't included. The front bubble is supposed to be made of two construct-a-buzz outer shells that plug into the front pegs. The result is an 8x9 dome that perfectly recreates the slightly oblate bubble of the gunner station. I might upload an image of my miscolored mockup later to show how the attached dome looks. Here's the central corridor. In the show, the four doors lead to the ship's lounge, two airlocks, and an elongated corridor that leads to the cockpit. The ladder leads up to the top turret. You may notice that there are gaps in the angled corners. unfortunately, the 1x6 plated that would normally fill the gap is too tight a fit for LDD. The ladder is not yet connected to the room, and as of right now the connection will likely be higher up towards the turret. Thanks for taking a look, I hope you guys like what I've got so far
-
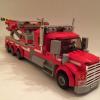
MOC: Jamie Davis Heavy Rescue Team Tow Trucks from Highway Thru Hell
timtosino posted a topic in LEGO Town
Jamie Davis Heavy Rescue is a towing company based in Hope, BC Canada (about 2 hours from where I live) whose main operations are on the Coquihalla Highway and are featured on the TV Show "Highway Thru Hell". I posted my Jamie Davis Rotator back in 2014 and said I wanted to eventually try to do the same truck in 7 wide. After seeing 4000022 I wanted to try to use those techniques on a new 7 wide truck but around that same time, I heard that Jamie had sold his prized truck the Rotator. When Season 5 of the show started airing last fall I started building the next biggest truck in his fleet which is even newer, a 50-ton Tri-Drive Western Star along with a smaller tandem unit and a Toyota Tundra for Traffic Control. Heavy Rescue 117 is a Western Star Tri-Drive Century tow truck with stabilizers, and a side puller (3rd winch on the driver's side). Used for recovering Semi-Trucks and other large vehicles. HR 116 is a Western Star Tandem Tow Truck with sleeper cab. Smaller than 117, but tandems can do just a much work as the biggest trucks. IR 104 is an Incident Response Truck for flagging traffic control. Toolbox in bed. Dispatched to secure accidents before the bigger trucks arrive or roadside service to smaller passenger vehicles. Full Album: https://www.flickr.com/photos/tim_tosino/albums/72157681702229046 Still working on Al Quiring's Truck aka "The Green Monster" which is unit as big as 117 and a VSA Highway Maintenance Snow Plow (all in 7 wide) and I may just tackle Jamie's Newest Truck HR 126 (which hasn't made an appearance on TV yet) in time for our local con (http://www.brickcan.com) -

Lego Minifigure Scale Millennium Falcon with detailed interior
lou144 posted a topic in LEGO Star Wars
Hello, I am looking to build a Minifigure scale Lego Millennium Falcon with a detailed interior. Though I am not very good at designing in Lego form (or Lego Digital Designer), so i was wondering if anyone had any instructions for this or if anyone has a LDD file for this that would great. Also I was wondering how i would go about building a project like this. Thanks Louis -
-
-

Evolution of the legendary Lego set 1952 from 1989 - Classic Town theme
xkgp posted a topic in LEGO Town
-
-
-
-
-
-
-
Hi Everyone! Just made a new #legocity moc- a rally raid truck. Here are some pics and how_to_build video of it >> and how to build TUTORIAL video >> http://www.youtube.com/watch?v=www.youtube.com/watch?v=zXwAtReYtsM Thanks for Watching!!!
-

[MOC] The Bug Runner
davidroberts01341 posted a topic in LEGO Technic, Mindstorms, Model Team and Scale Modeling
NEW from Llwyngwril Systems: an innovative high speed solution to all of your rough terrain personal transport problems! Bug Runner by David Roberts, on Flickr Bug Runner Film by David Roberts, on Flickr I hope that this little MOC contains enough Technic and isn't too silly for this forum. On a vaguely serious engineering note; I'd be very interested in any suggestions that experienced Technic builders might have for replacing the cams that I've used. They're 1x2 45deg slope bricks. After long-term use, they detach from the Technic connectors with studs that attach them to the big gear. I'd like to build a motorised model using this technique but the current cams won't sustain it. Any ideas please? -
Hi everyone, i recently finished this 1/42 minifigure scale model of the legendary Ferrari Testarossa. Probably best known from the show "Miami Vice" -classic! Was quite a hard one to get the shaping right....some nights were spend on this^^ The original is 4,5 m long -> with 1/42 its 13 studs in length whilst the minifigure is 5 studs high equaling 1,75m The width is really special on this car, since the back half is about 2 m wide, the front however 1,80+ m -> therefore i did the front area 6 wide, and the back 7 wide. its a bit too wide by 15 cm on each side in real life - but since the figs are so wide, i decided to do it that way to compensate that matter Now feel free to enjoy the pics;) Ferrari Testarossa Miami Vice by Ron Dayes, auf Flickr Ferrari Testarossa back by Ron Dayes, auf Flickr Ferrari Testarossa yellow by Ron Dayes, auf Flickr Ferarri Testarossa top view by Ron Dayes, auf Flickr Ferrari Testarossa by Ron Dayes, auf Flickr
-
Thanks for watching!