Search the Community
Showing results for tags 'moc'.
Found 5698 results
-
The year is 2003. We're back in Mata Nui! Enjoy this scene of daily life in island paradise, featuring fully-poseable Matoran builds. The Po-Koro pottery works turns local clay and flammable Onu-Koro mine gas into distinctive red pottery seen ubiquitously across Mata Nui. Matoran come from across the island not only to buy their pots but to watch the masters at work. Master potter Okoa throws pots on a custom-made, wind-powered pottery wheel. His apprentice Whe'ai meticulously glazes each pot with glazes made from local deposits of tin and iron. Together, Okoa and Whe'ai keep the kiln burning day and night. Their business partner Akamu is the salesman, tending their roadside stall and selling fine pottery to Matoran from all six villages.
-

DMC-12 Back to the Future
Ryokeen posted a topic in LEGO Technic, Mindstorms, Model Team and Scale Modeling
Hello everyone, As i'm kinda done with the exterior, cable management and stuck with the interior progress i'll just show what i got after around 4 months of work. I admit i took some inspiration from a moc on rebrickable from Mr.Platinum. I bought his instructions and asked if i could use some smaller parts like the idea how he did the back light so that's fine. It all started when i was a kid, watching that movie, loving the car and having lego :D and now that i'm older, the parts exists and i have the money i thought, yea let's build a DMC time machine. After gathering reference material and starting on a digital model my goals where set. Make it rc 4 speed gearbox Some light effects realistic interior Gullwing doors Hiding the electronic components Steering wheel should turn Possible leave it without motors as a display model So far i've more or less hit all my goals. Functional satisfied, aesthetically...to many cables. Since i wanted to maybe drive it a bit: Gearbox and lighting is remote controlled Lighting has 4 modes, off, only head/backlights, BTTF lights and both on. Ackermann steering geometry Independent suspension front and read The rc components components are similar to my tropy truck, but here i use a 540 80t brushed motor and 2 geek servos. One for steering, one for the gearbox. Full bircksafe gallery: DMC-12 First i started with building a normal stock DMC-12 so see if everything will fit and to make sure the base body looks good. Also i wasn't sure how to do the planned light effects back then. I tried to somehow mimic the layout of the original car and managed to place the motor above the rear axle. Sadly because gearboxes with lego parts are kinda clumsy i had to place that somewhere else. I thought about a few gearboxes but then just went for a linear layout hidden in the area between the seats. That also gave me space behind the seats to hide the esc, cables and the receiver. Also it served well as a reinforcement for the whole chassis as cars with gullwing doors have a problem to use the roof for stability, at least lego build ones. The real challenge started with the bodywork, especially the hood area, the doors, and the side area around the doors. I first tried to use panels but i didn't like how they were curved and the angles they gave me, also the bigger light blueish grey panels are quite expensive. So i made a rather complex structure to mimic the curvature from top to bottom and the front/back steep angles of the doors. From the shape itself i'm satisfied even though it's not as watertight as some other areas and resulted in quite heavy doors. That's also the reason why they lack a inner covering. But the gullwing doors are stable and with the help of some old lego dampeners(the transparent ones) they stay close and open smooth. The dampeners are placed left and right behind the back wheel arches. Making a time machine out of a Delorean Apart from all the sifi stuff in the back portion of the car a truly important feature, at least for me, was a lit flux capacitor and the blue light around the car during a time jump. The interior is still not fully finished, since i can't decide whether to go more in a modelling direction or just vaguely hint stuff. Flux Capacitor As i could not 3D print anything it was quite a challenge to make one that looks good enough and is actually lit. EL-Wires where one candidate but for that i would have needed a seperate inverter and those are not small nor quiet. So i went for optical fibres, similar to the old lego ones, some drilled holes and some glue. The fibres used are 1.5mm thick. Also i tried to make it like i saw it in the movie, a box with the recognisable Y shape stuff in it, shielded by glass. For the bluer parts of the lighting, when a timetravel happens, i use 3mm thick fibres which again fit nicly through pins so i could secure them well. The good thing for 3rd party parts here is, i could order them in 2m size so i didn't have to use put 2 24l lego fibres end to end and hope the light will transmitt well. 3rd party optical fibres are also way cheaper. I would like to have some cover to simulate the metal nature of those double lines, but no chance except i would 3D print or use modelling plastic sheets. But the cables for the led added to the realistic look as i could mount them where the original car had cables aswell. And of course the needed headlights for some night time driving. Simple 5mm leds fitted into pinholes. So far it was nice to combine all those techs to create something i wanted to build since i was a kid. And even if i need some of the metal parts or the servos and motors, i think i'll just keep it as a display model with lights Feel free to ask questions and have a great day. -
Eagle V2 an RC Trophy Truck [MOC]
Daniel-99 posted a topic in LEGO Technic, Mindstorms, Model Team and Scale Modeling
Hello, EuroBrickers! I am pleased to present to you the second version of my RC Lego Trophy Truck EAGLE. To be more specific, this is the third deep modification of the second chassis. Not surprising, as I've been working on this project for over three months now. For a better understanding of this topic it is worth reading about the first version. A better quality photos could be found on my BrickSafe. And a video: First looks: Features Independed suspension at the front with positive caster angle. 4-link solid axle suspension at the rear with anti-roll bar RC shocks (80 mm at the front and 110 mm at the rear) Brushless motor A2212 1200 kv for propulsion, Geek Servo for steering, 1500 mAh 3S Li-Po for power Strong and efficient transmission with metal U-joints and metal bearings. 95 mm RC wheels Light-weight bodywork Main goals "It's never a good idea to stop if you have something to improve." With these thoughts I was preparing a post about my Eagle a month ago. Here's a list of things I wanted to improve: Weight distribution: the heavy electronic components located in the cab loaded the front suspension more than the rear suspension. Rear axle geometry: due to triangulation on the rear axle, the driveshaft and lower suspension arms were located very high off the bottom of the truck, which limited the maximum compression angle of the rear suspension, and the entire chassis was not set to the horizon. Rear suspension setup: a true trophy truck requires a suspension with progressive stiffness. Front axle: steering was very sensitive, rather unusual front triangle shape and tilted lower suspension arms. Overall bulkiness of the chassis. Electronics The Eagle V2 utilizes the same electronic components as the Eagle V1. The story of my choice of such components is given in the post about Eagle V1. Therefore, I will be brief here. Motor: A2212 1200 kv Battery: 3S Li-Po 65C (30C is more than enough) 1500 mAh Controller: 2-3S 35A Transmitter: FlySky FS-GT5 Pros: Brushless motors last longer than brushed motors. High speed and torque in a compact size (about 3 BM in an XL motor) Radio control (best for fast RC cars) Cheap components (compared to Lego electronic components) available at local RC stores. External Li-Po battery allows for different layouts and unlimited power flow. Cons: Requires advanced techniques to build strong transmissions (requires lubrication) Otherwise can easily damage plastic parts. Not an easy decision for purists. Difficult to share instructions with others. Have to take care of tangling wires (same goes for large Lego-is designs). Non-universal solution, suitable mainly for RC Lego machines without a list of additional features. Frame & layout The Eagle V2 has a new "tube frame" (or chassis). This is why I decided not to call it a modification of my Eagle. Let's take a look at it from front to back. All important terms in this section are marked with bold text. In addition, this terms are highlighted on pictures. The front triangle uses the same "almost right" triangle with 14,15 and 6 stud lengths as the Eagle V1. The lower tube of the front triangle is made of two flip-flop beams that have been stacked together. This solution provides a sufficient level of stiffness and resistance to torsion. In addition, I was able to bring the suspension arm mounting points as close to the center as possible. The lower tube of the front triangle is adjacent to the flat bottom made of panels. The upper tubes of the front triangle intersect with the front wall. Further they pass into the side tubes of the cockpit. These tubes are made with flip-flop beams, which allowed me to secure them in place with a 15L front cross-brace (the Eagle V1 cockpit was 2 studs thinner). It's worth noting that the GeekServo motor squeezed perfectly between the lower front triangle tube and the cross-brace of the front wall. Thus, it practically reinforces the front triangle. The cockpit ends at the rear wall, which is reinforced by a rear triangle and structure around the transfer case housing. The side tubes pass into the rear H-tubes (horizontal). At the same time, the rectangular rear triangle is mirrored to form another rectangular triangle at the very back of the truck. The cross-brace on the rear wall is made using L-beams and 3D printed motor housing. Now let me describe the layout of the electronic components. Using a custom transfer case housing, I was able to move the brushless motor out of the cab. It is now located directly behind the rear wall. More importantly, I was able to move the Li-Po battery out of the cab. It is now located above the motor. It is true that this solution increases the center of gravity, but on the other hand it provides excellent weight distribution, which is very important for a trophy truck. The controller is located in the cab next to the driver's seat. Both battery and controller have no pin-holes, but I was able to fix them in place quite greatly. To load the rear axle even further, I added the spare wheel. Bodywork My main goals with bodywork of Eagle V2 were the following: keep it light keep the original shapes of Eagle V1 improve the proportions As a result I made the whole truck one stud longer and two studs wider than the first version. Now cockpit is wide enough to fit the driver`s seat. Also I changed the bonnet and the front grill. Finally I changed the very back of the truck to make it closer to real prototypes. I have to add, that not only the bodywork make the car look good. More importantly to keep the proportions in the chassis. The authentic look of the Eagle V2 is achieved with the proper settings of the suspension. Transmission I'd like to make a 3D model of my truck and show you a nice rendering of the drivetrain, like some great technical builders do. However, the Eagle V2 has a lot of custom parts and a bunch of "illegal" techniques like "almost rectangular" triangles. So I will just mark out the transmission components: Brushless motor with custom housing with planetary gear inside (1:4 gear ratio) Central transfer case with 28:20 gear ratio Rear differential with 12:28 gear ratio The transmission is built on carbon fiber axles and metal U-joints. It is separated from the frame by metal bearings. Metal bearings are used in the center transfer case, in the 5x7 frame that holds the differential, and in all the wheel hubs. I also lubed the planetary gear inside the engine case. Suspension geometry As I've said before, trophy trucks are all about suspension. So the main reason I did a V2 of my Eagle is to try and improve the suspension (both front and rear). Front suspension: Truth be told, not all custom parts turn out to be universal. On the contrary, the idea of efficiency in certain places and the idea of universality are not compatible at all. The Eagle V1 front wheel hubs are a prime example of this principle. They were originally designed for IFS street cars with smaller wheels. Therefore the basic ideas are present in their geometry: An inverted ball joint for the lower suspension arm (which is great in general). Combined with the tilted front suspension, they looked nothing like real trucks. The steering arms were 0.5 studs long, which resulted in very sensitive steering. I also didn't really like the 8 stud length suspension arms, which required custom of steering links to work properly. So I designed a new front suspension system that includes: 9 stud length suspension arms. New hubs (originally designed for live-axles) with 1 stud length steering arms. Thus hub does not use the ball joints! The new design is a deep modification of the Falcon trophy truck front suspension, which has proven to be reliable. In the V1, I used 8-studs suspension arms to fit within a certain chassis width and maintain a strong lower tube of the front triangle. However, by using stacked flip-flop beams, I was able to keep it 1 stud wide without losing stiffness. Rear suspension: It won't surprise you that the Eagle V2 has a new rear suspension. Here's a list of the changes: A new rear axle has been designed (again with a different set of custom hubs). It's more compact than the one the V1 had. The upper triangle of the suspension arms has been inverted (to match the real-world examples). New lower arms have been build. Now the live-axle was given the necessary degree of freedom. The attachment points for the suspension arms were lowered by two studs. This modification was possible due to the changes in the drivetrain described above. The anti-roll bar has been redesigned to match real prototypes. It resists to the twisting effect of the rear axle that appear in the acceleration. Shocks "Once a perfect suspension geometry is achieved, one may look for a proper set of shocks springs" The best springs Lego ever made are the hard 9.5 L springs, because they have a good amount of travel and responsiveness. For example, the 9.5 L soft shocks are not as good because the spring force has a hard time overcoming internal friction. On contrary, the 7L hard shocks have little travel and not enough stiffness to work properly with the hard springs. So I used 9.5L hard springs in the Eagle V1 and early versions of the second chassis. I tried to build a progressive rear suspension using Lego springs, but was not successful. The resulting design was either too unreliable or too bulky. I guess I lacked luck and skill, but I couldn't build a suspension that was both soft and shock resistant. It was either too stiff to absorb big bumps or too soft. So I decided to use RC shock absorbers to properly address this issue. RC shock absorbers have different springs that allow you to adjust SAG and progression without having to move the shock absorber mounting point along the suspension arm. I once tried to adapt RC shock absorbers to Lego, but couldn't find a suitable way to attach them to the Lego pins. Fortunately, a working solution was offered by Ryokeen in his Generic Brushless Trophy Truck. I again had to modify the chassis to fit 1:10 scale RC shock absorbers. Front suspension has 80 mm shocks with 2.5 studs travel. I mounted it behind the suspension arms as it is done it real Trophy Trucks and many RC scale models. There was a way to place it through the upper A-arm, but such solution required 4L liftarms. In addition it had not freedom in the choice of mounting points. Rear suspension uses 110 mm shocks with approximately 3 studs of travel. Additionally they have a dual spring setup, which give the desirable progressive hardness to the rear suspension. Again, I tried to mount rear shocks in the same way it is done in real Trophy Trucks. Developers diary. 3-7 Sep An Eagle V1 was finished. The driving tests started. Front wheel hubs are the same as in Hornet 4x4 Buggy. 11-15 Sep The new front triangle has been built. Now truck has a tilted lower tube and positive caster. The differential has been changed from yellow to red one. 17 Oct I stated developing a new chassis with a different set of ideas behind. (mostly with the triangulation in the rear axle removed and central transfer case added). 24 Oct First prototype of the new chassis has been built. In addition to the redesigned rear axle, I made a new front axle with a shock coming through the upper A-pillar. 27 Oct I started building a bodywork for a new chassis. 1 Nov The first modification of the second version of Eagle has been finished. I started the driving tests. The rear suspension has a new idea if mixing anti-roll bar with additional shocks to achieve progressive suspension hardness.... that was a total madness... 8 Nov The whole chassis has been widened by 2 studs for better proportions. 14 Nov A new rear suspension ideas has been applied. The back of the Truck has been changed. Now the rear suspension has two sets of hard 9.5L springs on each side. Progressive stiffness... Bulky realisation. 25-28 Nov RC shocks has been added. For that reason both front and triangles has been redesigned. -
"Chess Ko Sebulba." Anakin Skywalker, 32 BBY "Chess Ko Sebulba." Anakin Skywalker, 32 BBY by Nicholas Goodman, on Flickr "Chess Ko Sebulba." Anakin Skywalker Mos Espa, 32 BBY by Nicholas Goodman, on Flickr "Chess Ko Sebulba." Anakin Skywalker Mos Espa, 32 BBY by Nicholas Goodman, on Flickr "Chess Ko Sebulba." Anakin Skywalker Mos Espa, 32 BBY by Nicholas Goodman, on Flickr
-
(Afoland Castle Game. Meronia) For a couple of weeks, King Edric had not seen his archmage, Odrimorn. He decided to visit him in the tower and find out what caused his absence. Entering the wizard's room, the king found Odrimorn, who was fumbling in the notes and muttering something. He kept talking about something inevitable, not paying attention to the king. Edric went up to him, touched him by the shoulders and asked why his old friend was so worried. Odrimorn came to his senses and told the king about his fears. All these days he has been haunted by disturbing dreams in which the lands of Meronia are in danger. Unfortunately, the source of the threat is not visible and there are no leads. Various spells and ancient scrolls also did not help shed light on the threat. One thing is clear - these are not just dreams, but something really is coming. We need to prepare... At the end, Odrimorn added: “You know who we need!
-
(Afoland Castle Game. Meronia) King Edric called a runner and gave him an assignment - to go to Kvynn, find Gerard there and give him a letter. The messenger soon reached Kvynn and began asking where he could find Gerard. Naturally, every local knew where Gerard lived, but they could not deny themselves the pleasure of chasing the messenger through the village. Running from house to house, he still managed to find the right one and convey the message.
-
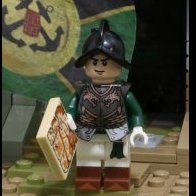
(Afoland Castle Game. Meronia) After the end of the war, the question arose about the need to build guard posts along the border of the kingdom. One of them was the North Tower, which is located near the village of Kvynn. Its garrison consists of a dozen soldiers under the command of the always grumpy Sir Norman. While Sir Norman scolds the warriors for the chaos, Vigmar cannot contain his joy when the supply wagon arrives. And there will definitely be a bottle or two of Ormston wine in it! Technique:
-
Stingrays; Mutant Ray. The Mutant Ray is a redesign of the origninal 4788 Alpha Team; Ogel Mutant Ray set. I've rebuilt it in the Aquazone; Stingrays theme. The Stingrays using the Mutant Ray for fast traveling around the sea. It's equipped with two adjustable engines, two harpoons and a destructive claw. This claw can heavily damage or even destroy submarines. 01_Stingrays_Mutant_Ray by Mathijs Bongers, on Flickr 02_Stingrays_Mutant_Ray by Mathijs Bongers, on Flickr 03_Stingrays_Mutant_Ray by Mathijs Bongers, on Flickr Pictures also on Flickr: https://www.flickr.com/photos/mathijslegofan/albums/72177720312894518
-
BT: Orphan More on Instagram My take on a BT from Death Stranding
-
 Lego Technic Ferclaren M23 and S23 Bolides (Free Building Instructions) Those are latest and most advanced M23 and S23 bolides models of Ferclaren Racing Team. Each model has 4 Technic functions: rotation of the front left wheel rotation of the front right wheel rotation of the back left wheel rotation of the back right wheel Overall, those functions give capability to move these models with enormous speed in lego world. Those robust models passed many children quality tests and proved they great playability. If you interested in building those advanced models by yourself the download links are below the images. Lego Technic Ferclaren M23 and S23 Bolides Free Lego Technic Building Instruction download magent link: magnet:?xt=urn:btih:8214FE6D177497EC1976F3091096496E1ED7FB1B
 -
So I thought this series was finished, but apparently not haha! This is a re-colour and Mod of https://www.bricklink.com/v2/catalog/catalogitem.page?S=76031-1#T=S&O={"iconly":0} I bought this set for my kids when it came out and I've always admired the way it captures the stance and feel of the Hulkbuster in such a simple and efficient manner. When the https://www.bricklink.com/v2/catalog/catalogitem.page?S=30611-1&name=R2-D2 - Mini polybag&category=[Star Wars][Mini][Star Wars Episode 4/5/6]#T=S&O={"iconly":0} came out I couldn't help but feel that this was a mash-up that needed to happen! He stands a touch over half the height of my other mechs but I think he fits right in with this motley crew haha! I tried to get this ready by the end of Mech-tober but ran out of time. "R2-D2, be reasonable about this!!!" by Greg Dalink, on Flickr R2-D2 Smasher Class Battle Mech by Greg Dalink, on Flickr R2-D2 Smasher Class Battle Mech by Greg Dalink, on Flickr I had a lot of fun building this guy and I hope you like it!
-
"Commander Cody, prepare the gunships for ground assault!" Let's give the Midi-Scale treatment to another timeless ship: the LAAT Gunship or Republic Gunship from The Clone Wars. Being a fan of the sleek and flush Clone Wars era design, I thought this variant deserved more attention, especially in Midi-Scale. This Midi LAAT/i consists of 1,015 pieces, measures only 22cm (without guns), and is accurately Microfig-scaled. It features a fully SNOT look, openable front doors, and a removable stand that can be tilted to taste. Design-wise, this ship was full of challenges, with lots of subtle angles and curved surfaces everywhere. Shaping the front section wasn't an easy task at this scale, as well as adding that crucial touch of lime green without any stickers. All of this resulted in a pretty intricate structure, especially for the front section. The angled rear section of the body features other details such as missile belts, exhaust slats and tail cannon. The underside of the ship is also fully SNOT-built. Initially, all four doors could be opened, but I chose to remove the less useful rear door mechanism for a smoother, easier building process. ► Instructions for the LAAT are available at BrickVault! More pictures on my Flickr page.
-
"I have traced the Rebel Spies to her." Tantive IV 0 BBY "I have traced the Rebel Spies to her." Tantive IV 0 BBY by Nicholas Goodman, on Flickr
-
[MOC]Generic brushless Trophy Truck
Ryokeen posted a topic in LEGO Technic, Mindstorms, Model Team and Scale Modeling
Well where to start, after i got back into building technic sets, the urge to create something of my own took over and i started to look around places where ppl discuss mocs, building techs and so on. That's how i got to eurobricks and the topics about rc and brushless motors in the lego world took my interest, cause moving things are cool. The eagle truck and in general the various mocs daniel-99 made gave me the motivation to create my own trophy truck and see how well bricks and rc components match. It's currently still wip as it's lacking a proper bodywork and might change once i can test it properly(to rainy atm). I'm not the best at presenting so feel free to ask. Quick overview: 4-Link live axle in the back Double wishbone in the front 3250kv brushless motor on 2s Lipo Geekservo for steering All carbon axle driveshaft fully with ball bearings Metal gears and metal u-joints Strong chassis for serious offroad driving Underbelly protection So far i'm using wheelhubs from zene with ball bearings and their closed metal differential. The whole driveshaft uses carbon axles, metal u-joints, metal gears and ball bearings. I kinda tried to mimick tropy truck suspensions, so it got a 4 link live axle in the back and a double wishbone suspension in the front. Havn't figured out how i could add roll protection on the back axles as my first attempt didn't seem to help. The use of triangle geometry gives the chassis enough strenght to take a fall from around 50cm without any damage. Another way i used to reinforce the chassis is the use of longer m3 screws and mathcing nuts as they fit perfectly through 3L pins and stabilize them aswell as preventing the connection to get apart. Good thing is they don't rly damage the parts, as they work similiar to 3L bars inserted into pins, just better. As i said i wanted to test how well rc components match with bricks so the first thing was using a brushless motor. The size is almost the same as a 540 brushed one so it was easy to mount using some m3 screews and 2x 32184 parts, for now. An mod 1 pinion gear with 12 tooths provides the connection to the drivetrain. As the motor got quite a punch and high rpms i decided to only use metal gears on carbon axles seated in ball bearings. Additionally i lubed them with some lithium grease. Currently the total gear reduction is 1:10 including the diff. That gives me around 2500rpms on the wheels with a fully charged lipo and plenty of torque. First i used 9L springs but in the first freefall test one of them broke, so i thought why not use rc dampers ? And 1:10 scale ones fit quite well. Their upper holes fit the pin diameter and the lower balljoint connection got a 3mm hole in them. Some screwing later they worked like a charm. Might even switch over to only use such shock absorbers as they can be tuned better. So far that's all, if one got questions, just ask, if one got suggestions, pls let me hear them. -
ISD Steadfast Hangar, 3 ABY by Nicholas Goodman, on Flickr ISD Steadfast Hangar, 3 ABY by Nicholas Goodman, on Flickr ISD Steadfast Hangar, 3 ABY by Nicholas Goodman, on Flickr
-
Here's my Corner Apartments MOC. I went unfurnished for the apartments on the 2nd and 3rd floor for now for cost reasons, so I will need to furnish at some point. Also, I made this one easy to add extra floors for additional apartments in the future if that becomes viable. When designing, I tried to have slightly larger floors for a larger profile of the building than some of my past MOCs (as can be seen in the last picture). Lobby is furnished though. Unfurnished apartment floors. With some of my past MOCs.
-
Hello all! Making one of my all-too-infrequent visits to the Sci-Fi forum to share my latest MOC! (It's nice here, I should come round more often...) I've been enjoying taking part in some of the monthly challenges this year, and I thought it was about time to get involved in Nnovvember. The result is this, which I have dubbed the VVPR Raider! I wasn't sure which direction this would take until I picked up the two Technic panels from 5981 Raid VPR - one of my favourite sets from Space Police III. They were just going to be placeholders at first, but I'd already picked up lots of black and white pieces, so I figured why not pay tribute to it? It's tempting to label this as a 5981 redux, but I didn't stick to many of the design cues other than making it a SPIII Vic Viper. The only big common elements are the panels and cockpit, and even then the cockpit is the wrong shade of trans-blue. (That said, even if I knew where the original cockpit was, I think I'd still prefer this lighter one!) So the jury is out on whether this counts as a redux. Both of the minifigs have gone missing as well. Fortunately the space police officer and alien from Series 21 of the CMFs are good substitutes! The only thing I haven't figured out is what VVPR could stand for (Vigil, Vantage, Patrol and Recon is my best attempt so far). If you have any good suggestions, I'm all ears!
-
Hello Corvette, A-Team and Speed Champions fans, the Chevrolet Corvette C4, colloquially known as the 'Vette, is a two-door, two-passenger sports car manufactured and marketed by Chevrolet across more than 60 years of production and eight design generations. The fourth-generation was the first complete redesign of the Corvette since 1963 and it is known for its sleek look. It was produced from 1983 to 1996. This color scheme of this model is based Faceman's 1984 Corvette from "The A-Team" which is an American action-adventure television series that ran on NBC from January 1983 to March 1987 about former members of a fictitious United States Army Special Forces unit. Building instructions are available on the following links: It is a studless build in the new, 8 studs wide Speed Champions style. I wanted to create a sleek model which is as accurate as possible in this small scale. I prefer to minimize the use of stickers to keep the flexibility of the used parts in further builds, and therefore this model include only two vehicle registration plate stickers. My intent was to keep the width-length-height ratio of the real car and this size makes it possible. The model contains lots of details: for example the emblematic color scheme with the red and black stripes on the sides, the glass hatchback, the side-view mirrors, the tiltable seats etc.. Maybe the most challenging one was the iconic rear side with the vehicle registration plate, here there is a half stud offset. I tried to fill every unnecessary gaps and therefore some tricky build techniques are used. The model has space for two minifigures. I suggest to use small hairs. Without the seats minifigures with bigger hairs can be used too if they are leaned back. Thanks for visiting, _TLG_ Corvette C4 - A-Team, Instructions 1 by László Torma, on Flickr Corvette C4 - A-Team, Instructions 2 by László Torma, on Flickr Corvette C4 - A-Team, Instructions 3 by László Torma, on Flickr Corvette C4 - A-Team, Instructions 4 by László Torma, on Flickr Corvette C4 - A-Team, Instructions 5 by László Torma, on Flickr Corvette C4 - A-Team, Instructions 6 by László Torma, on Flickr Corvette C4 - A-Team, Instructions 7 by László Torma, on Flickr
-

[MOC] Darth Maul's Scimitar (aka the Sith Infiltrator) Minifig scale with full interior
Evilkirk posted a topic in LEGO Star Wars
I'm absolutely delighted to present Darth Maul's Scimitar, or Sith Infiltrator - 100% minifig scale with a fully detailed interior! Build features: Semi-circular opening rear doors with a retractable boarding ramp lead into the lower floor of the main hull, where you'll find a fold-down bunk, a laser-gated holding cell and various storage compartments. A 'repulsor-lift elevator' takes you to the upper floor which is the flight deck, with passenger seating and Darth Maul's control console. From the lower floor a corridor narrows down into a maintenance crawl-space and leads through to various engineering access chambers - and eventually takes you out into the cargo hold, where the Bloodfin speeder and Dark Eye probe droids are stored. An access ramp lowers from the cargo hold (under the very front of the ship) + 2 panels under the ship's hull open for retractable landing gear with a fold-out landing pad under the main hull. The roof of the rear section is removable + the flight deck can also be lifted out to allow access to the lower floor + the whole roof of the front section is hinged to open fully, revealing some of the cloaking shield, hyperdrive and other engine components. I've designed a 306-piece tilted stand to display the ship in 'wings open' flight mode - the front of the display stand is fitted with a black 8 x 16 tile, for those who like to have custom UCS plaques on their ships. The display stand + Bloodfin Speeder + Dark Eye probe droids are all FREE downloads on my Rebrickable page :) During 18 months of it's building and design, I've spent hours studying source material for this ship, especially the floorplans - and I've put a lot of effort into keeping it as close to the original as possible without the whole ship becoming overly large. Having the correct proportions with its incredibly unbalanced front and rear sections + those large folding solar panels on the sides was very challenging - and keeping it all sturdy without any sag was quite a task, but it's turned out to be a solid build - you can swoosh this ship around until your arm hurts (I have!) and it'll be fine :) Specifications: This build uses 4244 pieces (not including the display stand, speeder or droids), is 63.4cm (25") long and 48cm (18.9") wide at the wing panels. Height is 18cm (7.1") standing on its landing gear + 42cm (16.6") high at the tip of the highest wing panel whilst in flight mode on the display stand. Weight is approximately 3.3kg (7.28 lb). TL,DR... I totally geeked out and went nuts on the details and here are a million pics of the results: -
Moving Through Halfaya Pass, April 1941 Moving through Halfaya Pass, April 1941 by Nicholas Goodman, on Flickr Moving through Halfaya Pass, April 1941 by Nicholas Goodman, on Flickr Moving through Halfaya Pass, April 1941 by Nicholas Goodman, on Flickr
-
THE MASK OF ZORRO left its mark to my childhood in 1998. At my young age, I was pretty impressed what I watched. The way that this mysterious, dark hero with his black mask and cape was fighting for peasents against Spanish dons. The scenes, costumes, acting, story... they were all attracted me. Before I decided to make a Zorro moc, I planned to build an old Spanish manor, but later on I thought, why not. About the movie, I find many similarities with Pirates of The Caribbean so if you haven't watched Zorro but like PoC, give a chance. ~Z~
-
Hi everyone, This is my 16x32 modular MOC which I’m calling Antique Toy Store. The ground floor is the toy shop with a marble roller coaster displayed in the front window, and the upper floors are a two-story apartment with a working clothesline in the back. There is also a working “touw en blok,” or rope-and-pulley system for moving furniture, so there is a bit of a “moving rope” motif going on. Interiors: Since these are supposed to be antique/valubale toys, I got a bit meta and turned one of the display cases into a collection of the most valuable small Lego elements in my collection. Many are from 2011’s Queen Anne’s Revenge pirate ship, including the ultra-rare and expensive dark tan plume. I was going for a Christmas-y theme with the dark red and olive green for the toy shop, and I placed a pine tree in the back to solidify that theming more. The second level has a living area and kitchen. The third level has a bathroom with a removable wall for easy access, and a giant bed, which was the last thing I created for the build. I have no idea how the minifigs got it up there. The roof section is nothing too special, but it does feature a storage area for the furniture rope. Influences: These are the references which inspired the design I chose. The ground floor was influenced by this really vibrant building I saw on a street corner when I was in Amsterdam last year. The dark red color, irregular angle of the door, arches, and small statue were ideas garnered from this building. (first pic is mine) The upper levels were loosely based around these images but are mostly a product of my imagination. Lastly, here is the antique toy store with some other modulars. (Mmmm, color therapy) Thanks for checking out my build, I hope you liked it!
-
4 season garden In early spring when the garden begins to come back to life, and the bees wake up from their hibernation and the butterflies begin to fly, that is the first sign for the gardener to start gardening. In the 4-season garden you can walk along a path through all four seasons, from early spring to warm summer, to colorful autumn, and finally to the crisp winter. The 4-season garden consists of 6 components that you can take apart and display separately. Spring and summer are connected to the main building, Autumn and winter are connected If you like you can vote on the project for the Bricklink series 3 https://www.bricklink.com/v3/designer-program/series-3/1013/4-season-garden Spring Spring is the first season of the year, In the spring you can find many different flowers and a number of vegetables. There is also a rain barrel to collect your own rainwater for the plants in the garden. In the spring you can find many types of insects, such as ladybugs and butterflies, there is also a bee hive to pollinate all plants and flowers. In the first zone, the spring, you can find these plants. marigold tulips radishes salad ivy Summer In the summer you can enjoy the beautiful warm weather in peace from your picnic bench, with a fresh juicy apple from the tree. Many types of plants grow in the greenhouse in the summer, including tomatoes and cucumbers, and there are always some plants that would like to be repotted :) In the second zone, the summer, you can find these plants. beetroot onion carrot spinach sunflowers apple tree Autumn Autumn is the time to harvest many different types of crops and then pickle them or prepare a delicious dish and then enjoy it, after all the leaves have been raked together of course :) In the third zone, autumn, you can find these plants. leek pumpkin Cauliflower potatoes Winter In winter most plants have gone into hibernation, and all seasonal plants have been cleared away for the next year. But that doesn't mean there isn't time to enjoy the beautiful winter weather, such as going ice skating on the frozen pond or playing in the snow :) In the fourth zone, winter, you can find these plants (often in hibernation) pine trees berry bushes I am a big garden enthusiast myself and love working in the garden. Many types of vegetables grow in my own vegetable garden, one of my favorite vegetables are carrots. What are your favorite vegetables in the garden?
-
Hello Speed Champions and City fans, It was my entry to Bricklink Designer Program Series 3 and 4. It has received many kind comments and support, but unfortunately it has not been selected, therefore I decided to make the instructions available here: https://rebrickable.com/mocs/MOC-177592/_TLG_/school-bus I always loved American style school buses, therefore I decided to design one to Bricklink Designer Program Series 3. It is not actually based on a real one, but it contains many typical details: the black bumper rails and STOP arms on the sides, the crossing arm, the side and rear doors, the rearview and crossover mirrors, the mudguards, the warning lights etc.. The roof assembly can be removed as one piece and in this case the internal details are visible: there is a driver seat with steering wheel, dashboard, gear shift, passenger seats and even a fire extinguisher. It is 8 studs wide, studless build in minifigure scale and fits perfectly to Speed Champions cars or to a LEGO City. There are many working details: the front and rear doors, the STOP arms, the crossing arm and windshield wipers. I wanted to create a clean build and tried to fill every unnecessary gaps and hide unnecessary studs, therefore some tricky, but legal build techniques are used. The set includes three minifigures: a driver, a school girl with a pen and backpack and a school boy with a brick built backpack. The model has space for 17 minifigures: one driver and 16 passengers. If the passengers are kids with short, rigid legs, then they can stand on the seats. The building instructions guidelines have been followed. It is built from the palette "BDP Series 3", so there are some color and part restrictions. The color "Bright Light Orange" would be a bit more authentic, but the available parts are restricted, therefore I decided to use "Yellow" and I am satisfied with the result. The STOP sign is very rare part and it is not available in this palette, therefore it is replaced by a simple, white, circular sign with a sticker. The door 43967 is also not available in yellow, therefore it is replaced by a brick built one, however, in this case I was able to add some extra details: a black door handle, bottom window and red lights. I hope you like my design, I appreciate any feedback. Thanks for visiting, _TLG_ School Bus - Bricklink Designer Program 3 - 01 by László Torma, on Flickr School Bus - Bricklink Designer Program 3 - 02 by László Torma, on Flickr School Bus - Bricklink Designer Program 3 - 03 by László Torma, on Flickr School Bus - Bricklink Designer Program 3 - 04 by László Torma, on Flickr School Bus - Bricklink Designer Program 3 - 05 by László Torma, on Flickr School Bus - Bricklink Designer Program 3 - 06 by László Torma, on Flickr School Bus - Bricklink Designer Program 3 - 07 by László Torma, on Flickr School Bus - Bricklink Designer Program 3 - 08 by László Torma, on Flickr School Bus - Bricklink Designer Program 3 - 09 by László Torma, on Flickr School Bus - Bricklink Designer Program 3 - 10 by László Torma, on Flickr
-
A 20-gun frigate assigned to hunting those pirates! Also carries a treasure chest, for those who dare... Or perhaps the appearance of a ship like this has forced the pirates into hiding? This is an extremely ambitious design with a smoothly curving hull built on a sturdy technic frame and a detailed, Minifigure-friendly, interior. I have built many sailing ships in LEGO before, and this is my best work so far, including all the techniques and features that I always wanted to include. Vote now if you want this design to be officially produced by LEGO as part of the BrickLink Designer Program: https://www.bricklink.com/v3/designer-program/series-3/1167/Imperial-Frigate-Concordia The 16 brick-built cannons on the gun deck can individually slide back and forth and all the gun ports can be closed when the cannons are in the back position. The capstan is also attached to a string reel and can be made working. Further details below deck include the galley, storage compartment and captain's cabin. Most of the top deck can be removed to access the gun deck. Minifigures can stand below deck and all gaps in the hull are filled. I also made a video to show the building experience, including the entirely brick-built & smoothly curving hull: More pictures can be found on the BrickLink submission page: https://www.bricklink.com/v3/designer-program/series-3/1167/Imperial-Frigate-Concordia VOTE NOW