Search the Community
Showing results for tags 'MOC'.
Found 5698 results
-
Introducing you to my latest Midi-Scale spaceship, the timeless Y-Wing from Episode IV - A New Hope! At 546 pieces, this compact and intricate model is barely wider than your average smartphone's height, but keeps a dense, detailed look and accurate proportions. I initially made a first prototype more than a year ago but was unhappy with the half-baked, almost playset-ish scale. I took on the challenge again and recreated it entirely from scratch: it's now smaller, more accurate, and just better in every aspect. Despite the small size, I did my best to capture the essence of the original ILM prop: tilted cockpit section, engines off-center relative to the thin support struts, asymmetrical greebles from top to bottom, cockpit turret... Believe it or not, the deceptively simple shape of the body was not easy to capture at this scale: with such a tiny surface to work with, a subtle balance had to be struck between incorporating complex greebling and "drawing" an accurate body outline. The cockpit section was a whole other beast, but once I figured out how to create the tapering, things clicked pretty fast. I managed to reproduce the slight downwards tilt, the yellow stripes on the fuselage, and the more discreet gray stripes on each side as well. I believe it's about as small as you can go when creating a Y-Wing cockpit without sacrificing crucial features and proportions! This model comes with a removable stand. Although it being purely a display piece, its swooshability is very good. In addition to being cost-effective, I think it makes a nice desk model for anyone loving that ILM prop look, with a small space footprint. ► Instructions for the Y-Wing are available at BrickVault! More pictures on my Flickr page.
-
This is my entry for the 4th round, a very detailed defensive tower with several elements such as: a improvised stable, a crossbow in the upper part, a habitable floor, etc. The number of pieces is 2991 and it has a modular system so each floor can be built separately. It can even be extended from the 3rd floor. Very easy to build and many possibilities. I hope you like it and if you want to support it (Voting and commenting your feedbacks) -> click on the link below. https://www.bricklink.com/v3/designer-program/series-4/1379/Ballista-Tower
-

Sets and MOCs - Do you replace parts with redesigned ones?
AmperZand posted a topic in General LEGO Discussion
When LEGO releases new parts that are more appropriate than existing ones, do you update your sets or MOCs with those new parts? For example, in 76202 Wolverine Mech, the legs are offset with one slightly in front of the other because there was no part at the time of the set's release that allowed you to have both hips in line. With the release of the 1 x 2 plate with ball connectors at both short ends (below), that's no longer the case. I have updated my mech with that part (and a 1 x 2 plate in dark bley to fill the gap). I also replaced the mech's finger and thumb parts with a bunch of these that are also new-ish: Do you update sets/MOCs or do you leave them as they are? -
"Masterpiece" Spending so much time at the Age of Steam Roundhouse Museum, one will really begin to appreciate everything in their collection, not to mention the facility itself. Everything from the extraordinary to mundane will find its way into your mind and heart. I must admit that in my years of steam locomotive research and enjoyment, the Nickel Plate 700's did not strike me. For whatever reason, they just didn't click with me. I'm not sure what it was, but obviously, that's changed now. Cale and I modeled 765 way back in 2017 when we were still figuring out Brick Model Railroader. It took some convincing, but we eventually decided that Nickel Plate Road 765 would be our first collaborative steam locomotive model. We had a running model that needed some adjustment, but quickly became disinterested in the project due to external factors. We were never quite happy with where we left this project, and vowed to each other that we would return to the model some day to do it again, properly. Several years later, in late October 2021, and on a whim, I laid out a scaled wheelbase in stud.io, just to see what it would look like. I left the file alone for a couple more months until the Holiday season of 2021. I began thinking about a Nickel Plate Berkshire running around a Christmas tree, inspired by the amazing "Travel Refreshed" speculative project: https://www.youtube.com/watch?v=h2mU6jVcv4w&ab_channel=FortWayneRailroadHistoricalSociety This set my mind racing with thoughts of the late 1940's when large mainline superpower led "hotshot manifest" trains through the heart of America. If there was ever a perfect depiction of postwar steam railroading, it was this, and the Nickel Plate Road was the poster child. The Nickel Plate Road connected the farms of the Midwest in St. Louis and Chicago to Buffalo in the east. The road took a fast, level route along the southern edge of the great lakes. A direct competitor to the New York Central, it was purchased by the Vanderbilts in an effort to remove competition. As such, the line was never optimized and operated with older and slower equipment. The Nickel Plate was purchased by Oris and Mantis Van Sweringen, brothers from Cleveland who had controlling interests of several other roads including the Chesapeake & Ohio, Wheeling & Lake Erie, Pere Marquette, Erie, and more. The "Vans" would lead efforts to completely transform the Nickel Plate into the powerhouse bridge road it is remembered as today. One of those efforts included the creation of the Advisory Mechanical Committee (AMC), which served as a design bureau for the roads under control of the Vans. One of the first projects for the AMC was the design of the C&O T-1 class 2-10-4 engines, the largest two cylinder steam locomotives when built. Continuing in efforts to rejuvenate the Nickel Plate, president John Bernet assigned AMC officer William Black the task of designing a super-power locomotive. The result was the Nickel Plate S class of 2-8-4, built by ALCO Schenectady in 1934. The AMC, capitalizing on their winning formula for the T-1, maintained the factor of adhesion just above 4 while scaling down the rest of the locomotive: eliminating the fifth pair of 69" drivers and creating a locomotive with 70% of the tractive effort and 70% of the weight. Unbeknownst to Bernet, Black, and the AMC, they had just captured lightning in a bottle. To truly appreciate why the 700's were such good locomotives, the operating mentality of the Nickel Plate must be understood. The road was a masterpiece of engineering, maintaining a very flat right of way along the mainline, running shorter but faster trains handling bridge traffic over the line. Operating conditions like these coupled with the high-horsepower 700s, there has hardly been a more perfect match of locomotive and railroad. The Berkshires were so effective and loved, the Nickel Plate laughed away EMD diesel demonstrators multiple times until the end of steam in 1958. Even still, several of these locomotives were stored serviceable in anticipation of a traffic spike that never occurred. 763, part of the third batch of Berkshires in total (S-2 class) and second batch from Lima (Works #8671), was one of these locomotives. Officially retired a few years after the end of steam, it stayed in Conneaut, Ohio until 1966 when it was purchased by the Virginia Museum of Transportation in Roanoke, Virginia. 763 remained in Roanoke for several years until it was towed to New Jersey for inspection to pull the American Freedom Train, but other locomotives were selected., and 763 returned to Roanoke. Ohio Central and Age of Steam founder Jerry Jacobson purchased the locomotive from the museum in 2007, returning the engine home to Ohio. It is currently stored inside the Age of Steam Roundhouse Museum in stall 4, a regular favorite part of any regular public tour. All that to say: I never expected to have such a deep, genuine understanding and appreciation for these engines. It says a lot when someone can connect with a piece of machinery in such a way, and gain understanding of its purpose and reason for existing. The 700s were truly magnificent machines. So, in deciding that I was going to model one of these amazing locomotives, I began working in stud.io, and over the course of several months, I came up with what must have been at least a dozen iterations of the rough shape of the engine solely to achieve "the look." With 765 currently operating and with countless fans of the locomotives, the 700's are well recognized and people are going to be able to pick out the details, so any model of one has to be done properly. Once I had the correct shape and proportions, I filled in gaps and rebuilt section after section until I had a completed digital model in June of this year. By then, I had just seen 765 operate in person for the second time and was feeling inspired, so work on the custom wheels and connecting rods progressed alongside. Refining, trial, failure, adjustment, and testing continued until December 2022 when I completed the physical model. Naturally, I had to model 763 specifically, being the preserved example at Age of Steam. Under the hood this model is identical to my Mohawk: a pair of Power Functions L motors geared 1:1 driving the third axle, each operating from its own Power Functions IR receiver, and powered by a Tenergy 7.4v 2200 mAh battery. 763 operates smoothly and without issue thanks to the drive train design and high-quality printing of the wheels, rods, and valve gear. Drivers and trailing wheels designed by me and printed by Rob Hendrix, all rods and valve gear designed by me and printed through Shapeways. All artwork was faithfully recreated by Cale Leiphart. Decals printed by OKBrickWorks and UV printed number boards and bearing caps are from Richard Glatter. Thank you all for your help with this project. Having completed and published Buffalo Creek & Gauley 13, Morehead & North Fork 12, and now Nickel Plate Road 763, my Age of Steam collection grows. Those who know me personally understand that I'm not one to brag about my work. However, I feel I must say that I think I've outdone myself with this model. I would say this is the most new, ground-up design of locomotive I have built in a while. I've achieved detail and accuracy that I haven't seen on even some traditional scale models, and it all works together to make 763 perhaps my best model yet. A masterpiece of a masterpiece, if you will. As 2022 winds down, I'm elated to publish this locomotive and check it off the list. As I mentioned earlier this year, I've had a lot in progress recently so wrapping something up feels fantastic. There's a bit more in store for the immediate future, but we'll get to that later. As always, thanks for reading, and thanks to everyone for their support of my work through comments, questions, and compliments. It is always sincerely appreciated and I am thankful to be a part of such a fun community. More photos here: Video here: Merry Christmas and Happy Holidays, Glenn Holland
-
Hi! I'm back with my 5th project from the Minecraft world! This time it will be: The Frozen Ocean one of the more difficult biomes, large space and icebergs. sounds boring, but it's not! I added a lot of interesting things in my project :) The construction process is available in my video, link below. How do you like my Frozen Ocean?
-
Hey there, I'm super excited to share with you my latest LEGO creation the BTL-B Republic Y-Wing in midi-scale! I got inspired to build this after seeing Flyinspace's awesome minifig scale version. But instead of going minifig scale, I decided to try something different with midi-scale. Building this was an absolute blast! Usually, I just try different designs and stick with what looks best, but with this one, I found myself going back multiple times to tweak and redo sections using different building techniques. Check out the evolution of the design from V1 to V3 in the pics I've included. One of the trickier parts was figuring out which version of the Republic Y-Wing I wanted to recreate. There are so many variations out there, with slight differences in shape, color schemes, and details. But in the end, I'm pretty happy with how this one turned out. I'd love to hear your thoughts or any suggestions you might have on the design! Thanks for checking it out! https://rebrickable.com/mocs/MOC-173299/Marius2002/btl-b-y-wing-starfighter/#details V1 V2
-
[MOC] Iveco Streetway 12M
mic8per_ posted a topic in LEGO Technic, Mindstorms, Model Team and Scale Modeling
Time to revive this account I guess... I am now making a LEGO replica of a city bus Iveco Streetway 12M, with currently working drivetrain and steering with a very big angle. The doors are pneumatic, I am planning to put an air tank inside, also the front door and the rear ones will have seperated switches. The rear is not done at all. Same for the interior. I am not really happy with the current look of the lights, does anyone know how to make them smaller? All you can see bellow is a WIP of course. Photos of the real thing: https://seznam-autobusu.cz/en/vuz/111410 -
Welcome to the Olympic Gardens! I'm by no means an engineer, but I started out wanting to create a beautiful domed European-style modular. There was going to be a tower, and a balcony, and an arcade along the front, to enhance my city layout. I got to the bottom of the dome and it did NOT translate well to the tower portion. The angles were terrible! So instead, I pivoted and turned it into a garden pavilion. And I like the result so much better! Some of my favorite parts are the planters holding the cypress trees. The main portion is a technic piece that makes a really cool textured planter. I'm a big fan of gardens and fountains, so there's tons of flowers and greenery in the finished build, and a main fountain up on the level with the pavilion. The cow horns near the bottom of the model (under the arches) were originally supposed to be teacups, but I didn't realize until too late that the pieces were too big for the gaps until later. So it's just a cool bit of statuary now. I plan to try and recreate this MOC in real bricks soon, as soon as I can order new bricks. It has more of a diorama style footprint than I normally do in my MOCs, so I can display the finished model on my shelf. There's tons of little details hidden in the scene as well, such as animals and lost coins, and bees everywhere. The flower bushes in the planters at the top of the stairs utilize a cool little piece with three studs, where I inserted the vines and green wolverine claws. The koi tiles are my absolute favorite, so I knew I had to include some in the build. I also like to make up primary stories to go with the MOCs I build, and for this one, the lady gets a text to meet her friend the artist at the park for a portrait painting. I also like the little grapes in the garden pavilion, they give it more of a pastoral atmosphere that I like to see in real-life gardens. The only thing that's really silly is that the balustrade on the side is a bit off center compared to the main balustrades, but that's something I can tinker with more when I build it in real bricks. Thanks for reading, and I appreciate any comments! :) Edit: I've created a time-lapse of the digital build, you can see it below: It took a lot longer to edit than to take all the photos, video software likes to keep crashing when you add 2,766 photos to it and try to shorten the frame length all at once!
-
Hello people! I want to start showing you some of my latest models, it's quite a lot of time I don't share them here. This is an Iveco T-Way, full RC with PU motors and hub, controlled via Brickcontroller2 and a Joypad. It is equipped with suspensions on all axles (pendular on the front axles and pendular in 2 directions on rear axles). The drive motor is directly connected to rear axles (it "moves" together with the third axle). Stickers are self made. This model is a mod of my original static model, in grey and black version, which features Hog steering, rear pendular suspensions, fake engine and tipping body. Instructions available here: https://rebrickable.com/mocs/MOC-121004/technicprojects/iveco-t-way/#details
-
Well, it's been a while... 8 years since I posted here. I present to you St.Miguel - a real Armada Flagship. It is inspired by Spanish galleon St.Martin, which was a flagship of a Great Armada (google it, if you want). Sails are fabric made and handpainted. Almost no illegal techniques were used. More in Brickshelf gallery Ahoy!
-
.thumb.png.ac42fe5bf808b68722d021abc3bc5691.png)
[MOC] 1970s rc rally car
Aurorasaurus posted a topic in LEGO Technic, Mindstorms, Model Team and Scale Modeling
Inspired primarily by the Opel Manta 400, I've made my own RWD rally car. It features independent front suspension, and a rear live axle using the big ball joint and a metal U-Joint. Its propelled by 4 buwizz motors and steered by one C+ L motor. Some late WIP photos Earlier WIP photos Problems Because of the narrow wheelbase and relatively high center of mass due to high up buwizz units, the model easily rolls when driving at high speed and cornering. I was lazy with the design of the suspension; the front is too soft and the steering is inaccurate because I am using Instead of the newer parts with longer arms for steering links. This allowed me to fit the wheels inside the body, though. The rear suspension is too hard primarily because I got lazy and wanted it done, after about 8 hours on the model I was getting bored. The bodywork has some parts that could be white if I had the parts in white, but those parts are quite small. If you have any questions, feel free to ask. As of right now I still have the model assembled. Thank you for reading. -
My first ever true Minifig-scale ship is finally here, and what better model to start with than the sleek BTL-B Y-Wing from The Clone Wars series. Being 23 meters long in universe, this accurately Minifig-scaled MOC is quite a unit: 57 cm long, 1,6 kg, 2,954 pieces. It can accommodate two clone pilots - one in the cockpit, the other in the turret. The model is available in three versions: classic (yellow), Rex's (blue), and red. With a spaceship of this kind, the main challenge is to achieve a level of smoothness and fluidity that gets as close to the original as possible. Using the Battlefront II model as a reference, my goal here was to closely match all key features of the ship: the subtle downwards angle on each side of the body, the curvy and tapered front section, the continuous yellow stripes that run across the entire fuselage, the intricate middle-section... and for such a smooth ship, going full SNOT (from top to bottom!) goes without saying. The T-shaped body of Y-Wings usually allow for simplistic structures, but in this case, figuring out the internals was one of the truly head-scratching parts of the build, since I had to properly incorporate angled fuselage assemblies and make a proper interior for Minifigs. Even so, the model is very swhooshable and can be grabbed from the underside, from the rear or even from both wings. Each color variant is accompanied by its specific set of instructions and parts list, giving you the freedom to build the one you prefer. The ship has two display modes, "in-flight" with its fully removable stand, and "landed" with retractable and easy-to-connect landing gear. The swooshing can begin. ► Instructions for the BTL-B Y-Wing are available at BrickVault! More pictures on my Flickr page.
-
Hello Creator and Disney fans, Mickey Mouse is a legendary American cartoon character co-created in 1928 by Walt Disney and Ub Iwerks. Steamboat Willie is a 1928 American animated short film directed by them. It was produced in black and white and this cartoon is considered the debut of both Mickey and Minnie Mouse. Building instructions are available on the following links: https://rebrickable.com/mocs/MOC-171558/_TLG_/mickey-mouse-steamboat-willie This is a studless model and everything is brick-built, stickers are not used. I wanted to create a clean model which is as accurate as possible in this scale. It includes many typical details: the shoes, the pants with buttons etc.. Maybe the most challenging one was the head with some tricky build techniques. Thanks for visiting, _TLG_ Mickey Mouse, Steamboat Willie - Instructions 01 by László Torma, on Flickr Mickey Mouse, Steamboat Willie - Instructions 02 by László Torma, on Flickr Mickey Mouse, Steamboat Willie - Instructions 03 by László Torma, on Flickr Mickey Mouse, Steamboat Willie - Instructions 04 by László Torma, on Flickr Mickey Mouse, Steamboat Willie - Instructions 05 by László Torma, on Flickr Mickey Mouse, Steamboat Willie - Instructions 06 by László Torma, on Flickr
-
For more photos and a 360 degree video, please check out my Flickr: https://www.flickr.com/photos/legoadam/
-
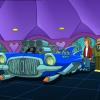
 This short animation was made in 24 hours for THAC 2024 contest. THAC is short for The Twenty-four Hour Animation Contest. This is an annual international event for fans of stop-motion animation. I've always wanted to participate but never had the free time. This year I managed to do it. What does it look like exactly? Read more » Video: Some stills: Full story here: LEGO Gallery - [BRICKFILM] Stop motion animation for THAC 2024 WIPs, Behind the scenes and other extras at my: Instagram | Facebook | Flickr
 -
Stingrays; Mutant Ray. The Mutant Ray is a redesign of the origninal 4788 Alpha Team; Ogel Mutant Ray set. I've rebuilt it in the Aquazone; Stingrays theme. The Stingrays using the Mutant Ray for fast traveling around the sea. It's equipped with two adjustable engines, two harpoons and a destructive claw. This claw can heavily damage or even destroy submarines. 01_Stingrays_Mutant_Ray by Mathijs Bongers, on Flickr 02_Stingrays_Mutant_Ray by Mathijs Bongers, on Flickr 03_Stingrays_Mutant_Ray by Mathijs Bongers, on Flickr Pictures also on Flickr: https://www.flickr.com/photos/mathijslegofan/albums/72177720312894518
-

Dodge Challenger SRT Demon
CrazyKreations posted a topic in LEGO Technic, Mindstorms, Model Team and Scale Modeling
Hey everyone, here is my newest creation... An 850hp supercharged BOAT!!!! AKA the Dodge Challenger SRT Demon!!!!! It is made using the parts from both 42154 and 42126. I liked this car and wanted to design a model that would highlight a similar and recognisable look! Please let me know what you think about it! Some photos and features: Front and rear View \ Wheelie function which is accessed using the orange key Doors, boot and hood can all be opened Please enjoy a video I made: https://youtu.be/TNrUjsT_23U?feature=shared Now on rebrickable: https://rebrickable.com/mocs/MOC-171570/CrazyKreations/dodge-challenger-srt-demon/#details -
(Afoland Castle Game. Meronia) The marketplace has always been one of the busiest places in the city. Here you can find anything you want - from food and equipment to adventures on your head. More pictures:
-
 Celebrating 25 Years of Adventure Category C 5968 The Cursed Race (Product Concept) By Rui Miguel “Not again! Another mummy chasing us” – Johnny Thunder “Well at least this one isn’t making any jokes” – Gail Storm 5968 The Cursed Race is the second chapter in the new journey on the Classic LEGO Adventurers theme. Shortly after Baron acquired the map it lifted the curse of Pharaoh Yuy. Our heroes still managed to get the map from Baron and Sinister but must now race against Pharaoh Huy. The only way our Adventurers can break the curse is to find the missing Jem of Anut. Features: - 292 pcs/pzs - Playfull Vehicles - 4x Minifigures (Johnny Thunder, Gail Storm, Dr. Charles Lighting and Pharaoh Yuy) Behind the Adventure Chapter II What kind of an Adventure would it be without cool vehicles and a mystical mummy? In this concept I wanted to bring vehicles that haven’t been made into a set previously. For example, a car capable of sitting all three main characters and an Egyptian chariot. The car is heavily inspired by the classic Excalibur cars. It was around two years ago, in a summer classics expo, when I saw an Excalibour car and when I saw it in real life I told myself if one day I was ever to do an Adventurers project this would be the heroes car. No more, no less. The model, the colors and the design just felt visually right and of course I added some small variations to fit the LEGO System. In the process I left my favourite part for last… The Mummy! Since I was a kid I always had a soft spot for villains, I don’t know why but they have always looked cooler than the heroes, always had the best musical scores and the best quotes, it’s just my opinion. In my draft story I wrote a new character, Pharaoh Yuy, a distant relative to Pharaoh Imoteh. He would be this cursed spooky ghost and for that I would use the Yellowish Green and Transparent Bright Green color pallet to that effect. The music themes of Ra from Stargate and The Mummy from composers David Arnold and Jerry Goldsmith inspired the design. I also found pressure in making this concept because it featured the minifigures of the heroes. Each to their own with their unique look and dressing. I maintained the color scheme and focused on refreshing with little drawing notes from my visual memory and movie culture inspirations and on top of that I adopted nowadays guidelines for minifigure design. Here is a detailed look at the graphic design of the characters and as well a closer look at the printed/stickers elements. And that concludes, for now, my take on Adventurers :D I hope you enjoyed my work, thank you for viewing it. Feel free to comment or add any ideas of what you would like to see in another chapter of Adventurers. Until the next project 😉
 -
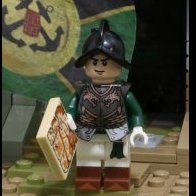
Moving Through Halfaya Pass, April 1941 Moving through Halfaya Pass, April 1941 by Nicholas Goodman, on Flickr Moving through Halfaya Pass, April 1941 by Nicholas Goodman, on Flickr Moving through Halfaya Pass, April 1941 by Nicholas Goodman, on Flickr
-
Hello fellow EB members. My latest MOC is called Atom Bowl. It's inspired by mid century architecture. I had intended to make it full on Googie but couldn't quite replicate some of the wild shapes prevelant in that style such as boomerangs. I spent most of the my time working on with the 'ball return' and diamond pattern. Couple of pictures; They are also found as usual on my flickr page: here All the best for 2024! Andrew
-
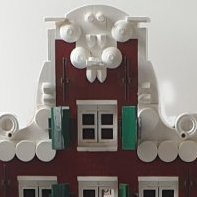
This is the most photographed house in Leiden, Netherlands. I often see this house on my bicyle if I cycle towards the center. It was built in 1612. The city carpenter's yard (stadstimmerwerf in Dutch) was located on the edge of the city expansion that was built from 1611 onwards. The city carpenter lived and worked in this building. It is an old typical historic Dutch house. More city mocs: Instagram
-
Here's my Corner Apartments MOC. I went unfurnished for the apartments on the 2nd and 3rd floor for now for cost reasons, so I will need to furnish at some point. Also, I made this one easy to add extra floors for additional apartments in the future if that becomes viable. When designing, I tried to have slightly larger floors for a larger profile of the building than some of my past MOCs (as can be seen in the last picture). Lobby is furnished though. Unfurnished apartment floors. With some of my past MOCs.
-
[MOC] german water castle Raesfeld - minifigscale 1:50
maydayartist posted a topic in LEGO Historic Themes
Hey there, it´s a veery long time since my last visit here at EB. The last 9 years () were full of children, construct a house and after all, design a new Lego room with shelfs wooden boxes and a long period of time to sort all my unsorted pieces a long time ago. And here we are! I returned building in september 2022 and finished my newest build last week. Now I have done some pictures to show and compare it with the original located in my home village. The start for this castle was in 2015 but only for few month. After this the tower including the first step of the roof was waiting seven years for continuing. So overall the building time was 1,5 years. The measurments are: LxBxH 1,6 x 1,4 x 1,25 m and the amount of parts are round about 70.000 Like always (my old threads speak the same language ) I have made a lot of pictures. Sorry for that, but there is a lot to show and discover. The following pictures are good to compare And here are some additional pictures for details and overwiew. This three pictures show how the roofs are made. The last two ones are made with a normal light chain inside. thanks for viewing Phil -
Hi fellow builders My third MOC here on Eurobricks is a minifig scaled model of the brand new SAR helicopter in Norway. The Leonardo AW 101 is a magnificent machine! I start off with some important information. I built this MOC based on a model i found on Lego Ideas. The creator SimonSchepp published six pictures of his grey army version of this helicopter, and I used these with the intention of making a similar model. The result is a helicopter that looks similar, but is probably built very differently. With only six pictures available It was really difficult to figure out how to build this thing. But I think it turnes out nice, and I learned a lot along the way. Hope you like it. Minifigs deserve only the best, and the AW 101 is state of the art. You can hoist the patients in to the helicopter. The crew has lots of medical equipment available for treating patients. The helicopter flies fast and safe in all kinds of weather conditions. Fully decorated cabin, similar to the layout in the real helicopter. Size does matter, and this thing is big. Fully decorated cockpit, with collective and cyclic. I know there should to room for 2 pilots. But to maintain playability, I could only fit in one seat. The godfather of helicopters, Igor Sikorsky, deserves som credit. Any comment or questions is much appreciated. Thank you for your time. Keep building :-)