Search the Community
Showing results for tags 'Mercedes-Benz'.
Found 11 results
-

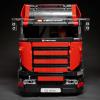
1:10 Mercedes-Benz G63 6x6
Zerobricks posted a topic in LEGO Technic, Mindstorms, Model Team and Scale Modeling
I was planning to build an improved and updated version of my old 6x6 from 2013 when i got an offer for cooperation from Mouldking which gave me an additional motiviation to design this model. I decided to go with a 1:10 scale, which would be perfect for the Unimog tyres. The final model dimensions are 60 x 22 x 24 cm Thanks to the all the amazing work done by fans updating the LDD, I was able to design the model as a modular build made out of a total of over 3100 pieces: A high number of pieces was needed to made this as detailed representation of the real model as possible. Starting under the hood, there is a detailed working V8 engine connected to the 2 drive motors: Inside the cabin there is a working steering wheel connected to the servo motor along with a detailed center console: Rear seats and the console between them can be folded to access the BuWizz bricks from the inside: Or you can simlpy fold down the rear wall inside the bed: The rear suspension and axles have been designed in such a way to maximize the volume of the bed, which is 15 studs wide, 20 studs long and 6 studs deep, making it my biggest truck bed to date: As you can see all the doors, hood and tailgate can be opened. The front doors even feature limiters: Now going from the aesthetics to functionality: The model features a 6x6 drive which can be powered by a pair of RC, Monster or upcoming BuWizz motors. Power is transfered to all the axles via a 2 speed gearbox. Each axle has a 1:12,6 gear ratio, allowing the 3kg heavy model to crawl over larger obstacles with ease. Low gear has a 1:12,6 gear ratiom while the high gear is overdrive, featuring a gear ratio of 1:7,56, allowing for higher speeds. Just like the real vehicle, the model uses live axle suspension with different spring rates. First and second axles use hard shock absorbers while the rear-most axle uses the soft version. Each axle uses a panhard rod with the rear axles uses two for even greater robustness Of course, I can't forget the most important photo: And finally here's a video of the model in action: -
 REVIEW - 42043 - MERCEDES-BENZ AROCS 3245 INTRODUCTION So here we are, finally. Last year the Volvo review was published at the beginning of June, so you all needed to wait a little bit longer for this one. Rumors started early December of a licensed Mercedes set. What could it be, a truck, a car? Christmas Eve revealed the LEGO Technic 42043 Mercedes-Benz Arocs 3245. The eager anticipation of news about a new model always has its special moments. This time Paul (Boratko) had seen a first glance of the model. This resulted in one or two questions being asked. What's the color scheme? Does it have pneumatics? Does it have new pneumatic parts? Does it have double wheels on the rear axles? Does it have front suspension? Does it have this, does it have that? Was I excited at the moment? Hmmm not really. To be honest; I figured this would be the Unimog all over again. It's a public secret that I am not the biggest fan of the Unimog. A pneumatic crane that doesn't work too well, flaws in the steering mechanism and the model is leaning to one side, because of the battery box. Don't get me wrong; it is a decent model, and it definitely looks great, but it just doesn't cut it for me. So my initial thought was "will this be better than the Unimog?". We will find out at the end of this review The model is designed by Markus Kossman, who is lead designer at TLG and is known for some other flagship sets (among other models): 8421 - Mobile Crane (2005) 8275 Motorized Bulldozer (2007) 8110 - Mercedes-Benz-Unimog-U-400 (2011) 42009 - Crane Mk II (2013) It's safe to say that Markus has some experience when it comes to designing trucks. At the beginning of each stage, I state how long it took me to finish it. Mind you, that when I'm building for a review, I lose a lot of time shooting pictures. So your building time will probably be 70% to 80% of my time. Note: Pictures, taken with a Canon 70D with 50mm Canon prime lens, can be clicked for hi-res versions. SET INFORMATION Number: 42043 Title: Mercedes-Benz Arocs 3245 Theme: Technic Released: 2015 Part Count: 2793 Box Weight: 4455 gr Box Dimensions: 57,8 cm x 47,8 cm x 12,2 cm Model Dimensions: 54 cm x 23cm/51cm x 15cm (wo crane/w crane) Set Price (MSRP): Approximately € 200 Price per Part: Approximately € 0,072 per part Links: Brickset THE BOX The box is the same size as last year's 42030 - Volvo L350F (review). It's huge and it's heavy. Weighing in at almost 4,5kg, this actually does feel like the biggest Technic set ever. Unfortunately my box was severly damaged upon delivery. Even the outer box was damaged, and looked like someone had opened it. Luckily, the actual box was only damaged, instead of opened, so all the parts where still there. FRONT SIDE The front of the box shows the model (nothing new here), the Power Functions logo AND the new Pneumatics V2 logo. Hopefully we will see the last logo more often in future sets. Under the Pneumatic logo, all new pneumatic parts are shown. Three of the five parts are simply redesigned parts, but the two 11L cylinders (1x1 and 2x2) are brand new. INSIDE The inside of the box shows most of the features and functionality, combined with some fun facts about the real Arocs. The model will measure 54 cm upon completion. SIDES One of the sides shows the model and the two logos, while one of the other sides shows all the Pneumatic V2 and Power Functions parts. CONTENT OF THE BOX Being the biggest Technic set to date, means lots of parts. 2793 to be precise. 2 bags with 6 wheels 1 bag with instructions and stickers 1 bag with pneumatic parts 1 bag with L motor 1 battery box unbagged 4 bags #1 2 bags #2 5 bags #3 2 bags #4 6 bags #5 2 bags #6 SQUARE BOUND BOOK Like the 42039 - 24 Hours Race Car (some of them) this set has a square bound book sealed in a bag together with the sticker sheet. I really do like a single bound book, but when TLG divides the build into 6 stages, providing 6 booklets also makes sense. This would make building with your children a great deal easier. The instructions for the A-model count 105 steps, covering a whopping 471 pages! The sticker sheet with stickers for the A-model and two stickers (#25) for the B-model, apparently a Mercedes-Benz Actros 1845. For the first time (to my recollection) the 62.4mm D. x 20mm Tires are packed in bags. Normally they are scattered between the sealed bags. The new Pneumatic (V2) parts have been neatly packed together in a single bag. The hoses are cut to length, which makes assembly more straightforward. There's no need to measure and cut the hoses yourself. The L-motor comes in a bag, while the battery box doesn't. Normally the battery comes in a bag too. Since it has a slightly different color than the previous version, maybe the manufacturer or manufacturing process has changed. NUMBERED BAGS A total of 21 numbered bag, divided over 6 build stages. You can click on the bag to show a hi-res version of the picture. HIGHLIGHTED PARTS This chapter describes the interesting and/or new parts in this set. BATTERY BOX The color of the new battery box is slightly different than the old one. The dark bluish grey is much darker and the light bluish grey seems to be slightly different too. VERY SMALL SMOOTH PANELS IN WHITE For the first time a set comes with very small white panels (#21) and very small white panels (#22). These two panels complete the range of white panels available. WHITE PANELS Four other types or white panels are used in the cabin. NEW 60T TURNTABLE That kinda looks like a new turntable under the crane. Allanp was absolutely right about the introduction of a new 60 teeth turntable, resembling its smaller brother (bottom and top). As you can see in the comparison shot below, it's not much bigger than the old version. The design is much better, resulting in a smoother operation. The potential downside is that the new turntable doesn't have teeth in the inside, which can be limiting. That being said; I still think that this design is better than the old one, so thanks to TLG for bringing us this new turntable! Hopefully TLG will some day release an XL version with this design. TIRES Nothing special about these tires, besides coming in a sealed bag. So, why am I showing these tires anyway? It has nothing to do with the tires itself, but with the quantity. For the first time an official LEGO set contains more than 10 of these tires. The 42009 - Mobile Crane Mk II counts 10 of them and the same goes for the 8285 - Tow Truck from 2006. The latter also had double wheels on both rear axles, but it only had two front wheels. CRANE AND OUTRIGGER LIFTARM BRACKET AND GEARRACK I'm not sure what the part names will be, but crane arm outside and crane arm center are used for similar parts in the City theme. I will stick to Liftarm Bracket and Gearrack. These two new parts are perfect for outriggers and crane sections, but I am eager to see what MOC-ers come up with. I do see an application for Mindstorms Robots or TC7 Contest entries. The red section, containing the gear rack, is 15L. The gear rack itself is 14L. CLAMSHELL BUCKET Two clamshell buckets are introduced in this set. After the Grabber Arm Claw, this is welcome addition for crane enthusiasts. PNEUMATIC V2 Save the best for last, the new Pneumatic parts! Some people like pneumatics, some people don't. Nonetheless, it's great that TLG hasn't abandoned Pneumatics in favor of Lineair Actuators. They have redesigned some of the existing parts and even designed brand new ones. Some people on this forum will be so thrilled with these new parts. The outlets of every element have been redesigned in a way that the hose will be easier to attach. This means the existing elements do have new moulds too. SMALL PNEUMATIC CYLINDER The Small Pneumatic Cylinder isn't a new part, but it has been redesigned with new outlets. On the right you can see a comparison between the old (right) and new (left) cylinder SMALL PNEUMATIC PUMP 6L Like the small cylinder, the Small Pneumatic Pump 6L has also been redesigned. And TLG has used blue again, instead of the Unimog pump, where they used grey. I do like the blue version better, although you will probably not clearly see the pump in the finished model. The right pictures shows the three different versions of the pump. NEW 2x2 11L PNEUMATIC CYLINDER The new 2x2 11L Cylinder is 4 studs longer than the old Pneumatic Cylinder. I wonder if TLG will release a new version for the 7L cylinder as well. The picture on the right shows the 7L (right) and new 11L cylinder (left). NEW 1x1 11L PNEUMATIC CYLINDER When you do need length, but not a lot of power this new 1x1 11L will perfectly fit your needs. PNEUMATIC SWITCH The new version of the switch is simply a redesign of the old Pneumatic Switch with modified outlets. The pictures on right shows the comparison. PART LIST The part list, spreading over 3 pages, counting 2793 parts. THE BUILD The build consists of 6 stages: Front-end of the chassis Outriggers and gearbox Rear-end of the chassis Crane Cabin Tipping bed STAGE 1: FRONT-END CHASSIS Bags: 4 Duration: 120 minutes You start by building the front section of the chassis, with a small part of the cabin. No new parts are introduced in this stage, except for some newish parts from 1H 2015 and 2014, like Pin and Pin Hole and 3L Axle Pin with 1L Axle. The Arocs has a 6 cylinders inline fake engine. Of course the piston will move when you drive the vehicle. Here's a picture of the actual engine, used in the new Arocs. New 6-cylinder in-line engines with a particularly robust design and a longer life. An 88003 - PF L Motor is placed behing the fake engine, facing backwards. This motor is connected to a gearbox, which we will build in the next stage. This single motor will power all the motorized functions. Below you see the first front axle, with suspension. The 9L Technic Link is used to steer the front wheels. The front suspension uses the yellow Hard Spring Shock Absorbers, resulting in pretty stiff suspension. When the assembly is connected to the chassis, the 9L Technic Link is connected to a pivot point. Rotating the pivot point will move the link back and forth causing the front wheels to steer. The second axle is connected to the chassis. This axle uses a 6L Technic Link for steering. Using different links results in different steering angles for both axles. I did notice a strange anomaly; the front axle does have 1L Round Pin Connectors, while the second axle doesn't. The leftover parts only show one extra?! The video below shows how the steering mechanism works. Make sure the 12 Teeth Bevel Gear on the right is placed properly. I placed the gear in the same position as the one on the left, resulting in one of the lights making the model steer to the left side when turned right, and vice versa. The two pictures below show the model after stage 1. The build is okay so far. The most interesting thing about this stage is obviously the steering mechanism, attached to the pendular suspension. The mechanism is unlike steering mechanisms found in other models, so this required some out of the box thinking. STAGE 2: OUTRIGGERS AND GEARBOX Bags: 2 Duration: 45 minutes The first step of the second stage starts with the new bracket and gear rack. The outriggers could easily have been designed without this new gear rack, but since TLG designed it for the crane (probably); why not use it here. The stabilizers on the outriggers are operated manually. It would have been great to have motorized pads too, but it's not a big deal. The two outriggers are linked together in opposite directions. The new parts provide a compact solution, but there are no fixed mounting points for the driving gears. The gearbox consists of two layers with gears. The lower part of the gear box contains the Pneumatic Pump, much like the one found in the Unimog. Two black 12T Bevel Gears are driving the gear racks. The upper layer of the gear box contains the white Clutch Gear. This gear prevents the motor from stalling and overheating when the end of a function has been reached. At the end of stage 2 the gearbox and outriggers are connected to the front-end of the chassis. The truck is slowly taking shape. At this stage I was still not 100% convinced what I would think of the complete model. STAGE 3: CHASSIS REAR-END Bags: 5 Duration: 135 minutes With 135 minutes, the second longest stage in the build. In this stage you will build the rear-end of the chassis, with suspension and drive train. Four Flexible Rubber Axles are used in the base of the chassis. I am not entirely sure why TLG used these parts, since you will lock the assembly using liftarms. Possibly, it's a construction used in the real Mercedes, or these parts will be used in the B-model. I would love to hear your thoughts. The tilting mechanism for the bed uses a Linear Actuator, instead of Pneumatics. I have made a mistake by placing two of the Pin Connectors in a wrong angle. Won't be the last error with these connectors. The Rear suspension on the real Mercedes is actually a leaf spring suspension. TLG is mimicking this suspension type, by using the relatively new Steering Arms found in the 42021 - Snow Mobile and 75060 - Slave 1. Picture of the real rear suspension. The steel suspension on the Arocs impresses in every situation with its robust, solid construction, high performance and loadability. Two differentials are linked together using a small turntable. Although being linked together, the two axles still have the ability to move independently. The model will have two live axles, linked together by a drive train through the small turntable. Live axle vs Dead axle A live axle is a type of beam axle in which the shaft (or shafts, since live axles, while connected to move as a single unit, are seldom one piece) also transmits power to the wheels; a beam axle that does not also transmit power is sometimes called a dead axle. While typically used in vehicles with Hotchkiss drive, this suspension system can also be used with other types of power transmission. Or, to quote Allanp, who was right again: The rear axles are a single unit (suspended by 4 springs) that pivots longitudinally to allow the two axles to twist independently from each other by means of a 28t turntable piece allowing full suspension and both rear axles to be connected to the engine whilst all fitting between the dual rear wheels. Simples! Here's a video showing the rear suspension and drive train. WARNING We've all been there, a model with two differentials and one of them is turning the wrong way. TLG has published an explicit warning in the building instructions. Pay attention to the position of the differentials! After building the rear-end of the chassis, you will be merging it to the front-end of the chassis. This was the point where I needed to move my camera backwards a lot. The model is growing big. Double rear wheels on both axles, suspension and two live axles is quit a feat, especially regarding the limited available space. For me this stage was the turning point in the build. From now on you actually see the impressiveness of the model. STAGE 4: CRANE Bags: 2 Duration: 120 minutes Only two bags are provided for this stage, but it still took me quite some time. Connecting the pneumatic hoses does take more time than simply adding connectors. This stage did offer a variety of new parts, like the Pneumatic V2, new Turntable and the two Clamhell Buckets. Pre-cut hoses are quite convenient. The instructions clearly show which length you will be needing. There's little difference between 216mm and 240mm so watch out. The new 60 Teeth Turntable is mounted on the base of the crane. It turns a lot smoother than the old version. TLG really nailed this one! Normally I build in my LEGO room, but this time I was building in the living room. I was building, combined with reading topics on Eurobricks. At that moment I was reading Drakmin's response in the Technic Photography topic. He stated that he'd like to see making of pictures, combined with the end result. This made me take the next picture, where you can see my working place. And as you can see, sometimes a LEGO model needs a little spicing up The bottom view of the crane shows lots of tubing, which will add difficulty when you connect the crane to the chassis. The tubing is touching one of the gears, so you need to push the hoses aside. There's quite some stress on the hoses, so it can be difficult to get everything into place. A lot of Pneumatic Hose Connectors are used to guide the various tubes alongside the jib and booms. Instead of using a single longer hose, the sections are linked together using these connectors. The picture below shows the complete crane assembly. Normally I am not the biggest fan of pneumatics or building the crane on a truck, but I had a lot of fun building this one. Not sure why, but the size of the crane is very impressive and the techniques/parts used are pretty cool. STAGE 5: CAB Bags: 6 Duration: 150 minutes Stage 5 is the longest stage in the build. And it's probably the most rewarding, since you will see the truck come to life. You start by building the front bumper. The rear view shows how the slanting grill is achieved. The name Kossmann is clearly visible on the plate, making no mistake that Markus Kossmann designed this model. The front bumper is connected to the chassis by simply using connectors. The axles with the gears are sliding into the 7L liftarm, keeping them in place. At this point the chassis with crane is mostly done. You only need to add the rear bumper, before you can start building the cabin. The cabin grill is comprised of lots of Perpendicular Double Split Axle and Pin Connectors. I really like the design of the seats, because of its simplicity. The printed Mercedes logo adds a lot of value to the cabin. Here you can see another mistake I made with the pin connector. No way the steering wheel will fit like this. The Mercedes introduces two new white panels. They are used as "cab side edge turning vanes", which improve aerodynamics. There was some discussion about the looks of the cabin, but seeing it in real life, I can only draw a single conclusion; this cabins is one of the most beautiful cabins LEGO has ever designed/released. The front view is stunning! Here you can clearly see that I accidentally moved the head rests and didn't return them to the proper position. You will see this discrepancy returning in multiple photo's. I found a mistake in the manual, which can be somewhat confusing. I didn't look at the image when connecting the cab to the chassis, but when I did take a look when I was shooting pictures, I noticed this small flaw. The circle with the arrow, doesn't match the outlined image on the right. The circle with the arrow needs to be placed lower than its current position. Here you can see the tilting mechanism on the actual model. Front view of the cabin and grill. It does make you wonder whether this could have been the right moment to introduce a Dark Bluish Grey 11x3 Curved Panel. The front is instantly recognizable as a Mercedes. Obviously the Mercedes emblem helps a lot, but without the star it would have been clear too. At first I wasn't too happy with the white and dark bluish grey color scheme, but seeing it in real life makes a world of difference. Here's a picture of the actual cabin. The main difference is that the LEGO version only has three bars, instead of 4. I can live with this. The bottom front section of the cabin seems to be some sort of metal, so maybe Markus was right by using the light bluish grey panel. The radiator grille designed in a bucket tooth look lends the Arocs a striking, unmistakeable face and underlines its power and robustness. The leftover parts, I forgot to add to the previous shot. STEP 6: TIPPING BED Bags: 2 Duration: 30 minutes This is by far the easiest stage of the build, consisting of mainly grey panels and liftarms. The intersection shows the simple construction of the tilting bed. The finished bed looks....well uhhmm grey. A cool thing about the tipping bed is the lock at the end. This locks the tailgate of the bed to prevent cargo falling out. FINISHED MODEL After 10 hours of building the model is finally finished! I reckon most of you will do this in 8 hours (or less), if you don't rush the build. Markus delivered a great looking model, which is even more impressive in real life, than in pictures. As you can see in the picture below, there is quite some strain on the base of the crane assembly, where the pneumatic switches are mounted. Some of the hoses at the base can probably be cut a little shorter, to save space. BOTTOM VIEW The bottom view shows the entire chassis, with suspension, steering and drive train. Some of you said the wheels are too small and there's too much space between the wheels and the arches. Looking at pictures of the real Arcos, the second front arch, could have been placed a stud lower. Those minor details set aside, the finished model resembles the Arocs a lot! Even the rear view gives you the feeling you are looking at a real truck. With extended outriggers and stabilizers and operating the crane. I forgot to put the wheel chocks between the rear wheels for extra safety. My reviews always contain pictures taken in a photo studio. Unfortunately, this doesn't do this model real justice. That's why I left my comfort zone and went out to shoot some pictures at a local construction site. A friend of mine is the manager of the site and he happens to be building his own new house over there as well. There's no better excuse to take the Mercedes for a drive in his natural habitat. And while we are at it, why not let the Volvo tag along for the ride. FEATURES AND FUNCTIONS This set has quite a few features and functions. Controlling them is done by a combination of using the L-motor as a pump for the Pneumatic functions or by switching it to control three other functions. Switching is done by moving the levers on either side of the model. Reversing the function is done by the switch on the battery box. In the beginning this can be quite confusing. Since you are used to using a lever to switch between back and forth, I ended up switching between functions, instead of reversing the current function. MOTORIZED FUNCTIONS The Mercedes uses a single L-motor to motorize 4 functions: Rotating the crane Extending/retracting the outriggers Tilting the bed Compressor pump PNEUMATIC FUNCTIONS When the motor is driving the compressor, again 4 functions can be operated (as shown in the two images above): Opening and closing the bucket(s) Lowering/raising lower boom section Lowering/raising upper boom section Extending/retracting the jib MANUAL FUNCTIONS There are also quite some manual functions on this model: HoG Steering Tilting cabin Working fake enginge Wheel chocks Opening doors Stabilizers Tailgate tilting bed lock FEATURES Below is a list of the most important features: Double wheels on both rear axles Leaf sprung suspension on rear axles Two live rear axles Independant pendular suspension on front wheels OPERATING THE FUNCTIONS The long list of functions and features is great, but the most important question is "do they work properly?". Operaring the functions takes a little getting used to. Maybe it's just me, but I tend to get confused on whether to move the switch on the battery box or the lever on the side. For example; when you extend the outriggers and you want to retract them, you need to switch the battery box, instead of the lever, resulting in rotating the crane. Actually, I know that I am not the only one, since the guy demonstrating the model, didn't quite get it right too. Of course, after making the same mistake several times, you get used to it It helps a lot when you manage to use the right switches and levers. All the motorized functions work perfectly. The pneumatic functions do work a lot better than the crane on the Unimog, with a side note that movement can be a bit jerky sometimes. This is caused by gravity or strain on the pneumatic hoses. Besided the incidental jerky movement, you can actually fully operate the crane, which is something you'd expect from a flagship like this. Before we go any further, let's take a look at a video I shot demonstrating the functions: The video seems to be slightly out of focus. Sorry for that. As you can see in the video, I still need to find my way around the functions. The jerky and sometimes slow movement of the pneumatic functions is also visible. However, I still think the crane is as good as you will get using LEGO and Pneumatics. Lifting the entire crane simply requires a lot of power. All in all I am very pleased with the playability of the model. Here's an extra image, showing the truck with the cabin and bed tilted. B-MODEL Since the building instructions are not available yet, I couldn't build the B-model. This appears to be a Mercedes-Benz Actros 1845, as you can see on the back of the box. The cabin has more or less the same design, but the chassis is different. SUMMARY Here we are, at the end of this review. The main question I posed at the beginning of this review "Is this set better than the Unimog?" can be answered with a loud "Yes!". Your milage may vary, but the pneumatic crane is more advanced and it is working better than the one on the Unimog. There's no problem with the model leaning to one side and steering, although not perfect on this model either, works better than the Unimog. Which brings us to the obvious next question. Is this set also better than the 8258 - Crane Truck? The 8258 is absolutely a fantastic set (probably the most highly acclaimed truck to date), but to be honest; I think the Mercedes just kicked it from the throne. Without stickers, the 8258 doesn't look nearly as good as the Mercedes. Add the ongoing list of functions to the mix and the only possible conclusion is; the Mercedes is the best LEGO Technic Truck TLG has ever released. Aren't there any negative remarks? Of course there are, but they are minor. Because the steering mechanism uses more gears than usual, there's more torsional strain on the axles. Pneumatic control of the crane can be a bit jerky or slow. There are a lot of hoses between the switches and underneath the base of the crane, which requires applying some force when you attach it to the chassis. You also need to be mindful that the gear on the chassis doesn't touch one of the hoses. Here's a complete list with Pros and Cons: PROS The model looks awesome Biggest Technic set to date New Pneumatic (V2) parts 4 Motorized functions 4 Pneumatic functions The crane actually works Double wheels on rear axles Leaf sprung rear suspension Pendular front suspension CONS Steering causes torsional strain on axles Pneumatic controls can be a bit jerky (or slow) Lots of hoses underneath the base of the crane The last question I need to ask myself, is this set better than the Volvo L350F or the 8043 - Motorized Excavator? I'm not sure about that, but I will conclude this review by saying that the Mercedes did land a spot in my Top-3. SCORE How do I grade this set? 9 DESIGN Resembles the real deal a lot. 9 BUILDING EXPERIENCE The model grew on me during the build. 9 FEATURES Packs a ton of features. 9 PLAYABILITY The model offers lots of playability 9 PARTS Pneumatics V2 and lots of other interesting parts. 9 VALUE FOR MONEY You get a lot of Mercedes for your money. 9 BEST TRUCK TO DATE Thanks for reading and feel free to ask questions! More pictures can be found on my Flickr page. FINAL WORDS For those of you who are interested, I have tracked the time working on this review. I ended up putting around 35 hours in it, divided over: 2 hours of unboxing and taking pictures of contents 10 hours of building 3 hours of photo processing 18 hours writing the review 2 hours on construction site
 -
 Hi, so I got the MB Arocs 42043 in January, and have been loving it! But now I want to make a C model. Previous attempts have failed due to my now apparent lack of skill at making well proportioned frames. But now I want to try one thing, and stick to it, right now I need to figure out what machine to do as a C model. I've decided on a 4 axle (including steering) heavy duty rotator tow truck Ideas were: Pics will be posted sometimes tomorrow.
 -
[MOD] 42043RC Mercedes-Benz Arocs
shineyu posted a topic in LEGO Technic, Mindstorms, Model Team and Scale Modeling
Hello everyone, Let's me introduce my new [MOD] 42043 RC, The purpose to buy 42043 in order to make a video for teaching how to RC 42043, then do not want to put it so fast break up, so put it into your own favorite dump truck -
 Inspired by the classic 300SL. I started by developing a custom framework with 2 l-motors for drive and a narrower chassis with a nimble turning radius. All of the classic features were motorized with the Lego power functions. Gull-Wing Doors: Front end with Benz logo: Frame: Video: Once the whole car was built, it turns out the gearing was incorrect and because of the weight, the vehicle wouldn't drive. So I had to tear down the car to the main frame work and rebuild. Now the gearing is reliable and more support was added to the back end.
 -
 As some of you may know LEGO is running a Technic Building Competition with Mercedes-Benz. I was looking forward to participate and it took me a while to understand what future truck would look like. Initial idea of building truck driven by both front and back axles was quite simple to implement. Two L-motors have been used for that. Steering is performed by Servo motor and truck is controlled remotely. Fun fact - chassis without aerodynamic cover is somewhat reversible and can be used up side down. Final model is very sturdy thanks to slick and strong body. Unfortunately, due to selected width rear axle is somewhat less reliable and has gear grinding upon start but drives normally afterwards. This is something wasn't possible to completely solve having double wheels per each side. [/url] Below you can check my vision of a truck in year 2045: Few more pictures can be found on my Flickr Stats: 2 L-motors for propulsion Servo motor for steering Small non-rechargeable battery box 44 studs long 17 studs wide 24 studs tall weights 1098g. no suspension
 -
2045 Mercedes-Benz Antos
Zerobricks posted a topic in LEGO Technic, Mindstorms, Model Team and Scale Modeling
So after a rather poor start I decided to totally reimagine and rebuild the Mercedes truck of the future. It all started with a random idea of routing 4 functions through a turntable like this: After fiddling around in LDD for few hours I came up with an 8 function gearbox powered by a single RC motor: The functions shown are: Orange - RC motor drive Lime - Horizontal extending od outriggers Yellow - Vertical extending of outriggerd Violet - Slide and tip of the bed White - Rotation of main arm superstructure Light gray- Rotation of claws Red - Lift of main arm Warm gold - Movement of claws Dark gray - Rotation of scondary arm After this rather unusual design process it was time to think of the basic shape of the model. I was inspired by the 42038 arctic truck's layout, but I wanted to add my own twist to the formula... Here's the result: Here you can see the massive cran arm used to pick up various loads: The truck uses four of the biggest Lego wheels in front and 4 tracks in the rear: As you can see all tracks and wheels have fully functional spring (and additional pendular for the tracks) suspension. Also notice the massive bed tipping angle. The truck also has a fake V8 piston engine driven by the tracks: And a prestige sand-colored interrior: Steering is done via HOG and the spare tyre behind the cab: Here's the description of the concept idea: _________________________________________________________________________________________________________________________________________________________________________________________________ This is my model for the future 2045 Mercedes-Benz competition. I named it Antos and it has several features: The engine is Euro 11 compliant 6-stroke aqua-diesel-electric hybrid. The additional 2 strokes inject water into the hot engine with expands as steam adding another work cycle. The engine also powers an electrical generator which is used to power the truck's front wheels. Front wheels also act as a generator while braking, therebye returning the electrical power back to the batteries. Tracks are driven directly by the diesel engine. For optimal performance the front is equiped with many air surfaces which reduce drag. Because this is an offroad truck, the massive wheels and 4 tracks in the rear provide it with massive traction area, which reduces ground pressure and preserves ground vegetation. The multi-functional arm and bed are driven by a single motor using a mechanical multiplexer mechanism. The Lego modes uses solid axle suspension in front, suspension on all 4 rear tracks, a fake V8 piston engine driven by rear tracks A powerfull RC motor powers the 8 functions. I managed to reute 4 functions through the turntable in order to fully motorize all arm functions. Total number of gears used for arm and bed (not including steering and fake engine gears)is over 130 making this one of my most complex switchboxes to date. The front was slightly inspired by the Unimog 400's sloped cab, but with added wings and a lower bumper. The idea for the tracks and arm actually came from the 2014 Lego technic arctic vehicle. The rear bumper is in a shape of a V in order to allow the bed to slide out and tilt. Interrior is detailed with seats, steering wheel and handles in prestige sand color. __________________________________________________________________________________________________________________________________________________________________________________________________ And as usual here's a short 3 minute video. (3 minutes is max time so you may pause some text) I hope you guys like the truck, I personaly think its a very retro-futuristic beefed up advanced half-track concept and in that sense something different and original. -
[MOC] Mercedes-Benz Actros 8x4 Tractor
shineyu posted a topic in LEGO Technic, Mindstorms, Model Team and Scale Modeling
Hello everyone, let me introduce my New Moc Mercedes-Benz Actros Tractor - Technic Figure 1:1, It has 1 XL motor for drive and 1 M motor, I have two mining machine but haven't transport tractor, Now I created a tractor for transport my mining machine, thanks for watching. Testing Tractor video: https://www.facebook.com/shineYucorner The official video: -
Mercedes-Benz G63 AMG 6x6 1:17
gsia17 posted a topic in LEGO Technic, Mindstorms, Model Team and Scale Modeling
Hi! The main in this car, is appearance, so there are not reduction gears on axles, primitive suspension etc. But now, work will be in technical direction. If you do not understand smth, ask me. I will try to give answers Sorry for my english Photos Thanks for watching! -
 So here is my contribution to the ever growing Mercedes Geländewagen MOC car park that's been popping up here lately! I've been wanting to build this ever since I got back into Technic about half a year ago, and Effermans brilliant small AWD chassis was pretty perfect, and finally made me realize the plan. This is my first MOC to prioritize form over function If memory serves me correctly, the "Multi Light" was originally a modified and chopped version of the already modified "Ultra Light" used by the Norwegian Army. The roof is gone, and an all around roll cage has been fitted instead. I think it was ordered by the Special Forces, to fit inside American Chinook helicopters. In addition, a more heavy duty ring mount was placed on top to accomodate heavier weapons (typically a .50 cal M2 machine gun or a 40mm Mk.19 or GMG), and it was stripped further down to reduce weight and increase performance. In essence, it is a platform to bring as much firepower in a small package as possible quickly around in rugged terrain. The particular model I've based my MOC on, was further developed and improved by Arctic Trucks of Iceland. They fitted a turbo, far better suspension and brakes as well as bigger wheels and various other improvements. Here is a promotional picture of the original vehicle: And here is my Lego interpretation of it: It is a truly great car, except when it's raining, as it doesn't have a roof nor windshield, and when people are shooting at you, as it doesn't really provide much protection. In the above picture you can see the reason for the roll cage being attached to the centre, rather than the right hand side: it allows the commander of the car to have a wider field of fire with his mounted LMG. The seats are not full due to the motors and transmission layout, but that doesn't really matter. I fit a working steering wheel, and the red 2L axles are supposed to be the firing buttons for the smoke grenade launchers. The winch is also very much form over function, but it does "work" A lot of old style connectors were used for the roll cage, as I didn't have enough of the newer fixed angle ones Oh yeah; neither battery box nor IR receiver were mounted when I shot the pictures. For the main weapon I opted for a 40mm automatic grenade launcher, loosely based on the Mk.19 and HK GMG. And no; the ring doesn't actually turn. I also made a sniper rifle in roughly the same scale as the car, (very loosely) based on the M82 anti material rifle I want to thank Efferman a whole lot for making the brilliant chassis and sharing it with us all! :thumbup:
 -

Sariel's Lego Mercedes-Benz 540K Special Roadster
DLuders posted a topic in LEGO Technic, Mindstorms, Model Team and Scale Modeling
Sariel (Paweł Kmieć) posted his BEAUTIFUL Lego Mercedes-Benz 540K Special Roadster on his website. It is a "Model of one of the most beautiful cars of the 30′s. Features drive, steering, working steering wheel and lights." "Datasheet: Completion date: 11/12/2012 Power: electric (8878 battery) Dimensions: length 54 studs / width 18 studs / height 16 studs Weight: 1.266 kg Suspension: none Propulsion: 2 x PF L motor geared 1:1 Motors: 1 x PF L, 1 x PF Servo"