Search the Community
Showing results for tags '42069'.
Found 14 results
-

[TC25] 42069 Extreme Adventure - 2/3 Scale
Zerobricks posted a topic in LEGO Technic, Mindstorms, Model Team and Scale Modeling
I chose this set, cause it's one of my favourite official sets, I really like the styling, functionality and details @grohl managed to cram into it. Started working on this idea yesterday in LDD, currently some 50% done, please note that not all colors are defined yet. It will feature all of the functions from the original 42069, here you can see the fake engine: And of course, the intricate door opening mechanism which I still have to test IRL: Still have to finish the tent-lifting mechnism, rear slide-out drawer and the rear doors. The only issue was with that I had to replace the purple with another color, so I chose Dark Azure, but other than that so far so good. -
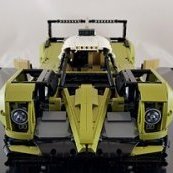
[MOC] RC Purple Pickup
Daniel-99 posted a topic in LEGO Technic, Mindstorms, Model Team and Scale Modeling
Hello everyone! Today I want to tell you about one of my latest MOCs. This model is build on the same chassis as my Jeep Wrangler. So it has a very close technical characteristics: Features: Universal chassis Live axle 4-link suspension 4 wheel drive 4x PF L-motors for propulsion (2 for each axle) PU L-motor for steering Ackerman steering geometry (not that essential for off-roader ) Buwizz 3.0 for power 1.4 kg of total mass, well-balanced >80% of parts are taken from 42069 set (except motors, new joints and few more pieces...) RC tires 90 mm I build this pickup for several reasons: I love pickups, especially Mitsubishi L200, this car has the best body, that tells about the speed and off-road capabilities of the car. I wanted to make a brother to my Jeep Wrangler. This will allow me to drive with my friend. I really like purple color from 42069 set I wanted to work on the chassis of Jeep Wrangler without disassembling it. RC tires has good proportions and give a lot of inspiration to me. For me the development of a car begins with the choice of its wheels. Beat any possible motorization of Ford Raptor (original chassis of raptor is only RWD and very weak for RC!) This car has modified chassis from Jeep Wrangler. I made several optimizations. You can compare it with chassis of RC cars - they have the same principles! Again this car has a good suspension with 9.5L shocks. While I was developing a body for a car I tried to hide wheels under the fenders. You can see on the pictures below that wheels can "hide" under fenders when suspension compress. Poor little 42069: The best thing about this car, is that it can drive really well! The playability is great! Here are several short videos with Purple Pickup: I want to make the instruction for this car as it was made for Jeep Wrangler. But it will take me quite some time, so be patient! -
[MOC] Mad Max's Peacemaker (C-model of 42069)
A Great Builder posted a topic in LEGO Technic, Mindstorms, Model Team and Scale Modeling
This is an alternative build (C-model) inspired by the Peacemaker from Mad Max's Fury Road (2015 film) The instructions are 2 PDF files. The first, includes the steps to build the chassis (this is a replica of the car tank built and used for the movie) The second PDF includes the instructions on how to complete the model by building the bodywork. I included a mount base for display. Model is functional with or without the bodywork. I made an effort to make as realistic as possible and therefore the model is manual. i will upload versions of this using Power Functions and Control +, But I am working on other models for now. Instructions available at Rebrickable: https://rebrickable.com/mocs/MOC-67431/A_Great_Builder/peacemaker-42069-c-model/#details Functions are: Full tracked independent suspension Central V8 engine Double differential steering "Hand of God" Turret (turns with engine's torque) Manual axle (to manually add torque to the system) Mount display Detachable bodywork PD. I made a YouTube video but it was one of my first videos ever and it's not as dynamic as my most recent video. Eventually I will create a shorter video once I have the motorized versions. -
[MOC] Kona Bike (42069 Alternative Build with instructions)
Isaac Yaw posted a topic in LEGO Technic, Mindstorms, Model Team and Scale Modeling
Video: Instructions: Instructions https://rebrickable.com/mocs/MOC-84891/Isaac Yaw/kona-bike-42069-c-modelalternative-build/#details Features: 1) Full Suspensions (front and rear suspensions just like the real/actual bike) 2) Realistic steering 3) Height adjustable seat 4) Kickstand to support the bike 5) Working pedals and chain Fully replicated from the original bike This build/MOC is a fully alternative build from the available Lego Technic 42069 set. The limited parts type in this set made it very difficult to construct a build because the set only comes with tracks and no wheels. Therefore, it is almost impossible to build trucks, cars, and etc. which need wheels. The track pieces available in this set were used to make 2 huge wheels to build this bike. -

[REVIEW] 42069 - Extreme Adventure
Jim posted a topic in LEGO Technic, Mindstorms, Model Team and Scale Modeling
REVIEW - 42069 - EXTREME ADVENTURE INTRODUCTION It's time for yet another review. This review will handle the second most expensive set of the 2H 2017 wave, the 42069 - Extreme Adventure. It represents a Land Rover like vehicle with a modified undercarriage. This vehicle has link treads instead of wheels. I am not the biggest fan of link treads, unless the vehicle is full RC. This is because treads limit the playability, especially on smooth surfaces. This is actually the first Technic set with rubber inserts, so I am eager to find out if they will improve playability. I couldn't help but think how this model would look with wheels on it. At the end of this review I will be attaching several different types of wheels, so you can check out for yourself. PICTURES Pictures can be clicked to view hi-res versions. More pictures can be found in my Flickr album. DISCLAIMER This set has been provided by the CEE Team of TLG. It's not my goal to promote this set. It's my goal to give you an honest opinion about it. Therefore the opinion in this review is my own and is in no way linked to TLG. SET INFORMATION Number: 42069 Title: Extreme Adventure Theme: Technic Released: 2017 Part Count: 2382 Box Weight: 2,79 kg (approx) Box Dimensions: 58,0 cm x 37,4 cm x 9,8 Set Price (MSRP): € 139 Price per Part: € 0,058 Price per kilo: € 49,8 Links: Brickset, Bricklink THE BOX The box is as wide as the box of this year's flagship (42070 - 6x6 All Terrain Tow Truck). Since it is less deep and high it doesn't look a lot smaller. You can't judge a book by its cover and sometimes you can't judge a set by the box! This set contains 520 more parts than the 42070 (2382 versus 1862). The part count obviously isn't the most important factor, but it doesn't happen often that a non-flaghip set has the most parts. The snow does a good job of making the model stand out. BACKSIDE There is barely enough space to show all the functions of the main model. The B-model looks more like a Research Exploration Vehicle than the one used in the 42070. It is called Mobile Base Vehicle though. The base seems to be detachable and it even packs a crane. It does help when the designer of the main model is one of the best B-model designers CONTENTS OF THE BOX The box contains: 1 Book and Sticker Sheet (packed together) 20 Bags (unnumbered) BOOK AND STICKERS THE BAGS No loose parts, just 20 unnumbered bags. HIGHLIGHTED PARTS PURPLE PARTS A modest collection of new purple parts. We already got some 3x13 Curved Panels in the 42048 - Go Kart in 2016 and now we can work with the parts below as well. Hopefully TLG will release sets with the bigger panels in purple, so we can all start building a purple Porsche SILVER RIMS Eight Wheel 18mm D. x 14mm with Pin Hole, Fake Bolts and Shallow Spokes in metallic silver have been provided in this set. That is quite a few, considering the fact that they only have been released in two sets, where you got one and two of 'em respectively. Sorry for the unsharp picture btw. 6x3 PANEL IN DBG For the first time this panel has been released in dark bluish grey. 40 YEAR ANNIVERSARY BRICK This set also contains the 3L liftarm, also known as the 40 Year Anniversary brick. PERPENDICULAR 3L CONNECTOR WITH CENTER PIN HOLE It has been a while since we have seen this in yellow. As a matter of fact I only owned two of these from last year's (2016) Volvo EW160E. Always funny that some common parts are actually not so common at all. Glad to see these making another appearance, much like the red #3 connector. RUBBER TREAD LINK ATTACHMENT These attachments already appeared in two Nexo Knights sets and now they make their first appearance in a Technic set. You get 52 attachments. In the Factory Store in Legoland Germany you can buy bags with these attachments, where each bag contains 28 of 'em. This is how such a bag looks like. SUSPENSION Not a very special part, but I still wanted to highlight the fact that you get six shock absorbers, four soft ones and two hard ones. Two of the soft ones will be used to dampen the door opening mechanism. ROPE This set contains a new rope. It has kind of a metallic touch to it. It is slightly thicker than the regular rope. Thumbs up for this new version. It looks and feels a lot better. (ctrl+c, ctrl+v from the 42070, which contains the same rope) 11L AXLE LBG Seemingly ordinary, so I almost forgot to shoot a picture of it, but this set introduces the 11L Axles in light bluish grey. Also found in this year's 10257 Carousel and 75172 Y-Wing Starfighter. Strange enough TLG introduced the 11L Axle in yellow first. DARK GREEN JUMPER PLATE Also a quite common part, but released in a new color, a dark green 1x2 Jumper Plate. PART LIST This set contains 2382 parts, spread out over two pages. THE BUILD Time to get building! This set contains 10 u-joints and in case you are wondering where they are going?! You already need four of 'em early on, in the middle of the chassis. After some additional building steps, you will be attaching the V8 engine to the chassis. It's very cool that this model has V8 engine, instead of a V6. Or even worse...a 4 cylinder engine. Thumbs up. You can also see the first few purple parts invading the model. As opposed to All Terrain Tow Trucks, we actually do find a winch at the front of this vehicle. How on earth would you go on an Extreme Adventure without a winch?! It has a cool lock which is made, using a simple Rubber Double Axle Connector. It has enough leeway to unlock the winch and it bounces back into place upon release. A very simple, yet very effective mechanism. The front of the vehicle shows the initials MR, which stands for Milan Reindl. Milan is one of the members who made the switch from Eurobricks to TLG, so it feels extra special to be reviewing one of his sets. I sure hope that Milan isn't in charge of designing the stickers though, because there are quite a few MR stickers on this model Here you can see the start of the door opening mechanism. The rotating axles will be connected to springs, to provide some cool damping when opening the doors. The axles are connected to the soft springs. This results in the need to apply some pressure when opening the doors, but when you have passed a certain point, the doors will ease out. Yet another thumbs up for this mechanism. Have we lost count of the thumbs up already?! Another cool feature is the roof that can be tilted up and down. It is operated by the mini Linear Actuator, connected to the liftarms. I will show the entire mechanism in a bit. Several steps further the doors have been attached and you have created the rear side compartments. This model has a ton of cool little details... ...which you see in the image below. Both side compartments contain a fire extinguisher and one the compartments even contains a medkit with a syringe. Adding these kind of "LEGO Sytem details" really add appeal and playability to the model. I will elaborate on that in the Features and Functions chapter. Here's is view from the other side, where you can also see the fire extinguisher. The following two pictures show the two states of the folding tent. I especially like the white color of the panel to emphasize that this is a different material. Another thing I really like about the tent is that it actually looks like a tent, even though it's just a simple panel. I am not really sure you would want to sleep in the vehicle with arctic temperatures though, but that's a totally different discussion The compartment under the tent holds a shovel, so you can dig in the snow or maybe even dig a hole in the ice to catch yourself some fish. You can also see the door lock which prevents the door from opening while you are driving. At this point we are almost done with the bodywork, except for the roof rack and the bonnet. Now it's time to build the undercarriage. The rear axle doesn't have a rack for steering, but it does have a differential. The front axle does have rack-and-pinion steering. Both axles are live axles, so they don't have independent suspension. At this point the bottom of the chassis looks like this. Two axles going to the front of the vehicle, one for steering and one for driving. One axle going to the rear of the vehicle, which is obviously for driving. There's no center differential in this vehicle, but it is 4x4...or 4WD...or AWD. There are subtle differences, and there will be discussion by the purists, but most of the time it boils down to marketing mumbo jumbo. For the average Technic enthusiast this is considered a 4x4. Voila, undecarriage complete. Live axles attached and we can hit the snow!! Let's not be hasty and get ourselves a proper bonnet and a roof rack first. Maybe we can throw in some jerrycans while we're at it. That's more like it. The roof rack has three different type of jerrycans, so be careful mixing them up. You don't want to be drinking fuel and driving on water (unless it's hydrogen powered). Luckily the cans have been color coded for our convenience. The roof rack even holds a couple of spare link treads, in case we ruin some of them. If you do actually need them, you must have had a pretty rough (and enjoyable) ride. The first time I laid eyes on this vehicle, my intial response was "yuck, what is that supposed to be. And what's with the color scheme?!". This was obviously after seeing some preliminary images. When the images from the toy fair popped-up things had changed for the better. And when looking at the following image, you can only say...WOW! I know some people aren't too fond of the black and purple color scheme. They think it's too dark, and while they might be right about it being dark, I personally think TLG nailed the color scheme. There's that typical Ken Block Monster vibe going on. FINISHED MODEL Unlike the All Terrain Tow Truck this model actually is a finished vehicle! The level of detail is extraordinary. There's so much to look at and to play with. Of course there will always be debate about purple and/or the color scheme, but I really love this purple color. Hopefully we will get more panels, liftarms and connectors, so the AFOLs can make better use of this color when building their own creations. The 3L printed liftarm is prominently placed in the front bumper, near the winch. Here you can see that Milan takes pride in his work...MR stickers all over the place. Narcissistic personality disorder maybe?! Just kidding of course. Milan is a great guy. Recently I had the pleasure of talking to him for a couple of hours and I am sure he will stay as friendly as he is now, even though his LEGO star seems to be rising! Enough with the praise, because this picture also shows a minor concern. The weight of the vehicle results in the treads slightly bending. It's not a very big problem, but it is noticeable. The rear of the vehicle, with the quadruple metallic silver exhausts, has been designed as beautiful as the rest of the vehicle. I do like the use of the yellow connectors and half bushes to add some yellow details. Yellow and purple make a nice color combination. Orange and purple works nicely on the Go Kart, but yellow and purple works even better. The tread wheel on the rear door provides a lock to prevent it from being opened. You have to turn the wheel before you can open the door. The side view shows the fake dampers in the suspension. All these cool details add value to this outstanding model. For the chassis lovers Milan didn't take the easy way out when creating the chairs. These aren't simple panels, but actual chairs. And last but not least....the icing on the cake....the jerrycans! 360 DEGREES VIEWER Back by popular demand, the 360 degree viewer! Okay...nobody actually asked, but I will throw it in anyway Swipe the picture to rotate the model. NOTE! In some browsers or in some cases the 360 degree viewer doesn't seem to work. I have yet to figure out why. Sorry for the inconvenience. FEATURES AND FUNCTIONS This set contains so many cool features that I don't even know where to start. ACKERMAN STEERING GEOMETRY This vehicle has HoG (Hand of God) steering. It works okay, but the vehicle is a bit too heavy to operate the steering when you are not driving. Other than that; the gear easily comes off. On the bright side; this model uses Ackermann steering geometry, which is something we hardly see in Technic sets anymore. 4x4 Four wheel drive has been realised with a differential in both axles, without a center differential. SUSPENSION The suspension is comprised of two live axles, which is done nicely. There's no independent suspension. WINCH Missing on the 42070, but present on this vehicle is the winch. Works like a charm and has a cool locking mechanism. The winch is operating by turning the 12T gear on the shotgun side of the vehicle. FOLDABLE ROOF/TENT By turning the gear on the driver's side of the vehicle, the roof can be lifted and the tent will pop-out. OPENING BONNET The bonnet can be opened manually, nothing out of the ordinary. OPENING DOORS What is out of the ordinary though, is the mechanism for opening the doors. Using a spring for each door, there's damping when you open and close the door. The door opens by moving the upper side up and the lower side down. This is a unique mechanism which we have never seen before and which will be hard to trump. OPENING REAR DOOR The rear door can be opened manually, by pulling the tread wheel. REAR DOOR LOCK The rear door has a lock to prevent it from being opened. You need to turn the tread wheel to unlock the door. OPENING SIDE COMPARTMENTS Both side compartments can be opening manually. SLIDING REAR COMPARTMENT The rear compartment slides out and contains a shovel. There's a mechanism in place to prevent the compartment from falling out of the vehicle. ADDED EXTRA DETAILS Something I like to emphasise is the added extra details, like the jerrycans, medkit and fire extinguishers. Not only do they look cool, but they actually add playability to the set. I highly recommend that TLG designers do this more often. Here is a video demonstrating the functions: PLAYABILITY I like to go into more detail about the playability of this set. One of the reasons this review has taken some more time is that I had my nephews visiting for a couple of days. They are aged 4 and 6, so they like to be entertained. And they brought a 7 year old friend LEGO-lover and his 4 year old sister. This is my chance to be the cool uncle. And a cool uncle has cool LEGO! This gave me a perfect opportunity to see how kids enjoy Technic models. They are too young to be building these models, although the 7 year old would probably be up for the job. Anyway, they all started with "WOWs" when I brought the sets downstairs. They have seen big Nexo Knight sets, but never any big Technic sets. Score one for the cool uncle. They definitely like RC vehicles, but they tend to operate the functions manually....at least they try to. After some time they asked for paper towels to make artificial snow and they were actually playing with the Extreme Adventure vehicle. It is so cool that this set includes new Technic figures, because the kids love to add them to the mix. Ohh, wait a minute....those were my 30-odd year old Technic figures. Come on TLG, bring back these guys. Kids really don't matter that they don't have the proper scale. Just sell them as a separate set if you are concerned about that, but how cool would it have been to include a Technic figure in this set. I can see the guy carrying the jerrycans, using the fire extinguisher, etc. You have done an outstanding job adding details, now go another extra mile and design some cool new Technic figures. I am not a big fan of models with link tread, except for RC ones (8043 is probably still me favorite model). The reason is that they tend to lack playability, especially on smooth surfaces. The slide over the surface, instead of driving. This bothers me. Luckily, this set contains the new rubber attachments, to make up for that. Obviously the total amount of grip depends on the number of attachments. You can add two to each tread, one on each tread, etc. This set doesn't have one on each tread, so it still slides over smooth surfaces. The weight of the vehicle does help though. I was surprised to see the kids drive the vehicle through the entire living room and kitchen. Apparently there is enough drivability in this vehicle, more than I expected. Fun fact is that the mother of the 7 year old and his 4 year old sister was picking them both up, so she was also looking at the models. She loved the purple look and figured it must have been used to appeal to girls as well. I am pretty sure this is not the case, but it shows what goes in the mind of potential customers. The 4 year old girl loved the Extreme Adventure, she couldn't stop playing with it. Technic Mini-dolls anyone?! All in all we had great fun and it was interesting to see these kids playing with both models (hadn't built the 42068 yet). The All Terrain Tow Truck required alternating turns, but the Extreme Adventure offered the possibility to play simultaneously. They liked both models, but they all prefered the 42069. And I did get the impression that having the jerrycans and the other playable extra's did the trick. I highly recommend TLG to motivate the designers to do this more often. B-MODEL The Mobile Base Vehicle looks interesting enough to give it a go. I am tempted to buy an extra set so I keep the main model built as well. The vehicle has a base which can be deployed. The base can open and close, and it even packs a crane. SUMMARY This set absolutely takes the cake. I was a bit hesitant about the playability with the treads, but my test team has proven me wrong. When you hear kids asking if they can play with the set again, you know you did a good job as a designer...and me as the cool uncle An impressive list of functions and features: Ackermann steering geometry 4x4 Suspension using live axles Winch Foldable roof/tent Opening bonnet Coolest door opening mechanism ever Opening rear door Rear door lock Opening side compartments Sliding rear compartment Added LEGO System details (jerrycans, medkit, fire extinguisher) I am starting to like the vibrant colors more and more after each build. Black and purple work really well together. Besides the color scheme, the design of the model is outstanding. From the well formed chairs to the jerrycans, the details are amazing. Even @Kitty (my partner) is very enthusiastic about this set and she is not into Technic at all. I am not allowed to put the wheels back on after switching back to the treads. Even though this model doesn't contain as much gears as the flagship, this still was a very enjoyable build. The cool mechanisms definitely make up for the lack of gears. Technically it's a very sound build as well. This set offers outstanding playability and at a total price of € 139 (5,8 cent per part ) you just can't go wrong with this set. We've lost a lot of good men out there! Milan Reindl a.k.a. grohl was one them. I feel sorry we lost him from our community, but I am very happy that he started working for TLG. As a wise man once said: "the needs of the many outweigh the needs of the few". I really liked his Heavy Lift Helicopter and the Extreme Adventure is definitely a winner too. Please, do bring back the Technic figures SCORE How do I rate this set? 9 DESIGN Absolute eye-catcher. 9 BUILDING EXPERIENCE Lots of cool techniques used. 9 FEATURES Long list of cool features. 9 PLAYABILITY Playability proved to be endless. Treads do somewhat limit drivability. 8 PARTS Nice collection of parts, albeit mostly common parts. Does have a unique purple selection. 10 VALUE FOR MONEY Can't go wrong for 5,8 cent per part. 9,0 ANOTHER HIT BY MILAN EXTREME ADVENTURE ON WHEELS As promised I have added a bonus section to this review, showing you different wheeled setups. This is how the front and rear axle look like. It took some time to come up with a proper solution. I am pretty sure there will be better solutions, but this one does use four Technic 5.5L Axle with Stop, in order to prevent the wheel from falling off. I started with a different setup just to shoot the wheels, but since I had me nephews around, I needed a more "kid-proof" setup. I haven't had any problems with the setup below. As you can see I have also changed the antenna setup. They kept falling off, so I ran them through the connectors. The front and rear axle setup. The next pictures still use the old setup where I used yellow axles. POWER PULLER TIRES AND RIMS Technically these are the 8466 - 4x4 Off-Roader wheels, but people like to call them Power Puller wheels. These wheels do touch the chassis when steering. TUMBLER TIRES AND BLACK RIMS Batman just isn't up for this job. 4x4 CRAWLER TIRES AND BLACK RIMS These look okay, although we might need to try yellow rims. CLAAS TIRES AND RED RIMS Somehow red does look okay, but we would need some more red details in the car itself. These wheels do touch the chassis when steering. CLAAS TIRES AND YELLOW RIMS A little bit too much, don't you think. These wheels do touch the chassis when steering. With hub caps. I cheated a bit here UNIMOG TIRES AND SILVER RIMS I do like the Unimog tires for this vehicle. UNIMOG TIRES AND YELLOW RIMS Now this is what I'm talking about. I really do like this setup. Big wheels and yellow rims, but not exaggerated. With minor details (pulleys) in the rims. BACK TO TREADS Although I absolutely love some of the setups, I have come to the conclusion that this model is better with treads. Maybe not for playability, but they make this a unique set, instead of yet another 4x4. Thanks you for reading this review. All pictures can be found here. -
42069 - Extreme Adventure - MODs and Improvements
Imanol BB posted a topic in LEGO Technic, Mindstorms, Model Team and Scale Modeling
Hello everyone, as i didn't see any Mods topic for this set, i decided to start it myself, and to start, i would like to share with you the LDD file for the official set (not sure if there was one already), there are some parts missing and some pieces are not fully connected (could i have used developer mode to solve this? yes, but for some reason i decided just to place apart the pieces i couldn't fit in), here is the model: Missing parts: -x4 24118 Panels in Dark Purple (Brick-built and grouped in the model) -x11 6167281 (I didn't add any substitute) -x1 6187734 (The rope) LDD file:http://bricksafe.com/files/imanol/42069/42069.lxf And next is my modifications for this set so far, the first thing that i wanted to do was to put wheels and tires, and because this is an snow-themed set, i decided to put tumbler tires, and i knew that these tires didn't look good in those very wide axles, with these tires the vehicle would look silly, but after narrowing the axle a little bit, i think it is looking like an authentic snow expedition vehicle (it even looks like an JLTV from the sides), i also changed some colors, but is just a test (the model is still WIP): The goal is XL-Motor for drive, Servo Motor for steering and M or L-Motor for the winch (and possibly some lights): I hope you like it, i will try to make more improvements, and i am looking forward to see more modifications by any other member, have happy modding. -

42069 RC mod with advanced lighting
Oupin88 posted a topic in LEGO Technic, Mindstorms, Model Team and Scale Modeling
Hello! The 42069 was the first set I’ve bought for about 15 years, and despite my initial intention to play with it together with my 4-year-old son, I soon got into modding it quite heavily, and he went back to his City and 42023. :) So here’s what I’ve done to it so far. ADDED COMPONENTS List of motors and electronic components added to the model: 4x PF L motors 1x PF XL motor 2x PF M motors 2x PF Servo motors 1x PF switch 24x Brickstuff LEDs 2x BuWizz 1x sBrick some PF & Brickstuff wires DRIVE The drivetrain/axle design is mostly RacingBrick’s design with 4x PF L motors (one for each track/wheel connected directly) and a Servo for steering, with some cosmetic changes to avoid self-disassembly of the suspension on rough terrain. ORIGINAL FUNCTIONS Both side compartments now house BuWizz units, the walls separating them from the middle section have been removed, and the space itself no longer exists, taken by a single sBrick and quite a lot of wires (more about the setup later). The fire extinguishers now sit right next to the seats, ready to use. The shovel drawer remained in place and functional, now also containing the first-aid kit. Pretty much all of the truck’s functions have been motorised, similarly to RacingBrick’s version. I left the rising door mechanism unchanged, I think it’s really cool as it is. WINCH The winch mechanism has been completely ripped out and rebuilt. To provide greater momentum, I used the more powerful XL motor, which I installed right behind and below the front bumper. The first version of the winch was geared 1:1 using three consecutive 32072 knob wheels for extra durability over standard gears, but since they kept getting stuck, I replaced them with regular 16 tooth gears. I considered an alternative setup involving a worm screw, but I wanted to maintain decent speed of the winch. The whole mechanism fitted inside the original bumper design which I modified later (it looked a bit thin to me), so if you like the big motor but not the puffed up front bumper, you should still be able to employ it. Since I didn’t use a clutch gear (which would have ruined the performance), to protect the XL motor from being turned on accidentally a safety-valve was installed in the form of a PF switch, activated with a turn of the gear/knob originally used for the winch. The original tiny hook has been replaced with the 70644 metal hook for extra durability. Alternatively, I sometimes attach the 95354 anchor - it looks a bit freaky, but so does the whole model, and it’s the best solution for hooking the winch up. OTHER There are also two PF M motors: one powering the fake V8 engine, geared up 5:3, and the other one raising the roof. LIGHTING I put a lot of work into the light system of the model with the use of Brickstuff LEDs. Without the additional lights on the interchangeable roof racks the lighting comprises of 24 LEDs: two for each of the main headlights, one for each bullbar light, six blinking turn signals (including one light on each of the wing mirrors), two lights on the original roof rack below the antennae, two taillights (white LEDs under trans-red tiles), four stop lights (similar as taillights next to the reverse lights plus red LEDs under trans-clear round tiles on the trunk door) and two reverse lights. The LEDs are powered from one of the BuWizz outputs via a Brickstuff PF power source with variable outputs. This certain piece deserves a few more words, especially for the readers unfamiliar with Brickstuff. One of its three outputs is always on (thus, all LEDs except for the turn signals, stop lights and reverse lights light up the moment BuWizz connects with the controlling device) and the other two outputs depend on the PF channel activation; in this case the BuWizz output for the lights is synchronised with the steering Servo, resulting in lighting up the corresponding blinkers. Lastly, the stop and reverse lights system involves another Brickstuff gimmick: magnetic switches. The circuit is closed when a small magnet (which fits inside a Technic axle hole) approaches the switch. I put the magnet inside a 1x2 thin liftarm, connected to a Servo, controlled in sync with the track motors. When the Servo is in neutral (with the model stationary), the magnet closes the circuit powering the stop lights. In reverse it approaches another switch, closing the reverse lights circuit, and in forward position it opens both circuits, cutting out the LEDs. (I know it’s a bit much to add a heavy motor just to control some lights, but I couldn’t think of a better solution - any ideas?) An extra bit of lighting comes in the form of two interchangeable roof racks, installed roughly in the location of the original HOG steering knob. I was curious about Brickstuff High-Power LEDs, so I put two of them behind some trans-clear 24116 curved panels and on the roof. The other version of the roof rack includes four regular LEDs similar to those put on the bullbar. The lights are connected to the main grid through Brickstuff vertical connector, which eliminates the need of connecting and disconnecting the fragile wires with every change of the racks or their complete removal. Since the complex lighting system tends to consume a considerable amount of BuWizz’s battery juice, I used another vertical connector to put together an additional master switch, disguised as a red toolbox and located between the dark green jerrycans on the roof rack. BRIDGING LADDERS The last modification, or rather some additional equipment is a pair of bridging ladders, which can be folded and stored on the original roof rack. Fully extended, they’re 49 studs long each (just a bit longer than the truck itself) and, although a bit flimsy, manage to support the weight of the model while crossing gaps or climbing obstacles. There’s also a removable, extendable ladder added to the rear door. CONTROLS As for the double BuWizz-sBrick setup and controlling the model: the BuWizz unit in the right side compartment powers both right L motors, the steering Servo and the winch, and the left unit powers the left L motors, the fake V8 and the sBrick. The raising roof, the LEDs and the Servo controlling the stop and reverse lights are all powered through the sBrick. That leaves one last sBrick output free for some other uses, i.e. motorising the doors. The whole setup is controlled through BrickController2 with the use of a physical controller (a bluetooth gamepad). The app works great with virtually no lag and allows for quick profile changes; I created two profiles: one for regular driving and one for tank driving. Obviously, all the extra elements made the model quite heavy - it now weighs 2700 grams on tracks and 2575 grams on Unimog wheels. However, 2x BuWizz units manage the weight rather effortlessly, especially in Ludicrous mode. OVERALL LOOK Having modified an already sticker-heavy model, I decided to go a little bit further and add some BuWizz & sBrick stickers and Brickstuff printed tiles (three of those came as bonus with consecutive shipments from Brickstuff). The front of the model now looks a bit bulkier with the new bumper, and the addition of the bridging ladders to the roof rack gave it an even more adventure-ready look. I replaced the 2654 trans-clear round tiles on the bull bar and roof rack lights with a trans-yellow variant - I like the look of yellow headlights on vintage race cars. Additionally, the 3069b trans-clear 1x2 tiles on wing mirrors have been replaced with trans-orange ones, because of their newly acquired function of blinkers. Ling to the gallery: https://drive.google.com/open?id=1jUqAZh1uowBBGpubQmRs6vS1ASuVkIBU -
10.000 Subsribers special - Mashup
Zerobricks posted a topic in LEGO Technic, Mindstorms, Model Team and Scale Modeling
First if all I totally forgot to post this model here on the forum, guess better late than never Now to explain a bit about the motives behind this model before I go into specific details. Counter on my youtube channel was nearing 10.000 so I wanted to make something trully special. I was not sure what kind of a model I want to make, a sportscar, offroader, construction machine, so the decision came to MAKE ALL AT ONCE. The model would also incoporate ideas from the last decade of Lego technic product to go along with my 10 years on youtube. Starting with the design, the front end is heavily inspired by 42083 and 41999. Notice the front wheels are from 42056. The first motorized function is adjustable front suspension inspired by 8297: The front end can raise by 3 centiemetrs to allow the model to negotiate rough terrain. Continuing towards the cab, which was inspired by 41999, we can pop up the hood to find a green colored 10 cylinder engine inspred by 42030: Cab doors are inspired by the doors from 42069, which open at the angle. Opening the doors you can find a full interrior with two adjustable seats andworking steering wheel: In the center of the cab there is a gearbox which movel lineary to switch between 3+R gears using a special mechanism. This emchanisem translates the sliding action into usable inputs for the gearbox: Going further back, there is a section holding the battery box and, orange lever and utensils on the left side. I will explain the function of the orange lever later. On the opposite, right side there are 2 M motors powering all the motorized functions. Notice the mysterious red lever which is used for switching motorized functions. Notice the pump used to power the pneumatic functions. There are also two electric switches to reverse the two driving M motors. If we continue towards the back, we can see there is a pair of linear actuators used to manipulate the container. The red lever switches power from one of the M motor between the adjustable front suspension and linear actuators. But not only can the linear actuators tilt the container, but they can also pick up and load the entire thing. To switch between tilting or picking up, the orange lever is used to lock the individual segments of the lifting arm. This function is inspired by 8052. The arm can reach out and pick up the container with ease: If we continue and look at the photo of the back side you may notice a PTO output along with a strange mechanism with rubber bands: Same motor that powers adjustable front suspension, linear actuators also powers the PTO output via 24 tooth clutch gear. Notice that the PTO output uses a CV joint in order to slide the axles into it without friction. The rubber band mechanism is used to hold the rear attachment. This was inspired by 8110 and 42054. Here is a sum up the functions of the model so far: 1. Motorized functions Adjustable font suspension Tilting of the container Picking up and lifting of the container Pneumatic compressor and storage provided by two air tanks powered rear PTO 2. Manual functions: 10 cylinder engine powered via rear wheels through a 3+R gearbox 3+R gearbox Steering controlled by steering wheels inside the cab AND the light on the right side of the roof Openable doors Openable hood Adjutstable seats Independent front suspension Solid live axle assembly in the rear - inspired by 42043 Features: Both front axles are at a positive cats angle, allwing the fat Porsche wheels to self-center Due to the immense weight, each rear solid axle is supported by 4 yellow very hard springs The 3+R gearbox is derived from my diagonal gearbox featured in the Dominator TRS Due to its framed design the gearbox provides a very rigid backbone to the model A 5 tubed exhaust seemed appropriate for the 10 cylinder engine I hope this photo helps you understand all the functions and features a bit better. Each color of the model's chassis represents a different module. Next we will look at the rear attachment built for this model. The attachment is multifunctional, combining linear actuators, pneumatics and 4-way switchbox to actuate all the functions: In total the attachemnt features following functions powered by a PTO via 4-way switchbox: Extension of the control arms via small actuators and a lever mechanism Lowering of the control arms via large actuators - inspried by 42009 Rotation of the arm Spooling up a winch which allows the arm to be used as a crane arm - inspired by 8258 Additionally there are 4 pneumatic function powered by the compressor and air stored in the two pneumatic tanks on the truck itself: Raising of the primary arm joint Raising of the secondary arm joint Tilting of the showel - inspired by 8043 Closure of the blue pneumatic claws - inspired by 8110 Some intersting facts about this attachment module: All of the penumatic functions + rope of the winch pass through the turntable. Rotation of the turntable is limited to some 350 degrees to avoid all those tubes and rope tangling up The structure of the arm with diagonal arms is inspired by crane arms Frictionless 8 tooth gears allow the white 16L axles to slide with ease while powering the two large actuators used for support legs The 4-way switchbox is one of my most complex and sense assemblies and it took me 2 days to design with support of LDD. Winch uses a friction pin to keep the rope from unloading when the winch function is off. The blue claw uses rubber bricks for better grip Combining the main model with the atatchment resluts in a model which weighs around 5 kilograms and is over a meter long! Some facts about the design, and build of the model: The whole model took me over 2 months to design and built, biggest challenging being the gearbox, container arm and rear attachment switchbox. A lot of care was placed into keeping all the functions working reliably with a limited power source (M motor) and safely with no gears skipping or breaking. The model uses around 16 universal and 3 CV joints to transfer the power to the suspension lifting mechanism, PTO, both steering sytsems and drive axles. Each rear axle is capable of supporting the whole model's weight, the weak point are the Power Puller tyres which sag quite a lot, especially on the third axle. Thanks to it's stiff gearbox, this model has one of the stiffest central frames I ever built allowing the model to be easily picked up by diagonal front and rear wheel without excessive flex. Gas canisters and first aid from 42069 are featured on this model The hood ornament is a bunny from a Lego Friends set This is my first model to use the white pneumatic air tanks for it's intended purpose. The model is covered with glow in the dark parts close to its edges, so its visible at night - useful when you are wandering around your building area at night A photo of the mashup's total of 8 glow in the dark bionicle claw/eye pieces: You can see the model in action in the following feature video: Finally I would like to thank you for reading through this massive post and for helping me reach 10.000 subscribers. -
I just started getting into Technic and I'm starting to buy sets both for parts and to learn some techniques. I already have the Arocs, Heavy Lift Helicopter and BMW bike, and I'm looking to buy another. I've decided on either 42054 or 42069, both of which I've found for about €105. In your opinion, which would be the better buy for me?
-
Hi everyone! I would like to show you my C model of 42069. It's a helicopter with many features. I'll make more photos as soon as possible and put them on Flickr. https://www.facebook.com/groups/LEGO.Technic/permalink/1941079909297366/ - On this link is a video showing how features work. Hope you enjoy it! I will try to mke instructions soon EDIT: Video of functions here: https://www.youtube.com/watch?v=zJK0dIs16KM&feature=youtu.be
-

[VIDEO REVIEW] 42069-B: Mobile based vehicle
Sariel posted a topic in LEGO Technic, Mindstorms, Model Team and Scale Modeling
As could be expected, the 42069's B-model is way more interesting than the 42070's one, even if it's not too pretty: -
[VIDEO REVIEW] 42069: Extreme Adventure
Sariel posted a topic in LEGO Technic, Mindstorms, Model Team and Scale Modeling
I'm happy to report that this thing is a delightful change from the awful 42070, especially in terms of suspension and details. It's like these two sets were designed on separate planets. -

Lego Technic 42067
Chase Rosipayla posted a topic in LEGO Technic, Mindstorms, Model Team and Scale Modeling
Hello everyone, I have started this form today because i could not find one anywhere else on Eurobricks. So, this is the place for anyone to discuss the mysterious Lego technic set 42067... To start this off i would like to re-point out something Jim pointed out about the 42070 in his review. he mentioned that the lower corners of the front that say TOW 067. Hmm very suspicious... Chase -
This form has been moved.