Search the Community
Showing results for tags 'TANK'.
Found 237 results
-

[GBW] - Troop movement - Erotema – Crossing enemy lines
sigpro posted a topic in The Great Brick War
GRID E4 STUDICA – GRID Q6 GENERAL MAP (APPROX) After the successful offensive movements of the COAC, it was time to seize enemy territory. This is a territory divided by a river. Erotema is on the left and Briolui on the right. Not a very wide and deep river, but enough to difficult the crossing without special means. A lonely combatant is searching the area, with his .50 sniper rifle. He doesn´t seem to wear the standard Briolui uniform. Maybe a mercenary? A member of a local militia? Who knows… 1 by green helmet spanish AFOL, en Flickr 2 by green helmet spanish AFOL, en Flickr A few minutes later, an EROTEMA MRAPv (Mine-resistant, ambush protected vehicle) arrives at the area. They are inspecting the border. 3 by green helmet spanish AFOL, en Flickr 3 1 by green helmet spanish AFOL, en Flickr 3 2 by green helmet spanish AFOL, en Flickr This vehicle features a quad 7.62 mm machine gun to provide support and self-defense, however other versions can carry a mortar, a TOW missile… Suddenly, the MRAP crew spot the sniper, who opens fire against them, so they have to do something... -Sierra 1, we are under sniper fire, we return fire, we return fire. 4 by green helmet spanish AFOL, en Flickr And the machine guns take no time in silencing the enemy. 5 by green helmet spanish AFOL, en Flickr After this small skirmish, the 2 members of the crew decide to inspect the river… 6 by green helmet spanish AFOL, en Flickr -We need the bridge layer tank, call the HQ. Call for an EOD team and the HUMINT cell, we need to get info from that fighter´s gear but there may be bobby traps or IEDs; however we will have to identify him and take his body for a proper burial. -Yes, Sir. They left the area and a few minutes later a bridge layer tank arrived. As many other armoured vehicles in Erotema, it shares the same hull than the previously seen SPH and AAA tank. 7 by green helmet spanish AFOL, en Flickr 7 1 by green helmet spanish AFOL, en Flickr 7 2 by green helmet spanish AFOL, en Flickr This model can save obstacles up to 14 metres long (approx). A future version will have a longer bridge (the real Leguan tank can save obstacles up to 24 m). The first thing the tank must do is lower the front support. 8 by green helmet spanish AFOL, en Flickr And after a short time the bridge is laid. The advantage of this sliding bridge is that it is difficult to be seen from longer distances, as the overall height is lower if we compare it with older bridge layer tanks. This model is inspired on the German Leguan bridge layer tank, in use in many European Armies. 9 by green helmet spanish AFOL, en Flickr 9 1 by green helmet spanish AFOL, en Flickr So the tanks can cross the river. Let´s slip the dogs of war!!! 10 by green helmet spanish AFOL, en Flickr Another member of the same-hull-family. The MBT has a 125-mm smooth bore gun, a coaxial 7.62 mm machine gun and a remotely operated 7.62 mm machine gun on the turret. 16 multipurpose grenade launchers (smoke or fragmentation grenades) complete the weapons array. As it has the engine in the front, it can be used as an APC. 11 by green helmet spanish AFOL, en Flickr 11 1 by green helmet spanish AFOL, en Flickr 11 2 by green helmet spanish AFOL, en Flickr 12 by green helmet spanish AFOL, en Flickr The bridge is left so other members of the COAC can enter Briolui with heavy vehicles. -

[IDEA] custom mini tracks
syclone posted a topic in LEGO Technic, Mindstorms, Model Team and Scale Modeling
Good day. Some time ago I made custom 5l wide tracks, this a slimmer version , being only at 3 studs wide . The concept is same , only done smaller . I also made a smaller driver gear . This was meant as an alterative to the weak small tracks TLG produces. I hope you will find this useful -
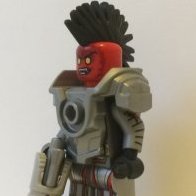
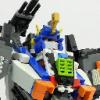
Receiving transmission: "Commandant. We have recovered the secret data from the archive. The data was highly encrypted but after our best hacker decrypted it, we found out that it had highly sophisticated mech frame plans. We carried out the XTS-620 experimental mech frame to the test range and it pretty much passed all the test in record timing. This is one of the most destructive mech we have ever built. We call it "Twins". This "Twins" mech is piloted by two pilots working in perfect harmony with eachother. The left side is mounted with a highly destructive gauss ion cannon. It has enough power to pierce our experimental "Cocoon" armor. The weapon is still not fully tested so do not go over 70% power or you risk destroying the arm completely. On the left side, we have a high pressurized pyromite launcher that has 3 times the range of our standard pyromite launchers. Also for melee combat, the left arm is mounted with a large plasmite claw. There is enough power to crush a class 5 titan head like an egg. The legs are equipped with experimental dampening systems that allow the mech to jump down without any damage to the actuators. This mech requires highly trained pilots that can sync up in perfect harmony. We have sent you this experimental mech for a field test on real action. Be cautious." -Mech build lab
-

[GBW] Supporting the war effort - Deland Republic - A new tank design
Tezclatipoca posted a topic in The Great Brick War
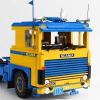
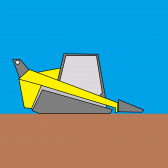
Supporting the war effort : A new Tank design Deland Republic, One of the new Armament Factories around Edrin, the Capital, Map Grid D7 - Here it is ! What a beauty ! Claimed the Chief Engineer Applestewssen - Sure, it is a superb mechanic ! Affirmed the Chief-Sergeant operator "Cat" Terpillar. - It is my proud ! I redesigned entirely the turret to add more comfort and manoeuvreability. It is now the top notch Assault Tank we can have in The Deland Republic ! Concluded Applestewssen when the armored vehicle emerged from the hangar of the factory in a Roar. More pictures of the tank alone in the spoiler : Thank you for watching ! C&Cs are welcome ! -
Receiving transmission: "Commandant. We have a solution to the invasion from the coast side. We would like you to try our latest weapon: the XT-G20. This combat walker is equipped with heavy lasers that will destroy the flying enemies with pinpoint accuracy. The lasers need a short time to ramp up but after charged, they can shoot down fliers from long distances. To keep swarming enemies on their toes, we added 8 long range missile pods to the shoulders that have flak tips. If however an enemy or two gets to land, we gave the XT-G20 arms that can punch or grasp into things. The XT-G20 is a heavy class mech with medium armor and it's only weakness is attacks from behind. It's however exceptional at long range anti air combat. Use your radar and locate the enemy fliers before they get too close. We have sent you 5 XT-G20's to help you in your next mission." -Mech build lab "Alright, let's see what this mech is made of. There is a large swarm headed our way." -Commandant
-
Receiving transmission: "Commandant. We have designed a new weapon for your command. May we introduce to you, the SW-K10. We nicknamed him.. "The Sasquatch". This combat walker is equipped with corrosive pyromite flamethrowers that will melt the armor from the outside and cook everything in the inside. This pyromite chemical will stick to any surface and continue to burn up to 5 hours on it's own. For ranged combat, we added some explosive tip medium range missiles to help you get closer to the enemies. We do not recommend to get up close and personal but as a last case scenario, we added some plasmite claws that heat up and help you claw trough heavier armor like it's paper. The SW-K10 is a medium class mech with high armor so it's only weakness is the slow movement speed. But the armor should make you durable enough to withstand long ranged weaponry for a short duration. Use terrain as your advantage and get to medium or short range to wreak havoc to the enemies. We have sent you 10 SW-K10's to aid you in your next mission." -Mech build lab "Ten SW-K10's deployed. Let's turn up the heat and roast some aliens." -Commandant
-
[WIP] Little Tank
Aventador2004 posted a topic in LEGO Technic, Mindstorms, Model Team and Scale Modeling
hello all tank builders!! if you are looking for a tank with modularity and style look no further. this tank has very easily found parts for helpfulness (almost all from 42039.), the only extra parts are pf and tank treads + sprockets. the motors are m (l motors do not fit) and v2 reciver is not needed, a buwizz or aa battery will work. modular. feel free to comment, video coming, and enjoy!!! Editor's note: this is being worked on side by side with my supercar. -
This is my Blacktron “Liberator” main battle tank (MBT). It was designed to be the backbone of the Blacktron land forces. It is a relatively small and fast attack vehicle with heavy armaments, capable of devastating hit-and-run attacks. At the moment it is just a prototype being field tested but as soon as this design enters full production Blacktron HQ expects to be able to take the initiative once again. Had a lot of fun playing with this MOC so far. I think it's a worthy addition to my small Blacktron army :)
-
I was hesitant to buy the Imperial Assault Hovertank for some time but I caved and finally did a week ago. Its a great little vehicle in the movie, I actually think it blends really well into the Imperial War machine. For thirty dollars USD its a great value, but this isnt a review. Even as good as the set is there is a lot of room for improvement. What stuck out to me most prevalently is the top hatch, whereas in the movie its just a little hatch in the set its the entire cockpit's roof that opens. I know Lego's version is the hover tank variant but I really want to squeeze in tracks. I also want to rework the cockpit to fit three figures and if at all possible make another hatch for the spotter to stick his head out. Last year there was a wonderful thread full of fantastic modifications to the AT-ST released this past fall. While the AT-ST is a far more known and beloved part of Star Wars then the GAVw "Occupier, I would love to open this thread up to any modifications the community has. If you've modified the Imperial Tank, please, feel free to post your pictures. Lets try and improve an already great set to the best it can be.
-

[MOC] Blacktron "Liberator" MBT
Kelkschiz posted a topic in LEGO Technic, Mindstorms, Model Team and Scale Modeling
This is my Blacktron “Liberator” main battle tank (MBT). It was designed to be the backbone of the Blacktron land forces. It is a relatively small and fast attack vehicle with heavy armaments, capable of devastating hit-and-run attacks. At the moment it is just a prototype being field tested but as soon as this design enters full production Blacktron HQ expects to be able to take the initiative once again. With it's completion I have finally realized a long term goal that I have had since I started making LEGO tanks, namely making a LEGO tank that has both the core functionality and the performance of an actual tank. -

[GBW] - Supporting the war effort - New Brickika - A Seaside Patrol
Spud The Viking posted a topic in The Great Brick War
(Apologies in advance for my terrible photography, I have limited space and only a phone camera ) Joining the forces was hardly an excuse for a holiday but with the promise of peace I gazed upon the great ocean in front of me. The reason for this particular excursion was to set up a patrol between the new coastal lookout posts which had been renovated recently, updated from their imperial days. New Brickika Coastal Lookout by Tom Gray, on Flickr It may have been an excuse to get the boys out driving again after all, it was a spectacular view along that golden wall. New Brickika Coastal Lookout by Tom Gray, on Flickr The squad was good company although the jeep driver seemed a little to common for my liking. New Brickika Coastal Lookout by Tom Gray, on Flickr New Brickika Coastal Lookout by Tom Gray, on Flickr Inside, the captain was listening out for 'enemies' on our top-grade tech. I am positive all that static will drive him insane though he wouldn't be the only crazy one in the army. New Brickika Coastal Lookout by Tom Gray, on Flickr Anybody in that filthy RoN thinking of a sneak attack on New Brickika would surely fail due to installations such as these! [Bonus; a wee look at the tank based off of the UK 'Warrior' tank] New Brickika Coastal Lookout by Tom Gray, on Flickr New Brickika Coastal Lookout by Tom Gray, on Flickr (Please Judge) -
-
Hi, i've been working on this platform for a while, now it's basically ready. It's a tank with 6 indepentent suspension (3 per side), remotely controllable with quite a powerful climb :) It has space to put something else on it such as a weapon or a crane or such. Here's some pictures (sorry for the blurrines): The shell without threads and EV3: I've also attached a webcam to it, i was able to stream a 160x120 live video and drive it around the garden remotely, pretty awesome if a bit blurry :P Unfortunately i had to use an USB hub which have a huge plug, i had to put the EV3 brick vertically or it wouln't fit. At least there's just the right space to put the hub :) Here's some render too:
-
Hello, today I show you my latest build, the S.H.A.D.O. mobile "evo" from 70's British TV series UFO. The show's basic premise is that in 1980 Earth is being visited and attacked by aliens from a dying planet and humans are being covertly harvested for their organs by the aliens. The show's main cast of characters are members of a secret, high-technology international agency called SHADO (an acronym for Supreme Headquarters Alien Defence Organisation) established to defend Earth and humanity against the mysterious aliens. SHADO has a variety of high-tech hardware and vehicles at its disposal to implement a layered defence of Earth. Among these the ground units including the APC SHADO Mobile, fitted with caterpillar tracks, in the pic below the evo-lution version bruick-built. My LEGO SHADO mobile features extras: - a bubble canopy; - a front hook; - a radar antenna with auxiliar light; - a back entrance and other accessories. The crew is composed by three: commander, driver and radio operator (all of them well equipped). I recreated a detailed interior with many features, included on board computers and many weapons useful to prevent potential aliens' attacks. Here the gallery on flickr. Thanks for stopping by.
-

[MOC] M4A2E8 FURY Sherman Tank
Tommy Styrvoky posted a topic in LEGO Technic, Mindstorms, Model Team and Scale Modeling
Lego RC M4A2E8 FURY Sherman Tank by Tommy Styrvoky, on Flickr This model has been quite a challenge, and also a lot of fun to see come together. I think this has to be the longest time I have spent working on a model so far, it took 3 months to develop it, and over a week it was converted into physical form with 15 Bricklink orders and about $400 of parts. At college, I have been currently very busy Organic Chemistry, and has had little time to edit and compose photos I took in August. Over the last 3 months I have worked on animating the digital model in blender, and working on the video. Finally today, after a week of intense studying for an Organic chemistry exam I was able to add the final touches and post it prior to my Thanksgiving break. Enjoy. More information about the model and film here. Lego RC M4A2E8 FURY Sherman Tank by Tommy Styrvoky, on Flickr Lego RC M4A2E8 FURY Sherman Tank by Tommy Styrvoky, on Flickr Lego RC M4A2E8 FURY Sherman Tank by Tommy Styrvoky, on Flickr This rendition of the Sherman is very close to being perfect, though with an overlay of blueprints, some minor changes could be made, by shifting the upper half of the hull backwards one stud, and maybe replace the tracks with custom four stud wide versions. I would like to potentially modify the design, and create a modular system for the Sherman, as I originally foresaw prior to creating my Sherman crab variant of the M4A2. This would include the both HVSS, and VVSS suspension options;The choice between the early D50878 turret with the 75mm gun, or 105mm howitzer. A modified D50878 turret bustle for the 17 pounder used on the firefly, or The late T23 turret with the 76mm gun, and modified mantlet for the M51 Super Sherman's 75mm gun. The ability to modify the hull between the long, welded hull, early welded hull, and cast hull could also be options, though designing a cast hull may prove to be a challenge. Potentially the option to change the front transmission housing could be an option, though for the early three part housing, the structure may prove to be difficult. Finally different powerplants could be chosen, though there will be some serious design challenges to make the 30 cylinder Chrysler muiltibank engine, and a continental radial engine fit. Though a Cummins V8 engine wouldn't be too difficult to make for the M51 Super Sherman. Though this may be a long term project, due to the complexity of some of the designs. This project has been fun to work on, and it taught me a lot about the differences between the Sherman variants design. I am proud to have made major changes to my old Sherman Crab's hull design, and maybe a potential option for the modular system would be to replace the space with drive motors for the Crab version, and for a pneumatic bulldozer version. Lego RC M4A2E8 FURY Sherman Tank by Tommy Styrvoky, on Flickr Lego RC M4A2E8 FURY Sherman Tank by Tommy Styrvoky, on Flickr Lego RC M4A2E8 FURY Sherman Tank by Tommy Styrvoky, on Flickr Lego RC M4A2E8 FURY Sherman Tank by Tommy Styrvoky, on Flickr Lego RC M4A2E8 FURY Sherman Tank by Tommy Styrvoky, on Flickr Lego RC M4A2E8 FURY Sherman Tank by Tommy Styrvoky, on Flickr Lego RC M4A2E8 FURY Sherman Tank by Tommy Styrvoky, on Flickr Lego RC M4A2E8 FURY Sherman Tank by Tommy Styrvoky, on Flickr Lego RC M4A2E8 FURY Sherman Tank by Tommy Styrvoky, on Flickr Lego RC M4A2E8 FURY Sherman Tank by Tommy Styrvoky, on Flickr Lego RC M4A2E8 FURY Sherman Tank by Tommy Styrvoky, on Flickr Some scenes from the movie that were recreated. Lego RC M4A2E8 FURY Sherman Tank by Tommy Styrvoky, on Flickr Lego RC M4A2E8 FURY Sherman Tank by Tommy Styrvoky, on Flickr Lego RC M4A2E8 FURY Sherman Tank by Tommy Styrvoky, on Flickr Lego RC M4A2E8 FURY Sherman Tank by Tommy Styrvoky, on Flickr And an 8K image of the Tiger battle with Sariel's Tiger XL This was quite a challenge, as I had to rotate the entire turret in Gimp, and replace all of the covered tiles with either renders, or copies of other parts from the photo. Though the end result was worth it. Lego FURY vs Tiger scene by Tommy Styrvoky, on Flickr -
Hi everyone! I'm quite new, but I build lego Star Wars MicroMOCs; in other words 'mini minikits'. I got my ideas from the Star Wars advent calendar series- style micro kits. I have built over 200 so far and I'm still going, so if you want to see any of these regularly, check out my facebook page: https://www.facebook.com/James.Arts2172 and my YouTube Channel "James_Arts_2172: Lego" https://www.youtube.com/channel/UCmYOMZz6DyvM1euY2qrRfpA All I did was go through every page of both DK Star Wars Visual Dictionaries and build every single ship and vehicle in them. Of course I have made many more besides (2014-present sets, Ep 7, Rogue One, Clone Wars, Rebel, Force Unleashed, Old Republic).
-
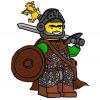
The Battle of France, also known as the Fall of France, was the German invasion of France and the Low Countries in 1940 during the Second World War. In six weeks from 10 May 1940, German forces defeated Allied forces by mobile operations and conquered France, Belgium, Luxembourg and the Netherlands, bringing land operations on the Western Front to an end until 6 June 1944. Italy entered the war on 10 June 1940 and attempted an invasion of France. I wanted to start creating some mocs with WW2 theme and Brickwarriors with their amazing new figs, gave me the inspirastion !! I created a diorama with the Germans after a fight.. in the roads of Paris! The main moc.. The squad.. The buildings.. I hope you like it!! C&C are welcome!! P.s. The Panzer IV Ausf. G Tank is a design from Brian Fitzsimmon with a little upgrade in some parts from me for stability and to move turret around and up-down.
-
Location: G03, New California Tags: Vehicle, Piracy, Land Vehicle, Military Job: Driver Start Log: My last mission let me use a sweet new mobile missile platform, the LR3. Not only does it carry a payload of three missiles, it also has a cab that serves as an escape hover craft. The designated target this time was an Octan sensory outpost. Job done. More pictures are available on brickbuilt. Thanks for looking
-
So.. I started trying to assemble some of my older lego sets from my giant box of mixed pieces from various sets i got throughout the years. I knew i had the pieces to the Mobile Defense Tank from Lego Exo-Force. So i looked up the instructions booklet on the interwebs and came across something pretty confusing. First look at the front box image. Now look at the finished version in the instruction booklet from LEGO's official site. Notice something? Yes. The Bar between the tracks is missing from the actual build. The bar can be slightly be seen on the rear tracks also, on the box image, but they are not in the actual build. There's more... Things got even more weird, because it turned out that i have been following two different instruction booklets... On this website: http://lego.brickinstructions.com/lego_instructions/set/7706/Mobile_Defense_Tank I found the instructions in the image below. These instructions show, that the bar between the tracks is put into place. But on the instructions you can download as PDF on top of the page, the bar is not included. The bar is not included in the instructions on LEGO's official site either. Looking through both instructions, there are actually a few more things that is different. The build of the canopy varies also. Even the parts list in different. Now... Can anyone explain what is happening? I have been browsing the interwebs for hours, trying to figure out if there is more than one version of this build but i cannot find any evidence. Did they change the build over time or what is happening? I really hope someone can explain this to me.
-
Hovertank L-11 by Sunder_59, on Flickr 3D view on Mecabricks
-
Hi EB! I haven't posted in a long time, but I have actually been building stuff. I promise. I had been looking to put together an american freight train for some time now: I originally thought I could get away with building a long articulated well car (which would make up the entire length of a practically sized lego train), but the well car has proven to have more restrictions and less reliability than I would have liked, and as such it was time to build some regular freight cars. Tank Car All of these freight cars were actually designed in maybe 2014, but at the time I did not actually intend to build them, preferring the aforementioned well car instead. This tank car was completed first because I was able to acquire almost all of the parts through my local LUG. The only expensive parts were the 8x8 dishes on the ends, which are apparently quite rare. As much as I hate to be imprecise, the car is a little bit of a freelance: I did work off a drawing to get the proportions, but I apparently could not find a photo or model of the thing in the drawing, so the greeble around the the dome and platform is a bit of a guess. The ladders are also a bit disproportioned, but that is more of a convenience. This car probably has the most interesting construction of the three here: I wanted to use the various 8-wide circle parts, but I did not want them to make up the load-bearing structure (so you can't pull the car apart). Therefore the load-bearing structure is actually a Technic frame that kind of moves up and down such that the top and bottom set of circle parts can connect at alternating bulkheads. Flat Car Like the tank car this is a little bit of a freelance, but I really wanted a flatcar such that I could put random stuff on it, and modern flatcars at our scale are far too long to run on R40. I found two models for reference, and I believe my drawing is for the bottom one, but the car itself really takes more from the top one. This one was actually the toughest one to build. As I designed it in 2014, there wasn't nearly enough structural integrity and the wheels would easily rub on various other parts in curves. It took me quite a few iterations to increase the structural integrity to an acceptable level without compromising the overall appearance of the car (mainly not making it too tall). As you can see the details of the final design look nothing like the details on my original LDD build. Build-wise, the key to making it structurally sound was to make the studs-out sides the load-bearing element, and the difficulty was doing that while still giving the trucks enough clearance to pivot fully in an R40 curve. If you press on the car in a turn there is still a but of scrubbing, but for now I consider that acceptable. Hopper Car Unlike the other two, this car is actually based solely on a specific model! It is the latest one to be completed, and I think it is actually my favorite of the lot. It took me a while to get around to it one because I thought it would need a lot of parts, but it was mainly just the 1x2 rails (something like 100 of them) and they were relatively cheap. Construction is mainly studs up for the chassis and studs forward/backward for the sides. Each side is a studs forward and a studs backward section held together with rails on the top and bottom with some additional SNOT needed to go around the ends. It's probably the sturdiest of the three cars, but also the heaviest. Well that's it for now. There is a full gallery with a few more pics if it ever gets moderated. I do have a new locomotive in the works too, and it will be interesting.
-
Hey guys, Never posted in this topic before so here we go... I was inspired when playing World of Tanks to recreate a tank from the game and behold... Lego Jagdpanzer 38(t) 'Hetzer' by Tom Gray, on Flickr (sorry for pic quality) Those tankers among you may have noticed there is a pair of wheels missing. Is this too obvious? Any criticisms welcome
-
This tank is built mostly for functionality, less for mobility and style A knob on the back wheels out four small cannons when the cannon doors are lifted up The wheel with three pegs on the back makes the machine guns in the front shoot. I used two six-stud-shooter pieces, but installed them in a way where the base piece, which holds all of the studs, rotates, while the trigger piece which releases the studs, stays stationary, which is not how they were intended to work. And this is the interior rotary which makes it all possible The cockpit seats only one to make room for the main cannon's laser function I apologize for the poor quality of the pictures; a better camera is on my list. Any thoughts and suggestions are very welcome
-
I'd like to show you my progress on my pneumatic tank. It includes the following functions: Driving Rotating of turret Shooting Barrel adjustment Both tracks can be controlled separately. I used gearracks to transform the linear motion into rotation to drive the tracks. I used a combination of gears to allow the tracks to move forward by extending and contraction of the cylinders. Therefore it is ony possible to drive forward. I limited the rotation of the turret by a 90 degrees to the left and 90 degrees to the right. This allows for the hoses to go through the turntable. The shooting mechanism shoot when the cylinders extend, and when the retract. This allows for relatively fast shooting. Do you have any suggestions what can be added or improved, just let me know.
-
This project started last December and progress were averaging at one bot per month. After 7 months of gruelling yet challenging efforts, Liokaiser is finally done. However , back then (end of June) ... I was given a chance to showcase my LEGO transformers at a local store , so Liokaiser was whisked there for a month (video link below). After a month , he was put in storage as I was busy with another LEGO TF project. I'd guess I better put a closure to this now .So there :) >> As a LEGO combiner of this size, (more than 1.5 feet tall)... he is top heavy, so he can't be posed in more elaborate manner. Too much stress were imposed on the hinges . :| >> Due to complexity of individual bot , merging them to form Liokaiser caused a few weak points in connections. I'm forced to apply extra scaffoldings in a few areas to reinforce these connections, so that posing him about would not topple him over . >> Yes, it's SEVEN breastforce members I mentioned just now. In the original cartoon, Deathcobra was the 7th member of Breastforce (forming the arm) but was killed early in the show. So here, I decided to pay homage to this character by having him as a helicopter that transforms/separates into components for the combiner: Hands, head and a gun. If you wish to view more photos of Liokaiser and the whole breastforce team (more than 200 photos!) , the following blog link is a good starting point: http://alanyuppie.blogspot.com/2016/09/lego-breastforce-combiner-liokaiser.html As a LEGO TF builder, this project really pushes my limits and skills (and patience.. gawd... finding ways to merge the upper body was simply taxing). OK now I need find ways to outdo myself again. Lemme think what else I can build next. Thanks for viewing!! :)