Search the Community
Showing results for tags 'modular'.
Found 885 results
-

Fictional four-stack ocean liner - RMS Allemann - LDD WIP (so far)
Murdoch17 posted a topic in Special LEGO Themes
This ship was designed to replace my original micro scale ocean liner from 2011. It's not intended to represent any real liner per say, though I was inspired a tiny bit by the Queen Mary (located out in Long Beach, CA) and a lot inspired by the Olympic / Titanic / Britannic sister-ships that were sadly scrapped / sunk by iceberg / mined in WW1. Here we see the RMS Allemann at sail at night in the mid-Atlantic sometime in the late 1920's. (this LDD picture was edited to give it a night-time feel. If only the portholes glowed!) The font of the ship (also called the "bow".) features three printed 1 x 6 tiles should spell out the name ALLEMANN on the left and right sides, and along with the stern. The light gray "hatches" at the fore and aft sections of the ship are for loading cargo into the various holds. Statistics: Ship Name: RMS Allemann Ship Type: "Gigantic" Class passenger Liner Owner: Red Star Line Ship Built: 1919 – 1921 Capacity: 400 Crew, 270 First class, 630 Second class, 1,000 Third class Lifeboats: 20 regular boats / 4 collapsible boats with 80 people per boat each (1,920 people total capacity) Builder: Strong & Steele Shipbuilders of London Propulsion: 24 Boilers, 2 turbines, 4 steel propellers Top Speed: 30 Knots Fuel: Diesel (originally Oil) The rear of the ship. (also called the "stern".) The raised portion of the deck is for the docking bridge when the ship is backing into port. The ship features a modular approach to it's construction, allowing for separation of bow and stern for storage ease... and in case I want to build a wrecked version in the future, I just disconnect the four Technic pins to remove the desired section from the rest of the vessel. Also, I thought about Gateway LUG holiday displays, which usually include light-up models in some form, usually modular buildings. These potential lights are now addable via the open bottom of the ship for a neat effect through the portholes. The pennant flag of the Red Star Line as originally used on the RMS Allemann. The RMS Allemann was first proposed in 1914, but World War One prevented it's construction by Strong & Steele Shipbuilders to start until 1919. The ship was modified from it's original proposed engine design to burn oil, and was completed in February 1921. The ship could hold 1,900 people total, with 400 being Crew, with 270 being First class, 630 in Second class, and 1,000 being the steerage, or Third class. The ship sailed it's maiden voyage in July 1921 from Southampton to New York City. The ship was English-owned, and as such, was immune to the new American anti-alcohol laws of Prohibition. The ship took off-peak season sailings (informally known as Liquor Cruises) around the Atlantic, returning to the American port of origin within a couple days. The ship managed to hold a steady service record, and remained relatively full-up until the Great Depression really took hold in 1931. The ship's owners, the Red Star Line, managed to stay financially afloat long enough to get the ship through the worst of the Depression, until the ship was requested by the English Navy as a troop ship in late 1939 for use in World War Two. The Allemann's fancy woodwork was put in storage and the ship was turned into a troop ship relatively quickly. The ship was strafed several times by enemy aircraft during the war, and narrowly missed being torpedoed in 1943, but it survived the war not too much worse for wear. When it was handed back over to Red Star Line, it was given a complete overhaul mechanically and electrically. The whole ship was rewired, and the oil burning engines converted to diesel. The Acadia's woodwork was painstakingly restored to it's original grandeur, and she was ready for for sailing by 1948, almost a year after being handed back to it's original owners. In the early '50's the ship began sailing luxury cruises to the Mediterranean from England and the United States, in addition to it's usual scheduled Atlantic crossings, and had it's third class re-designated as Tourist class. This was because the decline of the Atlantic immigrant traffic pattern was nearly complete. The ship began showing it's age by the late 1960's, when it's original glass dome began to leak badly. A handful of cracks in the reinforced glass caused the ship to be dry-docked, but before it could be fixed the huge dome collapsed in on itself, causing the grand staircase to be heavily damaged. Luckily, the accident happened in the middle of the night, and no one was on board at the time to get hurt by all that broken glass. The ships' dome was replaced, but only because the ship's owners knew of the ship's heritage and couldn't bear to see the old girl scrapped. (Not to mention it would have cost more to scrap the ship than fix the dome) By 1975, she was last four-stack ship in existence, and the owners were planning the grand lady's 55th Birthday for the next year. The Allemann celebrated July 1st, 1976 as her fifty-fifth birthday, and as part of the celebrations she was given to a preservation group dedicated to keeping the ship sailing as an "ambassador of history", as a peek into the way things were and how the men and women visiting and working on the Allemann went about their lives through each period of this ships stoic history. Many former passengers and crew detailed their experiences on the ship in writing or on film for the beginning of what later became known as The Allemann Living History Museum. Today, the ship features a feature-length film that chronicles the story of the ship and it's many passengers and crew through out the ships commercial and wartime lives. The film is shown in the Second Class movie theater, built into the ship in 1947 after World War Two, flowing seamlessly into the 1920's flavor of the ship. The ship still sails, making stops in New York and London (substituted for Southampton) at least twice a year. NOTES: The bow is either a bit too long or the stern too short, but I can't seem to fix that correctly to be "in scale". In fact, it's pretty much assured there is NO scale used with this ship, as I just built what looked good to me. The model will have to be bought sometime in Autumn of this year, as even though it has most of the parts from the 2011 ship inside it, (these have been removed the from the parts list to save money) it still will cost almost (US) $200 to purchase the remaining needed parts to have it done by the Christmas-time show later this year. Any thoughts, comments, suggestions, or complaints on this ship? -
Hey guys, I’m searching MOC instructions and LDD files for my near-future huge Lego city. I plan of course doing some MOC modulars but there are some very nice MOCs created by other people! I made a list of all the designers I found, I hope that list helps some other people who search modular instructions! Here are the MOCers with instructions that are definitely worth looking at (with no particular order): —Brick Ative (by @lookl and @Pakita) ebay Rebrickable —SteBrick (by @stef2280) Bricklink Stebrick Rebrickable —Snaillad (instructions on sale by @2013-lego) (by @snaillad) ebay Rebrickable —Sheo (by @sheo) Rebrickable —peedeejay (by @peedeejay) ebay Rebrickable —bricksandtiles (by @Giacinto Consiglio) ebay Rebrickable —Kristel (by @Kristel) Rebrickable —brickcitydepot (by @brickcitydepot) brickcitydepot ebay Amazon no starch press Barnes and Noble —Ryan Taggart (by @ryantaggart) snakebyte.dk LDD File of Construction Site –geo.gr (by @Gunman) ebay —BrickToyCo (by @Tobysan) BrickToyCo —hermez (by @hermez) Rebrickable —mestari (by @Mestari) Rebrickable —Huaojozu (by @Huaojozu) Rebrickable —2013-lego (by @2013-lego) (his own designed modulars) ebay Rebrickable —Duncaadkin0 (by @Dakar A) ebay —BrickBuildersPro (by @lgorlando) BrickBuildersPro ebay Amazon —The Brick Show Shop The Brick Show ebay —andrepsramos ebay TISMSTORE Rebrickable –Brickstruct Bricklink Brickstruct —10214 Alternative Build (by Garom) Rebrickable —The Magic House (by valgarise) Smart Bricks —Bob's Burgers (by jtam1608) ebay —Villa Maison (by @marcosbessa) (found the LDD file on LDD gallery as it’s no longer available in his own website): LDD File —Train Station (by @LegoWolf) (link to download the LDD file is on his Flickr): LDD File Here are some other ones (those which doesn't really interest me but I'm sure that will interest many others): —SkywardBrick Rebrickable —TheUniqueBrick TheUniqueBrick Rebrickable ebay —A *Deal* 4 U (by waltzking) Bricklink —Bricker and Co Bricker and Co ebay —Bjor Schoute ebay —sabriyo Sabriyo Customs ebay —Bauanleitungenmartin ebay —Berth Rebrickable —Soar Brick soarbrick ebay —gryffindorcommonroom ebay —scottcdavid ebay —sodabilly ebay —bolbuyk Rebrickable —deconstructor1 ebay —jval (Need for Brick) Bricklink Rebrickable —Fully Brick Models Bricklink —Brick Vice Bricklink Rebrickable —BrickusMaximus Bricklink —SonicSunday Rebrickable —Brickalive Rebrickable BlocK Shop —custombricks.de CUSTOMBRICKS Rebrickable —The Royal Church (by ateameric) Rebrickable —Alternative for Town Bridge (by Albertovax Corner) Bricklink —Bowling Alley (by drtyksh) ebay —Book Store (by Lair of Maedhros) Bricklink So that’s all I found. Maybe you wonder “why he’s asking for new instructions, he already found enough!” I ask it because I’m just purchasing/will just purchase the instructions in the categorie “must-have” . In LDD gallery, there are some interesting MOCs, you can download them too. I hope that list helps some people and some people helps me by recommending/finding more modular instructions/LDD files Cheers!
-
Well, this was an epic project. It took two years and several complete iterations get things the way I wanted to. Frustration at times was high but I learned much. Ninjago City and Docks are both great sets but I wanted to modify both by adding one more level below street level so that these sets would better fit next to my other modified modular buildings. Adding another level also works really well when there's a ship docked, picture of that comes later in the post. Another level also gave me a change to include one even more older level of ninjago city. I will add photos here from each layer. I'll start from the top and remove rooms one by one. Toilet/Tower was moved away from sushi restaurant to decrease the overall hight of the building. There is now more room for ninjas to enjoy lunch, under a cherry tree if they wish. Entrance to the restaurant is through the dragons mouth, and the dragon itself is an elevator connecting every level. (Ninjas - please leave your hidden weapons at the entrance.) The yellow room on the right and the turquoise tower on back are identical to original set. Small changes to crap restaurant and to the comic store so that they can be removed from main build without the street. The arcade is now slightly larger and I was able to to fit one more game inside. It is a Kill Bill themed sword game. When restaurant and other builds on the front are removed, you can see that there is an access to the toilet tower through ladders, not an easy path but accessible anyway. In the middle of this structure there is an opening that goes all the way down to the very bottom level. These rooms are quite similar to what they were originally in Ninjako City Docks. Behind the dojo there was small space unused, It has a shrine or golden armor inside now. Behind the toilet there is a young boy firing a rocket. The original city Dock clearly had two facades, front and back, both very well detailed. I only need one side to look good so I did try to get all possible details on the front side. It was sometimes incredibly difficult to get modified builds to fit together, it would have definitely been easier to just redo all rooms with new design :) The second street level is one single build and it connects everything together. This layer makes the whole building very rigid! The cash machine in front has a new mechanism for getting money out. You can see the green topped piece connected to a techic axle in the images above. This axle is connected to a lever in front of the street and by pulling the lever, money comes out. This mechanism works really well and is easy to use because lever is at front. Below the second street level are food stalls and small shops, several builds borrowed from Chinese New Year Temple Fair. Teehouse and the bedroom are very similar to the original build. The round window might be new, and the cherry tree behind it looks and feels nice. Cleaning robot is moved one level below. Builds from the Temple Fair added. It is really crowded in here and a lot of stuff from the Temple Fair. I like how the advertisements on the second floor wall look like. They are angled downwards and kept in place by ninjago swords. The second floor on back also has a minor play feature, the gray barrel can be dropped onto the street level to cause mayhem. I'm depating with my self if street levels should be covered with tiles or not. Here I kind of like the look but on the outside streets I would probably prefer tiled streets. The middle market part can be removed separately. This new room is for map maker. It includes some parts from the City Docks. Small storage inside the cabinet and below the bed. Below this build are more food stalls. And now the last level. It has full heigth and minifigures can easily fit in here. This level includes space for robots, fishery, mason's workshop and metal workshop. On the front there's a hidden compartment for posters. Fish processing has a small room at the back. It is connected to the elevator by a drawbridge and fishingboats can moor right next to it. On the front, next to mason's workshop is the room for maintenance robots. The walking robot is the same one from Ninjago City. The boat robot is new and it's responsibility is to keep the waters clean. The robot floats even if it falls overboard for some reason. The last room in this building is the metal workshop. Workshop has a sliding door, lathe, drill and several metal pieces. Friends photo poster doubles as a girl calendar :D On the front there are two smoking pipes and under the workshop table there is a secret hatch to a room underneath. These indicate that there is something even more older below this level. Here's a photo of the building when everything possible is removed. Yes, the dragon is tall, really tall in real life when other builds are not present. Elevator can be moved by a wheel which is on the other side of the dragons head. A string is connected to the elevator platform and unlike original elevator in the Ninjago City, this one is a single structure and elevator can easily move all the way from the bottom to the top. There are some ladders in this building but everything is mainly accessible by the elevator. There are a lot of different builds in this and the feeling when I put everything back together is really rewarding :) Here are some final photos of this building with Destiny's Bounty docked. All these photos and more in greater detail can be found from here: https://www.flickr.com/photos/133282349@N03/albums/72157719033114520
-
This is my first modern building - LIBRARY. Front walls are mostly glass from their bottom to the top. They are completed with shutters and ivy and formed in a best way to show the corner shaft of the lift. The whole building is covered by the steel metal roof hemming. The building consists of two levels only - the ground floor and the 1st floor. In the inside of the library we can find lots of bookshelves, a reading room, a customer service and a toilet. A minifig can go to the first floor by the lift which works automaticallly and is based on a power function set (comprised of typical motor and battery box only). When the lift reaches the top or the bottom of the building it turns off automatically. The whole modular consists of 2734 pieces so it's only a little bit bigger than the official Lego sets. Modern Library by Łukasz Libuszewski, on Flickr Modern Library by Łukasz Libuszewski, on Flickr Modern Library by Łukasz Libuszewski, on Flickr Modern Library by Łukasz Libuszewski, on Flickr Modern Library by Łukasz Libuszewski, on Flickr
-
Let me show you my my latest model. It is loosely based on my Brick Lawyers MOC but much larger and more detailed. While the Brick Lawyers build fits well in a smaller town, this model is made to fit into larger cities with higher buildings. The entire model is all about photography. It hosts a photo studio, a camera/photo supplies store and the photographer's apartment. Let's start from the backside of the building. It features a small backyard with a tree that can be accessed through a driveway. You can clearly identify the staircase section from the facade design. The entire staircase uses stained glass: Being a typical modular building all stories can be detached separately: On ground floor the camera and photo supplies store is located. Also some of the photographer's portraits are on display (and on sale) here. On first floor the photo studio is located. It features different lighting devices and of course a backdrop for portrait shoots. Located in a smaller room, the photos are developed (you can tell from the red light). On second floor the apartment of the photographer is located. Being a bit loft-style it features bedroom, living room and kitchen. Only a small bathroom is separated. The model is made of 3443 pieces and so far has only been built digitally. I have only used real existing parts in available color combinations to make the model buildable in real life. I have even tried my best to exclude rare and expensive parts as good as possible. Instructions are available through rebrickable.com Hope you like it :-)
-
This modular Victorian-era train station was inspired by set 71044, Disney train and Station. It now has a chimney flue featuring two fireplaces, freight area with dual sliding doors, and three loading platforms under a large canopy. The street facing portion of the station should have the year 1891 on the studs above the two main doors. (This was the year the 100% fictional station was built.) The large clock on the tower is gone, replaced by a smaller version above the main door to the platform, while the word GLENNCOE (a slight misspelling of a real Missouri town... the real town only has one "N" in it's name.) goes above the right hand door, as this is the name of the station and the town it serves. Also in that general area of the model, you can see I removed the second floor balcony, as I thought it looked better being replaced by a window. The upper floor features the station master's office with desk and telephone, along with a much later addition than 1891, a computer to track train movements. The lower floor features the cargo depot with opening mailbox, and passenger waiting room with ticket desk. Six public waiting chairs are also included on this level. The station comes in several large, easy-to-take-apart sections: -tower roof -second floor hallway roof -second floor -first floor Train track 3-way switch designed by 4DBrix, printed by OKBrickworks. It works like a charm, and is used on the station as a funnel for trains to be switched to the proper platform. NOTES: This real-world picture of the REAL Glencoe station is from 1910. It no longer exists as a building, and this is the only known photo I could find, taken from the Facebook group, "Missouri railroad depot's and structures". (I had to ask if anyone had seen a picture, and this was it.)The rail line passed through there from the mid-1850's to the mid-1940's, when it was moved to it's current alignment, and the old one abandoned to nature. However, a little 12-inch gauge ride on railway now calls Glencoe home, as it has since the late 1950's. This station (and any of my LEGO trains lettered for the Wabash Frisco and Pacific, the name of the small 12-inch gauge line) are a tongue-in-cheek tribute to the rail line that has had such an impact on me growing up.. and still inspires me today! EDIT 5/4/21: Added real life pictures of the canopy and updated train station to this post. I also changed the formatting a bit. Some pictures of the inside details remain to be changed over to the newer style. (I.E. with the canopy showing, not the old singular platform) As usual, comments, questions, and complaints are always welcome!
-
Hi all! This one has been hard do design. I got quickly a correct interior for the surf shop and the bar, and my main idea was the stairs in front of the building, but designing the upper part was a challenge. I've tried so much different roofs! And so much different colors and "textures"! Finally, a small building, but I love it this way :)
-
Hi everyone! Here is my modular inspired by Mary Shelley's Frankenstein :) In images:
-
Hi all! I've designed these two buildings (on two 16x32 base plates) in the style of New York City architecture :) Left one has a living and kitchen on ground floor, a gym room on first floor and bedroom with bathroom on second floor. Right one has a kitchen on ground floor too, a living room with sofa, tv and upright piano on first floor, and bedroom with bathroom on second floor. Hope you'll like them ;)
-

[MOC] Unimog U500 (405.201) (Instructions Posted)
Thirdwigg posted a topic in LEGO Technic, Mindstorms, Model Team and Scale Modeling
Finished 01.01.2021 A couple of years ago I started a modular Unimog project with the hopes of having a build that would be flexible enough to support a number of different versions and options. It certainly was. However, the Unimog 437 project was intended to provide a U500 cab option, but for a couple of reasons (namely those tires), it was not a great fit for the project. So in the back of my mind I figured I would do a proper U500 version at some point. The 437 was pretty popular, and it fits within my current design language; mid-sized, manual, truck/car, feature packed. Then when I saw the first reviews of the 76139 Batmobile set, and saw the new 68.7mm tires, and I knew it was time to resurrect the project. I would keep the scale at 1:17.6 as I did with the 437, and those tires would equate roughly to a 445//65/R22.5. Off to the races! I am partial to the 1st generation (2000-2013) U500, plus @I_Igor did a great 423 series already (Eurobricks). Also, I like the 500 more than the 300 or 400. The 300 looks tiny, and the 500 SWB gives me two extra studs on the wheelbase (24st) over the 400 (22st). I guess if I have enough space I'll switch to a 400, but I (generally) never need less space. I pulled a PDF for the scaling, and I started to set my build parameters. I build my MOCs by making a first draft with all the constraints: wheelbase, length, height, width, and general bodywork ideas. I try to keep the colors correct, but if the part is not in front of me, I move on to replace later. Then I start working in features, and rebuild as needed. The first draft came together pretty quickly. While I managed to buy the first tires available on Bricklink, I was not willing to wait for their arrival before I started building. At this point, I determined the features of the truck: Front and Rear Live Axle Suspension (sans portal axles) (With dual leading/trailing links and Panhard rods) Front Steering Fake Motor Tipper Bed Tipping Cab Front PTO Rear PTO Rear Bodywork PTO Front Mounting Plate Modular Rear Bed Attachment Points Realistic Bodywork The tires arrived in time for the second night of building, and they look perfect. By now, all the functions were in place. Loosely. Below you can see the general Front Mounting Plate, and the front PTO. Currently in front of the bed is a Gear that will power features on a mounted body (al la TC9 Entry) Below you can see the rear bed system. I have found this three way tipper option to work great on my 437 and the MAN TGS truck. The control input is currently on the left side, but it will need to move. The orientation of the lift is backwards, which does not allow for good tilting leverage. Turning the mechanism around will need to move the input to the rear. This compounds the issue with the rear PTO. It is currently in place just above the hitch, but will need to move when the tipper input is placed in the rear. Few U500s have a rear PTO, so I'll have to decide if this is a feature I want to retain. More to follow... Until the next post, hope you enjoy the next Thirdwigg Motors project. -
Hello there, I wanna present you my newest MOC building. It´s a building which can be used as a modular building my changing a few details. In the first floor a small pizza restaurant is located, which contains a room for guests and a italien kitchen with a big pizza oven. In the front of the building you can also find a place to sit down. In the second floor I placed a nice and cozy apartment. The next floor is filled with a paint studio. On the roof are some ventilations and other technical stuff. I hope you like the MOC. Let me know if there are some points of improvement. For more details watch the speedbuild video on Youtube: Sorry, I failed uploading pictures. Is it right, that I only can add bigger pictures over flickr ?
-
Back in 2015, Ive started to build the Core Mining Unit. That's a mining unit which will be used by the Xerion Mining Corporation. The Xerion Mining Corporation is a group of miners and researchers who discover new planets to search and mine ores. I've finished this MOC in 2018. The Core Mining Unit is a modular mining vehicle, which can be used in various mining and exploration missions. The vehicle have several modules: Drill, magnet crane, transport module for a small spaceship, sattelite launch module, laser cutter, tool module. The cabin contains a small speeder. Core Mining Unit modules: Several configurations: More pictures: More pictures at Flickr: https://www.flickr.com/photos/mathijslegofan/albums/72157718769903438 I hope you like it
-
For this project we focused on the aesthetics and design of the facades, while making sure that the set offers a lot of possibilities and playability for the Afols : for those who like to display their LEGO set, the Movie Set will be an optimal choice, as it makes an optimal use of pieces for that purpose the set can be used to reproduce scenes from cult movies by combining the different facades, for those who like to take pictures or make brick films, the set would make a great background scenery you can make a tracking shot with your smartphone over 1 meter long, thanks to a cart specially designed for that purpose, for those who have a LEGO city, the Movie Set would make a very nice background finally, for those who like big LEGO buildings, all facades can be put together to form a single building that would fit well together with other modular buildings Details and support : https://ideas.lego.com/s/p:41b6612863004734856253c8dd78fb2c
-
Hello all. I've recently just completed my latest building - Theo's tailoring. It's an Art Nouveau influenced building housing a tailors. It's taken about 2 months in all to put together and I've incorporated many elements of the time. Sadly not quite as weird as some real life examples I've come across but hopefully I'll be able to recreate them too someday! Onto the pics; You can view them at my Flickr here if you wish: https://www.flickr.com/photos/52656812@N04/ Happy to answer any comments or questions on the way its been constructed! Cheers!
-
A collaboration project with the original concept designer Brick-o-Tronic, my "Time Travel Ep.1 Portable Play Set" (instructions downloadable for free) is fully compatible and part of his modular Mobile City line. You can find more cool MC sets over @ rebrickable.com => Mobile City. Hope you like it. Play features: Step by step storage: Yes, it's Back to the Future and yes, it's Micro Machines - but this time in Lego... nearly endless possibilities ;)
-
Hi everyone It's been a while since I've posted a MOC on Eurobricks, in fact this is my first new MOC for over a year and the first building I've designed for almost 2 years. Anyway this is my latest creation "The Village Post Office". The model represents a typical British Post Office from the early 1930's and also features a vintage mail van. At first glance it may look like a modular but it is not. The model features an open back design and the different levels can't be separated. The base is also much different in size and design to a standard modular building. In total the model contains 2262 pieces. Here are some shots of the exterior... Notable features include an iconic red phone box, pillar box a bench and a tree. A series of steps at the side give the minifigs access to the first floor. INTERIOR DETAILS As mentioned earlier the building has an open back to give access to the interiors. On the ground floor is the main Post Office itself. I've tried to give this a rustic, vintage appearance with wooden floorboards and wood panelled service desk. Details include a cash register, lable dispenser, a set of weighing scales and shelves behond the desk for sorting all the mail. Opposite the desk is a parcel wrapping station. The idea for this was stolen borrowed from the Elf Clubhouse set. On the first floor above I've added an apartment which is home to the couple who run the Post Office. This is packed with everything they need including a bed, fireplace, kitchen and an antique gramophone. I didn't have space to include a toilet - but at least they have a bucket. VINTAGE MAIL VAN The mail van is a traditional red style truck as would have been used in Britain during the early 1930's. It is 6 studs wide and features opening rear doors and a removeable roof. The emblems on the van and postman are bespoke prints I created for this model. MINIFIGS AND OTHER DETAILS The model contains 4 mnifigs, a postman, customer and the husband and wife who run the post office and live in the appartment above. I've also included a bike and several animals. LEGO IDEAS My reason for designing this with an open back and with a unique style base was to try and distance it as much as possible from the modular buildings and hopefully give it a better chance of success on LEGO IDEAS. My hope is that if this was lucky enough to reach 10K then LEGO would view it as a standalone building in a similar way to The Old Fishing Store, and not something that would conflict with the modular building series. Anyway I hope you like the model. I had a lot of fun designing this one.. Feel free to let me know what you think. I'd also be massively grateful if anyone would be kind enough to support it on LEGO IDEAS as well. https://ideas.lego.com/projects/16ae1e95-cf30-41dd-ae23-36e07668df05 Thanks very much.
-
Howdy all! I’d like to show this expansive modular MOC that I’ve worked on and tinkered with for the past couple of months. It’s called BIONICLE Legacy: Storytelling with LEGO Bricks because I aimed to build something that conveyed what the theme represented to many fans, and the impact it had upon release 20 years ago. Even if you haven’t been overly fond of or familiar with the BIONICLE theme, I hope you’ll still take a few moments to check out this project! https://ideas.lego.com/projects/b5456207-ed0d-4f44-a02b-b0dae424158e I’m very hopeful and proud of this project, but it has been struggling to gain the needed attention to progress, and it clearly won’t get very far without your help and support. I greatly appreciate all support, comments, and shares. Fingers crossed! :) Uploading images proved to be a bit tricky, but you can also find higher-res images at Flickr:
-

[MOC] Midiscale Modular Office Building & Beauty Supply Store With Country Shop
Trekkie99 posted a topic in LEGO Town
Hello! Here is the latest addition to my "Midiopolis" Midiscale City. Enjoy! This Modular features an Old Office Building, with the first story having been renovated and occupied by a Chain Beauty Supply Store, leaving the remaining upper two stories intact in their original state. Next to the Old Office Building is a Country Boutique & Candle Shop. -
[MOD] Pirate Ship - Seacow - (21152 MOD) with Captain and crew figs - real life MOC
Murdoch17 posted a topic in Pirate MOCs
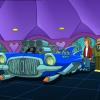
This strange, pixelated-looking ship with the cow-shaped figurehead has sailed the digital seas and plundered many a helpless Minecraft village. The NPC life was good for the three man crew of the "Seacow", but a chance encounter with a User Exit Portal (think like TRON) sent the pirate ship Seacow into the real world, albeit still in it's 8-bit form. Now, stuck in an unfamiliar world with strange logic, (Round surfaces? What is this deviltry!?!) the crew of the Seacow with it's Captain and nameless crew will have to navigate a way back to their computer paradise from the Pacific Ocean using "digitalized" mariner techniques. This ship was inspired by set 21152 (Pirate Ship) from Minecraft theme, (and the Seacow steampunk pirate ship from TLM) this pirate ship is finally done in real life! The ship's name (Seacow) is proudly placed on the stern railing. The ship breaks into three parts for storage (or for sinking scenes!), and comes with a plank for walking people into a watery grave that slides left and right that is located in the middle section. Here we see Minecraft pirate Captain Steve (also known as Peg-Leg Stevie, to differentiate himself from the famous original Steve) of the pixelated ship "Seacow". The crew are nameless and dimwitted, a curse of being former digital NPCs. They go by various nicknames the Captain gives them, but are most commonly known by the label seen above their heads: Pirate One (in middle with sash) and Pirate Two (on right in dark blue jacket). Comments, questions, suggestions, and complaints welcome! (Also, as an aside to the Moderator's, I put this is "Pirate MOCs" to hopefully get more comments on it... I don't think the "Licensed theme" is right for it, as it IS a pirate ship, after all!) -
Hi everyone I'm happy to share my third MOC which I have been working on over the last 2 months. I build the MOC with BrickLink Studio and used the Eyesight Render for my images. Carpenter's shop is a MOC modular building. The MOC consists of a fully equipped carpenter’s workshop, a small organic store and a two-story apartment. The MOC has a high level of details on each floor. It’s built on one standard 32 x 32 base plate and includes 4 minifigures and one dog. Minifigures Retired customer with her little dog Saleslady of the Organic store Carpenter and owner of the Wood Art carpenter's shop Resident of the apartment and amateur gardener. Level 1 – Carpenter's shop and organic storeThe ground floor contains a full equipped Carpenter's shop with workbenches, drill press, circular saw bench and many other details.The small organic store sells various vegetables and fruits. in addition to a counter and a refrigerated shelf, the store also has a small presentation area outside.Between the two stores is the passage and stairs to the apartment above.Impressions Level 2 – Kitchen, living room and terrace of the apartment Living room and functional kitchen with small dining area and bookcases. Large terrace with raised beds, overgrown pergola and barbecue fireplace. Impressions Level 3 – Bedroom and bathroom of the apartment Small bathroom with toilet, bathtub and sink. Bedroom with bed and closet under the pitched roof. Impressions Level 4 – Roof Flat roof with small exit hatch and antenna. Impressions Thanks very much for reading and I hope you like my third MOC. There are more pictures on Bricksafe and feel free to support my MOC on Rebrickable and let me know what you think about. At the moment I am building my MOC with real Lego bricks. As soon as possible I will post any photos of the real lego building.
-
Some pics of my almost square modular city. The layout consists of a lot of SNOT road and nine 32x32 plates. All modulars are placed on baseplates with plates under the modular baseplate. Sorry for my bad photoshopping skills. Most vehicles are mods or Mocs.
-
This is my first LEGO Ideas contest submission. Concept: one set to create multiple sports (more than shown here) so you can always build any sport you and your friends like with just one set, and start playing. The field is modular so you can I hope you'll love it, and will vote for it if you like it. Thanks! https://ideas.lego.com/s/ca:68a77abdd25247acb9f590a999774b55
-
Hello! I would like to show you my rendition of the Chez Albert Parisian Restaurant :) There aren't many things in common with the beloved modular, I simply wanted to have my own idea about what a Parisian restaurant may look like. And the one from creator was simply too small.. So without further ado, here it is: It all began in January 2018 when we visited our family and they had this painting on the wall (reproduction of a fragment only): This served as inspiration to my build which of course was not an exact representation of that building, but it was a good start. It took me around 18 months to complete this party due to size, family obligations and some "great" ideas I had like including all interiors and a 9V lighting system for the ground floor and one of the rooms on the first floor. But I like the effect :) You turn the lights on and off by removing part of the awning which gives you access to old style 9V battery box: The building is modular: On the ground floor there is the restaurant together with toilet for the guests and restaurant kitchen. There is also a staircase leading to apartments upstairs: I also thought that including a part of build that no-one will ever see or notice is brillaint idea, here is the restaurant ceiling for you to enjoy ;) You can also see all the lights - 3 for restaurant, 1 for the entry and 1 for kitchen. Then there goes floor number one and first apartment with bathroom, corridor, bedroom and living room with kitchenette. First view from the top: and view of the kitchenette: Second floor has similar layout, just different finish: The attic is a typical place for singles ;) No dedicated bedroom... and a view of the kitchenette (a shot from a WIP): and last but not least - the roof! It was supposed to be flat, but since this is LEGO it bends up like a boat... I plan to complement this building with another one of similar size. Together they will form a small wall of buildings, a mini version of a street. This is already a work in progress that will likely not be finished this year. But who knows ;) I hope you enjoy this one for now :)
-
Hello, I present to you my last modular. A cafe, the Alex 'Bar. Why Alex because it's my nickname IMG_7279 by alex peraux, sur Flickr Completely dedicated to fun (in these times of Covid-19 this is necessary) On the ground floor is the main room. I wanted to make a floor with 45 ° tiles. IMG_7289 by alex peraux, sur Flickr There is a large table where several people can meet for a glass (beer, wine or orange juice, it's up to you). The bar is in the corner of the building, there is a coffee machine on the side, the cash register is discreet but you have to pay for your drinks! IMG_7287 by alex peraux, sur Flickr Behind the door is the storage room with the garbage cans and the exterior access door. IMG_7290 by alex peraux, sur Flickr Upstairs we have the game room. An arcade machine, a dart board and a pool table. Everyone is having fun! IMG_7292 by alex peraux, sur Flickr IMG_7293 by alex peraux, sur Flickr IMG_7294 by alex peraux, sur Flickr Finally we are on the roof top. The atmosphere is already much more festive and musical! One DJ mixes the records while customers dance in front of the stage while others relax. IMG_7298 by alex peraux, sur Flickr IMG_7299 by alex peraux, sur Flickr IMG_7301 by alex peraux, sur Flickr I created the building under LDD to build it then. There are some change between lxf file and photos. I share the file with pleasure, if you want to build it or be inspired by it! You will find more photos in the album flickr https://bricksafe.com/files/higgins91/alexbar/batiment1.lxf
-
Modular railroad trestle (Lattice Girder + Truss hybrid bridge)
Murdoch17 posted a topic in LEGO Train Tech
I took two bridge designs (lattice girder and truss) and combined them. I know it isn't realistic, but the design is the best I could come up with. However, the truss part is removable via Technic pins, so it can become more viable for display at shows or home layout use. Here is the bridge with the top trusses on. The bridge with the top trusses removed. The 18 Technic holes could be used for decoration of some sort. The two ramps (which are included in the LDD file) use two-thirds of a brick every 16 studs over three track-lengths to make the gap from base-plate level to full bridge height. PLEASE NOTE: Their is a height restriction for the bridge with the top attached if you use the Maersk double-stack train cars or anything taller than set 10014 (My Own Train - Caboose). The bridge will simply not fit anything taller without modifications. (The train car is NOT included in the LDD file!) Here is my original inspiration for the bridge, courtesy of Flickr user Fireglo450: lattice girder bridge on Flickr The Lego Digital Designer file for my model is here: LDD file This bridge will be built in real life sometime around January 2017. Comments, Questions, & complaints are welcome!


transparent.thumb.png.64c75cc99e499bf757c13576b785e380.png)