Search the Community
Showing results for tags 'RC'.
Found 538 results
-

[TC11] Wheeled Scorpion
PKW posted a topic in LEGO Technic, Mindstorms, Model Team and Scale Modeling
Hi all, i've finally started my tc11 entry, i was playing around some building techniques i've improved on all my project and i initially wanted to build a robot with a razer like drive (omniwheel at the back and normal wheels at the front) but i found that drive inefficient and with a lot of friction, so i decided to built the "most compact 4x4 rubber-band powered flipper + lifter combo " and i'm not sure how it will end, but i came up with a concept chassis (it has working drive and lifting wedglets and it comes from the first idea of my entry (a sliding disk bot, but there are too many spinners here)), the problem is that i need to fit there the reloading motor (XL) the battery box and the two receivers/sbrick and i'm not sure i can (mainly because i've built a lot of compact robots and there were a lot more space than in this one) so i may came back to design a more efficent 4wd omni+standard drive and have a bigger footprint but i'm not sure, meanwhile (i'm currently building the mechanisms) enjoy the concept: drive: 2 XL motors, 4WD with friction gears main weapon: rubber-band powered flipper v2 (hoping for 2hg flipping, before it was ~1) reloaded by and xl motor secobndary weapon: lifting wedglets powered by and M motor (no electronics here) current size: 26x27 stud, with retracted weapon(battle position) -
I was really so busy that is a long time since i created a folder on brickshelf, and now it's time to add my remaining 8 bot: i'm also aiming to create a lxf file for each, but currently waiting for the first folder to become public. What i want to do is to keep this fist post simple with robots thumbnails, link to the future reply about them, descriptions and lxf files, let's start: Really hope that all the files and photos that i'll put there can inspire some TC11 competitors, unfortnately you can't fight bot in the entry video but i will really like to know how a fight between your bots and mine will end (despite my bot being ruled by different and more restrictive rules). Bot-focused replies will be posed one every day starting from tomorrow and then this first message will be updated with thumbnails, lxf files and more info, i'm doing this because i'm progressively dismantle all the robots and i want to keep them at least in digital form (so i'll have more pieces for my new ideas without loosing the previous ones). i also really want to thaks LRW (lego robot wars) group for the support that they gave to me while i was building and posting updates there: https://www.facebook.com/groups/105109289523663/?ref=bookmarks in order not no make this topic only a bunch of writings i have a small video about the first bot that will be showcased tomorrow (asap) so here all the robots: name: LIFTY description: this is the 2nd of the -ITY team, a series of simple robots made to show the archetypes of combat robots and also easy to replicate, they also fight each other but the winner wasn't this one. signature move: LIFTER weight class: 500g notes: despite being a lifter it is not really able to full lift the opponent but by going under it and pushing with the additive weight it can easily lift and flip up to 1kg bots! lxf file: lifty.lxf bot reply link(scroll down here): click here name: BITY description: this is the first of the -ITY team, also the most complex featuring a jaw that can be opened and rotate, it represents grabbers or control robots that aim to grab the opponent and push them into the PIT of oblivion due to the use of lipo BB (i have only one) and the excessive weight (700g) it didn't compete to the secret -ITY championship signature move: CLAW weight class: 500g notes: 4x4 transmission is really powerful but has a lot of friction while steering (even at smaller weight class) so the battle position of BITY is with the claw inclined down and front wheels lifted up and not touching the ground lxf file: bity.lxf bot reply link: click here name: FLIPPY description: 3rd of the ITY team it is a spring powered flipper! inspired by diotor this bot relies to a winch mechanism that is able to load and relase 4 9398 shock absorbers with only one motor! signature move: winch reloaded-spring powered FLIPPER arm weight class: 500g notes: unable to self right was defeated by lifty on the -ITY tournament lxf file: flippy.lxf bot reply link: click here name: CARBIDE description: replica of uk robot wars competitor carbide, grand finalist of series 8 and champion of series 9 signature move: horizontal spinner weight class: 1kg new technic motor used: 2x M for drive, 1x 9V motor (745699) for weapon drive: 2WD and can drive even if upside down! notes: the side armor is really tough but can be detached from th main body, also the bar has a quite good punch but luckily not enough to break lego pieces, it can remove armor and exposed wheels. also it is driven by an sbrick receiver so it has the advantage of PWM motor controls and no line of sight needed, may also join 3-robot matches due to not providing interferences with IR lxf file: carbide.lxf bot reply link: click here name: PULSAR description: again a 2016 competitor, smaller and faster than carbide, but equally lethal signature move:SPINNING DRUm with double single tooth weight class: 1kg replica new technic bricks notes: it requires only two channels to be controlled because the spinning drim is always one and a rubber band belt prevent the motor stall name: WITCH DOCTOR description: this replica is from BATTLEBOTS! unluckily i can't replicate the purple/green color scheme but this time i used old technic bricks so it is completely smash-able! but mind that its deadly single tooth disc smash bot before they can do anything signature move: single tooth SPINNING VERTICAL DISK weight class: 1kg replica with system bricks notes: my first inclined wheel drive (with chains) that really helps the bot steering even if 4x4 with all the wheels on the ground name: CARDIAC II description: the first fan designed bot that i motorized, it will fight witch doctor later this moth (hopefully) and it is armed with a deadly axe that can stop the 2000rpm disk of its opponent signature move: fast AXE weight class: 1kg replica with system bricks notes: it is the biggest bot i've ever built and has a pretty advanced weapon capable of rapid fire with a single M motor name: KILERHURTZ test chassis description: this poor bot was never finished (and used to test all other bots weapon) due to the armor of the original 100kg one being really difficult to replicate, but it's weapon really reflect the power of a 110kg machine signature move: rubber-band powered gearing reloaded AXE weight class: never finished notes: it can be operated with a full auto reload system and a tap firing button from the sbrick APP
-
 Here is my attempt to miniaturize the 42065 set. I wanted to make it as small as i could and take the main features of the 42065, a set i do not own myself, but i might pick one up to compare. Since the rubber caterpillar tracks suited this scale perfectly they where on my "must haves" list, a simple bogie gives it the correct stance and track tension. In the next image you can see the chassis and bodywork opened up, it is powered by a small AAA battery box, receiver and 2 L-motors, it is fun to drive and stops for nothing! Now i was hoping on some feedback on the paneling, i have not made a lot of bodywork with panels before and was hoping to get some suggestions and/or tips and tricks! Of course any other suggestion or comment is welcomed as well!
 -
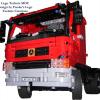
This is my Volvo fh16 750 rc moc. The main goal was to create a huge 1:10 scale model with less funktions but very strong and fast for this size. the propulsion from lego dirt crusher is fixed long side and the batterybox is in the front
-
Broken RC Unit, any electronic experts?
fresko posted a topic in LEGO Technic, Mindstorms, Model Team and Scale Modeling
Hi all! My RC Unit broke a couple of weeks ago, after mulitple malfunctioning problems. I bought it about 4 months ago (mid July) on Bricklink, and it worked perfect when I received it. I just had to clean up the battery compartment: some batteries of the previous owner leaked. I buildt some MOC's with it during the summer (I didn't use it intensively), until school started in September again. Like everybody knows, school/work=less time for hobby. During a period of 3-4 weeks, it layed on my Lego worktable (with batteries). I got some time, and I builded a MOC with it. When I wanted to try it out, it turned that the 'gas'-button (the left) of the remote didn't work porperly, in forward direction. Sometimes it just worked (I could drive forward and backwards), other times (mostly) it doesn't (I could only drive backwards, with sometimes a 'shock' in forward direction). When you went from 'backwards' to 'forward' the motors were braked. When you went leased the lever from 'backwards' to 'neutral', the motors were coast. The auxilaury plug worked fine. I tried to change the batteries (remote AND receiver), switched to other channels, tested with other motors (also not the 5292), another remote (my remote works perfect, I tested it with the RC unit of a friend), etc. When I was trying to find the cause of the problem, by trying to drive forward, it suddenly started to smoke. I immediantly removed the batteries and let it cool down. I tried again if it works, but it has still the same problems, with the exception that it doesn't drive, in any case in the 'forward' direction (of course I know I could just turn the cables 180° to drive forward, but then I couldn't drive backwards) AND if you press the 'forward' button long enough, the motors will turn with little shocks in the 'backwards' direction. It can be noted better when we attach a multimeter on the ouput, it sometime give some weird, very short tensions in the opposite direction. Moreover, the motors weren't braked anymore, they just coasted when you went from 'backwards' to 'forward'. I sent an email to Lego, and of course they doesn't sent replacements anymore. So, I screwed it open and I noticed the cables are melted a bit (both: the auxilaury plug AND the 'normal' plug), but I think that can't be the cause, because in the opposite direction everything works fine. Meanwhile, I bought a 'new' second hand Supersonic RC, but I'm still wondering if I could repair this unit? Are there any electronic experts on this forum? Kind regards, Fresko -
.thumb.gif.ad7c8d88b264ee812194946c07404504.gif)
[TC12][MOC] The Banana Scorpion
mocbuild101 posted a topic in LEGO Technic, Mindstorms, Model Team and Scale Modeling
Question: What do you get, when you cross a tank, with a banana, a scorpion, a V8 engine, and a bunch of stud-shooters? Answer: The Banana Scorpion! Color scheme: Yellow, with some black and grey. Driver: A Big Giant Banana-eating Tiger! (this one) Powered Functions: Drive: Tank tracks - powered by 2x M-motors. (also used for steering) Steering: Tank type skid steering. Engine: A massive V8 - powered by a high speed motor. Wacky function 1: Lifting hull mechanism - powered by M-motor. Wacky function 2: High speed spinning sweeper - powered via V8. Wacky function 3: The ability to tank-wheelie!!! (with some help...) Manual Functions: (aka: weapons) Cannon: A giant cannon mounted on the end of the adjustable scorpion tail. Stud-shooters: Front: 2x six-round, and 2x single-round - Rear: 4x single-round. Spring-shooters: 2x rear-mounted. (can be triggered by driver) The story of how The Banana Scorpion was built: -
RC Trabant 601
Mr Smith LEGO Models posted a topic in LEGO Technic, Mindstorms, Model Team and Scale Modeling
This is a MOC. It is built in scale 1:10. Features: Front wheel drive (L motor) Steering (servo motor) 4 speed sequential gearbox (M motor for changing gears) All wheel working drum brakes (1 M motor for front and 1 for rear wheels) Full independent suspension Openable doors, bonet and trunk (which hides the small battery box) Video: Note that the car is very small (only 35 cm long) so it was quite hard to put all these functions inside. Also recognize in the video that I had to use a special solution with mounting of the differential - because of small scale. The normal solution would be too wide. -
RC Dodge Challenger SXT
Mr Smith LEGO Models posted a topic in LEGO Technic, Mindstorms, Model Team and Scale Modeling
This is a MOC (my own creation). It is built in scale 1:10. I started this project one year ago and I wanted to make it as realistic as possible. The most complex part of this MOC is the 5+R sequential gearbox. It had to fit in very small space, so I had to use a new mechanism. It is driven by 4 motors: RC motor for drive, PF servo motor for steering, L motor for gearbox and M motor for lights. It has also realistic full independent suspension (I tried to replicate the real one) and doors with lock. Not like many lego cars, this has full interior with 5 seats. The front seats can move. The gearbox, steering motor, drive motor and two IR receivers are located above the front axle. The L motor for changing speeds is under the seats and the battery box is behind the rear axle. Video: Visit my youtube channel to see more of my creations! -

[MOC] Supercharged Muscle Car
paave posted a topic in LEGO Technic, Mindstorms, Model Team and Scale Modeling
- Electric: 2x L motor, M motor, IR-receiver, LiPo battery - Working supercharger - Positive caster angle - Independent front suspension - Leaf spring rear suspension - Opening doors with locks, hood, trunk - Removable body. Video: Some more photos: Body prototype: -

[MOC] Volvo excavator [video online]
steph77 posted a topic in LEGO Technic, Mindstorms, Model Team and Scale Modeling
Here I am again. This time the subject is one of the very usual kind: one PFS IR commanded excavator. They are many exemples of perfect excavator on the web...but I just wanted mine, of my own design. So I study it from A to Z and I had to answer many of the questions that many people answer before.Surprisingly, I do not answer the same at some of them :) But first this is what we are talking about: This model as been design in one only goal : a maximum of fun to play with it. In order to match that goal, each and every motor Is directly connected to each function. No mechanics in there. The function are ultra classical : drive, steer, rotate and the 3 movements of the arm. I make use of L motor for the tracks and lifting main arm. Other are medium size motors. I also choose to keep it as compact as possible. The main issue I find on many creation on the web is a too big body resulting in a too big arm. Too big arm need lots of power and often be very slow to move. I try to get what I think is the best compromise in size and use of existing motors. (No pipa I do not have RC ones :) ) The tracks gives the global scale. As you see the BB is in the lower part of the structure. This is due to compactness of the upper part but also for better design of this last spoken upper part. As the excavator rolls only on flat surfaces, no use of any suspension in it... view from the downside the tracks are well integrated, and even with the BB there is a good ground clearance of 3T wich is very good. I also try to implement good action range at the arm: And also small details that makes it looks good, like 3 sets of lights, toolbox, ... Back view, easy acces to the BB to swictch on/off and replace (often:) ) batteries The top part is designed so replacing M motor by Large one is easy (I do command two of them, awaiting arrival) So here it is, not the Moc of the year for sure, but sometimes it's good to achieve some simple goals. As expected and designed for, this one is very fun to play with. Hope you'll enjoy it Steph. -

[TC12] Truck Truck Boom Boom
EvilEnderman posted a topic in LEGO Technic, Mindstorms, Model Team and Scale Modeling
Hi all, I decided to have a go at this competition as it seemed like a laugh, and I had a lot of fun making what I currently have. My idea was to make a vehicle and strap a massive great machine gun sort of thing on it, and sticking it on the back of a truck seems like the perfect idea, right? But a truck with a machine gun on it's own would be rather boring, so I decided to give it adjustable pneumatic suspension, for those tricky bits of terrain it might encounter, and of course slam it right to the ground for that street cred. It's powered by a buggy motor, so it's pretty fast on flat surfaces. Mode 1, extremely low for maximum speed Mode 2, maximum height for off roading purposes! Of course, being hydraulic, the suspension can be at whatever height you want, but this is to prove the point. Now, my favourite part of this suspension is that it acts like the sort you'd find on one of those lowrider cars, and as such, it can pull off crazy moves like this, just for showing off purposes. The truck cab as it stands is still a work in progress, I'm not quite as good at aesthetics as I am at designing the technic part, so bear with me in that department! Here you can see the mechanism, it works with the pneumatic ram, and springs in order to give the desired effect. Tyre omitted for clarity. Apologies for the poor pictures, It's the fault of the camera. For the machine gun which I talk about, this is still all in my mind, however, I want to utilise some form of spinning disc mechanism and accelerate a plate or a technic beam at high velocity that way, but I will keep you all posted on that side of development Hope you all like it! -Ender -

RC MG Metro 6R4
All_About_Lego posted a topic in LEGO Technic, Mindstorms, Model Team and Scale Modeling
Hi! so, this is my first post on Eurobricks, I did actually make this model about a month ago, but I thought I might as well share it here too. MG Metro 6R4 by All.About.Lego, on Flickr So, here is a list of its functions: Front and rear independent suspension 4-wheel drive (RC) steering (RC) Working front and rear lights (RC) opening doors opening rear door/boot/bonnet (or whatever else you want to call it)... A detailed interior (with a roll-cage and seats) and loads of stickers... MG Metro 6R4 by All.About.Lego, on Flickr In total this model has 9 PF components: 2 L-motors, 2 pairs of lights, 1 servo motor, 2 AAA battery boxes, and 2 receivers/remotes. It was a bit of a struggle to cram all of them into such a small MOC, while still having independent suspension, and 4-wheel drive, but luckily I still managed to do it! This is the chassis I used for it: Lego Technic Compact 4-wheel drive chassis by All.About.Lego, on Flickr and of course, since I was doing the 6R4, I had no option but to make almost 40 stickers, just so I could recreate the iconic 'Computervision' livery which some of the 1980's group B rally cars had. MG Metro 6R4 by All.About.Lego, on Flickr that's pretty much everything, so I hope you like it, and any comments would be apprecited! Here is the YouTube video: Some more pictures: MG Metro 6R4 by All.About.Lego, on Flickr MG Metro 6R4 by All.About.Lego, on Flickr MG Metro 6R4 by All.About.Lego, on Flickr MG Metro 6R4 by All.About.Lego, on Flickr4 MG Metro 6R4 by All.About.Lego, on Flickr MG Metro 6R4 by All.About.Lego, on Flickr MG Metro 6R4 by All.About.Lego, on Flickr MG Metro 6R4 by All.About.Lego, on Flickr MG Metro 6R4 by All.About.Lego, on Flickr here are some pictures of the original car: MG Metro 6R4 - Original car by All.About.Lego, on Flickr MG Metro 6R4 - Original car by All.About.Lego, on Flickr MG Metro 6R4 - Original car by All.About.Lego, on Flickr -
 Hello everybody and let me present my version of a modified 42005 Monster Truck. It was my second set after my "dark age", that I've bought many years ago, after 42029 as supplementary set with a lot of useful pieces and planned to use for a live axle suspension and some other features for 42029 model. However, I liked the set as a simple and functional model and re-assembled it several times. Here is the model and later I'll provide the all details: A month ago, when I tired of infinite attempts to turn 41999 into a Muscle Car (the chassis isn't rigid enough, but I already did a great progress and hopefully will share it once) I returned to this model and set the task to motorize it adding 4WD, but keeping 4 wheels steering and current suspension (keep the original construction as possible as I can). First, I've analyzed the all existing attempts that I could find over EB, Rebrickable and YouTube and it happens that there were several MODs by different authors: First of all, it's @Splat’s MOD with all steered and driven axles (see topic here). I see no reason to duplicate its description, so let me just note that he saved the necessary features with adding Servo + L-Motor mounted under the hood and trunk. The chassis configuration is 4x4/4 or 4WD-4WS. It’s the best motorized model, I think, because of amazing simplicity and performance, but unfortunately it has a kind of “articulated” steering that isn't real, so was trying to made a "real" 4WD-4WS version, using this model as reference. Another one is Jan Dvorak’s (is he on EB?) MOD with all original features supplemented by on-axle L-Motor that drives the rear wheels and Servo for the 4WS. He added an additional 5X7 frame with differential that provided a necessary rigidness. The chassis configuration is 4x2/4 or RWD-4WS. Personally I don't like such a long axle sub-frame. However I've found a good idea of vertical gears inside the central shaft. The third one is @codefox421's MOD, inspired by Splat’s version, with the original front axle and non-steered custom rear axle with on-axle L-Motor. His custom rear axle, based on two portal hubs, is a quite compact and simple, but has no steering. The chassis configuration is 4x2/2 or RWD-FWS. It looks trial-ready with the portal hubs, but it's nearly impossible to add the steering here, so I got nothing from this model. An unusual @Tommy Styrvoky's MOD with an interesting feature: he modified the front axle, not the rear one, by adding a solid drivetrain with worm gear and on-axle M-Motor, so result is a front-wheels driven Monster Truck with oversized fake engine. The chassis configuration is 4x2/4 or FWD-4WS. Very aggressive! WRRRRR Daniel Wirasantosa’s (is he on EB?) MOD that differs from the previous ones by using of chassis-mounted L-Motor that drives the rear axle (that has a bit low ground clearance due to the 5x7 frame) and, moreover, he used a custom steering shaft that comes directly to the steering rack. The chassis configuration is 4x2/2 or RWD-FWS. Starting this version, I got a more or less defined plan: 4WD with off-axle (chassis-mounted) L-Motor that drives the both axles through the existing “drivetrain” (former steering shaft) and the off-axle Servo that steers the both axles through the custom steering shaft above the driveshaft. There were two more versions: Michael M’s stretched one and LEGOTechnic360’s solid-chassis version with no suspension, but they didn't help me with any new ideas. Nothing personal, guys, if you're reading it, I just had a full and consistent vision of my further MOD: Hull - the original with no changes. Axles geometry - original. I tried to save the all things like the wheels location, suspension mounting points, ground clearance, steering angles (that are even bigger a bit now)… And I still can't believe that made it, after a thousand tries! Suspension - original, with no changes. However I put the hard shock absorbers in the rear end, as the default ones were too weak to keep the BuWizz battery. Wheels - original. I decided to keep the original wheels and tires with no giant crawler ones or even Claas, that are too big even for a Monster Truck. Frame - mostly original, but possibly modified since it will have an L-Motor and Servo mounted above the axles (right under the cargo platform and hood). Drivetrain - it must be the ex-steering shaft that comes through the cardans inside the "big" ball joints to the both axles, connected to the L-Motor via the set of normal and clutch gears. Steering - for the all wheels, like in the original model, but the steering shaft comes above the drive shaft, in parallel with it and can slide a bit while the suspension moves. Enough the words...The most interesting part starts here. Following my plan, the bigger challenge was to modify the original axles - I tried several options, even trial-like with solid axles, but 4WS provides an amazing maneuverability due to big steering angles, so axle diffs are likely vital for such model (solid axles were making a permanent clicking noise in the transmission even with motor stalling sometimes) and I decided to make a fast Monster truck, not a slow crawler with a high torque. The drive train. There you can see how I did it: L-Motor rotates a set of 8T and 16T normal and clutch (required for the steering shaft) gears and then the main horizontal shaft, that were used for steering in the original model. After that the shaft rotates the 12T double bevel gears (ex-pinon gears from the original model), than 20T gears below, single-bevel 20T and the differentials. As result, the gearing ratio is 1:1.667 X 1:1.4 = 1.2334, and provides about ~100 RPM with 15.12 N.cm torque. The wheels connected by a wheel hubs, since I wasn't able to use the universal and CV joints with affordable steering angles, wheels position (I kept exactly the same position as in 42005) and rigidness. The steering. Here you can see the servo (mounted upside down in order to provide more space for the battery block above, steering shaft that goes above the driveshaft, 12T gears (pinions) and 13L racks joined to the wheel hubs. In order to allow the suspension travel, the gears has 1/2L offset from the racks and slides together with the shafts along the mounting points when the suspension compresses. It's a fully legal, but still allowed in LDD and works like a charm! The only mistake that the hubs must be from Claas, but they aren't presented in LDD unfortunately: Just to explain why I used the clutch gears (but with no gearbox actually, ha-ha ), the drive and steering systems intersects so hard, so followed TLG way and used the same solution that they did in the official models (42029, for example) - passed the one through the other. Green is a drive subsystem, blue - steering. The Axles. Here you can see how the steering shaft slides by 0.5L (notice the gap between the 12T black gear and LBG liftarm) - it provides about 1L suspension travel for the both axles. Other images, the story of a modified hull (by Phil), LDD file and instruction in PDF are coming soon...
 -

[HELP] RC Unit Compatible Controller
rkkm posted a topic in LEGO Technic, Mindstorms, Model Team and Scale Modeling
The darkest time has comed, bad forces of.... wait, meh just kids existing in my house knowded as my cousines just have used my rc controller as boat in pool. So, yeah - i need help with getting new, i have decieded that i will buy those pistol typed rc controller, i know that it has to have tacting at 27.145 mhz, but is that all? if i buy pistol typed controller tacting at 27.145 mhz will it actually work? And final question is range, my though is that normal rc controllers would have better range but correct me if im wrong. Im surprisingly happy even my controller was used as boat, maybe cause of that it was used as boat supposed to transport Little ponnies :P -
[MOC] Snowmobile 42065 C-model
TechnicSummse posted a topic in LEGO Technic, Mindstorms, Model Team and Scale Modeling
This is my first "published" c-model. It took me the last 2-3 weeks in total to build it. It was one of the reasons, why i paused on my speed-racer :) When my daughter (5) baught this model (42065 Tracked Racer), she wanted a lego rc car wich she could play with. But since the steering with the 2 tracks is pretty complicated and too hard for her, i decided to build a model with a regular steering from the set. I was thinking about building a halftracked vehicle at first, but then i decided to build a snowmobile. It was a really hard way, because of really limited amount of parts in this set (369) and the fact, that there is not a single gear included in the set . All in all i think i totally rebuildet the model 3-4 times until the current result. I still dont like it 100%, but its ok to play with for my daughter, and i need time for my own project again :) What funtions does it have?: - PF drive + steering - pendular front suspension - working handlebar (can be used as HOG) - virtual "differential" aka linear clutch at the rear axle for better steering. Motor drives left side front of the tracks, right side is connected with the clutch at the rear axle. - seat acts as PF-on-switch. A driver sitting down on it will move the battery-box to "on"-position :) -> you can see it in the video Here you can see the linear clutch in the middle of the "rear axle" footrests size comparision leftover parts Technically the chassis idea is based on something like this. -
[WIP] Super Fast Speedcar - current top speed: 32.4km/h
mocbuild101 posted a topic in LEGO Technic, Mindstorms, Model Team and Scale Modeling
I have decided to make a WIP topic for my tests of my speedcar, which is a car that I hope to get up to 40km/h or more. But I don't want this to turn into a discussion about wheels, I just want it to be a place to show my progress. This is where I will be doing most of my tests: - it's about 80m of very smooth car park + 15m of footpath and 10m of gravel. Here is my first car: 5:3 gearing, 725gm Here is the results of the tests: Yes, I know - only 24.3km/h, but it's more than I would have ever expected a few months ago (when I thought that the top speed for Lego was 27km/h). I have some work to do... -

Lego RC Monster Truck 4x4
CrisGarage posted a topic in LEGO Technic, Mindstorms, Model Team and Scale Modeling
It's a monster truck with a 4x4 trasmission and 2 speed gearbox powered by a SBrick. This MOC is very powerful because the first gear generates a great gear ratio. The chassis is simply and very strong and the suspensions are attacked to him. I couldn't use the "large hard shock absorbers" because i haven't them, so i used the "small soft shock absorbers". I added a V6 working motor, a rear openig hatch, and lights too! These pictures above are of the old version, in fact the axles and the position of the SBrick in the images are different from the current ones (below). The differential is removable to ensure more traction. The gearbox is very compact and strong (on that I worked a lot of time). The green axle is the input, while the red one is the output: the yellow gears are interested for the first gear and the blue ones for the second gear. The first gear has a gear ratio of 5:1 (very powerful), while the second gear has a gear ratio of 3.3:1 (balanced). The gear ratios were calculated by adding the gear ratio of the all transmission system, ie 3.3. And this is the outdoor video! I hope you enjoy my MOC! Leave a comment and a Like! ;) -

[MOC] Goldhofer AST-1X 1360
Uranox posted a topic in LEGO Technic, Mindstorms, Model Team and Scale Modeling
Today, I would like to share my first creation on Eurobricks with you all. A model of a giant towbarless Pushback Tug. To be exact, the Goldhofer AST-1X 1360. The real vehicle can lift up the front landing gear of the biggest aircrafts. I tryed to build all the functions, how they are build in the real Goldhofer, especially with the rear steering. The model has 8 RC functions:- Front wheel drive (XL Motor)- Front wheel steering (M Motor) - Rear wheel steering (2x M Motor) -- I had to decide, whether I would like to have crab steering or steering with different wheel angles to allow smooth driving. In the end I've chosen the second option, because crab steering is still kind of possible.- Raise cabin (M Motor)- Pneumatic pump (L Motor)- Raise landing gear (L Motor)- Close lid (M Motor)- Fix landing gear (M Motor) Unfortunately, the model has some flaws. The cabin is lifted in a weird way, because of the battery box under it and I struggled with the lifting section. I had to use really strong clutch gears and worn out valves, and even with that, the valves didn't switch always. Also I had a problem with one of the pneumatic cylinders, the reason why I used two pumps. As a result I had to glue two 2L axle between the pumps to the red 1x2 thin liftarms because of the vibration. I was sick of searching for another solution . Here is a quick render, made with LDD and Bluerender. Images with higher resolution on Flickr: https://www.flickr.com/photos/151347462@N05/albums/with/72157684495359644 I already took the model apart, but l would still love to hear your opinion, some tips or criticism. Maybe I'll give that model another go in the future. -

[MOC] RC SEAPLANE!!!
BrickbyBrickTechnic posted a topic in LEGO Technic, Mindstorms, Model Team and Scale Modeling
An RC seaplane! Larger than 42025, more functional and accurate! It has RC Drive, steering, and all flight surfaces working: ailerons, rudders, airbrakes, elevators, and flaps! Video: Thanks! BrickbyBrick -

Quick poll on how you like to control your mocs
Mechbuilds posted a topic in LEGO Technic, Mindstorms, Model Team and Scale Modeling
Hey guys! I was wondering how the majority feel about controlling their mocs or purchased sets. Do you prefer your legos to be mechanically operated by pushing levers or spinning gears? Or do you perhaps enjoy radio controlling your mocs? Maybe you're the small category that likes both and uses hybrid techniques like radio controllable tracks but manually operated arms on an excavator? Cast your vote. [There is a great option for polls at the EB site itself! I just helped you with that. No thanks. JopieK] -
The Lego set 42030 Volvo L350F is one of my favorite sets. I love the playability, but I wish there were more Volvo vehicles from the same series of earth moving vehicles that were equally playable. I happen to have a second L350F bucket kicking around from a second set purchase to make a A40 dump truck. I wish I had the Lego motorized excavator, but I have parts and this is Lego after all, I'll just make one. The first check in my mind is the bucket size. The L350F bucket is a spade nose rock bucket with teeth and segments. In real life this bucket is 13 feet wide and holds about 9 to 10 cubic yards. The EC750E's largest bucket is a general purpose earth moving bucket with a capacity of 9.34 cubic yards. It's width is unspecified(in the EC750E brochure), and while it will not be a spade nose bucket, the volume is close enough that maybe this could work. The first thing I've done is to figure out if/how the loader bucket could be used as a digger bucket. My initial scale is 1 stud width = 6 inches based on the 750mm grouser being 30" (2.5') or 6" x 5 being a good match for the Lego track being 5 studs wide. We'll see if I stick to this roughly 1:30 scale in the end. I'm going to document the build here: http://cloudslego.blogspot.ca/2017/ and discuss the problems that come up in this forum. Here is the first proof of concept on the bucket/arm/boom.
-

50+ km/h Hybrid LEGO RC Car 2.4GHz
janssnet posted a topic in LEGO Technic, Mindstorms, Model Team and Scale Modeling
For some time I'm working on a 2.4GHz RC controlled LEGO car. Trying to create maximum speed with a LEGO-based car using standard RC-components (sorry, not for purists). To make this work, I introduced some rules. The car must be build using LEGO parts, except for the battery, motor, speed control, steering-servo, remote-control and receiver (and optionally a car-body). Fully agree with comments regarding LEGO not being able to match RC-performance. But, nevertheless, I enjoy pushing the limits to see what speed can be achieved using (mainly) LEGO. It has been a great journey. Lots interesting problems to solve: reducing wear-out, maximizing traction, optimize direct steering, increasing control with suspension, etc. Happy to share the results so far. Haven't done a proper speed check, but some rough calculations show a speed above 50+ km/h. Please check the video: LEGO RC Car video. LDD available on request. Open for comments, suggestions, improvements. -

Finished Monster Truck MOC! *Free Instructions Now Available!*
Leonardo da Bricki posted a topic in LEGO Technic, Mindstorms, Model Team and Scale Modeling
Today I present to you my latest build: a motorized monster truck, still unfinished. Now Finished! Background: It was started last weekend after reading Sariel's book, "Incredible Lego Technic," which featured Crowkiller's monster truck MOC. I looked it up on his website where he had a photo of the chassis and the words "This model could easily be modified to be motorized and driven..." Now you all know what happens next... The Original: Crowkiller's excellent model is a manual 4x4x4 monster truck, with 5 link live axle suspension with diffs, a central differential, all-wheel HoG steering, a fake V8 connected to the drivetrain, and a detachable, and therefore, interchangeable, body. The Motorized Truck: The chassis length was increased by two studs in order to accommodate the two L-motors used for driving. The suspension geometry remains the same, though I will probably have to use the hard shocks... A Servo motor was added to control steering, as well as a standard AA battery box and a V2 receiver. I wanted to keep the central differential, but it would have required the body to be too wide. I also tried to incorporate the V8 engine, but the Servo motor and the steering shaft restrict the placement of gears to connect the fake V8 currently. What Is Planned: 1. A body (or two, or three, or four). 2. Reinforcement of the steering. At the moment, if I crash into anything at speed, (which happens frequently ) the front portion of the axle will bend to the side where the impact occurred. Which is not good. 3. Changing to the hard shocks, as the additional weight is already causing the suspension to depress most of the way... What Is Finished: See below what has been done. Also, LDD file instructions are available here. Photos: Wip MT side Wip MT front Wip MT under The Model Is Now Finished! Free Instructions Are Now Available! Click Here! More photos and information is on Page 2! Monster Truck Thanks for looking, feel free to give your honest opinion (anything from "I love it!" to "Why the &%#@ are you copying other people's work?!" is acceptable ) and any advice you want to. - Leonardo da Bricki -
 Hi all, even if this probably doesn't draw anybody from the woodwork today in the age of the Arocs 42043 ;-), i have - inspired from the better performance of the Arocs crane - recompiled my full featured Unimog 8110 from 2014 (http://www.eurobrick...00#entry1964626 and some following posts) and eliminated some remaining weak points: - better bracing of the XL propulsion drive train (now 100% reliable without any crackling gears) - double airpump now mounted the two pumps with offset to each other so the compressor delivers continuously pressure within a turn - replacing the M motor with a L motor which fits perfectly into the same location - preserving tiltable cabin even with battery pack placed within the cabin... So i have decided to rebuild the Mog from the scratch and to document the needed modifying steps with detailled photos, s.b. link... some parts of the following text and pictures are just a replication of some other postings by me in the Unimog Modification Thread but because these posting have a somehow WIP character which makes hard to recognice the final solution i have decided to present the whole final stuff in an own new thread - so if someone searches for a full-featured Unimog-MOD it can be found at one location. @moderator: if you think that this doesn't deserve an own thread, please feel free to move/merge this to the Unimog modification thread - sry for inconvenience! So here is the writeup of all the new features and improvements integrated in the Unimog. Here is the complete overview of the new features / improvements: New features: openable doors and windscreen wipers working steering wheel 3-side tiltable bed with real loading gates with locking mechanism Remote control for driving and steering - and this feature preserves the working steering wheel as well as the 3-side tilting bed and also the fake engine below the cabin. Basic requirement is 100 reliable steering and driving - Motors and receiver are quite invisible from the outside and do not badly influence the appearance of the Mog. rear PTO pass through (with PTO driven trailer, sb) so rear PTO can used even when the crane and outtriggers are rear-mounted flashing beacons on the cabin roof - activated when driving Improvements: PF switch for for better operating of the functions-motor, so you have not to change direction with the battery switch (which is very annoying) Double airpump compressor incl. airtank for more lifting power and constantly high pressure during crane and attachment operation. Airtank gives you also more flexibility during crane operation because cause of the air reservoir you can simultaneously move the pneumatic stuff and turning the crane smoother steering by fixing some steering issues Better weight balance (the standard Unimog is not really well balanced cause of the heavy battery box on the left side) More motor power for the functions and the compressor by replacing the M-motor by a L motor --> really a big improvement, strongly recommended! Attachments: - some front attachments: 8848 style pneumatic scoop pneumatic front-loader, PTO driven mower, PTO driven street cleaner - 8063 inspired trailer with PTO driven bed and deployable stand Primary goal was adding all these features and improvements but not to change the overall appearance of the 8110 because IMO this is very very good. In addition all standard features like fake engine and tiltable cabin should be preserved. Also the basic design with the gearbox etc. should be preserved. So all new features should be integraded homegeneously and - in best case - invisible. At this final state of the Unimog MOD i'm quite pleased with the result because all goals have been reached - IMHO ;-) Important remark: Some of the integrated mods are not my own but have been basicly "developed and designed" by others people, mostly eurobricks members. See the credits at the end of the posting! Pneumatic driven bed which can be tilted to all 3 sides - including real loading gates with locking It is strongly inspired by the driven 3-side beds of eurobricks members barman and tripletschiee - many thanks to both of you for your very well done solutions! . There were no instructions available but there exist a bunch of photos of both solutions so i could reverse-engineer the tilting mechanisms. Most important concepts are a rotary cylinder base (based on barman's solution) a flexible connection to the bed ((completely "stolen" from tripletschiee, a very simple and intelligent solution ) and a "sub-bed" which allows to unlatch one of 3 possible tilting sides (rear, left and right): For easier rebuild i have documented the whole stuff with many detailled shots - see links section at the end. For the loading gates (see photo above) incl. a nifty locking mechanism i found a very good inspiration from EB member stefan_betula_pendula. - in this posting i have already described all deatails incl. many photos: http://www.eurobrick...00#entry1972050 Double offset airpump compressor with airtank A Double airpump compressor incl. airtank provides more lifting power and constantly high pressure during crane and attachment operation. The dual airpumps are mounted with offset to each other so the compressor delivers permanently pressure. Supported by the airtank the whole system now offers in each situation enough and high air power so the crane operation has now always enough lifting power and quite fast response time. This offset needs some more space so this improvement needs one quite deep modification of the chassis which can not be applied to an already build unimog: More motor power for the functions with a L motor The M motor can quite easily replaced by a L motor if the unimog is build from scratch for all this mods. This is really a big improvement and it is strongly recommended! Turning the crane or driving something with one of the PTOs has now much more power. For the new double pump compressor (s.a.) the additional power is also appreciated. But one Remark to the pictures above: better use a standard 24th gear instead of the shown clutch - the double pump compressor appreciates the full power (with a clutch something gets lost within the clutch when airtank is almost full and no pneumatic operation takes immediately place) - with i standard gear i never get a stalled motor but always full air power... RC for driving and steering incl. a working steering wheel Today all stuff has to be RC - and even i'm not really into it i saw the challenge to integrate RCing into the Unimog together with the tilting bed (s.a.) - this tilting bed prevents from using the typical solution be placing the XL motor for propulsion in the middle of the chassis - there is simply to room for it. After a lot of try&error solutions i finally managed an RC-solution which integrates very well and is quite invisible from outside (btw: thanks to EB member Pat Ard for his initial idea placing the XL into the original battery compartment --> battery has then moved into the cabin) drives without any crackling of gears steers as well and reliable as the direct-servo-solution-on-fron-axle (steers also very well when not driving!) - a return-to-center is really not necessary with such slow vehicles... preserves the full suspension travel of the front axle (with the servo mounted on the front axle the travel must be reduced by the height of a 1x2 plate to prevent the servo from colliding with the pistons of the fake engine (from below) has a working steering wheel has a quite invisible IR receiver Integration of the XL motor: Overall the steering-motor, the accu battery and the IR receiver can be integrated very well into the cabin - the cabin then simply has a typical center console (M motor), a build in refrigerator box (gear reduction for steering) and a tool cabinet (accu at the back of the cabin): One remark to the steering solution: Here the servo motor was not an option for me, despite the fact, that the steering performance of the servo is perfect when mounted direct on the front axle - as shown e.g. by EB member Pat Ard. But this solution allows no working steering wheel because it is simply impossible to connect a universal joint and the steering CV joint (cause of too steep angle and too short distance). Running the servo from within the cabin by driving the standard steering gear-train of the 8110 is also no solution because then the steering performance is somehow mediocre: the servo has enough power but IMO the steering gear train from motor to the rack is too long with too many gears involved so there is to much backlash - and because the servo can just spin a 1/4 for a full steering lock and because of very much friction caused by the big tires this 1/4 round of the servo is partly somewhere lost in the steering gear train... These problems can all be avoided with my final and very well working solution: Steering driven by M motor with a quite high gear reduction in the cabin performs excellent, but only with a double clutch gear (because only one is too weak for a powerful and fast enough response steering even during stop cause of the high resistance of the big tires): For the working steering wheel i have 99% applied the solution of tripletschiee, simply because it works like a charm and is very well integrated in the cabin Openable doors they were inspired by the solution of EB member Pat-Ard but slightly improved by adding a second hinge so now the doors are guided very well and stable... Using a PF switch switching direction via battery box is always a pain --> therefore i have added a PF switch - IMHO quite well integrated (and nowhere stolen ;-) Fixing steering issues There are two problems which needed being fixed: a) better steering lock/angle: This can be done by replacing the 4 3/4 pins (DBG) by 4 1/2 pins (LBG). Removing the pins completely is not the best solution because then the tires can rub on the chassis when suspension is compressed and you will steer... b) making the steering easier - out of the box it is way to hard - this is not only cause of the high friction of the tires but also cause of 4 red friction pins involved. In addition the whole front axle has a strong bump steer. well, i have tried several solutions: - Nicjasnos complete new front axle: this one has by far the best suspension and steering and reduces the bump steer a lot. BUT: it looks to bulky and therefore the look isn't realistic for a Unimog... therefore i have discarded it after building, installing and testing - applying the full fix of Junkstyle Gio (http://www.eurobrick...1) which replaces all 4 friction pins with frictionless-replacements: this makes the steering indeed very easy but on the other side now each grain of dust colliding with a front wheel can change the steering angle...it's too easy.. Therefore i have applied only the half of the fix of Junkstyle Gio so its a mixture of friction and frictionless pins --> IMHO is the best compromise of easyness and stability for the steering and the look of the front-axle: Adding a PTO pass trough for the crane - switchable between turning the crane and passing through the PTO This enhances the flexibility of the Unimog a lot beause now you can add any PTO powered trailer even with back-attached crane. There is a switch which allows to switch between spinning the crane and runing the PTO pass-through. PTO 1 has same speed as the PTO of the chassis, PTO 2 is slightly geared down (12:20) This mod is not from myself but it is from EB member dr_spock. A very well done solution, works like a charm and the full modularity of the crane and the outriggers are preserved. Highly recommened! Thank you, dr_spock, for providing me some detailshots. Trailer with dumping bed driven by the PTO pass-trough This trailer is inspired by the 8063 Trailer and by a trailer made by EB member dr_spock (which is also the designer of the pass through PTO as mentioned above). In fact: It is the 8063 trailer with slightly wider bed, bigger wheels and ability being connected to a mechanical PTO. In addition the tilting still can be manually operated. The clever coupling is from dr_spock. But the full power-gear train is completely my own MOD. The original 8063 trailer has a nice stand that can be deployed via a lever mechanism that keeps the trailer upright when it is not attached to the towing vehicle. I wanted this stand being preserved because it works well and it is simply necessary for a trailer with such an axle layout: Preserving this stand makes a it little bit tricky to integrate a well braced and geared down gear-train from the coupling to the LA-base but i succeded: Details can be found in this posting: http://www.eurobrick...00#entry1948575 Flashing beacons i ordered them by EB member Zmei_gorini4 (Kirill) - they work perfectly and look very good - IMHO they are worth the price...good job, Kirill! More details can be found here: http://www.eurobrick...25#entry1976100 Links to many many detail shots: Modded chassis: Building the modded chassis from scratch with all the following new features integrated: 3-side tilting bed, XL motor for propulsion (RC), L motor as replacement of the original M motor, double offset mounted air pump, preparation of airtank mounting plus hose guidings and covers for both motors (XL and L). Rear axle is 100% original and front axle has only applied the known steering fix for smoother steering movement and greater steering lock (s.a.). Of course in both axles you must switch the gear ratios vice verca in the portals (with 8:24 the Mog drives very well)! You can rebuild it with the photos found here http://bricksafe.com...ll-mods/chassis together with the original BI of the 8110. Modded Cabin: Detailed photos how to integrate RC steering: http://bricksafe.com...ontrol/Steering Detailed photos of the working steering wheel: http://bricksafe.com...l and PF switch Detailed photos of openable doors: http://bricksafe.com.../Openable doors Because these 3 mods have been done at different states of the Unimog modding there can be some inconsistences between some photos - build carefully together with the original 8110-BI because these 3 cabin mods slightly influence each other! Flasing beacons: http://bricksafe.com...lashing beacons Rear PTO pass-through: detailed photos can be found here: http://bricksafe.com...TO Pass through Trailer with tilting bed driven by the PTO: detailed photos can be found here: http://bricksafe.com...Unimog/Trailers - together with the original BI of the 8063 trailer you can easily rebuild it. Front loader attachment: detailed photos can be found here: http://bricksafe.com...ts/Front Loader 8848 style scoop: detailed photos can be found here: http://bricksafe.com...pneumatic-scoop PTO driven mower and street cleaner: Photo instructions can be found here: http://www.technic-d...odell=126&bid=c and http://www.technic-d...odell=126&bid=d) Inspirations and credits: New features: openable doors were inspired by the solution of Pat-Ard but slightly improved by adding a second hinge so now the doors are guided very well and stable... For working steerng wheel i have 99% applied the solution of EB-member tripletschiee, simply because it works like a charm and is very well integrated in the cabin - modified by me to work together with my RC steering solution The 3-side tilting bed It is strongly inspired by the driven 3-side beds of eurobricks members EB-members barman and tripletschiee - many thanks to both of you for your very well done solutions! RC is completely my own solution and design, for steering as well as for propulsion The rear PTO pass-through is from EB member dr_spock. A very well done solution, works like a charm and the full modularity of the crane and the outriggers are preserved Flasing beacons are bought from EB member Zmei_gorini4 - integration in the cabin by me Improvements: PF switch is completely my own design Double compressor with offset airpumps is completely my own design steering fix is inspired by the solution of EB member Junkstyle Gio but modified by me better weight balance by placing the battery box with in the cabin is completely my own design replacing the M motor by a L motor is completely my own design Attachments: The 8848 style pneumatic scoop is 100% the design of EB member thomol (http://www.eurobrick...75#entry1164528) The pneumatic front loader is build based on the design of EB member Tim S. PTO driven mower and PTO driven street cleaner i have found here: http://www.technic-d...odell=126&bid=c and http://www.technic-d...odell=126&bid=d) Trailer with PTO driven bed is inspired by the 8063 trailer and by a trailer of EB member dr_spock. The clever coupling is from dr_spock. But the full PTO-gear train is completely my own MOD
 -

Tiny tracked vehicle with amazing power functions
Leonard Goldstein posted a topic in LEGO Technic, Mindstorms, Model Team and Scale Modeling
Hi everybody, my first topic, my first moc ... With this moc a had two goals building a tracked vehicle: 1. Make it as small as possible 2. Maximize playability with lots of power functions To the first point: the distance between the tracks is only six studs and the whole vehicle fits into the shovel of a 42030 And now the power functions: it is using a 8878 rechargeable battery box, an SBrick and four M-motors. Two motors are used for driving and there is a subtractor inside (which means one motor runs the vehicle forward/backward, the second motor is turning it left/right). The third motor runs the container lifting device at the back and it also locks/unlocks the trailer coupling. As it is double worm geared it is very slow, but very strong. The last motor runs the lifting device at the front. As there was absolutely no space left for any more gearing, it works by using a rope and a set of pulleys. Enough words, here some more pictures: As you can see these are pictures made with the LDD and so it was easy to extract the power functions: All just digital? Of course I know what you are waiting for. And here is the video showing this little thing in action: http://dai.ly/x5tmoni If you like my creation and want to copy it you can find a LDD-File here: http://bricksafe.com/pages/Leonard_Goldstein/tiny-tracked-vehicle There is also a background picture availably for your SBrick-profile (as you can see in the video). Maybe you have to adjust the resolution depending on your mobile device. Some notes to the LDD-file if you want to copy this: 42003 on the roof are not placed exactly as this is an illegal lego connection. Watch the video for exact position. Same for 32039 at the rear axle. The lifting device at the front needs a rubber band to keep the rope tight. Otherwise the rope would fall of the pulleys. For the lifting device I used a beam with ball cup which is not available in the LDD. I replaced it by 6M Half beams and a 2M cross axle. The cable routing is quite tricky as the vehicle is so small. I used same cable fixer to make this easier. Ok, no Lego-parts. Shame on me. But you can get them in every do-it-yourself store for a little money. Greetings Leonard Goldstein

