Search the Community
Showing results for tags 'Power functions'.
Found 368 results
-
[MOC] 4x4 Super Crawler V2
JJ2 posted a topic in LEGO Technic, Mindstorms, Model Team and Scale Modeling
Here comes something powerful, duel motor, 4x4... IMG_0374 by JJ2Sam, on Flickr Video and description coming soon... Look at post #10 -
Hello, I'm happy to introduce you to my modular garage with power functions and pneumatics: This modular has the following components: 1x Rechargeable battery box (8878) 1x M motor 1x air tank 1x manometer 2x small pumps (6L) 2x small pneumatic cylinders 2x medium pneumatic cylinders with square base Approximately 1,5m of pneumatic tubes (I didn't count, maybe there's more) I always wanted to mix technic and regular system bricks and I already did so with my Ice Cream Parlor (http://www.eurobrick...opic=111129&hl=). Now, with my third modular, it was time to introduce pneumatics! :D This is the coolest part of LEGO for me and to increase the cool factor I have used manometer as well :D This building's purpose is mostly to have fun, so I didn't care that much for the fact that gigantic manometer on top of the building is rather rare sight in real life ;) I simply always wanted to have one and observe the changing pressure as I play around with my model and here it is! Anyway, we have here compressor that powers cylinders that open the doors (2 small cylinders) and rise and lower the car lift (2 medium w/ square base). The list accepts cars up to 7 wide and has a lot of lifting power. You can remove all three sections of the roof for easy access. Here is full gallery on Bricksafe: http://bricksafe.com...modular-garage# And here is movie on youtube: Enjoy!
-

LDD Lego Ideas MOC: Amtrak Amfleet I Series Passenger Cars (5 Pictures
JesusIsLord posted a topic in LEGO Train Tech
Taking a break from my High Speed Train Project, I decided to once again attempt an Amfleet car, easier said than done due to the curved design of the car, I also plan on building a AEM-7 to go with it and upload the locomotive and passenger car to Lego Ideas. The carriage is 8 studs wide, I attempted to make it 6 studs wide since it's going on Lego Ideas, but because of the way the body of the passenger car curves inwards on the bottom (and top), it looked horrible being 6 studs wide. The car contains 22 seats and a bathroom (inspired by the Horizon Express bathroom), opening external doors, I have not built internal doors (yet), the real train has sliding doors, but that is not possible (at least for me, I'm sure someone else could do it) with LEGO, currently the passenger car contains 662 pieces, but that number will be increased when I add opening internal doors. The bogies are able to swivel 360 degrees which will allow them to turn with ease on the tight turns of standard LEGO track. Please also check out Shupp's Amtrak AEM-7 and Amfleet Coach from 2011. Thanks for reading, God Bless Christ be with you all .lxf file: http://www.mediafire...mp15/amtrak.lxf -

Saberwing40k's WIP and Ideas thread.
Saberwing40k posted a topic in LEGO Technic, Mindstorms, Model Team and Scale Modeling
Well, I've got a bunch of ideas and other random things, as I am building more often, so rather than make a dedicated thread for every off the cuff thing or proof of concept I turn out, I'm just going to compile it here. The first item is a proof of concept chassis for a Gottwald crane, which I meant to be an AK-912, but there are many different models that have a similar chassis, including the AMK-1000, and the AK-680. It's a WIP, but I have other projects I want to finish first, so I made this, and am currently working on an LDD file. Once that file is finished, this thing will be taken apart, so I can use the pieces for other projects, and once I am ready to give this my all, I will use the LDD file to rebuild it. Gottwald AK-912 chassis. by Saberwing007, on Flickr The model is meant to be like an official set, like 42043, meaning one motor, and no RC. The chassi has a V-12 engine, like the real thing, and 8 wheel drive, with a single middle differential. I found that given how far apart the axles are, a differential is required between the 2 sets of driven axles. The different angle between the steering axles is achieved by a diagonal beam, which is very effective. There is almost no backlash, and the axles are in sync automatically. Also, due to how it works, the axles are set to the correct angle relative to each other automatically, due to how it is built, without any calculations. Another picture of the front unit: Gottwald AK-912 chassis. by Saberwing007, on Flickr In addition, the chassis can be separated into three parts, like the real thing. Seperate by Saberwing007, on Flickr Although the steering on the front and rear units works well, it's connecting the two that has proven problematic. I blame lack of stiffness in the middle reversing linkage, and using friction pins for every steering connection. But, for now, this is finished. I will get back to it later, I don't know how much later, though. -

Ultra Small Forklift - Muravi
mahjqa posted a topic in LEGO Technic, Mindstorms, Model Team and Scale Modeling
So I prefer to build small. I managed to miniaturize all the functionality of a standard forklift (driving, lifting, tilting) into a chassis only 11 studs wide. One of the advantages this offered me (among better strength, speed and maneuverability) is that I was able to build an entire warehouse to muck about in. This wasn't always the plan. I thought I'd just build two or three containers to show off its functionality, and that would be it. Then, the Android Sbrick app crashed and burned (or at least, it did on my phone) and it took two months for them to update the thing into relative functionality again. So I had plenty of time to build some scenery. For the enthusiasts; I've uploaded a LXF file to Vayamenda.com so you can tinker with it. (By the way, if you're a person who has built a forklift, could you link me to a picture of your forklift in this view? https://www.flickr.com/photos/28134808@N02/26063611241/ I'm very curious to see how it's scaled relative to other people's MOCs.) -

[WIP] Grave Digger
AxeSlash posted a topic in LEGO Technic, Mindstorms, Model Team and Scale Modeling
I've been lurking here for a while but have never been satisfied with any of my MOCs enough to post them here. The nearest I came was an MLRS that worked well but looked rubbish :P Anyway, I'm in the process of designing a Grave Digger monster truck replica (approx 1:15 ish scale). Features: - 4 wheel drive - 4 wheel steering - Steering modes: 2-wheel, 4-wheel, crab - 4-link, very long travel suspension - Suspension travel is also to scale. Almost. - All motors contained in the chassis (no servo-on-axle affairs) - SBrick control - Tyres from a Tamiya Lunchbox I'm designing this in Sketchup and rendering with the Twilight Render (free) plugin. Note that I've drawn all the pieces myself, and they're all drawn to have a low polygon count so that my machine doesn't croak to a halt. Some of the pieces aren't very accurate atm (e.g. the XL motors). So far, I think I've got the chassis designed: And here's a couple of closeups: Issues I can foresee so far: - Friction from so many knob wheels - Bump steer (but I don't want to sacrifice suspension travel by putting the servo on the axle) - Not sure whether having the steering upside down like that will have any negative effects. - Not sure if I can get all of the parts in green that I want Can anyone see any other potential issues with this design (before I start putting in BL orders)? Thanks -
[MOC] Motorized Bus with Instructions
HallBricks posted a topic in LEGO Technic, Mindstorms, Model Team and Scale Modeling
Hi! This is my first (maybe second) post on this forum, but I've been following it for quite a long time now. I started building with Lego Technic about five years ago and now I would like to share with you the video of my latest creation which is this Motorized Bus. This model features: Drive, powered by two L-motors Steering, powered by a Servo Motor Opening front and back doors powered by two M-motors It also has a very detailed fake V6 engine in the back. I started building this model about a year ago. My spare time is rather limited since I'm a student, and I've been working on other projects as well, but there's still a lot of work behind this creation. The doors were the most challenging things to build and it took a very long time to get them right, I've rebuilt that mechanism at least five times. It was also very hard to make a mechanism that would fit under the roof of the bus and not be visible through the windows. Well, now it's finally finished and I'm quite happy with the end result so I hope you like it too and enjoy watching my video! -
Nuclear Building is a round modular building whose shape resembles a mushroom cloud. Model characteristics: Building comprises 3 stories and has a height of 40 bricks. Fits into 32 x 32 modular standard and can be put near any other modular building not taller than 28 bricks. Building is equipped with a functional elevator. Model consists of over 4100 parts. Some of the architectural features: Model consists of 4 modules: The following picture shows how the modules are connected together: The building is equipped with a functional elevator: Despite its oversized top floor, the building can be put near any other modular building not taller than 28 bricks. The connection points are embedded in the fences. Additional links: Photo album on Flickr. Building instructions are available on Rebrickable.
-

How to Motorize the LEGO Mars Rover?
sir_launcelot posted a topic in LEGO Technic, Mindstorms, Model Team and Scale Modeling
I am looking for some suggestions. My daughter is building the Mars Rover set (go here for the details: http://www.eurobricks.com/forum/index.php?showtopic=98222) for a presentation at school and I told her I would help make it operate by remote control with one of the power function kits. Problem is that it is a lot more complex than I thought. (I have no experience at the expert LEGO building). I think I can maybe get it moving with a remote, receiver, and simple motor attached to one wheel, but I do not have any idea how to do the steering and don’t know how to move any of the other functions (camera, antenna, robotic arm). see It was not designed to be converted to power functions / motorized. Here is a photo of the underside: I am not sure the easiest / best way to add power for drive and steering. It just has to move a little bit in the classroom, not drive outdoors in all terrain. I posted in another forum and a member suggested that I post here. Any suggestions to help me figure out what I need to do and what to buy to easily make this work would be much appreciated. Thanks much! -

[WIP] Amphibious Sherp 4x4
Zerobricks posted a topic in LEGO Technic, Mindstorms, Model Team and Scale Modeling
After skyping with a good friend of mine braker23 he gave me an idea to make A sherp 4x4. Here's the real deal: It took me an hour to make a first protoype in LDD, which you can see here: As you can see everything is built around the boat hull, so that the model can also float like the real thing. And here's the first rough build in the water: I used track elements wrapped around tumbler wheels to get the paddle shape. I will need 4 more track elements since 2 can fit with ease on each wheel: Underside you can see the reinforcments keeping the boat hull secured: So far there are soem problems with 36 tooth gears skipping under high torque which I belive I can fix by using 8L axles with stop instead of current 5,5 ones. If that doesnt help I can always use small turntables. I also need 4 more tracks, but currently I spent all my money on parts for silverfox and oshkosh 10x10, so these will ahve to wait a bit. I very surprised on how well this thing floats, but it cannot support much more weight, so the bodywork will have bo light and basic in order to keep it from sinking. Whats your opinion guys? -
RCBRICKS Lego compatible servo motors, reviewed by Sariel
Saberwing40k posted a topic in LEGO Technic, Mindstorms, Model Team and Scale Modeling
Today, I found a video from our good friend Sariel about a new, Lego compatible motor system called RCBRICKS, from a startup of the same name. These motors look quite unlike PF motors, and seem to be based off of high torque hobby servo motors, and as such are quite capable. Watch the video for more information. (It's in Polish, but the subtitles are just fine, and in English.) Here are the Pros and Cons, as far as I can see: Pro: Lots of power Highly responsive Great range Should be relatively inexpensive. Compatible with any kind of RC gear. Con: Not compatible with Lego PF system in any way. RC receivers and transmitters are expensive. Questionable battery choice. Motors are entirely new shapes, and not readily compatible with the system, meaning that they are not drop in replacements Unproven startup. Receivers and batteries are not Lego compatible. I don't know, they sound okay, but the thing is, what most people have problems with is either the power supply, or receivers of the Lego PF system, and not the motors. While I think it is a valiant attempt to rectify the Lego systems short range, I don't think they are going about it the right way. I am also kind of dubious about the idea of using a USB batter pack for this, as it is not really Lego compatible, and has to be awkwardly rubber banded in place. It would be preferable if there were a way to go from RC standard to LPF standard, as having all new motors might alienate people who just want a drop in PF receiver replacement, like SBrick. What do you guys think? -

42029 MOD w/Power Functions
DamonMM2000 posted a topic in LEGO Technic, Mindstorms, Model Team and Scale Modeling
42029 Lego Technic Customized Pickup Truck in highly modified form. Features include ultra-firm dual independent suspension. Motorized with Power Functions. -
Hello, I noticed that the performance of the original 9398 was not very good so I decided to do this mod including 5 motors. IMG_0086 by JJ2Sam, on Flickr I kept the body original and suspension except shock placement and drive and did extend the wheelbase but kept the original width. The suspension has about ~45* of flex and is responsibly soft and responsive to bumps. I used 2 XL motors in the back, 2 L motors in the front and replaced the servo motor with a M-motor for steering and added 1 pair of headlights. IMG_0116 by JJ2Sam, on Flickr IMG_0117 by JJ2Sam, on Flickr The front axle has a kingpin incline making the wheel pivot near the inside of the wheel making it easier to steer and makes it have less stress on the steering motor. You may be wondering about the use of 2 different motors in the dive chain causing problems in speed differences but your worries can be put to rest because a L motor geared 12/20 is almost the same as 1 XL. IMG_0121 by JJ2Sam, on Flickr Thank you for reading-watching! More pictures on my flickr https://www.flickr.c...6592@N04/albums
-

Help And Ideas Needed For Completing My Car
NickGratian posted a topic in LEGO Technic, Mindstorms, Model Team and Scale Modeling
I need suggestion with my car. I have images below of what I have so far. A few questions. What springs should I use. Hard or soft? What wheels or tires? And I need ideas on how to complete it. So far my axle has working steering and a driveshaft connected. I don't know what to do next as I am a new technic builder. If any more information or pictures are needed please tell me :) Images: http://imgur.com/a/QbhXw -
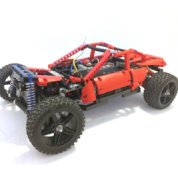
Here's a Beach Buggy I made for an upcoming truck trial this weekend. This trial only has a few rules: Use 62.4 wheels, 2 motors for propulsion max and 1 for steering. It's based on Zblj's "Blue" suspension, drive and steering, modified to fit my beach buggy/trial needs. It features 4 wheel drive and steering. Was a little bit of work to work with the bright green from only 1 Le Mans set. Forgot to make a picture with the suspension pressed. Might make it tomorrow (bad lighting now). It looks pretty sweet with it compressed. The rear wheelarches look like they hug the wheels (a stud or so of space left between wheel and wheelarch). The car bottoms out with the suspension fully compressed. Here you can see how much I stole from Zblj. I only changed the type of suspension arms, slightly altered the steering mechanism and placed my motors differently for a lower look. (ignore my Lego tripod in the bottom right) Thank you for your time.
-
After the realtive succesfull black wolf I think its time to make a new, better and cuter Technic animal. I decided to make a silverfox, since I have some 1000+ of antennas with the gray base. Compared to the black wolf, this model will have many improvments starting with total rebuild of joints. Back in 'ol 2011 the ball joints just came out and were rather a novelity. Now I have enough ball joints, and linear actuators to make a mechanical analougous of hips, shoulder and muscles. Total amount of LA's used in this model will be 10 or more, having 6 large and 4 small LAs. The number of ball joints will be 6, four for legs and 2 for head and tail. I already built a mockup both in LDD and real life. Notice that the body is quite compact even though there are 6M motors, 6LA's and some 30 gears in there. So far it may seem like a unrecognisable shape of bits, but if you looks closer you can see where the legs will attach to the body. The whole body is also double articulated in front and rear. And its articulated to the front and rear can swing not only sideways, but also up and down, so the fox will be able to bend spine in all directions.
-

[APP] BrickController2
imurvai posted a topic in LEGO Technic, Mindstorms, Model Team and Scale Modeling
BrickController2 is an Android and iOS application that allows you to control your Lego models using a compatible gamepad. It supports the following devices: - SBrick - BuWizz 1-2 - BuWizz 3 (basic support) - Lego Powered-Up devices: Boost, PUP HUB and Technic HUB (or Control+) - PF infrared (on Android devices having infrared emitter). Features: - Multiple profiles for a single creation - Multiple motor (or output) assignment to a single controller event - Different types of devices can be used at the same time - The same motor (or output) can be assigned to multiple controller events - Different joystick characteristic settings - Different button modes: normal button, simple toggle, ping-pong toggle, carousel toggle, ... - Train mode on joysticks - Normal and servo mode for the new Control+ motors - Sequences (like for flashing light) BrickController 2 on the Google Play Store: BrickController2 android BrickController 2 is also available on the Apple App Store. BrickController2 iOS Video tutorial created by @kbalage (many thanks for this): And another great video by @kbalage: Older versions: BrickController Android application. It lets you to control Lego creations via Lego infra-red, SBrick and BuWizz V1 and V2 using any Android compatible game controller: Current version: BrickController 0.6 User guide: BrickController User Guide Minimum system requirement: Android 4.4 and bluetooth low energy support on the phone (or tablet) Video on the older SBrickController application: -

Power Functions Wiring
andrewganschow posted a topic in LEGO Technic, Mindstorms, Model Team and Scale Modeling
I just bought a mini air pump today and an extension wire with the intention of splicing the pump to the wire. I wanted to know which wires on a PF cable carry current, and which carry signal for RC controls. I know there are two wires to carry current and two to carry signal, I’m just not sure which wires do what. Thank you in advance for the help. -

(MOC) ZIL E134 Mad Max/Steam Punk Design-Truck + Instructions
Berghain89 posted a topic in LEGO Technic, Mindstorms, Model Team and Scale Modeling
Hey, i would love to share my latest Creation with you guys. Its been a while since my last MOC, but i took the time to build something cool. It is definitely one of my best so far. And for the first time i decided to provide detailed instruction for this MOC. What are the functions of the ZlL E134 Truck: First of all, i used 2x SBricks and 2x 88000 Battery Packs. 2 XL Motos for propulsion 2 L Motors for steering 1 M Motor for gear change (2 speed transmission) 1 LED on the roof (there is a lot of space to use more LED) a working 12 Zylinder Fake Engine behind the cabin. 2965 Parts , about 3,4 Kg. There is still room for improvements. Under the hood is enough space to put in what ever you want. The whole Bodywork can be removed very easy. (modular design) But as always, a short video can show you the Model in action. Instruction: https://rebrickable....nkmad-max-desig Thanks to Madoka for the inspiration with his Tatra 813 Truck. Great work as always. -
I whipped together a motorized turbo tank MOC for an upcoming Star Wars weekend event at the LEGOLAND Discovery Centre. It's 25 inches long, 8 inches wide, and 17 inches high. It features Power Functions, 8 wheel steering, suspension, 10 large Unimog tires, reinforced internal Technic frame in case kids or adults there can't read the 'Do Not Touch' signs. My MOC had to be built with parts I had on hand. The Empire Monetary Fund (EMF) is too broke to finance BrickLink orders after Christmas. Motorized Turbo Tank by dr_spock_888, on Flickr As you can see, I added some non-Star Wars bits for kids to spot. Video:
-
After a few years off from MOC building I can finally present another creation. This is one complete set of the new 4000 class commuter trains used in Adelaide, South Australia. The A unit is powered by one power functions train motor. LEGO A-City 4000 Class EMU MOC by Lego Engineer, on Flickr The 4000 class are the latest addition to Adelaide's commuter rail system. They are also the first electric trains on the network. Introduced in 2014, each one is comprised of three-car semi-permanently coupled sets. A-City 4000 Class EMU by Lego Engineer, on Flickr A-City 4000 Class EMU by Lego Engineer, on Flickr
-

Aircraft Tug XL (Pushback Tow Tug/Tractor Tug)
filsawgood posted a topic in LEGO Technic, Mindstorms, Model Team and Scale Modeling
HI! Today i want to present you my new work - Aircraft Tug XL I started this project a year ago, but bring to mind it succeeded only now. Meet Aircraft Tug XL (Pushback tug/Tractor tug). The model is an extension of the project Aircraft Tug 2014, many of which I am personally not satisfied, and therefore had an idea to build something more functional, large and attractive. Thus was born the Aircraft Tug XL. Machines of this kind is mainly used at airports when towing aircrafts to parking or vice versa - to the runway. I think everyone who has ever been in the large airports, have seen similar tugs. Less a similar technique can be found in seaports or any other freight terminals that require towing heavy loads. This truck has four-wheel drive by two XL motors, independent steering front and rear axle on two servo motors, lifting mechanism cabin, as well as a system of four mechanical jacks driven by two motors L. Full remote management for that answer 3 infrared receiver, and power models provide two large battery pack located on the sides, and of course, he has V10 on board! The functional copy of the tractor completely original machine. The layout of the indoor units I came as close to real. Dimensions: D / W / H 56/27/15 stud. 445/220/120 mm. The model is made of 100% Lego parts except stickers - I made them their own. The basis of design I took the logo of the Khabarovsk airport - in the form of a flying bear. In Russia bears do not just walk down the street with balalykas, but also know how to fly :) I also worked on the detailed cabin from the outside to the inside. Now, in contrast to the previous tractor, the door is open, there is a full salon, which are two fire extinguishers, driver's seat and the passenger, levers, steering wheel, and monitor devices. Tractor turned quite powerful, as you can see by watching video. In practice, it is able to move from his seat and dragged to drag a weight of not less than 6 kg, as long as the batteries have been good charge :) You may see more information and photos on my blog -

[MOC/MOD] AROCS SCV:pRC
Pluto_MkII posted a topic in LEGO Technic, Mindstorms, Model Team and Scale Modeling
After my fork rake and the tractor I present you the AROCS SCV:pRC - Specialized Construction Vehicle: partially Remote Controlled Today I would like to present my modification of the Lego 42043 MB AROCS to you. Yes, the setup is unusual for a typical construction truck. I decided to choose this setup because I like the crane setup from the old 8868 truck. The room between the specialized setup, which is inspired by the 8868 crane cabin, got filled with a side tipping bed. I moved the original tipping bed to the trailer. But first, let me tell you what functions it has inside and which of them can be controlled by RC. 1) RC package, supplied by one AA battery box: Driving (XL-Motor, RC) Steering (Servo, RC) Supporting stand (L-Motor, 2 small linear actuators RC) Tipping (L-Motor, 1 big linear actuator for each tipping bed, RC, switching between the two tipping beds possible through gearbox) The RC functions are limited to functions needed while driving the truck or getting ready for working with the clamshell. Because of the heavy weight of this model and the strong XL-Motor I had to replace the cv-joint with a cardan joint. 2) Clamshell package, supplied by one AA battery box: Compressor (shares the M-Motor with the rotation) Rotation (shares the M-Motor with the compressor) The rotation of the clamshell setup can be changed or stopped through the red lever, which you can see on the right side, slightly under the cabin. If you switch on the battery box the M-Motor will run permanently and so will the compressor do. Only the rotation can be turned off through the gearbox. All functions of the clamshell setup are integrated, so there is no cable or tube running through the turntable to the truck. There is no limited turning radius. More pictures are available at my brickshelf album. Please use the thumbnails below, because the brickshelf album is not yet public. -

[MOC] German Regional-Express with doubledeck coaches and Vectron engi
HoMa posted a topic in LEGO Train Tech
Regional-Express with Bombardier doubledeck coaches and a Siemens Vectron engine Today I am presenting my new train set which is a typical German Regional-Express with doubledeck coaches and a modern electric loco. These trains can be found all over the place in Germany and some years ago I used one of the to comute to work. Since then I had the idea in mind to build a LEGO model of this train. The train consists of 3 Bombardier doubledeck coaches (one with the streamlined end cap) and a modern Siemens Vectron electric engine (you can find the original at https://www.flickr.c...oto/13558726015). The train is build in 7-wide and is powered by Power Functions and two train motors in the bogies of the engine. The Deutsche Bahn company does not use the Vectron engine to push or pull regional trains like this one but I felt that the "grill" structure on the head of the Vectron engine is a nice challenge to be captured in LEGO bricks. The most challenging part was in fact the end cap of one of the doubledeck coaches. Using various curved slopes I ended up in a result which is not perfect, but close to the original shape (see it at https://www.flickr.c...6man/9465049170). At least I've avoided the non-curved 75° slope bricks which would have been to square-edged for the latest version of the end cap. The design phase started with the windows of the upper deck. They have a very iconic bend in the lower half of the window. And I also wanted to have a complete brick-build red-colored frame around the window. The lower part of the window are transparent cheese-corners with the higher side facing outside. The bended part of the window is a SNOT transprent panel which is attached to a Technic hole somewhere inside the coach. The upper red window frame is build using the thin part of a 1x2 - 2x4 bracket element. Unfortunatelly the 1x2 plate of this bracket is facing right inside the interior so I had to modify the minifigs a little bit. The display on each side of the coaches between the lower and upper deck has an offset of 1/2 a plate height and again the thin part of a bracket was used to cover the small gap which is left over when a 1-stud-wide subgroup is build in SNOT wise. Videos I took two short, bad videos just to prove that this train is running. At the end of the "push"-video the power of the batteries died. Pictures You can find more pictures in my Flickr album https://www.flickr.com/photos/holgermatthes/albums/72157662500969610 Enjoy and happy new year to all of you in the Train forum! Holger -
 Update october 2023: After abandoning this MOC about 7 years ago, I felt it was time to revisit it after years of brewing ideas to make this work. I am getting close to a full functional model, but not sure I can eliminate the last few issues completely. Currently the transformation works flawlessly, drive works, brake flaps work, steering wheel in the cab works, actual steering works somewhat, 360 turning works somewhat. The problems with steering is mainly in the arms for the wheels, the part above the wheel with the small turntables has too much flex, I need to tackle this while trying to keep the look of the arm as close to the source material as possible (and I already took some liberties there as you can see). It houses 2 XL for drive. There is 1 wheel at the front under the cockpit and one behind the exhaust each with their own XL. A concept was made to put the motor besides the wheel, like how the "real" model has an electro motor there, but it gave similar problems like the steering arm flex problems. 2 L- motors to steer these wheels 4 L-motors to steer the wheels at each arm 1 L-motor to act as a switch for "360" turning with 3 PF switches it inverts 1 drive motor, 1 steering arm motor at the rear and 1 at the front. I also use this setting to turn the wheels close to completely sideways for the transformation (I didn't do this in the picture above) 1 Servo for the brake flaps 2x (train) battery boxes. Also to be clear: the arms do not carry the weight of this model. I cheated, those 2 wheels for drive under the model+4 bogey wheels placed directly under the battery boxes carry the weight. One of my biggest mistakes from 8 years ago, was thinking Lego could handle this, so that was abondoned instantly for this. I also figured it would be nice to have a vehicle that's basically a tank, build like a tank, so it has about 40 5x7 frames, flip-flop beams and I tried to secure every panel into position. This makes it very heavy, but quite sturdy. Special note to https://www.eurobricks.com/forum/index.php?/profile/21067-hass-kabal/ He made a system bricks model of this batmobile long ago (2015) and I used some of his solutions, like the wheel arches on the side of the front arms, the steering wheel in the cab and I pretty much sized up his "electro" motors on the inside of the wheels. I hope to make a video of the whole thing within the next month, but no promises More pics will probably happen sooner than that. Original post from 8 years ago: Hardly finished anything on this model, but felt like sharing the progress so far anyway. Building this is the goal: Here's a video which shows various functions of the batmobile in the game: I am planning to add the following functions: -2x XL motor for 4WD (I expect the total weight to be about 3-4kg, so I reckon I could use their power. I am a little afraid of breaking gears/axles, so still have L motors as a backup plan. -2 servo motors which are going to provide 3 ways of steering: Normal drive with airflaps to assist steering (as seen in the video) 360 degree turn on the spot (unfortunately not in the video but it can do this) Battle tank mode with crab steering -2 M motors for the turret and opening the cockpit for Batman to get in (I expect to add that function anyway besides the 2 functions I want for the turret) -9 PF lights, among which 1 set for the afterburner in "normal drive mode" I wanted to built this model since Januari, I even briefly considered it for TC7, but Jim and I both agreed that this vehicle fails the "looks like a normal car in non-battle mode" Meanwhile some other people on Eurobricks had a crack at the model (click en clicker) I liked the first topic alot for the CGI pictures of the batmobile like this, because seeing all the details on a model that's mostly black ingame is kind of hard. The fact that Warner Bros cancelled the version of the game that came with a scale model of the batmobile didn't help either, luckily these pictures also help for getting the scale right in the MOC. The second topic is pretty nice for some of his brickbuild solutions. An area I am not too familiar with since I built mostly Technic and lack knowledge of normal Lego parts. Two things I don't like about the second model: the wheels are too small (or the model too big for the wheels), especially shows around the wheelarches, but the wheelarches on my model are too thick too, but not as much as this one I think. The other thing is that he cut and drilled some parts to fit the model. I like to find solutions within the Lego system, so modding is a big no-no for me. Anywho, time for some pictures. It isn't much (not even in time invested, since I just did a little every moment I had time for it), but at least I can copy-paste to the other side instantly, assuming I don't have to make adjustments (as if lol) The midsection is just for me to get a rough idea of how it will look (leaning on a BB so it won't fall over). So it's lacking details just about everywhere in that section. Wheels and stuff missing some details too, but I want to get a functional model first. Every wheel needed to have 3 things: drive, steering and lights. The real model has electro motors on each wheel, I briefly considered mounting a M or L motor on the side and have it drive the wheel, but getting it locked in place there wouldn't look right with the actual model (wire of the L motor basically going over the inner tire). One thing I haven't looked into though is making my own rims for the tires, I will see how this works out first. The wires for the lights have been in many places and this is just about the only place where they don't interfere with the steering and driving gears. Here you can also see the main reason why my wheelarch is too thick: I needed 2 studs to fit those functions above the wheel. I am afraid the structure holding the wheels proves to be too weak for the full model, so might have to reinforce that later on. XL motor's spot is up for the debate. It will probably end 2 studs lower. Gear ratio at the moment is 1:1 (I think), not sure which way I am going to go with that since the XL is known to break gears and axles Battle tank crab steering mode. My model won't make 360+ turns with the wheels, nor even 180 degrees for 2 reasons - 360+ I am not feeling because of the wires getting tangled up - 180 degrees isn't going to really work with the servo. I want to use the servo for snappy steering like the real thing. The liftarm for the steering is a stud closer to the middle of the car than i'd like, but this was the spot to at least get a 100-120 degree turn. One servo will function as a gearbox between the different driving modes while the other servo just steers. I chose this setup to be able to switch quickly between steering modes, just like in the game. Lights had to be used on this model. I am still looking for a way to get the lights to turn red when he enters battle mode, but I don't know where or how (open for suggestions). The reason the rear doesn't have 3 lights on the wheel (does ingame), is because these are rarely shown (battle mode only, and only with the wheel at an angle). In case you wonder about some angles in this model. Pretty early in the build I lost track of what's 100% clean so I just began testing stuff by fixing a liftarm on 1 side and lining it up with the hole I wanted to use on the other end. If I could spin an axle freely in this hole, I gave it the thumbs up, if not, back to looking for another solution. One funny spot on the model where there is pressure, is at the rear, thanks to the freaking 12L soft axles, which quite frankly aren't acting so soft! If the soft axles aren't locked into to place the triangle above the rear lights aren't pushed into the 5x7 panles on the top, they push them slightly in when they are connected Some panels are only fixed in 1 spot, to give them room to move slightly around another panel/axle/liftarm if needed. I noticed a little late that some photo's are a little blurry, sorry, will check it next time. Next up: the actual chassis.