Search the Community
Showing results for tags 'Mindstorms'.
Found 225 results
-
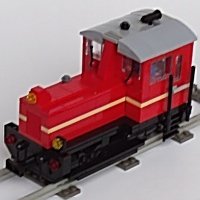
Hi all, today I want to show some models I created for the exhibition „Fantasie und Technik“ in Abtsgemünd, Germany on 2./3. december 2017. All models were operated with only an EV3 Set(+1 small motor in one modelll), the motors and sensors have been plugged in just a few minutes from model to model, here the visitors could help. It was important to me that the mindstorms components are not hidden, visible and out,. to reveal their function. The models should show that it is also worth about the travelling robots to automate homemade models. There are almost no transmissions, which would unnecessarily complicate the whole thing, most everything is powered directly from the motor shaft. Most of the models could be operated with different programs. All were operated almost exclusively by the visitors. And here ist he transfer station … "Gravel" from the truck is transferred to small waggons with the loading station, the whole process is controlled by mindstorms EV3. It's again a model in which shows the Mindstorms components To illustrate the features a short schematic. The truck part (right) and the charging unit fort he train (left) work completely independently of each other, so one player can use the truck, others ride the train. Everything else is controlled by EV3. The IR sensor (1) in the blue part determines whether the truck is in position, then closes the barrier (2) and the truck is tilted (3). In the yellow part the touch sensor (4), the color sensor (5) checks whether it is empty, if so the motor (6) oft he conveyor belt starts. The truck The train The conveyor consists of two standard-LEGO conveyor belts In the picture the fill level indicator and the touch sensor, if the orange indicator on the waggon matches the column the conveyor belt starts A view from the rear, there is almost no visible mindstorms technology…. A short video on youtube (1:40) The „train“-part oft he program cu Werner
-
Container Crane Hi all, today I want to show some models I created for the exhibition „Fantasie und Technik“ in Abtsgemünd, Germany on 2./3. december 2017. All models were operated with only an EV3 Set(+1 small motor in one modelll), the motors and sensors have been plugged in just a few minutes from model to model, here the visitors could help. It was important to me that the mindstorms components are not hidden, visible and out,. to reveal their function. The models should show that it is also worth about the travelling robots to automate homemade models. There are almost no transmissions, which would unnecessarily complicate the whole thing, most everything is powered directly from the motor shaft. Most of the models could be operated with different programs. All were operated almost exclusively by the visitors. And here ist he container crane: I only used the mindstorms parts of sets 31313 (EV3 brick, 3 motors, 2 sensors). The container terminal provides two container spaces, a railway connection and a truck Here the part that controls the on/off of the claw. The four threads of the claw are summarized in a small sled and only one rope pulled by the motor. When the claw is up (black slide left) the touch sensor stops the motor. To sink the motor moves defined turns. The second unit is the trolley drive for right / left. Through the colored tiles on the chain the IR-sensor recognizes the position of the trolley (1st place, 2nd place, railway, truck) , the yellow tile is visible just below left The last element of the movement is the adjustment of the claw. To open the claw must be lifted with the outer threads, to close it with the inner wheels. This is done by simply extend of the lengtht oft he threads The trolley of the crane 3 The four ropes are on the left attached and can be adjusted by turning the blue pins, like guitar strings The claw with the four threads, if the two outer/upper carry the load the claw is open, if the two inner/lower carry the load it is closed There are two programs: one for the automatic operation, and one for the manual mode pressing the keys of the EV3-brick. Usually the visitors used second mode and played, especially the kids... Here is a short deo showing the funtions (1:31) and the automatic mode (2:44) Hope you like it. cu Werner
-
Hi all, today I want to show some models I created for the exhibition „Fantasie und Technik“ in Abtsgemünd, Germany on 2./3. december 2017. All models were operated with only an EV3 Set(+1 small motor in one modelll), the motors and sensors have been plugged in just a few minutes from model to model, here the visitors could help. It was important to me that the mindstorms components are not hidden, visible and out,. to reveal their function. The models should show that it is also worth about the travelling robots to automate homemade models. There are almost no transmissions, which would unnecessarily complicate the whole thing, most everything is powered directly from the motor shaft. Most of the models could be operated with different programs. All were operated almost exclusively by the visitors. First MOC ist the parking garage. Interestingly, the MOC consists of four individual parts which are only pushed together: the parking garage, the entrance with " card reader" and barrier, the baseplates to run the robot on and the mindstorms function block. The Park House itself is very classic, the grey palettes are not fixed. The entrance with the barrier, on the right hand side the parking tokens. Chip 13 (1st floor, 3rd place) is inserted. The three Motors move the slider for the plates in all directions: right / left, driving on / off, slider forward/back The entire MOC works with just one color sensor. There are various color markings: Blue (the high tile) left on the card reader adjust height ( yellow, right next to it), card reader with four colors 1 - recognize card(always green) 2 – floor 3 – place 4 - card taken out of reader? (always green) And many white dots to be counted for the position.... And here is the video (2:22) Enjoy! cu Werner
-

Mindstorms Gallery Closing
DamonMM2000 posted a topic in LEGO Technic, Mindstorms, Model Team and Scale Modeling
So this is tragic news... the Mindstorms Gallery is closing? Does that mean that I lose all my projects that I uploaded? As if closing the message boards wasn't enough? Fortunately, I have a website, so all of that can be moved... but I still can't believe this is happening. So many memories... And I really dislike the format of the new gallery. It appears as if you can only add pictures, similar to the Technic gallery. That's a huge step backward. What is LEGO doing? -
 The problem: it takes hours and hours of grinding to unlock the good stuff in the Star Wars Battlefront 2 game. The trick: in the Galactic Assault multiplayer mode you get some credits even without scoring any points, provided you don't get kicked for idling. The solution: this LEGO EV3 contraption that uses randomized algorithm to play with the Xbox pad"
 -
Let me introduce you my biggest and most complex MOC so far - COFF3 BOT. Once I was contacted by a man from HP (Hewlett-Packard) and he asked me: "Are you able to build LEGO robot that would supply Nespresso coffee machine with capsules?" It sounded interesting to me so I set meeting with him to know more. He explained me that they got coffee machine with bluetooth so you can turn it on from your smart phone. The problem was that you have to insert capsule manually into coffee machine and they were looking for some "remote control LEGO solution". Soon I began working for him and it took me about 3 months to finish this robot. It was built mainly out of LEGO Mindstorms Education and LEGO Technic Bucket Wheel Excavator. It contains about 2500 parts. The most difficult part of development was building this robot. Programming was piece of cake. Robot in stand by position. It has 3 storages for 5 capsules so you can load it with up to 15 capsules. Robot without coffee machine. Notice the rail that helps robot to stay with coffee machine. Detail of three mechanisms that insert capsules into slot on the top of coffee machine. Detail of gearbox - there are three parallel gearboxes that switch large motors between operating storages and movement of robot. I had to use gearboxes to avoid using another EV3 brick. This series of gearboxes is part of robot that causes most of its failures. EV3 brick works also like counterweight for jib. I've attached it in such way to keep access for battery charger. And how it works? You turn it on and it moves to stand by position. Then it waits command from some bluetooth device that determines number of storage - you can choose out of three different capsules for your coffee. When robot receive it, it turns over coffee machine and opens its slot for capsules. It does it by pulling little lever on the top of coffee machine. Then it releases chosen capsule into slot and closes it. When it is done it sends you message that you can turn on coffee machine. I will add link to video when HP releases it (I am not allowed to upload any video of this robot). And finally one fun fact: cost of this coffee machine is about $200 and cost of LEGO bricks for this robot was about $800 (excluding my work).
-

Mindstorms EV3 Lamp (Now with program explanation)
Eddie_Young posted a topic in LEGO Technic, Mindstorms, Model Team and Scale Modeling
You know when you build a huge MOC and your lamplight doesn't illuminate the whole thing and you have to constantly aim and re-aim the lamp? You might not know it but this adds no less than 42 minutes to your overall build time! Outrageous! Luckily, I've found the solution: The video may be left to speak for itself: Now the build is pretty simple. The base was the toughest part. Getting two independant spinning axles througha turntable while keeping the area nice and clean! The whole structure rests on four tyres to eliminate vibration and the resulting sound. the bulb is clamped by a worm and 8-tooth gear. I did not alter any bricks to fit the bulb and the bulb can be taken out at any time if anyone requires a purely LEGO lamp. And who would dare! The lampshade is how it is because the lighbulb was very mean and melted through the system bricks that formed the first prototype. It brought a respectable amount of tears to my eye. This new framy lampshade has endured over two hours of maths homework with no sign of wear! Now, the programming did require some little thought. The aim in the vertical plane is done through a load of trigonometry, while the horizontal aim works directly with the IR sensor's "beacon heading" output. One thought I'm particularly proud of is my use of squared and cubed values to slow the motor down as they approach their desired positions, thereby eliminating any shaking from hesitation or even indicision! That's all I have to say but I'll be more than happy to answer any question from a fellow moving-LEGO-lamp enthusiast, if there ever was such a thing! Please check out my Wind-up Robot on LEGO IDEAS! Thank you, for reading my words! -
 Since 2011, our large fully automated train layout will be displayed at Lego World 2017. In several subtopics, you could have read about the building of the delta crane, the train controlled by a Mindstorms EV3 and much more. A video of our layout in 2016 has been watched almost 30.000 times. For 2017, the train layout consists of 12 Mindstorms EV3 bricks and 1 Mindstorms NXT: 1x Train (EV3) 1x Delta Crane (EV3) 1x Wheel of Fortune (EV3) 1x Ticket Dispenser (EV3) 4x Delivery station (EV3) 1x Ticket reader (EV3) 1x Delta crane (EV3) 2x Container and Candy dispenser (EV3) 1x Air compressor (NXT) All the EV3 bricks are controlled by a Microsoft .NET application, written in C#. We are now in the phase of integrating the Lego builds and fine-tuning the software. Click on the picture below to surf to our Flickr page and you can watch a video on Youtube to see a full test run. The layout will be displayed at Lego World 2017 in Utrecht, the Netherlands from Wednesday 18 - Saturday 21 October 2017. Regards, Hans
 -
Hi all, In January 2014 I build a small 9v LEGO train layout. I use Mindstorms nxt 2.0 to control the trains and switches. Now I’ve found this video, I’ve uploaded to my YouTube Channel. The layout works like this: 1. Both trains are running on the outer track. The nxt motor controls the big yellow button on the Speed Regulator. 2. Due to small differences in the train motor and the weight of the trains, the come closer to each other. 3. If the distance between the two trains is to small (less than 3 seconds, seen by the ultrasonic sensor), the last train drives to the inner track and stops over there for 10 seconds. A nxt motor switches the switch. 4. The train on the outer track keeps driving. 5. After 10 seconds the train on the inner track moves to the color sensor, just before the switch and stops. 6. If the train on the outer track passes the other switch (ultrasonic switch), the train on the inner track starts moving to the outer track. 7. Then it all starts over again. Let me know what you think about this layout! I’m also curious how you guys control your trains and switches. Any automation with Mindstorms?? ?
-
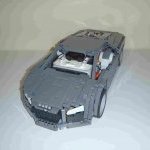
"The Pursuit of Perfection" - slogan of the Lexus brand. I'm now back with my greatest Lego creation ever. A 2010 Lexus GX 460 with EV3. It's a replica of my Dad's car, but this one's in gray with black interior. I made it as much as I could to the real car, thanks to pieces from the Arocs and Porsche set. Features Sariel's 4-speed sequential gearbox controlled by a medium motor All-wheel-drive Independent suspension Rack-and-pinion steering Fake V8 engine Six seats (could not fit a seventh one) with the rear four being foldable Opening side doors, trunk door, and hood. Detailed interior The gearbox and the two differentials in the car like to click while moving (especially on rough terrain) around, but the result was a car that was heavy, slow, but also makes lots of torque. I'm very happy with how this car came out and I couldn't have done it without all of the helpful people on the Lego community and EuroBricks. Thanks especially to my good friend TheMindGarage for never making me give up. Now I can officially call myself a true master builder. Check out this build on my EV3 community account too for more photos and information about it. I would love to make a YouTube video soon about the features of the GX EV3 and footage of me taking this build on some dirt trails in a park. I also want to take a picture of this right next to my Dad's actual car. So please follow this post to check out some stuff I might upload in the future! To finish this post, here's some collages with photos of the GX EV3.
-
Lego Mindstorms Ev3 Tank Bot CUBE
DamonMM2000 posted a topic in LEGO Technic, Mindstorms, Model Team and Scale Modeling
Hey Guys! I have been building with Mindstorms for just about 4 years now. To think of that is pretty mind-blowing! So I decided to re-create a video on a creation I built almost 3 years ago: My Lego Mindstorms CUB3. Description: "Built with LEGO MINDSTORMS and Technic components, this creation includes: 2 EV3 Large Motors, 1 EV3 Medium Motor, 1 EV3 InfraRed Sensor, 2 small linear-actuators, a pair of hidden caterpillar tracks, and more! With its insignificantly-looking cubic structure, CUB3 is engineered to look like your ordinary box just lying around. Decoration, anyone? Your neighbors will find out soon enough. Just watch!" Hope you guys enjoy! P.S. - Some of you EB users gave suggestions on my video editing of a previous video. I tried to follow that advice when editing this video. What do you think? Thanks! -

Need Help Making Heavy AWD SUV Move Better
StudRobotics posted a topic in LEGO Technic, Mindstorms, Model Team and Scale Modeling
I'm back with one last issue in my GX EV3 build. I just got done finishing the doors, side panels, rear trunk door, hood, and some part of the roof. But the vehicle was so heavy that when I drove it around, it kept on doing the same thing. The diffs were clicking and the car had very much difficulty moving. Here is a picture of the bottom of the vehicle. Most of the clicking seems to be coming from the rear diff when I move the wheels by hand. I can either do two things. 1. Reinforce the rear diff somehow. 2. Improve it's off-road performance and stop the clicking somewhat by replacing the diffs with knob gears. But this will come at the cost of independent moving between the wheels. What should I do? Please give me the best response you can so the clicking will stop and I could finally take this AWD machine through some rough terrain like a real SUV. I really appreciate any advice. -

[HELP] Buying Humble Bundle Books
veryhappy posted a topic in LEGO Technic, Mindstorms, Model Team and Scale Modeling
Hello, I just found out that the web page humble bundle has released a bunch of books about Lego and robotics. I was thinking about buying them myself but I don't know about their quality. Can someone give me a clue? -
For the large candy container warehouse that I am building (click here to read more details), I need three more builds: A candy feeding mechanism. I need a mechanism that feeds one candy at a time to a conveyor belt. Color detection. The color of the candy needs to be determined. Systems that puts the candy into a container. The container can then be conveyed to the warehouse where it can be stored sorted by color. The color as determined in step 2, needs to be passed to the warehouse brick so it can store the container on the right level. Color detection (step 2) I started with step 2. To realize the candy sorter, I needed to know if a Pixycam (see www.charmedlabs.com/default/pixy-lego/) can distinguish the colors of the candy. The colors are not bright (like the Lego bricks), so I wasn't sure if it was possible. I created a quick setup to test the color detection: Next, I placed the four different candies (Fruit-tella) on the conveyor belt and programmed the camera for the four colors. This is the image of the camera, from left to right: (1) raw video, (2) cooked video (= mix of raw video + color detection) and (3) detection only video. Finally, I made a simple test EV3 program. With the addition that the detected block should be more than 20 pixels in width, it detects the candies in the correct color. Candy feeding mechanism Ok, so I have a conveyor belt with a candy on it. But how do I get the candy, one by one, on the conveyor belt. This is where the feeder comes in. I searched the internet for 'real life' solutions. I found out that a rotary feeder or bowl feeder would do best. I tried to make a vibratory bowl feeder (out of 16 circle gear rack elements 24121), but that didn't work. However, rotating the bowl seemed to work so I made a prototype based on rotation and gravity. The bowl is placed at an angle of +/- 20 degrees and then it just rotates in a steady pace. The result was good: it never happened that two candies were fed to the conveyor at the same time. The next step is to make a more solid version and add the color detection unit to it. I'll keep you posted. Enjoy, Hans
-
[MOC] Giant LEGO F1 Car
TheMindGarage posted a topic in LEGO Technic, Mindstorms, Model Team and Scale Modeling
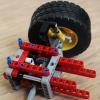
Yes, this is a giant F1 car. It's around 1.2 metres long and large enough to sit in. The main features: Pedal-driven rear wheels 8-speed sequential transmission shifted via paddles on steering wheel Rear disk brakes activated by button on steering wheel Electronically-controlled limited-slip differential Rack and pinion steering connected to steering wheel Display showing pedal RPM, gear and wheel speed The car uses MINDSTORMS EV3 to operate the functions. It uses one standard EV3 set's worth of electronics plus an additional Large motor. The gearbox is a 4-speed design expanded with a close-ratio 2-speed (ratios 1:1 and 1:1.2) giving 8 speeds in total. A single motor controls it - each gear requires 180 degrees of rotation. Rotating by 90 degrees puts the gearbox in neutral. A Geneva mechanism is used to control the 4-speed - when the 2-speed goes from the high gear to the low gear, the 4-speed is advanced one gear. This is how it shifts from gear 2 to gear 3. In order to reduce the amount of torque handled by the gearbox, it is geared up very highly. This increases friction and reduces efficiency, but there is no shortage of power (I calculated a human’s power output at over 100 EV3 Large motors!). The limiting factor here is how much torque the parts can handle. The disk brakes use a 49mm tyre as the disk and red rubber pads from the EV3 Expansion set. There are two sets of callipers on each wheel (4 pads per wheel in total) giving huge stopping power. A rather complex linkage allows a single input to control both sets of callipers at the same time. An EV3 Large motor pulls on the beam which activates the brakes via a bell-crank linkage. There are two brake motors so the EV3 can operate them independently - this is important for the next step. The differential is very ruggedly-built to prevent gear slippage or parts breaking. An extra small differential measures the speed difference between the two outputs - this goes to a Medium motor used as a rotation sensor. This allows the percentage differential slip to be calculated - if it exceeds a certain limit, the faster wheel is braked slightly (via the disk brakes) to give more torque to the slower one. The clutch ring is manually operated by a switch under the steering wheel- when engaged, it locks the output to zero, making the differential operate as a solid axle. This is a very similar system to the one used on the million-dollar McLaren P1 hypercar. The wheels are made from tank tread links bent backwards into a tight loop. Not sure if this is considered a "legal" solution, but it works very well. The front wheels have 42 links and the rears have 48. The rear wheels have very tight spokes in order to allow them to take the massive weight of the driver. The wheels started gaining camber (tilting) and falling off under load, so I added extra support on the other side of the wheel. The beams are set up to be under tension to push the wheel towards the axle and prevent it from falling off. The rear section uses many layers of beams and frames to make it strong enough to withstand the weight of the driver. Extra diagonal beams (the white ones) are added - they are positioned in a perfect 3:4:5 Pythagorean triple to avoid having them under compression or tension. I used a Warren truss for the central structure - that bit is virtually indestructible. The front section doesn’t look very strong, but the extra vertical beams allow it to withstand plenty of load. The chassis is very sturdy, but with a driver on board, it tends to bend quite a bit and suffers from some serious body roll issues. The steering uses a rack-and-pinion system with just over half a turn from lock-to-lock. This is similar to the steering ratio used on F1 cars. Two large custom-built universal joints are used for the steering shaft. The shaft is reinforced to prevent torsion - even a little twisting would result in inaccurate, floppy steering. The steering wheel is made to look like an F1 wheel. The two rear paddles are for the gears - right for shifting up, left for down. The front left paddle activates neutral gear when held - as soon as it is released, the transmission returns to the last gear selected. The front right paddle activates both brakes simultaneously. Each paddle presses a button on the EV3 infrared remote which is in the middle of the steering wheel. Its signal shines through the turntable and is captured by the IR receiver on the other side. This allows signals from the steering wheel to reach the EV3 brick wirelessly. The paddles have a very short throw and a crisp feel - they’re one of my favourite parts of the car. The car has a full display with features like an RPM bar and wheel speed shown (since the wheels have very little grip and are liable to doing burnouts, actual speed will be quite different). The gear number is also shown. The RPM is measured by a touch sensor and a cam connected to the pedals. The cam bumps the touch sensor every 1/7th turn of the pedals. I initially tried to use a Colour sensor to detect the black chain links against the greys but the difference in reflected light was insufficient for it to be reliable. Strength-wise, the chassis can easily deal with 20kg on the seat. Perhaps it would be ideal for a 6-year-old gearhead. Unfortunately, I'm a lot more than 20kg, so I kind of broke it. Here's the aftermath: Here's a video of me explaining and demonstrating the features of the car. You can also skip to 10:56 to see me try out the car... [All music is composed by me. My F1 V10 impression is not edited in any way!] In the end, I think it was a successful experiment. I intended this MOC to be a testbed for various ideas I had, and you might possibly see a scaled-down version of some of the mechanisms (such as the differential) in a normal-sized car of mine in the future. After all, that's why real-life car manufacturers build concepts and sell low-volume cars at a loss. If it wasn't for that, we wouldn't have the Bugatti Veyron, Pagani Zonda R, Lexus LFA and other amazing machines. -
[EV3] Fully Automated Candy Warehouse
Hanso posted a topic in LEGO Technic, Mindstorms, Model Team and Scale Modeling
As part of our fully automated train layout (see more at our blog here: siouxnetontrack.wordpress.com), I have started to build a fully automated container warehouse. The warehouse should be able to store a large number of candy containers. I want to build four rows with shelves to store the containers, served by two robots that can store and retrieve the containers. The first thing I needed is to build the vertical lift for the stacker crane. I looked at other builds and found out that there are three possible mechanisms to create the vertical movement: Gears climbing a toothed bar (element 3743), a nice example can be found here: https://www.youtube.com/watch?v=GToA2tOVyHg Cables pulling the lift up, an example can be found here: https://www.youtube.com/watch?v=rCNwQVjXz60 Chain links, an example that uses the small elements 3711 can be found here: https://www.youtube.com/watch?v=fQIAAb8x8MI And as you may have guessed, I have tried something different. I use the worm gears (element 4716) to get the vertical movement, this is the first test setup: If you stack the elements 4716 on top of each other, they should be aligned correctly to create one, long worm gear. I just finished a first prototype of the stacker crane. The crane has two forks, in order to store or retrieve a container from either the left row or the right row. The lift can move up and down, the (horizontal) movement along the row needs to be build. One EV3 M motor is used to move the forks either to the left or to the right. It uses a color sensor to determine the middle position. One EV3 L motor is used for the vertical movement. A touch sensor is used to detect the bottom position. Watch the video to see a demo: More details will be added later. Enjoy watching and please let me know what you think. Hans -

TicTacToe Mindstorms Robot using Camera
bartneck posted a topic in LEGO Technic, Mindstorms, Model Team and Scale Modeling
Play TicTacToe against this LEGO Mindstorms EV3 robot. It uses three motors to drop its balls into the right field and a NXTCam to view the board. It then calculates the best move using a MiniMax Algorithm. All future moves are explored and rated according to their winning chances. An IR sensor detects your hand when you drop your ball. The robot is using red balls and the human player uses blue balls. The java code is available at Github and the building instructions are available for LEGO Digital Designer on my website show in the description. I used the MinuteBot baseplate, which is useful for building static Mindstorms models. I also used a LED lamp to provide consistent lighting that is powered through the USB port of the EV3. The position of the camera can be centered on the board using the wrench and through sliding along the axles. I hope you enjoy this robot. More information at http://www.bartneck.de/2017/07/17/tictactoe-playing-lego-mindstorms-robot-using-computer-vision/ -
[MOC] METER - rebrick.com superbots
Jurss posted a topic in LEGO Technic, Mindstorms, Model Team and Scale Modeling
Posted to rebrick.com, so also details here Final model Details in 4th reply Finally decided what to build for lego official contest. It will be distance counter - automatic, as it is about some automation. Started with 3 level counter - cm, dm and m. First level is continious, other to discret with 10 steps. -
Help With EV3 Remote Control Program
StudRobotics posted a topic in LEGO Technic, Mindstorms, Model Team and Scale Modeling
I'm programming my EV3 vehicle to be operated by an IR beacon remote. I've successfully got the car to be able to move, but I'm stuck on something else. My vehicle has a 4-speed transmission, and a medium motor shifts the gears. I used the remote's topmost button (the one that turns on the green light on the remote) for shifting the gearbox. But when I press it, something goes off. It's really hard to say, but what I know is that the topmost button isn't acting like a normal button. So the motor keeps on moving until the IR sensor realizes the green light is off. I really need help with the program because I just want the topmost button to act like a normal button so I can press it to make the medium motor shift one gear with a one second wait before shifting to the next one. I would love a very helpful response from someone that knows how to program the IR remote and if there is no way to get the topmost button to get the result I want, an alternative would be nice so I can be able to shift gears with the push of a button on the remote. -

A New way to program EV3 Controller
eyal coderz posted a topic in LEGO Technic, Mindstorms, Model Team and Scale Modeling
I wanted to tell you about this new (and cool if I may say) program that is being developed by a company with more than 30 years of experience in robotics for education called Intelitek. This program, called CoderZ, is all about teaching kids STEM through robotics and programming. This program enables an entire team to have a robot for each participant/member. How? Well, CoderZ is a fully operational robot simulator. Right now, Intelitek is giving FLL teams a free trial that lasts until the end of June, this is a great opportunity for all teams to hone their developing skills for next year’s challenge. You can easily register and start using CoderZ by clicking here: bit.ly/2pq0LnA Feel free to share your thoughts with the CoderZ team after registering and trying it out at http://gocoderz.com/. -
When I was building the Robot Arm (see my mail thread here), I stumbled upon the ABB robot flex picker (also known as a delta robot). I was amazed about the simple construction and how fast it can work. Although I am definitely not making the first one of Lego, I wanted to build my own version of it. In this thread you can follow the work in progress. I have now build the base and the three arms that will support the grabber. The grabber will be able to pick up the candy containers and move them to a different location. Don't know yet what its place will be on the layout, but I am confident that it will have its use. Photos can be found at Flickr, click on the picture below to see some more pics and an animated gif. Please let me know that you think of it. Enjoy, Hans
-
Gear Grinding in Differentials (EV3)
StudRobotics posted a topic in LEGO Technic, Mindstorms, Model Team and Scale Modeling
I said before in my previous post that I had some problems with my GX EV3 4x4 chassis that I needed to fix. Once again, it's more gear grinding/clicking, but this time it's only in the front and rear differential gears. The grinding occurs whenever the chassis tries to drive into a wall or when it tries to drive in different conditions (because as an SUV it should drive smoothly in dirt or uneven terrain). What also annoys me is that when I push the car, instead of letting the motors move, the differentials make clicking noises that, like I said before, sound like a machine gun. I really need help so I can stop the differentials from clicking so when the car tries to drive into the walls, the motors won't still move while the differentials click, and so the car can be a lot more versatile on uneven terrain (such as what I used for testing, blankets) without the differentials causing a problem when the car moves. Here's some pictures of the bottom of the chassis. -
Bucket Wheel ExcEV3tor - a Mindstormified BWE (EV3)
The_Icestorm posted a topic in LEGO Technic, Mindstorms, Model Team and Scale Modeling
I created this modified Bucket Wheel Excavator some time ago, and I thought I would like to share it on this forum. After building the original BWE, I wanted to try to incorporate some Mindstorms functions into it. I managed to motorise all the active functions, using both an EV3 brick and motors, as well as some PF motors. Functions can be preprogrammed, or can be remotely controlled using an EV3 IR remote. Here is a list of the functions: Bucket wheel rotation and main conveyor belt - PF XL motor Lower conveyor belt - PF medium motor Boom arm elevation - EV3 large motor Lower conveyor swivel - EV3 large motor Superstructure rotation - EV3 medium motor Driving - EV3 medium motor Since I owned an NXT as well, I used it to motorise the small mining truck that was included in the set. There are also some LEDs that illuminate the 'work area', but they don't really do a good job, its just a nice thing to include. Here is a video of the excavator in action, as well as the mining truck (sorry about the poor resolution and bit rate): More info about the machine can be found here: https://www.us.lego.com/en-us/mindstorms/community/robot?projectid=3e125a5b-475c-4a4c-b3ed-e4b4f2192907 Let me know what you think of it in the comments! -
More Gear Grinding/Clicking in Gearbox (EV3)
StudRobotics posted a topic in LEGO Technic, Mindstorms, Model Team and Scale Modeling
I'm back again with another gear grinding issue but this one is a bit less critical. The grinding only occurs when my 4x4 SUV chassis (with Sariel's 4-Speed Sequential Transmission) is in a certain gear. Here's some photos of the chassis. The transmission is shifted to the speed where the nonstop grinding occurs. When in this gear (I believe it may be 3rd) The car is supposed to move, but it does very slowly while clicking noises fire like a machine gun. This is the only time when the gears grind other than, say, if the chassis hits a wall. When the clicking begins, I hear the driving rings shake (which awfully reminds me of the somewhat gear clicking in the Mercedes-Benz Arocs set). I would love a response a soon as possible to address the clicking problem so I can finish the chassis once and for all. -

'Moto-mod' for using a Motorola phone as EV3 Brick
legolijntje posted a topic in LEGO Technic, Mindstorms, Model Team and Scale Modeling
So, I came across some news articles talking about some new 'moto-mods'. For the people not in the phone-world, Motorola is selling some phones which have special connections for so called 'moto-mods'. The mods can be used to enhance your phone with whatever functionality the mod-maker comes up with. Apparently, Motorola showed off some new mods. One of them caught my eye: a Lego Mindstorms mod. Take a look: | Image from here. It's maybe not clear from an image, so here's a video too. Really recommend watching it, because it makes it much clearer how it works. You can clearly see the EV3 module at the 15 second mark, and it clearly shows how it works and also in combination with other mindstorms and Technic parts. I'm not sure if it is just a concept or if it will be an actual product. Nevertheless, it looks really cool and think of the possibilities! I mean, a phone has a lot more power than the ev3 brick while also being significantly smaller. It has a much better screen. And, depending on how they implement it, maybe you could even use the phone as a sensor too, or the camera capabilties. The only 'downside' I can think of is that a 'moto-mod' like this would (obviously) only work on compatible phones from Motorola and isn't a more general device that works with e.g. all android devices. Nevertheless, I think it's quite cool and I'm wondering how much Lego is involved in this. Maybe, they are working on a new version of Mindstorms where you can use any phone as the 'intelligent brick'? What do you guys think about this moto-mod?