Search the Community
Showing results for tags 'Rebels'.
Found 113 results
-
Hi all, here's a quick modification I did to the new 75357 Ghost & Phantom set. I really love this new set, it's a very well proportioned build and fairly faithful to the ship we all love, but as with most big ships it's lacking detail. As usual with Lego the underside was ignored and sadly the Phantom 2 was kindof badly proportioned and odd looking, so I had a go at improving things. As always Instructions for the modified Phantom are on Rebrickable and the 566 extra pieces will only cost about £45, plus another £15 to build the first Phantom. And here's some photos. The original structure is still in there, the mods involve removing exterior parts which only takes around 15 minutes, then almost everything I've added is surface detail or rebuilt sections. Several of the sections are completely new, like the docking rings and roof, and some like the main top panels just need some tiles and wedge plates to be added or rearranged. The underside of the ship has a lot of parts added, partly disguising the Technic Brick structure but mostly adding some simple slopes as well as the signature lower-body shape. I'm really pleased that I was able to eliminate some of the gaps around the roof area, as well as reposition the docking rings to be centered rather than high up. I think the angled stand also helps The Ghost look it's absolute best when on display. Anyway, thanks for looking and I hope you enjoy the mods!
-

[MOC] GHOST - VCX-100 light freighter (INSTRUCTIONS AVAILABLE ON BRICKVAULT)
TGBDZ posted a topic in LEGO Star Wars
UPDATE! (DECEMBER 2022) Version 2 has gone live (Sorry for the delay), new function video can be seen on Brickvault YT channel (Click HERE) List of changes: - Upgraded landing gear - no more tilting to the backside with Phantom II docked - Reinforced main engines - additional support to prevent the main engines from disconnecting from the fusselage - Corrected color scheme to better match one in the Rebels TV show - Reduced greebles and added slight discoluration to match better with the one in the Rebels TV show - Changed docking port design - Reinforced front mandibles using new SNOT bricks from Super Mario series - Changed engine thruster color from Transparent Light Blue to Transparent Neon Orange (Transparent Yellow color is reserved for frontal lights) - Added limiters to pilot canopy piece, to ensure that it won't close too far. (Closing the canopy fully ensured incorrect placement of the frontal roof piece) - Reworked common room layout now includes corner sofa and a smaller kitchen area - Reworked Phantom I* - Reworked Phantom II** * Not minifigure compatible ** Both Phantom older versions are still usable Everyone who has purchased the original instructions should receive the new ones for free. -------------------------------------------------------------------------------------------------------------------------------------------------------------------------------------------------------------------------------------------------------------------------------------------------------------------------------------------------------- After 3 years of work and 2 different iterrations I can proudly present one of my favorite SW ships - GHOST Part count - Approx. 4100 (excluding phantom) Length - 62 studs (50 cm) Width - 50 studs (40 cm) Height - 26 studs (20,5 cm) It's not a minifig scale model, but rather a playscale one - it is designed to fit the minifigures, but when corresponding to proper scale model the inner rooms are smaller and I had some artistic freedom making them to my likings and configuration. GHOST suffers from being heavy to the rear end, to prevent the model from tipping the chasis/landing gear is slightly angled forward and therfore model can stand on it's own without any additional support at the back. GHOST features modular removable sections - Phantom docking bay, top floor with the gunner position and roof sections in the front and the back. All of the removed sections reveal an interrior space that can be used by minifigures. And yes, this model is made IRL as well. It was one of those rare times that I made model with real bricks first and only then it made in digital form. Compared to the UCS Star destroyer 75252, GHOST looks rather small, but to be honest a lot of MOC's look rather small next to that thing! More photos/renders of interrior and Phantom will be added soon. Also, the instructions are being worked on right now. Update (17.08.20) Renders for the Phantom and how it fits with the ship. Also. description and top view of the accessible interrior. Main floor Top Floor Rooms as following: 1. Front gunner seat, accessible by lowering ladder 2. Pilot position, accessible from the communication room 3. Communication room and droid repair station 4. Main hallway, connects main ramp, living quarters, communication room, both airlocks* and the backside of the ship 5. Living quarters - has 3 beds, table and some basic furniture to accomodate basic minifgure needs 6. Cargo elevator. Can be used to access the lower cargo hold** 7. Right airlock 8. Left airlock and doorway to common room 9. Access to upper level, main gunner seat and Phantom docking bay 10. Armory and gunsmith 11. Dejarik and dining table 12. Kitchen area 13. Bathroom 14. Engine room, houses 2 hyperdive units and signal jammer 15. Main gunner position*** 16. Access hatch for the docking bay 17. Phantom Docking bay *Airlocks cannot be opened due to the structure of the build, they are keeping all the side connections together and play major role to make GHOST swooshable. ** Lower cargo hold access is limited, therfore it's hard tu use it for "playing" porpuses. It's possible to put some cargo and boxes while still building this MOC. Cargo will be seen through the large 8x8 grill pieces. *** Main gun on the top of the ship is fixed and can be reattached at 90 degree increments. I tried to make it freely rotateble but at this scale I didn't want to sacrifce looks for this small function. Hope to finish instructions till the end of the August for anyone who is interested in buying my playscale GHOST. UPDATE (11.09.2020) Instructions available at Daves Customs shop! Check it here - Daves Customs Shop UPDATE (23.01.2021) From now on the instructions are available on Brickvault.toys - VIDEO review here! -
Please excuse my mugshot in this post but a banana for scale just wasn't cutting it. I've just completed work on a pretty big Nebulon-B. A re-make of a midi scale version of the ship I created 3 years ago. Unlike that one however, for this model I matched it to blueprints and screenshots every step of the design and build process (see final image below). The Nebulon-B turns out to be a far sleeker and streamlined ship than it appears to be at first glance. Hopefully I've captured some of that with my build. Instructions are available on Rebrickable here: https://rebrickable.com/mocs/MOC-131500/Rubblemaker/movie-accurate-nebulon-b-escort-frigate-midi-plus-scale/#details Full album can be found on Flickr here: https://www.flickr.com/photos/164260086@N06/albums/72177720304383285 Thanks for looking. :)
-

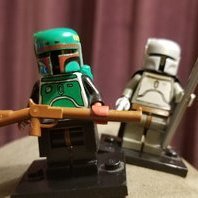
[MOC] MINIs from Star Wars Rebels - 2 NEW Models ARC Cannon and Imperial Gunship
obijon posted a topic in LEGO Star Wars
See replies in this thread for any NEW models Models in this thread - SHADOW CASTER PHANTOM II PELTA-CLASS FRIGATE IMPERIAL GOZANTI-CLASS CRUISER QUASAR-CLASS CARRIER IMPERIAL TROOP TRANSPORT GHOST & PHANTOM INTERDICTOR CRUISER TIE DEFENDER MINING GUILD TIE FIGHER ARC CANNON AT-DP PROTOTYPE (NEW) LAAT/le PATROL GUNSHIP (NEW) SHADOW CASTER Hello again everyone This week I present the Shadow Caster a Lancer-class pursuit craft - the ship of Bounty Hunter Ketsu Onyo from the excellent (well last 3 series anyway) Star Wars Rebels animated series. I was ill a while back and my attention span at the time was only an hour or so so watching a few Rebels episodes at a time fit nicely. It made me realise that there were a lot of vehicles from the animated series, not just Rebels, that I have not built or could update form my old collection so this is the first of many from this genre so keep an eye open. This is not a very tricky build, The difficult part was getting the colour scheme right whilst not making the model too thick. The new maccaroni tile pieces and 6x3 semi circle plates certainly helped with that once I realised that they existed. I tend to find out about new parts now when my son gets a new set! I think i have the overall shape and dimensions just about right. I am surpised an official minifig scale set of this was not made. As this was not the case I have also had to build a Ketsu Onyo minifig from official parts for the display. This is not my speciality so if anyone can think of better minifigure parts let me know. Anyway, enough waffle, here is the model. Let me know what you think. Jon -
Disclaimer: credit where credit is due; this is a modification of the amazing X-wing moc (V2) by @Jerac (see here.) I had to make some modifications to make the theme work, but it's mostly his design. Don't know if that will disqualify me, but at the very least, treat it as a reskin. I was in the middle of designing it in Studio at the time that the contest was announced, but have since built it. In-universe (SW) history: Blackburn Squadron is group of former pirates from the outer rim who chose to align with the Rebellion when the Empire started taking control of systems in their territory. Much like the great Saw Gerrera's Partisans, Blackburn's methods are often deemed too violent for much of the Alliance's leadership. Their results, however, are rarely questions. Candidates for the squadron are heavily trained and tested before they can be considered for membership. Upon selection to the unit, every pilot must travel to the fourth planet of the unit's home system to hunt and kill two Jakerni, giant indigenous primates that rival Gundark in size, strength and ferocity. Their skulls and leg bones are then fused to the wings of the pilot's new X-wing. Real world history: The scheme is based on the Jolly Rogers series of U.S. Navy squadrons, beginning with VF-17 in WWII and passing most recently to VFA-103 in 1995. Initially, bearing just a small black "Jolly Roger" (skull-and-crossbone) flag on an otherwise normal paint job, they began to adopt the more-recognizable scheme currently utilized with VF-84. While there have been different variations, the common components are the black tail fins with large white skull-and-crossbones and gold tips, black around the cockpit that continues to the nose and "Vagabond" stripes (gold w/ black chevrons or black with gold chevrons, barrowed from VF-84's previous name.) Some have gray noses, some black and some F-4's had white ones. Build history: I adopted mostly the current version of the paint scheme, but thought the white nose was distinctive (like a skull itself), so I used it. Originally, the wings were done with stickers, but I wasn't satisfied with the results (it would have helped to have a 6 x 4 tile without studs), so I decided to "brick build" them instead. This was tricky due to the pins that stick out of the bottom. With such thin wings, I decided that they had to be fused to the top. Ended up using these to turn technic bricks for the pins to mount in. The long bones are attached with black clips, one raised by a 1x1 plate to clear the other. I haven't settled on the Vagabond stripes yet, as I had a few ideas (for example, as seen here.) Even had some sticker chevrons, but didn't use them after I went brick build on the S&CB. For the gold color, I went back-and-forth between Yellow or Bright Light Orange. Most of the actual designs are closer to yellow, but due to lighting, often look like BLO. I went with the one closer to the Trans-Yellow windscreen, which I knew I had to incorporate as soon as I saw it. Using yellow did, however, require redesigning the rear portion of the laser cannons, since ingots do not come in Yellow (but do in BLO.) Finally, the red corresponds to the inlet caution labels on many of them. At first, I used dark red, but decided to try red instead, thinking it look more like vibrant blood coloring.
-
Hi everyone Here is a modular building i am making for a moc I am planning Rebel patrol by Tom, on Flickr
-
Hi everyone Here is a wip of my rebel cell. there will be more minifigs added and a midi scale fleet to help protect there corner of the galaxy let me know what you guys think i'm struggling for a name for them, any help would be appreciated many thanks tom Rebel troopers by TED D'Arcy, on Flickr
-

[MOC][Instructions] Micro Scale Blockade Runners: The Liberator and Tantive IV
mcphatty posted a topic in LEGO Star Wars
Hi everyone! I have been building up to tackling a 'Blockade Runner' CR90 Corvette for over a year, MOCs this size are definitely not my strong point so my thanks go to community members Bruxxy and MasterBrickSeparator for their help. First things first, here's a render of both the Tantive IV and Liberator colour schemes, there are more on my Flickr page and should any of you be interested the instructions for both colour schemes are available on Rebrickable. I can hear a lot of you screaming at your screens "Its not micro!" and I admit you're probably right, the build is 59cm long and weighs 1.6kg which is similar to the Tantive IV set 75244 from 2019. It is however the same scale (1:250) as the rest of my little fleet of ships so I feel like I couldn't not slip micro into the title. I've tried my best to make the exterior as accurate as possible, I began by dividing and measuring the obvious sections and designing them seperately in Studio, then connecting them to a Technic frame. I started with the cockpit and worked backwards, although I nearly gave up there as getting the shape right whilst leaving space for an bridge was a nightmare, the modular nature of the ship made building the rest much easier though. The central fins also proved difficult, they are the most fragile part of the ship and can be easily knocked out of position, but very luckily they fit around the cylindrical core well enough to look pretty accurate. The fins also make the ship harder to pick up, two hands are required to lift the ship off a surface until you can hold the stand in one hand. I'll keep working on his aspect in case a stronger solution is possible, I would really love it if I could make the ship one-handedly swooshable. Fininishing with the engines I came across a new challenge, how to build the 11 thrusters with enough detail but not so much that they would cost a fortune in small pieces. The structural frame is very strong, its probably overengineered but I'm pleased with how solid the build feels as the strength was a complete unknown to me whilst designing in Studio. Best of all the frame allows for a tiny interior, sadly its not 1:250 scale (Lego pieces only go so small!) but it does give the MOC some extra playability and character. The roof can be removed in two sections to expose the cockpit, the upper deck and top gunner position, a central corridor running the length of the ship and the docking areas near the rear side pods. The upper deck can also be removed to reveal the main deck's conference room, side engineering corridors and micro escape pods, which are also all removable. At the end of the project I especially enjoyed adding a little 4-stud tall crew, each little stack of round plates is probably unreconisable individually but I think that when they're seen together with the ship they really come to life! Whilst putting together the instructions for both colours I decided that I wanted to build the Liberator from Star Wars Rebels. I've been rewatching the show and I have to admit that after seeing the ship in action repeatedly in season 2 I feel that its far more exciting than the Tantive IV! I'd love to take more photos of the Liberator with my other micro ships but at the moment I don't have the equipment, skill or enough micro A-Wings to do a decent job, but I'm working on it. Here's a few photos showing the Liberator along with my micro Ghost and X-Wing, plus the interior. You can see more in my Flickr album. I've tried to balance detail and cost, so apart from a few rare colours for the Rebels crew the 1900ish parts are all common and each of the ship colour schemes will cost roughly £/€/$150 to build. I know that the Blockade Runner has been recreated in Lego many times, both by Lego themselves and the community, but I've tried to make something with a few unique features that is hopefully a worthwhile addition to the roster. Thanks for taking the time to look :) -
My son saw a small "foil pack" X-wing somewhere online. We got the instructions from Bricklink and build one. When he got The Ghost in one of those small bags it was the same size as the X-Wing. That's not right. It motivated me to build The Ghost in the same scale. So 6 studs equals 15 meters. http:// http:// Here it is with a couple of the X-Wings. We made 12 red squadron and 12 blue squadron for a much bigger project the Ghost will be involved in. Also, the bag Slave One is the correct scale. No need to redo it! http:// I made a Razor Crest too. But it was the design by obijon. Sorry for the kitchen counter photos. Space is limited right now! http:// http://
-
After a looong time, I finally finished it! This is the Thunderwasp (from Thrawn. Apologies if it does not look like it) which measures about 5/6 the length of the SSD Executor. Size comparison The bridge The underside And finally the simple interior.( Side panels openable but LDD glitched) Pls let me know if any improvements can be made!
-
A long, long time ago I started working on a micro scale Millennium Falcon. To begin with all I wanted to do was add detail to the Microfighter but I kept tinkering and before I knew it I had a growing collection of micro Star Wars freighters and fighters, and here they are! Instructions for all these little builds are on my Rebrickable page. Since this all started with that Falcon Microfighter the cockpit piece (a light blueish-grey 2x2 truncated cone) became my yardstick for scale. Luckily trans-black 1x1 slope pieces work as fighter cockpits at the same scale so all the ships are, and will continue to be, as close to scale with each other as I can manage, at least based on these pieces and whatever reference images I can gather from Google. My Blockade Runner (April 2021) is the last ship on my micro Star Wars to-do list, although it’s hardly micro! The size and weight were a new challenge for me, I’ve never had to worry about a moc falling apart under its own weight before, but I enjoyed the challenge and managed to make it pretty easy to pick strong. I’ve put together instructions for the Tantive IV as well as the Liberator from Star Wars Rebels, which I couldn’t resist building for myself. Rather than doing new posts for each new ship I’ll edit the very long post below. All the instructions are on my Rebrickable page and there are photos and Studio renders some photos of the ships in this post, plus a few more on Flickr and Instagram. Thanks for looking!
-
This is my MOC of the rebel base at Yavin IV based on A New Hope, Rogue One and Star Wars Rebels. I tried to make so that it could possibly be made as an actual LEGO set so it's one section out of four to keep the piece count at around 2,000 pieces and the price as low as possible at this size, and so the exterior can be exhibited and the interior can be accessed to at the same time. The set has 4 different sections, each one based on a different area of the base seen in the movies and the TV series. The first one is the hangar where the ships are fixed and get ready for battles, the second one is the war room where the rebel leaders meet and follow the state of the battles, the third one is the room where the rebel pilots were taught how to destroy the Death Star, and the fourth one is the ceremony room where the heroes of the Battle of Yavin got their medals. I made the set on LDD and rendered it with POV-ray. I've made a list of minifigs that I think should be included with the set and I'm finishing making the illustrations for them since some of them are new so I'll post them too when they are done! Feel free to ask any questions about the moc or leave any comments or critiques about it!
-
/
-
This is my entry in the Brickset Star Wars 'What's Missing?' building contest. 75213 Blade Wing Starfighter - £69.99, $79.99, €89.99 - Hera Syndulla, Garazeb Orrelios, Sabine Wren, Quarrie, BG-81 This set contains 704 parts. - Fly into battle aboard the prototype Blade Wing Starfighter! - Open the dual cockpits to seat the pilot and gunner inside. - Convert the Blade Wing from its landed configuration to flight mode. - Rotate the cockpits as the starfighter manoeuvres. - Fire the spring loaded shooters. - Includes Blade Wing Starfighter and five minifigures!
-
*Your entry has earned 11 XP* Well known for it's orbital shipyards, Kuat is a prime target for the Alliance. Believing the planet to be relatively undefended given recent rebel activities in other sectors, the rebels launch a surprise attack. Still, the shipyards were still defended by three ISDs: the Viceroy, the Impermanence and the Ring Guardian. With all fighters deployed, the rebels must take down the shipyards before imperial reinforcements arrive... Ambush over Kuat by simulterious, on Flickr MOCS and MODS used (most are just duplicates in the photo): A-wing by simulterious, on Flickr Y-wing [1] by simulterious, on Flickr Star destroyer by simulterious, on Flickr Nebulon B frigate by simulterious, on Flickr X-wing by simulterious, on Flickr Tie Interceptor by simulterious, on Flickr
-
This is my very own Tantive IV Main Corridor with Airlock Doorway MOC built of LEGO bricks: Served as an Alderaanian Diplomatic Cruiser, the CR90 Corvette TANTIVE IV played a central role in the events at the beginning of the Galactic Civil War, serving as Princess Leia Organa's personal starship in the leadup to the Battle of Yavin ... Tantive IV Main Corridor features the iconic round shape design for the walls, including very accurate wall-cubes and the iconic shaped side columns, as well as a smoothly sliding Airlock Doorway, that reveals an indicated Imperial Hallway behind to recreate the Borading Assault by using a pretty clever technique. The Hinge-mechanism allows you to get better access to the Corridor, and serves as a switch, so you can either close the Corridor, or open it which makes it easier to take shots of scenes with minifigures and reenact moments from Star Wars: A New Hope or Star Wars: Revenge of the Sith. The entire build is extremly sturdy which allows you to grab the whole build without falling apart, and every detail is securely locked in place. You can follow me on flickr or take a look at more Star Wars MOCs of mine: https://www.flickr.com/photos/the-creatorr/ What do you guys think?
-
Hi After checking out the so called " cubistic ion cannon" in the new UCS Echo Base set I decided to give it a go and try to create a more worthy design. Here is the result: What do you think? Is it any better? Let me know what you think. Also, If you want to help raise attention to this please support the idea in lego.ideas: https://ideas.lego.com/projects/140111 CHEERS! Thanks!
-
I picked up a Phantom II set (75170) a couple of weeks ago for my 7 yr old son. I was immediately impressed with the figures adding key pieces to our collection, but the shuttle was severely lacking. Like usual, there was no room in the fuselage for any figures. Even the pilot barely fits...wth! So I gave it a go and chose to fix the issues. I wanted to start with a fresh piece so I could take my time and avoid my son asking for his toy every five minutes. Did some looking and found a shuttle, by itself, for $7.00. Grabbed it and got started the minute it arrived. The main idea was to add cargo and passenger room while connecting the rear of the hull with the cockpit, creating a walk through of sorts. I also wanted to maintain the exterior dimensions so we didn't lose the ability to dock with the Ghost. I wanted to keep the build simple and provide strength since it would still be played with. Like most ships, and sets for that matter, this shuttle was over-engineered. I can understand why, but it really was overkill for this application. Original set... Interior structure for top fin...
-
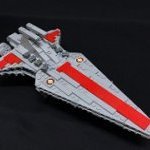
Back when the original Lego midi-scale sets came out, I fell in love with the idea of having models the size where they were small enough to display, but large enough to have detail and be cool. So, I set out first with my all time favorite capital ship in Star Wars, the Venator Cruiser. I roughed out the main idea, and kept tinkering with it ever since. That was 6 or 7 years ago. I was a beginner, so needless to say that it took four years of tinkering, remodeling, overhauling, and learning that got it to where I was satisfied. My thoughts about midi-scale, or desk-scale as I call it, were to focus on capital ships, since it seemed cool to have the largest ships in star wars on my desk. I also had the benefit of there not being very many people that had done capital ships at this scale. As a result, I built my next favorite capital ship, the executor. If you see the other photos, it was a good attempt, but it wasn't the greatest. Luckily, I found @skayenhere on Eurobricks who showed how to make the dimensions correct, though his is much, much larger. One good overhaul and viola!, the current model. (compliments of @skayen) It was around this time that I discovered Bricklink, which expedited the process. A lot. I decided to give it a go with smaller craft, starting first with a ship I came to love, the Ghost from Star Wars: Rebels. This time, design to completion only took a month (working on it off and on). It was also on this one that I tried my hand at custom sticker work as you can see on the cockpit and front turret. Then, I saw Rogue One and had to have a U-Wing. That was a pain in the butt as I designed and bought the parts only to realize that the wings were way too heavy to be supported by only a clip. I redesigned them to be lighter, but I still had to give up the functionality of the wings folding outward. I’ve seen others be able to do it, but I didn’t have the techniques to figure it out without an entire overhaul (which I don’t have the motivation or patience to do). It looked good, and that was enough for me. I left the clip in to make it look like it could though :D. Then, I had to hit the Resurgent battle-cruiser that was introduced in The Force Awakens. There wasn’t much source material at the time (pre Last Jedi) and I'm glad it turned out as well as it did. All the while, I'm getting better and better at designing and building, so it went from four years to completion, to two, to finishing two in a year, to now three in a year. They aren’t the most complex builds you’ll ever see, but that’s part of the style of this collection. Now for the Falcon. I hadn't dared do something so iconic since it'd been moc-ized at every conceivable scale innumerable times. But, I studied and saw one niche scale where it hadn't been given justice in my eyes, and I went for it. Another driving factor is the Ultimate Collector's Series Millennium Falcon that had been released that same fall to celebrate the 40th anniversary of Episode 4. I wasn't going to pay $800 dollars for a set, as cool as it is, and I didn't have anywhere to put it even if I did. Time to crank out the desk-scale experience. Two months later and there it was, my greatest thus far. It weighs two pounds. I managed to finish it before 2017 ended, making it my 40th anniversary celebration piece. Be sure to hit my flickr to see a couple of timelapses of me building this sucker! The latest I’ve done was inspired by @Inthert when he modified his excellent U-Wing into the junker version that appears in Star Wars: Rebels. I thought, “why not? I can so the same thing!” and voila! I’ve since shortened the wings a bit from these pictures so they are more accurate. Here's some pictures of most of the fleet on a wall: Their public debut and my first Lego Con, Brickslopes June 2018: I hope you enjoy. - Jordan Fridal aka simplethinker Every model has one element, idea or technique that I borrowed from someone else. So thanks to Erik Varszegi, V1lain, Tim Goddard, @Inthert, @sparkart, Palleon, @DarthTwoShedsJackson, @skayen, @Brickdoctor, and the LEGO Group! I’ll leave it as a challenge to all of you to look through the photos and figure out which elements came from where.
-
Hi everybody, We built this Lothal skyline from the Rebels series, in Architecture style; hope you like it: Tried to include the recognizable buildings; Ezra's tower, the Imperial Center, the Old Senate building, the marketplace, etc. The Ghost and ATDP are our designs too. (We know that the ATDP is way larger than it should be, but wanted it to be more detailed) More images here: https://www.flickr.com/photos/152265303@N06/sets/72157706049088074
-

[SoNE Episode XVII] [Rebels] [Week 25] In the Pines
Forresto posted a topic in Nar Eurbrikka Archive
Shadows of Nar Eurbrikka Episode XVII: In the Pines 4 ABY: Sanctuary Moon of Endor - Gulch, Northern Mountains Can't...breathe...right. Damn AT came outta nowhere... Bleedin' real bad... I tried, I fought and I killed to find you... Not got much left to give brother... Think shrapnel got me through the gut... Never was gonna go out clean was I? Doubt you'd recognize me now, you were always the one lookin for a fight not me... I can't even recognize myself... I'll sit beside you at the fire pit of the ancients soon brother... It hurts so much... ~~~~ Behind the Scenes: Episode List: -
Page_1 by Meyerj, on Flickr Page_2 by Meyerj, on Flickr Page_3 by Meyerj, on Flickr Page_4 by Meyerj, on Flickr Page_5 by Meyerj, on Flickr hope you enjoyed the comic style version, I tried it, not to sure i'll stick with it takes a lot of time. cheers Jody Meyer
-
Page_1 by Meyerj, on Flickr Page_2 by Meyerj, on Flickr Page_3 by Meyerj, on Flickr Page_4 by Meyerj, on Flickr Sorry for the laziness in my story but I am super tired from real life events, they are starting to take a toll on this old body of mine. @elementary should be providing the move for us. Cheers Jody.
-
Since TheNerdyOne_ posted his first ships for his Rebel Fleet, I was inspired to build some capital rebel ships myself. The CR90 (a.k.a. Corellian Corvette or Blockade Runner) is propably my favorite rebel capital ship - its fast and pretty maneuverable for its size, heavily armed, easy to reconfigure for different tasks, and most importantly of all, it has interesting shapes as a model and a nice contrast between its elegant long shape and the massive engine array on the back. I initially started by building TheNerdyOne_'s Corvette according to his LDD files, but I quickly realized that this model could not be built with bricks without the application of glue. So, while his model still remained my inspiration, I set out to do what's most fun with LEGO: Come up with my very own build. The model is roughly the scale of TheNerdyOne_'s Corvette - it's slightly bigger - and built very differently to his model, so that I can now with confidence call it a MOC of my own. The core consists of alternating layers of bricks and two plates stacked in multiples with a footprint of 2x3 and 2x5 studs, with modified studs (one stud on the side) running along the middle. 1xX plates are connected to the studs that run along the sides of the core structure in the middle and make for a super-sturdy base with studs on the front, sides, and optionally on top and bottom where needed. Both the engine array and the display stand are connected deep into or with the core, which results in one of the most sturdy models I have ever build. The ship I built I have christened 'ARGUS III'. It's a ship attached to Phoenix Squadron which has been outfitted with a very powerful sensor array and the capability to mask its signature to some extend. The ARGUS III has been used on several occasions by FULCRUM (Ahsoka Tano) to spy on imperial facilities and intercept secret imperial transmissions - lastly near Mustafar. I hope you like the model, and I hope @TheNerdyOne_ likes it, too - your fleet is the inspiration for my own fleet, which will hopefully join the ARGUS III in time.
-
Inspired by Battlefront 2 and the final book in the Aftermath Trilogy, Empire's End, I decided to build a MOC of the ruins of a Star Destroyer - a motif that Jakku is famous for. Instead of just building some wreckage though, I wanted to build an Imperial camp, so I built this Outpost within the ruins, featuring a command station, lots of crates, some barricades and one of the star destroyer's battered computers that are, at the moment, being powered by a gonk droid as a stormtrooper does the boring work of searching through its files.