Search the Community
Showing results for tags 'sbrick'.
Found 171 results
-
 After some month of building I like to show you my latest MOC: A Mercedes Zetros 6x6 truck. It is a ~ 1:13,5 scale model of the Mercedes Zetros 2733. All functions are Full RC. It is 69 cm long, 21 cm wide and has a height of 27,5 cm. The weight is 4553 g. As battery I use the BuWizz. The Zetros is remote controlled by 4 Sbricks via iPhone. Functions and used parts: Propulsion: 4 Lego Technic Buggy Motor Steering: 1 Lego PF Servo Diff Locks (front / rear axles + central lock): 1 Lego PF Servo 4 Lego Pneumatic V1 + V2 1x5 (Automatic) Compressor: 1 Lego PF L-Motor 4 Lego Pneumatic Pump (V2) Winch: 1 Lego PF L-Motor Telescope Crane: 1 Lego PF M-Motor 3 Lego PF Servo 3 Lego Pneumatic V2 Cylinder 2x11 2 Lego Pneumatic V2 Cylinder 1x11 Outriggers: 1 Lego PF Servo 1 Lego PF M-Motor 2 Lego Pneumatic V2 Cylinder 2x11 Lights: 10 pairs Lego PF LED plus several Lego extension wires Some more highlights: Full independent Multi link live axle suspension Portal Axes Planetary Gears Working head lights, rear lights and flood lights Working turn signals and warning lights [/url Edit: I nearly forgot some special picture pair ;) [/url] Second edit: I corrected the scale which I'd miscalculated.
 -

Ropa Maus 5 Sugarbeet Loader
BondemandClausen posted a topic in LEGO Technic, Mindstorms, Model Team and Scale Modeling
NEWS of 12-11-2017: I have been invited by Ropa Maschinenbau, to join them at Agritechnica in Hannover Germany with my Ropa Maus 5, and my Ropa EuroTiger 4 XL, the coming Thursday and Friday the 16-17. in Hall 25, Stand G14. Come and have a look if you plan to visit this exhibition. Hi Guys, long time no see. Bondemand Clausen is back with some farming equipment. It is a Ropa Maus 5, which is used for cleaning and loading sugarbeets onto trucks or tractor wagons. This MOC is build in Scale 1:16, weighs 8 kilo. It has been presented at Lego World 2017, Copenhagen, and Skaerbaek Fanweekend 2017. First pictures shows the Machine in transport position. Unfolded and ready to work. It has 23 motors, 13 Servos, 2 XL, 3 L, 4 M and 1 Micro. They are controlled by 6 Sbricks, via Ipad. 10 of the servos controls pneumatic valves, powered by 4 pneumatic pumps. It has 11 pairs of PF LED lights. The real machine the Ropa Maus 4, Cleaning and Loading my Sugarbeets in 2013. -
Hello Eurobricks AFOLs, I am Engine and this is my first post here on EB forum. My friend HorcikDesigns told me, some of you here want to know more about my last MOC. My pleassure! Original Vehicle: As some of you noticed, my MOC should be scale model of Ghe-o Rescue. It is a Romanian rescue vehicle designed for extreme terrain, with a capacity of up to 11 people. Dimensions are: 5.2 m length; 2.7 m width (even wider version exists); 2.4 m higth (without rooftop carrier). The weight is 3.2 tons. Under the bonnet, more engine types can be monted, with the most powerful one with 500 hp. Live axles are used for suspension, both equipted by lockable differentials. There are also built-in water tanks for 620 liters for fire extinguishing. Another specialty is the possibility to mount tracks to rear wheels or pneumatic "pillows" on wheels for floating on water. Tires are also special. It is Arctictrans 1300x700-24 (diameter 1300 mm and width 700 mm). The manufacturer shows off an independent test in which they won over Avtoros and Trecol manufacturers. Here you can see several cars built on them. And because the tire diameter and width exactly match the 1:16 scale to the LEGO "Tumbler" tires Ø81.6x44, the scale of the model was decided. So far I do not know any other LEGO cration of Ghe-o Rescue. MOC: The MOC was designed for Kostky.org Trophy Competition, organized by our technic race event guru Peter. And the task was to build a drivable, remote-controlled, off-road vehicle that would be able to travel about 3 km. And at the same time, it should be as beautiful as possible and with design matches to original vehicles. Terrible task. The dimensions of the model are: 332 x 168 x 168 mm (41.5 x 21 x 21 studs), weight 1.2 kg. The drive is permanently 4x4 without differentials. Axles are not sprung. But thanks to the torsionally soft frame of the vehicle, decent axle crossing is achieved (some LEGO trial experience here). Inside, there is a functional winch with a length of 2.5 m. Good lighting is a necessity for the expedition special. The control is provided by sBrick. The propulsion is made by 1 x PF XL motor with a total gear ratio of 1: 1. Schizophrenic steering is provided by the PF Servo. The winch is driven by a PF M motor via a worm gear (8: 1 ratio). Five pairs of PF lights really shine in front of the car. Electrical source is a battery box with 6 AA batteries. The whole MOC is pure LEGO exept of: sBrick receiver, high strength thread as winch rope, threaded cardans and event mandatory stickers. Drive ability: Drivig speed corresponds to a pleasant walk. Off-road capabilities were adequate to the track. Tire traction did not limit offroad capabilities, but a small power of e-motor did. Then the winch becomes useful, that is able to lift the entire weight of the vehicle. And if it was still not enough, the other "competitors" were there to help. A minor issue was the steering. Thanks to the loose in steering mechanism and occasional insensivity in the mobile app, sometimes I sent it out of the way. A major issue was energy consumption. Within 1.5 km, I drained out three sets of batteries (2x alkaline GP Ultra Plus, 1x rechargeable GP 2700). And yet I do not know how to solve it. But most likely it is caused by PF Servo motor, as we disscussed after the event with other partipiciants. ----- Thank you for comments and questions. Pictures are here in my gallery. Original post on Kostky.org.
-
[WIP] Yet Another Baja / Trophy Truck
miguev posted a topic in LEGO Technic, Mindstorms, Model Team and Scale Modeling
Hello! I’m not particularly proud of this Technic horror I’ve created, but I’d like to share it with you rather than keep it to myself, possibly forever. Shortly after I learned about (and supported) SBrick and MiniZip in KickStarter, I started dreaming of building powerful, compact MOCs using a new combo: PP3 NiMh battery + MiniZip + SBrick + 5292 RC Buggy Motor. This is my first attempt at it, now that Android SBrick app (1.3+) is finally usable Functions Drive: 2x 5292 RC Buggy Motor, each connected to a separate SBrick, each powered by a separate PP3 NiMh 250 mAh battery using MiniZip. Steering: PF Servo. Front suspension: independent, soft, long travel, with “fake” positive caster Rear suspension: solid axle, dragged (didn’t figure out how to do four-link) 4x Lego LED Still haven’t applied myself to learning proper bodywork, so designing my own was out of the question. I went for an easy, fairly plain one. No openable doors, bonnet or anything. I worked with these two photos and scaled for 62.4mm tires. Full size (> 1024px): 1, 2. Photos were made really quick, during a baby siesta (indoor) and in short incursions (outdoors) no more than 20 meters from home. For now, I can only dream of having more time and freedom for this :D v0.99 without stickers: v1.0 with stickers based on video: Old school navigator refused to deal with GPS and computers, wanted just a compass (70001pb02) and a map with an X that marks the spot. Smart dude, run off with the loot. Very short of creativity and sleep, the only alternative I could think of to get rid of the demonic Monster logo and brand was a rather lame one: Music Energy. Example diff: I asked friends to vote in G+ and 3 out of 4 prefer Music, but the one who prefers Monster is my the only one into LEGO. I’m divided, will probably print them and try them on, but still not sure which ones to use for filming. I started with 1 battery, 1 SBrick, 2 motors. It seemed to run well. Adding an extra battery and Sbrick seems to make it run even stronger / faster, although SBrick developer Zsolt Majoros said it shouldn’t matter. The real reason I added the extra SBrick is that “2 ports 1 function” only works in Android app when those 2 ports are on separate SBricks. You may ask why use PP3 batteries instead of the acclaimed LiPo batteries… mainly because they are expensive, and a bit of a lottery with their thermal protection. MiniZip + PP3 NiMh 250 mAh wasn’t a whole lot cheaper, but the combo is certainly more compact, half the weight and doesn’t have any thermal protection. SBricks can draw as much current as the motors want, with just a small risk of overheating and possibly catching on fire… ah well, what could possibly go wrong? I haven’t actually managed to make the batteries warm up, they get warmer when charging. One likely reason for not achieving hotness is short life, according to this battery life calculator, they’d last 3.5 minutes at 3 A, 10 minutes at 1 A, 20 minutes at 500 mA. Can someone make a better-informed / estimation of a more realistic battery life? But there are more and worse problems, for which I sure can do with your advice! Caster angle is fake, isn’t? I mean, I just shifted the upper A arms a half stud backwards, but both A arms still move vertically. I think this is why big bumps will throw the truck’s front up rather than only the front wheel/s going up. When hitting a big bump with a front wheel, the wheel will thrust up and with it the whole car will roll to the opposite side. This results in a raised rear wheel taking all torque to just spin in the air, so the car stops until the raised wheel hits the ground again. Shifting the upper A arms a half stud backwards messed with the steering geometry, so now there’s a not-so-slight bump steering. I think this, combined with the twisting effect on the solid axle, is what’s causing the truck to steer to the left when accelerating. Too bad. Motors are hard coupled on their fast output and then geared down 20:12 twice, not including the 20-tooth to differential connection. Maybe I could / should gear down 20:12 only once, haven’t had a chance to try yet. I suppose integrating the motors in the rear axle and connecting wheels directly to them would help with the last couple of problems, but couldn’t figure out how to fit that in this body just yet. I’m also concerned that if one battery drains faster, the motor (no longer) powered by it will get damaged. With each rear wheel directly on one motor, that would result in the truck going in circles, but motors wouldn’t get damaged. How bad is this? Steering with SBrick (v1.3) as a significant latency, in the time it takes from the moment I slide my finger to a side (much or little) to the moment when the PF Servo starts moving, the truck is already going the wrong way. It’s really hard to drive straight. rm8, what’s your experience regarding this latency with your Double Trouble? If anyone has not seen rm8’s Double Trouble, I’ll put it as “my dream, properly done” Thank you for reading. If you were looking for a video... EDIT(25.05.2015): slightly better pics. EDIT(26.09.2015): I’m now a little more proud of my creation, at least the suspension seems right to me: it’s long travel and soft enough to reacts promptly to bumps, but the car doesn’t sink too much on it. I dare say it works better than most others, probably because it’s much harder to this the a bigger scale most others have been working with. The car is still not really fast, so I didn’t bother measuring its speed. I did try putting less reduction in the drivetrain, but that only resulted in lower speed due to lower torque, so I reverted back to my original setup. It’s still fast enough to be impossible to drive well, specially with the terrible latency in the SBrick. Latency is not a problem with the port tester, so it doesn’t look like a hardware limitation. Anyway, it’s fast enough to be fun. Thanks to Sir Wolf’s help and support, we finally have a somewhat decent video. Enjoy! :) And we learned many things the hard way: by failing. Fake caster angle is not good, you need real caster for off-road racing. I took the idea from someone’s supercar project here (sorry, couldn’t find it again) to displace the upper suspension arm by ½ stud backwards from the lower arm (see belly shot above). That gives you quite a bit of caster angle on the wheel (or snowmobile skies) but it does not help reacting promptly to the most serious bumps. It also screws the geometry in that the gear rack should ideally be ¼ stud backwards, but it’s either 0, ½ or 1. This results in notorious bump steering: front wheels are toes out when suspension is fully extended, and toes in when fully compressed. When this adds to the torsion exerted by the powerful motors on the live axle (see in the video how left front wheel jumps up when car starts). All in all: bad Idea. Portal hubs from 8070 are not good for off-road racing, I should have used the ones from the snowmobile 42021 (2015). They are also too expensive to go on dirt with them, so I didn’t. Differential slows down or even stops the car when one rear wheel take off. I knew this was a problem with crawlers, but never imagined how bad it’d be on a trophy truck. Damn it, I’ll never do this again. Just use one motor per wheel, and accept that if one motor runs out of battery or losses signal, you might take a sharp turn or find yourself driving in circles for a little, depending how the front wheels cope with the imbalance. MiniZip are great to get “buggy-motor-grade” power in a smaller size than LiPo batteries. PPA 9V batteries can fit a width of 3 studs, so a 5x11 panel makes for a perfect home. However, MiniZip’s lack of power switch in makes it a complete hassle to replace batteries. Should keep them very easily accessible. -
Hi everybody! Thats my new 4x4 rock crawler. So,here it is Specifications: -4 link suspension -portal axles -rc 108 mm tires -3s li-fe battrey -2 buggy motors -1 sbrick I hope you like it Let's see it in action!
-

Technic animation / automation
knotian posted a topic in LEGO Technic, Mindstorms, Model Team and Scale Modeling
Quandary. First I apologize for the long post. I have finished the first stage of a large industrial MOC. So far it has 4 motors for several models AND 4 channels on an sbrick for an overhead crane. ( with more to come) I'd like some suggestions as to how to proceed with the animation/automation. I'd like to use a laptop as a central control point. I understand that sbrick is working with scratch on a pc interface. I have read that a pc running windows can communicate with an EV3 with Bluetooth protocol. Has anyone done any work with any kind of an integrated environment. Ideally I would like to make the EV3 sensor readings available to the pc and then issue commands to either EV3 motors or sbrick motors. The sensor capability of the sbrick is not versatile (at this time) to use a full range of EV3 sensors. Am I "beating a dead horse" with trying to keep the Ev3 + sbrick + pc in the loop or should I do a switch to Ardunio / Raspberry Pi / NanoPC etc? I 'was' an experienced programmer before retiring and am leaning towards a micro solution to get in a single language environment. Any help/comments would be appreciated. If you would rather continue this topic privately, drop me a message. Thanx -
 Updating the first post to have all three RC mods in one place. 1st version - Power Functions motors & SBrick control This is a quick and dirty upgrade, it started as a test to see if 2 or 4 L motors can drive the set properly, but things escalated quickly :) The aim was to add the PF components without taking apart the set completely or to change original structure, so obviously there are more elegant ways to hide all the motors and to upgrade the suspension and the drive train. The list of the added elements: 4 PF L motors (drive) 1 PF Servo motor (steering) 3 PF M motors (functions) 1 PF switch 2 8878 Battery boxes 4 PF lights 2 SBricks The 4 L motors can drive the car, but it has no extraordinary performance due to the added weight. The servo motor is struggling sometimes (especially when the car is not moving), it'd need another servo motor or some other solution for the steering to work smoothly. 2nd version - pickup-style body, 4 buggy motors, 2 BuWizz units After the first attempt I wanted to build something faster, so I had to reduce weight and add more power :) The back part of the truck was removed, I removed also a lot of non vital elements (like the fake V8). 4 Buggy motors were added and they were powered by 2 BuWizz units. The results was pretty fast considering the tracks and could handle the obstacles well. 3rd version - tracks removed, wheels added, pickup-style body, 4 buggy motors, 2 BuWizz units This is my third and last Lego 42069 Extreme Adventure remote control mod. After the previous version I did not plan to create another one but I was convinced by some comments on my YouTube channel (thanks for the tip!). Although I really liked 42069 on tracks, I realized that the top speed was limited by the construction so the 4 buggy motors could not show their full potential. I removed the tracks and added the wheels from the 9398 Crawler set. The pickup-style body was kept from the previous mod to ensure the car is as light as possible. The axles were rebuilt completely to fit the buggy motors and the wheels. The car is driven by 4 buggy motors and there's a PF Servo for steering. It is controlled and powered by 2 BuWizz units. It became surprisingly fast, I was curious so I added a small GPS tracker to measure the top speed - you can check the result in the video :)
 -

[MOC] Baggage Belt Loader
Superkoala posted a topic in LEGO Technic, Mindstorms, Model Team and Scale Modeling
Hello Eurobricks, (sorry, posted by mistake , I'm currently writing the topic) That's OK now. If you get tired of airport vehicle, you can still escape. I had some time to kill during my forced holidays, so I present you my latest MOC, a baggage belt loader. This kind of vehicle are used to delicately load you baggage in the bulk cargo room of aircraft. The belt is made of two parallel tread sliding on studeless beam and are actuated by a PF-M motor + Worm gear (and some gear inside the conveyor). The U-shape prevent the tread to move. Regarding the other function, you can find steering (through PF-Servo motor), propulsion (through PF-M motor) and the elevation of the coveyor (through PF-M motor and linear actoator) Except the smal size of the model there is no real complexity in this MOC. I tried to add some small detail to make it look better, I'll let you discover them in the here below video. thank you for reading Complete album on Flickr : https://flic.kr/s/aHsm78fkMT -
How about that little cross between mud and go on the rocks? Crawler 4x4 always ready for it! Still would! Its wheels are shod with tires RC Rock Crusher X/T 1.9, coupled with portal axles and two motors running by SBrick and LiPo battery box - we have an off-roader with excellent maneuverability, suspension geometry and a low center of gravity due to the unsprung axles. Crawler 4x4 built under the rules of the forthcoming Off-road trial competition in Moscow, at the same time. I tried to build the chassis in such a way as to achieve maximum throughput and maximum flexibility - namely, so this chassis can set the wheels of virtually any size from 62 to 108 mm. The body of the model removable. This allows the chassis to this every body, even though the truck, even an SUV. Get more photos on my blog of flickr
-
.thumb.jpg.c73e512ce1ed75fb1580e192a3e8b48a.jpg)
[MOD] Dinotrack from 42065
jam8280 posted a topic in LEGO Technic, Mindstorms, Model Team and Scale Modeling
The only thing worse than a hungry meat-eating dinosaur on your tail is one with a tank! (Well, getting caught is pretty bad, too.) Battery: 7.4V PF LiPo rechargeable in place (was AA box) RC receiver/controller : SBrick/custom joystick on Android phone (was PF with bang-bang handset) Motors: L front and rear (were Ms) Drive train: Direct drive (no change) Steering: Differential power to the tracks (no change) Tracks: Lugs every link for traction (new) Overall dimensions: 206x170x146 mm (LxWxH) Mass: 546 g (down from 599 g) Installed power: 4.3 W (was 1.5) Power to mass ratio: 7.9 W/kg (was 2.5) Stalled torque: 0.52 N m (was 0.18) The biggest and most important advance over 42065 was in outdoor play value -- by far my best yet in any MOC or MOD. The biggest contributors there were the L motors and the red rubber track lugs. Dinotrack performance was generally traction-limited without the lugs. Photos and write-up at http://www.moc-pages.com/moc.php/441699 -

[MOD] 42005 Monster Truck
Splat posted a topic in LEGO Technic, Mindstorms, Model Team and Scale Modeling
A few years ago I created a modification to the 42005 Monster Truck set, where I motorized it and made it RC (IR), but tried to keep the geometry as close to the original set as possible (see topic here). I always liked the design and size of the body of this truck, so I have used it again, but this time I have completely removed the chassis and the drivetrain, and inserted a new one. This truck uses: the Lego Power Functions Rechargeable Battery (8878) to power an SBrick which controls a 9V Buggy Motor (5292) for drive and a Power Functions Servo Motor (88004) for steering. The truck is controlled remotely using Bluetooth via the SBrick and SBrick Android App on my mobile phone. This truck features: large suspension travel Ackermann Steering and positive caster steering geometry. The tires (56908c03) are the tires that were first seen in the Batman Tumbler set (76023). Even though the wheels are so far apart the truck has a short wheelbase, and thanks to the Ackermann steering geometry and differential in the rear it has a fairly tight turning circle. The front suspension uses a single shock absorber (731c05) with a setup similar to the 8081 Extreme Cruiser set from 2011. The rear independent suspension uses two hard shock absorbers (731c04), one each side. Here's a video to see it in action: Although the Monster truck uses a Buggy Motor, I couldn't give it full power without the battery and/or SBrick cutting power to it. I could only go at about 70% of max speed. I didn't have much space for gear reduction (apart from a 20-tooth gear to 28-tooth differential), so the output doesn't have much torque when using such large tires. Because of this, the truck takes a while to get to full speed, and slows down when hitting an incline or going off-road, which kind of makes the large suspension travel a bit pointless. I might see if I can gear it down some time in the future. I still continue to have a lot of trouble with the SBrick too. I finally have a version of the SBrick Android App that seems to work ok, but despite being only a few feet away and with nothing else around to interfere with it, it would still lose connection with my SBrick regularly. Hopefully BuWizz will be better, and be able to power the Buggy Motor better too. My BrickShelf Gallery with larger images (once moderated) Any constructive feedback/comments/questions are welcome. -
[MOC] Aircraft Super Towbarless Tug
Superkoala posted a topic in LEGO Technic, Mindstorms, Model Team and Scale Modeling
Hi everyone, I’m please to introduce you my latest MOC, the Aircraft Super Tug, an attempt to make something inspired from the Goldhofer AST-1X 1360 used for moving biggest aircraft including A380 on airport platform. If you’re curious there’s some nice videos on Youtube. The MOC: [ All images are available on Flickr There is some basic function controlled through SBrick inside: Propulsion (1 PF XL) Steering (1 PF-M) through several mini linear actuator Catch the aircraft landing gear (1 PF-M): adaptable to different size of wheel Lift/down the aircraft (1 PF-M) through 2 linear actuators A video will explain better : There’s a lot of issues with the functions, the gears don’t engage properly so the truck is unable to move or turn under its own power. Not a great success so maybe I will restart this vehicle from zero one day to make a better version 2. Thank you for your time, best regards, -
[MOC] King of the Hammers IFS Buggy
offroadcreations posted a topic in LEGO Technic, Mindstorms, Model Team and Scale Modeling
IFS= Independent Front Suspension Hello all Today I'm proud to present my new MOC, the King of the Hammers IFS Buggy. This all started almost a year ago, when I wanted to build this, but changed my mind because of trouble with the rear suspension. So I made this in under a week, one reason for the speed of this build was that I used a pre-made rear suspension. It is a floating axle with four links designed by @Sariel, it works great on this model and gives it lots of travel. The reason I used this was because when I decided to build this, I thought that was what was used on the real ones. After closer inspection, I remembered this is just a live axle, with links going to a moving rod on the back. For example, this. So the suspension isn't realistic, but I think it works perfect on this model. For power, it uses a Minizip cable and 9V battery to power an SBrick, which controls 1 XL-motor geared 1.667:1 for rear wheel drive and a Servo motor for steering. LDD: http://bricksafe.com/files/Offroadcreations/king-of-the-hammers-ifs-buggy/KOH IFS Buggy.lxf Rebrickable: https://rebrickable.com/mocs/MOC-8996/offroadcreations/king-of-the-hammers-ifs-buggy/#comments Loads more pics:http://bricksafe.com/pages/Offroadcreations/king-of-the-hammers-ifs-buggy Here are some pics. Here it is with a 42000- inspired color scheme, if that's more your style. And size compared to 42037: Tell me what you think, and have a great day! -

Lego Gaz 34 soviet truck
Toni-23 posted a topic in LEGO Technic, Mindstorms, Model Team and Scale Modeling
Hi everybody! today i wont to show you my new creation - Gaz 34-6x6 soviet truck. This truck is modification of legendary Gaz 66.I'm crazy about 6x6 trucks,thats why I built Gaz 34. So,here it is: As you see,this is not original configuration of Gaz 34.I'm added portal axles(without diffs),bigger wheels and slightly changed the rear suspension.Finally-it is really good trial truck,with great grip on sand,grass (thanks to the wheels from 42054). So,lets look for the technical specifications: -6x6 wheel drive,without any diffs -portal axles -huge offroad wheels -2 buggy motors for drive -1 medium motor fot steering+micro motor(they tern steering wheel in the cabin) -Sbrick -3s li-fe battery(9,9 volts) -Leds lights(headlights) -balanced rear suspension(thats why truck has really good suspension travel) Let see it in action! https://youtu.be/hHDJLmvZ4BA -
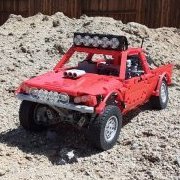
[MOC]4x4 offroad pickup
Toni-23 posted a topic in LEGO Technic, Mindstorms, Model Team and Scale Modeling
hi everebody! Today i would like to show you my new 4x4 pickup truck. Specifications: dependent suspension portal axles 2 buggy motors for drive(geared 13,8 :1) 1 M motor for steering 107 mm wheels so,here it is and the video available here: -

Speed test: PF V1 / PF V2 / SBrick / BuWizz
Sariel posted a topic in LEGO Technic, Mindstorms, Model Team and Scale Modeling
Now that I have the GoPro 5 camera which can record speed on video, I wanted to use it for comparing how various power supply options affect speed of LEGO motors: old PF battery box, new PF battery box, V1 and V2 PF receivers, SBrick and BuWizz. Various AA batteries, too. However, in the imperfect conditions I was running my tests in, all results came out pretty close. I admit that this test could have been conducted in a better way. -
I'd like to share with you my upgraded version of the 42050 Drag Racer. First of all, 2 videos: I really liked the look of the 42050 set when I got it, I think it has all the main characteristics of a drag racer. On the functions' side I was not that satisfied, there were a couple of issues: - Simulated wheelie mode looks ok-ish while the model is standing, but it's really lame when you motorize it - official motorized version has manual on/off, you have to walk with the model to stop it. If you add an IR receiver steering still remains manual - M motor is weak to power a vehicle that supposed to be fast :) - Driver seat is small for a Technic guy, minifig fits but that's really out of scale The upgraded version has the following features: - body panels and stickers from 42041/8041 Race Truck - Servo motor for steering - 2 Buggy motors - 2 BuWizz units for maximum power and more weight - 1 M motor for powering the fake engine - Proper seat for the driver - Larger spoiler to add weight to the back – essential for the wheelies ? I am quite satisfied with the result, the upgraded version is fast and most importantly it can do proper wheelies :) A couple of pictures of the build: I also built a drag racing Christmas tree for the videos. The Lego LED lights are controlled by 2 SBricks. The staging/start sequence is pre-programmed, I did not have all the necessary components to build a proper functioning one. I'll add some information and images later if you're interested. You can see some more pictures and additional information in my blog post
-

[MOC] Liebherr LTM 1090 4.1 - Sarens
dikkie klijn posted a topic in LEGO Technic, Mindstorms, Model Team and Scale Modeling
September 2013 the first WIP picture of my crane was uploaded, now 3,5 years later I dare to say the model is finished. In all these years I have faced a lot of technical challenges with this model, thought most of them are solved a few remain annoying (steering and drive). In the end I consider the model done and decided to learn from the not fully working features to improve on in later builds. Other tough challenges that were beaten in this model are: Fully capable outriggers that lift the complete model of its axles, Lift of the boom using a brick build linear actuator, fitting tens of meters of wire in the model to power all the led's. A full list of the features can be found at the end of the post. Even though I consider myself quite a purist a few elements of this model are not from TLC. For control the model uses 5 sbrick's together with a custom profile, enabling all the rc features I needed with a good signal . Since the PF led's are way to expensive and dull I decided to solder my own led's with the right color and a good brightness. The stickers are supplied by JaapTechnic. More pictures can be found on my flickr Full road configuration with 14.4 tons of ballast weight. The spreader plates are stored on the back. All the light are controlled by the Sbricks, this includes the indicators, beacons and reversing lights. Yes this actually lifts. With the jib mounted the piston is able to erect the then 1.7 meter boom to full height. Fully erected the model stands 2.6 meters tall. Even though the model faces a lot of technical challenges all of the details are added including full interior in both cabins. Full feature list. Motorized functions: Drive, Steering, Outriggers front and back, Compressor for the outriggers, Slewing, Boom lift, Boom extension, Winch, Cabin lift. Light functions: Normal driving lights, indicators, hazard lights, beacons, reversing lights, working lights on the superstructure. Other functions: All cabin doors open, Openable storage doors on the back, Full suspension, Folding jib with multiple angles, Folding safety railing. -
[WIP] Ultra4 Buggy + Black Edition
offroadcreations posted a topic in LEGO Technic, Mindstorms, Model Team and Scale Modeling
Hello all! Today I am presenting my newest project, an Ultra4 buggy. I know it isn't an exact copy, but I based it off one I saw and added my own details, like fake injector stacks. All that is left is an interior and working on the front suspension some more. I'm not very good at making them (suspensions), so it usually takes a while to finish them. Oh, and there's one more thing... I need to test it! I haven't been able to, because it is using broken motors as stand-ins, because my working ones are in something else. I will replace them with the real 2 L-motors and 1 Servo. I plan on using an SBrick. Tell me what you think of it so far, and what else I should add later. Thanks for taking a look! Edit: Here is the video of the completed model. LDD: http://bricksafe.com/files/Offroadcreations/competition-buggy/Ultra.4 FINAL.lxf Rebrickable: http://rebrickable.com/mocs/MOC-7815/offroadcreations/ultra4-buggy/ -

Using SBrick+ with a real gamepad is super fun!
BarakRL posted a topic in LEGO Technic, Mindstorms, Model Team and Scale Modeling
While my previous post from 2 weeks ago didn't get any love, I think hope this one just might. I've had a lot of progress on my SBrick framework (ELI5: it's a piece of code that let me write my own apps for the SBrick instead of using the official app) and I now support most of the features I wanted to (including some limited Wedo distance sensor support). The only thing that annoyed me was using the touch screen for control, so I decided to write a quick app to bridge between a real gamepad an the SBrick. Some details for those who care: The gamepad is a 8Bitdo SNES30 connected to my iPhone 6s in iCade mode (any iCade gamepad will work). The iPhone then translated the key presses to SBrick commands and also adds some sounds effects for fun (using the iPhone as a speaker). Both the gamepad and SBrick are using bluetooth of course. Let me know if you have any questions :) -

[MOC] Mercedes-Benz Actros MP3 - Mammoet & Nooteboom
JaapTechnic posted a topic in LEGO Technic, Mindstorms, Model Team and Scale Modeling
By reading the title you may thought - Yeah i know this model, you designed it 4 years ago... Yes... but nope. This is an entire new version relying on the same real truck but this time in 2 different colours. The previous version designed in December 2012 used Technic beams and liftarms. Since brick build models can be way more detailled - I chose that technique to build the new model with. Also i discovered the truck could use some more power so there are now 2 PF XL motors in it. There are a lot of improvements on this new 2016 version. All features, included by the fact its SBrick controlled, are listed below: Powerful 8x4 drive train by 2 Power Functions XL motors 2 axle steering by Power Functions servo motor 2 Power Functions front LED lights Sbrick Controlled Openable cabin doors with realistic hinge design Openable storage doors with realistic placed lever behind the seats Tilt able cabin with easy acces to the V8 fake engine Fully adjustable seats and steering column Fifth wheel suited for automatic steered trailers Front and rear tow bars Easy accessible Rechargeable battery box on top of the cooler behind the cabin Improved playability with sturdy overall build quality Off course there is a building instruction available for these new models. Compared to all my other instruction this one goes again one step further in quality. With all stickers implemented in the instruction you can't make a mistake anymore regarding their position. Check out my website for more information about the building instructions: JaapTechnic Website Check out the entire photoshoot on Flickr LEGO - Mercedes-Benz Actros 4165 by Jaap Kroon, on Flickr LEGO - Mercedes-Benz Actros 4160 & 4165 by Jaap Kroon, on Flickr LEGO - Mercedes-Benz Actros 4160 & 4165 by Jaap Kroon, on Flickr LEGO - Mercedes-Benz Actros 4165 by Jaap Kroon, on Flickr -
I just unboxed by first SBrick this weekend and this note provides a review of my experience thus far. First let me start with the background. I was fascinated by the development and release of the SBrick last year. It looked REALLY great, but I thought to myself, "while I'd love bluetooth controller, it looks great, but I don't think I could justify $60+ to replace IR if I only need one output." Of course there are a lot of people on this forum building their own homebrew bluetooth receivers, while they look incredible, these self-build receivers are way beyond the reach of my time resources right now. Yet, from long before the SBrick came out, I have been struggling with power issues in my two long passenger trains. The first train is my Superliner train with 7x 52 stud long cars, a dummy F40 and a powered F40 with a pair of PF train motors. The second train is my North Cost Limited with 8x 42 stud long cars, and an A-B-A set of locomotives (one powered with 2 PF train motors, the other two dummies). Examples of both trains taking standard lego curves can be found in this thread about a now aborted project to build wide radius curves. I made a 90° R88 right before ME announced their Kickstarter (man, that would have saved me a lot of time if I had known it was coming, but I'm still a happy man for the ME curves). Both trains predate the ME curves and I now have R88 and R105 curves (which both trains love and can take at full speed), both my permanent layout and my club's layout are both 9v, so I also want to be able to operate with the legacy R44 curves. I have had no power problems with the IR receiver powering a pair of XL motors and pulling VERY HEAVY trains (50+ cars in some cases), however, the combination of the train motors and these too heavy passenger trains taking multiple curves is just too much for the IR receiver. The original IR receiver can handle one 90° R44 curve without complaints for either train. Sometimes my club layout is large enough that I can use the full consist, but other times I have to set cars out if the straightaways are not long enough. As soon as the train is long enough to be in two curves the drag overpowers the IR receiver and it trips out for a few seconds... only to come back abruptly at full power and pull the magnets apart (in spite of the additional rare earth magnets). [Of course at this point in the review it is premature of me to say that it was the IR receiver that was tripping out, it could have also been the battery or the motors... but based on what I've found with the SBrick, it was the IR receiver. Anyways, back to the original timeline...] So for an upcoming show one of the other club members was talking about bringing 8 pf trains and letting the kids run them with IR controls. That is way cool and I think will be a huge hit with the crowd and the venue... but not so good for my running pf myself. For this show I don't want to do 9v (we are doing this one "just trains" and it will be our first show "on the floor"). So what's a man to do? Then I got to wondering about alternatives for IR in general, and higher power in particular. That was when I discovered that the SBrick can deliver up to 3A while the standard IR provides about 1A and I think the v2 provides up to 1.5A. I needed no further convincing and got one to give a try. I unboxed it two days ago. The first think that is clear, you need an account on the sbrick servers to configure your receiver. The SBrick folks have videos on line showing how to configure the software, but you first have to sign up for an account. This part was one of the things I did not like. Rather than simply offering a receiver, they are offering a social networking site that you have to pass through before you can get to your receiver. Not a huge deal, I just found the social networking a minor annoyance. It only took 5 min to turn off 20+ "share this" options, an equal number of "notify me when" options, and switch my profile to private. I'm sure many will find it a nice bonus, but for me I don't plan on spending much time on the SBrick site. I just want a plain vanilla train controller. This point could also be an issue in 5-10 years if they stop supporting the SBrick, but if it works it is worth the small risk for me. Once you have your account and the SBrick app you can go to the profile market... but none of the controls looked like the met my needs and what little documentation there was did not clarify things for me. So sooner than I had expected, I was off to design my own graphical user interface (GUI) on the Beta version of the designer site. First drawback is that it appears the site only works with Chrome or Safari browsers (not a problem if you already use one of those, but another minor nuisance if you don't... and here too, once I get my GUI working, I don't plan to spend much time on this site either). I was not able to find much documentation on the GUI design, so here's what I discovered: (1) I think you need an "exit" button to quit your control, at least the default GUI has one, it is a special object class and since it seems like a generally desirable feature I did not feel like exploring whether you can do away with it. (2) As I recall, there were three other types of objects- a 2D slider control, a 3D joystick control, and a push-botton. (3) While it was not apparent to this newbe, you do not define which specific output each control is set to (the SBrick has 4 outputs). Instead, you come up with a name for the particular output. I wound up using a single 2D slider and named it "throttle". (4) There are a lot of control settings you specify (or accept the defaults): min power, max power, default start position and power, "snap back to default start position when control released (like the non-train PF controller)" or "hold the last setting when released (like the PF train controller)". It takes some trial and error to get all of these settings to your liking. Each time you want to make a change you need to tweak the GUI layout in your browser, then download them to your device, then tweak the settings on your phone/tablet (more on that in a moment). It is nice that you can scale and position the various control elements where you like on the GUI layout. I think you can include multiple SBricks in the layout too, so a single controller could easily have room for 4+ trains on a tablet and 2+ on a phone. (5) It looks like the GUI is infinitely customizable, they offer 6-12 options for button styles, slider styles, background styles, etc. or you can upload your own artwork. (6) Unfortunately it looks like each GUI design is aspect ratio dependent, presumably to preserve custom artwork. So the GUI I designed for my phone was not available on my tablet and I had to redo it for the tablet at its aspect ratio. Here too, not a big deal given the simplicity of my controller. It's a bit like programming your microwave for the first time. It would be nice if they also had a "universal layout" option that could be used on many different platforms, by shrinking it to the most constrained dimension... maybe in the future. In the mean time, it would have been REALLY nice if they had an option to copy an existing GUI so that you could adjust it (if that option is there I couldn't find it). None of this is a deal breaker for me, just be prepared for a small learning curve as you get up to speed with their system. It took me an hour or two to get to a point that I was satisfied with. With your GUI designed or redesigned in your browser, you then go to an option on the SBrick app to go to the profile market to download a profile. Once downloaded the profiles are stored locally, so you could design a single throttle control in the GUI and then in the SBrick app make variants for several different locomotives, each with their own SBrick. Or as noted above, you probably could also make a single controller that controls multiple SBricks. One minor annoyance to me was that every time you went to the profile market it first insisted on loading all of the standard GUI options (none that I wanted) before it allowed you to get to your own GUI designs. Once the profile you want has been downloaded to your device, you then go to "my creations" to actually associate a GUI with an SBrick. I think you have to have the given SBrick(s) on initially so that your device can sync with the SBrick. Then you go to the configure page for the creation and this is where you tell it to associate the "throttle" in the GUI design controls with one or more specific output(s). I decided to use the Superliners as my test case since this train has more drag (heavier and longer cars). Since I have two motors I decided to put each on a different output from the SBrick. They were previously on a single output from the IR receiver. Not sure if this makes a difference on the SBrick, but it was easy enough to set the throttle to control two or more outputs. There are also virtual pole reverser switches similar to the little switch on the IR controller. Then you are ready to run your model... well... as they recommend, try it first to make sure you have the pole reversers set to the direction that you want. In my initial design I wanted a "kill switch" like the IR train controller in addition to the throttle. I could not see a way to associate two control elements to a single SBrick output, so away went the kill switch. Usually hitting the exit button will kill all motors, but not always (here too, more on emergency stop in a moment). I started with letting the throttle range from full reverse to full forward, but I found that getting it to stop at no power was very difficult. There was no "snapping" to zero. Since the Superliner and North Cost Limited are effectively one way trains, I made a second controller that is limited between zero and full power (no reverse beyond "hand of god"). So I can easily flick it to zero without worry. There might be away to fix this, but I haven't found it yet (remember, I'm a newbe at the SBrick). So I first had the model running with all of the PF innards exposed and it ran great. No problems pulling the entire train through two 90° curves and a small S-jog all at once. It ran for at least an hour with now power drops. So that's how I knew it was the IR receiver that was limiting me before, the IR receiver would not survive when the train was in the two 90° curves (R44). So at this point I stuffed all the PF wires inside the model and put the roof back on. Of course now it started misbehaving. !@#$% did I drain my battery so quickly with the heavy load? The IR would run for a few hours. Nope, that wasn't it. After some trouble shooting I realized that I had inadvertently knocked one of the connectors off when reinstalling the unit after testing. So only one motor was getting powered. As a result, the locomotive would stall once the train was in two curves. Apparenlt without intending to do so I discovered that the SBrick has a much nicer overload response than the IR receiver. The train sat there and the engine did not jet off at full speed, it did not move at all until I rezeroed the controller. In fact the single powered motor was strong enough to pull the train in a single curve with wheels spinning while pushing against the dead motor. Once fixed, I didn't even have problems starting in the most twisted part of my layout. That was when I decided to see how far I could push it. At the moment I have two single crossovers in my layout (I've been playing with the PF trains). So the train effectively went across two switches, through a 90° curve, then through two more switches back to the original track. It was as the locomotive was returning to the main track when it overpowered the rare earth magnets. So more than enough pull and something else failed before the SBrick was pushed to its limits. Now here's where I learned another important feature of the SBrick. Once I set the train running, I could go to blank screen on my device and the train would still run. Nice, you don't have to run down the batteries on your device to keep the trains running. My trains are in the basement and I went to get something upstairs. At one point in this trip there were two concrete walls between me and the train. When I returned the train was stopped. Did that stinking battery finally run out? Nope, it started right back up when I hit the SBrick controller. Okay, what happens when I turn off bluetooth on my device? Train stops. Cool. Lose contact with the controller and the SBrick stops. Turn bluetooth back on and the SBrick responds immediately to the next command. So there is a potential emergency stop if the exit button does not do it for you. So needless to say, I will be buying a second SBrick here in the near future for the North Coast Limited (hum... maybe I can build some of those other cars that I was forced to leave out for the IR receiver). For now I'm going to stop at two SBricks. It is nice to be able to completely hide the receiver, but probably not worth the extra $45 for me given the number of PF trains that I have. The extra power, however, is definitely worth it if you need it.
-
SBrick-iOS (Swift framework)
BarakRL posted a topic in LEGO Technic, Mindstorms, Model Team and Scale Modeling
Since SBrick are taking their sweet time releasing a Swift library/framework, I thought I'd just write one by myself. It's an early version that supports just the basic commands - driving and stopping (with channel, power, direction), but I'll update it whenever I can. You can download the framework and a working example from my GitHub: https://github.com/BarakRL/SBrick-iOS Usage is pretty straight forward: var manager = SBrickManager(delegate: self) manager.startDiscovery() func sbrickManager(_ sbrickManager: SBrickManager, didDiscover sbrick: SBrick) { //connect sbrick.delegate = self sbrickManager.connect(to: sbrick) } func sbrickReady(_ sbrick: SBrick) { //send a command sbrick.send(command: .drive(channelId: 0, cw: true, power: 0xFF)) } -
.thumb.jpg.050f28ccd893f68d8416233f594d9f3d.jpg)
Ultimate Bulldozer 17 PF motors, 5 SBricks
shadow_elenter posted a topic in LEGO Technic, Mindstorms, Model Team and Scale Modeling
I was always inspired by the multi-functionality of backhoe's, and I always imagined ways to improve upon it and now I finally did. In this MOC I challenged myself to make the most multi-functional vehicle I could, using all the motors and sbricks I had, naturally I ended up buying more motors XD The final build includes 17 LEGO power functions motors (5XL motors, 6L motors and 6M motors), 4 LEGO power functions lights and 1 DIY LEGO laser! It's powered by 4 LEGO PF battery boxes, controlled by 5 SBricks and operated by a 20 channel SBrick profile. The drill/laser arm is operated by 5 channels 1 channel for rotating the arm (PF XL motor) 1 channel for tilting the arm out (PF L motor) 1 channel for extending the forearm (PF M motor) 1 channel for spinning the drill head (PF M motor) 1 channel for activating the DIY LEGO laser (TOPIC HERE) The excavator arm is operated by 4 channels 1 channel for rotating the arm (PF XL motor) 1 channel for tilting the arm out (PF L motor) 1 channel for extending the forearm (PF M motor) 1 channel for moving the bucket (PF M motor) the bulldozer scoop is operated by 2 chanels 1 channel for raising and lowering the scoop (PF M motor) 1 channel for tilting the scoop (PF M motor) The crane is operated by 3 channels 1 channel for rotating (PF M motor) 1 channel for extending the crane (PF L motor) 1 channel for operating the winch (PF L motor) The plow/ trailer hook is operated by 1 channel 1 channel for lowering and raising the plow (PF M motor) The drivetrain is operated by 3 channels 2 channel for driving forwards and backwards (2x PF XL motor) 1 channel for steering (PF XL motor) The lighting is operated by 2 channels 1 channel for headlights 1 channel for rearlights Weight: 4.6KG Length: 62cm With: 32cm Height: 31cm building time: 4 weeks A special thanks goes out to my friend Bas for helping me edit and my amazing girlfriend for her everlasting support. -

SBrick Towercrane
juGSI16V posted a topic in LEGO Technic, Mindstorms, Model Team and Scale Modeling
Hello everyone I build a Towercrane powered by SBrick It's have 3 motors: 2 "L" and 1 "M" - 1 "L" for the rotation of the crane: - 1 "L" for the shuttle: - 1 "M" for the hook A vidéo come soon