Search the Community
Showing results for tags 'Race'.
Found 69 results
-

[REVIEW] 42039 - 24 Hours Race Car
Jim posted a topic in LEGO Technic, Mindstorms, Model Team and Scale Modeling
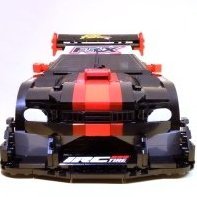
REVIEW - 42039 - 24 HOURS RACE CAR INTRODUCTION When the preliminary images of the "Le Mans Racer" surfaced somewhere last year (2014) it got a lot of praise. This changed dramatically when the final images of the 24 Hours Race Car showed up. The front side of the car, especially the head lights, and the curvature of the side of car had changed a lot. The car obviously still resembled the prototype, but the new design raised a lot of eyebrows. The new design was considered a step back instead of forward. Eventhough I still liked the design, I must admit I liked the earlier design better too. With the emphasis on past tense liked. I am not sure anymore and this review will show you why. Like the Arctic Truck this set has a B-model which is well worth checking out. That's why this review includes both the A-model and B-model. For people who are on the fence, the B-model might actually convince them to buy the set after all. Let's see what this set is all about! Note: All images can be clicked for hi-res versions. SET INFORMATION Number: 42039 Title: 24 Hours Race Car Theme: Technic Released: 2015 Part Count: 1219 Box Weight: 2110 gr Box Dimensions: 47,8 cm x 37,3 cm x 8,7 cm Model Dimensions: 40 cm x 18 cm Set Price (MSRP): €99.99 / $? / £99.99 Price per Part: €0.082 / $? / £0.082 Links: Brickset, Bricklink THE BOX The box measures 47,8 cm x 37,3 cm x 8,7 cm and weighs well over 2kg (2110 gr to be precise). The width of the box is the same as the box of the Arctic Truck. This box also feels like it's filled to the brim. THE FRONT The front shows a picture of the main model in action, with radial blurred wheels to emphasize the motion of the car. The lower right section shows the dimensions of the model. Upon completion, it will measure a length of 40cm and a width of 18 cm. THE BACK Like the front, the back side has exactly the same setup as the box of the Arctic Truck. The top shows the functions of the model, while the lower left side shows the B-model and the lower right side shows the motorization options. The picture of the B-model looks so cool, it could be a model of it's own. At this point I was very eager to build both models and compare them. THE SIDE One of the sides usually shows a part in 1:1 scale. This time it's one of the wheels indicating the size of the model. CONTENT OF THE BOX The box contains: 1 Book(let) 1 Sticker Sheet 13 Bags 4 Tires INSTRUCTION BOOKLET Since I own two copies of the set, I also received two instruction booklets. What's catching my eye is that my second copy is supplied in different packaging than the first one. It's for the first time (that I am aware of) that the instruction booklet and stickers come in a sealed bag, without cardboard back. Hopefully this will be a new standard for all sets with sticker sheets. Instead of multiple booklets, this set contains a single square bound book. In earlier reviews I have epxressed my preference for a single book. I don't see any advantage in having 2, 3 or even up to 6 booklets. STICKER SHEET Like the actual model, the sticker sheet looks very vibrant. The bright green, white and black color combination has found it's way to the stickers as well. Either you love 'em or hate 'em. Since I started writing reviews I have been applying stickers and I am happy I started doing it. Stickers do give the model it's finishing touch. BAGS WITH PARTS Thirteen bags with a total of 1219 parts (give or take a few) are supplied in the densily packed box. The rims and flex are sealed in a bag as well. Sometimes looking at the bags makes you wonder what the logic is, behind the distribution of the various parts across the different bags. Well this time it really got me confused. Take a look at two of the bags below. There's a bag containing all the 3L Blue Pins. Then there's a bag with various parts....and a single 3L Blue Pin. I figured this might be an error, but both of the sets have the same anomaly. TIRES The tires have been supplied unbagged, as usual. HIGHLIGHTED PARTS This chapter describes new and interesting parts. This set actually contains a lot of them. This set also contains an abundance of panels. If you aren't into panels, this isn't the set for you. CHANGEOVER CATCH This year (2015) the new changeover catch parts were released. It's a combination of three parts. The advantage of the new parts is that the red gear is the same on both sides, which avoids mounting it the wrong way around. It also avoids the changeover catch slipping out of the driving ring, like it used to do. You can apply lots of pressure, but the catch doesn't slip out. PINS Some of last year's new pins are also included in this set. 12 x Pin with Pin Hole and 21 x 3L Pin with 1L Axle. Securing Technic Beams can be quite simple with the new Pin with Pin Holes. The new 3L Pin with 1L Axle gives you more possibilities when connecting Beams and other parts. Below are two example situations where the new pins have been used. Granted, the examples below can be accomplished by using other techniques. However, some predicaments from the past can be easily solved by using these new parts. Like me, you will most likely appreciate the ease of use. ENGINE AND SUSPENSION Also included are two Steering Portal Hubs and Steering Portal Hubs with Ball Joint Arms and four Steering Portal Axles for driving and steering the vehicle. These parts are commonly used nowadays. The picture below also shows some other parts, like gear rack, steering arms and suspension. FRAMES This set comes with a single 5x7 Frame and three 5x11 Frames. PANELS This set contains a whopping 47 panels in three different colors. I personally like panels a lot and I do appreciate the variety we have at our disposal lately. This set even contains a new 13x3x2 Curved "Mudguard" Panel. NEW 13x3x2 CURVED PANEL This is the first set to contain the new 13x3x2 Curved Panel. Looking at the pictures doesn't do these panels justice. In real life they are actually quite big. I figured they would be smaller, but they are even longer than the 11 x 5 frame, with a length of 13 (including the attachment points). Hopefully this part will be available in other colors as well, preferably white, for adding variety to your EV3 robot. 19L WHITE FLEX-AXLES The White 19L Flex Axles have only been released in a single set, the 8461 Williams F1 Racer in 2002. Current prices on Bricklink are as high as 15 Euros! Needless to say we are very happy with the return of these White Axles. Now we can build Jeroen Ottens' awesome Alfa Romeo 4C Spider for a decent price as well. I am really happy that useful rare parts are being used more often by TLG designers PART LIST Here's the complete list for all 1219 parts. As you can see in the Highlighted parts section, this set contains a lot of interesting and useful parts. If you don't own sets like the 8070 - Supercar, this might be the set to pick up if you want to start building your own supercar. THE BUILD Enough with all the set and part information, let's build the model. REAR SUSPENSION The build starts with the rear suspension and drivetrain. As you can see in the picture below, the length of the Axle between the Steering CV Joint is 4L, where it usally is 3L. This is an indication that the finished model will be a bit bigger than usual (8070 for example). The finished suspension is one of the cleanest suspension setups I have seen in an official model. It's pretty basic, but it works like a charm. This setup is defintely worth using in your MOC. Here's a video: After attaching the suspension to the frame you rotate the module and secure it. At this stage the rear section of the chassis with suspension is almost finished. V8 MID-ENGINE Extending the chassis forward results in the picture below, where the front spoiler is already visible. What's also visible is the V8 engine placed right in front of the rear axle, resulting in a Mid-engine setup, perfectly suited for sports and race cars. Two exhaust pipes have been fitted on either side of the engine, together with two hoses attaching them to the engine. The instructions are easy to follow, although you sometimes you need to bend the beams a bit. Minor improvements are possible here and there, but nothing shocking. FRONT SUSPENSION The front suspension is a bit more complicated than the rear suspension, which makes sense considering the fact it contains the steering rack. The shock absorbers are placed in a different angle than the rear ones, resulting in a somewhat stiffer front suspension. All in all the front suspension is well designed and the steering rack can be easily powered with a Servo Motor. The picture belows shows the front suspension attached to the chassis. If you follow the official instructions to motorize the model, the area in front of the suspension is used to mount the battery box. When you are modding this model to make it Full RC this area can be used to mount the servo motor. GEARBOX Like the gearbox in the 8070, it's not used to switch gears powering the drivetrain. It's used to switch between two functions, opening the doors and the hood/bonnet. The gearbox is located at the left of the vehicle, near the cockpit. The mechanism to open the doors is located on the left side, while opening the hood/bonnet is taking place at the right side. To accomplish this, some axles traverse under the cockpit to the other side of the vehicle. Following the axles to other side of the vehicle and adding some gears, results in the situation below. The video below shows the gearbox in action. DOOR OPENING MECHANISM The mechanism to open the door is comprised of some Knob Wheels, Links without Stoppers and Pins with Towballs. Take a look at the doors opening and closing. THE FRONT Using the new mudguards and various other panels you finish the front of the car. The front is probably the most controversial part of the car. This is caused by the preliminary pictures shown before the release of this car. In the early pictures the front of the car had smooth curves and beautiful lines, while the final car lost these smooth lines and got a more blocky look in return. I must admit that at a first glance, the new design lost some of it's appeal. However, this model grew on me pretty rapidly. The headlight design can be found, in more or less the same way, on several real Le Mans type race cars. THE REAR The rear of the car looks great, with the stickers continuing from the mudguards to the panels underneath the spoiler. The two exhausts sticking out give some details to the back. I absolutely disagree with all the negativity surrounding this car. Maybe it's one of those models which needs to grow on you. FINISHED MODEL Here it is, the finished model. I know some of you don't like the looks of the car, but I think it looks great. The color scheme is outstanding. The new (for Technic) bright green parts, combined with white and black make this car look very vibrant and colorful. I am not a big fan of the green used in the 42008 - Service Truck, but I do like this bright green a lot. It fits perfectly well with the Mindstorms EV3 set. The curves on the side of the car are not as smooth as some of us hoped, but I still think the car looks more than acceptable from the side. The stickers add some nice details to the car, giving it that characteristic race car look. The model looks great in pictures, but it does even look better in real life. I love this picture of the front of the car. However, I do wonder if a dedicated 24 hour Le Mans Racer has the seat and steering positioned off-center?! Using the good ol' Google Machine I come to the conclusion that they do have centered seating and steering, at least the majority of them. There's ample space in the cabin, which makes me wonder why TLG decided to place the seat off-centered. The rear view looks cool too, with some of the suspension showing and the two exhaust pipes clearly visible. The bottom view is very useful to determine the size of the car in studs. It measures approx 59 x 27 studs. The chassis looks organized and well designed. The engine has been placed close to the ground, which is perfect for the weight distribution. A low center of gravity improves the handling of the car. I really enjoyed building this baby. The build is very clean and organized, although there are some steps where you need to bend the beams a bit to get things into place. Seeing the model come to life and seeing it grow to pretty impressive proportions is very satisfying. For me it was fun, but I reckon kids will go nuts over this set and the build. SIZE COMPARISON What became obvious during the build, but what's emphasized when you have finished the model, is that it's quite big! The size of the car is pretty impressive. The pictures below show the car next to the 42030 - Volvo L350F. The side view emphasizes the size of the car. It's even longer than the Volvo, if you dismiss the bucket. PARTS LEFT Some parts left. Nothing out of the ordinary. FEATURES AND FUNCTIONS Unlike the B-model, this model doesn't implement any unexpected features. The functions it does implement are exactly what you would expect from any car. Steering (HoG) Working fake engine Suspension Opening doors (gullwing style) Opening bonnet/hood Opening trunk Gearbox for switching between functions Unfortunately the steering wheel hasn't been linked to the HoG (Hand of God) steering mechanism. Placing the seat in the center would have provided an easy way to link the steering wheel to the steering mechanism. it's a shame we hardly see actual steering anymore. Opening the hood actually opens up the entire rear section of the car, providing you with easy access to the motor compartment. The mechanism to open the hood works properly, which results in smooth opening and closing of it. The same goes for the gullwing style doors. Both functions are operated manually and you need to switch with the lever to the left of the cockpit. These two functions are also the ones which can be motorized by placing an M-motor near the cockpit and a battery box in the trunk. All things considered I think this car offers lots of playability. The model is solidly built and the functions are easy to operate. I'd say it's pretty safe to let your kids play with it. B-MODEL Unlike the A-model, the B-model for this set received (almost) universal acclaim, and I can see why. Often the B-model is a pale shadow of it's part donor. In this case the model looks so good, it could be a model of it's own. It even incorporates a neat feature, which actually deserves to be in the A-model. There's a lot a variation in the quality of digital building instructions TLG is providing, but these ones are of very high quality. The picture below shows most of the chassis with suspension, fake engine and gearbox in place. FINISHED MODEL Some concessions have been made, but overall the car looks fantastic. The black of the roof has been extrapolated from the hood, which definitely works for me. The rear section of the car feels a bit empty, but the panels do cover up most of it, so it's hardly noticeable. The V8 stickers will be upside down if you use the parts from the A-model. Since I could apply new stickers, I have placed them using the proper orientation. The bottom of the car shows the chassis. It's obviously a bit smaller than the A-model's chassis. FEATURES AND FUNCTIONS Taking the functions into account, this model isn't playing second fiddle to the A-model. Besides the obvious functions like steering, opening doors and hood, this car features folding fog lights, which deserve a better podium than a B-model. Steering (Hog) Working fake engine Suspension Opening doors (manually) Opening hood/bonnet (manually) Opening trunk (operated by gear) Folding fog lights (operated by gear) Gearbox (used to switch functions) FOG LIGHTS One of the most interesting features of the B-model are the folding Fog Lights. It almost feels a bit weird that a feature like this is implemented in the B-model, instead of the A-model. Below are 4 steps showing how the mechanism works. I have also included a video. The mechanism is somewhat reminiscent of fork mechanism used in the 8109 - Flatbed Truck, which has been described in Efferman's Review. Take a look at the video to the fog lights in action. PARTS LEFT A fair number of parts left, which isn't uncommon for a B-model. SUMMARY To summarize how I feel about this set, you need to take a look at the picture below. The combined image reflects the quality of this set....or better yet....sets! You actually get two great models, for the price of one. You don't like the A-model? No problem, you can have lots of fun with the B-model. I can't stop playing with the fog lights, it's mesmarizing. The color scheme on both models is outstanding. I simply can't emphasize enough how well this color scheme pleases the eye. The regular green is dull and boring, but this bright green really pops out, especially when combined with black and white, and possibly some red details. Black, white and a little red?! Sounds familiar? Yes, bright green can easily be combined with your EV3 robots. So while you are combining the bright green with your robot, why not use the great new curved "mudguard" panels. These new panels are introduced in this set and they look great. They open up a lot of possibilities in the design department. The build of the A-model is outstanding. It is fairly simple, but since it's so clean, I really enjoyed it a lot. I think the build should be entertaining, which doesn't mean it needs to be a real challenge. And let's be honest; when is a build really challenging?! The rear suspension is a good example of why I liked the build. It's very simple, yet very effective. Works like a charm. The same goes for the other functions in both models. And the star of the entire show can be found in the B-model. How's that for a surprise?! Being aware of the fact that I like this model a lot better than most of you seem to do, I really encourage you to give this model a chance. The sheer size is impressive, the color scheme is awesome and you get a bonus model, which is actually worth building. SCORE Okay, so how do I grade this set? 8 DESIGN Open to debate, but I like it a lot. 8 BUILDING EXPERIENCE Fun and clean build. 9 FEATURES Superb function in B-model steels the show. 9 PLAYABILITY Both models offer lots of playability 8 PARTS Lots of new parts and cool existing parts. 10 VALUE FOR MONEY Two models for the price of one. 8,7 TWICE THE FUN I hope you enjoyed this review! More pictures can be found on my Flickr page. -

Lego E-formula competition idea
Zerobricks posted a topic in LEGO Technic, Mindstorms, Model Team and Scale Modeling
I was watching some of the E-races on youtube ad thought to myself, why not have competitions like that too. Just like the trial trucks, but with the focus on being speed and handling. Here are the basic rules I'd propose use either 2XL, 3L or 4M motors for drive, no RC motors allowed use any Lego battery box, the Li-Po is lighter, but has lower voltage, while the new AA battery boxes have no current limit use of Sbrick is allowed since it only controls the model the model can use a third function like a gearbox, or even a spring-powered boost mechanis, as long as it does not power the car directly use of pre-2005 bricks is not allowed to keep things modern and fair What do you guys think? Anyone wanna try it? Few more ideas: size limit - all cars should be approximately at the same size paneling - cars should be properly covered with panels, bare chassis is not allowed -
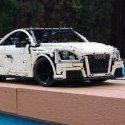
Hello, feel the speed! It is my own hypercar concept inspired by real hyper and supercars. It is a 6 studs wide, studless model built from standard LEGO elements. The overall size is similar to the Speed Champions sets, but the wheels are from City sets as I wanted to keep the height to length ratio closer to the real sports cars. It can be combined with my other MOC Hybrid Truck which will be available on LEGO IDEAS soon too. If you like this car, please share and support the it on LEGO IDEAS: https://ideas.lego.com/projects/44e6dbbf-734f-4b38-84c7-2075b09495bb Many thanks! LEGO Hypercar concept1-02 by László Torma, on Flickr LEGO Hypercar concept1-01 by László Torma, on Flickr LEGO Hypercar concept1-03 by László Torma, on Flickr
-
Hey guys, this is one of my first stop motion videos, let me know what you think. Is there any other type of stop motions that you would like to see in the future. Any advice would be really helpful.
-
i made some race spaceships and this is the first model The Blue squid V2 the instructions can be released if you want
-
[MOC] Touring Car
GiantAmbushBeetle posted a topic in LEGO Technic, Mindstorms, Model Team and Scale Modeling
I highly modified an older racecar of mine, it eventually turned into a Touring Car - I even managed to find some fitting stickers. I hope you like it! And as always - if you have suggestions to improve this model don't hold back! :) -
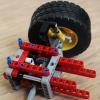
I mainly build Technic C-Models, but I also enjoy Creator alternatives, so here's what I built out of set 5763. In the photo, hot-rodder sigfig is added for scale and reference). Features: ► minifig scale (with adjustable steering wheel) ► openable and adjustable canopy-cage with roll bar ► rear suspension (individual for each wheel) ► details such as engine with radiator and twin turbo, lights, steering wheel, twin exhaust and rear view mirrors Browsing through OLX (online marketplace fo classified ads) I found old (2011), used 5763 for a price of a new small, ~50 piece set. I liked how the set contained big wheels and offered possibility to build suspension, so I bought it right away. Only one super-cheap plate was missing, so it was a nice deal. The MOC Alternative uses almost every part from the set. As you can see, the build came out quite clean:
-
Hillclimb Rally Car - Gravel Trim-
GiantAmbushBeetle posted a topic in LEGO Technic, Mindstorms, Model Team and Scale Modeling
Hello fellow Legofreaks! May I present to you, my newest creation! This is a large scale model of a typical Time Attack // Hillclimb rally car. These are timed point-to-point racing events on various track surfaces -like gravel, tarmac or a mix- where there is only one goal: complete the course as fast as possible. Thanks to the very open and liberal rules of those events those cars feature very powerful engines and spectacular aero packages. Downforce in excess of nearly twice the weight of the car at 100mph and engines that create up to 1000 horsepower are not unheard of. My model consist of approx 900 parts and features proper steering, a completely modeled interior with roll-cage, 6-cylinder turbo engine and of course all the sensible downforce creating aerodynamic devices like a swan-neck rear wing, huge rear diffuser, front splitter, ankle cutters, Gourneys etc. etc. The car is sporting a heavy gravel trim, which means slim heavily profiled tires and elevated ride height. I hope you like it! -
Classic 1990 Ferrari Formula 1
GiantAmbushBeetle posted a topic in LEGO Technic, Mindstorms, Model Team and Scale Modeling
Hello fellow Legoheads! Here is my most recent creation, a medium-scale Ferrari Formula 1 car in the style of the 1990's era. 450 parts, original LEGO stickers, steering, and all the proper aerodynamic features of that time - namely big wings, bigger wing end plates and a blown diffuser for -literally - tons of down force. If you like it or if you have an ideas for improvements please let me know via a comment. Thank you! -

Which suspension type should I use ?
Storext posted a topic in LEGO Technic, Mindstorms, Model Team and Scale Modeling
(sorry for my bad english) I'm thinking which suspension type should I use for my race car. I'm doing it outta LEGO Mindstorms (NXT/EV3). It's suposed to be RWD (with differencial) car for racing on flat surface. But on the the track the is one jump - it has 15 cm (or 5.9 inch). And I need suspension that is going to be light, kinda robust (it has to survive fall from 15 cm (5.9 inch) and also simple. I was using multilink suspension in the back and something like McPherson in the front, but it didn't worked as i wanted. So I'm thinking about using still multilink in the back, but double wishbone suspension in the front. (I'm using soft springs because car weights 850 g (or 1.87 lbs)). What do you thing is it allright or should I change it, or are there some bad sites of this two types of suspension ? -

TESLA concept 24 hours race car
9 fingers posted a topic in LEGO Technic, Mindstorms, Model Team and Scale Modeling
Hello to all LEGO fans. Today I am presenting you the future of racing cars of 24 hours Lemans. TESLA concept race car. It is driven by 2 electric Buggy motors.Power suply is via freshly charged batteries. ( our future i think) It has a concept steering mechanisem for better driving propertis. It is a concept from Tesla and Michelin group. Its called Das koncept. The whole car inspired me to make someting like the real concept of Tesla T1.But not in the shape, only the steerin system. ( it is ugly ) So i decided to make my own version of the body shape and chassis. Lets see some pictures of my design: Some detailed interior with opening the cabin. Picture of the undercarriage. As you can see, nothing special. It has full independent suspension on all wheels. Rear axle is direct driven from iner output of buggy motors. Frot axle is steered via RC unit. Some dimensions: lenght: 62 studs, width: 28 studs, height:14 studs. weight is 1380 grams. Speed: I did not measure it, But for this weight and size its wery wery fast. After the shooting for the video, i was playing with this litle race monster abouth 1 hour or something. Spectacular driving. I was again a litle child. And the video. I hope you like it. Best regards, Valter -
Muscle car building instructions Parts list
-
Blue sport car building instructions
-
Hot rod building instructions
-
Building instructions
-
[MOC] Old Styled Race Car
Alex Ilea posted a topic in LEGO Technic, Mindstorms, Model Team and Scale Modeling
Hello all ! I want to present you my curent wip MOC, an old styled race car: Features will be : -suspention(checked) -HoG(checked) -steering wheel(checked) -working engine(checked) -4speed sequetial gearbox(checked) -doors(checked) -engine cover(checked) Hornestley I am building this car just to use the tumbler tires They are quite big for a chassi like this (only half a stud between chassi and them when full steering is aplied). Adding an 8 speed gearbox to this kind of a car size is quite challenging but defenatley not impossible :) Side view: Interior as of now (steering wheel by Didumos69): I hope in the end it will be strong and very playable . Any suggestions and comments are welcome :) -
Recently found out about Speed Champions, so I downloaded Stud.io and overhauled my old Superbird with new parts, build techniques and improved proportions. Superbird by Henchmen4Hire, on Flickr The pics show the major beats; doors and trunk open, there's space for a brickbuilt engine, adjustable steering wheel, door handle/keyhole/speakers detail, etc. And yes, a minfigure figure will fit, there's even room in the backseat for 1 more. I think I spent over half the time just working on the rear. Specifically, I wanted to recess the tail lights and add the little raised black section between them, as well as work in a 180 SNOT flip so I could attach exhaust pipes to the bottom. Damn, that thing was complicated, but I managed to get everything connected (and hopefully kept it sturdy). Building for real may be a test of patience and dexterity. lol Odd Connections •I saw those axle pieces and really liked them, but they don't mesh with the Speed Champions wheels. So, the wheels connect to the axles with a bar, you'll have to snip one to size. If you use rigid hoses instead, I think you would get a suspension and steering effect since the tires will have some "give". •I wanted to recreate the steering column from a Roadrunner/Satellite, which meant I had to work in the gear shifter and blinker lever. My usual brute force building habits weren't working so I had to get more creative! To create that assembly, you need a bar running through it all, snipped to size. •The rear is ridiculous, there are headlight bricks in all directions, 4-stud snot bricks, clip tiles with a bar for support, jumpers, inverted brackets, cripes! Working out the minute offsets was a nightmare. •Really happy with the nose, it's easily removable via pins so technically I could pull it off and build a standard Roadrunner nose/face. I managed to create natural attachment points for the black wedges, something I failed to do in the old model. Some headlight bricks and 1x1 light clip plates (thick version this time) get the job done, it was just a matter of getting all the pieces oriented properly. Questions, comments, hatemail welcome. Alright, that's enough, now more pics: Superbird 2 by Henchmen4Hire, on Flickr Superbird 3 by Henchmen4Hire, on Flickr
-

[WIP] project C.O.R.E.
agrof posted a topic in LEGO Technic, Mindstorms, Model Team and Scale Modeling
Hello All, I am working on a new MOC, which for I am experimenting a lot with unusual pieces in Technic. To achieve their proper implementation into the Technic world, I am at crossroad now: wether to build illegal (tiny stress) or find a legal solution. I prefer the illegal version in look and strength point of view - I can deal with slight bend of the connected parts, but of course a legal solution would be nice - I have 2 for now, but they just look to messy, and 1 of them is weak too (only rubber connection). Lime 15L beams on the RIGHT is the illegal, the others on the LEFT are legal, only 2L axles missing from rubber connectors (marked with pink): Hereby I would like to ask the community for brainstorming, parameters to follow: All red parts must be on place - no possibilities to move. Axles in the frame pieces to be rotate freely. All red parts must be fixed horizontally and vertically too, rigid connection needed. Must be buildable in reality too. The solution must look clean, visible part of the MOC. HERE You can find the LDD file - some parts will be dropped at open, as it was made in Developer Mode, please refer to the picture above. I hope You will find interesting this problem solving, I am open for any ideas. Thanks for everybody in advance! -
To celebrate the new season of Formula 1 and the new cars, I thought I would give my 42000 an update. What started as a small refresh turned into a project The changes: -Chassis w/ simpler DRS controls -Front and rear suspension, wheel hubs -Lower, more sculpted nose -Front and rear wings, diffuser -Removable, one-piece engine cover -Turbo V6 -New mirrors -Perhaps most importantly, the car has proper rake
-
[MOC] Race truck - FDT
Jurss posted a topic in LEGO Technic, Mindstorms, Model Team and Scale Modeling
Fire department team (FDT) race truck :) Functions: risable cabin openable doors HOG steering with Ackerman-like geometry 4 cylinder engine connected to rear wheels trough differential rear suspension (axles used as springs) Some more pictures http://bricksafe.com/pages/Jurss/race-truck -
[MOC] Old Race Car
Paul Klop posted a topic in LEGO Technic, Mindstorms, Model Team and Scale Modeling
Hello everyone! This is my lego Technic Old Race Car. It's not based on any particular model but it must look like an old race car. This car is driven by a L motor, steers with a servo and has suspension. The goal for me was to build a car with suspension. I looked at the 24 Hours Racer (set 42039) how this al works. When I tried to put a servo motor on it I came to the conclusion that I need to change the steering a little bit. Here's a video and some photos. I also made a instructions video (and LDD file) for the front suspension with servo motor. You can download the instructions on http://paul.klop4you.nl/instructions/lego-technic-old-race-car/ and here is the video If you want some photos of the front suspension please say it in the comments. Thanks for watching this topic! -
[REVIEW] 42048 - Race Kart
Jim posted a topic in LEGO Technic, Mindstorms, Model Team and Scale Modeling
REVIEW - 42048 - RACE KART INTRODUCTION If you are old, like me, there's a pretty good chance the 854 Go-Kart (or 948 Go-Kart for the US) was the first Technic set in your collection. I remember my dad had to help me building this set. Actually, I think he did most of the building and I watched in awe. If you are a dad and have a son (or daughter) this might very well be the set to introduce your kid to LEGO Technic. Is it interesting for us AFOLs too? Let's find out. 854/948 GO-KART FROM 1978 Here you can see a picture of the kart I am referring to. One of the first LEGO Technic sets, although it wasn't called Technical LEGO back in the days. Wikipedia: The concept was introduced as the Expert Builder series and originally Technical Sets in 1977,[1] and was renamed Technic in 1984.. Note: All images can be clicked for hi-res versions. SET INFORMATION Number: 42048 Title: Race Kart Theme: Technic Released: 2016 Part Count: 345 Box Weight: 558 gr Box Dimensions: 15,4 cm x 13,8 cm x 5,9 cm Set Price (MSRP): € 26,99 Price per Part: € 0,078 Links: Brickset, Bricklink THE BOX The box shows the Race Kart on the starting grid and in the lower right corner you see the piston moving. There's also an arrow near the lever, going two ways, so there's probably a gear box of some sorts. BACKSIDE The backside shows the alternate model and a reference to the digital building instructions apps. The instructions weren't available in the app when I built the model, so I can't tell whether they are any good. They are probably up to par with the other instructions in the app, which are quite good. CONTENT OF THE BOX The box contains: 2 Instruction Booklets (A- and B-model) 1 Sticker Sheet 5 Bags INSTRUCTION BOOKLET A-MODEL The instruction booklet for the main model. INSTRUCTION BOOKLET B-MODEL Noteworthy is the inclusion of an additional booklet for the B-model. This is common in smaller sets, but I didn't expect it in a set this size. STICKER SHEET One look at the sticker sheets and it's obvious where these stickers need to be applied. The small round sticker is for the tank cap. The purple and orange color scheme is clearly present in the sticker sheet as well. BAGS Five bags containing all the parts for the model. No unbagged parts in this set. HIGHLIGHTED PARTS This section describes the new or highlighted parts. YELLOW 5L AXLE The 5L Axle has never been released in yellow. As far as I can tell, this is the only 1H 2016 set with a yellow 5L axle. RED 4L AXLE The Axle 4L in Red hasn't been released since 2005. It has only been released in 4 sets in red, so it's not a very common part. SILVER 3L TECHNIC LIFTARM The 3L Technic Lifarm has only been released in Silver in the 10242 - MINI Cooper. DARK BLUISH GREY 3x11 TECHNIC PANEL PLATE Also unique to this set is the 3x11 Panel Plate in Dark Bluish Grey. 3x13 CURVED PANEL The 3x13 Curved Panel, which was introduced in Bright Green in last year's 24 Hours Race Car, is being used in Purple. WHEELS AND TIRES The model uses 37 x 22 ZR Tires and 30.4mm D. x 20mm Wheels. Both are very common, but I mention them for easy reference. PART LIST The Race Kart consists of 345 parts. Here's the complete part list. THE BUILD The build is pretty straightforward, although the rear side with gearbox can be a bit tricky for the younger builders. The picture below shows the model halfway of the build. You can see the steering mechanism and lever for switching gears. The finished model looks quite good. The purple orange scheme makes the model standout. I like it a lot. Now that TLG introduced Purple panels, I hope that TLG will release more parts in Purple. Purple will also work very well with White. Steering is actually done via the steering wheel, something most car models lack nowadays. Of course the steering is easily accessible which facilitates the steering. The turning radius is quite big, which slightly reduces playability. This is clearly visible in the second video. The rear of the vehicle looks great too. One can criticize that using a big panel lacks ingenuity, but I think the panel is perfect solution. Admittedly, I am a big fan of the 3x13 Curved Panel! Hopefully this panel will be introduced in White in the near future. The next picture shows the chassis of the vehicle. As you can see, the White Driving Ring Connector is used multiple times as a 3L connector, where you normally might use a 180 Degree Axle and Pin Connector Angled #2. This is something you will find in the other new sets as well. To be honest; I can't stop looking at the Kart! I also imagine a Bright Green and White version, using the panel from the 24 Hours Race Car. Actually, I have built the Kart in Bright Green and White. You can see the result and comparison at the end of this review. The front and rear view of the Kart. VIDEO PARTS LEFT FEATURES AND FUNCTIONS This model has the following features: Steering Gearbox STEERING The steering wheel actually steers the Kart, which is a plus. On the other hand, the Kart from 1978 already featured steering like this, so it's not very special. Hand of God (HoG) steering wouldn't make any sense on this model. The Kart does have a pretty big turning radius, which does affect playability. I know the options are limited on a small model, but I would have liked some ingenious way of steering that would result in a smaller turning radius. GEARBOX The Kart has a 2-speed gearbox, and a neutral. The gearbox is operated by the red lever. VIDEO OF FUNCTIONS The video below demonstrates the features of the Kart. B-MODEL Since this set includes instructions for the alternate model, I decided to build it. Apparently this is a Track Car, although that is a broad concept. I can't really tell by the image on the back of the box what kind of Track Car this is supposed to be. There's only one way to find out I still can't pinpoint exactly what kind of Track Car it is, but it is a pretty decent B-model. Unlike the main model, it does have Hand of God steering. And it features an opening bonnet/hood. The steering wheel is for decoration purposes. It doesn't steer the model. For a B-model the design is more than sufficient. The next picture shows the chassis of the car. All things considered, this is a high quality B-model. VIDEO B-MODEL The video below shows a short demonstration of the Track Car. PARTS LEFT This image shows the parts left after building the alternate model. The leftover parts from the A-model are shown on the left. As you can see the B-model uses one red Technic Bush from the extra parts. SUMMARY Besides the rather large turning radius, there are no real downsides to this model. I love the looks and color scheme. It also it contains various unique and rare parts. It even features a working gearbox and working steering wheel. The set comes with printed instructions for the B-model, so it's basically a real 2-in-1 set. For around 25 euros you really can't go wrong with this set. Given the price, this also makes for a perfect gift. A gift for someone else, or gift for yourself?! You decide! I'd say this is definitely a worthy successor of me first Technic set ever!! SCORE How do I grade the good guy in this year's duo. 9 DESIGN Purple and orange work great together in this set. And it does look like a real Kart. 8 BUILDING EXPERIENCE Fun to build. Great introduction to gearboxes and steering. 7 FEATURES Working steering wheel and gear box on a relatively small set. 7 PLAYABILITY Limited turning radius slightly limits playability. 8 PARTS Some new parts and parts in new (rare) colors. 9 VALUE FOR MONEY Totally worth the money. 8,0 THE PERFECT GIFT As a bonus here are some picture of the Kart where the orange and purple color scheme has been changed to bright green and white. Not too bad, not too bad at all. It would probably look even better when the panels at the front could be replaced by bright green as well. My favorite picture of the Green Kart! The green fender works really well. COMPARISON Here you can see a comparison between the Purple/Orange and Green/White kart. I personally like the Purple/Orange better, but it's fun to have options. More image can be found on my Flickr page. Thank you for reading. I hope you enjoyed it. -
A racing car-like model created for a stop motion that never was. The idea was born out of creating a vehicle with uneven wheel base widths (because of limited parts) and the colors are lime green because those were the parts on hand. The Power Miners stickers actually work towards the model's design in my opinion. The model was reproduced in MLCAD (without stickers) and will be submitted to Rebrickable as well. The windscreen is on a double hinge which allows it to open up despite limited space. The rear compartment is also hinged to allow access to the engine. The car has both front lights and rear lights (on the MLCAD version). Unfortunately, no rear bumper is a weakness of this design. EDIT: I'm also putting a dark blue version of this racecar on rebrickable with pieces that are marginally less rare and (hopefully) less expensive to procure. It looks like a Batman car (whoops :{ )
-
Cars from Micro Dream Race is a series I created for my brickfilm. I made it for Porsche and LEGO contest. Have you seen it? No? Now you got chance! Read more Bigger photos and full story here: LEGO Gallery - Cars from Micro Dream Race Follow my new MOCs and articles at: Facebook | Flickr | Google+ --- Notice: This is a shortened version of the post from LEGO Blog - Bricks' Treasure. Edit, the movie:
-
My latest free-build for Kaliphlin, and also an entry for Classic-Castle's Flag of Your Kingdom Contest. The ostrich rider design was borrowed from Kayne. I would like to claim UoP credit for: General Building, Minifig Posing. The Duke of Ferrari is well known for his annual Desert Run 5000 and the competition is stiff this year. Ferrari’s representative is in the lead, while the ostrich and camel rider are not far behind! The mummy with his scorpion chariot, however, is a full lap behind the rest of the competitors. There are more pictures on brickbuilt. Thanks for looking, your comments and suggestions are always appreciated